
josephine5308861
josephine collins
IDES1262 Class Blog
10 posts
Don't wanna be here? Send us removal request.
Last Seen Blogs


rosieresvietnam
ROSIERES - Hãng thiết bị bếp danh giá Rosieres

metoook-blog
maxime selin

aliu
Untitled

discoverbhubaneswar
Discover Bhubaneswar
Text
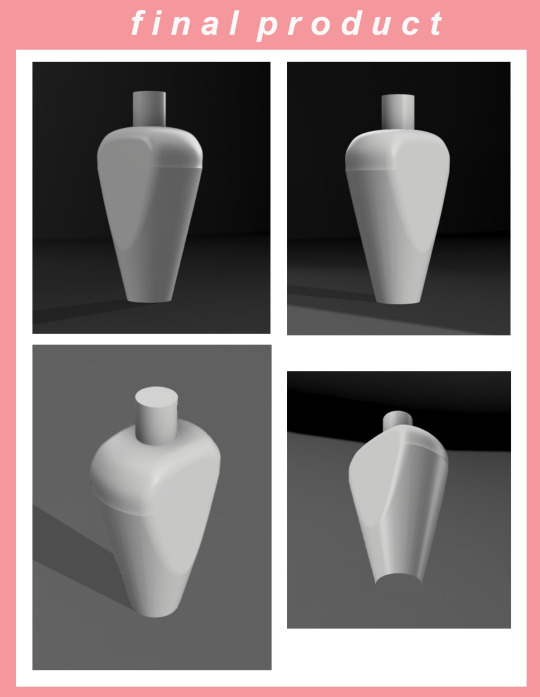
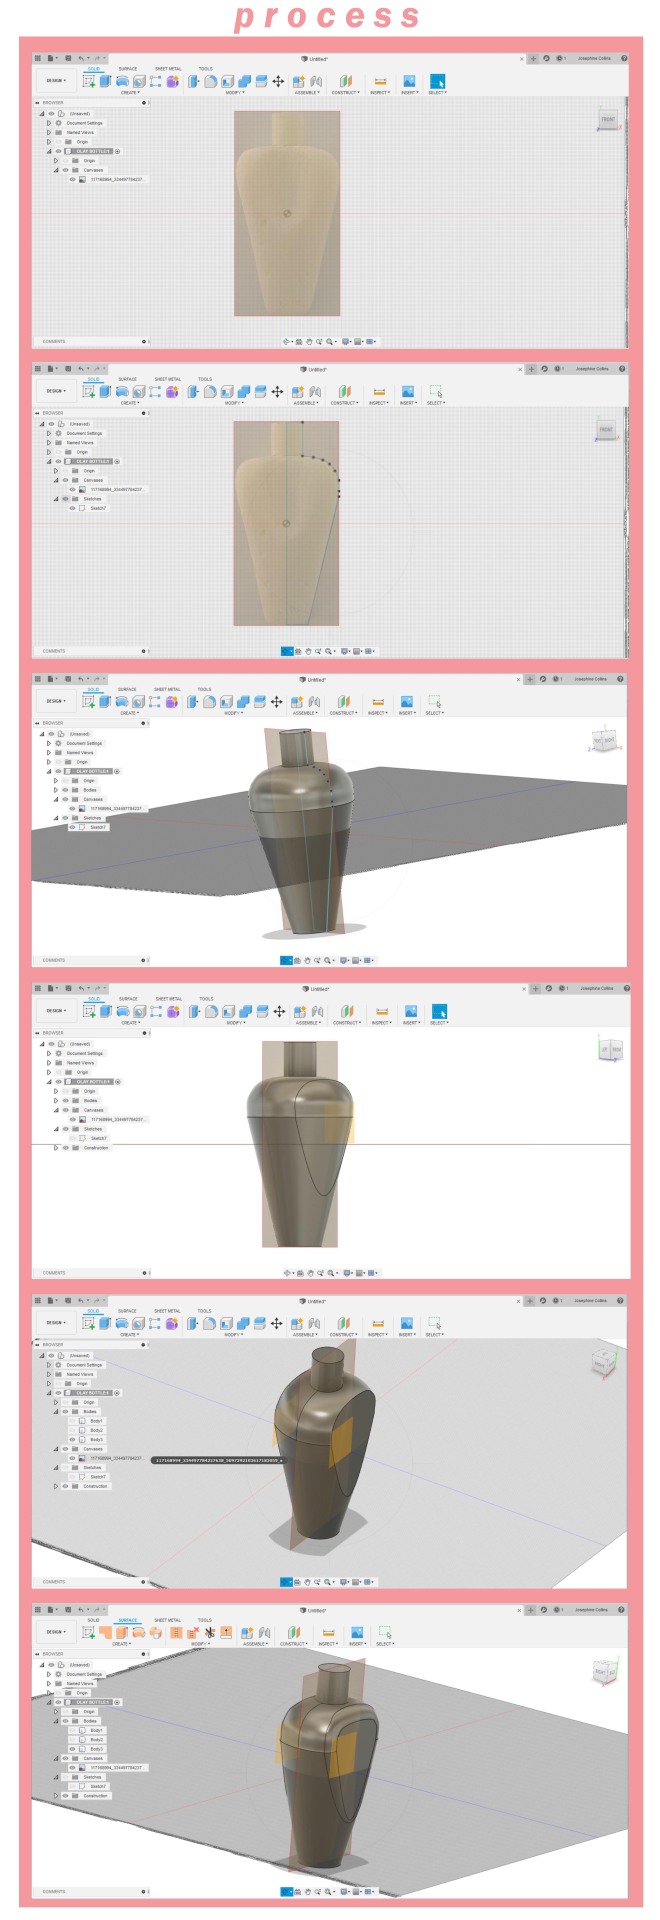
Week 8 - Digital Models
This week’s tasks built off Week 7, in which we were asked to turn our physical models into digital models. This was one of the most challenging exercises for me, as I only have a basic understanding of Fusion360. However, my skills improve little by little whenever I use this program for an assignment, and I was pleased with my effort this week and hope to keep improving.
The pre-class activities allowed me to complete this task; particularly “How to 3D Model a Beer Bottle” and “How to 3D Model a Whiskey Bottle”. Although I knew I would not be able to fully resolve my models using the provided techniques, I used the videos as a starting off point. I followed the “Beer Bottle” tutorial up until the ‘Revolve’ step, then I had to account for my bottle not being symmetrical for 360°.
The following steps took a little experimentation and research:
1. I created two vertical offset planes on either side of the bottle
2. I split the body into 3 separate parts and deleted the two smaller curved shapes
3. I chamfered the edges of the remaining, central component to create a smooth finish
I was unable to create the concave dip on the front (for the label) from my own experimentation and research, however I Intend to conduct further research and ask for help in order to create the shape. I could just be missing something obvious, but I wasn’t able to get the result I wanted after trying out a handful of techniques. I plan to finish this before next week’s activity!
I am glad that my skills and comfort with using the program are slowly improving. Although some aspects are frustrating during the learning process, I’m glad I have good resources to help guide me.
5 notes
·
View notes
Text
Week 7 - Physical Model Making
This weeks activity explored the skill of foam model making. I had a lot of fun with the more hands on and interactive aspect of the activity. Although it was my first time using the medium of extruded polystyrene foam, I hope to keep improving in order to have a better grasp on the invaluable skill of model making as a designer.
The process started with drawing up an orthographic sketch of my chosen bottle. I focused on the front and side view as I knew that I would rely on these drawings to help shape the foam. I was unable to purchase blue foam on campus, so I went to my local art shop and picked up some yellow modelling foam. I cut out the orthographic drawing and stencilled on the shape of the bottle on all six sides. I also used the negative side template to help with carving the outer faces. These two steps were essential for me to complete this task to the best of my ability, and I was pleased with the overall shape I achieved.
In issue I did run into was cutting away excess foam. A lesson I seem to learn every week is to not forget the importance of good tools – I had purchased new scalpel blades and sanding blocks, however I also needed a hand saw and sharper box cutter. As it was my first time working with this medium, I tried my best whenever I ran into difficulties. The larger, duller blade snagged the material too much while the smaller, sharper scalpel could not go deep enough into the foam. After recognising how many bumps I had made to the bottle, I alternated between roughly cutting away outer pieces and using a combination of a rough sandpaper and scalpel to shape the object. In my final product, you can see the areas in which I started off too quickly, and the areas I put more time into. I used a variety of sandpapers to achieve the final finish, including the curved edges and the concave detail in the centre. This was extremely helpful in evening out the shape of the bottle and improving its quality.
I came to firsthand understand the importance of model making as I could see the differences between a design on paper and a design in the 3D space. Although I double checked the measurements with each other, the base of my model seemed much too narrow. Viewing it in different lighting and holding it in my hands, I had a very different understanding of my design. I really enjoyed this weeks activity as I was able to both improve my skills in model making and to further understand its importance in the world of design.


0 notes
Text
Week 6 – Non-teaching Week
Reflecting on Andrew Simpson’s video
Over the course of this year studying design, my understanding of model making has grown immensely. Growing up in the digital age, I had more experience with model making through CAD software, first with Google Sketchup then later Fusion360. I cannot recall making any physical models as part of my design process, instead relying on sketching then jumping straight into making the final product. However, throughout the course of making various models in the past few months, I am growing to appreciate its importance in the design process. I’m not an extremely meticulous person, so there’s definitely a learning curve and frustration with fiddling around with glue and small parts, but I always come to appreciate being able to hold a concept and view it in a 3D space. The value of hand models to a designer comes from being able to deepen your understanding of your idea, and to explore its possibilities and potentials through spatial problem solving. Although the models I’ve made so far are far from perfect, my imagination can fill in the gaps between what I’ve made and the final product.
My Home Maker Space
Below is my current workspace. I’ve tried to optimise this space through small changes, including moving my desk next to my window in order to provide lots of natural light and ventilation for future spray painting and spray adhesive. I’ve secured my cutting mat to the desk using double sided tape and have placed a clear matt under the desk and chair to help make cleaning easier. I’ve been looking for a new desk that is deeper and has more storage space to allow me to work on bigger projects and to keep organised, but for now my at home maker space should be ok!

Week 6 Task
Completing this week’s task of making a small model cube was a good learning experience. Cutting the edges to a 45° angle was harder than it looked in the video, however I was able to clean up the edges using fine sandpaper. Although I got a new scalpel blade fairly recently, I see the importance of having a very sharp blade to achieve the best result. I was fairly happy with the final result, however I want to keep improving my accuracy and techniques to produce cleaner models in the future.


0 notes
Text
Week Five - Sketching
This week’s activity focused on developing our hand and digital sketching techniques whilst also exploring ways to express our conceptual designs through personal approaches. I enjoyed completing this week’s activities in my own time by following the recording and completing the digital task step by step.
During class we had a series of hand sketching activities to complete that aimed to help our line confidence, drawing technique and getting more comfortable with depicting different perspectives, contouring and shading. I love drawing so I really enjoyed completing these quick exercises and developing my hand sketching skills. I like how Rob emphasised drawing from the shoulder and to draw strong, confident lines as opposed to smaller little dashes, something I will keep in mind in the future.

For the second, digital component of this week’s task, we were asked to create a series of concept sketches for an Olay bottle. As I didn’t have a dual monitor and have beginner-level Photoshop skills, I struggled to keep up with the tutorial, so I completed this in my own time. The whole process took a little longer than expected, due largely to my poor Photoshop skills, but following the instructions step by step was great in teaching me digital drawing techniques on Photoshop. As I have a Wacom drawing tablet, I was able to go through a few concepts quickly and undo them to create the four final shapes. What I enjoyed most was experimenting with the shading and highlighting; it was really satisfying seeing the flat shape turn into an object with contours and depth. If I were to complete this again, I would tone down the intensity of the shading as my final drawings were much darker than the examples, but I was just enjoying experimenting with digital drawing. Although adding the thick sketch lines after already making the shape seemed a bit counter-intuitive, it made the final product look much nicer to present as a concept sketch and I would like to go back and add/subtract more to see how it would change the feel of the drawing.
I really enjoyed this weeks activities as I love drawing and have been wanting to explore digital drawing techniques, not only for general use but to present my design concept sketches in a much more polished and professional manner.


2 notes
·
View notes
Text
Week Four - Perspective Drawing
This week’s exercises allowed us to practice technical perspective drawing.
The lecture for this week was a great introduction into teaching perspective drawing. The photos from the slides and the additional resource on Moodle was crucial for me to complete this task without too many issues. I made sure I fully understood the task by reading it through a few times and going over this week’s resources.
What took the longest was trying to approximate the real world dimensions and how to translate that onto the page accurately. After getting started with the drawings, I found the process fairly quick and enjoyable to complete. I didn’t have any issues visualising the object as we had constructed it for last week’s exercise, which made this a lot more simple. I might have rushed a few lines and been slightly inaccurate, but I was really happy with the final product for my first attempt.
The second part of the activity was similarly quick as I copied the shape and dimensions from the previous part. Again, the longest part was approximating the new dimensions of the box from my eye and the ground and trying to check the new SP, HL and GL lines reflected what I saw in real life by moving the object to different distances. Drawing the extended boxes was fairly straightforward and an enjoyable extension to what I had just learnt.
The third part was an interesting change and was a good introduction to understanding perspective in curved edges and shapes. I could have constructed the cube more accurately however I was generally pleased with the result.
This week’s exercises really helped me understand perspective projection, an area I hadn’t covered in high school art classes. I feel as if I completed this week’s learning objectives and I’m happy with the work I did this week.

4 notes
·
View notes
Text
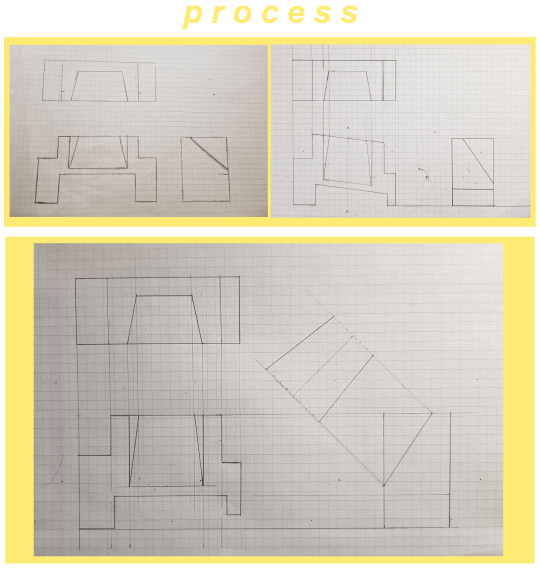
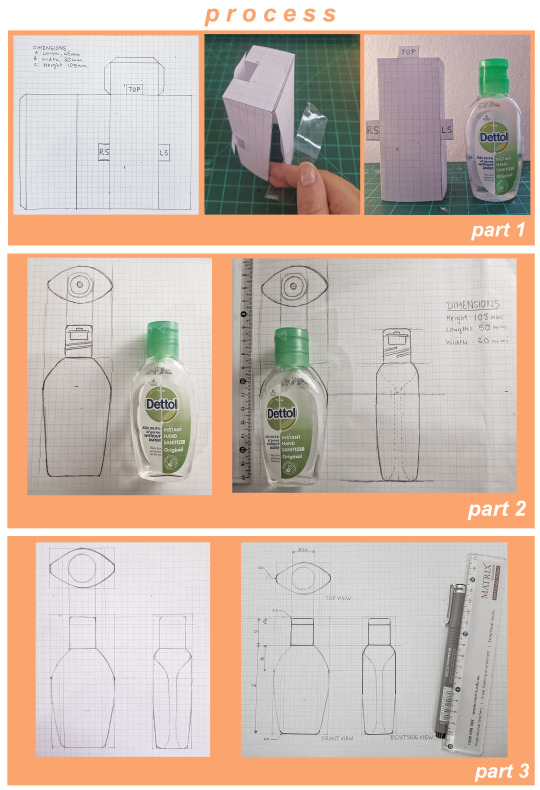
Week Three: Part Two - Secondary Auxiliary Views
The secondary activity for week three was to further our understanding of drawing auxiliary views by constructing a primary auxiliary view of a Chamfered Box and then creating a paper model from our sketch.
Creating the front, top and side view was quick, however when trying to create the primary auxiliary view of the object a few issues arose. I struggled with picturing the shown object rotated, and how this would translate onto a 2D page. I started with projecting the lines up at a chosen angle and very lighting sketching an outline of the object. I did this a few times to find an angle that worked well and that I could fit onto the page. This process of coming to fully visualise the object took a few attempts and I am still not fully sure if the drawing was executed correctly, however I did my best attempt and was fairly pleased with the result. Drawing the secondary auxiliary view was much easier for me and the only issue was that I struggled to fit it into the space.
Constructing the paper model based off this new information was relatively easy. As you can see in the process photos, I had to create a separate piece for the oblique face as it did not fit into the space, but that could have been avoided by drawing a few plans of the net.
This was a helpful exercise in furthering my skills in creating drawings and imagining 3D objects. After comments to the class by Rob in last weeks lesson, I found looking through other class blogs for inspiration and assistance made this activity much easier.


2 notes
·
View notes
Text
Week Three - Section and Auxiliary Views
This week’s exercise involved applying third angle orthogonal projection, section views and auxiliary views in addition to building on what we learnt last week regarding AS1100 drafting standards, hand sketching and using drafting equipment. I had a few issues this week, but it was a great learning experience overall.
When starting the freehand sketch, I did not pay close attention to the measurements shown and instead started drawing a rough sketch to help me visualise the object shown. I assumed the object was symmetrical due to the angle it was shown. I started the second draft sketch with consideration of the measurements but now had trouble trying to visualise the object. Knowing one side was shorter, I had the base of the object flat against the ground and angled the horizontal lines downward, as seen in the second image of my process documentation. Although the top and section view were accurate, the front view made it obvious that I had misinterpreted the object. I set out on my third draft knowing I had to keep the horizontal lines flat and instead brought the smaller right side up so that the base of the two sides were not the same. This made a lot more sense in relation to the original image of the object shown and I went on to drafting the auxiliary view.
In order to fit the auxiliary view onto the page, in my third draft I also inverted the sectional view so that the projection lines went left into the middle of the page. As we only had to draw the tapered surface, I was able to fit it into the space. I was finally satisfied with my draft and begun the final drawing.
I found it much easier this week to complete the final drawing neatly as this object only had straight lines and I had a much more detailed draft drawing to help guide me. I feel as if my skills in laying out the different views and the measurement indications have improved, and I was happy with my final product. This week’s exercise was helpful in developing my skills in visualising 3D objects onto paper, something I have always been weak at (possibly due to my aphantasia!), along with all the other learning objectives.

10 notes
·
View notes
Text
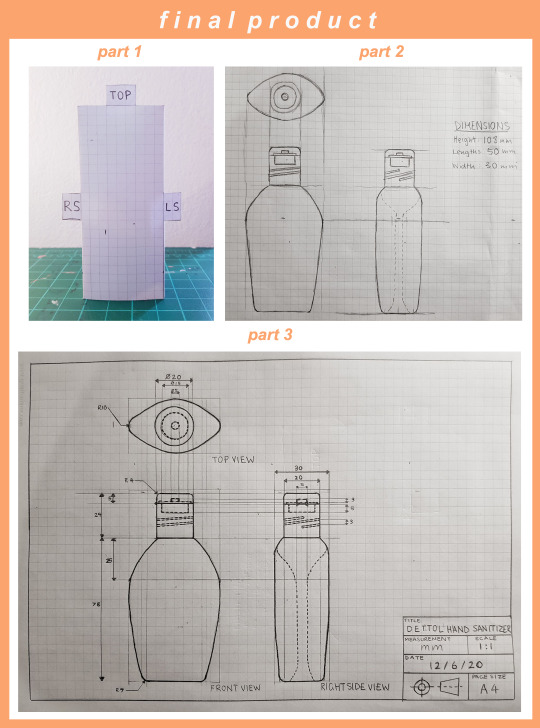
Week Two – Orthogonal Projection & AS1100 Standards
For this week’s exercises we practised applying the principals of orthogonal projection and developing our drafting and hand drawing skills. My object of choice for these tasks was a bottle of hand sanitiser; although being relatively simple, I wanted to practice drawing curved edges.
Task One involved creating a five-sided box based off the overall dimensions of the object to help us better conceptualise the object for our later drawings. Due to the curved sides, it was initially difficult to find the exact dimensions. In my first attempt, I had made the net too shallow and it wrapped slightly when placed over my object. I corrected this in my second attempt and was pleased with the result.
Task Two instructed us to construct a free hand sketch of our object. Using the dimensions from Task One and further measurements taken for the added detail, I was able to complete this task fairly easily. When looking at the final draft, I thought I had mismeasured the length as the physical object looked much slimmer. However, after double checking the dimensions, I learnt that curved three dimensional objects translate differently on a two-dimensional drawing.
Task Three, building off the previous exercises, asked us to create an accurate orthogonal projection drawing of our object. I have yet to purchase a French curve ruler so outlining the curved edges in pen was difficult but I took my time and was fairly pleased with the result. I learnt how important being accurate with my drafting tools were when having to create circular shapes with very small radii. My final drawing wasn’t perfect but I was happy with it as a first attempt at engineering drawing.
4 notes
·
View notes
Text
Week One - Drawing Instrument Exercises
For our first studio class, we were introduced to the basics of sketch modelling and learnt about how it lets us communicate more effectively as designers. This weeks studio activities, which asked us draw and cut a variety of shapes, allowed us to begin building a familiarity with the tools of engineering drawing and how we can use them to draw more accurately.
The drawing equipment I used for these activities were a mechanical pencil, a pen, an eraser, a ruler, a protractor and a compass. Using grid paper also helped with achieving a symmetrical sketch.
Figure one was relatively simple to execute; the straight, symmetrical lines were easy to achieve with the aid of a ruler and compass and I was able to create the two equilateral triangles using my protractor. When outlining the shape in pen, I was concentrating hard on creating a clean line that I accidentally drew over the sections in which the triangles intersect. I made a note to avoid this mistake in the future.
Figure two was slightly more challenging. Drawing the geometric pencil sketch was similar to figure one, however when doing the two interior circular shapes I had to trace around a two dollar coin and freehand. This left some room for error and inconsistency. When doing the pen outline, tracing the outer circular perimeter was challenging without the help of a compass and was ultimately slightly imprecise. However, I was generally pleased with the overall sketch.
The final part was creating the tessellating pattern. This task was easy to achieve with the help of a ruler and protractor and the four pieces fit together nicely once cut out with a scalpel.
This weeks introductory tasks taught me the importance of focus and practice when executing our sketches, and the value of our drawing tools in achieving the best possible results.

7 notes
·
View notes
Text
About me!
Hi everyone, I’m Josephine and this is my class blog for IDES1262 Communications 2 -Sketch Modelling. I’m excited to post throughout the term and to hear feedback on my work!
Outside of class time, I’m passionate about art and making things, whether its sewing together old clothes, starting a new art project, or mixing music. I’m looking forward the the rest of my studies in industrial design.
0 notes