
Last Seen Blogs


stalenobodykid
Sidney Higgins

redleatherhunter
Devil May Cry

xevenathousandmiles-blog
AIN'T NO WAY WE'RE GOING HOME! ☆
xevenathousandmiles-blog
AIN'T NO WAY WE'RE GOING HOME! ☆
Text
Week Ten - Reflection
This course was amazing and I really enjoyed the content. From start to finish, all the different tasks have taken me on a learning journey, allowing me to develop new skills, and improve skills I already had. Each task gave me a new insight into the model making process - it was good to get an all rounded experience in relation to creating a product. The lectures and tutorials taught me new information and skills that I will carry with me through out the rest of my career. I liked watching myself grow throughout the process, and I believe that these exercises have really helped to grow my current skill set significantly.
Moving forward these new found skills will help me an extraordinary amount, they have set foundations to learn new skills. From here on I am able to built on what I have learnt and continue expanding my skill range. These fundamental skills will be important to any future designs that I undertake - I have already found them useful while completing tasks for other courses. Overall, having these new understandings are going to be exceptionally important and helpful to my work.
I believe I performed well as a reflective learner. Reflecting on the work I had previously created allowed me to further understand what I had just done, as well as identify problem areas that I can fix moving forward. I found reflections to be useful. As a learner I need to work on my time management and my priorities - I found it difficult juggling all the work from different courses. Moving forward I hope to become more efficient with the way that I work and complete course work.
This entire experience has been really good for me, id like to thank you Miles and Rob as you have made the experience fun, enjoyable and extremely educationally - I am very thankful for the new skills I have learnt as they will be a big part of my future.
Thank you!! :)
2 notes
·
View notes
Text
Week Ten
This exercise was designed to help develop some practical skills in the finishing of a 3d model printed to presentation standard, I believe that this task accomplished this.
Unfortunately I was not able to collect a 3D model of the project, so for this reason I painted my foam model instead. This obviously did not come up as clean as it would have I was painting onto plastic, however I am still happy with the outcome. I used water based acrylic paint so that the foam would not be ruined when the paint was applied.
I started by painting the lid of the bottle black, seen in figure 1.1, I then moved onto painting the bottle. I decided to use a light purple colour as this matches my original sketch board and I thought I would stick with the theme. This took a few coats, as the foam soaked up some of the paint and air pockets were visible. I tried to get the paint as smooth as possible but this proved quite difficult as small particles of foam were becoming stuck in the paint. Figure 1.2 shows me painting the bottle.


Figure 2.1 shows the final bottle from multiple angles.

I am happy with how this turned out. It definitely would have looked better if it was 3D printed, however I had to make do with the resources I had available to me at the time. This experience not only showed me how the final model would look, it allowed me to improve my practical model making skills. This task also showed me that I was able to adapt to my available materials and facilities.
7 notes
·
View notes
Text
Week Nine
This weeks task was created to help us develop our practical skills utilising mesh modelling as a tool for manipulating a digital version of a design concept in a fast and effective way. I believe this exercise accomplished this outcome.
This task was challenging - yet achievable. The pre class video as well as the tutorial created by Rob really helped in creating this digital model. The videos were easy to follow and allowed me to create my desired final product.
I ran into some issues when trying to download 3Ds Max, however I was able to overcome this issue during the lecture - when other students explained how to fix the issue.
While using the software I ran into a few issues - mainly just trying to follow the tutorial as the screen recording did not show the drop down menus, this made it difficult to understand some of the steps. After watching the tutorial many tomes and listening closely I was able to overcome all of these issues and create a product that was ready for printing. Below is my final model.
I did not have my badge to use the 3D printer yet, but I was able to resolve this with the help of Miles.
This process was very helpful in furthering my skills and I believe that I have learnt yet another vital skill in relation to model making and development.
1 note
·
View note
Text
Week Eight
This exercise was designed to give us some practical experience in transferring our physical model concepts into a digital Fusion 360 model, I think this exercise achieved this.
This process was very frustrating, I have not had much experience using this software so it was a bit of a learning curve. After watching the provided tutorials I had a much better understanding of the software and I was able to start modelling.
I first began measuring my model and transferring these measurements into fusions360 - while following the whisky bottle tutorial. It took a few attempts for me to figure out the tools I was using but I eventually got the hang of it, however, after I has spaced everything out correctly I went to add my guide lines - this is where it all went bad. Trying to loft my design proved very difficult, my software kept telling me there were errors and I tried multiple times to fix this (even starting again at one point). FINALLY i was able to get the loft tool to work by removing the guide rails and adding an extra offset plane, I was then able to finish my design.
The images I used (as a canvas) to make an accurate depiction are below.

Creating and positioning the lid of the bottle was fairly simple, especially after learning the required skills from the provided videos, all it involved was a circle and the extrude tool.
Below are images of my final fusion360 model, from multiple angles.

This was an extremely frustrating process for me and took many attempts, however I do feel like I learnt during this experience. I am glad I pushed through and was able to produce a finished product. The experience helped me to further my skills - skills that will be very useful to me in the future.
3 notes
·
View notes
Text
Week Seven
This weeks exercise was designed to give us practical skills and experience in relation to foam model making, I believe that this exercise achieved this.
I found this exercise slightly challenging, there were many aspects that I struggled with, however I am happy with my overall product.
The first thing that I struggled with was sitting through the foam straight, this is just a technique issue that I will need to fix. I had trouble laying out the pattern on the foam, I had my orthographic plan however my brain just didn’t want to grasp how it would work - but finally I came to my senses and figured it out (it really should not have been that difficult). Getting all the sides even was another problem area for me, I found that holding the model up with lighting behind it helped me to see where the problem areas were - this allowed me to fix them.
Until the end of the process woking with the material was very rough, I managed to cut myself with the rasp a few times (just lack of concentration I think). Im glad I used such a fine sand paper to finish the model as I believe it gave it a very smooth finish, this really finalised the process for me I think.
The sketch that I have chosen to turn into a physical model is below.

The tools I used are pictured below. These tools were very helpful in creating my final product. I found the material moderately easy to work with, it took some time to get used to but once I had got the hang of it, it became much easier.

Below shows the block that I started with and my final product. I did not have access to blue foam as I could not make it to uni, however I was able to find yellow foam at a near by art store and though this was a good substitute.

Figure 2.1, 2.2 and 2.3 show the model from different angles.


Although the model did not turn out exactly like the sketch, the process was still very helpful. It was very messy and time consuming however I think it was a good learning experience, it has really helped me to further my skills in relation to model making.
2 notes
·
View notes
Text
Week Six
Video Reflection:
Andrews video was interesting and informative, I enjoyed watching him talk about the different uses for model making and when, why and how you would apply them to different projects. I liked how he explored different reasonings behind creating models – e.g. for scale, it helped me to better understand why physical models are so important to the design process and to an industrial designer. He talked about opportunities to change the design while creating models (a reason why he likes to create them himself instead of outsourcing), I found this interesting. The integration of different techniques was also intriguing to me as it shows how the design process is expanding, techniques such as low-pressure moulding, and 3D printing are really helping designers to create more refined concepts.
After watching this video, I can understand why creating physical models is so important to the design process, and how they can determine the outcome of a design concept.
video link:
https://www.youtube.com/watch?time_continue=381&v=f3wlp2G5DtM&feature=emb_logo
Home Maker Space:
Space One:
I created this space at home earlier in the year when uni went online, it makes for a great workspace and I utilise it when doing work for all of my courses – the space can be seen in figure 1.01. The great thing about this area is how uncluttered it is, the use of the extra storage draws really helps with keeping everything tidy – I really recommended getting something like this as it helps to keep everything organised, this can be seen in figure 1.02, I use these draws to hold all my supplies, such as; tapes, glues, pens, pencils, paints etc. (each has their own compartment). The desk is already quite destroyed from being used and abused over the years, so I don’t mind getting it a bit dirty while working on projects, this is good when it comes to activities that include painting and gluing.


Space Two:
Because we no longer have access to the workspaces at UNSW, I’ve found that it’s important to have some kind of external work area, luckily I have multiple spaces at home that I am able to use for activities that require ventilation or that will create a lot of mess. I find when I am using spray-paint or spray adhesive that placing a piece of cardboard or an old towel down first really helps with the clean-up, as well as preserving the space and preventing any damage. Figure 1.03 shows the work bench that I have access to at home. Having this external space gives me a lot more room to create and allows me to work freely without having to worry about damaging anything.

Model Making:
This task was fairly easy to complete, and the video was fun and interesting to watch, however I did run into a few issues along the way. Cutting the six original pieces went well (figure 2.01). I had problems trying to cut the 45-degree angles onto the squares, towards the last few pieces I had gotten the hang of it and it became a lot easier – so I believe this was just a trial and error problem that was solved with some practice (figure 2.02). I decided to use all-purpose glue as I did not have any PVA or a hot glue gun, I think this was actually a good substitute as it is not as messy as hot glue and dries faster than PVA. While gluing the pieces together I found that the painter’s tape was pulling the cube apart when I was removing it – to fix this I just used smaller pieces of tape and removed the pieces very carefully (figure 2.03). Overall, I enjoyed this process and think that my final cube (figure 2.04) turned out nicely.


6 notes
·
View notes
Text
Week Five
This exercise was designed to develop our hand and digital sketching techniques, and to develop some of our personal approaches to communicating conceptual design ideas. I think this activity was very successful in doing this.
Part One:
Free hand sketching. I really enjoyed this process and I found it to be very therapeutic, the steps were easy to follow and helped me to develop my hand sketching techniques. Figure 1 shows the first three exercises, these tasks we simple and easy to follow, however they required some confidence – you can see that my confidence increased as I went along. Figure 2 shows a variety of hand sketched cubes, each individually shaded to show dimension and a light source – each cube is from a different perspective. Figure 3 shows a range of potato shaped objects, I outline them in pen to show the original shape and left the skeleton lines in pencil – this was to differentiate the two.
I believe that this process helped to improve my confidence with hand sketching, I am happy with my finished products and I think this was a fun exercise to help develop my technique.


Part Two:
The purpose of the photoshop task was to improve our skills, I believe this task accomplished this. I have a much better understanding of the software now and I am able to create a lot more with it.
The Photoshop task was challenging for me and took some time to complete, I struggled a lot with keeping up during the live lecture (due to not knowing the tools well and some of the down bar menus not showing up on the shared screen), I found myself watching the recording a few times to get everything right. Once I got the hang of things the task became a lot easier. I am happy with my final product, however; I do believe my shading could use some work. Using the brush tool to create “sketching” lines was extremely tedious – this was probably because I was using the track pad on my laptop, I found creating some of the texture lines the hardest as my curser would not keep up or the line would not complete its path. My final product is shown below.

Overall, I found this task to be very beneficial to me. Although frustrating, I can’t say I didn’t enjoy it, it has helped me to broaden my understanding and learn skills that will transfer when creating many different projects in the future.
4 notes
·
View notes
Text
Week Four
This exercise was created so we could practice applying our principles of technical perspective drawing, I believe that this activity accomplished this. There were three different processes and all of them helped me to improve my overall skill set.
Part One:
This exercise was to use the 2-point perspective method to replicate a view of the chamfered box that was created in week 3 (part 2). This process wasn’t too difficult however some issues did occur. Trying to establish the correct measurements and angles was challenging for me, it took a few tries however once I had drawn the left shape and the top shape, the final view became easier to create – as I was able to connect lines and add viewpoints. The final product can be seen in figure 1. I am happy with my finished product and am glad I was able to overcome the problems I was having.

Part Two:
Part 2 was similar to part 1 however the chamfer was removed. This process did not take much time as the foundations for it had already been created – figure 2.01. The second step of this process, extending each of the 3 visible faces so that each has another matching box joined to it was also fairly simple – figure 2.02. I ran into a few issues while creating the perspective lines, such as placing them at the wrong angle or in the wrong position, however after I few tires I was able to solve this issue, I decided to outline the final product with a black pen as I think it gave it a better finish. I am happy with my finished product and I believe it looks neat an aesthetically pleasing.


Part Three:
Drawing circles in perspective. For this process I decided to draw three cubes as I wanted to improve my skills in relation to this process. The red lines indicate the major axis and the blue lines indicate the minor axis. It was an easy task to comprehend and complete however I did run into a few minor issues concerning my craftsmanship. I found it difficult to draw the circles perfectly (as you can see clearly in the bottom cube of figure 3), I also had an issue with the blue pen I was using as the ink decided to smudge. Overall, I think my finished product achieved the appropriate outcome for this process however I definitely think it could have been neater (using different pens, improving the steadiness of my hand etc.).

Overall, I think I did a good job at this weeks assigned tasks, although somewhat tedious I still put as much effort as I could into creating a neat and aesthetically pleasing final product. I am happy with my outcomes in each task.
4 notes
·
View notes
Text
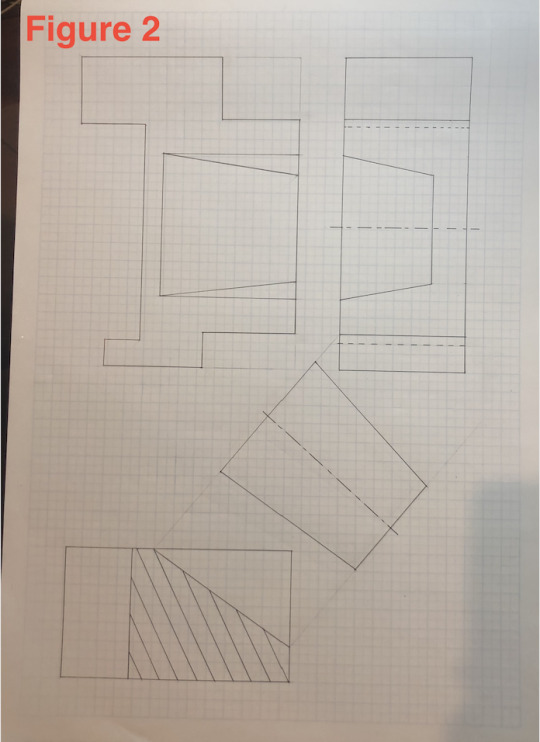
Week Three: Part 2
This exercise was to create a third angle orthogonal and primary auxiliary view drawing of a chamfered box and then create a paper model of the object. This exercise was challenging, however once I figured out exactly what I needed to do the steps became a lot easier to complete.
Step One:
Drawing the third angle orthogonal drawing took minimal time, figures 1.01, 1.02 and 1.03 were simple to create as it was easy to transfer the provided measurements. I made three different versions of this step to try and convey measurements, similarities and points. Overall, I was happy with the outcome of this step – it was not too difficult.


Step Two:
Creating the primary auxiliary view of the object was difficult and took some time. Trying to get the guiding lines in the correct places was difficult and I had to make a few attempts before getting it right, I eventually figured out how all the parts aligned and what measurements went where – this can be seen in figure 2.01. Once I had all the foundation lines drawn, I went in with a black pen an outlined the main objects, I also added measurements (figure 2.02), this was to make the finished product look neat and aesthetic. Overall, this step was time consuming and challenging, however I was able to overcome any issues and I am happy with my final product.


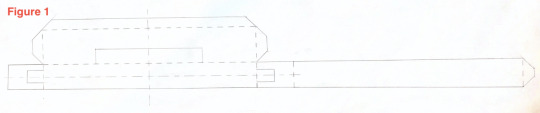
Step Three:
Creating the paper model was fairly easy for me and I did not run into too many issues. I was able to transfer the information from the above steps into a flat template (figure 3.01) – this allowed me to easily construct the box once it was cut out (figure 3.02). Overall, this step was fairly easy and didn’t take a significant amount of time, I am happy with the final product and think it is constructed quite nicely.


I am happy with my attempt at this task and I believe that that challenging nature of these steps helped to improve problem solving skills and widen my overall skill set.
2 notes
·
View notes
Text
Week Three: Part 1
Week threes exercise was designed to further our skills in section and auxiliary views – I believe that the assigned task achieved this. These new skills will be very helpful in the future, within and outside of this class.
Task one:
Task one was fairly simple and laid down the foundation for the future steps. It was slightly tedious as it was the first time the measurements were translated from an isometric view to a third angle orthogonal drawing. One step I had particular difficulty with was drawing the auxiliary view, however I eventually figured this out by using connecting lines and measurements – was very relieved when I finally got it done. My layout sketch can be seen in figure one.
Task two:
Once the layout was correct, I moved onto drawing the object with drawing instruments and in pen. This step was easy as I had already done majority of the work in task one. This step in the process can be seen in figure two. One difficulty I had with this was making sure the pen was as neat as it could be, I believe I produced a neat and well put together piece of work during this step.
Task three:
Once the object was drawn, I added measurements and made sure my foundation lines were still visible – as seen in figure 3. This step was definitely the most time consuming. I made a few minor mistakes that I was able to fix (luckily) – these included placing measurements in the wrong areas and few mix ups with the placement of my arrows, however I was able to overcome this issue by coming up with solutions such as using whiteout or placing a measurement in a different area. Overall, I like the way this step turned out, I think my work is as neat as it can be, and I am proud of the final piece that I have produced.
Overall, I really enjoyed this exercise. I feel that my skill set has been expanded and I am happy with my standard of work.


6 notes
·
View notes
Text
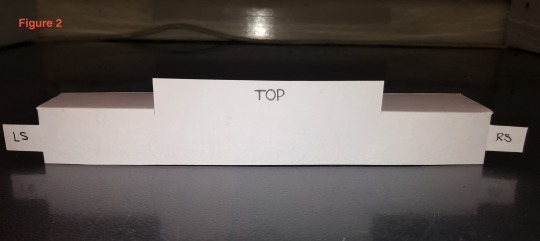
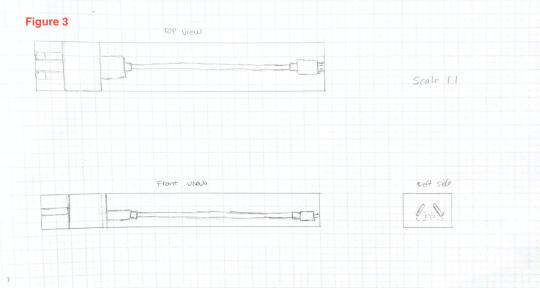
Week Two
Week twos task was designed to give us some practise applying the principles of orthogonal projection, AS1100 drafting standards and expand our hand making and drafting skills. Overall, I think that this activity achieved its desired objective. Although the task was tedious and at times difficult, I believe the skills learnt from it along with the patients it required was a fantastic learning experience.
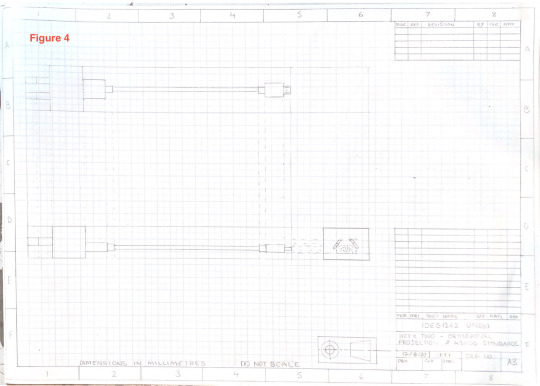
Chosen object: phone charger
Task 1:
This task required the making of a box to fit around the dimensions of our chosen object. The activity was fairly easy and didn’t require too much thinking. The process did take some time as multiple lines needed to be drawn. I really like the way the final box turned out (figures 1 & 2), and I believe creating this helped to expand my hand making skills.
Task 2:
Task two was a very quick process as it was only a rough sketch of the object in an orthogonal projection layout – seen in figure 3. Already having the measurements from creating the box, along with not having to stress over details made this a very efficient process.
Task 3:
Task three was the most difficult and time consuming out of the three. The process required a lot of time and effort to complete. Figure 4 shows my orthogonal projection before the addition of measurements, figure 5 shows after. Overall, I am happy with the outcome of this task. This process taught me patience as well as expanding my understanding of orthogonal projection, AS1100 drafting standards and drafting skills.
I like how all three tasks turned out and I believe that my knowledge and skill set has been expanded.

4 notes
·
View notes
Text
Week One
Week one’s activity required the creation of three shapes, the intent was to expand our understanding of our tools and allow us to practice using drafting equipment. I enjoyed the exercise and I believe it achieved its objectives. By improving my knowledge of these tools, it will help me with future projects and activities.
Figure one was simple to create, once the outer circle was drawn it was easy to divide it into the required segments as I could use the compass to create points around the circumference, and connecting the points was easy!
Figure two was slightly more challenging (mainly when outlining the specified areas with pen), however the construction of the shape was simple. The dimensions provided were extremely easy to comprehend and follow.
Figure three was again quite simple, after figuring out the first shape the other three pieces were easy to create. In the end, they fit together nicely.
Having the dimensions provided and using grid paper made these tasks very achievable, it showed me how a variety of figures can be constructed with a limited number of tools.
Overall, I like how all the figures turned out and I believe they are neat and consistent.


11 notes
·
View notes
Text
about me
Hi my name is Kate Hollis
Im from Sydney and have lived here my whole life. I chose to study industrial design because I like how it involves practicality and creativity
Also I love a good schnitty at the pub :)
0 notes