
Statistics
We looked inside some of the posts by katesprocessblog and here's what we found interesting.
Average Info
Notes Per Post
1
Likes Per Post
1
Reblog Per Post
0
Reply Per Post
0
Time Between Posts
11 days
Number of Posts By Type
Text
17
Last Seen Tumblr Blogs


Fun Fact
Tumblr Inc. is funded by 13 investors.
Text
Week #13
Introduction
There is not much to say this week. The exhibition was a lot of fun. I didn’t expect the opening night to be crowded, but the place was so packed you had to squeeze through crowds of people to get around the space.
Documentation
Last week I posted some photos that I took for documentation, but on Thursday I was able to take better photos with the help of Nancy.


Deinstallation
Deinstallation went smoothly. I was quickly able to take down the vinyl lettering without too many issues. I thought the complexity of my font would cause issues since it had weird edges, but since they were pretty bold most of the letters came off smoothly. Below is a photo of the letters almost off I just thought it was funny. I ended up taking the legs off the table and my mom came and brought the table and benches back to my home in New York.

Reflection
I’m really happy with my project. I had a couple friends play the game and they gave me a lot of good advice if I wanted to tweak the rules even further, but I think the core concept and visual presentation of the game were extremely well done. The only thing that’s left to be done is to finish my section on the visual arts website, but I uploaded my photos and elected to use a template so that shouldn’t take long at all.
0 notes
Text
Week #12
Introduction
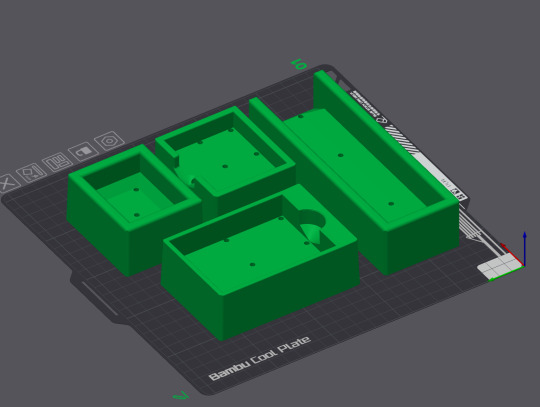
The final week!!! I have a lot to do and a lot of caffeine to consume to get everything done. I have full confidence that I can get it done, I just need to do it now. I need to wrap the final version of the box, cut out my cards, clean up my tiles, make the 7 doors, and make the instruction manual. Then, for the installation I need to build my furniture and put up my vinyl lettering on the wall.
Research
Took some photos of my pieces and piece holders to put on the bottom of the box. For the box wrap, I outlined in pencil where each side was. Then, I carefully lined the box with my double tack mounting film, and placed it onto the wrap. I used a bone folder to crease/fold the edges around the sides. Then, I placed more tape on the sides and was carefully not to leave any air bubbles when wrapping the box sides. I lined the inside of the box and lid with brown paper to hide the imperfections of the wrap, cover the chipboard texture, and improve the structural integrity of the box.


I made my cards next. At first I tried printing each side on a separate sheet of paper and then glueing them together, and even tho I liked how sturdy they were I didn’t like how thick they were. I ended up reprinting them double-sided, and then just carefully cutting them out measuring the 2.5x3.5 dimensions. The corner rounder in the fablab I found the corner radius too large, but Hannah came through and had one that had a smaller radius rounder that was perfect for the cards.


Unfortunately, I didn’t take process photos of me spray painting the doorways onto the tiles, but here is a photo of the stencil I used to put on top of the tiles. Then, I spray-painted white acrylic on top of them. After spraying each set of tiles, I went through with a permanent marker to line the doorways in black, partially to hide any imperfections during the spray painting process.

Here I started researching different instruction manuals to decided how I want mine to look. I want mine to be pretty minimalistic in black and white, but I also do want some small pictures to show the players how things should look since there’s no playmat or anything.


Finally, I built my table and benches on Monday at the gallery. I didn’t take any photos of me making the 7 doors, but you can see in these photos the doors that the players go through to escape. The last things I need to do after this are put my vinyl cut lettering on the wall and a poster of the box art.


Reflections
I feel very good about how everything looks. I do wish I had put more time into the instructions and play, but I playtested my game on Monday, and it went well, so maybe it’s just the artist's curse of never being satisfied. I’m happy that I’m almost done because it’s been super busy, but I'm also sad that I won’t have this project that I’ve spent the last 6 months working on. I know I can keep working on it technically, but I won’t have the resources anymore to do so. I think it’s time to move on to whatever is next for me, taking all of the things I learned from producing this game and applying those to my next project.
0 notes
Text
Week #11
Introduction
We’re down to the last 1.5 weeks to finalize my project before moving on to my installation. I’m going to try and do the vacuum forming one last time, but since time is running out I might have to pivot to other options for the piece holders. I honestly plan to do a lot in the upcoming Wednesday-Friday, so I might have to push off a lot of things I had planned to then.
Research
I got the molds printed for the vacuum former. The first issue I ran into was that the new plastic pieces I bought were maybe half an inch too small for the larger machine. Therefore, I immediately knew I wouldn’t be able to wrap the larger piece I printed, as the only other machine they had had a 5x5 inch bed. The second issue was that the molds I had were too tall for that machine, causing the corners of the heated plastic to rip.


You can see here my trials look pretty good otherwise, but each one just had broken corners, so I couldn’t use them. I think my molds were fine, I just wish the plastic I had worked better with the MakyuBox, because I think the larger bed would have minimize the stretch ariudn the corners. I also could have rounded the corners more than I did, since some of my prints had a smaller fillet radius than others.
I decided to pivot to just 3D printing the piece holders. I modelled some new holders that were a bit nicer. They have debossed text showing where everything goes. The taper angle is -1.5 degrees to allow for them to be taken out of the box more easily. A hole for your thumb to take the pieces out were added too. I left one side of the tile holder open to do two things: allow the tiles to come out more easily, and logistically, the space that they take up was too large if both sides were closed for the 3D printer bed, which was only 10 inches long. I also rounded the edges to a larger radius than my previous prints, so that everything was nice and smoothed out.

Reflections
I need to do a lot in the upcoming days, since a lot of my process involves printing, and the FabLab is not available to use during the weekend. I am sad that the plastic forming didn’t end up working, but I am glad I gave it a solid try, and it taught me how to use a new software, which I think will be helpful in the future. So overall,l it was a good experience and I don’t think I wasted too much time doing so. I already started working on the designs in Illustrator, but I just haven’t gone to campus to print them yet
0 notes
Text
Week #10
Introduction
2 more weeks left! AAHHHHHHHH! Thankfully, I feel good with the advice and feedback I was given during the critique last week in class. The professors suggested maybe using flocking, but I had looked into that the previous week and decided it wasn’t the look I was going for. I need to refine the tiles to make them look better. I also need to incorporate the colorful tiles into the box design. I liked the black and white color scheme, but it would definitely elevate the look and make it pop by adding in the galaxy style of the tiles. The professors also said that I need to make the text on the box and the cards more readable, which is an easy fix. The last thing they said was that the characters didn’t feel like they related to the rest of the game because they were too “cute.” I can definitely see that, but since there’s limited time left, that would be the last thing on my list of things to do. I might have time though, since I cut out making a trailer for the exhibition, as that would bring on a lot of extra work I don’t think I have time for anymore.
Research
I went to the NYU MakerSpace to test out the vacuum former machine they had. Unfortunately, I only realized I should have made a female mold the day before, and by then it was too late to model and print the molds, so I just went with my pieces to become familiar with the equipment and then hopefully come back. When I arrived, I realised they had 3 machines when their website only listed one. I was prepared for their Keystone Single Chambered Vacuum Former, which was only 5x5 inches in space, so I was pleasantly surprised to see they had larger machines! They had a huge industrial one that I think would be overkill for what I was doing, but the medium-sized machine they had was a Makyu FormBox which was perfect for making my individual molds for the board game inserts.
The plastic I brought was a little too thick, so I ended up ordering thinner sheets after the fact (they’re only 10 dollars with free shipping so I just got them sent without using my budget, so they came on time).

I started by putting my dice and characters onto the machine bed. My first go around was really rough because I didn’t heat up the plastic enough. But on my second go, I was able to get a good vacuum seal onto the pieces and the dice, although they shifted a little during the vacuuming process. I tried a couple of times, but didn’t want to waste too much of my material. I ended up using one of the plastic formed pieces I had made as a mold. I punched holes through the bottom to see how well the air would go through those holes and fit the form of a mold. I didn’t want to have a noticeable draft angle for the inside as that would affect the fit of the pieces. Thankfully, the holes I punched seemed to work well!


I unfortunately had to leave or else I would have stayed longer, but I was ultimately satisfied with my trip that day. Over the weekend, I modelled the molds I would use for my next visit to the MakerSpace. I started in Blender, which I was more comfortable with, but I was having a difficult time getting my measurements to be exact. So I looked into alternatives and ended up downloading Fusion 360 and learning how to use it. After some tutorials, I was caught up to speed and modelled these molds to be 3D printed in the FabLab. The tile holder is going to have to be done in two parts because the forming machine is just slightly too small, but I made the mold longer than it needs to be, and then I plan on combining two halves in the middle. I originally didn’t think about the thumb holes, but I ended up adding them to make the pieces out easier. Hopefully, the holes at the bottom are enough to allow the vacuum to properly get into the nooks and crannies.

Reflections
I felt like I was waiting on timing for some things. It was awkward planning when to get things done because I worked Saturday, Sunday, and Monday this week and couldn’t find time to get on campus. In addition to that, I was waiting for the linen textured paper to come in before wrapping the box. Now that it came in, I will work on getting that box completely done. After that, I think the tiles I want to completely finish next. I am really hoping that my visit to NYU pt.2 goes well so I don’t have to plead with my friend to go back since it’s out of the way for both of us (he’s at the Manhattan location, but the MakerSpace is in Brooklyn and he has to travel there to swipe me in). I’m going to buy him dinner or something after this as a thank you for sure! I have felt swamped with my work, capstone, and design III, so I took off one of the days I was supposed to work when it gets closer to the exhibition installation so that I can really focus up and produce the best quality work I can.
0 notes
Text
Week #9 - Final Critique
Introduction
This week I am going to lock in for the final critique. I would like to print better cards, as well as wrap the new box. If I have time, I also need to at some point make a stencil to spray the door designs on top of the tiles, but that doesn’t necessarily need to happen.
Research
I began by tweaking the content on the cards, now that I’ve come up with some of the playable roles in the game. I’m pretty much done with the cards, with some event cards being about taking and divvying up damage to the characters, and other event cards about removing tiles. The main issue I’m running into with these pre cut cards is that:
The material I originally bought is too wobbly
I was having trouble centering the cards correctly because after doing a test print in the FabLab the margins kept changing and the printer dialogue box doesn’t allow you to not shrink to fit inside of the margins for some reason
After enough trial and error, I’ve decided to try and do a double sided version where I glue both sides separately onto cardstock and then cut them out myself and use a corner rounder to make them like playing cards.

The next thing I did was design the wrap of my game more, adding some text to describe the game on the bottom of the box. Instead of regular printer paper, I went with a premium paper with a semi-gloss finish. The weight of the paper was 24lb and this slightly thicker weight made the final wrap of the box a lot cleaner. I also used double tack mounting film to glue the wrap onto the box, and this made it easier to get everything to stick evenly with no glue marks from using super glue like I did last time.

Here is the final construction. I really like how it looks, and the new paper I’m going to get will only elevate it further. I’m learning a lot about this which feels very similar to book binding, and so hopefully my next version will be my final. The only things I would tweak would be the actual size of the box, as I thought it was too tall and not wide enough slightly as I held it in my hands vs modelling it on my laptop screen. Everything technically fits in the box, but there could be more wiggle room inside with the pieces. I used 1/8th of an inch tolerance on the chipboard box, and it’s way easier to take on and off the box this time than my previous prototype. I think I could make the tolerance a LITTLE less but not too much.


For critique the last thing I did to get ready was print out the mockups of the space I had made in SketchUp, as well as what I want the board game insert to look like (which I haven’t attempted yet), and a photo of the table and benches I want to order on Amazon. On the topic of the board game insert, I really wanted to try using a vacuum forming machine, which is how they’re made professionally, but Stevens does not have one. I looked at which schools in the area had one and asked my friend from NYU if I could use the one in his MakerSpace. I unfortunately could not get there before the critique, but I have plans to go there on Thursday.
Reflections
One thing that I haven’t put a lot of work into is the instruction sheet, which is my next goal. I think that’s because it requires a lot of writing and checking with other people to see if they understand the gameplay. It’s not really something I can do on my own time, like I do with a lot of the other parts and aspects of my project thus far. And I can’t really get good feedback from the 2 ppl I’ve playtested with, since they’re too familiar with the game. I know I can just ask anyone, but it’s just something I’ve put off because I’ve chosen to do the other stuff first. Overall, though, I feel prepared for the critique, and I hope I get great feedback that will help me make my final steps in the upcoming 3 weeks before installation.
0 notes
Text
Week #8 - Spring Break
Introduction
During spring break, I have a lot to do to get on track and finish in time for the exhibition.
Research
I went to Blick and picked up a lot of art supplies. I purchased double tack mounting film, which Allyson suggested I use when wrapping my board game box. I also picked up some other types of glue/adhesives to experiment with. The main bulk of my haul was a lot of cans of acrylic spray paint. It wasn’t as expensive as I thought it would be, and I just went ahead and bought it so I could use my budget towards making the installation nice and other small things.
For the 2nd purchasing deadline, I wanted to get an idea of what my installation could look like to know what I need to purchase, so I modelled a rough idea in SketchUp. I had two designs with a circular table and a rectangular one. To be honest, I’m not sure if I want to have a monitor displaying a trailer anymore, because I don’t think the game needs a video besides it. I like the idea of having some of the graphics and instructions on the wall, but not necessarily on a monitor. I’m also unsure about the logistics of having a video running on a monitor and I think it might make it look ugly having to obscure the wire to plug it in, even if I tape over it with white tape or something. I don’t want to completely decide yet, so I’ll ask about it next week at the critique to get help with knowing how to present the game now that it’s almost done.


I ended up finding this table for really cheap on Facebook Marketplace, and even though it’s not EXACTLY what I would have liked it was a good steal so I ended up just getting it. I will get a wood finish to make the top look nicer. Now all I need is 4 chairs that match the table.

During spring break, I decided on the 4 dice sets I will be using (2, 4, 5, and 6 below), and I tried to replicate the patterns by testing spray painting on newspaper and also some failed tiles that I had.


I mainly messed with how to aim the nozzle and how much pressure to apply in order to get a full spray vs the speckled areas. After experimenting for a little but, I felt I was pretty comfortable with the spray painting process, but I needed more colors. At the time, I had only gotten the 4 base colors and was mixing them to try and produce that space, galaxy-style look. I went to Home Depot to get some more and set up in the studio to do some final testing on the colors to use for each player before I did the final tiles.


Here are some examples of the photos I took to show which cans I used and what that produced. Ended up testing for several hours before deciding I wanted to go ahead and spray the tiles. Initially, I messed up and the light blue tiles got shifted while I was spraying on top of them. This made the bottom side of the tiles smeared with paint on the newspaper. I wish I had gone to secure the tiles better, but I didn’t want to scrap everything because it would be so time consuming to rip the magnets out of the current tiles to try again, since I had constructed all 52+ tiles. The two halves had to be hammered together and were basically locked in, and I had tested how difficult it would be to take them apart and it took a lot of effort and completely destroys the prints. The printing process took in total over 18 hours all together without any hiccups (I was having trouble with the FabLab printer stopping randomly during the middle of my prints and the monitor wouldn’t notice so it wouldn't be ready when I came in the following day to pick them up), and I just decided to try and make the most of it and continue painting.
My main mistakes were shifting the tiles before they were dry and not realising the newspaper had thicker areas of paint that would take longer to dry so even if the tiles were dry to touch, the newspaper wasn’t. With this in mind, I feel as though each set of tiles came out a little better than the previous set. The purple and pink are definitely the best. To cover some of the unevenness and messy bottoms, I sprayed white around the bottoms and sides while covering the tops after they dried. I will clean up some of the one’s that have smeared areas sometime soon, but for now I was overall satisfied with how most of them came out.

The last thing I did this week was print a new box to see if the finger joint method would be better or worse. After constructing it, I think it’s more structurally sound, but the inside areas you can see the joins slightly and I think it looks ugly. For my final box, I’ll just laser cut the individual pieces seperately and glue them together very carefully. With the wrap, I think it will hold up fine.


Reflections
I’m very happy with the amount of progress I've made in the past two weeks. I ended up getting the tiles to 85% completion, and all that’s left is making a stencil to spray white over the tiles for the design on top. What I need to do by critique next week is print more cards and an instruction sheet, and wrap the current new box I have (although I want to make one final box without the finger joints). With that, I’ll have the game at 90% done, which I think is okay. The main things I need to think about is deciding quickly if I want a monitor to display some graphics/video or if I just print materials to display on the wall.
0 notes
Text
Week #7
Introduction
It’s the last week before spring break! This week I’m going to start designing the cards now that I have a feel for the design of the board game box. I last minute decided to add an extra element to the game that would involve more cards (now there are Event Cards and Role Cards), so I will mainly be deciding how to differentiate between the two. I will also talk about the galleries we went to to look into how others install their exhibitions.
Research
First, I did research on different game card ideas.
The ones below are from betrayal, from which I take a lot of inspiration from. I definitely want mine to have a different style, but I like how the information is laid out vertically (I was previously thinking about having the cards be horizontally long). I also like how there is a fun photo at the top for the items. I could incorporate that element into my design as well.


A game that I own that I was taking a look at is Monikers. These have less information than the cards above, and I like how simple everything is laid out. It’s just Title -> Body Text -> Type of Card -> Point Value.

A third game I thought of bc it’s sitting on my wall of puzzles is Red Flags. The main reason why I included this in my research is because of how simple these cards are. I don’t have that much information that needs to go on the event cards. I also like how the text is pushed to the top, and how they have their logo to balance out the space.

So after researching different games’ cards, here are the resulting cards. I kept the same vibe as the box I had designed as a prototype. I am really liking the black and white look, but I know I want the tiles to be monochrome, with 4 different colors for the 4 different playable characters. However, I need to decide whether I incorporate color into other designs. I think that thematically, it make sense that the rest of the world is washed out in black and grey, and the players are the only ones with color. But I just need to think about that one more. I also need some more drawings to use. I will have a similar style to the ones I drew, but I just need more.
I also want to have the text moved to the top like in Red Flags, because it’s easier to read. I am thinking about also including playing reference cards for 4 players, which I always find helpful when a game has them.
A side note is that the print ended up being upside down, so I need to remember to have everything flipped for the laser printer. I also noticed that there was some ink smeared on the prints, and it looked ugly. I hope that the printer isn’t broken! I have 19 sheets now, with 6 cards per sheet. Let's say I do 3 more test prints, resulting in 16 sheets. I believe my final game will have around 7 role cards and 13 event cards. That’s 20 cards using 4 sheets. So I could do 4 different batches before I would use up all of the paper I have.


Gallery Trip
Below are the photos I took during our gallery trip last week during class time. Most of the galleries were not very helpful because we didn’t get to see any interactive exhibits. But I did get some ideas about presentation. We went into this furniture gallery?? And they had some cook ways to show off tables. One thing I saw was they had this like 3 panel folding screen behind one of their tables, which I have in my apartment and so now I’m considering bringing that in to divide the space and make the area feel more private and comfy. Another thing I noticed was just how nice the lighting in most of the galleries were, and how that positively contributed to the presentation of the works.


Reflections
I wish I had more, but I am a week/two behind schedule. I need to get my next purchase order in so I can start testing painting. Hopefully, this week in class I can request to do that early. I am feeling good about where I’m at in general, but I need to start moving faster, which is okay, just needs to happen.
0 notes
Text
Week #6
Introduction
It’s past the halfway point, and the exhibition feels around the corner to be honest even though we still have a month and a half. I need to start really getting on making my final pieces and packaging. One thing I did this week was I spoke with the FabLab monitor to ensure that I can use the 3D printers more often in the upcoming weeks. For this week, I want to model the shut the door mechanic and start testing different event cards. I need to get the cards done, which is the final part of the game that needs to be tested so that I can make the instructions page and design the cards as well.
Research
I continued with my 3D printing process, but I had sent a print in on Monday, and when I went in yesterday, they said another worker had printed it even though the print was nowhere to be seen. I went back today, and it still wasn’t found so I think my print was just lost, and I’ll have to do the 8-hour print all over again. It’s fine because it runs overnight, but I don’t go to campus usually on certain days of the week, so it is unfortunate that it’s taking so long to print out…
I also researched a lot into different ways that I could print the doors. A lot of the options I saw had each door on an individual hinge as seen on the picture below which I didn’t like the look of. I want the art to stand out on the doors, so I want to be able to draw on them and then slide all of them on one rod. Also, now that I know the box will be laser cut out of chipboard with finger joints, I think I also want the shut the door container to be chip board to match the feel and vibes.

Another option which is all wood has no hinge or rod, and just has a wooden piece that can rotate in place for lack of a better way to describe it.

I thought this was interesting, but overall I don’t think I’ll do this method either because it would require a lot of fine tuning on the print and cut of the pieces so there’s enough tolerance to move freely but not too much so that the piece wiggles out of place.
The method I want to go with is 3D printing the 9 doors with a hole through them, and then constructing the outside with chipboard and a wooden rod that I already own from previous prototyping. I started modelling and constructing this next in blender:
Another thing I was going to do last week but didn’t get around to is collecting what I need for a Blick order. I no longer need chipboard, as the material in the FabLab is the correct weight that I need.
I need different glue than the krazy glue I’m currently using, and also scor or book binding tape so the glue doesn’t bleed through the paper on the outside of the boxes. I also need primer and spray paint to get the 4 colors on the tiles, and paint on the design of them too.
Reflections
I’m definitely behind this week. I felt myself falling behind last week, and I have a couple of tasks in my weekly schedule that haven’t been done for the past two weeks. The main thing I need to catch up on is that I still haven’t decided exactly how I will construct the shut-the-door game piece. I also printed about half of my tiles, but I need to finish that. Finally, I just need to start designing the cards and instruction page. Those will be easy, but I guess I keep pushing it off because it feels very finalizing, like once I lock those in, that will be what the game looks like. It’s a little daunting to be close to having a final product. I love the process of ideating and having different ideas of what to do, but I don’t like deciding on which path to actually take and usually defer that choice to someone else.
0 notes
Text
Week #5
Introduction
This week I tested printing/production methods making a mockup of the board game box. My goal is to fine tune the box so that I can start building the inside storage section as well as the shut the door aspect.
Research
The first thing I did this week was start the mass production of the tiles. I got 15 printed, but 2 of the halves were messed up so I printed 14 useable tiles overall. I really like how they feel now being able to playtest with them. The one part I initially didn’t think of it that when they stack sometimes they don’t fit flush with each other because of the magnets so I measured what 1/4th of the height would be and then multiplied by 4 to get the new space that I needed to contain them. It only went up about half an inch.

https://lh7-rt.googleusercontent.com/docsz/AD_4nXcuOXgptL3ciA8_YI-fPO-hSZxkWFLuimu4AmG2o9kLU-cWxikp2qHjm6mQ9OpcTm_IgTByPeb82kF4H0lg_sXoRqmlGHCs5ba0kRFwixauKtFknu0Eem4gnehwgpdBgKnZ6sYvZA?key=q3JCcL4h4z4tXnpTj9XHbA

It proved to be difficult to assemble because I thought the material would bend easier, but Phillip suggested to use this website make the finger joints for my next print. https://en.makercase.com/#/


After the full assembly, I realized I didn't leave enough tolerance in the print to allow for the paper that would be folded over both the base and the lid. So it was a really tight fit to open the box and I had to shake it really hard to open it back up.
Reflections
I didn’t get to make a list of what Blick items I need for around spring break time. I’ll try and do that this weekend. Overall though I am really happy with my work this week. I made several mistakes in the printing process, but now I know what direction to take. I like the material and sturdiness of the chipboard, but will use a finger joint method instead for the box when I laser print. For the outside, I still want to test printing methods so I’ll try a glossy print next. I might make a tiny little box because it’s getting expensive to print the full scale. I also need to ask whether or not those costs can be taken out of the budget.
0 notes
Text
Week #4
Introduction
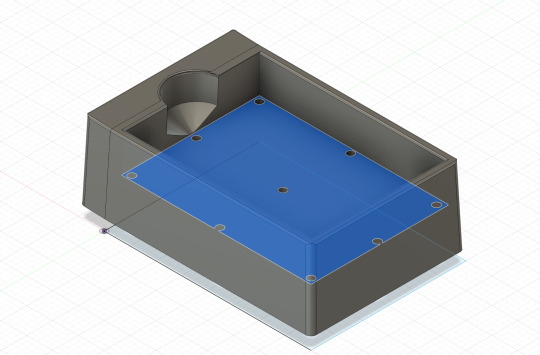
My next steps are to design, print, and assemble the final version of the game (no more prototypes). This week I hope to know exactly what direction and steps I’ll be taking with the outside packaging as well as the internal components of the shut-the-door box and piece holders.
Research
The first thing I did was assemble 3 of my hex tiles now that the magnets have come in. The process was a bit harder than I expected, but that was due to me not anticipating how strong the magnets would be. I was able to get the magnets in their respective slots without merging together by keeping them in place with another magnet below it through the tile. Then, after assembling my first tile, I could just stack the new ones on top of each other to keep everything steady. Once assembled, I tested the strength and how well they stay in place. I am satisfied with the tiles and now I can begin to mass produce.
The next thing I did was research into the next steps for making my game look like a legit board game. This video linked below was good for learning about using laser cutting as an option for the inside of the game. I think this would be an easy option that provides a lot of structural support. I was originally thinking about 3D printing everything, but I like the feel of wood/paper much better.
youtube
This video provided insight into the construction and print layouts of the outer design for my box.
youtube
I found this helpful website that showed a couple different options for boxes, and I decided I want to go with the classic two-piece box, as that is the design that most reminds me of games I have been inspired by and that I want mine to feel like.

Reflections
Although I didn’t get to go on campus yesterday to print more, I did make considerable progress with learning more about the production process of board games. I now know that I will need to purchase chipboard probably from Blick. I’ll use that for the outside part of the box. To wrap the box I’ll just print on regular paper and glue + fold that around the chipboard. For the inside, I want to laser cut the divider sections and then line that with a felt material to cover the wood. I feel like I know what to do next now with many of my questions answered about the production process going forward.
0 notes
Text
Week #3 - First Critique
Introduction
After last week I feel like I’m in a good position for the first critique. The main thing is I feel like I’m just chugging along making my prototype and I don’t know what questions to ask for the critique. I guess what I need some direction from not just friends and family about the design choices I’ve made and make sure they’re good before going fully forward with the finalizing steps which would be next.
Research
I did a little bit of research on ways to eventually paint my tiles and other printed aspects. I am currently considering using spray paint on PLA. So in the next couple weeks I need to acquire sandpaper, spray paint, primer filler. The 2nd purchase requests are at the end of March though and I’d like to start experimenting beforehand. So might just need to eat the costs of those just to do a trial.
For the 1st critique this is what I want to have to present:
Full box with styrofoam on the inside to contain the objects
A couple tiles printed for size (magnets won’t be in yet)
Shut the door outside component
A couple cards
I started constructing my final prototype before making the final version of the game by obtaining some things like styrofoam. I used my olfa blade to carve out the styrofoam to encapsulate the individual parts of the game. Then, I layers that with felt for a more finished look. I used a handsaw to cut a piece of wood in my parents’ garage to make the top of the game where the shut the door mechanic will be. I also sanded that down. For the makeshift doors, I cut 9 pieces of styrofoam and poked hole through them to line them up, then I started drawing the design of the doors. I think this is the first officially drawn art that indicates the direction of the art I want to go with. I think I’ll go with a mix of black and white and minimal color to help indicate which pieces are for which player. The colors will be very similar to the dice.


Reflections
One thing that I totally forgot I need to do is name the game. I think I’ll add that to next week’s work and put a lot of thought into it. Hopefully this week’s critique I get a lot of valuable insight into making sure the design is sound so I can start modeling the final thing and starting on the artwork as well.
0 notes
Text
Week #2
Introduction
For the next class, we’re having a joint class meeting to discuss Show Committees. After taking a look at the list of jobs, these would be my top three choices:
Graphics - any category but gallery graphic materials
Website Dev
Publicity/ Outreach
These are the categories I have the most experience with, so I feel like I’d contribute meaningfully to these committees. I was unsure of what order to list them in, but I ended up on this order. Graphics first because that’s my concentration, and I have the most experience with creating things like promotional materials, digital graphics, and branding. Then website development because it would be nice to have a tangible outcome to show like, “This is the work I did, and you can check out the website I helped make!” And then Publicity/Outreach, since I do PR for my club at Stevens, I would be well equipped to do that job. But the last two are honestly interchangeable.
Research
These were my weekly milestone goals for the week:
Print testing tiles ( contingent on whenever the magnets arrive)
Continue design of shut the door
Playtesting
For the first item, I printed a test tile, but the magnets haven’t arrived yet, so I will start assembling them next week. One thing I did was calculate the volume that the tiles will take up so that I know how much storage I’ll need. Either for the game box itself or I was also thinking about storing them underneath the shut the door mechanism. The dimensions of one tile are 1.5in x 1.75in x 0.2in (0.53 cubic inches). So 52 of these would be close to 28 cubic inches. So I could fit all the tiles into a 7x4x1-inch space. That plus the space needed for 4 characters, cards, and dice, I am liking so far how it’s pretty compact.
Keeping these dimensions in mind, I started looking into designs and how I’ll model and 3D print the box. For example, the design below is pretty interesting as it’s super compact and holds dice within the box. The one thing I don’t like is that each door has an individual hinge, whereas I think it’ll be best for me if they close all along one rod, and if needed I can put spacers between them.

<https://makerworld.com/en/models/1023088#profileId-1004862>
Then I drew up some different designs and created this rough model to show the scale of what the box might be. I really like the idea of the lid containing the door elements and then inside as all the parts.


For the playtesting side, I didn’t get any photos of it but I did play a couple games with my friend. I need to think of a better way to figure out how each player’s islands of tiles will connect since they’re not locked into a grid. I don’t think it’s a major issue, but I just need to figure out an exact spacing so that the tiles are close enough to a grid. I also need to tweak the health system. Another thing is that the game is super easy for the first couple of rounds and only gets hard when enough doors are closed so I either need to make the game short so you can always play several rounds in one go, or make it more difficult.
Reflections
I felt like I could have done more work this week over the weekend, but I didn’t end up being able to print part of the box like I wanted to try originally. I also could have playtested about twice as much as I did. However, I did make considerable progress on the Shut The Door aspect. Next week I’ll seriously look into stat pieces and hopefully print. I will be away for the weekend because I’m going home for my mom’s birthday, but I will plan around that.
0 notes
Text
Week #1 of Capstone II
Introduction
For the first week of Capstone II, we were assigned a couple goals.
Create a Weekly Milestones Schedule to help plan the course of the semester as well as help the professor keep track of our progress and be on the same page
Complete our first purchase request
After completing my Weekly Milestones Schedule, these were the goals I had for the week.

I budgeted most of the items I knew I needed to order because I wouldn’t be able to make them from scratch. So while I will be making several aspects of the game myself (the doors, hex tiles, box, instructions pamphlet), I need to order several things in advance. The main thing that I’m waiting to come quickly is the magnetic balls because I need those to test and fine-tune a 3D print of the hex tiles. Other items include dice for all 4 players, backup wooden tiles just in case I decide to pivot, and glossy playing card paper to print my cards on.

Research
I researched by looking into ideas for the tiles and the shut-the-door parts of my game. For the doors, I wanted to write down what I wanted to keep from the classic design and what I wanted to change. Another thing is that in class last week, another student mentioned the idea of having a magnetic tile-locking mechanism. I had previously thought about this and even discussed it with another friend previously, but I kept thinking about how cool it would be so I ended up doing a bit of research and found a solution. Instead of gluing magnets into place, I found a design by a user SingularityGames, where he slots in magnetic balls that can rotate in place in order to have the correct polarity. Below are the notes and mockups I created this week:


Reflections
I feel like I’m heading in a good direction and I’m happy with my progress so far. I tried to break the schedule down so that I’m not working on one aspect of the game and only that aspect each week, because knowing my own work ethic, I get super tired and uninspired when I only focus on one thing. I’ve realized it’s better to make slower progress on a couple things versus narrowing in on one and getting stuck. That being said, I bolded the weeks later into the semester where one part of the game needs to be finalized, so that I don’t push off finalizing stuff all to one or two weeks. In terms of the budget, I left around 1/3rd of the budget for printing and exhibition-related purchases. I also have a feeling I might want to get a box custom printed to make it look more official, but I don’t know if I can get that reimbursed since it’s not on a website that’s an approved vendor for the school. I was frustrated with the budget having to include shipping and tax for every single item since I have a lot of smaller purchases (items that are less than 10 dollars), and I really hope they let us know how much it actually costs for our items and hopefully, it’s less than I listed.
0 notes
Text
Week #11
Introduction
Ok I don’t really have much to say about this week. It’s the last post before the final critique (ahhhh!).
Research
The Trivia Club at Stevens held a Murder Mystery event and as PR, I was in charge of making the visuals for it. I think this relates to my project because of the genre of the event, but also because I may be thinking about making characters and playable character cards and backgrounds for my game just like in the event. The event was monster themed, so I helped make character profiles for each of the suspects and victims. I also helped make a presentation for the trivia set.


I feel like I want to include this in my research as making a game for people to enjoy, curating it to a specific demographic, thinking about how long the game is going to take and pacing it correctly, fact checking and researching, making characters and a story, etc. These are all skills that I can use for making my game in the future.
Reflections
I don’t feel very prepared for my final presentation on Wednesday!!!!!!!!!!! I think it will go fine, but I don’t feel super confident in the direction of my project. I forgot that the work that I had done for my club could be applicable to my project, but I realised they are related. Just need to get through the upcoming week and work on the presentation slides now.
0 notes
Text
Week #10
Introduction
Theme of this week is GAMES. I looked at games in many forms. Board games, video games, dice games, John Conway's Game of Life (if you google that it has cellular automata in the background!)
Research
I did some documentation of different board games I own as well as went to C2GS (the board game club at Stevens). My goal was to take an inventory and really look at all the different pieces and ways in which the games work and how players interact. For example, the majority of games I own are 2-4 players where the players are pitted against each other. Some games have pieces that represent the character as a little 3D printed model on the board AND a card that has your stats like HP. Others don’t have playable characters and you have to roleplay as the character yourself. Games that heavily revolve around dice generally have shorter rule sets. Also having a game revolve around dice makes it feel more like RNG compared to strategy, even if there is strategy involved (like Yatchtzee).


Above is 7 Wonders and Five Tribes. Five Tribes is a unique game that involves movement being dependent on how many meeple you have on a tile. I thought it was an interesting alternative to the normal movement mechanics in more traditional games. I also took note of the role of the art in games. There is a wide variety of games where some have little to no art at all (the design of the dice or a standard deck of playing cards) while others are centered around the art and heavily utilize it (Betrayal, Sagrada, Calico). 7 Wonders have a really pretty art style that is central to the game. Each character (up to 7 people) plays as the ruler of one of the 7 wonders of the world and there is unique world building that happens playing off of the art style that differentiates the fictional game from real life.
Another observation I had was that the box design of some games really drew my attention to them, while others were more basic. One that really stuck out was how all of the games from Facade Games are designed to look like old books, which fits the theme of them as you play as characters from different eras.

Video Games

One of the games I looked into was Half Life. I’ve never played or seen any gameplay of it before but looking into the monsters I like how expressive they are while also being quite simple, due to the constraints of programs and game development since the game came out in 1998.
Another game I looked at was Bridgecurse 2. Saw this short randomly while on YouTube, and love how they incorporate audio/music timing in the game. Because I’m thinking about making a board game right now, I don’t know if I can incorporate audio or if that would be too much to tackle but it is something to think about.
youtube
Conway’s Game of Life

I briefly thought about this during my research. I remember coding it during CS115 and while I was thinking about how many players I’d want my game to have it reminded me that this is one of the few zero player games. It’s cool because with just a few very simple rules you can get so many unique instances of the game. I could incorporate rules about different neighboring tiles like they do with cells.
Reflections
Overall I feel positive about the research I did, learning more about games after comparing them to each other and thinking about what works and what doesn’t work. I will definitely use information I learned this week in my project going forward.
0 notes
Text
Week #9
Introduction
Since I spent most of my time last week in the digital space, I want to do some drawing. Although it took a decent amount of time to cut out and assemble the board game, I felt like I needed to focus more on what art I want. For this week my research will be looking for inspiration through comics and movies etc.
Creative Research


These two drawings are playing with perspective. I was thinking about this panel (will be below) in Dandadan, the manga/anime series I just started reading recently. The current setup I had of my game was pretty linear. Even though I switched from a grid to hex tiles, I still think it plays more linearly than I may want. I could definitely play around with the actual game board being more wonky so that it plays into that confusion that horror can make you feel.

Other Research
It’s What’s Inside

“A pre-wedding reunion descends into a psychological nightmare for a group of college friends when a surprise guest arrives with a mysterious suitcase that starts to tear the group apart.”
Really trippy movie where everyone is body swapped. It plays into my topic using themes of identity and it raises questions of the difference between soul, mind, and body. Listening to people’s reviews and also the interview of the director, it showed me that I need to be mindful of the line between complex and too confusing. Mystery and a bit of confusion is good but too much will leave someone with an overall negative experience if they can’t overcome that confusion or ground it in some other mechanic or part of my game.
Chainsaw Man


Read a bit of the chainsaw man manga! I love the dynamic poses as well as the framing of the monsters and demons in this series.
Reflections
This week I got a lot of great art and story inspo for my project. I was also going to group games into my research but I want to dedicate a full week to only that. For next week, I’ll really deep dive into games.
0 notes
Text
Week #7-8
Introduction
From the midterm critique these comments I want to keep in mind:
How are people receiving horror and finding themselves within those thoughts?
What elements are you drawn to?
“When I think of horror, I think of violence.”
How do these narratives lead to further identity formation?
Creative Research
This week I explored board game ideas. I have an idea of a concept that can work as a video game board game or even just video. I think for the future I’d want to ideate on a loose story that can take form in different ways. First I did research on games that use horror themes and tropes, as well as talk to some friends that know more about board games than I do. Then I started working on the game’s themes and mechanics.
One thing I thought about was that many types of games don't have a movable character, but I think I want a character for people to play as. Creating a couple characters (not different personalities maybe but just the look of them) helps to create that sense of identity as you take on and embody the little player piece. Another thing that I want to keep in mind is that I don’t want the game to feel too basic or cheesy, I want it to be a layered exploration of identity.
Keeping all of this in mind, I created a rough prototype for a board game. I would want a lot more than 2 different characters to choose from, but just for the sake of time I chose two small characters from objects lying around my apartment. I had a couple other options, but I liked the idea of two different animals (duck and cat) trying to reunite because I feel like the form of your consciousness doesn’t need to be represented by a human character. Maybe next week I’d look more into 3D design/modeling to eventually print something out.


List of items for game:
2 Characters
Instructions Sheet
Game Board
12+ Unique Tiles
Event Cards
My Ideas:
-Game will have 2 players set up with the box dividing for now so they can’t see each other's board
-Game like collaborative battleship so like you’re working together to try and arrive at the same coordinate?
-horror elements
Like the haunt in betrayal I think the scariest tiles like the darkest ones will have the most doors or exits because going into that place in your mind helps break down walls and unlock and communicate whatever
So using those should have pluses but also minuses
You want to go to the darkest parts of your mind and when you do you
-Shut the Box will be able to be rolled 4-6 times
This is SLEEP PARALYSIS
Each player rolls a d6. You then together decide what number(s) to put down and any tile on those get removed from the board (they go back into the pile)
-Win condition is to have players meet at the edge of the board. When one player gets there, they can’t move and they must take damage. Once both players are at the same tile number at the edge of the board they win
Here was my finished prototype product:


Other Research
The Film Reroll
Beetlejuice (Part 1)
This podcast is great because they play through movies like they’re RPG campaigns. I love how the DM is able to let them go outside the bounds of the movie but still reel them in to hit the needed plot points. He controls the narrative while allowing the players to create new moments and identities almost for these already established characters.
The Big Picture
‘Terrifier 3,’ ‘Smile 2,’ and the 10 Best Horror Movies of 2024
The Slasher Movie Hall of Fame, With Alex Ross Perry
‘Speak No Evil’ and the Top Five “Get Me the F--- Out of Here” Movies, With James McAvoy!
Dandadan
This show is airing weekly and I just caught up on it. I went and read the manga up to where the show is now too because I love the art style so much. The takeaways I had is that you can show these creepy monsters and ghosts and aliens and have them be effectively creepy, but still keep the tone of the content to be targeted towards young people.


Reflections
I really enjoyed making this game! The feedback I got from having two people play it in class was extremely helpful as well. I think I could expand the concept to include 2-4 players as well, and it would still fit with my theme of identity formation. For the future, I learned I need to keep in mind the difficulty and think more about if I want to make a simple vs complicated game. I need to basically think about what the audience will be. I could also have a simple and harder version of a game which I’ve seen before. I also want to force more communication between the players and also force them using their imagination more, because my game for this week was almost purely a strategy game with not much story. Next week I also want to try working with colors possibly.
1 note
·
View note