
kelpieseatturtles
dumbass turtles
here for the fun of it | minors DNI
455 posts
Don't wanna be here? Send us removal request.
Last Seen Blogs

queerasart-blog
Queer As Art
queerasart-blog
Queer As Art

dolorezhazes
princedom by the sea
dolorezhazes
princedom by the sea

cosmicocoffee
Hey Ya’ll!


Text
lmao he just has a mid life crisis every time he drinks
Rise! Leo I would imagine if drunk enough would forget he is a turtle lmao. You and Leo are 21+
Leo, drunk af: would you love me if i was a turtle?
You confused as fuck, trying to help him to bed: b-but you are a turtle
Leo, tears pricking his eyes: I-I'm not a turtle.
You: you are a turtle.
Leo: would you still love me as a turtle?
You: of course.
Leo has a grin plastered on his face, as he plops his ass on his bed. Kicking his feet back and forth, he waits for you a happy churr low in his throat.
Leo: Would you love me if I was you?!
63 notes
·
View notes

Text
30 Days of Art Improvement Challenge
Are you tired of feeling like your art just isn’t improving? Do you want to do a 30-day challenge that’s actually useful? Welcome to 30 Days of Improvement Hell. >:D
I made this because I’ve been feeling super ‘blah’ about my art these days, and I needed something to kick-start myself. Who wants to do this with me!? Start now or whenever you can (now you procrastinators!). Challenge yourself and have fun at the same time!
Tag your posts with #Improvement Hell so everyone can follow along and see each other’s awesome artwork. I may even create a blog and reblog them! :D
What are you waiting for? START!
Self-Portrait - Introduce yourself
Draw a figure using a reference - link to reference
Draw a figure that’s in action, using a reference - link to reference
Draw a part of the human anatomy you have trouble with. x20, with atleast 5 being skeletal/musculature studies.
Draw more figures. Quick gestures and silhouettes. x20, with atleast 10 different body shapes
Let’s have some fun. Design a character from either This or This character generator! Be creative and bring something to life!
Pick the weirdest object in your house/room. Draw it. Shadows and Highlights.
Find 2-3 objects, make a scene with them. Draw it. Bonus points for creativity. Double points for dramatic lighting.
Draw a landscape of a place you’ve never been or drawn.
Draw a BG with 1pt Perspective. Negative points if it’s a railroad or an empty street.
Draw a BG with 2pt Perspective.
Look out a window. Draw what you see. Bonus points for adding something interesting.
Draw an interior setting with the character you designed on Day #6 in it.
BG with either bird’s eye or worm’s eye view.
Halfway there! Draw three ‘action’ scenes with different compositions in each. Quick sketches are fine, just make them interesting and understandable! Bonus points if it’s the same scene, but different composition.
Draw a single page comic with 5-7 panels (the story begins and ends on one page).
Draw an animal you’ve never drawn before. x10 Link references.
Draw a car. Negative points for whining. Hint: Use a perspective grid.
Think of the thing you hate drawing the most. Guess what? Draw it! Negative points for lying to yourself.
Pick an object in your house/room. Now design a character from it, using the shapes, forms, textures, purpose and colors as inspiration. Also link/post the object you used. Negative points for using a humanoid action figure.
Draw a character/object/scene, and shade them using ONLY solid blacks and whites. Bonus points for good use of lights/shadows
Draw a different object/scene/character. Shade using hatching, crosshatcing, and/or pointillism. Bonus points for lights/shadows and textures.
Colors! Pick a color palette, and paint a scene/character/object using only those colors (some blending allowed). Bonus points for good use of lights/shadows.
Draw and color a scene/object/character - no lines allowed! (aka - lineless art). Don’t forget light and shadows!
Draw a scene/character in a style you’ve never drawn before. If emulating an artist, credit+link. Bonus for color style.
Draw a character. Draw 10 emotions/expressions. Bonus points for 'uncommon’ emotions. (i.e. anxiety, guilt, despair, loneliness etc.)
Draw three random shapes using your opposite hand (or your foot). Now design characters from those shapes.
Turn on the tv (or load your illegally downloaded movies). Pick an actor and draw them.
Almost done! Let’s have some fun. Draw some fanart. Bonus points if it’s super obscure and unknown. Make people guess what it’s from.
Last day! Find a drawing you did within the last year. Now draw it again using what you’ve learned! Link it for comparison!
Look at all that amazing improvement! Congrats!
[Update] There is now a sequel challenge, Draw All The Things!
68K notes
·
View notes
Text
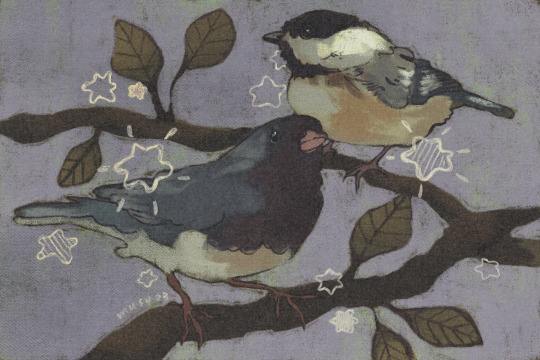
dark eyed junco + black capped chickadee ˚ʚ♡ɞ˚
two of my favourite backyard visitors
25K notes
·
View notes

Text
me @ y/n when they do something i’d never do:
like babe this isn’t us ?? get it together
58K notes
·
View notes
Text
me when the READER in the X READER has a name:

like babe the fic ate but i do NOT look like an Aurora🙁
28K notes
·
View notes
Text
the bond between a girl and their favorite fictional man is both an unstoppable force and an immovable object
66K notes
·
View notes
Photo

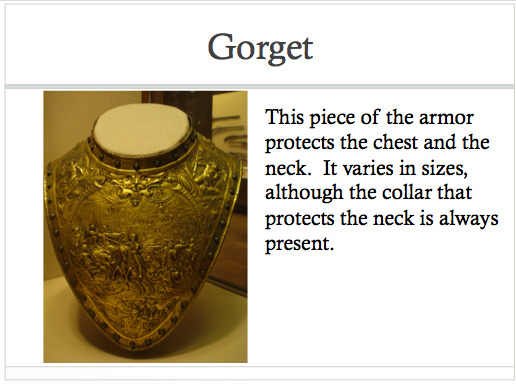

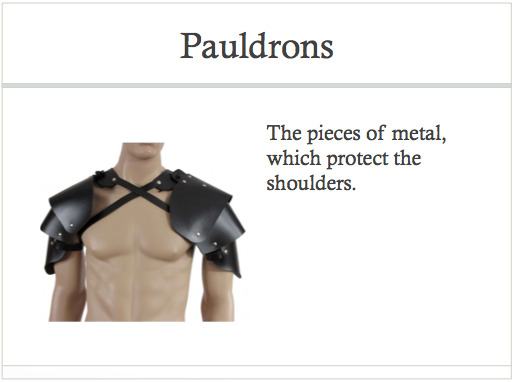

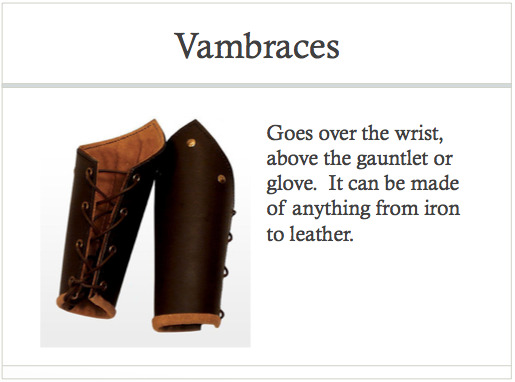
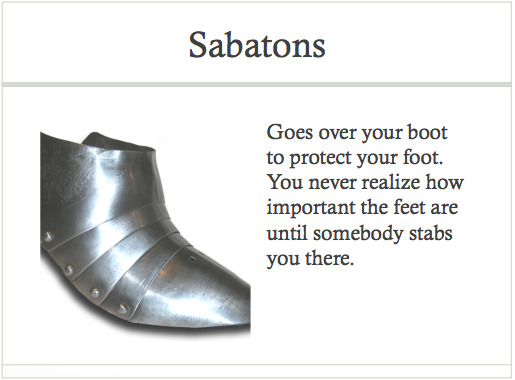
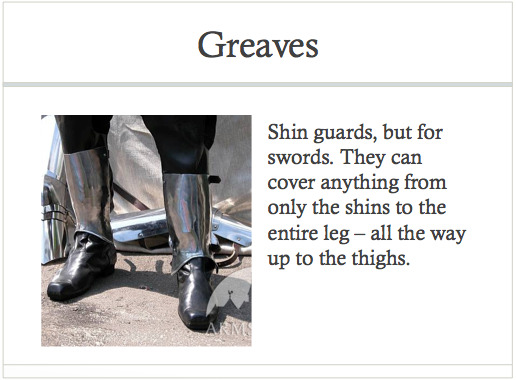

A breakdown of medieval armor, since a lot of pieces are required to create a full suit.
281K notes
·
View notes
Text
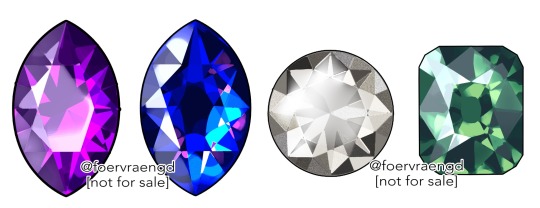
Mirre’s “How i render gemstones” tutorial!
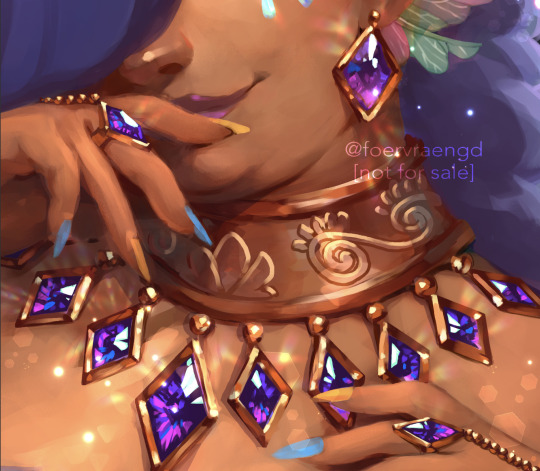
(note: image above is not what is shown in the walkthrough. It is an example piece)
Ingredients:
Art program that has layers and selection tools
Patience (hubris or stubbornness is fine too)
(recommended) photo references of gemstones and/or prisms
(Optional but very helpful) Knowledge on how to use Reference layers and anti-overflow in Clip studio Paint
For this tutorial i am going to use clip studio’s “anti-overflow” feature. This post is not going to explain how to use that specific setting but you should be able to find guides on how to use it on clip studio’s official website or on youtube.
Please Note: The result of this technique will not 100% represent real life gemstones. These are more simplified but should still make an impression of the brilliance and appeal of gems, crystals and diamonds.
If you don’t work in CSP: the best workaround is to use the polygonal lasso selection tool for the same purpose.
This ended up being a long post so I am putting it under the readmore:
First off; Basic idea on how the light refracts inside a solid transparent object:
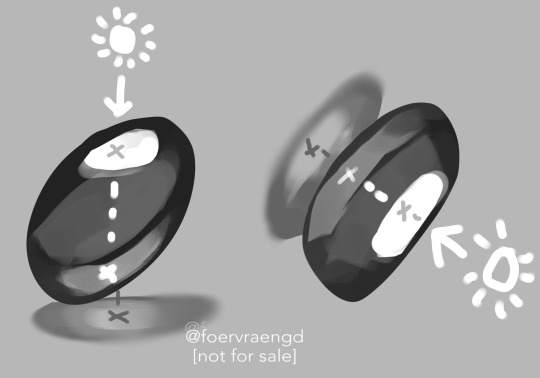
Wether it is acrylic, glass, water or crystal, the way light pass through more or less should behave the same as long as it is solid and not hollow inside. Pay attention to how the darkest parts of the stone goes along the inner edges, leaving a ”mid tone” sort of in the center. However, this might vary depending on the light setting. But it is a generally good rule-of-thumb to follow if you’re drawing something not based on a photo. Another thing to pay attention to here is how the placement of the highlight will lit up the inside of the gem in a parallel line. It also shows through on the cast shadow.
Light refraction on a cube:
I have already made two posts on this, so definitely go through them:
CUBE BREAKDOWN POST HERE
But a rough summary from those two links would be: Every side/facet of a gem or a cube etc refracts the light individually and not as one entity (that would make it look hollow and not solid). Think of it like how each piece in a broken mirror individually reflect your face back to you. Like a weird patchwork!
Putting this into practice:
For this tutorial I’m going to be nice to myself and not try to draw perfectly accurate gemstones. Instead I’m gonna draw them with a more ”natural” looking set of facets. Which actually isnt as common in real world as video games makes us think. Some crystals have geometric shapes naturally, but a lot of other stones are not as fancy. Anyway, im taking artistic liberty on these example stones because the technique I’m going to use will work for these just fine.
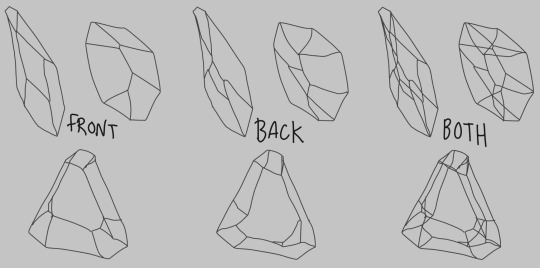
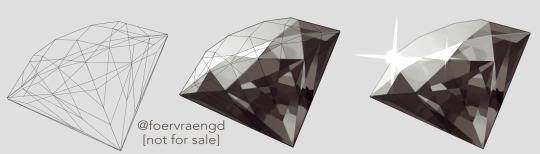
So, in clip studio paint, I first draw the stones on a vector layer. I give them facets for the front side. Then I duplicate the layer, remove the front facets and replace them with the facets on the back of the stone. The third image here shows both layers visible on top of each other. I now put these into a layer folder and mark the folder as ”reference”.
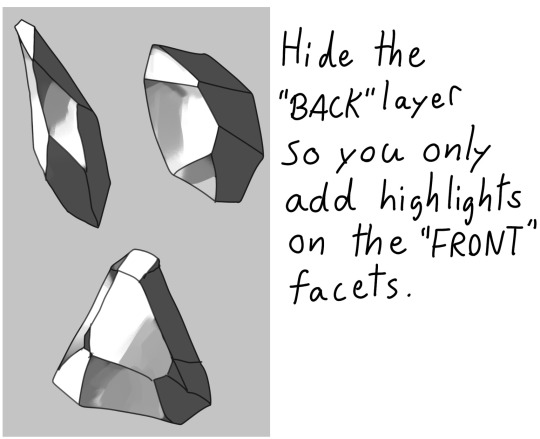
Now, on a layer below the lineart folder, fill with your base tone. Then make a layer on top (if you can clip it to the base tone, do that), this layer is where you decide where the highlight will be placed. In some cases the highlight is only lighting up one single facet - it really depends on the design of the stone. You can also blend and soften the highlight here if it looks good for you, just make sure not every facet is highlighted. The highlight layer should be on top of all the other layers clipped to the base tone layer.
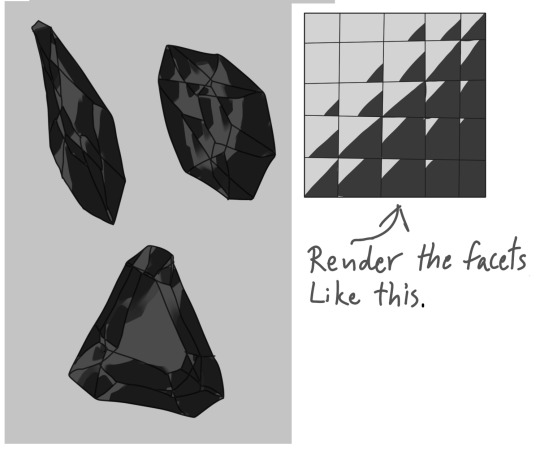
Now it is time for the juicy juicy stuff! Turn on both lineart layers so they’re both visible. I hid the hilight layer here because it was in the way, but might not be needed in your case. Make a layer clipped to the base tone and paint in the darkest tone. This is where anti-overflow helps me out, because when i run my brush over all these crossed lines it will make the stroke pop in and out for each facet. If you dont use CSP, this is where you can use the lasso tool and select every second facet. It will take a bit more time but it should work similarly.
After the darkest tones I then make a layer for the inside light that the highlight has lit up. Here i keep it inside the darkest tone but this might vary depending on the light setting. If it looks good to me, then that’s what i stick to.
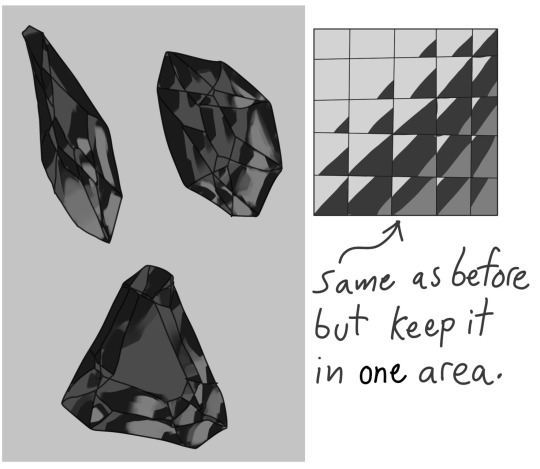
The way I approach rendering the facets here is like the grid in the example images above, every shade and tone appear more or less in each facet but the amount is relative to their position. So a gradient wouldnt have a smooth transition; it would be slightly scewed in each square on this example grid. Essentially like how some bathroom window glass panes look like.
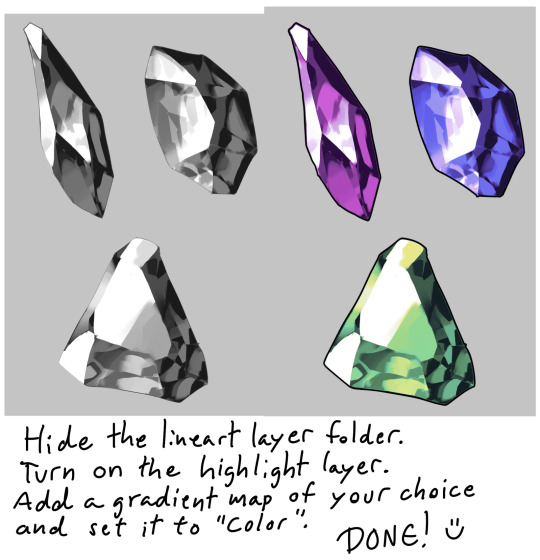
Now it’s time to hide the lineart layer folder and check if the gemstones look decent to you. If not, then you can look up some reference photos and analyze where the values group together the most; be careful not to focus too much on the photos 500 million sparkles. Squint your eyes or blur the reference and try to see how the overall values behae.
I, personally, am satisfied with these rocks so I slap on a gradient map (you can manually color in them too if that’s your thing) and call it a day. The lit up inside of a gemstone tend to have a brighter and more saturated color than the mid tone.
Other Examples with this technique:
If you look up ”gemstone types” you can often find images displaying various facet types from more than just front view. These can serve as useful base templates for practicing this rendering technique. The backside of a gemstone is called the “pavillion” and is really useful to have at hand when it comes to painting the inner refractions. You can probably also use 3D models and convert the wireframe into lineart. But that is slightly out of my pool of knowledge.
Applying this knowledge without using a base lineart layer is of course possible. In this painting I followed a simplified summary of how the facets sparkle: Keep the highlight shape to match the front facet design, and all the inner refractions should be more scattered and split up but face a direction towards the center of the gem. Now don’t you think this sort of makes the gems look like eyes? That’s right! You can, and absolutely should, apply this on eyes to create the most sparkly anime eyes ever.
Now, refracted light that lands on the surface surrounding gemstones varies depending on the material - and if the gem is inside a metal frame it usually doesnt create this much refraction around it. But I want to have fun so i decided to break this rule in the name of pretty sparkles. :)
2K notes
·
View notes
Text
Art Help

I redid this list because broken links 💀
General Tips
Stretch your fingers and hands
Art is for fun
Never too late to start/improve
Tumblr radar! Submit your work!?
Using a tablet
Editing software: pictures & video
Moodboard resources
Comic pacing
Storyboarding techniques
Watercolor
Coloring
Color Theory (not children's hospital)
Gemstone reference
Resources: coloring things a different color
Gold
Dark Skin undertones
Dark Skin in pastel art
POC Blush tones
Eyes colors
Cohesive Color Palette
Lights and Colors
Human Anatomy
POSE REFERENCES
Eyes: pupil shape, direction
Wizard Battle poses
Romance poses
Shoulders
Tips for practicing anatomy
Proportional Limbs
Skeletons
Hair Directions
Afro, 4C hair
Cane use
Dingle dongles: male reproductive
Clothing
Long skirts
Traditional Chinese Hanfu (clothing reference)
Cultural clothes
CLOTHING REFERENCE
Medieval armor
Sewing information
Animals
Horse -> Dragon
Snouts: dogs, cats, wolves, fox
Foot, paw, hoof
Plants
Blossoms: cherry, plum, apricot, etc
Plants/flowers: North America, Hawaii, Patagonia
More
Drawing references sources
More references: floorplanner, height & weight, expressions, hands, animals, sculpting tool
Art tutorial Masterlist
Another art tutorial Masterlist
Inspiration: father recreates son's art
Inspiration: Lights
ART BOOKS
Art Cheats
42K notes
·
View notes
Text
One Shots
All Characters Always Aged Up
Three Little Letters (Raph x OC Avery)
Confess This Way
This Dance
This Dance (Version 2: Leo x Fem Reader) (coming soon)
You're Safe with Me
Hey, Beautiful (Explicit)
I'll Love You Still
Now or Never (Leo x Fem Reader) (coming soon)
14 notes
·
View notes
Text

only thoughts after episode 3 of hbo’s tlou
25K notes
·
View notes
Text

YOU DONT UNDERSTAND THEY BUILT A HOME AND A BEAUTIFUL LIFE IN A TRAGIC DYSTOPIAN WORLD. THEY HAD 16 YEARS TOGETHER AND THEY DIED IN EACH OTHER'S ARMS. THEY GREW STRAWBERRIES AND WATERED THEIR PLANTS AND PAINTED AND COOKED AND THEY LOVED EACH OTHER 😭😭😭😭😭 THEY WERE EACH OTHER'S PURPOSE 😭😭😭😭
30K notes
·
View notes