
Don't wanna be here? Send us removal request.
Statistics
We looked inside some of the posts by kennnnle and here's what we found interesting.
Average Info
Notes Per Post
0
Likes Per Post
0
Reblog Per Post
0
Reply Per Post
0
Time Between Posts
1 day
Number of Posts By Type
Text
17
Last Seen Tumblr Blogs


Fun Fact
The total number of visits Tumblr.com received during January 2021 is 327 million.
Text
Patterns in Adobe Illustrator

Drag the design we have done in Adobe illustrator into swatch window until a blue border line come up, release the mouse and we now have our swatch among the other. We can now create any shape that have the swatch in it.

Then to adjust pattern, we can double click the swatch and tweak things there. For this one, I tried to create a star shape with a bird in it, then change setting inside pattern options to have the result above.
0 notes
Text
InDesign page adjustments

Using + button to add more pages in pages menu at the right corner of the screen.
Parent pages

At the top of the pages menu, separate from the pages we just created, there is a page labelled A-Parent. If we adjust parent pages, it will apply to all the other pages.

Add [None] page to create a page that are not under influence of parent page and we can do things separately in here.

Add number in a text box inside parent pages then use current page number inside Insert special character in Type window to add page numbers on the parent pages, it will appear as A on the parent page, but it will be different numbers corresponding to other page that under parents page.
Margins and columns

Shift click other parent page after click first one to edit margins and columns of both parent pages.

To adjust margins and columns, go to Layout window > margins and columns, check the chain symbol to edit the margin independently, if not, they will all be the same value. In here, I created 6 columns.
0 notes
Text
InDesign Introduction
InDesign is used for text-based design like web ads, books or any other digital uses.

The rectangle shown right after we create new file represent the margin where our text should be.

We can create a text box by press T (type tool) then click, hold and drag it. Click inside the box to start typing, to exit typing mode, simple just click outside the box.

We should change the units in preferences setting in edit menu to millimeters as it is the main unit used for this project.

There are some menus that are important as they are mostly used in InDesign and needed to be toggle on through Window menu such as: Control and paragraph styles.


This tool is in the control menu on top of the screen, which is ordinarily set to one. Change the value to change amount of columns.

When selecting a text box, we can fill them with lorem ipsum (placeholder text commonly used for previewing layouts and visual mockups) inside type menu.
Paragraph Styles
A paragraph is the text between returns.
A paragraph's style can be saved to a style, and then can be applied to any paragraph in the document. It is ideal to use paragraph styles for large documents.

Paragraph styles can be accessed through window menu.

We can edit a paragraph in 2 ways: select words that needed to be edited then press + button in paragraph styles menu to create a style and double click it to set the style within the menu. Or create a style first then apply it to whatever we want.

Inside paragraph styles setting menu, we basically can adjust any aspect of the paragraph and remember to check the preview button at the bottom to be able to see changes right after any adjustment.

For example, I created a new paragraph style and call it heading , that means I can apply it to any heading in the document. After tweaking something in paragraph styles, I made space between heading and paragraph and change the size of it a little bit.
Character Styles
Same function as paragraph styles but characte styles are for changing characters, words within a paragraph. It only affect the word we apply on but not the whole paragraph like paragraph styles.
Bullet points

Can be assessed within paragraph styles. First, we need to put a return after each piece of text we want to be a bullet point then create a new paragraph style. Then we can make space between bullet point or paragraph with incident and spacing tool. It is better putting left indent and first line indent the same number but with first line indent is minus one to have good result.
Images in InDesign
To import an image into InDesign document, click Place inside file menu , then navigate to the image we want to put in.

To move it around use selection tool, to move it within its frame, click the circle appeared in the middle and drag it around.
To scale the frame that contains the image, click the image, then Hold shift while adjusting edge points of the gizmo to change proportions. Hold Option to scale from centre.
To scale the image , hold Command while adjusting the gizmo to change proportion. Hold shift while doing so can make it more even.

To crop the image into a circle, I created a circle using ellipse tool then cut the image into that circle to crop it. Using text wrap tool ( can be opened through window menu ) to create space between the image and the paragraph.
0 notes
Text
InDesign Shortcuts
Space: Pan
Z: Zoom
V: Select
A: Direct Select
T: Type
W: Toggle Preview Mode
Shift return: Moves just one word down to next line
Shift Command and drag gizmo: Resize image instead of resizing frame
When selecting text:
Option with selected text and arrow keys: Adjusts space between lines.
Hold shift and left and right: Select letters individually
Command, shift and left and right: Select words individually
Shift and up and down: Select whole lines
0 notes
Text
Photoshop compositing

I used object selection tool to select the guy from the background. But it is not perfect as there were still problems needed to be fixed such as unwanted parts with his shoes, or his arm not blending in perfectly and his hair was the most difficult part to fix because of its small shape.

There are some solutions to these problems. For curves like the shoes' part, I use pen tool then command click work path in path panel to select it and paint it with black inside layer mask to hide it. I did the same thing with other parts but sometimes I used lasso, marquee tool in easier situations that did not have curves.
Lastly, for the tricky hair, there are 2 ways to do this, first one is color range but it is not guaranteed to always work so I used the second method which is the same one as all the others that is painting black and white using brush tool in the layer mask. But the hair is quite small so I often turned the background on and off to check and I also had to use very small size of brush tool.

I created a snake in AI and place linked it ( with crop to media option) in photoshop. Using layer mask again with a snake layer above jumping man layer with another copy one under jumping man layer to hide some snake's part to make the image overall look more immersive. Then I added an environment background which is based in Dragon Ball anime.


After that, I use pen tool, lasso tool to remove Goku ( a character in Dragon ball anime) and Rasengan ( a skill from Naruto anime) from backgrounds in layer masks and put them in this image.

Final step, I created an effect for the Rasengan and did a little bit of typography and some UI on top of the image in Adobe Illustrator so it looks like a fight between them in a game.
To be honest, It does not look perfect because I am still not very good at Adobe Illustrator but for photoshop, I think I did it pretty good especially with compositing and color adjustment ( thanks to Toby). After all, Iam still proud of what I have done and definitely will hone my skills in the future.
0 notes
Text
Layers, Masks and Selecting
Layers, Masks and Selecting are photoshop tools used for compositing images like combining different images, parts of images,...
Layer mask:


With this photo, I used selection tool to duplicate it. Then to remove some of the extra components that didn't match the image, I used pen tool while in layer mask. In layer masks tool, painting black color means making pixels transparent.
Selection mask:


To change the fruit colors, I needed to use elliptical marquee tool to select them but to have that exact selection shape in the image, I had to mess around with lasso tool with add selection( shift) or subtract ( option) to carefully selected what I want.
Work path to selection:


To select these 5 leaves, we can use lasso tool but we use pen tool in this case because It can handle many curves especially with these leaves but it demands more carefulness to do so. After using the pen tool, it just made a line around it but not actually selected it. We have to use work path ( command + click it ) to select it. Now we can chang it the way we want.

Select the bird then put it in layer mask to make it easier to edit its overall shape to better looking one by using pen tool to for curves and paint it black at some unwanted parts to make them transparent.
0 notes
Text
Some photoshop edits


For this photo, I wanted it to give a more sadness vibe, so I used color balance to add more blue value to the image. But I used the curve adjustment tool to darken the image because I think it was still a little bit too bright.


I used hue/saturation adjustment tool to make this image more vibrant and have a warmer color hence leading to more focus on the sun and the sky to make it more feeling of sunset.


And with the last one, I darkened it a little bit by using curve tool because it was too bright for me, then I increased its saturation to make it more vibrant and tweaked hue's bar a bit to have a warmer color as I don't like it too much green and also made the staircase having more depth in it.
0 notes
Text
Color balance
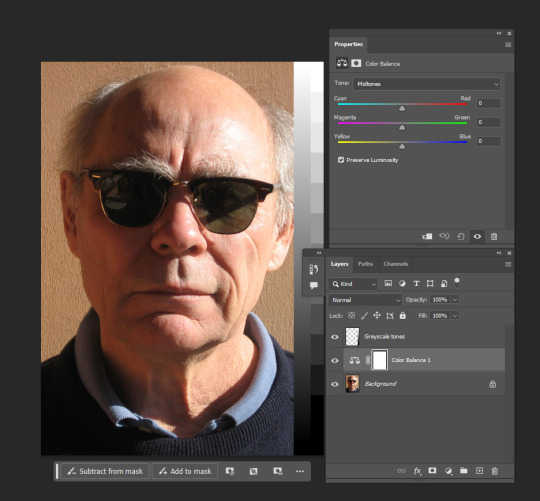
Another color adjustment tool that gives the ability to change highlights, midtones and shadows in an image.
0 notes
Text
Photoshop shorcuts
Shift Command I: Invert Selection
X: Swap foreground and background colour
Option Delete: Fill selection with foreground colour
Shift Option Delete: Fill selection with background colour
Command D: Deselect
B: Brush
E: Eraser
Command A: Select all
Number Keys 1 - 0: Opacity
V: Move tool
Command Z: Undo
Shift Command Z: Redo
V then hold option : duplicate selected
Command J: Copy selection to new layer in same position
Shift Command J: Cut selection to new layer in same position
Command T: Gizmo
When selecting:
Shift adds to selection
Option subtracts from selection
Space moves selection
Command Option Delete: If in higher layer clears selection and fills it with lower layer.
0 notes
Text
Hue Saturation adjustment
Are adjustments that make the images look better in terms of color.

Accessing Hue Saturation adjustment is the same as accessing curves adjustment but instead of choosing curves, we choose Hue and saturation.
0 notes
Text
Curves adjustment ( value adjust)

To use the curve adjustment, I need to click the half black half white circle at the bottom of the layers panel. Then choose the curves option that will lead to the properties tab showed above. We can adjust image's values through that by editing the curve inside the histogram.

In this image, it was too bright and needed more dark/black value, I moved the point at the bottom left (which is the darkest value) to the right but not cross-image data so that it could be darkened without interrupting the value itself.

But in this one, it was too dark and I needed to make it brighter. To do that, I moved the point at the top right ( the brightest value) to the right but I tried not to cross the image value as much as possible.
0 notes
Text
Photoshop color introduction
Hue: The base color
Saturation: the color tone
More saturation means more vibrance and saturated
Less saturation means more neutral and muted
Brightness: value
More brightness means more tint, white value to the colour.
Less brightness means more shading, black value to the colour.

0 notes
Text
Penguin project
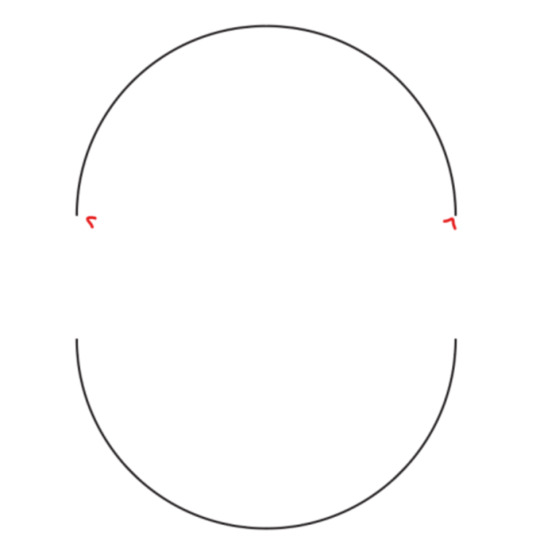
I used the ellipse tool to make a circle and then I used the direct select tool to select the bottom half then used cut tool ( ctrl x )to cut it half, drag down the lower part and join them together to get the pill shape which is the basis of the penguin body.

Then I added 2 anchor points at the bottom of the shape, using the direct select tool to mess around with those points to get the shape of the penguin tail.
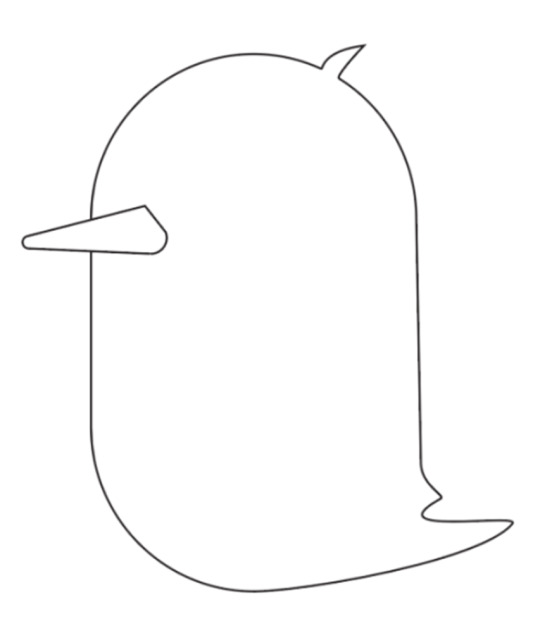
Using the add point tool and direct select tool again to create the shape of the penguin's hair. After that, I made a nose for it by creating a triangle shape with pen tool and then round its 2 points at the bottom to make it more like a nose shape.

To make eyes, I used the ellipse tool to create the shape and then used the gradient tool to put the gradient in the eyes.

There are a lot of processes needed for legs and quite tricky to finish it. Followed by the instructions given, at first, I needed to draw half of its legs by pen tool ( with help of smart guide from view to make it align ) then using reflect tool to make other half, join them together. And making the legs' thickness by duplicate it by option + shift then join them together. After that, I used the PATHFINDER to make the outline of it( pathfinder can also be used for uniting or intersecting shapes). Then duplicate to make another leg. Next, I used pen tool to create penguin's wings. Then I select its body and press R to rotate to make it looks like it is walking.

Then I selected parts of the penguin and put those in different layers to make it more organized. There was a lot of pathfinders and layers part to make the gradient and the color of the penguin.
After all, although this was quite tricky to do and Adobe Illustrator was quite new for me but I am still proud of it.
0 notes
Text
Master these

More difficult shapes to draw especially with the mouth and the bone. The dog bone was quite hard to make as it demanded a lot of curves and symmetry. I cheated a little bit by making only the first part of the bone and then copy, paste and reflect it.
0 notes
Text
Curve to straight

Click back the point at the end of the curve and click somewhere else to make a straight line.
0 notes
Text
Straight to curve
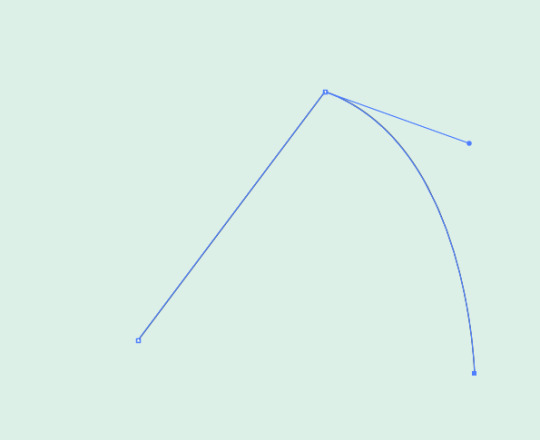
Click, drag, click, and hold, then press option to create a curve.
0 notes
Text
Close curves

Things got more difficult as there were more difficult shapes to draw and I had to mess around with the direct selection tool a lot to make those shapes as symmetrical as possible.
0 notes