
Don't wanna be here? Send us removal request.
Statistics
We looked inside some of the posts by kevin5319438 and here's what we found interesting.
Average Info
Notes Per Post
64
Likes Per Post
31
Reblog Per Post
0
Reply Per Post
33
Time Between Posts
6 days
Number of Posts By Type
Text
11
Last Seen Tumblr Blogs


Fun Fact
BuzzFeed published a report claiming that Tumblr was utilized as a distribution channel for Russian agents to influence American voting habits during the 2016 presidential election in Feb 2018.
Text
Final Course Reflection!
This course is coming to an end and looking back on the whole learning process, I feel that I have learnt a lot. I feel that I have achieved the learning objectives of the course and it is a great feeling that I have learnt something, more or less, as a result of my efforts. I feel that I have improved a lot, both on a technical and a psychological level.
From the class itself, I learnt how to draw basic engineering drawings, including basic three views, sections and auxiliary views, and what I felt most at this stage was the rigour of the design: uniform standards, fine measurements, and even the weight of each line. Although it was only a drawing process, I felt the beauty of perfectionism and it was a great feeling when I had worked so hard to produce a perfect drawing. This formal standard of rigour creates a uniform language that makes it easier to communicate with third parties such as manufacturers during the design process.
Later we learnt how to draw perspective drawings. It was more like a presentation drawing, a visual representation of the product, and when we saw it we felt like we were actually seeing the product being designed. I think the core words here are realism and effect. The perspective of the object has to be accurate in order to bring out the most realistic shape and structure; when I colour it with pencil or marker, I need to learn how to show the highlights, shadows, textures, transparency, etc. in order to achieve the best possible effect.
Then we explored the use of materials to create physical models of products, which are more complete than painting to show the full extent of an object. We also learned CAD modelling, how to use 3dsmax and part of Rhino. There are also many benefits to computer modelling. It saves material and is easy to manipulate, such as punching, stretching, deforming, rounding corners etc. Each method has its own strengths and weaknesses and I have gradually become more proficient at using various methods to express my designs and ideas during this period of study.
These are the skills that I have learnt during the course. But the aim of education never stops at the transfer of skills. I would like to thank Robert, Tom and Gonz for guiding us to explore how different materials affect the way we make models, how different types of pens affect the presentation of light and shadow, and what the different modifiers in 3dsmax can do. The teacher would not go into detail, but encouraged us to experiment on our own. I think it's a great way of doing things and it's okay to make mistakes. In the process of learning, most of the mistakes will become experience and make you much easier when you go to do the same thing next time.
Finally, I would like to express my sincerest thanks to Robert, Tom and Gonz.


0 notes
Text
Week 9 Exercise Reflection
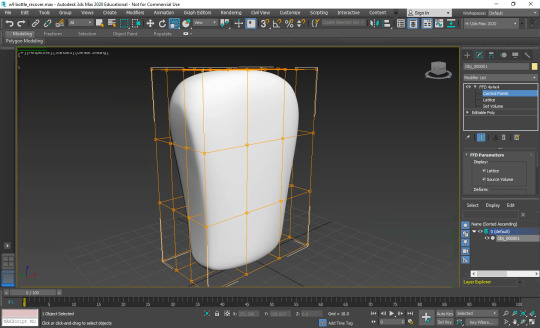
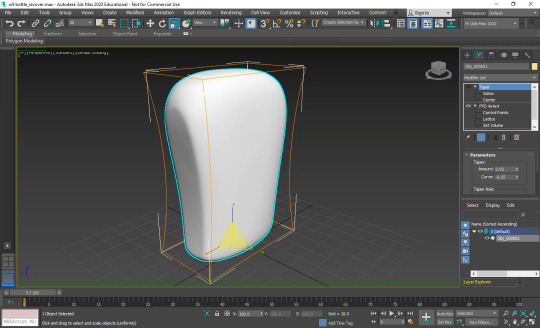
In Week 9, we learnt to model a bottle through 3dsmax. After we had watched all the Autodesk tutorials, we followed our understanding and learned how to make the bottles we had designed in the previous weeks. The original request was to use the orthogonal view as a reference for modelling, which would be more accurate and intuitive. However, my bottle design is a more organic shape and it was difficult to model it in a separate view, so I still used edit polygon to modify the model. I have made a prototype of this design in the last week. So this week my main task was to modify the previous bottle model. After studying the Autodesk tutorials, I have a basic understanding of how to use the various functions in edit polygon. In order to learn more about modelling techniques, I also searched for other instructional videos on video sites to study. In the end I learned some tips and tricks.
My design last week was not very similar to my original design. I think it was mainly because the waist curve was too wide and the top (similar to the shoulder) and bottom of the bottle were not curved softly enough and still visually had a distinct angularity. In the last week I still only used polygon editing, but now I know how to adjust the shape of the model by modifying the vertices.


I am enjoying the fact that as I continue to gain new skills, I am able to express the ideas I have in my head more and more easily with the modelling software. Through constant tweaking and revision, my designs are becoming more and more presentable.
Although I have mentioned it before, I would like to say it again. Using 3dsmax on a mac is a real pain, firstly using myaccess to run windows software on macos doesn't allow the computer processor to perform to its full capacity, and my laptop's cpu is not performing well and when I get laggy when using the software I feel like I'm watching a slideshow frame by frame. Sometimes I can't even recognise the response of the software after I've done something because of the display and for a while I don't know if I've done it wrong.
The biggest insight I had at the end of this session was that I need to get a more powerful computer to do my modelling.
Just kidding.
I realised that using modelling software is actually a technical job, it doesn't require you to be creative or have any ideas per se, it's purely a learning curve. There are a lot of people on the market who are engaged in assembly line computer modelling work, making models and effects for other people. But I find that we don't learn this to make models for other people, but as a way of expressing our ideas. That's why our class is called Communication!
1 note
·
View note
Text
Week 8 Exercise Reflection
Week 8 was an exciting and painful week for me. I especially like learning modeling software, such as rhino in the last term. I like the precision and logic I feel in the process of software modeling.
This week, we had a preliminary understanding of some basic operations of 3dsmax, a modeling software. Including understanding the composition of UI, modeling logic and the use of some tools, etc. I think I have done a good job in understanding software modeling methods. In class and Autodesk tutorial, I have learned a lot about how to make efficiently in 3dsmax. I can express what I imagine through the skills I have learned. In this regard, I think I am successful.
Difficulties
But this process is still very difficult, because I have been very familiar with the operation of rhinoceros before. In a sense, I have formed a modeling idea in rhinoceros. Therefore, in 3dsmax, there are many operations that are very different from what I expected, including rotation, translation, viewing angle, etc. During the production process, I felt a little uncomfortable. But after a period of trying and learning, I can naturally be handy.
But another problem has been bothering me: the system compatibility is not high. In my acess, both resolution and system response speed make the whole modeling process very bumpy. Including the incompatibility of magic mouse and the incompatibility of ALT and option on the keyboard. In addition, due to the performance of GPU and the way similar to simulator operation, display problems often occur. But under such difficult conditions, I still successfully completed the exploration of some models.

1. Modifier: love
In task 1, I start with a sphere and superimpose different modifiers on it. Including bend, stretch, squeeze, taper, etc. Then, I used symmetry to turn the original model into two staggered together to form such a heart.

2. Edit polygon: sofa? chair?
Later, when I began to study some methods and techniques about edit polygon. This method allows us to modify the appearance properties of a shape in some detail. Including extrusion, chamfer, etc. Through these methods, I designed a chair (or a single sofa?) with a base integrated with an armrest.At the handrail, I use the chamfer adjustment to make the overall visual feeling more comfortable.
Interesting fact: the angle of this sofa chair and cushion is based on the famous Barcelona chair.

3. Pratical attempt
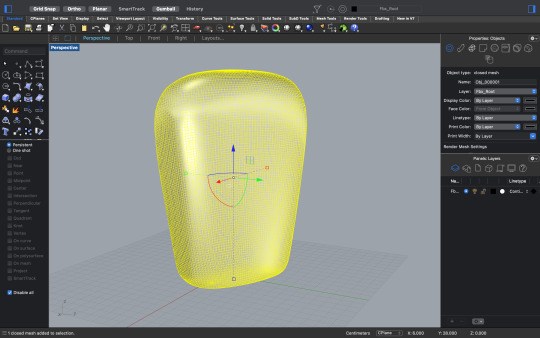
When I was basically familiar with these techniques, I tried to create my Olay moisturizer bottle in this. The final product looks okay. But I think the shape formed by adjusting the surface is not smooth enough, whether using edit polygon or edit mesh, but I have no other solution.

If I had a chance to do this. The best thing is to prepare a Windows computer lol. If it is really difficult to achieve, I think it is necessary to prepare a mouse with a scroll.
After I finished this exercise, I thought about it. I think learning modeling software is a very important thing, because it provides a new idea for us to express our ideas. Due to the development of science and technology, all kinds of modeling software are good communication tools. It is more intuitive and comprehensive than painting; it is more convenient than a physical model. But we can't rely entirely on it. Our communication skills must be comprehensive.
12 notes
·
View notes
Text
Week 7 Exercise Reflection
In Week7, we learned how to use foam blocks to make models. For exercise, we need to make its physical model based on the Olay moisturizer bottle we designed last week. After I read the tutorial of exercise, I found that my design has almost no symmetry, and the overall shape is very complex. So I want to change the method in the original exercise to fit my model making.

First, I drew an orthographic view of the appearance of the bottle that I had designed before. And the frame is drawn according to the size of the original bottle of 100 mm * 65 mm * 40 mm. As the appearance of my design is more organic, I directly drew the whole body line by free hands.


Later, I put the main picture on the foam box of the same size as the bottle, and removed the unwanted part according to the outer line, and the same on both sides. Then I got a rough bottle shape. Later, I polished the shape with 60/120/180 grit sandpaper. The first time is mainly to modify the main body shape, so that the whole does not have very obvious edges and corners. When using 120 grit sandpaper, my main purpose is to smooth out some defects and improve the curve transition, making the whole closer to the ideal shape. 180 grit is to improve some unsmooth curves. I look for defects through the light and shade boundary reflected by the desk lamp.


The whole grinding process is not very difficult, but a lot of foam dust and debris are generated. They are adsorbed everywhere because of static electricity. I took a disposable cloth and put it on the floor to pick up the waste. But I still got a lot of it on me.


The final product is similar to what I imagined, but if I do this again in the future, I will leave more space for error, otherwise the more grinding, the less material I have.
2 notes
·
View notes
Text
Week 6 Exercise Reflection
The first account that I like is Sketch-A Day. I started to watch his video about a year ago. He is not like any other accounts which only shows the work and expresses how detailed it is. He teaches me the method to draw objects. Start from a box, we can draw anything we want.https://www.youtube.com/channel/UCBtSgEZk914z5InEs_U2J3w

The second one is an industrial designer in China: Aylin Teng. He has a strong individual style. His drawings are always clean and clear. All the details are included. In his videos and works, l have learned how to make instructions in drawings, showing people how to interact with products in the drawings.https://space.bilibili.com/57488796

Another industrial designer called Joseph in instagram . His works are not very detailed or delicate. But I think it would be a target for me. Maybe after this term. I can be as good as him haha.https://www.instagram.com/doodlin_joseph/

The Week 6 exercise is to use Photoshop to sketch our concept models of the Olay bottle that we did last week. We have learned to Create shapes, add lights, shadows and outlines and so on.
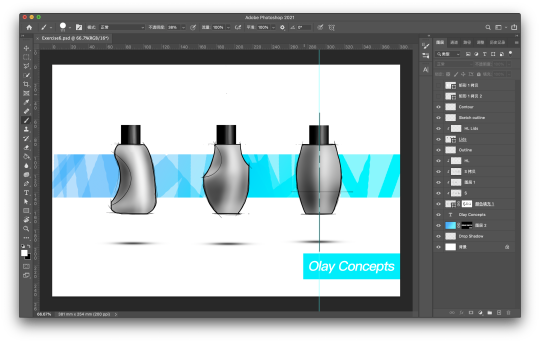
I have experience using Photoshop. So it is really easy for me to do it. I also tried to use Apple Pencil and iPad connected with my laptop. Then I use the Apple Pencil to draw shadows and highlights. It is more convenient to control the lines. But the pressure of the Apple Pencil will change the weight and opacity of the lines. Sometimes it is not that easy to use.

The major skill to use ps is to use masks and paths. With these tools. We can make a lot of things easier and may be impossible to do in real drawings.

But I spent a lot of time on it because of the speed of the internt : ( It takes me hours to load these tutorial videos and it is too hard for me to concentrate.
6 notes
·
View notes
Text
Week 5 Exercise Reflection
In week 5, we learned about how to sketch real objects in perspective. At the beginning of the tutorial class, we did some warm-ups. Including basic straight line, circle, ellipse, perspective cube, structure line and so on. For me, straight lines are not very difficult, because I have contacted freehand drawing straight lines before. But I'm not very good at drawing circles and ellipses, so my practice looks terrible.


Later, we need to redesign the bottle of a moisturizing product. First, we draw twelve concept maps on a piece of paper and arrange them on whole paper. I didn't realize at first that the lid can't be changed, so I had to keep the original lid in the later design. I tried different styles. It includes a design that can reflect the human body curve, or the groove that conforms to the ergonomics, and the popular circular chamfer design in recent years.

Later, I drew a two-point perspective box of the same size through the scale of the prototype bottle as the outer frame of 3D sketch, which is also a reference. After drawing the box frame, I first tried to draw the original bottle in 3D. This way of painting is more standard than painting directly on empty paper, and it also challenges my spatial imagination. After having experience of drawing models for the first time, I began to draw my own redesign bottle with two-point perspective, and the effect was very good. I tried to express the light and shadow by both pen and markers and it shows different effects. The shadow drawn by pencil is detailed but spends too much time. Pen is a convenient way to express shadow although it may be not very realistic. Markers can show various colors but hard to use. Maybe I need to spend time to practice it.


8 notes
·
View notes
Text
Week 4 Exercise Reflection
In week 4, we learned about how to draw a standard 3D form in two point perspective. Before I started learning this course, I had a basic understanding of perspective drawing and I have tried it several times. However, all I know is to choose vanishing points wherever I like and connect with the shape. It is more like a feeling and I did not know how to draw an object with a precise size. I have learned a lot of steps to make perspective drawing that I had never heard about and that refreshed my knowledge haha.


However, I had some problems when I was doing the task: some of the drawings looked weird. I thought maybe the view perspective was not quite normal so it would be fine. But when I finished drawing the square cube, It is completely not the same as I thought. After a long time check, I finally found that I did not draw the vanishing points in a correct way! I just randomly chose two points on both sides.


After that, I started to reflect on my own. Because of the language barrier. Although I have passed the language test. It is still challenging for me to understand everything the teachers said completely. I think I need to practice hard and spend more time than others.
10 notes
·
View notes
Text
Week 3 Exercise Reflection
In week 3, we learnt about the principles of section and auxiliary drawings. The exercise requires us to make the orthographic drawing of an object shown in an isometric view. The right side view were changed into a section and we also need to add an auxiliary view. After the practice in week 2. I have got a little bit of experience of the conventions of engineering drawings. It was not hard at first. The front and top view is easy to make although we need to be careful to read the isometric view provided. The section drawing requires us to simulate the shape in our mind and draw it. It was quite interesting and challenging. However I made a mistake. I thought the auxiliary view needs us to draw the whole object in the view projected from the inclined face and I almost spend hours on it! After I check the activity sheet, I found that I just need to draw the inclined face only…


After a while, I found that it was a little bit confusing to add the measurements of the front view on the side of section. Is there any way to solve this problem?
8 notes
·
View notes
Text
Week 2 Exercise Reflection
And this week our work is about making models and drawings of objects chosen by ourselves. What I chose was a transformer. We need to measure length, width and height and make a paper box which is 10 mm longer than each side of the object and mark the front, left, right and up side of the box. Then make a rough hand drawing of three angles of the object. After that, I need to construct an orthogonal drawing of the object. I think my drawing is reeeeeaaaaalllly precise and it looks like a CAD drawing. I really love the feeling of being rigorous and the drawing is clear and beautiful.


However, I still have some confusion about the drawing. What should I do if there are too many measurements cross over? It will be messy if I connect all the measurement lines (the cross place in image3).


In addition, I know there is a sense of achievement and it feels super great after I finish the precise drawing. But after that, I began to reflect on why we need to spend hours on it instead of drawing by computer. It should be faster and more convenient, right?
5 notes
·
View notes
Text
Week 1 Exercise Reflection
This week, during exercise, I learned about how to read basic CAD 2D drawings and use tools to draw them by hand. At first I thought it was as simple as the shape construction in high school math. However this activity requires higher accuracy and standards. Firstly, the drawings must be parallel to the edges of paper. In addition, errors should be avoided as much as possible. It is easy to think about how to construct these shapes by using a pencil and a compass. However, I have to focus a lot to reduce the inaccuracy caused by the weight of the lines. But overall the process of trying to make the drawing super precise is really enjoyable.


The second activity is to create shapes which are related to equilateral triangles. It is a little bit challenging because the 60 degree angle should be really accurate. Otherwise, there will be many gaps when the shapes are put together. I was not disappointed with my work haha. It’s not bad! Isn’t it!


If I have another chance to do it. I will use a better paper or pen because the ink will spread if my pen stay too much time on it. And I will not use wooden pencil because it cannot stay sharp.
5 notes
·
View notes
Text
About me : )
This is Kevin from China! I love playing basketball and really love EDM. But actually I am a amateur rapper lol. Recently I am learning how to play billiard. It is really complicated!! Hope to see you soon! The atmosphere of the F2F classroom is really great!
7 notes
·
View notes