
Statistics
We looked inside some of the posts by kevindmit-blog and here's what we found interesting.
Average Info
Notes Per Post
0
Likes Per Post
0
Reblog Per Post
0
Reply Per Post
0
Number of Posts By Type
Text
1
Last Seen Tumblr Blogs


Fun Fact
Post activity is at the highest at 4:00 pm EDT; notes peak at 10:00 pm EDT.
Text
Learn to make a Website! (Beginners)
This tutorial is guide to making a nice website that you can later add on to or modify and change. I made this tutorial to help my friends understand and see the work that it take to make a website.

This is the finished product that you will create!
1. Text Editor - First thing you will need is a text editor program, much like the simple notepad you have on your computer but a little more advanced to help us facilitate coding.
Download Sublime Text Editor at https://www.sublimetext.com/
This text editor is free and easy to use. This is the one I use in the tutorial but there are many others that can also work.
2. Folder Prep - In your computer find a simple place to make your folder that will contain the website. Below is an image of what folders should be included.

3. Creating our Files - Now we are going to drag this folder into our work area in sublime text and start creating our needed files.
STEP 1 Video
This is what the files need to look like in the end.

Note: Sublime gives you a guess of what you want to type. For example in the above video when I type in html I then press tab and it automatically finished everything for me. I use this feature many times during this tutorial so I suggest to get familiar with it.
Understanding HTML
HTML is the structure of the website, you can think about it as the bones of the body. When writing HTML there is always an open and close tag (<title></title>) The close tag is identified with the side slash.
The head tag is the brains of the website. This is where information is usually recieved for the website to access.
The body tag is like it says the body of the website.
Now we are going to add more pieces to this structure. The header tag, the main tag and the footer tag. These tags also play a huge role in the sections of a website.
The div tag is basically a container to keep everything in place. If you think about it div tags are like boxes inside a moving truck. The truck is what hold the boxes but each box also has content in it.
4. Adding Structure
STEP 2 Video
Now that we’ve added some boxes or div tags we are we can add some of the components of the website. Navigation is key in any website because thats is how you move around the different boxes or divs.
Also sometimes you can add more boxes inside of other boxes to get desired effects. In this case we will also be adding some boxes inside of other boxes.
5. Adding Key Components
STEP 3 Video
Now we’ve added a few new tags the img, nav, ul and li tag. The nav tag is simply the navigation. The ul tag is unordered list and the li tag is list item. The img tags simply for images.
So as you can see how its laid out we have three list times in out navigation bar.
We’ve also added more divs into some of the sections. Lets go ahead and add some classes and id to these tags that we have.
6. Adding Classes and ID
STEP 4 Video
Classes and ID are for design purposes. This is a way to telling a specific item the style you want to give it. If there are more than one div tag and you dont want all of them to have the same styling, this is how you fix it.
Classes can be used more than once on different items. ID’s can only be used once per page and on a single item.
We added an a tag this tag is a link and anything inside will be looked at as a link to another page or ID.
In this case we’ve placed # referring to ID, #home, and one of our divs is id=home.
7. Adding more tags and content
STEP 5 Video
We’ve added some content and some new tags. The content is just dummy text so you can add whatever content you think is best.
The new tags that we saw now are h1, h3 and p tags.
The h1,h2,h3 these are all header tags or title tags. They are usually the title of an article or some sort of passage. The p tag is a paragraph so it add a spacing in between and is just for text or images.
We’ve been adding quite a few things so lets take a look at what we actually have built so far! We can view our work on any browser but for this case we will use Chrome.
8. Taking a look at Chrome’s Developer Tool
We are going to take a look at Chrome’s Developer Tool that makes everything much easier when it comes to styling and also understanding how the structure is looking.
STEP 6 Video
That was a quick look at the developer tool that allows you to explore exactly where all your tags are located.
When we get to the styling portion we will be using developer tools to understand and easily make changes to the styles of the website.
9. Adding a Form and Remaining Content
STEP 7 Video
We’ve added some new tags and more content, the tags are form, label, textarea and input.
Form tag is the structure of the form its self, with out it there is no form. Label tag is the name of the input field, name, email, phone stuff like that. Input tag is where the user put their information. Textarea tag is the area for the message to be written.
There are different types of inputs and more things you can add into a form but for now we are going to stick with this.
Make sure you’re all caught up with the file and you have the same classes and id’s that I do. If you failed to keep up get the finished index.html file here.
10. Get you Images
Here we are going to start adding the few images. You can use the ones I use on Github or find your own. Make sure these files get stored in the images folder that we had set up for the beginning.
Styling the Website
1. Understanding CSS - Header Section
CSS is another language that will add style to our website. If you are to view the website now it doesn’t have an style. In css we will use all the tags, id, and classes to give each of these items a certain style.
STEP 8 Video
Make sure you link the css sheet to the html file for all the changes to be seeing. Just for saving time and make it easier to get the finished product I will copy and past from my finished product section by section. I recommend the you pause and copy the sections to get a better understanding of what each thing does.
Explaining CSS
You can choose and object by its tag. But you can also choose it and make it more specific in case you only want to effect that one object.
If you have 10 <p> tags but want to effect the one in the header you can simple do this.
p { margin: 0px } : will effect all p tags in html
header p { margin: 0px; } : will effect all p tags in header tag
Using a Class and ID
# is used to refer to ID, a dot such as “ . “ is used to refer to a class.
#important{ margin: 20px; } = will effect only this ID
.classImportant { margin: 20px; } = will effect all with the classImportant
Classes over write normal tag styles, id will over write classes styles.
If you are completely new to coding there will be many thing used here that will not be explained. I recommend googling and find more answer and specifications that you may need.
2. CSS - Header Image Section


3. CSS - Home Section
This section we will add a few changes to the structure of the website to make different columns.

The way this is working is its making the the width of the containers be half of the width of the bigger container, then making them line up side by side by making it float left this is what is happening here. If the class .half was not placed then the containers would be stacked one on top of the other.
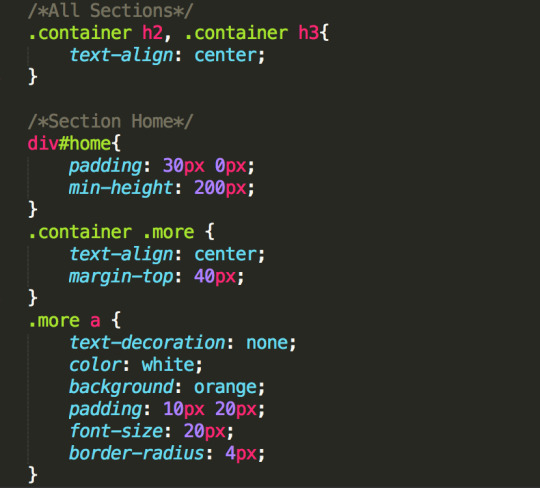
In here we are making the containers

This is the result of the home section after you add the following styles to the css file. No changes have been made to the HTML file although a few things will be added in the next few steps.
Difference Between Padding and Margin
The difference between padding and margin is simple to understand. I’m going to use an analogy that I think easily explains the difference.
Margin is like wearing clothes if you wear a big think jacket the distance between you and other objects or people has increased. If you were a t-shirt it has decreased. If you have a big large belly you have a lot of padding. The padding is usually inside the container or in this case the body. It works the same way with HTML. If an object has padding it will increase everything inside the container. So if the box was blue adding padding will show a bigger blue box, but if the you add margin instead of padding your blue box will not get any bigger because the size of the container is still the same size.

4. CSS - About Section
In this section we will be making a few changes to the about section (<div id=“about”>) Here we will add an image be next to the paragraph.
We added a title and put the paragraphs inside div tag where we added a p tag with the class side-image and an img tag inside, link this to your chosen picture.

Just like above in the home section we are doing the same thing with paragraph along with


This is the result of the about section and how the image will look next to the paragraph.
5. CSS - Contact Section
There two changes made to the HTML file in this section. Clearfix class added to the div and submit class added to the p tag.


This is the changes that should be made to the CSS file to get this result of this last section the contact page.
6. CSS - Footer Section


This is what the footer of this website should look like after the css styles are added to the footer.
7. Add Ons.
There are a few add ons that are made in the head tag. These are more optional than anything but can easily be added. Inside the script tag we have a completely different language called javascript and jquery. This just adds a nice gliding effect when you click on the navigation links.
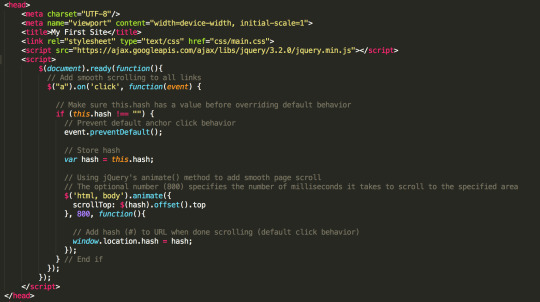
Copy this or get it from Github
8. Congratulations!
You have just finished you very first website! You should be proud of yourself! I hope you take this project and add to it and learn more about web design and development.
0 notes