
tracking — #kgifsource resources for k-pop gif creators menu ☄️
Don't wanna be here? Send us removal request.
Statistics
We looked inside some of the posts by kgifsource and here's what we found interesting.
Average Info
Notes Per Post
14K
Likes Per Post
9K
Reblog Per Post
5K
Reply Per Post
1
Time Between Posts
11 hours
Number of Posts By Type
Photo
15
Note
1
Text
1
Last Seen Tumblr Blogs


Fun Fact
69% of Tumblr users are millennials.
Photo

lizzie-olsen’s base psd + sharpening atn for gifs & sharpening atn for edits.
surprise! as a little gift to all of you, i have decided to release the base psd & my sharpening actions i use to create all of my gifs & edits. i’ve added some notes to some of the layers of the base psd, as well as a few optional layers that will boost the coloring just a little bit in the way i usually do it, instead of you adding the layer yourself.
since this is a base psd, it does not change the original coloring of said tv show, movie or interview, but simply boosts the coloring and brightens the base. this psd can be used for pretty much anything as long as you adjust the curve layer marked for you to adjust. feel free to add your own layers and use as a base to your own psds. i would love to be tagged in any creations you use said action or psd (or both) in. i always track the tag: #usernea.
download psd
download gif sharpening action
download edit sharpening action
give this post a like / reblog if saving or using the psd or the actions! much love, your girl néa. 🥳 💖
213 notes
·
View notes
Photo
— WELCOME to KGIFSOURCE ☄️ this is a source blog for k-pop gif content creators and it will be a place for tutorials and resources to make gifs! this blog tracks #kgifsource so feel free to use the tag in any tutorials or resources that you create. you can also tag this blog in k-pop gifs that you make that use gif effects such as typography, blending and so on!
— this blog will not reblog stolen gifs or stolen resources! — you can browse our tutorial menu here — apply to be an affiliate — request a tutorial or just ask a question here
#userkelli#tusercelia#userjoanna#useroro#cheytermelon#usercchuu#heyjoy#userjuju#useranusia#userkale#photoshop resources#kpop gif#gif tutorial#*m
3 notes
·
View notes
Photo

HOW TO — blend GIFS and create that ‘double exposure’ effect.
this is an effect that has been pretty popular with content creators recently, especially among film and tv creators (as you can see in examples 1 / 2 / 3 ). there are several ways to do it but i thought i’d share my favourite method!
this is an image heavy tutorial!
you will need ○ photoshop with the timeline ○ two clips and preferably one with some darkness in it (this makes the blending easier) i used isa’s scenes from the run2u music video ○ knowledge to make basic gifs / as well as colouring + sharpening (optional)
i’m placing the rest of the tutorial under the cut but please like and reblog if you find this tutorial useful!
ONE. first, you want to have your canvas ready with your base gif. your base gif should have a central point (this is the part of the gif that will peek through the overlay gif) and it should also have some dark parts on it (in this case, it’s isa’s hair).

i made this gif on a 540px canvas and it’s a fairly common dimension for these sorts of gifs but any dimension should work as long as it fits into the tumblr gif size limit :D and at this point, there isn’t any sharpening or colouring on it.
TWO. now this is the colouring for the base gif. i added some basic curves to balance the light out and decrease the slight washed out look of the original gif.
then i increased the black in selective colouring and the darker the better, as it allows the overlay gif to be more visible when we reach that stage!
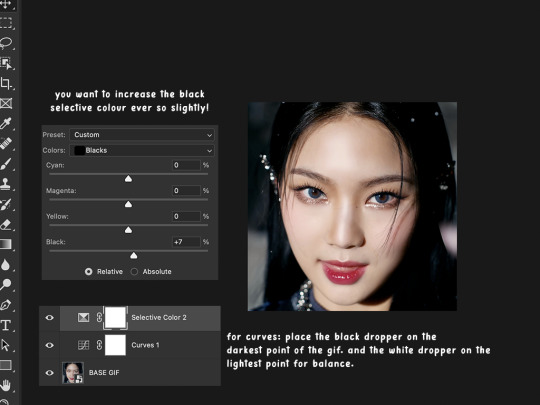
it’s often useful to keep your layers organised in folders. the original gif and the adjustments for it can go into a folder and you can call it whatever you want. i called mine ‘BASE GIF’ - short and sweet.
THREE. well, now we’ve reached the overlay gif. i’ve added it onto the SAME canvas and i’m adding my colouring onto it. the same colouring as last time - so a curves layer and i’m increasing the black in the selective colour. you can also tweak around with the neutral selective colour and drag the slider slightly to the right (+3 or +4).

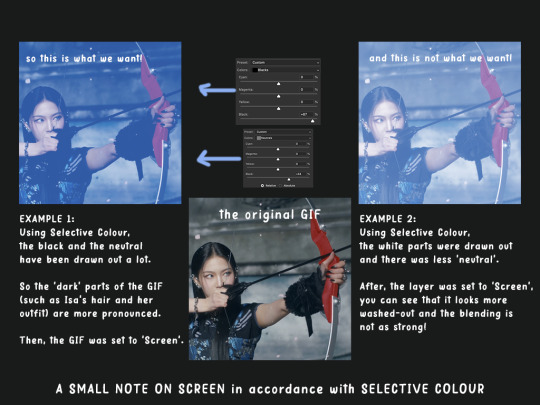
FOUR. now this is not a part of the tutorial but it is very useful is understanding why the selective colour can matter so much in this process of blending gifs.
i’ve set two examples of the same overlay gif. one of the gifs has had its black and neutral increased in the selective colour while example two has had the opposite (i decreased neutral and increased white).
then i placed the gifs on a solid colour and set the gifs to screen. as you can see, the gif WITH more black and neutral creates a better and clearer image than the one WITHOUT the black and neutral. personally, i don’t prefer the washy-looking gif on the right.
FIVE. now, we are still working with our overlay gif that is placed on top of our base gif. i’ve added a black and white layer onto the overlay gif (you can use a clipping mask). this will make our monochrome colour pop out better and prevent weird colour mixtures like a weird blue-orange-green if i placed a blue solid fill onto the gif.

SIX. so basically, we have our BASE layer underneath and our OVERLAY layer on top. the overlay layer has a solid colour layer on it but it’s worth mentioning that this step is not always needed! some people forgo the solid colour layer but in this case, we’re gonna add some blue onto the overlay gif.

SEVEN. as i’ve stated in the image, go to the dropdown for the coloured rectangle and go to multiply (you can do other settings as well and i will show those settings in the next few steps) but i chose multiply for that slightly darker look. i’ve placed all the adjustment layers in the folder titled OVERLAY GIF.

EIGHT. so this isn’t a part of the tutorial either but it’s for reference! these are all different settings you can do on the solid colour that’s on top of your overlay gif. they all produce different results which i will add in the last step! this part is all personal preference and they will vary on the colour that you choose.

NINE. now here is the final and arguably the most crucial step. you’ve got your base layers and adjustments in one folder. you’ve got your overlay gif and its adjustments as well as its colour layer in another folder. now both folders are closed.
for the overlay folder, click SCREEN. and this should give you your blended gifs. you can always tweak the final product (by playing with the selective colours and curves and so on) and in the previous step, i mentioned different settings for the colour fill and they are included at the bottom of this image.

TEN. now just add your sharpening and any final touches to the gif and you’ll end up with your final product!

i hope that this tutorial was useful and if you want some clarification on anything, feel free to hop into my askbox and inquire further because i can get a bit all over the place when explaining 😭
#usergif#completeresources#ps help#photoshop tutorial#gif tutorial#blending gif tutorial#allresources#dailyresources#useranusia#userkale#tusercelia#userjoanna#cheytermelon#usercchuu#userjuju#kpop resources#tutorial: blending#mine
122 notes
·
View notes
Photo

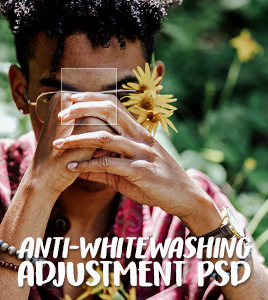

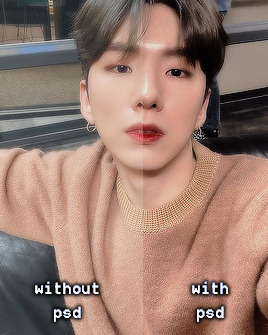
✧ ADJUSTMENT PSD 001: ANTI-WHITEWASHING — BY EVANSYHELP.
This is an adjustment PSD designed to correct whitewashing. It comes in four strengths and includes 3 add-on adjustments to fix possible issues caused by the main layers (ie. tomatowashing). It is not meant to be a complete PSD on its own; place it underneath your colouring PSD for optimal results. Please like or reblog if you download, and credit me if you use it in your icon/gif packs.
✧✧✧ ( DOWNLOAD. )
3K notes
·
View notes
Note
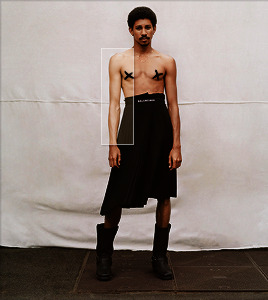
Hi! I have a little request. Can you help me find a tutorial/tips for this? Every time I try to make gifs from concert videos, I get stuck on coloring.😿 It shines too much and looks white and lifeless. I've been trying to do it for minutes but this is the result, it's too bad.
Hi darling! I'd be more than happy to give color and lighting correcting tips. I'll use your photo as an example first, and then show how I'd go about it in a gif example.
STAGE COLORING+LIGHTING CORRECTION AND UN-WHITEWASHING TUTORIAL
We're going to talk about Camera Raw Filter for this, as it's the best PS tool IMO. You can find it under Filter>Camera Raw Filter

It's the only way to autocorrect coloring on gifs, whereas with static images you can use the Image>Auto Tone+Auto Contract+Auto Color options.
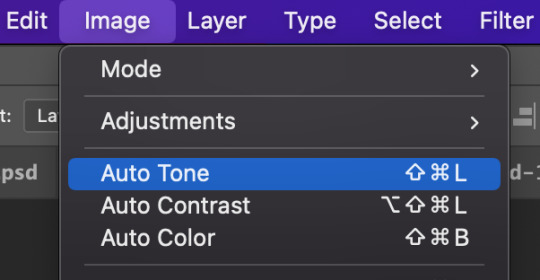
But I still prefer Camera Raw Filter on static images. So without further ado, lets jump in.
Open Camera Raw Filter (I'm going to refer to it as CRF moving forward). You will see the control panel, which has an Auto button, as well as the Basic category, which contains the White Balance dropdown selection.
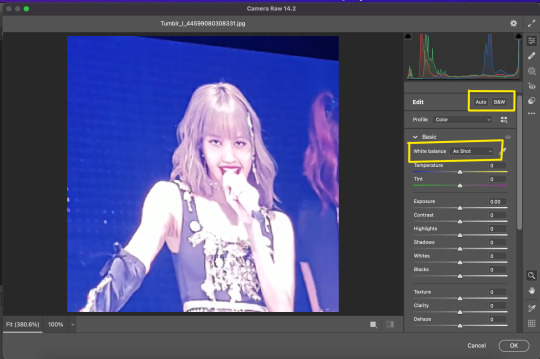
2) Click the Auto button to correct the overall lighting
3) Before you adjust the sliders to get the exact lighting you may want (Photoshop is just guessing after all, you'll always need to modify the results to your preferences) make sure you click the White Balance dropdown and select Auto

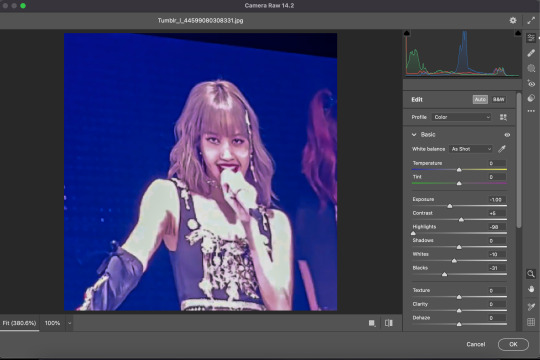
Now you can adjust the sliders or mess with any of the other CRF control categories.
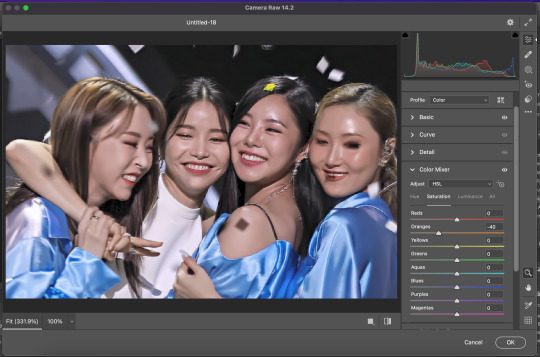
My personal favorite is Color Mixer, which allows full control over Saturation, Luminance, and Hue. Why is that any different from a Saturation adjustment layer? Well, what CRF can do that regular adjustment layers can't is target the color ORANGE.
Many times we editors want vibrant colors and to bring melanin back to whitewashed idols skin, but we don't want them to look like they have a spray tan!
Take this unedited Mamamoo gif for example
They're pretty whitewashed here due to stage lights, so I automatically darken the gif, and then add some vibrancy to bring back skin color. But adding saturation turns their skin orange:

Now I understand why many people would consider this un-whitewashing, but people are not naturally neon orange.
To fix this, we move on to the optional 4th step.
4) Desaturate the oranges in the Color Mixer section of the CRF control panel (just do this while you're adjusting the lighting and color balance so it's out of the way before you start adding PSDs and adjustment layers)
Here is the gif now with the oranges desaturated.

Feel free to disagree, but I think that looks MUCH more natural while still keeping all the vibrancy.
Hope this helped darling!
102 notes
·
View notes
Photo

anonymous asked 💬 what are your personal font recs?
USERGIF FONT RECS 🪄 PER MEMBER Here are some of our members’ favorite fonts! Fonts without a source icon are default fonts on Photoshop. Fonts with the source listed as “other” may require a deeper Google search or are only available to purchase, but most fonts are free! TIP: On mobile, slide your finger over the gif to slowly scrub through frames.
MORE RESOURCES FROM USERGIF MEMBERS: — fade-animated text tutorial by nik [@sith-maul] — font compilation by kate [@selinakyle] — font compilation by sole [@fionagallaqher] — font packs + downloads by jennifer [@antoniosvivaldi] — glitching text tutorial by nik [@sith-maul] — moving text tutorial by drea [@sashafierce] — quick text styles tutorial by kate [@selinakyle] — warp text tutorial by drea [@sashafierce] — (all fonts listed below the cut)
Keep reading
3K notes
·
View notes
Photo


@cooky’s 1k psd pack!
i hit 1k followers a while ago so heres a psd pack to celebrate! feel free to send any questions if you have any! and once again, thank youuuuuu!
taehyun (post) ✧ yeonjun (post) ✧ rose (post) ✧ yeonjung (post) ✧ seonghwa (post) ✧ mark (post) ✧ all together [zip]
76 notes
·
View notes
Photo


KPOPCO 💜 PSD Pack #1
We’re excited to release KPOPCO’s first PSD pack, which contains 27 original PSDs created by our members. You can download it here.
Thank you to everyone who participated, including our admins @yunaevis, @hanjesungs, and our members @awek-s, @ryudaeng, @highwaytoheaven, @parkjimiin, @visualqueens, @wonkwans, @leeshinah, and @renchinz.
Don’t forget to like this post, follow us, (and our members) and tag #kpopco in your creations so we can reblog them. Happy editing!
190 notes
·
View notes
Photo

a couple of people have asked how i colour shots that have an awful yellow tint, and it was requested by an anon that i make a tutorial today, so… here we are.
this tutorial will detail on how i remove the yellow tint and touch on my basic colouring, and i’ve tried to make it as concise as possible. it’s aimed towards heavily tinted shots, though you’re welcome to also follow along with shots that are more subtle (you might not find step 3 necessary though). please keep in mind that the more in-depth explanations are only applicable to the example shot i used, and when colouring your own, the settings will be different.
tutorial under the cut, please reblog if you can!
Keep reading
2K notes
·
View notes
Photo

some of my friends in pscentral and an anon recently asked me on how i did the glitch effect in this gifset. i know how tricky it appears to achieve, and hopefully you’ll feel a little more confident after this tutorial <3 this tutorial will assume that you know your way around photoshop
please like/reblog if this helps, tutorial under the cut!
Keep reading
873 notes
·
View notes
Photo

HOW TO: MAKE HIGH-QUALITY GIFS
Hi! A few people have asked me about my gif-making process and an anon asked about my coloring on a specific Bridgerton set. So, I decided to make a tutorial combining both! This is a very in-depth tutorial but there’s also nothing groundbreaking here. If you enjoy seeing how other people work like I do, this is for you <3 very long tutorial under the cut!
Keep reading
2K notes
·
View notes
Photo
I was asked about how I blended the graphic novel with the show in my Heartstopper gifset so I thought I would make a tutorial about it! This tutorial assumes you have basic giffing skills. I’m using Photoshop, but I guess it could work on Photopea too.
Keep reading
320 notes
·
View notes
Photo


PSD #02 - KIHYUN ♡ dl. — created for the clip of kihyun singing lost in the dream! — works well for gifs! darkens red and orange hues! — do not steal or claim as your own!! — feel free to adjust the levels layer as well as the colour balance and gradient map! — like and reblog if used!
60 notes
·
View notes
Photo
since I’ve been giffing quite a lot of choom videos I’ve noticed how annoying they can be to colour. so here’s the colouring I always use on them, it’s mainly made to restore the colour back onto the skin and to manipulate certain shades (mainly blues and magentas). feel free to edit to make it fit your gifs!
do not repost or claim as your own
download here
123 notes
·
View notes
Text
ts files & resources for content creators!! including: kdramas, music shows, variety shows.
hello friends. since kpopexciting has been removed as of today (200925) & i’ve seen people upset and freaked out about not being able to gif using ts files anymore, i thought i’d put together a list of uploaders on twitter. i’ll specify who and what they upload for and i’m also going to include some more information & resources in this post so please make sure that you read it all, and please reblog it to spread the word! note: i won’t be linking these as otherwise tumblr will hide the post from the tags, but one quick google search should bring them all up!
note: i spent half a day compiling this list and going through every single one of the groups on the lists on kprofiles; these are the only accounts i was personally able to find, but i tried my best and i’m sorry in advance if your favourite group isn’t on here!
before you continue, some advice on other things you should make use of:
avast antivirus – it’ll automatically blacklist urls that may harm your pc.
universal bypass – it bypasses adfly and other ad links that wanna infect your pc with viruses. it’ll take you straight to the download link.
yourfonts – fonts for your creator needs. if the links don’t lead anywhere, just google the font & it’ll come up on a font download website.
soshistagram – downloads vlives.
4kdownloader – downloads youtube vids up to 4k quality.
utorrent – torrent downloader. can use web version.
smart cutter – used to cut full episodes of a show.
gdbypass[.]host – bypasses the download limit on google drive files.
this list will, to my knowledge, contain no reposted or reuploaded (read: stolen) files from kpop24hrs. if you should find out that an uploader is in fact stealing, please let me know so i can remove them from the list.
Keep reading
#files: ts#files: bts#files: blackpink#files: red velvet#files: itzy#files: seventeen#files: exo#files: twice#[ will continue later ]
1K notes
·
View notes
Photo


hey anon <3 thank u for ur kind words! i’ve shared the psd that i use here let me know if the link doesn’t work and i’ll dm it to u 🥺
the one thing to keep in mind is that sometimes the red/yellow selective colouring is a bit strong and you’re gonna need to add in a curves layer individually depending on the gif.
29 notes
·
View notes
Photo


1K CELEBRATION PSD PACK ⌙ Consider this my little show of appreciation for helping me reach my first big milestone! I tried to avoid using color lookup because older versions of photoshop doesn’t have it but one or two of these psds do have it. Also, adjustment is key here. No psd is ever going to look the same on different videos, or even different scenes and you will have to adjust the different layers depending on the source material ♡
DOWNLOAD HERE. (Please like and/or reblog this if you download any of the files, I’d appreciate it!)
196 notes
·
View notes