
Statistics
We looked inside some of the posts by killmymind and here's what we found interesting.
Average Info
Notes Per Post
190K
Likes Per Post
95K
Reblog Per Post
96K
Reply Per Post
96
Time Between Posts
1 hour
Number of Posts By Type
Text
14
Note
3
Last Seen Tumblr Blogs


Fun Fact
Tumblr was attacked by a cross-site scripting worm deployed by the Internet troll group GNAA on Dec 3, 2012.
Text
Reblog and put in the tags how you came up with your fake name.
#i wanted to go by F or Efe <- that’s how you say it in spanish#but it didn’t look right so i just added the i lol
194 notes
·
View notes

Note
this a gorgeous gifset for wicked 💗
https://www.tumblr.com/tidescaller/781106467228073984/glinda-in-wicked-part-i-happy-birthday?source=share
I would appreciate a tutorial for the first gif blending and colouring

Hi anon! thank youuu, i'll leave the tutorial under the cut ૮(˶˃ᆺ˂˶)
As always, basic knowledge on making gifs is required to do this type of edits. I linked some useful guides on my previous tutorial here.
PART I: BLENDING
STEP 1, BASE GIF
I recommend getting ready the gifs you're going to use before any try on blending them. And which ones are right to blend? That's just depends on the scenes you're working on. On this gifset, I made two previous blends that didn't make it to the final version cause I didn't like how it turned out. It's all about trial and error.
For this specific blending, as I'm working with only 2 gifs, I'll start editing first the base and then the one "blended". Adjust your BASE GIF in your canvas as you want.

I sized mine like this cause I imagined the second scene of Glinda behind this one.
STEP 2: BACKGROUND
i followed becca's coloring tutorial for this part, except I didn't add any adjustments yet. only coloring the background for a later gradient blending.

STEP 3: BLENDING
Duplicate your other gif into the canvas and change its blending to screen

Now add a layer mask (the button marked with red in the picture) and, with a soft brush at 200px/300px, start erasing whatever you don't want. Remember black is 0% opacity and white is 100%.


STEP 4: THE BLENDED GIF
The problem I noticed by this point is that my background coloring on the BASE GIF was kinda irrelevant cause now the BLENDED GIF completely covered it (。•́︿•̀。) and I also wanted this one to be pink. In order to do this, I created a gradient map layer and made it as a clipping mask so it wouldn't affect my main gif.


PART II: COLORING
STEP 5: BASE
For the base coloring, I always follow this tutorial cause it's literally how I learned how to do it. Honestly, check all maziekeen's tutorials (she made A TON) cause they are so good and your learn a lot. However, I tend to give my personal touches like adding another vibrance layer if i feel like it, cause I like the colors to pop; or skipping steps if I don't think they fit my gif/style. Anyways, this is the result for now:

and these are my settings


i tried to translate as much as possible (,,>﹏<,,)
STEP 6: SMALL TOUCHES
Could leave the gif as it is, but when I was working on it, I felt like something was missing. So the last step is to apply/paint some small touches of pink (or whichever color you're working on). This trick I learned it from this beautiful and very detailed tutorial from dani (she is awesome!! and her tutorials and gifs are flawless!!)
Create a new layer, use the soft brush tool at 1000px, zoom out your gif and start painting out of the canvas (you can totally paint inside if you feel like it) Play with different opacities and blending modes of the layer, this is literally how I created all these gifs. I know it sounds stupid ajskjas but it's true!! Try what best fits the structure of the gif. The first one I made is with multiply at 60% and you can see how much the gif changed already.

The second being color at 100% and the third one hard light at 30%
STEP 7: THE CHERRY ON TOP
Finally I added an animated overlay from this post. Changed the blend mode to screen and erased a bit of it on glinda's face creating a layer mask and with a soft brush. Added my texts... and that's a wrap! :D

I used the same process on gifs 3 and 5 ⸜(。˃ ᵕ ˂ )⸝♡
92 notes
·
View notes
Text
becca’s mega coloring tutorial
i’ve gotten a lot of requests recently asking me to make a tutorial for my ‘colorporn’ gifsets, and i think i’ve finally gotten over the traumatic incident 3 years ago, when i spent all day writing out a coloring tutorial only to accidentally hit backspace causing the entire thing to be wiped. so, here it is, buckle up folks! it’s going to be a long ride but here’s hoping it’ll be helpful.
so we’ll be going from left side (no coloring) to right (coloring & color porn):

Seguir leyendo
4K notes
·
View notes
Note
hey! your tarlos evolution gifset is sooo pretty <333. thank you so much for these wonderful gifs :) can i ask how you did the typography on this set, like what fonts did you use and how did you get the cool metallic effect?
Of course, thank you so much as well, your comment means a lot. It’s actually a pretty simple effect so I’ll talk you through it under the cut.
First off you need to make and colour your gif etc. Once you’ve got your gif made we can start working on the text. You can use any fonts you like, but for this set I used Amalfi Coast and then Tw Cen MT for the definition. Keep it coloured white for now and place it where you would like it.

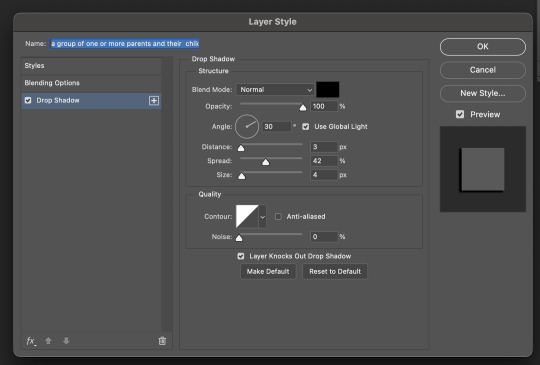
Once you have your fonts ready now it’s the fun time. For the definition it’s just a simple drop shadow, these are the settings…
Now for the title font. Firstly duplicate the font layer 3 times. Hide the first two for now and focus on the bottom layer.
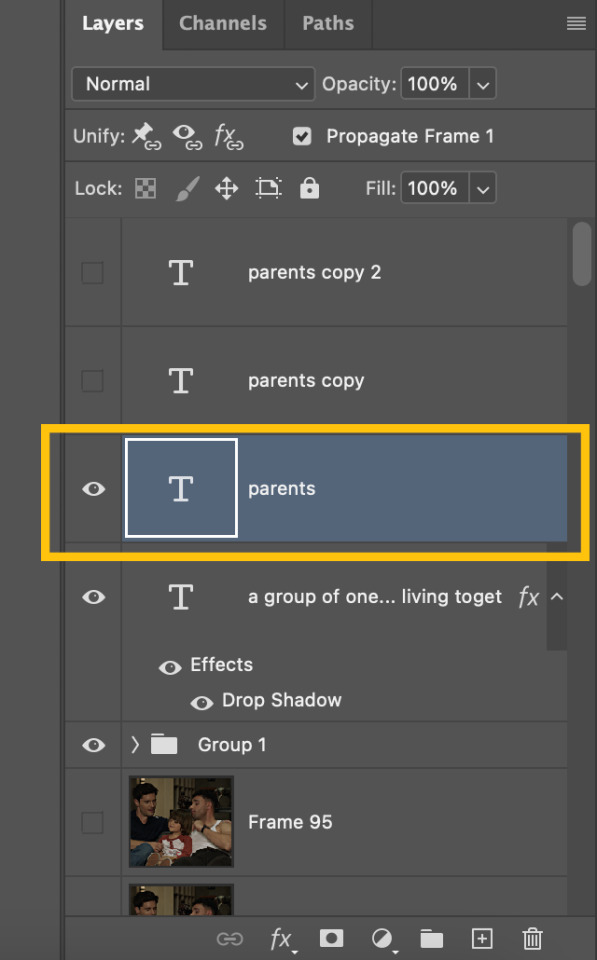
For this layer, add the same drop shadow as the definition and then turn the fill down to 0%
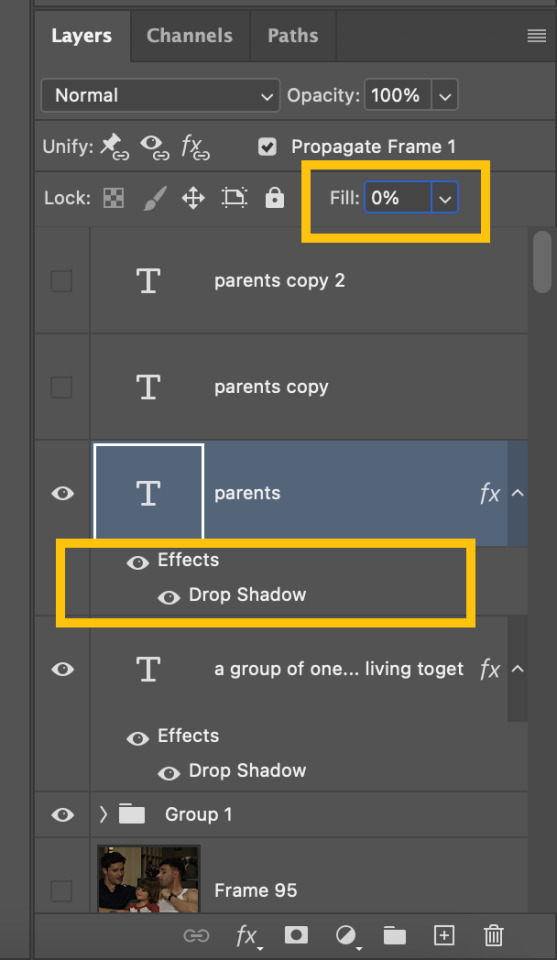
Now we move onto the layer above. For this layer you need to change the blending mode to Difference.

And finally we move onto the last font layer. For this one I changed the colour of the font to #2dadff and then changed the blending mode to colour.
And that’s it, your typography is completed.
69 notes
·
View notes
Note
Hi! Would it be possible to post a tutorial of how you created the white text in this set /post/695221752725422080/buckpendragon-911-verse-coc-week-day-1 thank you :)
hiii! you mean the text in the first gif, right? it's actually a pale green so i hope that's what you meant 😅
i somehow still have that psd so i was able to go grab the exact settings for the two text layers used here:
(if you meant the little white text, it's simply the font candara with different values of tracking/letter spacing)
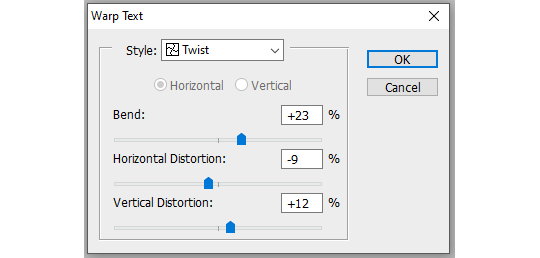
the font i used is called letter magic, and i've given my bare text a bit of warp (right click ont the text layer > warp text > style: twist). by the way, the color of the text doesn't matter, so no need to pick one.
BASE LAYER
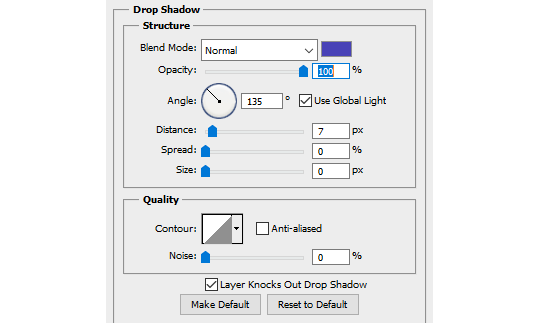
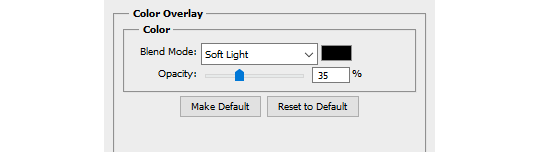
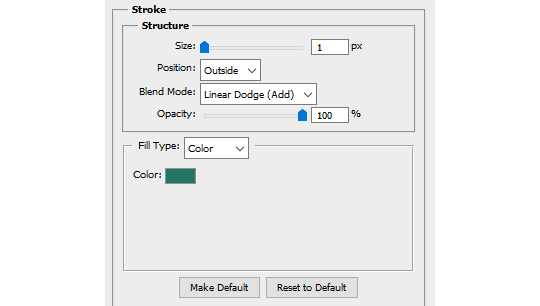
first, put the text layer's opacity to 100%, and the fill to 0%. the text will become transparent, it's what we want. then double click on the layer to get to the layer style options. you'll want to add a drop shadow, a color overlay, and a thin stroke:
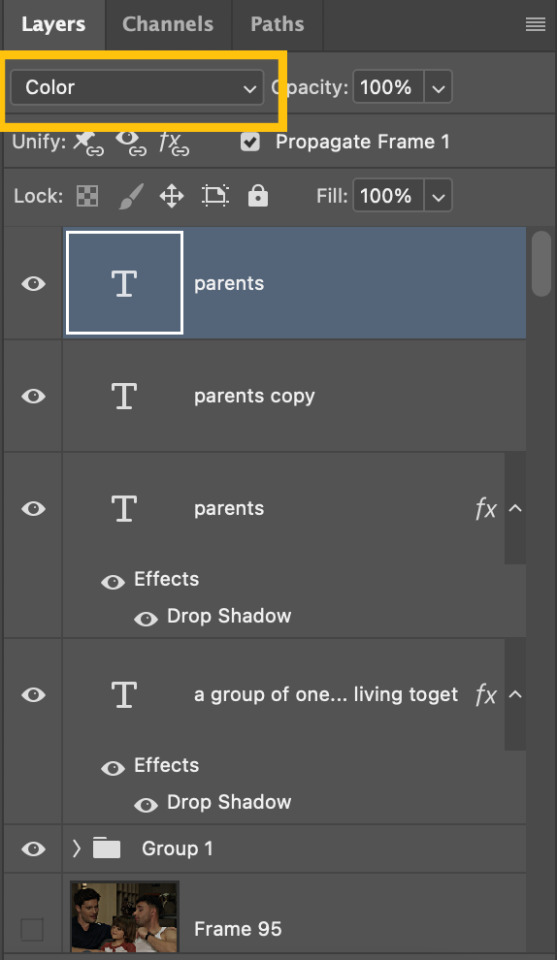
DUPLICATED LAYER
i found the stroke a bit too thin on my gif, so i duplicated the base layer (right click on the layer > duplicate layer > destination should be the same canvas), put its opacity to 50% and kept to 0% fill. and disable the drop shadow and color overlay by clicking on the little eyes on the layer:
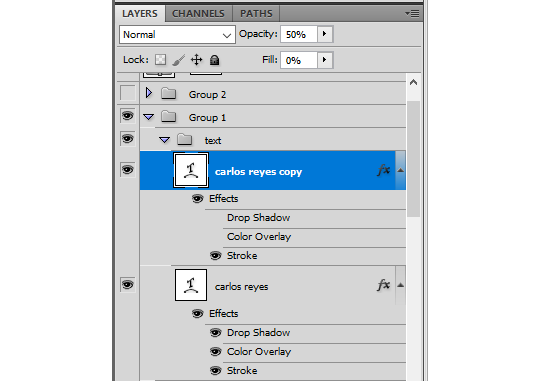
voilà :)
479 notes
·
View notes
Text
i’ll be reblogging posts i have in my likes related to photoshop so if you guys do not wanna see that you can filter #ps resources :D heeeeheeee
1 note
·
View note
Text
Mock sports rpf all you want but it will get you eventually. It happens to us all at some point
948 notes
·
View notes
Text
he was openly bisexual. he didn't know that but he was
6K notes
·
View notes
Text


Mamma Mia! (2008) dir. Phyllida Lloyd
27K notes
·
View notes
Text
i joined louietwt for the funsies (again) and yeah i get why louis made that tweet
#yeah you guys do Not wanna see that stuff believe me#the problem is also that people quote these freaks and it just brings more attention to the topic#but yeah it’s bad#effie talks to the moon
6 notes
·
View notes
Text
curious.
2K notes
·
View notes
Text

2 notes
·
View notes
Text
girls when they know that they used to be better

279 notes
·
View notes
Text
Vaginismus of the soul
6K notes
·
View notes
Text
just finished s10 of skam france.. i honestly loved this season but was disappointed by the ending. i was expecting more than a party lol. but anyway anaïs best girl ever. i love her (and frida)
#adopting random characters from the skam remakes is my passion#matteo and anaïs <3#anyway. onto the new generation ig!#effie talks to the moon
0 notes