
ksfreddo
Krystal Sfreddo - Portfolio
This is the portfolio of random guides and projects completed by Krystal Sfreddo. Please feel free to reach out for more information or with any opportunities.
6 posts
Don't wanna be here? Send us removal request.
Last Seen Blogs

platinumselectionsg
Platinum Selection Singapore

kloppman-knits
Klopps

shimazu-akira
Osaka Continental Manager


buzzthetower
you can be my wingman anytime
Text
Destiny 2: I killed over 5,000 yellow bar enemies to test Heavy Ammo Finder. It doesn't work.
3.8k Upvotes | 98% Upvotes | 601 Comments | Bungie Replied
NOTE: This was posted on October 16, 2018. Bungie later re-worked the perk entitely and it is now working as intended.
————————————————————
This is a numbers heavy post. TLDR that sums it all up at the bottom
I saw the posts of a fellow Guardian killing 800 enemies and then 2000. I thought this was interesting but was wondering if there was a difference with yellow bar enemies. So I decided to test it out.
I killed 800 yellow enemies (and only yellow enemies) with my heavy full the entire time, never picking up a brick. Here is what that looked like:
Max Heavy Test 1 (200 Enemies)

I felt like I noticed a pattern to drops. I would often go 20-50 kills with no heavy and then start getting 3-5 drops in a row. So I started keeping track of what kill dropped what heavy. In this test I picked up the heavy as soon as it dropped and used it all before I killed another enemy to test if that had any correlation. Here is that info:
No Heavy Test 1 (200 Enemies)

No Heavy Chart 1 (200 Enemies)

After looking at my numbers and u/BoxOfRingsAndNails numbers I decided I need to just test it on more enemies because there was just too much variance. So I killed 4,000 more enemies. Here's what that looked like:
Max Heavy Test 2 (2,000 Enemies)

Max Heavy Chart (2,000 Enemies)

No Heavy Test 2 (2,000 Enemies)
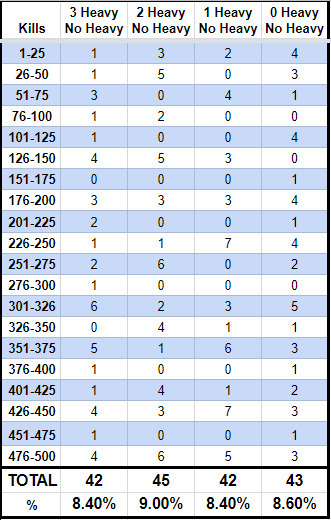
No Heavy Chart 2 (2,000 Enemies)
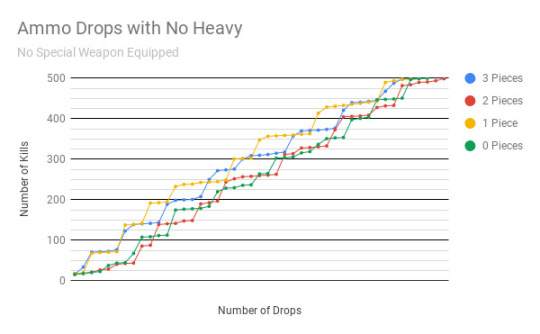
There didn't seem to be much difference between having no heavy/full heavy. Combining all 5,600 kills gave me these percentages:
Overall Drop Rate

Here is my spreadsheet all together if anyone wants to look at it all at once, including the numbered kills:
My Data
Here's a template if anyone else would like to add their own data:
Heavy Ammo Template
And lastly, here's my "brand new" Crimson that I grabbed from Collections to keep track of kills.
TL;DR: Heavy Ammo Finder doesn't seem to work at all. If it does, it's such a low percentage that it's not worth running. It doesn't matter if you have heavy ammo on you or not, your drop rates will be the same. Juggler is still in effect and HUGELY noticeable. If you want heavy, don't run around with your heavy out.
Reddit Link: https://www.reddit.com/r/DestinyTheGame/comments/9onsdm/i_killed_over_5000_yellow_bar_enemies_to_test/
0 notes
Text
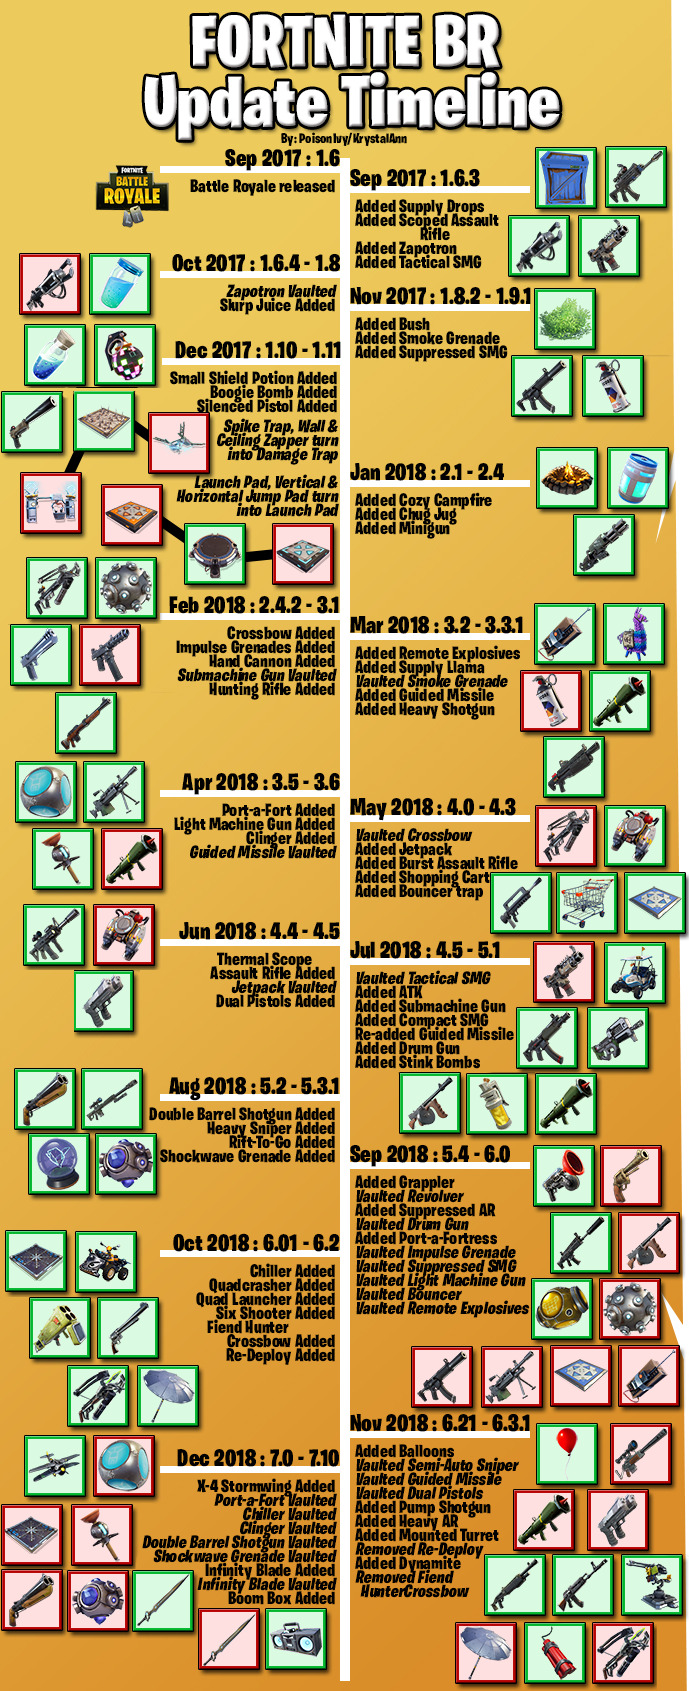
Created January 5, 2019
"I made a timeline to visualize what items were added/vaulted and when"
1.9k Upvotes | 97% Upvotes | 296 Comments
Reddit Link: https://www.reddit.com/r/FortNiteBR/comments/aczk32/i_made_a_timeline_to_visualize_what_items_were/
0 notes
Text

Posted on May 26, 2018
Game: Bless Online
"I made a map with the Elite spawn & Dungeon locations for faster leveling"
211 Upvotes | 96% Upvoted | 45 Comments
Note: This is a compilation of hundreds of manual screenshots of the map from the Japanese version of the game.
0 notes
Text
Destiny: No Time To Explain COMPLETE GUIDE
Posted on October 20, 2015
875 Upvotes | 96% Upvoted | 453 Comments
————————————————————
Hey guys! This mission can be unlocked by getting Praedyth's ghost in the Heroic/daily version of Paradox. Once you get it and also turn it in, you must wait until next weekly reset (Tuesday, 2 AM PST). The quest will be available to start in the Tower at Lakshmi, the FWC rep only on the character you handed the shell in on.
Here is a guide on how to get the ghost if you have not already done so. This is intended to only be done in Paradox when it is the daily. (Edit: It can be done when it's not the daily too. Here's how!)
DO NOT, I REPEAT, DO NOT WASTE MOTES TRYING TO GAIN REPUTATION IF YOU DO NOT HAVE THE FIRST QUEST STEP. YOU CAN GAIN THIS QUEST AT 0 FWC REP. IT IS ON A TIME LOCK ONLY. IF YOU HAVE HANDED IN THE SHELL, YOU MUST WAIT UNTIL NEXT WEEKLY RESET. DO. NOT. WASTE. MOTES.
Quest name: NOT FORGED IN LIGHT
Step 1: Ready for War
Description:
"Earn reputation through donations to the Future War Cult"
Quest Text Here
5 Motes of Light = 10%
25 Armor Materials = 5%
25 Weapon Parts = 5%
2 Heavy Synth = 5%
Step 2: Talk to Lakshmi-2
Step 3: The Simulation Core
Description:
"Here's how I see it: the Hive want to eat us. The Fallen want our stuff and the Cabal want our planet. But it's the Vex, Guardian, only the Vex can take our past away from us. If we're going to understand what these files mean, I'm going to need more context.
Hunt down a powerful Minotaur Taken by Oryx. Destroy it, and pull a simulation core from its husk. Shatter the core and return to me."
Quest Text Here
This is a GUARANTEED drop from doing the Paradox daily with the secret mission, so if you haven't done the daily yet and want a free legendary engram this is your best bet.
Any major/ultra Taken minotaurs can also drop it, but red minotaurs cannot.
This is the item it drops. It can be found in the Mission section of your inventory. Hold square (on PS4) while hovering over the item to shatter it.
After you destroy it, there's some cool flavor text
Step 4: Talk to Lakshmi-2
Step 5: The Eye of Atheon
Description:
"Excellent work. I'll make good use of the data your Ghost is feeding me. We've spect more time looking through these files, and we believe we know what your next step must be. It will not be an easy one.
Gather a Fireteam and return to the Vault of Glass. Confront Time's Conflux, Atheon, and take its eye. Within the eye will be invaluable data. Shatter it, as you did the simulation core, and then return to me."
Quest Text Here
This is super easy with level 40 Guardians. We managed to bring him down in less than 10 seconds with a tether and 2 Sleeper Simulants.
This does not need to be done on Hard mode!
Here's the item he drops, just shatter it like the last item.
Step 6: Talk to Lakshmi-2
Step 7: Approach the Twilight Gap
Description:
"Excellent. I'll begin my analysis of Atheon's data at once. In the meantime, I have results from the simulation core. The heart of the Minotaur revealed a ... ripple. A snag in the timestream around the Twilight Gap.
Head out to the pass, try to determine what Praedyth's Ghost saw there. Then, return to my side."
Quest Text Here
Step 8: Shadows at Twilight
After you spawn in, the mission updates
This can only be done as a single player.
You spawn in and slowly start getting blinded, similar to a Golgoroth wipe. You can clear the blind, and prevent dying by running into pools.
You must find an item, a bracelet, which is hidden in a chest. For me, it was near Point B in Control. For my friend it was near the special ammo spawn at Point C.
If you're a hunter, put on keen scout as the chest will show up on your radar.
Step 9: Talk to Lakshmi-2
Step 10: Approach the Black Garden
Description:
"Let me see what you ... a bracelet. With the symbol of House Bray? Ana Bray's personal sigil. Guardian, the inner circle will be grateful that you have returned this artifact to the Tower.
The data you retrieved from the Eye of Atheon, meanwhile, has pinpointed another ripple. This one is at the heart of the Black Garden.
It is time you returned to Mars. The rippled in the Garden apparently flows from a construct called "the Groundskeeper." Find it, destroy it. And return to my side."
Quest Text here
Step 11: Blood in the Garden
After you spawn in, the mission will update.
You definitely want at least one other person for this mission.
At the start, you must "anger" the Groundskeeper. You do this by killing the Vex. The Goblins will give you 2% increase in his anger per kill. However, if you don't kill them quickly enough you will start losing progress.
This format is similar to the speed patrol missions, except with kills.
Minotaurs will eventually spawn, a lot of them. These seem to give you somewhere around 7-10% anger but are obviously harder to kill.
They have void shields, so void weapons will make this a breeze.
Once you hit 100%, the Groundskeeper will spawn. He's a giant minotaur and you must kill him to progress. If you drop below 100%, he will despawn.
There will be tons of Minotaurs between you and the boss and they will keep respawning.
Dying here will not wipe you, it is not a darkness zone.
Here's a video guide on how to get to a helpful cheese spot. For some reason, the video skips but you can just jump there smoothly. You can't die here and can easily snipe out the boss.
Step 12: Talk to Lakshmi-2
Description:
"And now ... what? A ring, with the symbol of the Warlock Pujari? Death, again. Like Ana Bray, a Guardian fallen to the second death. Lost to us. We shall study these objects, Guardian. Learn why they have been pulled through time.
I believe your work is over. For now. Praedyth's files have unspooled. Their data undone like uncoiled strands of hair. And what has fallen free?
A weapon, transmatted from some time and some place, and specifically for you. Someone has taken notice of our actions, Guardian. Someday, we may be able to ask them what all this means."
Quest Text & Reward Screen here
Congratulations! Enjoy your No Time To Explain!
EDIT: Here's a short video guide!
EDIT2 : It looks like the reset did not make this quest available to characters who turned in Praedyth's ghost on 10/20. According to /u/nathanields "if you did paradox daily first time around and therefore had the 'Not Forged in Light' quest yesterday but didn't start it, it's still there today."
Reddit Link: https://www.reddit.com/r/DestinyTheGame/comments/3pjvre/no_time_to_explain_complete_guide/
0 notes
Text
The Division: Tips/Things that aren't immediately obvious in the Incursion
Posted April 12, 2016
1.1k Upvotes | 93% Upvoted | 283 Comments
————————————————————
Blue drones = shock locked. They should be the main target when they're out.
Thanks to /u/compassghost: Flashbang sticky bombs will disable drones for quite a bit. This is really helpful!
Red restock is limited to only be opened once but resets every few waves. So no infinite restocks. If a teammate opens one it will drop ammo for all. The crate upstairs behaves slightly differently than the 2 in the center of the map. Also note that once you go downstairs you can't go back up. Ammo stations make this a breeze.
Waves spawn when EITHER you kill all enemies or if enough time has passed. You do want to be quick as enemies can pile up if you're not keeping up with the timer.
The center of the map is definitely the safest place to camp out. Grenades can't hit, the missiles can't hit, drones won't go down there, enemies rarely drop down AND you can put your supply station completely out of sight of enemies. It's also pretty close to where you need to put the explosives.
Thanks to /u/cirquemedia: If you're having issues in the center of the map with shotgunners. the area behind the two generators (on the right side of the map when you drop down) another easy place where the ACP and turrets can't hit you.
Thanks to /u/morepandas: For every new wave, have your team clear out the "back" close to the spawn so that you dont have to fight enemies at every angle. They typically come straight out that door and are very easy flashbang fodder.
Faye will not shut the freak up if you do not place the explosives quickly after it drops.
Double revive still works and is so helpful.
2 set pieces drop the first time you do it per week, one from weekly and one from the boss. The piece that is your weekly completion reward is NOT tradable. Every time you do it after that the boss will drop one gear set item. This IS tradable. You can run this as many times as you like and still get the boss drop, much like Challenge mode.
Thank you to /u/jasonneal1: As of right now if you have already received your weekly reward but join a party where the host HAS NOT then you will receive a new reward if you complete it with them.
Gear set pieces drop 2 HE materials versus 1 when dismantled.
This is absolutely doable with 3 people. It's not hard at all once you get the rythm but it IS slow and grindy. Be patient and you'll get it done.
FREE REVIVES! If your teammates are dead on explosive rounds and you successfully grab, plant and defend the explosives they will be brought back to life.
Here is a list of the order in which enemies arrive. Thank you /u/bloom328
Thanks to /u/GunBrothersGaming: Throwing a turret after round 11 will result in the turret being hacked within 5 seconds.
Every bomb wave, not just 15 will respawn enemies if you don't plant the bomb in the allotted time. Any enemies killed will respawn. Wave 4, 8, 11, and 15 are bomb rounds
This is actually super helpful in round 15 because it also means that enemies despawn as soon as the "boss" dies. My group only kills the bomb carrier on the last round and then just runs it to make it faster.
If you see the red laser above the stairs in the center (or wherever you may be camping) do your best to avoid it. The turrets hurt and make it very difficult to move.
There are two panels that temporarily disable the turrets. There's really only enough time to use it to get in there and plant the bombs and then re-activate a second time to escape back to your hiding place of choice.
Thank you to /u/Motojoe23: EMP grenades work on these turrets but for a short time, about 3 seconds. This can be used when you want to run to disable them without the hassle of tanking them.
Thank you to /u/Hyde_Train: One person can successfully run the bomb. Have someone throw a turret in front of the apc, the turrets will aggro on it but can't kill it.
The missile are a grenade-ish sized AoE but really hurt. Even tanky mammoth's can be one shot. When you hear the beep-beep-beep, run out of the red ASAP.
Pick off a few enemies at the start from the top, but don't stay there too long. That AoE will become really tiring really fast. As soon as you feel confident your group can survive a sprint, run to the center of the room. Don't wait for the second wave to spawn in, it'll just prolong things.
If you're scared to run the explosives/not quite tanky enough, it's really easy to leave someone in the center, out of harm's way with a res signature skill up. If people drop, pop the sig and save a wipe. Only 3 people are needed to run it anyway.
Challenge mode and hard mode have the same mechanics. The enemies are simply tougher in challenge mode and can start adding up quick if you don't kill them fast enough.
There is a weekly bonus for each level of difficulty.
0 notes
Text
Anthem: Actual Complete List of ALL MW/Leg Items
Posted on February 26, 2019
1.9k Upvotes | 99% Upvoted | 464 Comments
————————————————————
I've seen a few articles that claim to be a complete list of MW/Leg items. But just scrolling to the Colossus section and noticing none of them even have Ablative Shielding made it obvious they're not really complete. Anthem Archive exists but doesn't have numbers (yet). Thanks to /u/wykk for being the best and helping me pull this together :)


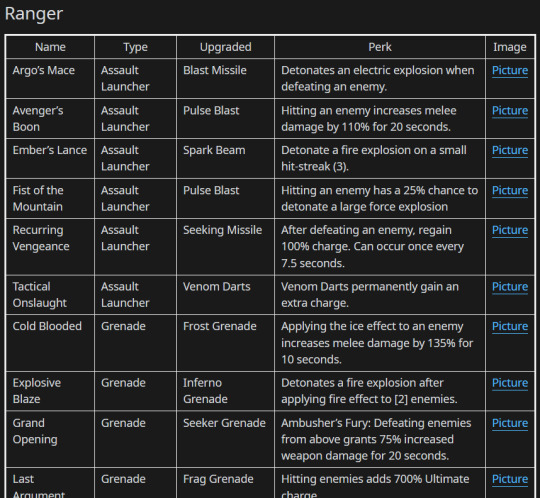

Reddit Link: https://www.reddit.com/r/AnthemTheGame/comments/av0oo5/actual_complete_list_of_all_mwleg_items/
0 notes