
Statistics
We looked inside some of the posts by lars5359752 and here's what we found interesting.
Average Info
Notes Per Post
23
Likes Per Post
11
Reblog Per Post
0
Reply Per Post
12
Time Between Posts
5 days
Number of Posts By Type
Text
11
Last Seen Tumblr Blogs


Fun Fact
In February 2021, Tumblr had 518.6 million blog accounts.
Text
Week 10
Course Reflection:
Being excited for a break I’m also sad to see this course come to an end, it was really enjoyable and a steep learning curve. Over the 10 weeks the course varied from doing engineering style drawings, to working with our hands to make physical models and learning a new CAD modelling software.

I felt comfortable starting this course with a bit of background in all tasks we were going to complete, however after the second week this changed quite quickly. I was thrown outside my comfort zone and had trouble with numerous different activities throughout the term but this was obviously expected and led to me learning heaps. Each week was the start of a new mini project which I both really enjoyed and disliked. The idea of going through such a wide variety of tasks let me come up with different ways to tackle each, however saying this I also struggled with continuously starting new projects from scratch and not having a project to come back to and work on. Reading other students' blogs I realised like myself, they also struggled to start with some tasks, but an overarching lesson I've learned from this course is to just start! Looking at a blank page does not help you or speed up the process of completing the project, so instead just randomly start whether you know what you're doing or not. I used this technique for most tasks and i’ll admit sometimes I was far away from what the brief was asking, but without starting I would only be further from the brief.

Having this course on Fridays when the task was due on the monday left little time to complete each task. As a procrastinator I did not like this but did help me by forcing me to start the work immediately. Looking back this really helped my work ethic and I saw this when getting work from other classes. I learned to start work earlier which is a great trait to have as it leaves you time to reflect and edit your work before its due.
Overall I really liked this course and learned a lot of new skills and traits to use in future courses and projects. Tom Loefler really impressed me during the perspective sketching lesson with his artistic skill and inspired me to get better at sketching. I’ve tried to involve the use of sketching with every project since, uni based or just random DIY projects.

3 notes
·
View notes
Text
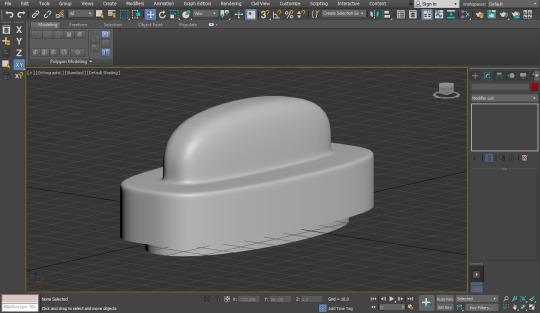
Week 9
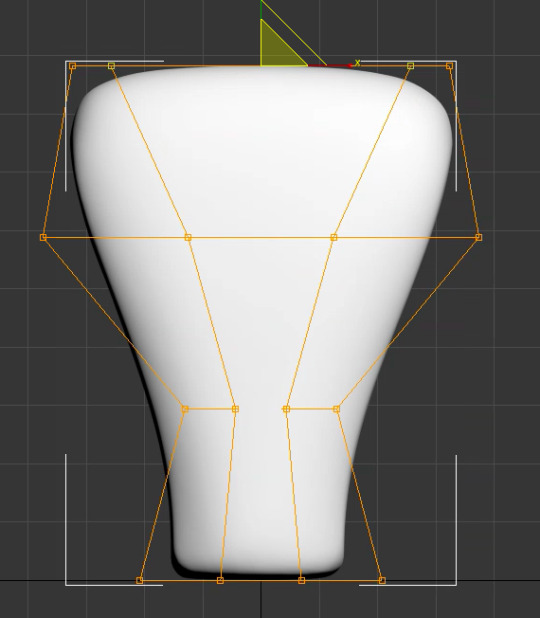
Similar to week 8 we continued using 3DSMAX. I was talking to some people who I knew were capable of using cad modelling softwares after last week's difficult tutorial and I was told one important thing. You are always subconsciously working through things in your mind, which includes 3DSMAX. Keeping this in mind I started this task being a lot more comfortable and capable, completing certain tasks with ease due to unknowingly realising how to use the program. Although I say I’ve learned a lot with 3DS, I still struggle making certain models, evident in the presented models.
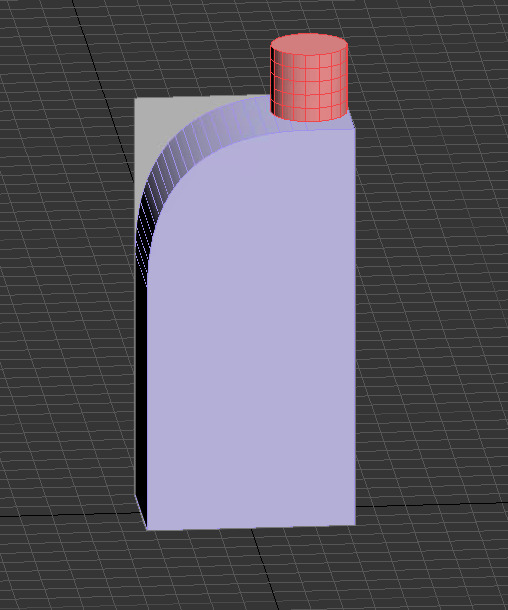
In week 7 we made a number of foam modelled bottles based off our drawing, I would have liked to make the same 3 in CAD however due to my lack of skill I had to alter the designs to something I could make. I made my most simple foam model in the program however made one extra which was not one of my main models. I’ve started enjoying 3DSMAX a lot more as I understand the process better, I still however have an infinite amount of techniques, shortcuts and processes to learn over the coming years.

I completed most of the work during the tutorial but forgot to save my work. Instead of being annoyed by this I found it an opportunity to learn and master the program. Repetitive actions inevitably make you learn a task for good. This time around when setting up and making the models I was faster and more efficient which answers the question ‘If I could do something different what would it be?’. Now having done it for a second time, I wouldn't change anything apart from purposefully not saving my work so I would force myself through the steps again.

2 notes
·
View notes
Text
Week 8
This week's tutorial was really hard. I like to think I’m quite capable with CAD modelling software such as fusion and rhino however I started completely rethinking this with 3DS MAX. I needed to rethink in a completely different manner to what I did when using fusion or rhino as nearly all of the commands were different, further as it is a software for Microsoft all of the commands shown in the video were different to the ones I was inputting, which was including either one or two extra commands to make it work. This software was also a lot different to what I was used to as the steps involved to create an object were very different. Once I started understanding how to form and model objects the process became more clear and less frustrating. However, during the start of using 3DS MAX, I still had the mindset of modelling like I would in rhino or fusion, which made the process a lot harder. Having to unlearn what I know to be able to see it in another perspective is more challenging than I expected, I mindlessly reverted back to commands and steps which stuffed up my work and made it take hours longer than expected.
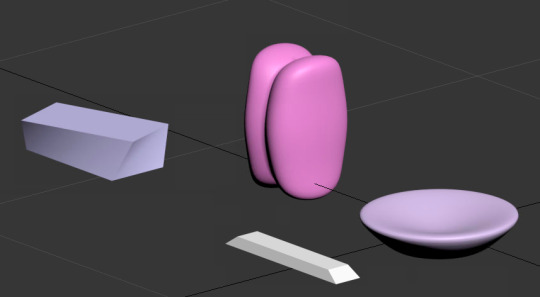
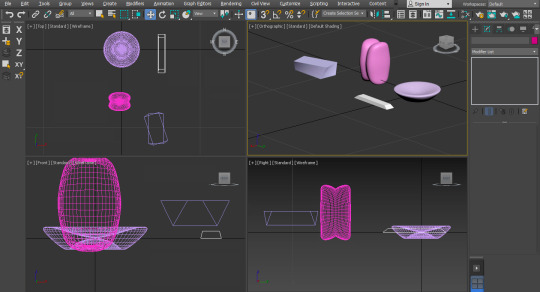
Aside from my troubles with the program, I can see the capabilities it has when a user is used to it. It fascinated me when looking online at major projects people have made using 3DS MAX. If I had the chance to redo my process I absolutely would. I would spend no time trying to figure out commands and buttons on my own, and instead work alongside instructions straight away. This would decrease time and frustration buildup. For my models I made a very basic computer, and for the second I recreated the bench seat from the train station to learn the proper modelling technique in 3DS MAX.

6 notes
·
View notes
Text
Week 7
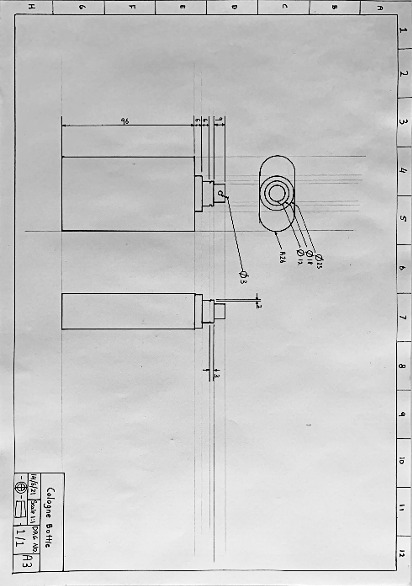
This week's tutorial we started making foam models of our lotion bottle designs. I luckily had not used all of my foam I bought last term so I had plenty left to use for these models. Referring back to the dimensions of the original bottle I cut out 3 same sized blocks. Although the foam is quite easy to cut, cutting such a large section even with a hacksaw took longer than expected. Before I started to cut away at the foam block I went onto illustrator and made 2D faces for the foam boxes which made the accuracy of each cut a lot higher than without. Two of my designs have a ridge across the side but instead of making a side face template I use the width of my ruler as a guide, drawing in pencil to show where to cut.


I used my stanley knife to cut away large sections of the blocks and the scalpel for smaller areas. The last block I cut was a lot more difficult than I thought as it involved many different curves, being nearly impossible to cut away with a knife neatly. Using a hot wire cutter as inspiration, I made a small metal curve out of some scrap metal which I heated over the stove. Whilst hot I brought the metal through the foam, cutting away a perfectly shaped curve. I accidentally burned away some areas a bit too much due to not making an easy to follow template, however using some small files and sandpaper these areas were buffed out.


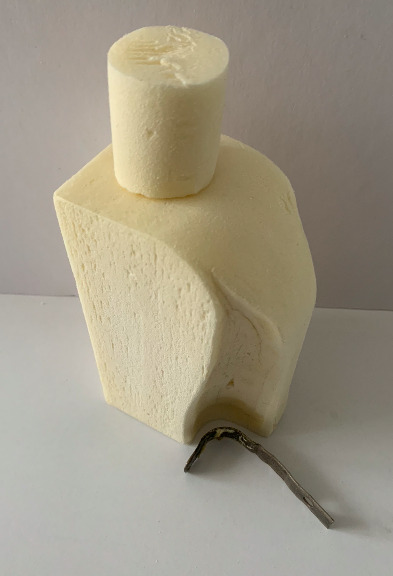
I enjoyed making foam models however in future I would have left excess material after cutting to sand down. Some areas of the models have a rough finish that I cannot smooth out otherwise the dimensions will be un-proportionate.
3 notes
·
View notes
Text
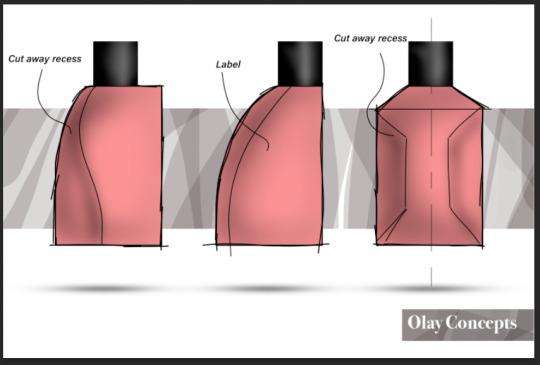
Week 6
During the week 5 tutorial I saw Tom had used arrows in his perspective sketching to show movement of parts. I have ever explored the idea of using arrows to show movement or create a ‘moving sketch’ so I decided to look further into this sketch style. I found some cool sketches on Pinterest using arrows in the same way to convey movement.


During the non-teaching week we were tasked to make sketch models based on our perspective drawings. These Olay concept design sketches were done using photoshop, a program I am very unfamiliar with. I've always had the feeling photoshop is a really complex and difficult program to use however following Robs instruction video the process was easy and clearly explained. To my surprise many commands and features are similar to Adobe Illustrator making the transition to photoshop quite quick and easy. Although making it sound like I had no issues, I still struggled on some parts of the exercise, making the same mistake 3 times by not including layers for each step. This made the task very difficult to complete especially when editing work I did not like. I decided to bite the bullet and redo some major parts of the task however looking back I gained a lot more insight into how the program is meant to be used.

0 notes
Text
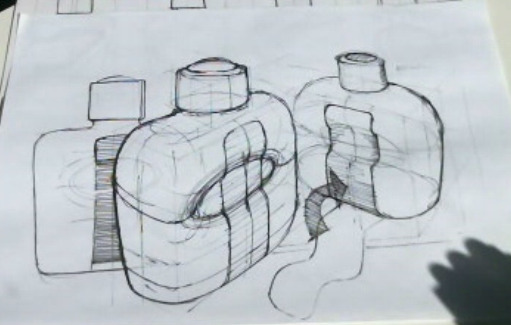
Week 5
This tutorial lesson was a lot easier than last week which was a good relief. Beginning the lesson by doing drawing warm ups got me focused and ‘loosened up’. I told myself to start doing these warm ups more often before drawing to practice and increase skill on the basic drawing techniques. This week we redesigned an Olay moisturiser bottle by first making 16 empty boundary boxes in half scale to redesign the face in 2D. Originally I sketched onto the same paper as I drew the boxes however later scrapped the page and restarted. I drew another 16 boxes and used thing tracing paper to look through and onto the drawn boxes. I drew directly with a pen as instructed by Tom from memory, to ensure you aren't too picky with your designs as it is only sketching. I experimented with pen shading through hatching and line densities, some designs worked better than others.


Once finished with the exercise I started freehand drawing my favourite designs in a 2 point perspective however quickly learned without a perspective box it is very time consuming and difficult, opposed to viewing Tom, who drew the perspective with ease. I continued trying to draw freehand for the rest of the lesson but made little progress and erased my work many times. When coming back to working on the task the next day, I did not bother to draw freehand and I drew another perspective box, as instructed for part 2. Using the same method as part 1, I drew 3 of my favourite designs within the perspective box on tracing paper. I used pencil to sketch and freehanded pen to finish yet still giving it a sketchy look. I further experimented using a pen for shading as I liked the finish it gave on some of the 2D drawings.


0 notes
Text
Week 4
Week 4 tutorial was by far the hardest task we were given to complete. Although some may not feel a difference to working in class or at home, I have always had more motivation and capacity to work efficiently when in a classroom setting. With this being the first week stayed home this term I significantly realised the difference in work progression.
This tutorial we were introduced to perspective drawing. I’ve always found perspective drawing difficult to get right which both excited me and troubled me when I started this task. I was enthusiastic to learn the tips and tricks to perspective drawing however knew that it would be a learning curve to understand. I found the task description minimalistic and difficult to understand taking me close to 20 minutes before I started understanding the basic concept of the task, however after procrastinating I followed the mentioned advice to just start! After drawing the first couple of lines onto the page the task ‘unfolded’ and I began to understand what was being asked.
Viewing the perspective drawing PowerPoint helped a lot in understanding the preparation work behind a perspective drawing, although being used to having specific measurements and dimensions for drawings I was slowed by the idea of being free to choose a size and vanishing point measurement.
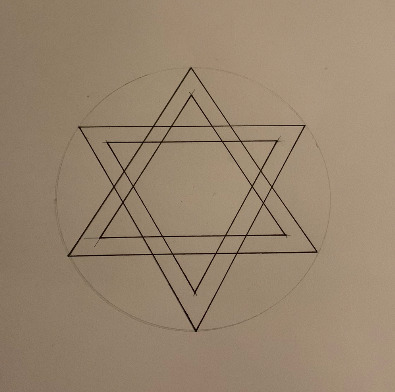
Learning how to draw circles in perspective really interested me as I didn’t realise how much was involved. Drawing and using the major and minor axis helped a lot with both the understanding of how to draw circles and obviously the application of it. Although I drew the circles in pencil first, tracing them with pen still lead to an error as I followed the wrong pencil mark I made, in future before tracing I will need to get rid of all the extra pencil lines.


0 notes
Text
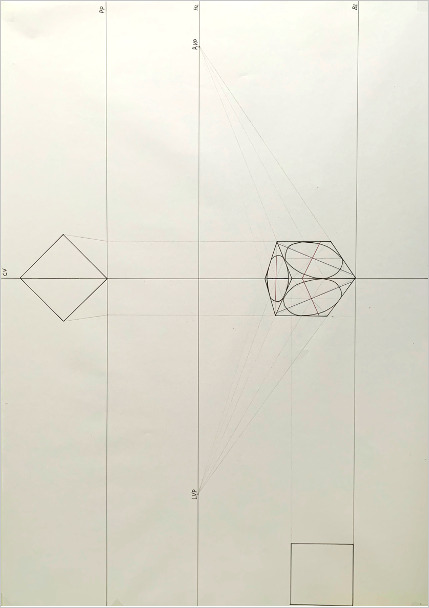
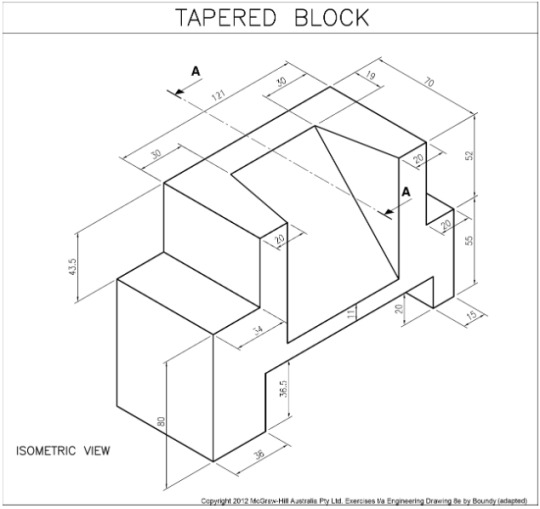
Week 3
During this weeks lecture we explored section and auxiliary views learning when and where to use them to convey information through AS1100. During the tutorial we practiced these drawing types using an isometric view of a tapered block as our object. I drew 2 primary projections (front and top) leaving space for the section view and the auxiliary view. Scaling the drawing 1:1 little space was left for the auxiliary view, making me draw it offset and rotated. I made many mistakes during the drawing as I rushed over the details drawn in the isometric view, I did this because these exercised look familiar to many I have done previously, therefor thinking it was an easier task than it proved to be. Following the saying ‘measure twice, cut once’, in future I will ‘measure twice and draw once’ to make sure these mistakes are not made.

4 notes
·
View notes
Text
Week 2
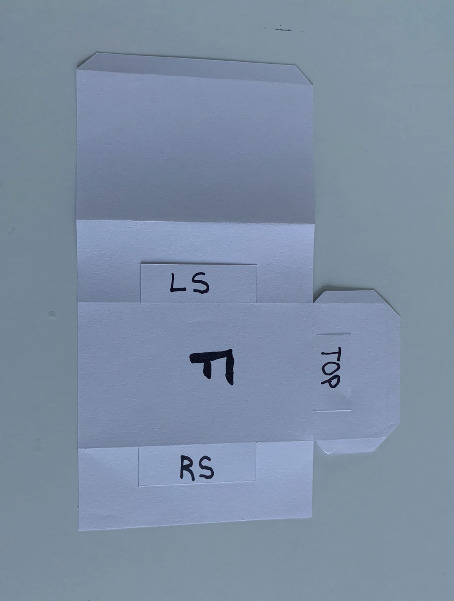
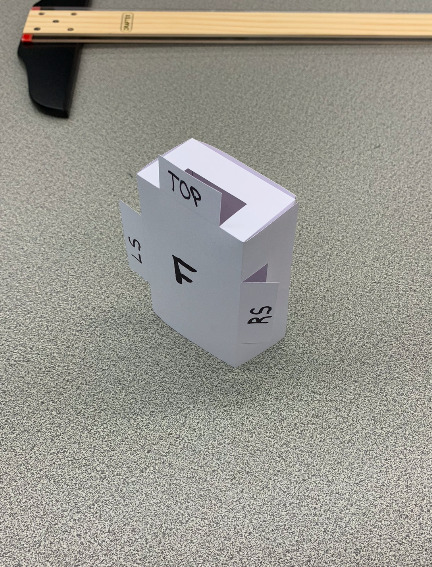
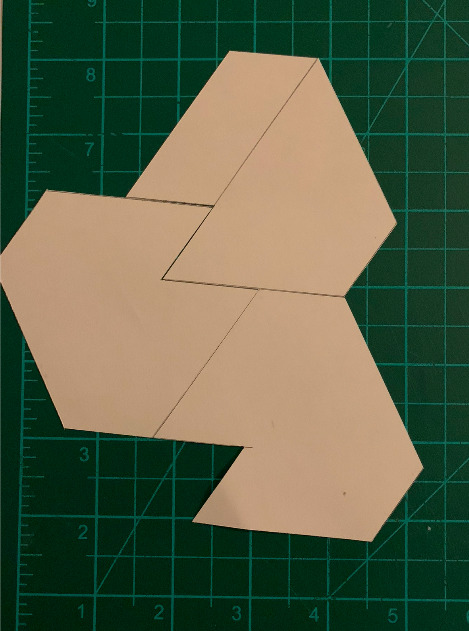
This week we started orthogonal drawings. For the first exercise we constructed a paper box to fit around our object, this exercise helped us understand different projection methods. Marking it for 3rd angle projection it was an easy reference to use when moving into the engineering drawing.

For the second exercise we drew our chosen object to AS1100 standards, including correct line weights, dimensioning, border and title block. Personally the biggest challenge was remembering the different line weights & some symbols. Having done engineering drawings before, the other aspects were simple and straight forward. For future drawings a good investment would be a letter template to rid the unprofessional handwriting style.
4 notes
·
View notes
Text
Week 1
Part 1)
During this tutorial we were challenged to read and draw engineering style drawings. Although I was unable to come into Uni, I followed my classmates learning process through the live stream. During high school year 11-12 I practiced engineering style drawing with given drawing equipment, these skills were quickly adapted to the given drawings and completed in pencil without trouble. Highlighting the drawn lines in black pen deemed a larger problem than expected. The use of the compass with a pen attachment proved more difficult than expected making some small errors.

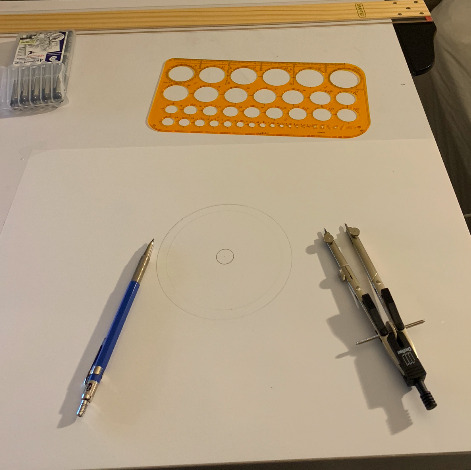
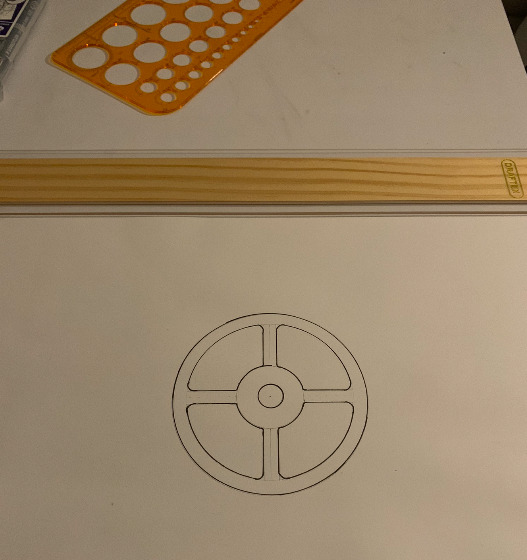
Part 2)
For part 2 of this task careful measuring drawing was needed. With each piece fitting like a puzzle, a small millimetre mistake would be visible. Even with the use of the T-Square and triangles the precision was difficult to achieve and I discarded failed attempts.
1 note
·
View note
Text
Welcome!
Im passionate about all things design, and through this blog, hope to share some of that with you. Happy reading!

0 notes