
lauren5420214
Lauren z5420214
Communications 2: Sketch Modelling Progress Blog
8 posts
Don't wanna be here? Send us removal request.
Last Seen Blogs

hopashinobu
Vanity Unfolded

younggiftedmind
Thinking of a master plan

njjameson-blog
Nate Jameson Motivation

maryamebrahimi-art
Untitled

fandomshipsinthenight
Your Fave Would Date You
Text
Week 10 - Completing the Loop
End of term reflections
Communications 2 allowed for an exciting term that provided a combination of resources and practical exercises which enabled me to develop skills in a range of practical methods for making and evaluating physical models as part of an iterative design process.
The experience has opened so many doors for me. In the past, I only viewed the unit as a stepping stone in which I could pick up skills and technological tools which Industrial Designers use. Now, I realise through this unit the significance of not only the practical skills, but also soft skills such as the ability to network, adaptability, communication, teamwork and openness to feedback.
During the period of this course, I learnt that the most effective way I learned was when I was in the DFL with my peers, actively connecting and seeking help from one another. I was able to not only learn how to use equipment in the DFL to model a prototype but grew from seeking feedback for my work regularly and open-mindedly. Another lesson learnt was knowing how useful it is to be able to research and utilise valuable sources beyond the provided material to broaden my learning. Making use of YouTube videos, even staff from the DFL, as well as tutorials beyond the course content really boosted the quality of learning and allowed me to effectively produce work when I was working remotely.
Although I thought that the emphasis on the content this term was on exploration and skill mastery, I came to the realisation that I really had only just briefly touched on how to actually use the interface of softwares such as 3ds Max. Practise and repetition being necessary to be able to delve below the tip of the iceberg, this wasn't the case for this unit as instead, we explored more broader processes of design from prototyping to 3d modelling. As such, I found it more eye-opening to begin my journey as an Industrial Designer by starting to learn how to use softwares and different equipment. I think it would have been perfect if we had more time dedicated to in-depth learning for some programs like 3ds Max and Rhino.
Something I felt I had the most fun with was developing my drawing techniques. It was intriguing to see what I could achieve with the addition of equipment I had never seen before such as the circle templates. I especially enjoyed the engineering drawings from Week 3 as it was comforting to have a set "right" answer within the boundaries of calculations and parameters.
Another key takeaway was the importance of paying attention to the smallest details of anything produced with the intention of it being presented. Although it not being exclusively taught in class, I think I've developed the habit of putting special consideration to the layout and aesthetic of assignments - even to assignments in the form of blog posts.
If I could redo this course, I would firstly acknowledge the importance of time management, especially the notion of getting started with something as soon as possible. I figured throughout the term I found myself pushing a task back as it seemed "too big of a task". Knowing it's better off to start with nothing than leaving it to the last minute in the hopes that I can make it perfect, I hope I can make use of my time smarter next term.
All in all, upon completing IDES1262, I was able to experience the design process from hand-sketching technical drawings to prototyping with blue foam and digitally fabricating, to finally reach the 3D printing stage. I hope I will be able to continue my learning with skills particularly that of actively seeking/providing constructive criticism, social and networking skills, and reflection. Thanks Gonz, Rob and Sarah!


from drawing, to hand modelling and digitally editing
0 notes
Text
Week 9 - Preparing a 3D Scan for Printing
Continuing our digitally focused activities this week, we explored the process that led to finally producing a 3D model of what we'd usually see in a virtual screen through 3D printing.
Part 1
Following from the presentation about 3D scanning at the MCIC in class this week, I was so glad to be able to first-handedly experience using another high-tech equipment of the 3D scanner. I thought it was really impressive how my hand-crafted foam model could be converted into a digital print without the need of another software. When scanning my model, I quickly realised the limitation of the process as the scanner was not able to read 100% of my model. This was understandable as my model had a very intricate design thus making it hard for the scanner to read the crevasses and hidden areas. Multiple scans in various positions were taken to maximise the use of the scanner, and overall, I was happy with the results.


Part 2
The next step was using the FFD Modifier tools in 3ds Max to fix any imperfections and ensure the model would be ready for printing. I had tried to use Rob's model of the bottle that he made in class for the activity as I did not yet have access to my scan of my bottle.
I was able to navigate 3ds Max a lot more easily this week as I was much more familiar with it from the previous exercises. Although I was faced with small challenges such as having to orientate viewpoints properly from first importing the file, I was able to effectively use the gimbal and pivot point tools to overcome the problem faster than I would have.
Adding the Edit Poly Modifier was a helpful tool to smooth out the surface of the object by altering the vertices' level with the pivot tool. However I realised this was a really slow process as it required a lot of attention to each individual vertex point one by one. Another way to flatten the imperfections was to use the Make Planar tool in Edit Geometry, which would average the vertex points to level the chosen surface. I found this was the faster option, although it meant I had to compromise making each vertex perfect. Also, this option only worked on flat surfaces, so I had to manually work on the vertices which had a concave surface.
When using the Edit Poly Modifier, another note taken from Rob's lesson was to check the Backface option in the Optional Culling section to ensure I was only altering the chosen vertices.
One key takeaway was the fact that the process of scanning the model was so much more faster than having to edit the imperfections on a software of the scanned model. I'll try to remember to take more time perfecting my model before scanning next time to help reduce the effort of having to edit in 3ds Max.


Part 3
The final step would be to orientate the model in Cura to prepare for printing. I used the rotating tool to fix the model upright as it was disoriented when first imported. Overall, I found the learning process really challenging but rewarding in finally being able to visualise projects that looked closer to completion through long hours of work. As much as I was fascinated by all the new learning and tutorial content, I hope to remember that it is only through practise and application where I am able to retain the memory.

0 notes
Text
Week 8 - Digital Iteration
Part 1
Exploring different applications to morph objects such as a sphere was a really interesting process in which helped me familiarise myself with 3DS Max as a first-time user. Using Modifiers such as Stretch, Noise and Bend to morph the shape of the sphere allowed me to understand that I had no grasp of knowing to what extent I should modify the strength of the tools; it took me a lot of time to know exactly how big of a number I should enter in X, Y and Z to produce a desired outcome of a particular shape.
Another challenge I faced was having trouble viewing my objects in all 4 viewports as some would disappear whilst I'd be fiddling around with my work. I tried to use the navigation tools such as zoom, pan and orbit, in the bottom right to no avail.

Stretch

Noise

Stretch + Noise

Stretch + Noise + Bend


Part 2
Applying the various tools to create an object in a deliberate manner was a challenge as it required a lot of proficiency and knowledge of the software. I found that it took me a lot more time than I had expected since I had to get used to the controls, such as knowing when to lift off the right-click of the mouse when creating round lines (I had various re-attempts trying to make a nice, smooth line of the cup handle). I figured even knowing how to select multiple desired parts at once by holding the "option" key and selecting the right buttons sped the process up by a whole lot. I think it would be helpful to familiarise myself with the shortcuts of the software whilst attempting future projects next time.
I was able to use the Bevel tool in the Edit Polygon category to create the cavity of the mug, and also learnt that Turbosmooth from the Modifier List could smooth the vertexes of the outer lines.
I also realised the importance of a good quality and working mouse, as working with a laggy mouse really slowed down the process, especially when working with the intricate vertices and lines.
Overall, this activity was definitely a slow process, but helpful in introducing me to the modifiers to manipulate simple primitives. I am excited for the future of this journey where I will hopefully be able to use the software with a great level of proficiency.


2 notes
·
View notes
Text
Week 5 - Sketching
Although simple and somewhat tedious, the sketching drills were a practice crucial to my ongoing development and skills as an industrial design student. Patience and concentration were key learning points from these activities.
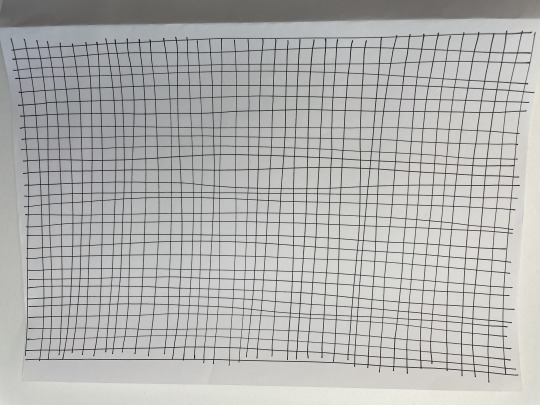
Exercise 1. Straight lines
I thought I had been doing a good job drawing straight horizontal lines, until I had to turn the page to make vertical lines to form a grid. I realised it was easy for me to consistently start my lines off an equally spaced margin from the left, but I had lifted my pen off at more random points when finishing my lines on the right hand side of the page. Something to help this could be using guide lines from the edges of the page to ensure all the lines are of equal length.
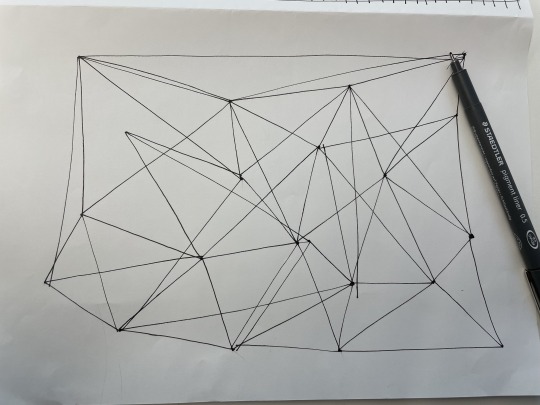
Exercise 2. Join the dots
I was fairly proud of my finished work for this exercise. Rotating the page was really helpful in maintaining precision and control when connecting the lines. Further, practising a few sketches in the air just above the page before adding pen to paper was really beneficial to producing a good outcome. Although a simple task, a lot of concentration was required when trying to look at the finishing point before drawing.
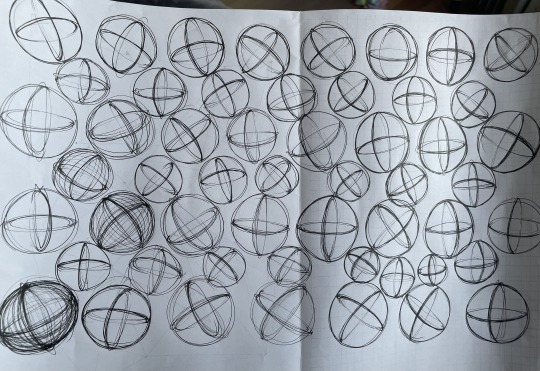
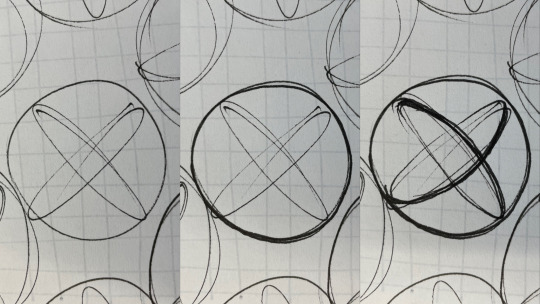
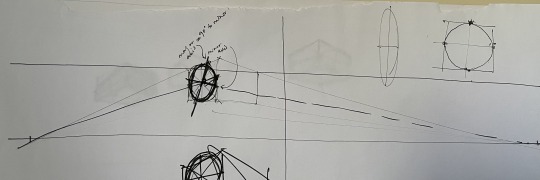
Exercise 3. Circles and Ellipses
The process of trying to construct perfect circles and adding contour lines to produce form required concentration, patience and practise. I figured that using the whole arm in fast movements was helpful producing first-hand sketches of the circle, then going over the sketch with slower and more controlled movements helped refine the image. Using this two-step process definitely helped create a more neater and complete look to the overall sketches.
Exercise 4. Ellipses in Perspective
It was difficult to grasp an understanding of how ellipses could be drawn into perspective but I figured the importance of the mid lines and their orientations. I am still yet to confidently grasp the concept of the major and minor axis, though. Time management was and is still something I have trouble with, hopefully I will be able to make more time to ask for assistance with this soon.
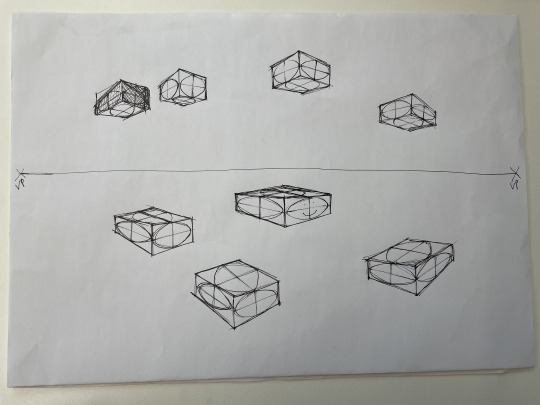
Exercise 5. Cubes in Perspective
Viewing the vanishing point from the drawing on an eye-to-eye level was helpful when trying to sketch without any reference lines. Further, drawing in mid-air right above the page to connect the vanishing point with the sketch was helpful executing the lines at the right angle. Drawing the ellipses in the cube's surfaces were pretty challenging due to the organic nature of the shape - making reference dots on the centre of the square parameter allowed me to construct these circles with more accuracy.
Exercise 6. Contour Lines
I think I did an okay job at creating a realistic looking figure with the contour lines. I found it difficult to keep consistent with the lines of the borders and started to redraw over the lines, which made the overall look a bit messy. Next time, I think it would be beneficial to start drawing the lines from the inner parts of the shape and following the grooves inwards to out, rather than just drawing from left to right or top to bottom.

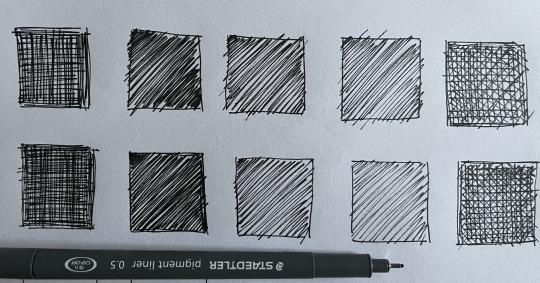
Exercise 7. Shading & Tone - Flat surfaces
I tried to experiment with different shades on the boxes with the diagonal shading, and realised how difficult it was to maintain a steady hand. I found that the more I applied less pressure for a lighter shade, the more unstable I became as I tried to keep my pen as far off of the page as possible. Taking the time to shade in the lines was a lesson learnt.
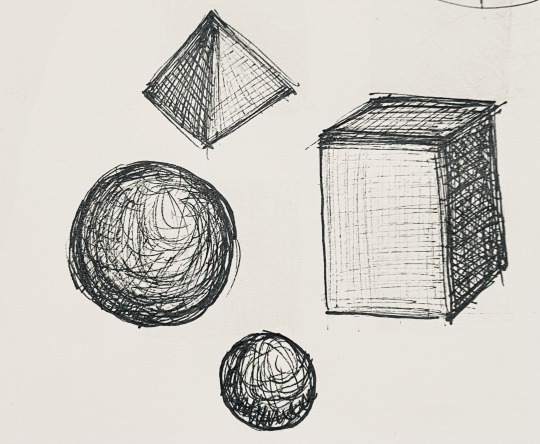
Exercise 8. Shading & Tone - 3 dimensional form
Trying to shade 3 dimensional shapes with pen was really difficult, as the line and angle of each stroke was so prominent, making the shading look messy and irregular. Using pencil would be the better option when making shades.
2 notes
·
View notes
Text
Week 4 - Perspective Drawing
This week's exercise gave me some practise applying the principles of technical perspective drawing, and further allowed me to develop my handling skills of the set squares and tee square.
Constructing a 2-point perspective drawing of a chamfered box was a challenging process as I had many failed attempts. First, I had miscalculated the space which was needed for the vanishing points to be fully seen on the page when extended from the Station Point (SP). This meant that I had to position my drawing more lower and towards the right hand side of the page. There were a few times where I had to recalculate the measurement of the three reference lines horizontal to the page, and am still not too sure if there is an easier way to figure it out before drawing it all out to only visualise it then.

fig. 1 drawing multiple vanishing lines to see which one 'fits'
Upon following the instructions, also realised I had drawn far too many guide lines onto the page when they were supposed to be for reference only. When the time came for me to erase these lines, this only became unnecessary work and I was stressing over erasing the lines that I needed. Next time, I'll remember to identify which lines are drawn lines and which are guidelines.

The overall construction turned out okay. I realised using a real model of the chamfered box to refer to when drawing really helped and definitely sped up the process.

2 notes
·
View notes
Text
Week 3 - Section and Auxiliary Views
This weeks tutorial was helpful in allowing myself to practice applying the principles of third angle orthogonal projections, section and auxiliary views as well as AS1100 drafting standards. I found the task quite challenging as it required a lot of visualisation, where I tried to imagine the face of objects when viewed in different perspectives and orientations. Further, it was a joy to celebrate my successes upon understanding my mistakes in the past and making progress in my learning.
The construction of the sketch of the top and front projections of the object was fairly easy as the measurements were provided. However, I found that when lining up the top and and front perspectives to the AS1100 drafting standards, the shapes didn't perfectly align. This indicated the mistake of misusing the T-square and lack of precision when ruling. Hopefully in future tasks I will be able to use the equipment to its fullest potential.

figure 1. top and front views not properly aligned
Something that I was able to remember to do was starting my drawings nicely spaced from the edge of the page. This was something that I reflected on in Week 1, where I wasn't able to draw my entire sketch on the page due to poor placement and planning. This time, I was able to fit all of the projections onto the page and the drawings turned out nicely centred. Forming a to-do list in my head prior to putting pencil to paper was really beneficial.
I found that the labelling of the measurements could be a lot more uniform in their placement from the edge of the shapes. I felt that my attempt of the exercise looked a little messy due to the labelling and could be something to work on next time.

figure 2. final orthogonal drawing
1 note
·
View note
Text
Week 2 - Orthogonal Projection & AS1100 Standards
Week 2 involved drawing and crafting to practice applying methods of orthogonal projection and AS1100 drafting standards. As this weeks activity required students to not only draw but measure using a given standard as well as cut nets to construct 3D shapes, I found this to be a fairly challenging task compared to Week 1. Overall, the activity gave me insight into viewing the different perspectives of objects however found constructing the net for this became
Constructing a net of my chosen object (Copic marker) was a time-consuming process. This was because I had used the edge of the page as the top side of my net instead of a drawn line, thinking it would be helpful to have a straight-cut edge, instead, this made referring to the example picture confusing.
Further, I think drawing the net using different lines such as a dotted line to indicate folding and a slightly thicker line to indicate a cutting line would have made the construction process easier. I was able to deduce from this activity that, taking the time and effort to draw something in its earlier stages definitely helps when in having to construct it later on.
One major complication that I faced was realising that I had positioned my sketch far too close to the right so I had run out of space by the time I had gone to draw the right wing of my net (fig. 1). Next time I will try to make smarter use of my space by starting my drawings with spacial awareness in mind.

figure 1. orthogonal net view from the back
My speedy colleague had made me a net that covered the Copic pen if it were standing vertically. It was nice to have two different perspectives of the object.


figure 2. finished orthogonal drawing of a Copic marker
Using a pen of a thicker lineweight would definitely help when producing work to be scanned next time.
2 notes
·
View notes
Text
Week 1 - Drawing Instrument Exercises
This weeks tutorial covered an introductory activity on how to use drawing instruments such as T-squares, compasses and set squares as a fundamental skill in industrial design. I was challenged by the amount of precision, time and detail that was needed to produce clean and accurate lines. I was prompted to try and make a habit of being precise when drawing to further hone my skills as an industrial designer.
Part 1
Lining up a T-square against the edge of the table and page was a significant help in achieving lines of the right measurement and perfect angle. As this was a newly introduced practice, I was unsure how to use the equipment to its fullest potential however with Rob's assistance understood that T-squares were more helpful when used with set squares. Although the concept was simple, setting up the right set squares to acquire the exact angle was a very unfamiliar practice. I found that using graph paper or gridded rulers was a helpful alternative to T-squares.

figure 1. setting up set squares against a T-square
The final results:


Part 2
Sketching the tessellating patterns required a great deal of precision specifically in the line weight of the pencil. As seen in figure 1, using a blunt pencil was not ideal. However in the absence of a mechanical pencil, I found that paying attention to the amount of strength holding the pencil down helped create equally thin lines.

figure 1. a blunt pencil and lines of uneven thicknesses
I was reminded that using a ruler to cut using the scalpel felt tremendously different to when using a ruler to sketch lines. This was because of the ever so slight difference in thickness of the metal bit of the scalpel compared to thicker pencils and pens. Next time I will try to remember to hold the ruler slightly closer to the guideline when cutting with a scalpel.

figure 2. uncentered scalpel-cut
I was unsatisfied with the final product, mainly because the patterns didn't tessellate perfectly, but also because the cut lines could have been cleaner. In the future I will make sure to use more pressure when using a scalpel to ensure the line cuts in one clean stroke.

figure 3. tessellating patterns put together
1 note
·
View note