
Welcome! Thanks for visiting my blog.My name is Michael Wildoer and I enjoy exploring new technologies, particularlydigital electronics. I then write about what I discover, and publish it on my blog, to share my experiences and hopefully inspire and educate readers.I'm a professional digital electronic design engineer, but also have a strong background in software development, developing products for desktop computers (Windows, MacOS and Linux), cloud servers (Amazon AWS) as well as mobile apps for iOS and Android devices.Check out my LinkedIn profile for details.
Don't wanna be here? Send us removal request.
Statistics
We looked inside some of the posts by lavaworkshop and here's what we found interesting.
Average Info
Notes Per Post
9
Likes Per Post
9
Reblog Per Post
0
Reply Per Post
0
Time Between Posts
1 day
Number of Posts By Type
Text
10
Last Seen Tumblr Blogs


Fun Fact
Tumblr has 411 employees.
Text
The Arty RISC-V computer
Part 1: Summary
This project is a RISC-V System-on-Chip (SoC) softcore for the Arty FPGA board based on the ‘Potato’ RISC-V implementation by Kristian Klomsten Skordal, an RV32I processor with various peripherals including a 32-bit timer, generic GPIO, memory, interrupt controller, and UARTs. It extends this implementation with a VGA video controller, so it can display text (and in future, graphics) on a VGA monitor and so enable the user to interact with it visually.
It is intended for education and experimentation, and was inspired by Project Oberon (see http://www.projectoberon.com). Project Oberon is a design for a complete desktop computer system from scratch by Professor Niklaus Wirth (the inventor of Pascal and Modulo-2). ”Its simplicity and clarity enables a single person to know and implement the whole system, yet still providing enough power to make it useful and usable in a production environment.”
To support the deep exploration of the processor and SoC, an Integrated Development Environment (IDE) for RISC-V has been created. This IDE enables users to disassemble RISC-V machine code, and thus learn about the internal structure and function of the RISC-V architecture and it’s peripherals, as well as develop apps in the C language. In addition, the openness of the design makes it possible for users to reconfigure and extend it.
For simplicity, from here on the hardware will be referred to as the “ArtyRV board”, and the software will be referred to as “RVStudio”.
This project utilizes the following tools and technologies to create a range of products:
Tools
Vivado IDE (Xilinx)
FreedomStudio (SiFive)
Xojo IDE (Xojo)
TextWrangler (Bare Bones Software)
OpenOCD
Technologies
RISC-V processor (SoC)
FPGA development
VHDL coding
RISC-V machine coding (RV32I)
RISC-V assembly coding (RV32I)
C coding
VGA video format
Hardware
Xilinx Artix-7 FPGA board (Arty)
VGA PMod module
Olimex ARM-USB-TINY-H (high-speed ARM USB JTAG)
Products
ArtyRV board:
An Arty FPGA board running a softcore RISC-V SoC
A VGA output with 1280x720 (HD) and 1920x1080 (full HD) resolutions
RVStudio:
An interactive RISC-V disassembler for Windows, Mac and Linux
An integrated command line terminal (UART serial port)
An Intel Hex, Xilinx Coe, Bin file converter
An IDE to develop apps in the C language
Future extensions (in no particular order)
VGA output extended with a memory-mapped character RAM and PCG (custom fonts)
Addition of SDRAM and Flash memory interfaces to the RISC-V SoC
Addition of a sprite engine, and keyboard and mouse input to RISC-V SoC
Integration of the gcc toolset for RISC-V Assembler compilation
RISC-V program upload, monitor and debug system via UART
Host font extractor, so various fonts can be uploaded to the PCG
Addition of a superscalar unit (instruction-level parallelism) to the processor core
RISC-V Assembler with multi-file source code editor
Note: Some parts of this project are not yet fully complete. When they are complete, many of the materials will be made available for download.
1 note
·
View note
Text
The Arty RISC-V computer
Part 2: Introduction
In the 1980s, the first personal computers had 8-bit CPUs like the Zilog Z80, with clock speeds of 1.77 MHz, 16k of RAM, 12k of ROM, and even a built-in Microsoft Basic interpreter. They displayed text on a monochrome monitor, usually a green screen, in a 64 character x 16 line format, and also had a blocky 128x48 graphics mode for plotting graphs or playing games.
The great thing about those first personal computers, like the Tandy TRS-80 (or the System-80 in Australia), was that everything about the computer was accessible and open to the user (CPU, logic chips, cassette-based data storage system, composite video output, keyboard matrix, etc.), and all details about the computer, even the complete circuit diagrams, were included in the computer’s Technical Manual. If you wanted to learn how computers worked and how to program them, you could. It was an exciting time!

Figure 1. The System 80 Technical Manual
The most amazing thing about those first computers, though, was that they could be used for serious applications like word processing, spreadsheets, and software development, even when running at 1.77 MHz. How is it that PCs now run at around 3.0 GHz (1700x faster) but can still seem slow at times? It would be great if you could learn about the inner workings of a computer, program it at the bare metal level, and yet enjoy high performance as a user even though it runs at modest clock speeds.
The new RISC-V processor can provide exactly that - it’s a brand new open-source architecture designed from the ground up to use all the innovations in microprocessor design made in the last 40 years, but also eliminates all the clutter and complexity of legacy Instruction Set Architecture (ISA) designs like x86 and ARM. Its other great features are its scalablility and modularity, making it suitable for low-power embedded IoT devices, all the way up to desktop computers and high-performance servers.
To complement the RISC-V processor, we need a suite of useful peripherals, such as UARTs (serial ports to get data in and out), RAM, ROM, GPIO, a video output, a data storage system, etc. In other words, we need a RISC-V System-on-Chip (SoC), which can form the basis of a usable desktop computer. To make it compatible to modern technology, we could use VGA or HDMI for the video output, and flash memory for data storage (preferably an SD card).

Figure 2. The Worp-9 word processor for System 80
This project describes my exploration of the RISC-V processor in detail, by programming a RISC-V SoC into the low-cost Arty FPGA board. In addition, I look at extending the SoC to include a VGA video output (to display text and graphics), and building a simple cross-platform toolset to program it easily in assembly language. In this way, I’ll aim to make a complete computer which can be programmed to run many different types of simple applications, and so offer an excellent platform for education, innovation and fun.
1 note
·
View note
Text
The Arty RISC-V Computer
Part 3: Finding a RISC-V core for the Arty
The Xilinx Arty A7 is a popular, low-cost Artix-7 FPGA Development Board designed for makers and hobbyists, with the capacity to run a soft processor. It includes a range of Input/Output (I/O) devices, such as LEDs, 7-segment displays, flash memory, SDRAM, and expansion connectors for PMOD modules. PMODs enable a range of additional hardware to be added, such as a VGA output, OLED display, switches, and A/D converters, which can be driven directly by the Artix-7 FPGA.

Figure 3. The Xilinx Arty A7 FPGA board
The other great benefit of the Arty is that it includes Vivado Design Studio (the license is device locked to the Arty), a software suite produced by Xilinx for synthesis and analysis of Hardware Development Language (HDL) designs. Vivado enables developers to synthesize (compile) their designs, perform timing analysis, examine RTL diagrams, simulate a design's reaction to different stimuli, and configure the target device with the programmer (see en.wikipedia.org/wiki/Xilinx_Vivado).
After I chose the Arty board for this project, the next step was to find an existing RISC-V processor design which could be loaded onto it. The first stop was the SiFive website, which has a downloadable Xilinx bitstream file containing a basic RISC-V SoC for the Arty board. In addition, SiFive offers their FreedomStudio development suite, which makes it easy to write programs in C, and upload them to the SoC.
I signed up at the SiFive website, downloaded and programmed the Arty with the RISC-V SoC bitstream, and LED0 changed colors to indicate the processor was running. Fantastic! Then I downloaded and installed FreedomStudio (based on Eclipse), and compiled the simple UART example project bundled with it. I uploaded it directly from FreedomStudio, and watched my serial terminal program dump out a text banner of the SiFive logo. Great stuff!

Figure 4. The SiFive logo
I thought I’d also be able to write RISC-V assembly language (ASM) code with FreedomStudio, but this doesn’t seem to be available. It is possible to view the assembler code for a compiled C program in a panel in FreedomStudio, but it’s not the ASM bare metal level of access I was hoping for. That was a bit disappointing. Maybe they’ll add this to a future version.
Now I wanted to have a closer look at their RTL source code, to see how they had built the RISC-V processor in VHDL/Verilog. I also wanted to add my own peripherals, such as the VGA output. I signed up on their website for access, and my request was quickly granted. I then downloaded the RTL source code, only to discover it was obfuscated (ie. mixed up to make it unreadable by humans). There were some fixed peripherals, and very small amounts of on-SoC RAM, effectively making it impossible to extend in the way I’d planned. Another disappointment, though I guess understandable, as they are selling their IP on a commercial basis.
The second promising RISC-V implementation I found was open source, and available on Github. It’s called the ‘Potato’ RV32I processor, “A simple RISC-V processor for use in FPGA designs”, and maintained by Kristian Klomsten Skordal (see github.com/skordal/potato). Kristian provides excellent instructions for setting up the Potato processor on the Arty board, and in his documentation suggested using the RISCV GNU toolchain repository site to build and install a 32-bit RISC-V toolchain.
The RTL code was in VHDL (my preferred language), using the Wishbone interconnect - I would have preferred AXI, but Wishbone is good too, and it’s open source. It looked like I was finally able to do everything I wanted to with a RISC-V SoC for Arty!
1 note
·
View note
Text
The Arty RISC-V Computer
Part 4: Getting the RISC-V core running
It was fascinating to read through the ‘Potato’ VHDL source code in Vivado and see how the RISC-V processor was implemented. The design includes a fairly small amount of RAM and ROM, enough for experimentation, and the ROM contents are set in Vivado by assigning a Coefficient (.coe) file to the ROM IP core. I started the synthesis stage in Vivado and it worked fine. All good so far.

Figure 5. The Potato RISC-V processor
Then I hit a major roadblock - the implementation stage failed with thousands of timing violations. The worst was a -3.3nS Worst Hold Slack (WHS) violation, but there were many smaller ones. The thing is, when you’re working with someone else’s creation, and it’s complex, it’s hard to know where to start to debug the problem.
I had to do a deep-dive into the Xilinx documentation about timing closure to try to find a solution. The Xilinx documentation is very well written, but there is a lot of it - the ‘Timing Closure User Guide’ (UG612) is 254 pages, the ‘Design Analysis and Closure Techniques’ (UG906) is 278 pages, and the ‘UltraFast Design Methodology Guide’ (UG949) is 283 pages.
After quite a bit of reading about the Xilinx FPGA internal clocking topology, clock routing, ways to resolve clock domain crossing issues, etc. I came across a video on Vivado timing closure techniques which showed ways to enable physical optimizations. When I enabled these, the compile time increased, but I managed to reduce the worst timing violation down to -2.6nS. Better, but not good enough, and there were 1000s of other smaller violations which were still unresolved. Clearly, I needed to find a global solution…
After much mulling and reading, I re-examined the clock generator used in the Potato design. I’d followed all the instructions on the Potato Github reposition precisely, and it mentioned that it had been tested on Vivado 2018.1, the version I was using. Strange. I once again checked out all the controls for setting up the Clock Management Tile (CMT) via the Clocking Wizard IP core, and then noticed the ‘Clocking Options’ source was set to a default of 'Single ended clock capable pin’, but that a 'Global buffer' option was available. Exactly what I was looking for. I changed it to 'Global buffer’, and the implementation stage compiled correctly. Further progress.
Amongst a range of other files, FreedomStudio generates a .hex file when a C program is compiled, so I had to find a way to convert this .hex file to a .coe file to initialize the Potato ROM. The file formats are quite simple, and I found C source code (a file named ‘hex2coe.c’) on Github which would do the job. I used the command line C compiler included in the Visual Studio Community Edition to build an .exe file I could use for the file conversion process, and then converted the .hex file to a .coe. The .coe loaded up into the ROM and I subsequently generated the bitstream, but nothing happened after I uploaded into the Arty.
I had a think about what was going wrong, and came up with a path to resolve it. I realized that FreedomStudio is designed to compile C programs for the SiFive Arty bitsteam SoC, not Potato, which had a different memory map and configuration settings. I wondered if Kristian had tried FreedomStudio, as it would be a great way to program the Potato SoC, if it could be made to work. I also thought Kristian might be able to send me a ‘known good’ .coe file I could use - using as many ‘known good’ components in a prototype system is a great way to track down why a system is not working, and get it working, before extending it.

Figure 6. The FreedomStudio splash screen
I emailed Kristian to tell him about what I’d found, tell him about FreedomStudio, and ask him for a test .coe file. He said that the Potato design was originally done on an earlier version of Vivado, that he had upgraded to 2018.1, and it had compiled and worked on the new version as well. He suggested Xilinx may have changed some defaults in the clocking wizard in 2018.1, which would explain why the default ‘Clocking Options’ value in my build was different. It just shows that the simplest things can cause massive issues when programming FPGAs, and diligence and research is the key to resolving them.
Kristian kindly provided me with a prebuilt .coe file containing a SHA256 hash example program for Potato. I assigned it to the ROM IP core in Vivado, compiled and uploaded the Xilinx bitstream into Arty, and it worked perfectly! It was fantastic to see the LEDs flashing on the Arty board under RISC-V processor control. Kristian also said he would look into FreedomStudio, which was excellent, as FreedomStudio would make a superb IDE for the development of C programs for the Potato processor.
I now had a fully operational RISC-V SoC running on the Arty board, with a range of Wishbone interconnect peripherals, including a 32-bit timer, generic GPIO, memory, interrupt controller, and UARTs. I also now had the ability to add more peripherals, including a VGA output. I was pleased with progress, but I needed some new software tools to help me with disassembly of .coe and .hex files, so I could check out the cold boot initialization code which starts up the RISC-V. Also, having a fast and easy-to-use assembler would be very useful for writing ASM test code, and run it at the bare metal level…
1 note
·
View note
Text
The Arty RISC-V Computer
Part 5: Designing a VGA video controller
It’s great to have a RISC-V SoC running, but a real computer needs a video output as well, so it can display text and graphics and enable the user to interact with it visually. You want to be able to hook up an LCD monitor. That makes it much, much more interesting, and expands the range of useful applications it can run. Also, it would be good to have a video output that is fast, much faster than a serial terminal, and that means it needs to be memory-mapped.
One of the most simple and flexible video output systems ever devised is VGA. The ubiquitous 15-pin D-connector was first introduced with the IBM PS/2 line of computers in 1987, and can still be found on most Windows computer and LCD monitors today. The great thing is that it also supports high-resolution displays, such as 1080p, the HD standard for the current generation of TVs. If your monitor or TV only has HDMI inputs, there are even inexpensive VGA-to-HDMI converters available on eBay and other online marketplaces that will convert VGA to the right format.
In it’s day (circa 1980), the Tandy TRS-80 was pretty fast, and part of the reason it felt that way was that it used a memory-mapped display RAM for it’s 64 character x 16 line output. Write the character ‘A’ (ASCII code 65) into a particular memory address of the display RAM, and the letter ‘A’ would appear on the screen. Updating the entire screen with fresh text only required 1024 bytes to be written to the right addresses.
The designers also provided a simple graphics mode, where the 64 ASCII codes from 128-191 generated graphics characters (a set of 2x3 dots at each character position), which were used for many games. Though the games look primitive by today’s standards, the efficiency inherent in the graphics system design enabled it to be implemented in a very small amount of RAM, and also made it possible to display information in a pixel-based format.

Figure 7. Eliminator on the System 80
A key reason for this approach to the design of the video output was that the amount of RAM available in the TRS-80 was very limited. With an FPGA like the Arty, this is also the case, unless we find a way to effectively use the SDRAM or flash memory on the Arty board for the video output. As the first step in creating a useable video output for this project, I’ll focus only on utilizing the available resources in the FPGA itself to create a display design similar to, though a bit better than, the TRS-80s.
In it’s current iteration, the ArtyRV board has had it’s VHDL extended to include a VGA output in two different resolutions: 1280x720 (HD) and 1920x1080 (Full HD). VHDL has also been added for a simple single character ROM-based font containing the letter ‘A’ (for proof-of-concept).

Figure 8. VGA 1280x720 (HD) output of the ArtyRV board
This will be extended with a memory-mapped character RAM and Programmable Character Generator (PCG, for custom fonts) in the near future. RVStudio will also be extended to include a host font extractor, so various fonts can be created and uploaded to the PCG via UART.
1 note
·
View note
Text
The Arty RISC-V Computer
Part 6: The beauty of bare metal RISC-V
When learning about any new field, it’s good to start simple and focus on the basics, then build your knowledge at a comfortable pace, so you can learn, explore and try out different things without feeling either bored or overwhelmed. It’s also important to feel satisfaction when making progress, achieving successes, and being in control of the process along the way. Learning should ideally be an adventure.
A simple computer based on the RISC-V processor on the Arty board (the ArtyRV Board) is a great way to learn about all facets of how computers work. This includes:
● the RISC-V as a Central Processing Unit (CPU) ● Read-Only-Memory (ROM) to store the boot program ● Random Access Memory (RAM) to store programs and data ● serial ports to connect keyboards, terminals, and peripherals ● General Purpose Input-Output (GPIO) ports to provide digitial input and output controls ● timers which can be programmed to trigger periodically to manage various types of events ● a video output to display text and graphics on a monitor or TV ● excellent expandability (analog I/O, DDR3, Ethernet, DSP, flash, Arduino header, etc)
When coupled with user friendly tools which run on a host computer (Windows, MacOS or Linux), such as the interactive RISC-V assembler and disassembler in RVStudio, this computer should provide an excellent playground to learn about and deeply explore a complete computer. In the process, the user will become familiar with the RISC-V architecture, a rich assortment of computer I/O, and even how to program an FPGA using HDL. All these skills are current, leading-edge areas of computer engineering and electronic design, which have a high and ongoing value in the computer industry.
As mentioned in the introduction, the RISC-V processor is a brand new open-source architecture designed from the ground up to use all the innovations in microprocessor design made in the last 40 years. It’s also highly scalable and modular, making it suitable for low-power embedded IoT devices, all the way up to desktop computers and high-performance servers. Thus, deeply understanding the RISC-V internal architecture (particularly the RV32I base) should be a valuable professional skill for many years to come.
In comparison, there are many types of microcontroller and Linux-based experimenter boards available, such as the Arduino, Beagle Bone and Raspberry Pi, but they do not really qualify as a simple, complete computer. Arduino is great for experimenting, but doesn’t have a built-in video display. Beagle Bone and Raspberry Pi are quite powerful and complete, but are not simple - Linux can be overwhelming for first-time users (just watch the boot sequence once and you’ll know what I mean).
Programming a processor using C, particularly microcontrollers, is very common and effective, because one of the key powers of C is it’s portability ie. you can write a C program for one microcontroller, and easily recompile it to run on another. In other words, you write it once, and you can re-use it again and again in the future. Also, extensive C libraries are available, which make it very easy to get quite complex programs up and running fast.
This power of C, however, is actually it’s downfall when you want to learn about a processor’s internal architecture, since it hides the bare metal. Assembly language (ASM) gives you full program control of the bare metal ie. at the register level.
Also, RV32I Assembler is intended to be useful forever, as described by the RISC-V processor’s inventors: “RV32I is frozen and will never change, which gives compiler writers, operating system developers, and assembly language programmers a stable target” [p5, The RISC-V Reader, by Patterson and Waterman].
Thus, the ArtyRVI board coupled with the RVStudio assembler and disassembler provides users with a fantastic way to learn about the new RISC-V processor in a fun and deeply interesting way - the simplicity of a computer which anyone can understand, with a richness of possibilities, just like Project Oberon.
1 note
·
View note
Text
The Arty RISC-V Computer
Part 7: An interactive RISC-V disassembler
The gcc toolchain for RISC-V is incredibly powerful, mature, and flexible - perfect for professional C-code developers who write software for products which contain the RISC-V processor. However, gcc is also very complex and works at the command line, so is not a good starting point for new users to learn about programming the RISC-V. FreedomStudio is a great step forward from gcc towards an easier-to-use C-code development environment, which is really useful for many developers. However, as mentioned in the section, “The beauty of bare metal RISC-V”, C-code inherently hides the inner workings of the RISC-V processor at the bare metal level.
That’s why RVStudio was created. It’s an integrated tool which enables programmers to see everything, and control everything, at the register level. At this point, RVStudio only contains a RISC-V disassembler for the RV32I ISA, the simplest architecture available. It has some really neat features, though, including support for ABI, pseudoinstructions and branch labelling.

Figure 9. Raw RVStudio disassembler output
The screencap above shows the disassembled output of some machine language (with ABI and pseudoinstruction conversions disabled), so you can compare it with the original assembly language source code (on the right).
Pseudoinstructions are artificial assembler instructions (like a macro built from one or more regular instructions), which are specifically designed to be easier for programmers to read and understand. This clarity helps programmers write better quality code, and has no performance penalty. It’s also a clever way the RISC-V designers used to reduce the number of instructions (and thus chip die area and cost) of the RISC-V, without causing any pain for programmers. For example, instead of creating a special NOP (No OPeration) instruction, the NOP pseudoinstruction is actually ‘addi x0, x0, 0’. This instruction effectively does the same thing as a ‘real’ NOP ie. nothing, but costs nothing as well.

Figure 10. RVStudio disassembly with pseudoinstructions enabled
When the Enable pseudoinstructions checkbox is enabled on the RVStudio window, all the raw instructions are replaced by their nice, clean pseudoinstructions. You’ll notice that the 32 registers in the RISC-V, though, are represented by their register names, x0-x31. See the screencap above.
ABI stands for “Application Binary Interface”, where the bland register names, x0-x31, are replaced with names which have greater meaning for the programmer. For example, the Stack Pointer (sp) is actually x2 (see table below). Many other registers have similar specific (or suggested) functions.

Figure 11. ABI conversion table
Now, if we enable the Enable ABI checkbox on the RVStudio window, the ABI registers are displayed, making the assembly source code easier to read.
If you compare the ASM source code, you’ll see that the disassembler produces very clean ASM source code from the machine code (the raw bytes decoded and executed by the processor) fed to it. It also automatically adds branch labels, to make it easier to see where branch instructions jump to. As you can see above, the assembly language code in RVStudio is even easier to read, more so than the original source code it was derived from!

Figure 12. RVStudio disassembly with pseudoinstructions and ABI
Since RVStudio is intended for users who want to deep dive into the internals of the RISC-V processor, there is an even more powerful mode built into RVStudio which helps users manually decode opcodes in the machine code (the raw 32-bit data words). When you enable the checkbox named Display ‘Opcode decode’ column, the raw machine code source is displayed as a 32-bit binary number, along with periods which separate out the key opcode bit fields (the main opcode bits are 6:0, Rd, Rs1 and Rs2, the minor opcode bits are 14:12, etc).
This separation of bit fields into segments helps enormously when manually visually decoding the RISC-V machine code, which is something designers need to do when they test the opcode decoding circuitry of their latest and greatest RISC-V ISA extensions. Now that is deep diving to the bare metal!

Figure 13. RVStudio disassembly with ‘Opcode decode’ column
An important part in the development of both hardware and software is testing and verification - making sure the thing you’re making actually works, and conforms to your design specification. In this case, the disassembler must correctly decode RISC-V machine code and convert it into assembly language instructions according to the RV32I ISA specification. This specification can be found at https://riscv.org/specifications/.
A good way to get high opcode test coverage of the disassembler is to feed it a full set of machine code instructions (ie. all the opcodes in the RV32I opcode table), and then check that it decodes and displays the correct assembly language instructions corresponding to that machine code. This needs to include tests for pseudoinstructions as well, since these usually have very specific register and immediate data values. Including tests of boundary cases is a good way to minimize the number of tests, and maximize coverage.
To accomplish this, a binary (radix=2) mode was added to the .coe file loader in RVStudio, so that binary instructions (eg. “00000001010100101000001001100111”) could be added manually to the opcode test list. Binary instructions are a good approach, as they enable much easier binary field extraction when manually preparing the test data (the test data set I created is included with the project files).
In addition to this high coverage approach to testing, we can also disassemble compiled code (whether compiled from assembly language, or C code) and verify that the machine code is converted to appropriate assembly language. We have the benefit of a simple RISC-V assembly language program in the ‘Start.S’ ASM file, which is bundled in the Potato repository on Github. The ‘Start.S’ ASM file contains the assembly language code which initializes the RISC-V processor before it starts executing the ‘Main’ entry point in the C program.
Of course, we also have the prebuilt .coe file containing a SHA256 hash example program for Potato. I converted this file to binary (using the RVStudio file converter) and then loaded it into the disassembler. The screencaps above show the disassembled output created by RVStudio from this SHA256 hash program (the portion displayed is the initialization code from ‘Start.S’), side-by-side with the ‘Start.S’ ASM source code file. As you can see, they match up perfectly.
Note: The disassembler in RVStudio is nearing completion, with some pseudoinstructions still to be added, and some additional tweaks to be made.
1 note
·
View note
Text
The Arty RISC-V Computer
Part 8: Programming the ArtyRV board in C
The next step in making the ArtyRV board do useful things is to set up the necessary tools to program it in the C language. The great thing about C is it’s portability, and that it comes with a wide selection of support libraries, which make it easy to write useful programs quickly. C is a very popular and widely used commercial language, so is a very good language to learn, particularly as it provides low-level access to the hardware on a processor board (though not quite as low-level as assembly language).

Figure 14. The seminal book on C
The tools to build executable programs from C source files using the GNU toolchain for the Potato processor operate from the command line ie. there’s no nice Integrated Development Environment (IDE) like FreedomStudio to help you with managing your project’s source code files, single-stepping your program, etc. You basically type build commands into the Terminal (also called the Console) and hit the return key to run them.
However, it’s good to know a little about ‘makefiles’, ‘linker’ scripts, and how the GNU build process uses these files to convert C source code files into an executable program. Luckily, Kristian Skordal has provided some example software as C source code (as well as simple makefiles and linker scripts) for the Potato processor, and these can be found in the ‘potato/software/‘ folder.
For details about how ‘makefiles’ work, please check out the GNU Make Manual at https://www.gnu.org/software/make/manual/. Simply reading Chapter 2, ‘An Introduction to Makefiles’, will give you an excellent summary of how the ‘make’ process works (ie. how C source code files are converted into relocatable object files).
For information about how ‘linker’ scripts work, please check out https://sourceware.org/binutils/docs/ld/Scripts.html. This explains how the linker script joins together the relocatable object files created by the ‘make’ process into a single executable program, which can then be uploaded and executed on the ArtyRV board.
The Git version control system (and the GitHub website, a hosting service for version control using Git) is one of the most popular in the world, and well worth learning about. A very effective way to learn about Git is to read the free Pro Git eBook (available at https://git-scm.com/book/en/v2), which can be downloaded in PDF (and various other) formats.

Figure 15. The Git version control system
On the Potato readme file (see https://github.com/riscv/riscv-gnu-toolchain), it mentions how to install the 32-bit RISCV GNU toolchain by following the installation instructions at https://github.com/riscv/riscv-gnu-toolchain.
I’m a Mac user (though I also use Windows and Linux computers regularly), so I followed the MacOS installation instructions on that page, but with a few necessary fixes in the installation process (take special note of steps 2, 7 and 8 below):
1) start the ‘Terminal’ app 2) navigate to the folder where you want the RISCV GNU toolchain to be installed, ensuring that the path to that folder has no spaces in it. If there are spaces, the build process in step 7 won’t work. 3) clone the Github repository using the command:
$ git clone --recursive https://github.com/riscv/riscv-gnu-toolchain 4) install Homebrew for MacOS as described at https://brew.sh 5) install the Homebrew dependencies using the command:
$ brew install gawk gnu-sed gmp mpfr libmpc isl zlib expat 6) navigate to the ‘riscv-gnu-toolchain’ folder (created by the git clone command above). 7) make the installer build the 32-bit soft-float version of the RISCV GNU toolchain:
$ ./configure --prefix=/opt/riscv --with-arch=rv32gc --with-abi=ilp32
8) build the toolchain (the ‘sudo’ provides necessary permissions) using the command:
$ sudo make
9) wait a while (maybe 30 minutes or more, depending on your computer speed)
After the installation of the 32-bit toolchain is complete, you should be able to compile the simple test projects (‘hello’ and ‘sha256’) located in the ‘potato/software/‘ folder using the ‘make’ command. This would be done as follows:
navigate to the ‘hello’ (or ‘sha256’) folder in the terminal
type ‘make clean’ (to make sure any old object files are removed)
type ‘make’, to build the project according to the instructions in the ‘Makefile’
if the build process is successful, various files will be created, including ‘hello.coe’
Running the GCC tools from the command line is really good, but it’s much nicer to be able to use an Integrated Development Environment (IDE) instead, especially one which includes syntax highlighting of keywords, functions, variables, etc., displays source files in a project view, and shows the build console output when an application is built, etc.
In addition, having a custom IDE for the ArtyRV board would make it easy to extend it to include a font converter and uploader (for the planned Programmable Character Generator), add a sprite editor, offer fully integrated code compilation and uploading, and other goodies. All of those features would make is so much easier for new users to program the ArtyRV board, as they would work out-of-the-box. To make this a reality, RVStudio has now been updated to include an IDE, with scope for future extension, and this new IDE is described in detail in the next chapter.
1 note
·
View note
Text
The Arty RISC-V Computer
Part 9: RVStudio gets a powerful IDE
This project is intended for education and experimentation, and to achieve this goal, the RVStudio IDE should be easy to install and use on a range of different platforms, including MacOS, Windows and Linux. Users should be able to start experimenting immediately after installation, just like the Arduino IDE does for the Arduino microcontroller boards (see https://www.arduino.cc/en/Main/Software?).
The core features required in a typical Integrated Development Environment (IDE) include:
• A Project Manager, for helping keep source code files organized • A Source Code Editor, for editing and updating source code files • A Build Console, which links to the command-line gcc compiler • An Application Output, to display messages from the app • An Uploader, to upload and run the built app on the ArtyRV board
RVStudio has now been extended to include most of these core IDE features, but it also offers some really cool tweaks to help users write high-quality source code efficiently, including syntax highlighting, auto-completion, and bookmarks.
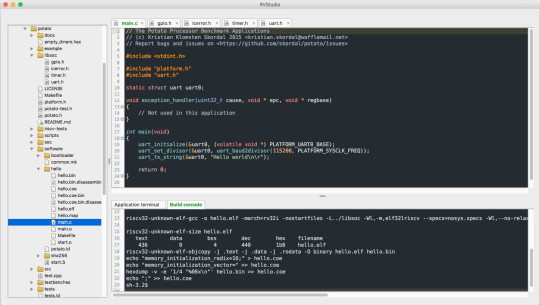
Figure 16. The RVStudio IDE, showing the ‘hello’ demo project
If you have a look at Figure 16, you can see that syntax highlighting makes it easy to distinguish between different parts of the code, such as comments, preprocessor directives (eg. includes), types, variables and functions (see https://en.wikipedia.org/wiki/Syntax_highlighting). For example, the ‘address of’ operator (&) is highlighted in orange, making it contrast clearly with the variable name it’s being applied to. This ensures that the operator is not accidentally left out by the coder.
Similarly, types (eg. uint32_t) are highlighted in italic blue, and functions in green. Fixed width integer types since C99 (the C coding standard released in 1999) are supported (see https://en.cppreference.com/w/c/types/integer), in addition to types from earlier versions of the C standard.
Syntax highlighting is controlled by ‘Definition’ files, which are stored in XML format in the ‘Definitions’ folder. Users will be able to create or modify existing ‘Definition’ XML files to suit their own color tastes. The figure above shows off the ‘Dark’ theme, but other themes (including a ‘Light’ theme) will be made available with the public release of RVStudio.
As you can see above in Figure 16, users can quickly move between different source code files, makefiles, linked files, and text files by clicking the various tabs at the top of the edit area. The currently active tab is highlighted in bold green. To open an existing source code file in a tab, just double-click it in the Project Manager panel.
Features supported by the RVStudio IDE’s source code editor include:
Syntax highlighting
Line auto-indenting
Auto-completion
Line numbering
Undo and Redo
Panel resizing
Line Foldings
Find/Replace
Bookmarks
RVStudio links to the gcc toolset for RISCV through the Build Console. When RVStudio is released publicly, it will use the gcc toolset for all compilation, since gcc is a mature toolset which is maintained by the RISC-V Foundation (see https://riscv.org). This will ensure that all compiled code conforms fully to the RISC-V ISA standards.
The ability to upload and run the built app on the ArtyRV board will be completed soon, and will work via a simple Intel Hex (see https://en.wikipedia.org/wiki/Intel_HEX) bootloader program running from ROM on the ArtyRV board. This bootloader will support the uploading of data into the memory-mapped Programmable Character Generator (PCG) and sprite generator, as well as the loading of executable RISC-V machine code into the RAM. The bootloader will be written in C using the new RVStudio IDE.
The bootloader will also contain a monitor program, which will enable the user to enter a range of commands, such as dumping the memory contents at a specified address to the Application terminal, jump to (execute) a program uploaded into RAM, disassemble memory from a specified address, poke and peek values into memory or CSRs, etc. It will basically be a toolkit providing visibility into the internals of the Potato RISC-V SoC.
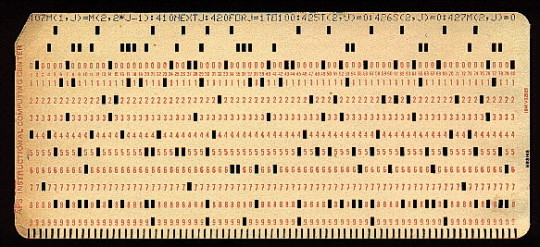
Figure 17. Bootloader punch card for IBM 1130, circa 1965
In addition to supporting the editing of C source code, I also plan to add support for editing RISC-V assembly language code. This will include syntax highlighting (opcodes, registers, immediate values, labels, preprocessor directives, etc.), auto-completion, bookmarks and all the other IDE features currently offered for C source code editing. Users of RVStudio will thus be able to effectively write and compile programs in RISC-V assembly language, a unique and compelling feature of this IDE which is perfect for education and experimentation.
The RVStudio IDE is currently in alpha (ie. not yet feature complete), but a beta version will be available soon (when this project is released publicly). There are still a few features to implement in the IDE, in addition to the various planned extensions to the ArtyRV board, such as the PCG and sprite generator extensions to the VHDL source code.
I welcome feature suggestions for RVStudio (please email me at [email protected]), and may also offer fully custom builds of the IDE to RISC-V adopters (ie. firms developing their own custom RISC-V based chips and boards) to suite their specific requirements and instruction set extensions. Please email me if your firm would like a custom build of the RVStudio IDE.
1 note
·
View note
Text
The Arty RISC-V Computer
Part 10: Where do we go from here?
The Potato processor used in this project supports the complete 32-bit RISC-V base integer ISA (RV32I) version 2.0, and has a single-issue in-order 5-stage pipeline. It includes an optional instruction cache (simple read-only, direct-mapped). It’s basically one of the simplest softcore RISC-V processors you can find, making it the easiest to learn about, and the easiest to extend.
The great thing about implementing a softcore RISC-V processor on an Arty FPGA is that you can experiment with the RISC-V core by modifying it’s VHDL source code. For example, you could add a superscalar (multiple instruction per clock execution) unit, like the one implemented in the RV01 RISC-V core available at OpenCores (see https://opencores.org/project/rv01_riscv_core), or expand the amount of RAM, interface to other peripherals on the Arty board, or add a more sophisticated instruction cache (eg. one which is two-way set associative, as described at https://en.wikipedia.org/wiki/CPU_cache).
This ability to modify the RISC-V SoC, at such a fundamental level, enables users to create the deepest hacks and execution optimizations imaginable. RISC-V is an architecture with a great future, and part of that future is driving it’s performance to make it comparable or better than other processors in it’s class. It’s interesting, for example, to see comparisons of RISC-V processor performance with the various processors in the ARM family (see https://en.wikipedia.org/wiki/ARM_architecture) by doing a Google search.
After exploring the RISC-V architecture, if you want to take the next step and develop a custom chip for your product, there are a number of commercial partners you can work with to implement your RISC-V designs. The RISC-V entry on Wikipedia is a great source of the latest information across all things RISC-V, including members of the RISC-V foundation (see https://en.wikipedia.org/wiki/RISC-V#Adopters).
SiFive have two classes of evaluation boards available now, the HiFive1 (single-core at 320MHz built with TSMC 180nm) and the HiFive Unleashed (quad-core+1 at 1.5GHz built with 28nm) boards. According to SiFive, “SiFive Core IP, verified and delivered in Verilog, scale across multiple design nodes, making them ideal for your next SoC design” (See https://www.sifive.com/products/risc-v-core-ip/).
Finally, to get the latest information about RISC-V, including specifications, members, news and events, you should visit the official RISC-V Foundation website at https://riscv.org.
I hope you’ve enjoyed this journey into the RISC-V architecture, and I look forward to expanding this project document regularly with lots of new and interesting future extensions, a few of which were described in the “Summary” section. Enjoy your exploration of the world of RISC-V!

0 notes