
Statistics
We looked inside some of the posts by leo5323864 and here's what we found interesting.
Average Info
Notes Per Post
46
Likes Per Post
23
Reblog Per Post
0
Reply Per Post
23
Time Between Posts
6 days
Number of Posts By Type
Text
11
Last Seen Tumblr Blogs


Fun Fact
Tumblr is used by 21% of adults online aged 18-29 years.
Text
Week 10 - Completing the loop
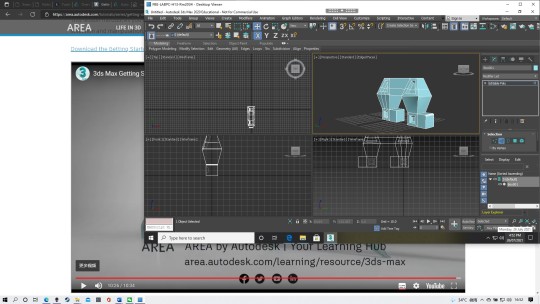
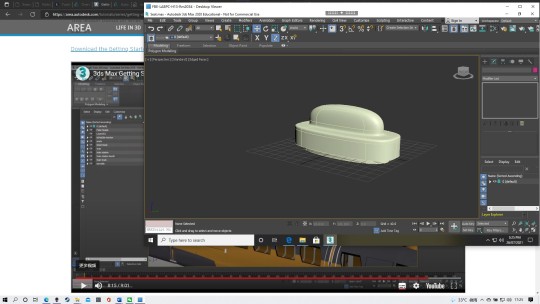
This week is the last week of our class. In class, we mainly focus on the last procedure of model making with a computer: 3D Printing. Tutor introduces a new software named Ultimaker Cura, this is a model making software, we can set up materials, model quality, the scale of model…etc. After the tutor demonstrate how to qualify the model using Rhino, we start adjusting the orientation of the model and modify it in 3ds Max(Tutor provides sample model on Moodle). After rotation, several modifications with XForm Reset, fixing the surface with tools, and several modifiers (not too much because we are not redesigning), I export the STL file and open it in Cura. After setting the file with the list in the exercise, I export my .3mf file and submit it on the online system(Until the time I post this blog, I haven’t received any mail that mentions submitting successfully, but I did upload it properly with the uploading link).


After 10 weeks of study in this course, I understand the entire loop of designing a product, it is clear to see that my skills have improved a lot: The technical drawing in this course is very professional, which is far neater than the one I draw in term 1. Also, the physical model making and 3D model making skills are improved: Foam model making with saw, blade, and sandpaper creates a model with better shape comparing to simple blade cutting. Even though the 3D model making with 3ds max is new to me, but it is still a very useful tool to use, and with the Cura, models can be easily print or cut out as sketch models. Honestly, everything in this course is hard the first time we did it. For instance, in the engineering drawing, I did feel very confused while I see there are a lot of things to be careful with, but after several times of practice and asking classmates, I finally work the tasks out properly. I did enjoy this course a lot because we are doing a lot of things with multiple tools, which is far better than viewing articles. However, because this class is designed as an in-person course, so I feel very sad that only participating in the online course. This class is very special compare to other courses, all marks come from our blog post, and I haven’t experienced this kind of assessment before. This is very creative because while we are submitting our works, we can read and give comments to our peers, which not only improves me but other classmates as well, and it did make a lot of sense to me.
Lastly, thanks to all tutors and peers for this wonderful term!
9 notes
·
View notes
Text
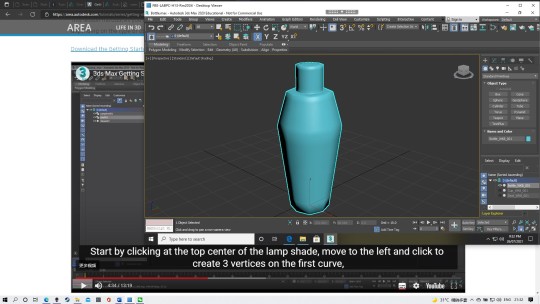
Week 9-Mesh modelling your own concept
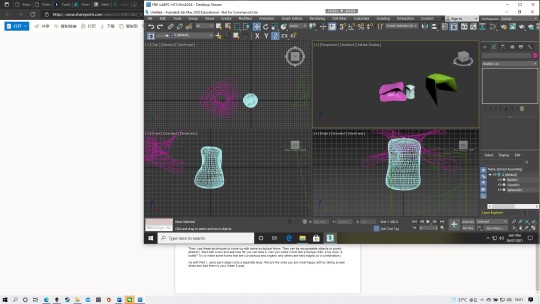
This week we are creating models of our Olay bottle concept with 3ds Max. With exercise from last week, demonstration in class, and videos from Autodesk, I start to understand how every tool works. The tutor demonstrates how to create templates for the bottle, and I found it very useful. With the reference image maps from Moodle, I start making the original Olay bottle by changing a box into editable poly.

By matching up the edge of the box with the reference map, it becomes the shape of a bottle. Because it still looks very boxy, I use NURMS to make it look smoother, and it did.

For the lid part, I first made it with multiple cylinders and the bevel tool, but it still looks a bit sharp with the edge, so I made another one with the lines and the lathe modifier, this time the circle on top looks rounder and smoother.

A good thing with the template is that once I finish one lid, it also applies to other body designs. Therefore, my other 2 bottle designs are using the same lid. Even though I am using the sample template, I still found it useful: the border tells me where is the edge of my model (I got the measurement of my physical model of W7 ). My model was done with the polygon modeling tool, one of them is finished with the NURMS tool. Because of my own mistake, I forgot to fold the edge for my design, so I edited it. After the main shape, I use the chamfer tool to create a smooth edge. For further modeling, I can understand more with the software, I believe I still got a lot of tools for design, which can make my design looks better and easier to process. Also, I can work with the rendering tool to give it some texture.


Pre-class activity: The use of models in Andrew’s cup project is pretty similar to the designing of our Olay bottle: we do a physical model to feel it size and shape, then we make our final models. But the materials he use is different with ours: Because we are making our models at home, we didn’t have chance to access complicate machines to make our model, so the accuracy is quite different.
6 notes
·
View notes
Text
Week 8 - Digital Models
This week the exercise is computer-based, and the tutor introduced software called 3ds Max. Even though it is a 3d modeling software just like Rhino that we learn from the last term, the ways to build models are quite different. After watching the videos of the Razor case study, I can see that models can provide the feeling of mass and size of actual products, which sketching and drawings alone could not. I think Andrew's meaning of "low-fidelity" and "hi-fidelity" is the precision that the product matches its design. I choose to do this work on MyAccess because I haven't downloaded it online and I realized that it works quite smoothly on my computer, so I continue to work on it (I will download it before next week's class). The layout of 3ds Max is similar to the Rhino(4 different views to set), and there is much geometry provided for us to use.
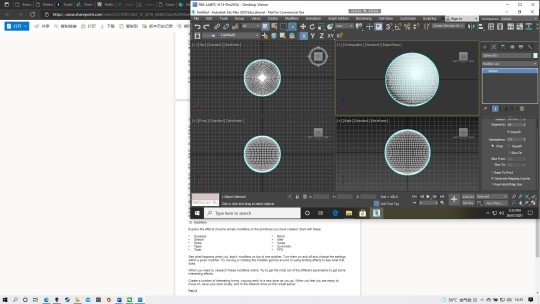
By following the steps for part 1, I adjust the views of the 4 windows so the arrangement is similar to the orthogonal drawing from the past several weeks. The modifier provides multiple tools like FFD, Skew, and Squeeze, which help us form wonderful shapes from simple geometry shapes like spheres and boxes.
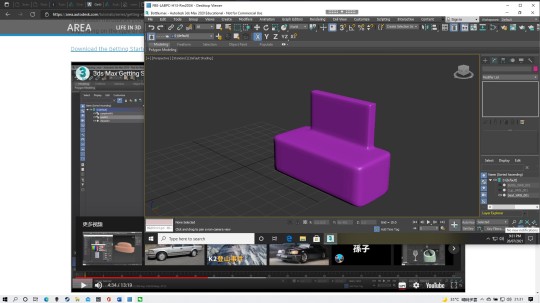
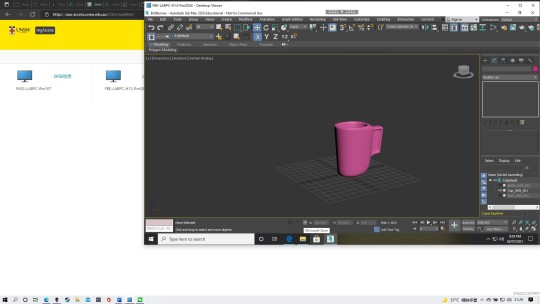
In part 2, by watching the videos of Modeling tools and polygon modeling, I create 3 different shapes with the NURMS tool. I found that it is a very wonderful tool to create a smooth surface just by making boxes and using the "swift loop" tool. After making several models with 3dm Max, I think Rhino is better software for me. I found it is very hard to make an adjustment to the views(maybe I didn't get the trick to do it), and sometimes I didn't found the tools I want(Maybe because I am not familiar with this software). I will continue to discover this software, prepare for next week's task!
3 notes
·
View notes
Text
Week 7-Model Making
Our exercise for this week is to convert the digital concept we design last week into a 3D model.
By understanding that this work might create a lot of dust, I drive to another house to do this project.
For part 1, I draw the template onto the board with a 1 cm margin. However, during the cutting section, I forget to include the edges of the shape. Thankfully I still find some duck tape(from some previous project) and I use it to secure the template, and it works fine.


For part 2, I face some problems with the foam cutting. Because I carry all tools I need in my car, including the saw. While cutting, I realized that the saw I bring is too small, it can only cut halfway into the form. So I can only use my blade to continue cutting the foam. Since the blade is new, it is easier to work with the cutting and refining section of the foam.

Even though the saw is too small to cut blocks out of big foam, it still works while doing part 3. With the front view template, I cut the main rectangular prism shape out with the saw and the triangle part with a snap blade.

Part 4 is to give the final refine to the foam. After cutting off the part base on the template, I start doing the sanding part. Because until the moment I write this blog, I still haven’t received the sandpaper I order online, so I brought the sandpaper to the nearby furniture shop. However, they only offer 120 grit sandpaper, so I brought 10 of it for doing this work. Finally, I have done 3 different bottles.


After completing this week’s exercise, I realize that foam needs to take good care of. If you gain too much pressure while sanding, it will leave marks on it. Next time I will be careful on this and prepare multiple grit levels of sandpaper earlier, this will make my works better. Also, I should take good care with the lid part, because they still look a bit different from each other.
6 notes
·
View notes
Text
WK6- Digital Concept Drawings
This week we are working on converting our works from paper into digital drawings. The tutorial on Moodle is very useful, it gives us a very detailed explanation of how works can be done on Photoshop. However, when I try following the steps on videos I realized that doing works with a mouse is hard. Because of that, I choose the Autodesk sketchbook to do my concept drawings. Even though I didn’t do it with Photoshop, it clear to see that all steps are the same. By creating different layers, I can do several steps that Photoshop can do, like drawing guidelines(Sketchbook doesn’t have such a tool), which can help us manage the spacing of bottles. Also it much easier to manage drawings from a different layer, so each time I need to do some erasing, it doesn’t affect different parts of the drawing. Different from the tutorial, I choose I tool called Airbrush to create value. This tool gives a very smooth and blurry feeling. On the much deeper part, I use black with very low density, and for the lighter part, I choose low-value grey with low density (Too white feels weird). The lid part is drawing with a lower value of grey marker, because that what the tutorial has mention: a glossy feeling. After finishing the bottle, the last part is the background and notes. By creating a layer lower than the bottle, I finish the drawing of the background, and notes were done on the new layer created on the top of the bottle layer. By finishing this week's tutorial, I start getting ideas on how to create wonderful concept drawings on our computer or iPad, we can access many different tools, and many actions like creating multiple layers are also different than sketching on paper. Maybe later, I can buy a Wacom and dig more on Photoshop(the tools on Photoshop are much easier to use).


These are the three concept drawings while exploring on Pinterest(linked to Behance), which have wonderful render with pens and markers.
Mauricio Sanin https://www.behance.net/gallery/78965533/DESIGN-SKETCHBOOK-2019

Marius Kindler https://www.behance.net/gallery/47182091/Sketches-2017-(Part-1)

Aaron Wansch https://www.behance.net/gallery/28838523/Sketchbook

2 notes
·
View notes
Text
Week 5- Sketching
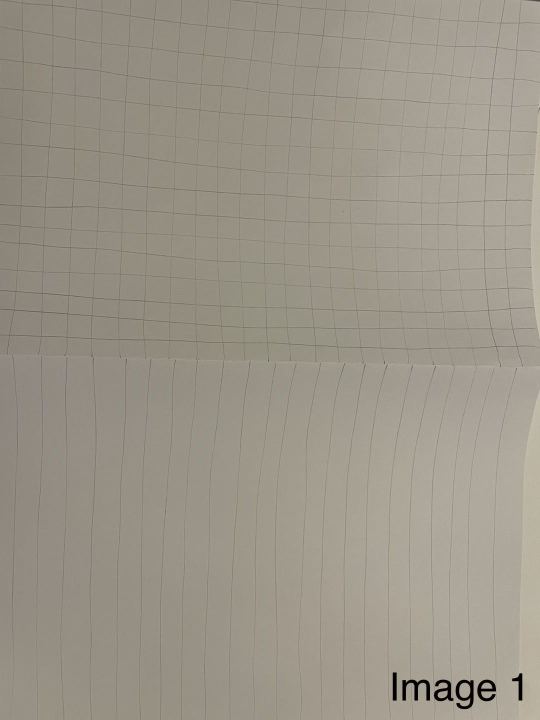
This week we are working on the redesign of the Olay Moisturiser bottle. We start our tutorial with the sketching exercise. While I was watching tutors drawing, I thought it may be quite easy. However, when I start doing it on myself, it clear to see that the lines are not as straight as what tutors are doing. I think the reason I am not drawing straight is I focus too much on the pen tips, and I draw it too slowly. This also appears with the exercise of joining the dots. Because the line is not straight, the entire shape looks pretty rounded. So if I am doing it again, I would draw the lines quicker so it goes straighter, and I can take some time to practice it before class. The circles and ellipses are the last ones I followed in class, after that I start working with the box of the bottle. The shape of circles and ellipses are not going as I want: I expected it to be rounder, but without using the circle template, my circles are going oval. I think this requires more practice, which I can practice before class. (Image 1-3)
Next, I move on to the thumbnails of the bottle. By using a ruler to calculate the distance between, I start drawing those boxes using a right-angle ruler. Because I prefer using straight lines, I draw only 4 bottle thumbnails with curve lines. Even though I personally prefer straight lines, I think I can draw more rounded designs if I can do it again, to grow my creativity of designing curves. After drawing 12 thumbnails, I pick 2 of them to do my perspective sketch. By using the skills we learn last week, I construct 2 bottles. While drawing, I found that if I mark the distance of edges on the top view and draw the base of the vertical line on it, I can get a pretty precise shape. With that been drawn, I add some shadings to give it some depth. One thing that I think I can improve on is the shape. While I was thinking is a 2D shape, it seems alright, but when the shape has been switch to 3D, it looks a bit weird. Maybe some curvature can be added in future designs. This week we focus on the perspective of the object, a series of 2 point perspective drawings. Before the class, we have been mentioned making a chamfered box. However, because I notice it too late and the printing shop is closed, and I don’t have one at home, so the making was delayed. After I cut it out and paste it up, I realize a serious problem: the chamfer is not correct. The length of the different sides is not the same as what we have on the step-by-step solution, at this point I can see I paste the box with the opposite side. Therefore, I print a new piece of paper and paste it with the correct side(Image 1, the one with the dashed line is the correct one). For part 1, because it’s the first time we work on 2 point perspective in this class, I noticed that if I don’t follow the steps correctly, the perspective view is quite difficult to do, so the first one I draw is not correct( Image 2, the edge of top view doesn’t point to the station point at the bottom, which makes the perspective view a bit weird). By connecting the edges and station points correctly, I get a better perspective view while drawing it the second time. Part 2 is extending the box. By extending the lines, I can get the extended side of the box. The requirement is to extend the visible face, so I extend the front, right side, and top. Part 3 is drawing a circle on the sides of a cube. After drawing a cube, I used the technique of reading: construct lines between midpoint, and connect them to the viewpoint. This forms the major and minor axis of the ellipses. If I can work on this again, I would like to double-check the different viewpoints of perspective view and improve my skill in drawing ellipses, because the viewpoints are an important factor in making sure the object was drawn correctly, and the improvement of drawing ellipse makes the drawing looks better. (Image 4-7)


2 notes
·
View notes
Text
Week 4- Perspective Drawing
This week we focus on the perspective of the object, a series of 2 point perspective drawings. Before the class, we have been mentioned making a chamfered box. However, because I notice it too late and the printing shop is closed, and I don’t have one at home, so the making was delayed. After I cut it out and paste it up, I realize a serious problem: the chamfer is not correct. The length of the different sides is not the same as what we have on the step-by-step solution, at this point I can see I paste the box with the opposite side. Therefore, I print a new piece of paper and paste it with the correct side(Image 1, the one with the dashed line is the correct one). For part 1, because it’s the first time we work on 2 point perspective in this class, I noticed that if I don’t follow the steps correctly, the perspective view is quite difficult to do, so the first one I draw is not correct( Image 2, the edge of top view doesn’t point to the station point at the bottom, which makes the perspective view a bit weird). By connecting the edges and station points correctly, I get a better perspective view while drawing it the second time(Image 3). Part 2 is extending the box. By extending the lines, I can get the extended side of the box(Image 4). The requirement is to extend the visible face, so I extend the front, right side, and top. Part 3 is drawing a circle on the sides of a cube. After drawing a cube, I used the technique of reading: construct lines between midpoint, and connect them to the viewpoint. This forms the major and minor axis of the ellipses.(Image 5) If I can work on this again, I would like to double-check the different viewpoints of perspective view and improve my skill in drawing ellipses, because the viewpoints are an important factor in making sure the object was drawn correctly, and the improvement of drawing ellipse makes the drawing looks better.


7 notes
·
View notes
Text
Week 3- Section and Auxiliary Views
This week we do more works that based on skills we learn last week, the orthogonal drawing. At this week’s lecture we learn more about section and auxiliary views, and we this two appears on this week’s practice. The given object looks pretty simple at the beginning, and I think of it as a symmetrical object. However, after taking a closer look on the given numbers, I realized that it is not as simple as I think. Firstly I draw a simple sketch on things I am going to draw on a blank paper (image 1), and I think it fit on a paper with its original scale. At this moment, I haven’t realized my auxiliary view are not correct, and I start working on the final one. While finish 3 parts of it (Which is the front, top and section views), I check the book again, and I figure out that the views are not what I am thinking. Thankfully, by rotating the view, the space I leave for it do fit. I think I can still make some changes to it if I can do it again: Even though all object fit in the space, the work are not neat enough, so next time I can draw it in a smaller scale, like 2:1, which make the entire work looks more comfortable, and there will be more space for the border lines.


2 notes
·
View notes
Text
Week2 Orthogonal Projection
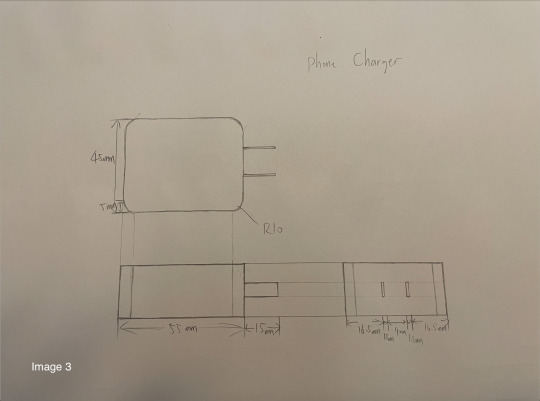
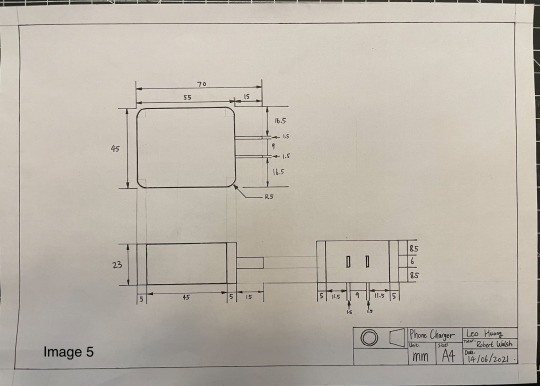
This week we are working with some more professional drawings, and it is the most complicate orthogonal drawing I ever done.
The part one is making a box to cover the chosen object. I choose to draw a phone charger, but because of some problems on drawing, I do make a mistake on the measurement of width over the top, and it doesn’t fit(Image 1), so I make a new one, this time I check on the measurement so its correct. Next is the freehand layout sketch for the object. This is the one I use to record some numbers for my final one. However, I do make some mistakes on this one: Some numbers haven’t been record, and that cause me do to some extra measurement while drawing the final one. For the final one, I first constructing this on a A3 paper. However, this looks too small on it and I didn’t do it properly( The border is not right). So I draw a new one on a A4 paper. I think for the next time doing it, I can arrange the position better, and for the further task, I can be more careful on the instruction.


6 notes
·
View notes
Text
Week 1- Drawing instrument Exercises
This week we focus on several figures to practice the use of different tools. While drawing the first figure, I make some mistake on the distance of compass, so it goes a bit smaller. So I redraw a circle on the outside, and edit on it. However, after drawing I realized that the ink is not dry so I didn’t erase the pencil mark. Because I got the wrong circle template, I didn’t have a chance to draw large circle, so I draw the large curve with the inner round of tape. For the pattern one, I draw it with triangle ruler and cut it out with the blade, and maybe it is better if I do it in different color. This week is the first class, so I’m happy to get use to those new tools that I never use before.


1 note
·
View note
Text
Blog 01
Hi, my name is Leo, I love cars and dogs.

2 notes
·
View notes