
Don't wanna be here? Send us removal request.
Statistics
We looked inside some of the posts by leviathansgrasp and here's what we found interesting.
Average Info
Notes Per Post
8
Likes Per Post
7
Reblog Per Post
0
Reply Per Post
1
Time Between Posts
7 days
Number of Posts By Type
Text
17
Last Seen Tumblr Blogs


Fun Fact
1,644 Tumblr posts in 1 second.


Text
Narrative Story Game Complete.
Today marks the final day of our project, so it’s time for me to document all of what I’ve done from start to finish.
My story game took a few different turns development wise, it started as a story about a young girl living in a household that doesn’t accept her for who she is. But I found that I wasn’t as equipped as I thought to write and develop such a narrative.
Instead I went with a story about a family dealing with greif and discrimination for things out their control, so I used a fantasy lens for this story, making my world have two species, humans and what I’ve called ‘inhumans’ who are mythical beings from legends and folklore such as fae creatures.
We began by using a pre-made template for a story adventure game made by someone online. It comes with a bunch of pre-made blueprints that we can edit freely by making duplicates of the master blueprints, I will personally be recording down what I changed and created specifically.

To begin I first built my house where my game takes place, then after I had that I designed the neighbourhood it’d be placed in since the player starts the game outside, then I used a prebuilt home from an asset pack that we had in a collective student folder, this had assets to build a simple neighbourhood, after which I just copy and pasted the prebuilt house and my own built house a couple times to make the neighbourhood look like a mass produced state housing situation. To stop the player from wandering away I placed roadblocks under the guise of construction, as well as putting blocking volumes which are just invisible walls to stop the player from walking too far away.
After the neighbourhood was finished I designed the inside of the house, making three bedrooms, a living room, kitchen, laundry, upstairs bathroom, store room for useless family junk and a garage/man cave for the dad.
With the blueprints available within the template we were working with I only really edited a few, namely the inspectable objects which we added an item description so we could use them for narrative purposes. I also made a light switch so the lights were interact-able which was a matter of making a child of the master light blueprint and making an array element and an activate node to tie them all together. (Shown Below)

A blueprint I made myself with a bit of help from a classmate was a flickering traffic light that rotated through its colours. I had an idea that my protagonist Cailean, a teenage rebel type would be the kind of person to steal road equipment so in his bedroom he has a traffic light, door exit sign and a stop sign. To make the light cycle the code was a lot more complicated than I thought…


So this is the full code for the light itself, it has a line for when its turned off by the player, and a line for when its active, the line for activity is a loop that can be stopped at any point so when its interacted with it’ll simply restart when reactivated. It looks simple but I couldn’t figure it out alone.
Another blueprint we all made was a radio that would play when activated by the player, after I did this I added a duplicate and turned the static mesh (Object that is shown so a radio object.) into a piano and changed the sound it plays from radio static to Clair de Lune by Debussy. I liked the idea that Cailean was taught piano and played the song with his mother in his childhood. This idea stems from the fact that I was taught piano in my teens years. The blueprint for this was fairly simple. The code shown below is what we made for the radio which I copied for the piano.

The last blueprint I made myself was the end game trigger which is the pillow in Caileans room. The idea is at the end of the game you enter his room and do the final interactions in his room then activate the end scene by clicking on the pillow in his room. This was just a matter of having the pillow when clicked trigger a fade to black and then play the sound cue of Cailean patching his wounds together. I’ll show below the lines of code and the sound cue.


Above are just a few screenshots of the process for making this scene work, its just a screen widget that has a fade in animation, which is activated by a simple event node, the event node is triggered by the pillows code which also plays the sound cue, and as shown the sound cue is simply a main track of pained grunts accompanied by a randomised node for the sounds of what I can only describe as the gory sound of putting oneself back together.
The template came with interactive draws and doors for cabinets, shelves and doors obviously, the pre-made blueprints allowed for us to switch the meshes out with meshes we had available to us, which in and of itself was just a matter of making sure the static meshes we wanted to use had a few adjustments such as making sure they had the proper collision, had correct pivot points (Or else they wouldn’t move correctly.), were placed correctly (See previous bracket note) and lastly when swapped out with the previous mesh were tagged in the editor as interactable (to do that you can just search in the editor for the tags section and add a tag named ‘interactable’).
After all of the previous things had been completed (Plus a few workshops we had in class that’d be too long to go over) it was a matter of altering textures, adding in decoration, making my narrative, creating the games progression and ending as well as sound design and level design.
My personal skill in my own opinion is aesthetics, so that’s where I place most of my energy and time, I used what basic code and blueprints we were given with the template aside from the ones I mentioned before and then built my game around those functions and my narrative I wanted to tell. The end result is a story about grief, prejudice, finding your place in the world and the importance of family and communication. I am very happy with the outcome of my work and it’s very much a labour of love based on my own life experiences.

0 notes
Text
Final Assessment, Narrative story game.
This is the final assessment for my certificate in Design communication under the games pathway. We have been given the task of creating a narrative environment to interact with, using all that we’ve learnt this far through our plat forming game which taught us how to make interactive environments and our landscape project to create a environment that tells a story.
For me, I’ve decided to create a story about greif and discrimination since they are topics I am qualified to talk about ad I’ve experienced more than enough of both.
My story is about a world where inhuman beings live alongside humans, these inhumans often face prejudice because of how different they are to humans. I’ve pulled the myth of the Cu Sith, the Scottish spirit hound to act as my medium. Cu Sith are mythic hounds that guard the worlds of life and death, and my main character is a young man named Cailean Mac`dhai. Cailean is a Cu Sith and has a younger sister, father and a mother who passed away at the hands of discrimination. My story will focus on how he’s faced prejudice in his life and the grief of losing his mother because of hate.
The environment I’ll be using is the Mac`Dhai family home, Cailean will navigate the home and interact with items as he reminisces in his childhood and family before and after his mothers passing and also how he’s been a victim of discrimination.
My reason for this is because as someone with a type b personality disorder I’ve always felt different from others and there have been times I’ve been othered because of it. Living with Borderline personality disorder is like living life with different rules and standards, because of that I don’t fit in well, I can be intense, dark and dramatic which makes me feel like I’m not human a lot of the time. I grew up loving myths and legends because they often made me feel normal.
The grief aspect comes from learning how to live with the knowledge that my mother has a terminal illness, and knowing that because of circumstances she won’t live to see many things in my life and won’t always be there for me. When my family learned of this we had to process and more or less go through the stages of greif pre-emptively because of this. I have also lost a family member suddenly to suicide and had to process that quickly when I didn’t expect it.
This project is very near and dear to my heart since I typically channel my real world experiences into my art and an assignment like this is no exception, I don’t like shying away from hard topics and I strive to make the uncomfortable thing more normalised and to also help those who’ve shared my experiences find comfort in the knowledge they aren’t alone.
3 notes
·
View notes
Text
Puzzle Platformer, Magitech Mania.
My second term in my course covers block 2, ‘Creative Online Design’ which for us game students involves us making a 3D puzzle platformer game.
For this we were taught the basics of unreal engines blueprint system to make some objects to use within our platformer. These items were a door, button, moving platforms, launchpads, checkpoints, load level and a control object for interactivity.
Once we had these our task was to design three levels (Tutorial and two levels.), a title screen, the main menu and pause menu. When it came to these things we had creative freedom to design the game levels as well as change the designs of the blueprint items.
We first began by creating our basic blueprints for the items, I’ll post down below the screenshots of what we made and the functions the blueprints allow.


So here are the blueprints for our interactive items, the master objects code mostly lies within the first person character code (The green boxes), its code is to allow it to be grabbed by the player and moved around. Other code for the master object (Not pictured) is for how it interacts with the button. The door is a simple string of begin and end nodes that send info to the corresponding items to move when needed. The buttons code is rigged to the door and the platforms so that when they are connected, upon the button being activated the corresponding item will react accordingly.
The platform blueprint is coded to be either triggered by a button or automatic as well as being able to move along the X & Y axis as either vertical or horizontal. I made a duplicate with the ability to move along the X & Z axis combined or separate, allowing for diagonal travel.
The launchpad is more or less a trigger with a series of math nodes to calculate player location and then the height and distance of where to launch the player. By making the height and distance editable within the engine settings itself makes customising them faster and more versatile, the same method was applied to the platforms so we could adjust the movement of the platforms. (Such as how high, how far and in how fast or slow they move.)
The death plane was also a functional blueprint we made which was to allow the player to respawn upon contact so should the player fall off of the map it would respawn them rather than make them fall infinitely into the void. Now some of my classmates got smart with the code and made rolling balls that would ‘kill’ you if it touched you, Indiana jones and the raiders of the lost ark style. The death plane also works with our object so if it falls off the world it will respawn.
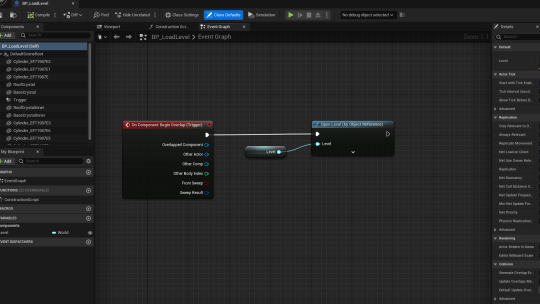
The checkpoint was fairly simple as it was a matter of taking the players location info and then resetting their player spawn with the checkpoints location. The death plane also has code to work in tandem by remembering each time the players spawn location is updated. The Load level is a simple trigger and open level command code, it’s two nodes.
One final note on the control object was troubleshooting, we learnt from our lecturer that if the player is standing on our object and picks it up it would allow the player to effectively fly, so to remedy this error we added a view angle and if the view was lower than a set number of degrees then you would be unable to pick up the object.
After we laid down the ground work we made our Title and Pause screens.


As shown above it can be seen that these blocks of code are rather cut and dry, each button on the screens correspond to a different command which executes exactly as written. (Resume-resume play, Quit-quit game.)
Once all of our frame work was completed after all of these steps the next task was to create a tutorial level which covered the basics of each items usage, and a puzzle for them. Our task was not only to showcase our items functions but also to make them fun and engaging… ‘finding the fun’ to paraphrase. After the tutorial was completed we had to create two more levels, each with varying levels of fun or complexity. Additional details we implemented were sound effects as well as cinematics, at the least we had to have sound cues for our doors and buttons and each level has to have a cutscene to showcase the layout.

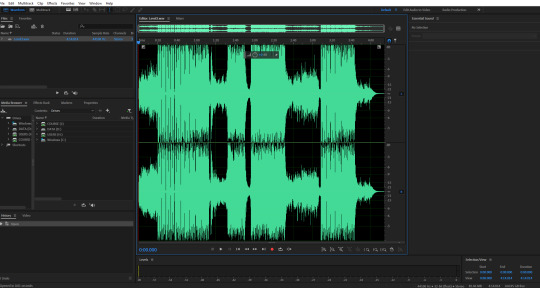
This is the layout for the camera cutscene editor, you bring in the visual camera actor and then make a new sequence, drag the camera into the sequence editor (Shown in the above image.) and then open the transform panel to begin filming shots. You can also pilot the camera so it takes the shots from where you are looking, which is handy for streamlining the process of basic cutscenes.
each time you want to make a new shot you have to drag the slider to where in the sequence you'd like to add the shot and click the + button on the transform section to plot in the next section. From these simple steps you rinse and repeat until you have the amount of shots you want, after if you have multiple sequence shots (Pictured below)
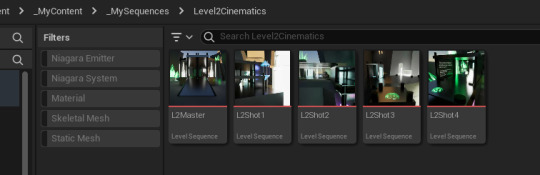


Here you see I have 4 shots, I then made a master sequence and drag & dropped the 4 shots into the master, adjusted the order and timing and saved. After to make the cutscene play in the game what is needed is to enter the level blueprint and enter the line of code shown above, as can be seen I also created a node for a background music, this was to simply give my game some sound other than the blueprints.
The last step for me was to add sound to everything, giving my game some audio life. I got my sound files from the website pixabay, a largescale royalty free website for images, audio and more. I browsed through the library of audio, found ones I liked and downloaded them.


So shown above is the process, first you download the files you need, then we opened adobe audition, imported the files (Trimmed the audio if needed as well as edit and adjust to preference), export the files as .wav files and they were ready to use in unreal.

To create the sound cue it is super simple since we just imported the .wav file, created a sound cue and then dropped the .wav into the editor and hooked it up. From there we could adjust the sound more to our needs by clicking each node and adjusting the settings.

Adding the sound is fairly simple as well, to use an example here above is my launchpad which I named 'wind gem' since my theme is crystals. The spawn sound attached is for static objects with ambient sound such as platforms and launchpads, whereas play sound at location is for when an item produces a sound upon activation. It was a matter of just repeating this process for each blueprint I needed to have sound and saving it all.
When all of the combined steps (Plus a few that I have not mentioned due to seeing them as minor or unnecessary to document like sprint mechanics or double jump since they are auxiliary) have been completed its merely a manner of putting it all together, making it look nice, making it functional, creating puzzles and then final touches and we had our games. I'll post a few pictures to show off my work.


It's hard to describe how I came across my theme but I accidentally made some construction equipment and then thought I could work with it so I made some crystals and turned it into a magical technology construction site type of vibe. I also hand modelled the crystals shown in the levels, which I found very fun to base them on real crystals such as Selenite, beryl, and a form of weather worn emeralds.
I'm now sitting writing this all up in a frenzy because I was too lax with notetaking but I've very much learnt my lesson and aim to not repeat this mistake. I'll link below my Itch.io page so to any who read this can download and play my game.
0 notes
Text
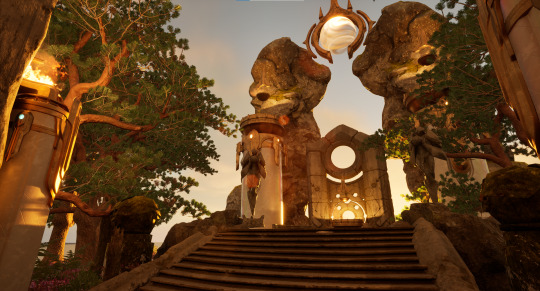
'This island has a secret' Full Project completion.

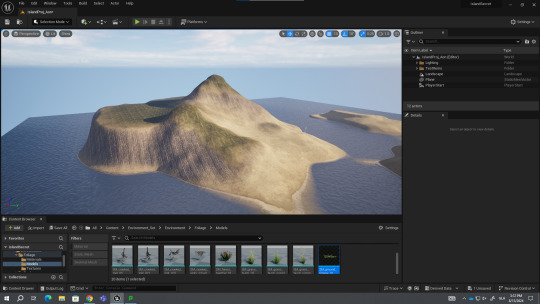
My final project of what I've dubbed 'Block1' was to use the skills I've learnt so far in Unreal Engine to create an Island landscape, from there we use environmental narrative storytelling to give life to our landscape and tell a visual story of a 'secret' our island has.
Shown above is a video walkthrough of my Island, while some open ended edges of the assets I grabbed off of Quixel bridge are showing I simply couldn't do much about it.
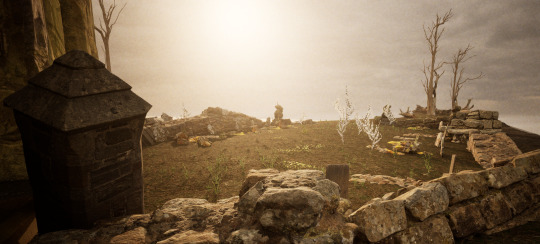
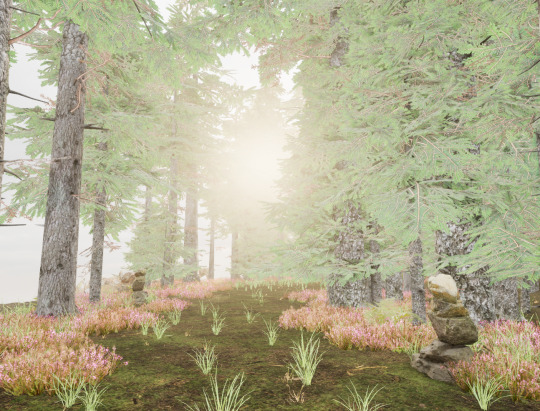
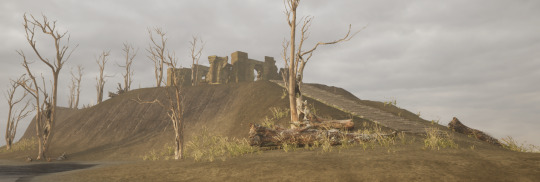
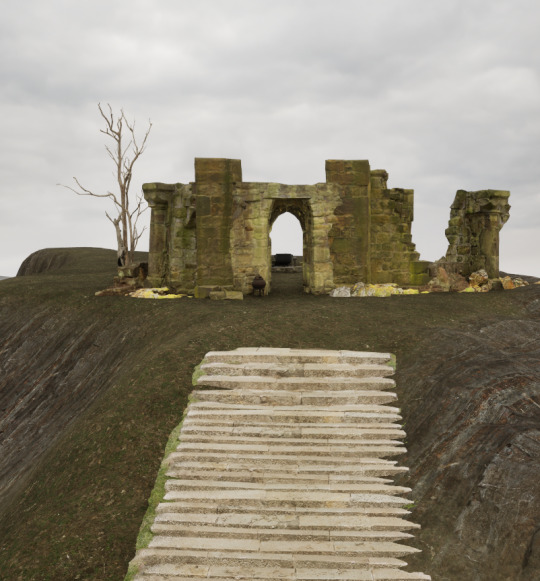
The overall narrative of my island is the divide between life and death, one island is barren and in ruin with dead trees and old graves, meanwhile the other island is sprawling with life, verdant trees a sacred grove and signs of human activity with the well and campfire.
The secret itself is the grove I have on my larger island, in the Celtic belief nature has a lot of power, our 'gods' are not overly divine beings but rather forces of nature and personifications of such things. The Celtic people would gather around sacred places known as 'Nemeta' the plural or 'Nemeton' the singular. A Nemeton is a site of worship, typically a large tree or grove of trees where the Druids would commune with the gods.
To further sell this I used symbolism of butterflies, which in many Celtic beliefs are to be messengers between life and death, giving them an otherworldly presence. I also used the four treasures of the Tuatha dè Danann being the spear of Lugh, the speaking stone, Nuadas sword of light and the cauldron of the Dagda.
A personal touch I added was in the grove I used red whortleberry plants as ground foliage as well as heather to add colour and because red whortleberry is the symbolic plant of my family.


0 notes
Text
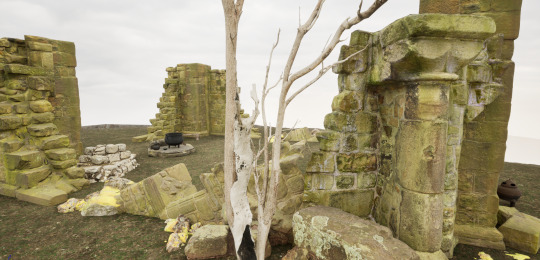
Island Project Update
This week we have been tasked with using visual storytelling to create an island scene and add a secret to be displayed with storytelling aspects. I went with inspiration from celtic myth and the islands of Scotland, so I added an old church that had been dilapidated over time, a forest and a Nemeton, in ancient celtic life the people congregated near Nemeta, which are sacred spaces typically being large trees or stumps.


We still have till next week to finalise and keep adding things so I will continue to do so.
2 notes
·
View notes


Text
Moodboard for Project


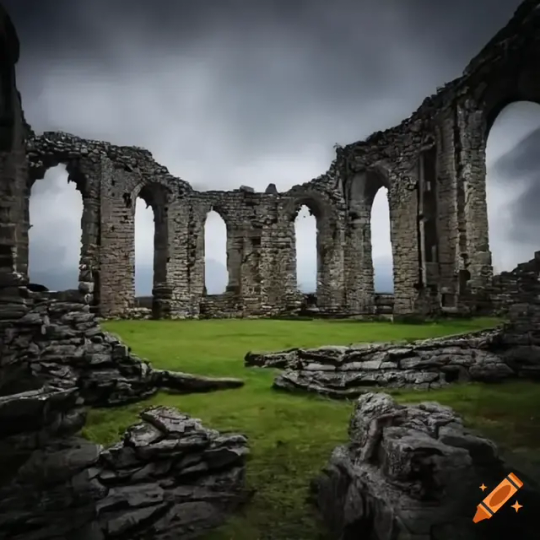
Here above are the inspiration photos for my island project, I wanted to use references from the ancient ruins of the Scottish islands and the Hebridean islands. To me personally there is a sense of beauty in seeing such ancient buildings wasted away due to the flow of time.
As someone of North Eastern Scottish descent I feel a draw to seeing such ruins, and for a project about islands and secrets this feels like a great way to blend my culture and my skills to create an environment I am proud of showcasing.
0 notes
Text


August 6th-9th Project amalgamate.
Using instanced foliage, post processing modes, volumetric lighting for the forest project and modular assets, blueprints, raytracing, and lighting.
0 notes
Text
End of week Development report

This week we did a few different things, one was to revise and finish up our forest by leaning how to use displacement and instanced foliage from our landscape material. The second set was to build a basic house and furnish it with lighting using the 'atmospheric house pack that our lecturer provided for us, through this we learnt the basics of modular assets, blueprints in unreal editor as well as more practice with advanced lighting. Finally to finish up the project we had a quick crash course in creating decals using photoshop and unreal.
Displacement-

Starting with the first task of this week is Displacement, here above is a snapshot of the blueprint code we used to enable displacement, while it is all well and good to just enter this in and hope for the best a few steps must be taken first before displacement can be enabled since it is a new Beta feature in the engine. To begin, one needs to enter the plugin screen of the engines project settings and enable the Nanite plugin, save and close the UE project, open the config file of UE in the File Explorer, select the 'DefaultEngine.ini' file and input these two lines of code (Shown below.)


When this is completed save the file and close it. From there it is safe to open your UE project, once it starts up it'll more than likely need to compile new shaders which may take time, after this has been done you will need to double check that the Nanite plugin is enabled.
When all of these prior steps have been taken, and you have created the displacement in your landscape material, turned them into editable parameters for MI's (Material Instances) You can bring them into your project. Below I will show some examples of what displacement does in the project.


Here above are some different textures with displacement values at 0 and then a selected value based on the needs of the preference or texture. For the stone tiles only about one unit is needed for a subtle change whereas the sandy puddle texture shown is set to 7 units to show varied sizes. If displacement is too high it can cause distortion of the texture and result in some strange effects.
Landscape Grass Types-

Pictured above with the lines is the landscape grass type, organised in the comment box labelled 'LGT'. To start with basics you need to create a LGT in the editor and add in some foliage for it to use.


Above is showing my LGT's, I made two because in my landscape material I have two grass textures so to bland the foliage well my top layer has a more thicker and taller grass whereas my under layer has a smaller and denser grass type, in the blueprint my layers are labelled in Gaìdhlig due to my understanding of the language. So layer Aon (One) and layer Dhà (Two).
Once these basic steps are done using the landscape paint tool in the editor wherever you paint on layers Aon and Dhà over the other layers foliage will automatically be overlaid on the landscape as shown in the below image.

Modular Assets-

The Image above is a house I created using modular assets from the 'atmospheric House' pack. Using the modular BP's (Blueprints) for the walls, floors and roof as well as the porch out front and the front doors of course. The assets used are modular in the way you can alter what assets get used with the roof BP's having gutters and pipes, the floor has a matching ceiling tile which is only aesthetic and doesn't block light. The roof tiles themselves are what block light.

I have in the above photo shown a simple desk light as well as a custom decal made with photoshop, making the decal was fairly simple with creating an image and exporting it as a .png and then uploading it into UE and using the magic erase to remove the white background, after that applying it to a decal actor to create it as a decal.
Blueprints and Lighting-

Here above is a demo of light physics using ray traced shadows, by altering the source radius and intensity, changing those values alters the brightness and amount of shadows and penumbras cast by the light and objects.

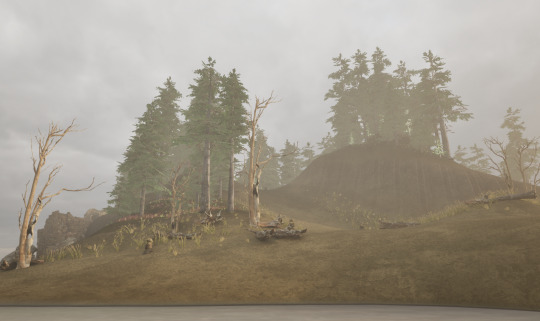
Here is shown some ray traced crepuscular rays (Also known as 'God Rays'). This effect is created by the worlds directional lighting and the Exponential height fog which are basic additions in building up a world atmosphere. Also like displacement, Ray tracing is a plugin that must be enabled for it to function. By further adjusting the intensity of the directional light scattering and the fog density you can adjust how vividly the crepuscular rays are shown.

This blueprint shown above is a table lamp, here we changed the original blueprint to give ourselves more usage from it in the editor. Originally the blueprint would 'turn off' the light by destroying the point light, to alter it we added a node to set its intensity to 0, we then added a alternate node to increase the intensity to the preferred luminosity we want. Turning the intensity into parameters allows us to edit the brightness in the editor instead of in the blueprint, shaving time off of the process. We also added a Ray Tracing node and made it into a parameter to allow editing outside of the BP.

To showcase what has been completed here the table lamp from the above BP has been placed and set with my preferred luminosity and allowed Ray Tracing which can be seen in the soft and semi realistic shadow on the plant.
This concludes this weeks progress report, I will post the result pictures in a separate post.
0 notes
Text


Forest landscape project, 2nd of August.
Made using Unreal engine 5, with assets from Kite Demo, Paragon, Ambient CG, Quixel Bridge, and Base engine assets.
0 notes
Text
End of week Report

This week we were tasked with making a forest using the landscape tools and foliage brushes.


First we learnt about getting textures from sources such as the website AmbientCG as well as the unreal built in asset library Quixel Bridge.


Here are the colour and normal maps for the texture above, for the normal and colour texture maps the SRGB needs to be active and for the normal map we flipped the green channel so that the textures on this specific asset would be facing up and not down which would cause the result to come out reversed in the engine.


Here is how we turned the textures into a master material. by unpacking the textures in the editor we made each of the textures a parameter and linked them to a multiply node attached to a tiling node. This allowed us to alter the textures once we created a material instance from the master material. I've explained and showcased this in a previous post.

Above is just a sample of the material and an instance made from it using a grass texture, this knowledge will be put to use in my forest map.


Here after we knew how to create a master material we took some assets from AmbientCG and imported them into our project, I used a grass with clovers texture. The yellow image above is the ambient occlusion, roughness and displacement all compiled into one texture. For this stage in our knowledge we didn't use the displacement so that will be disregared and not shown for the remainder of this post. On this layered texture we had to alter its compression settings by going to that node inthe textures editor and making its compression set to HDR Compressed which helps to separate the different textures and making its addition more seamless.
From there we made a landscape material using the grass texture just how we made the master material, the only difference is we want to have multiple layers so we can paint on textures to the landscape. To do this we made a layer node, I labelled mine using Gaidhlig numbering but that's personal choice seeing as I understand it. Before we could just hook everything into the node we needed a 'make material attributes' node which is a way to condense the layers into one node to which we connected to the layer node. As seen in the picture above we repeated this process and made two layers to start. Once these were in place and in the layer node we made a 'Break material attributes' node, this is what we needed to take the two layers and deconstruct the information to plug it into the main landscape material node. For separate knowledge I repeated this process to make six layers but since the process is identical I will not go over it.


So here is displaying how the material instance looked in the engine, the black mesh is caused because there was no layer info created. To remedy this we went down to the target layers tab and selected the plus button beside each of the layers, creating a small dropdown menu that we then selected the 'weight blended layer' button to create a layer info that we could paint our textures onto.
From there we opened the material instance editor and selected the groups assets, this gave us the ability to edit the textures and use them, the tiling option is the size of each texture when placed in the world, this is important because some textures appear small and when repeated on a large scale can look too obviously repeating, by increasing the tile size they will look bigger and also less repeated.
The picture of the layers also shows a new set of nodes these are the reduction of macro, to simplify it helps to make the landscape look less repeated by adding a sort of mask over the texture to break up the texture.


Here is a closer look, we took the texture mapping from a gold asset by using similar methods to making a material layer we added them to a macro layer which covers the whole material. We then plugged that into a reduce macro node so it would not affect the landscape material to a degree that was too strong.


For this step finally it was a matter of adding it to a multiply node attached to the base colour to enact the desired effect, I will make note of the two nodes added above labelled specular and visibility mask. Specularity is the detail of how shiny the land looks, at 0 the land is matte and looks flat, at 1 its too shiny and looks like plastic. I placed the setting to make it look somewhere in between both.


After all of the main settings had been completed it was a matter of stylizing and adjusting the landscape to my personal preferences. We also added a pond or three, using a material plane instance and a water material instance so that we could alter the collision and settings, we also added a decal to make the shoreline look wet which affected the rocks in turn which is what I wanted.

An extra little setting we added for personal use was a tint, by creating a colour node and a multiply node and feeding the base colour node into it we could then alter the colour of the grass or other layers base colours.
From there we used the foliage and selection tool to add in rocks, grasses, aquatic plants etc. into the scene. By adjusting the density and scale of our rocks or foliage we could have variation in size and placement.

Here is what my project looked like I added in some foliage, rocks, grass and trees, from there my project was also finished. To finalize and take photos I added in a post processing volume and adjusting it to my personal preferences.
I'll post the final images in a separate post. Next week we will be focusing on interiors and more advanced lighting.
0 notes
Text
End of week report.
This week has concluded and our starter project is in its final state.
Yesterday the 25th we studied blueprints and particle effects, creating custom blueprints with light and particles as shown in the fire in my shrine. To do this we created a base blueprint and used the legacy fire cascade particles.
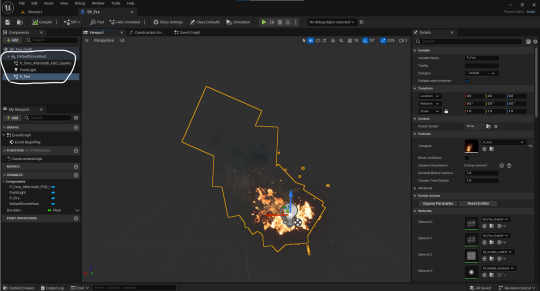
Here is shown the blueprint I have made using the cascade fire particle, Paragon aftermath effect for realistic cinders and the point light feature to give the asset its own light source. While the cascade fire has its own light source, using multiple instances can create a visual glitch where the shadows procedurally created by Lumen, Unreal Engines lighting system can cause flickering and unstable shadow effects. To remedy this we go into the particles edit menu.
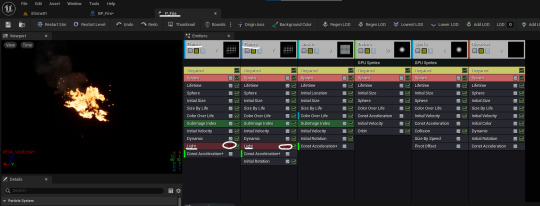
Here I've highlighted that in the particles effects menu I have set the flame effects light parameter to false so it wont generate its own light effect, in doing so combined with my point light in the blueprint means that the point light will be the main source of light which won't result in the shadow glitch.
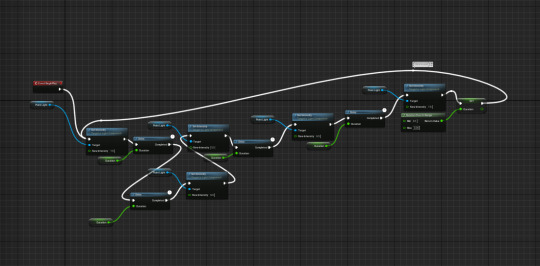
The next step is to make the flames in my blueprint flicker like a real flame, to do this we create a basic script known as an event graph. Here I've attached a node action to the event begin node, my first action is to set the intensity of the point light, I have it set to 7.5 lumens, the next node added is duration which is set to 0.1 seconds and is also made into a variable meaning it can be altered and randomized using auto generated values, such as changing the duration of the lights intensity on a scale of 0.1-0.5 or whatever is preferred to the user.
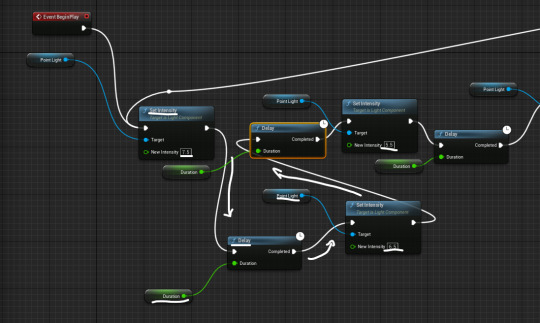
Seeing as this code is very basic and rudimentary for a flame flickering effect I simply took my two action nodes and duplicated them up to five times, using connections to string it all together and then looped it.
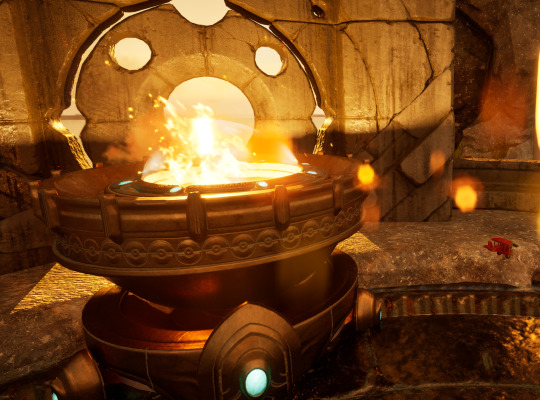
What we resulted in was a very simple and realistic flame effect that I could use for my shrine, I also constructed a basic brazier to showcase my flame.
After we had all of the basic elements of our shrine completed we then cleaned it up and enhanced it using a process known as 'Post-Processing' its a common function used in cinematography, game design and many other visual editing media. For videogames its used to shift visual effects and add in effects such as film grain, chromatic aberration, lens flares and bokeh into the scene as well as shifting color values, contrast, brightness etc.

Here in my shrine I've used post processing to adjust the overall color balances, adding warmer tones, lowering the cool tones and I took the creative liberty of adding some lens flares and bokeh to illustrate a realistic sense of light passing through my shrine walls holes.
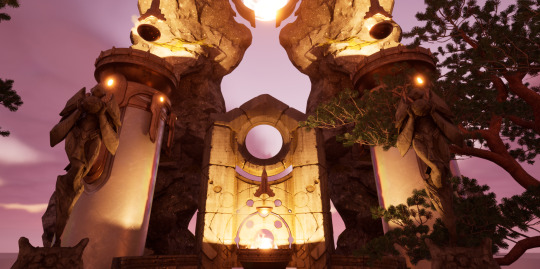
Here is an example of what my shrine looked like before I added the post processing effects, In my own personal opinion adding the post processing enhanced the overall image quality and gave it a life of its own.

Here is shown what he post processing looks like in the editor menu, its a simple cube that typically only exists inside the cube. The shown effect in its default is known as 'auto exposure histogram' which does a simulation of the human eye when exposed to light. While this is nice we need to alter the exposure for our own purposes, but first to make sure we can see the effect properly we need to make the volume global. To make the effect global you have to enter the volume settings as shown below.

After this is selected to be true, the post processing effect becomes universal instead of within the confines of the cube. Now this can be useful when it isn't unbound, if you wished to have two post processing effects in one level you would just need to scale and shape the base cubes and place them as needed and so long as the player is within the confines of either cube the effects will be seen separately, but seeing as were only making a single level and need a global effect we made the volume unbound.

After we've completed those prior tasks we can adjust the exposure, by changing the metering mode from Auto exposure histogram to Manual and turning the physical camera application to false it allows us to alter the settings of the effect to our specific desires such as changing the exposure compensation to the desired brightness.
This concludes this weeks project in basic understandings of Unreal Engine and using pre-made assets to construct a scene. From here on out I will be posting weekly updates to condense my posts and allow for better record keeping, only posting progress shots daily or any other necessary updates.
1 note
·
View note
Text
Materials and Material instances.

Today we studied the basics of creating materials and material instances, by creating a simple texture and altering it using RGB values as well as metallic and roughness variables.
Here I've shown a basic material with a slight metallic sheen and dull roughness. By adjusting the RGB values I gave it a mint coloration.
After doing so I placed it into my files and then created a material instance, an instance is a copy of the base material that shares its programming, such as its base coloration, roughness and metallic values which are selectable as parameter values shown in the image below.

Here I made the instance more like a chrome ball, by altering the color and roughness, giving it a sleek metallic finish. After I had done this I knew how to create new instances and then make multiple more as seen in the below image.

0 notes
Text
FBX Files and Collision

Shown above is a model of a wooden toy plane that our lecturer Morgan created 3d studio max. In our shrine project we had a rather quick tutorial on .fbx files and importing them into unreal.


The above three images show the first steps you will need to have when importing models and textures. The Interface shown in the first image are the .fbx file import options, these are for if you have things that need to be edited before the static mesh can be fully imported such as whether or not you need the mesh to be nanite enabled, if you'd like the engine to generate collision automatically, despite us not wanting to have auto generated collision we have it enabled (We deleted it later to make our own.)
Once you confirm those settings the next photo is just an in editor view of the mesh without its textures. To enable the textures we need to create a material for the mesh to use which leads me to the third image, shown there are the five textures that are typically needed for the bases of making a material. We have in order: Base colour, Metallic, Ambient Occlusion, Normal and Roughness.

A quick note here is that for the metallic, ambient occlusion (Henceforth shortened to AO) and roughness the rgb option in the texture settings do not need to be enabled since the textures themselves are just data values and have no colour values, so we just disable the rgb. The Base colour texture is the only one that should have rgb enabled seeing as the colour data is the only value we need the engine to read, and despite the normal map having colour in the view it automatically has rgb disabled because the colours represent data values.

Once those settings have been completed we can simply drag and drop the textures into the material editor after creating a new material in the engine, its a fairly straightforward process of just placing each texture into the corresponding node value in the end node. Once completed simply save the material and it is ready for use.
Shown here is the toy plane with the material added on, you can see that shown up on the top right side of the screen in the material slot, its as easy as dragging and dropping the material into place.
Shown also is the collision boxes we hand constructed, collision is the green boxes that essentially have values to tell the engine that within these boxes the static mesh has density, giving it the capacity to simulate gravity and physics, I am no expert in physics so I cannot elaborate further on how unreals physics engine works. The reason we added our own collision boxes is to have a more specified amount of simulated physics, doing so tells the engine that the tail of the plane has weight and so to let it rest on the surface when placed in the engine.

Here is the toy plane mesh in my shrine, to allow the collision to work correctly we need to simulate physics and enable gravity which will use the collision boxes to figure out what parts are most affected by gravity within the scene such as letting the tail of the plane rest on the ground.
0 notes
Text
Further Practice in Unreal Engine


Wednesday 24th July.
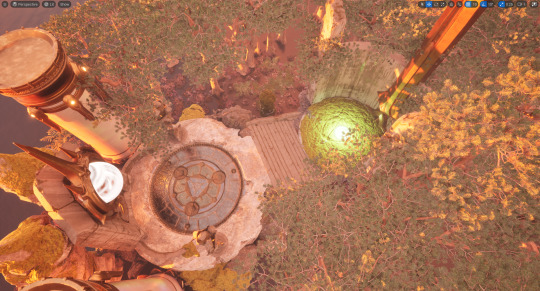
Today we learnt how to use foliage painting and instance layering. Added in trees, shrubs and other vegetation. Also used directional lighting to create ambience and mood, added in point lights to create effects.
Moved a few items in and around to shift the feeling of the space, changed texture of the orb to suit my personal preference.
1 note
·
View note
Text
UE Keyboard Shortcuts.
Hold R mouse to move camera.
While using R mouse, WASD & QE for omnidirectional movement.
Ctrl + Z to Undo
W to Select & Move
E to Select & Rotate
R to Select & Scale
G to hide outlines and icons (Game mode)
F11 for Immersion mode/Fullscreen
F to Focus on object selected
Ctrl + L to control object direction 360
Ctrl + Numeric key to save camera angle
Alt + P to enter play mode (Used in testing mesh collision)
0 notes