
lexideannayt
LexiDeannaYt
| Instagram & Twitter @lexideannayt | Youtube: LexiDeanna | Twitch: LexiDeannayt | Graphic Designer | Sims 4 CC Reblog |
1519 posts
Don't wanna be here? Send us removal request.
Last Seen Blogs

256nicom-posts
news
tainghekhongdaycomvn
Chuyên bán tai nghe không dây chính hãng tại Hồ chí m
tainghekhongdaycomvn
Chuyên bán tai nghe không dây chính hãng tại Hồ chí m
tkfreg
Mommy's Escape
Text

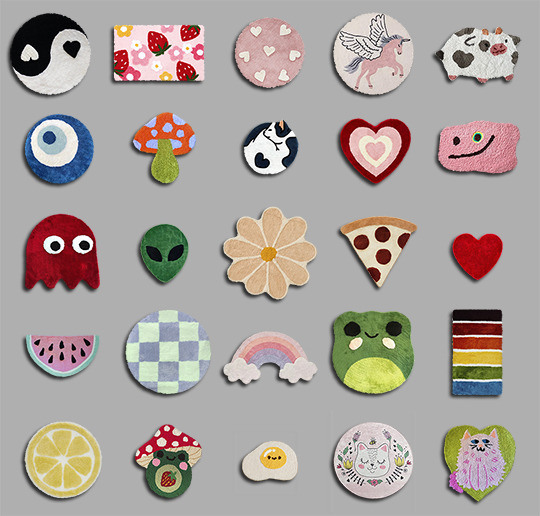
Cute Rugs
Super cute rugs! 😊
25 swatches
DOWNLOAD at Patreon!
1K notes
·
View notes
Text
Hair Care Overrides
[7/27/24]
!!Make sure to place the overrides in the folder as the original mod!!
For the baddies who want alpha overrides.
Functional Hairbrushes - Replaces wooden and silver brushes with flat and modern.
Sims 4 Bathroom Clutter Kits Become Functional - Overrides the clutter kit hair dryer.
Meshes By: HeraSims, PlatinumLuxeSim


994 notes
·
View notes
Text
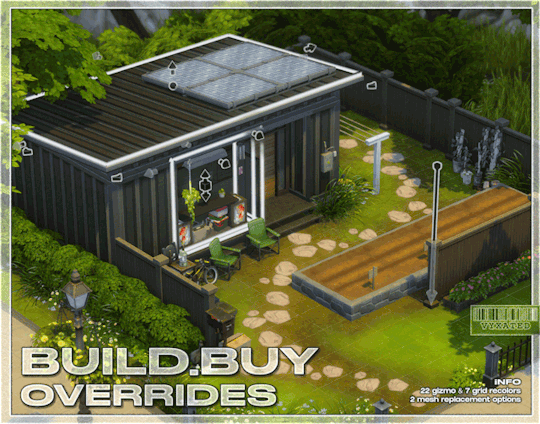
Build Buy Gizmo Overrides
A brand new mod that replaces the build buy gizmos & grid! I've sized them down and added a bunch of recolors for you choose from ^^
// gizmo - mesh overrides


Available in 2 versions: smaller (70% of original size) and Outlined.
Choose only 1 version.
// gizmo - recolors
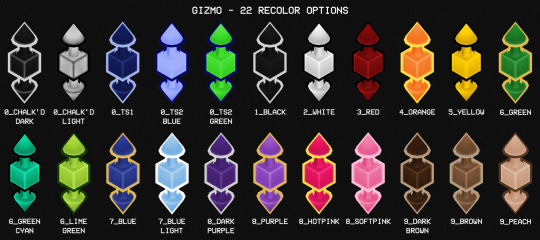
22 colors to choose from (pick only one).
All recolors can be used with either the sized down mesh or the outlined mesh.
// grid - recolors

7 color options (pick only one). Much subtler than the original grid :]
DOWNLOAD
simfileshare / patreon
2K notes
·
View notes
Photo

Infant Starter Pack
| GO TO DOWNLOAD PAGE |
@sssvitlans @moonglitchccfinds @dreamstatesimsfinds @emilyccfinds
136 notes
·
View notes
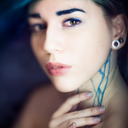
Photo
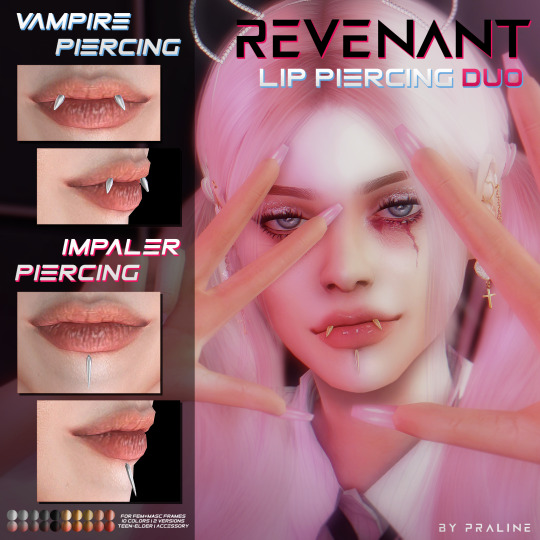


REVENANT Lip Piercing Duo
2 new vampy rivet lip piercings for your sims. Can be combined, or worn on their own.
Things you should know:
Very low-poly (Vampire 160 / Impaler 128).
Available in 20 shades (10 metal colors, each in 2 versions).
For fem+masc frames, teen-elder. HQ compatible.
To be found under general face accessories category.
Can be freely combined with almost all of my other piercings.
DOWNLOAD (Patreon FREE)
Hope you enjoy~ Happy Easter! 🍷
If you like, please consider to support my work 🖤
2K notes
·
View notes
Video
CAS TUNING - CONTROLLED POSITION MOD v1.1
✅ GENERAL DESCRIPTION
Full control of your sims position in CAS in all categories;
No more automatic position change when choosing СС or its swatches;
Now the character will stand in the position in which you put him: face, back, sideways or face, it’s only up to you to decide;
Custom fingernails position (individual pose for females and males)!
✅ FILE TYPES (install only one version!)
CAS TUNING - CONTROLLED POSITION MOD v1.1 - position control only.
CAS TUNING - CONTROLLED POSITION MOD v1.1 custom fingernails position - with custom fingernails position!
✅ INSTALLATION INSTRUCTION
Just put in your mods folder one of the versions;
Doesn’t conflict with mods I’m aware of.
📑 ADDITIONAL INFORMATION
In the video I used GENTLE CAS LIGHTING MOD and Stand Still in CAS. To make all of these mods work, just put it in the SAME folder.

MORE INFO AND DOWNLOAD
Thank you a lot for all your support 💘!
7K notes
·
View notes
Photo


𝕀𝕟𝕗𝕒𝕟𝕥 𝕄𝕚𝕟𝕚 𝕊𝕟𝕖𝕒𝕜𝕖𝕣 𝔻𝕣𝕠𝕡🔱
Available FREE on my website here: 🔱
𝒯𝒪𝒰
(𝒟𝑜 𝓃𝑜𝓉 𝓂𝑜𝒹𝒾𝒻𝓎 𝓉𝒽𝑒𝓂🚫❗️)
(𝒟𝑜 𝓃𝑜𝓉 𝒸𝓁𝒶𝒾𝓂 𝒶𝓈 𝓎𝑜𝓊𝓇 𝑜𝓌𝓃 🚫❗️)
(𝒟𝑜 𝓃𝑜𝓉 𝓈𝒽𝒶𝓇𝑒 🚫❗️)
(𝒟𝑜 𝓃𝑜𝓉 𝒸𝑜𝓃𝓋𝑒𝓇𝓉 𝓉𝑜 𝒶𝓃𝓎 𝑜𝓉𝒽𝑒𝓇 𝑔𝒶𝓂𝑒 𝓌𝒾𝓉𝒽𝑜𝓊𝓉 𝓂𝓎 𝓅𝑒𝓇𝓂𝒾𝓈𝓈𝒾𝑜𝓃 🚫❗️)
997 notes
·
View notes
Text


[gloomytrait] TS4 Portable Walkers For Elder Sims
Hey guys, I hope you're all having a lovely weekend! I'm so happy to finally share this little project with you! It took me forever and a day to finish but I'm quite proud of how it turned out. I felt like Growing Together was lacking content for elderly Sims and I always wanted to have walkers in the game, so I came up with the idea to make my own walkers and make them as functional as possible.
Unfortunately, I'm not good enough at modding to add animations for these so your Sims can't actually use them as they are intended to but I did edit the object tuning so that you can place these inside your Sims' inventory and take it with you wherever you go! I also added quite a few slots, the version with the basket has more slots and it's also a bit more expensive in the buy catalog. You can also use these walkers to just decorate your elderly Sims' rooms with and add a bit more realism to your game. Any pose creators out there, please feel free to make poses for this item if you want.
I apologize for how high poly the meshes are, I tried to lower the poly count as much as possible but it's still 18K for the walker with the basket and 16K for the other one. Please be sure that your PC can handle high poly custom content before you download these!
Walker V1 (right):
basegame compatible
poly count: 16170
all LODs
search for 'gloomytrait' in the buy catalog
Walker V2 (left):
basegame compatible
3 swatches
poly count: 18719
all LODs
search for 'gloomytrait' in the buy catalog
@sssvitlanz @maxismatchccworld @emilyccfinds @mmfinds thank you!
dl (free, no ads) | TOU
2K notes
·
View notes
Photo


Animal Socks - Infants ♥
12 swatches
📁 [SimFileShare]
3K notes
·
View notes
Photo


👶🏼Baby Shower Set 🍼
Set Contains:
• Table - 8 Swatches
• Cake - 6 Swatches
• Baby Blocks - 11 Swatches
• Bear With Balloons - 10 Swatches
• Wall Balloons (right) - 10 Swatches
• Wall Balloons (left) - 10 Swatches
DOWNLOAD
Patreon early access - Public 12th April on our Website / CurseForge!

DO NOT - Reupload, Include my mesh in your lots / rooms / CC Folders OR Blender Scenes for download or on pay sites (always link back to my page so they can download directly), Use my textures, Convert, Claim as your own or modify my mesh in any way.
• OUR MESHES IN THEIR ORIGINAL FORMAT ARE COPYRIGHTED & OWNED BY US - NO CONVERSIONS / PERSONAL USE ONLY.
YOU CAN - Recolour with credits, but don’t include my mesh.
617 notes
·
View notes
Photo


Infants CD Onesie
• 5 Swatches
Free Download on our Website [ 💗 ]
(Dated 16th March)
Or Patreon if you’d like to support [ 💗 ]
Enjoy! xo
507 notes
·
View notes
Photo


Luxe Chester Crib
For Infants
After some alterations & editing/adding to our original mesh, we were finally able to make a functionable version of our Luxe Chester crib - but for infants! 😊
• 12 Swatches in total (same as our original/deco version!)
All seems to be working fine for us in game - but if you have any problems at all please let us know! 💗
DOWNLOAD
(Patreon / 3-day early access)
** This item will be FREE for everyone on our CurseForge page on Sunday (due to them only doing moderation approvals Sunday-Thursday 8am-3pm CET) **

DO NOT - Reupload, Include my mesh in your lots / rooms / CC Folders OR Blender Scenes for download or on pay sites (always link back to my page so they can download directly), Use my textures, Convert, Claim as your own or modify my mesh in any way.
• OUR MESHES IN THEIR ORIGINAL FORMAT ARE COPYRIGHTED & OWNED BY US - NO CONVERSIONS / PERSONAL USE ONLY.
YOU CAN - Recolour with credits, but don’t include my mesh.
443 notes
·
View notes
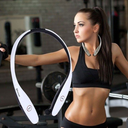
Text

Functional Blender and Protein Shakes
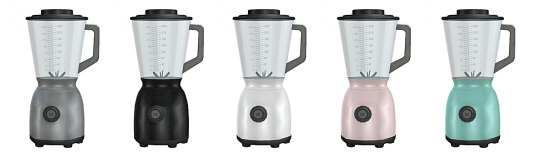
Protein shakes:
Animation - drink through a straw
Have their own buff and energetic mood
If you drink BEFORE strength training, they will help you build muscle mass faster
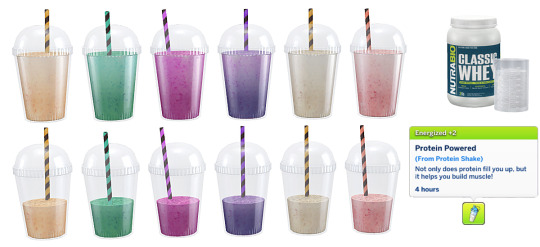
The process of making protein shakes:

DOWNLOAD AND LEARN MORE INFORMATION
🕓🔻
Early Access "Gourmet" and "Restaurateur" February 23
Early Access "Taster" on March 2
🔓Public release on March 16
4K notes
·
View notes
Text
How To: Auto Height for Shoes
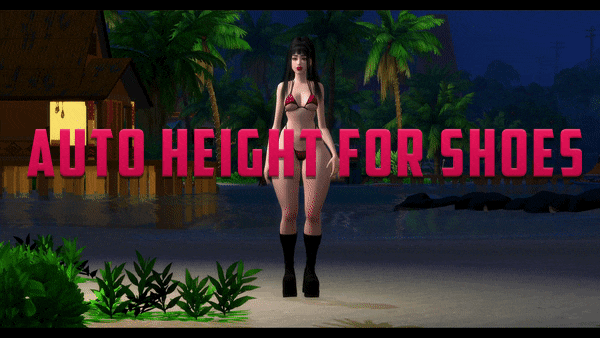
Haiii! As promised, here is the tutorial to make it so your custom shoes no longer require a shoe slider!
Thank you to the bestie who took the time to pick through Madlen's package file to figure out how it worked. And of course, thank you to Madlen who did the majority of the work figuring out how to make this possible in the first place!
♥ Tut below cut ♥
~~~
Set Up Your Blend File:
We're going to add a plane that will act as the mesh for the SlotRay which will allow for you to adjust the height of your shoes!
Open your blend file that contains the shoes your wish to adjust.
In the 3D View, press Shift + S and in the menu, select “Cursor to Center” In the 3D View, press Shift + A and in the menu, hover over “Mesh” then add a plane.
Now size this plane down as small as you can get it. You don’t want this plane visible in game.
Double check to make sure the plane has not moved from the center!! Your sim won't be centered in game if it has! If you see that it's moved:
Press "Shift + S" and click "Cursor to Center".
Then Select your plane and press "Ctrl + Shift + Alt + C", click "Origin to 3D Cursor".
Press "Ctrl + Shift + Alt + C" again and click "Geometry to Origin".
Navigate to the “Object data” tab and under “UV Maps” add a new one then name it “uv_0”.
Next, navigate to the “Scene” tab and under “S4Studio CAS Tools” set the cut number.
Depending on how many cuts your shoes have, you’ll want to adjust this number. For example, if your shoe has 3 cuts (0000, 0001, 0002) then this plane would have a cut number of 0003.
Since my boots only have one cut, I will put the number as 0001.
Now select your shoes and enter Edit mode. Select a face/vertice/edge on the very bottom of your shoes. Look to the panel on the left side of the screen (if it’s not open, press “N”). Under “Transform”, note down the number next to “Z”
After that, save your blend file under another name so you can distinguish which is which. I’ll name mine “Boots_3_Height Cut”
youtube
~~~
Add a New Cut to your Package File:
We're going to add an additional cut in your package file for the new plane!
Open Sims 4 Studio, make a new package file for your shoes and import them.
Go to the Warehouse tab and select your LOD 0, it will be the geometry with the largest file size. Sometimes you have to close then reopen the package to see the geometry.
Duplicate this geometry and in the box that pops up, change the last character of the “Group”. It can be any number or letter as long as it’s not the same as the duplicated geometry. On the duplicated geometry, note down the Group, Instance & Type values.
Find the “Region Map” and next to “Entries” click “Edit Items”. Add a new entry and in the “Layer” box, type the number you used for your cut. Since I used the cut number 0001, I will type 1.
Keep the “Region Type” as “Base” and move to “Models” then click “Edit Items”. Add a new Model entry and paste the Group, Instance & Type values you noted down before. Save and close each box.
Find your “CAS Part”, this is your swatch.
If you have additional swatches, it is a good idea to remove them and add them back once you are finished with this process.
Scroll down until you find the “Lods”.
Click “Level: 0” and next to "LOD Models", click “Edit Items”. Add a new entry and paste the Group, Instance & Type values again.
Save & close each window and return to the Warehouse.
youtube
~~~
Adjusting SlotRays:
We are now going to edit the SlotRays for the new cut which will adjust the height of the sim for your shoes!
Return to the new duplicated Geometry and in the “Data” tab, find the “SlotRay Intersections” and click “Edit Items”. Add a new entry and find the “OffsetFromIntersectionsOs” box.
You'll want to change ONLY the middle coordinate number. That will be the height of the sim.
You want to take the “Z” coordinate that you noted down from blender and replace middle coordinate number. If the number you wrote down is negative (i.e -0.01234) make it positive (i.e 0.01234).
In the “SlotHash” box, change the value from “00000000” to “FEAE6981”. This is the hash for the b__ROOT__ bone in the Sim's Rig.
Save and close the dialogs then return to the warehouse. Next, reimport your mesh and save your package file. You can now test your shoes in game!
youtube
Please keep in mind:
You have to do this for every LOD of your mesh
You can freely replace the mesh of your shoes and adjust the height since the cut with the plane has the SlotRay data
Animations may be off since EA hasn't made the game to support taller sims
CAS windows may move slightly if your sim is using poses/animations where they are leaning to the side. This won't affect gameplay
I recommend using Helgatisha's Stand Still in CAS mod to make sure your sim is absolutely centered
Hope this helped :)
1K notes
·
View notes
Photo

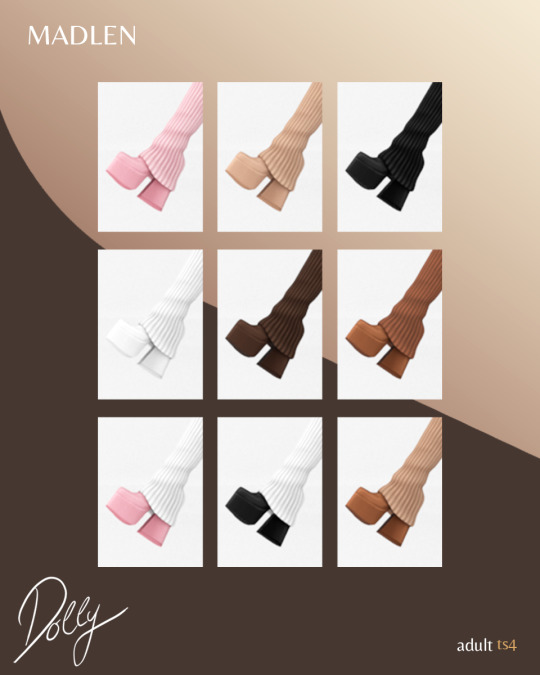
Dolly Boots
Fashionable platform boots with leg warmers!
Whether you’re out on the town or braving the frozen tundra, these baddies will keep your feet and legs cozy and warm! ✨💕
DOWNLOAD (Public 28/Mar/23)
3K notes
·
View notes
Text


as promised here is foundry cove, info and download under the cut
residential lots are unfurnished
i own all the packs
do not claim as your own
the surrounding area is going to look different. i used the tool mod to place items outside of the lots. there's nothing i can do about it
download
4K notes
·
View notes
Text
Functional Blender and Protein Shakes
Protein shakes:
Animation - drink through a straw
Have their own buff and energetic mood
If you drink BEFORE strength training, they will help you build muscle mass faster
The process of making protein shakes:
DOWNLOAD AND LEARN MORE INFORMATION
🕓🔻
Early Access "Gourmet" and "Restaurateur" February 23
Early Access "Taster" on March 2
🔓Public release on March 16
4K notes
·
View notes