
Showcasing the computers im building, quadcopters I'm flying, and everything else I'm working on.
Don't wanna be here? Send us removal request.
Statistics
We looked inside some of the posts by lflanagan2020 and here's what we found interesting.
Average Info
Notes Per Post
14
Likes Per Post
6
Reblog Per Post
0
Reply Per Post
8
Time Between Posts
3 days
Number of Posts By Type
Text
3
Photo
2
Last Seen Tumblr Blogs


Fun Fact
Tumblr Inc. is using 66 technologies for its website.
Text
See? I told you it can fly!
Short post, mainly just showing off a video. I took my quad out for a spin this weekend and decided to record the flight. Nothing fancy, as it was more of a test flight. The footage is completely unedited, start to finish, and was recorded using only one battery pack. Unfortunately, I did break the screen on my GoPro, however it still works fine.
youtube
Here’s a photo of the carnage:

4 notes
·
View notes
Text
Flying With Friends + New Gear!
This is a shorter post mainly because of the length of my last one. A few weekends ago, I went flying with two of my other quadcopter-building buddies. It was a great opportunity for me to test my quad, and to try flying the ones owned by my friends. We broke lots of stuff, but luckily we were prepared enough to fix most of our problems without having to leave the field, however my pile of broken propellers in the corner of my basement is growing at an alarming rate. Here’s a group photo of all of our quads.

Now, for the part I’m super excited about. Recently, I acquired a new set of FPV goggles. These allow you to see a live-video stream from your quadcopter, letting you to fly from a first person perspective. The other thing I’ve changed was adding a paint job to my controller/radio. Now it’s red, better matching my new goggles! Below is a photo of both my new goggles, as well as my painted radio.

For anyone curious about the keyboard in the background, my next post will be about my gaming/desk setup, where I will talk about all my peripherals, including that keyboard (and yes, it’s RGB).
2 notes
·
View notes
Text
Pumping Water Inside an Expensive Computer
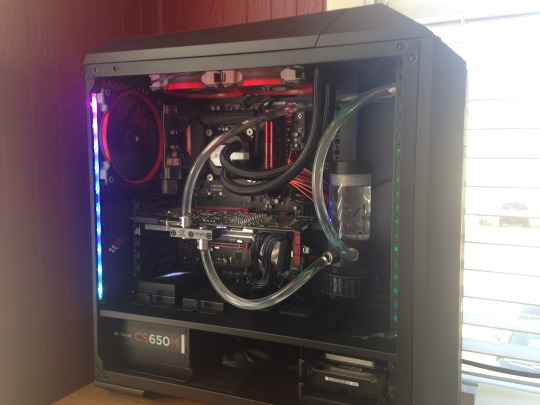
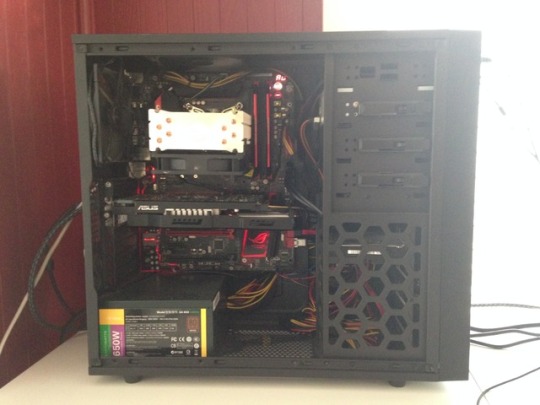
“You put WHAT inside your computer?” This is a common reaction when I tell people about one of the hobbies I have. Cooling a computer using water sounds like an excessively stupid idea, and without any background information, It certainly may seem that way. Cooling hot computer components with various fluids has been in use since 1982, and gained popularity among computer enthusiasts in the early 90s. My first experience with the method was in late 2015, when I installed an “All in One” CPU Liquid Cooling System, that came probuilt off-the shelf. It was then when I began to learn about how it worked, and the advantages behind it. Below is a picture of my computer, with the cooler installed.

For those who don’t know what they’re looking at, direct your attention to the ceiling of the computer, where you can see two red rings. Those are fans, which are attached to a radiator that allow for air movement through the radiator’s aluminium fins, thus taking away heat. Now, look at the rightmost fan, and notice the two black tubes running next to it. Those connect the radiator to the “water block”, and allow for movement of liquid between the two. The water block is a small copper plate, that is pressed atop the component you’re trying to cool, and acts as a conductor of heat between the component and the liquid itself. It also contains a small pump, used to circulate the water through the loop.
This off-the-shelf system was easy to install, and worked very well, however, I wanted more. There are two main components that needed to be water-cooled in my system, the CPU, and the GPU. While the CPU was being cooled by water, the GPU wasn’t. That was when I decided to take the next step.
In addition to the closed-loop CPU cooler I already had, I decided to add cooling system for my GPU. However, this time I wanted to do something more advanced. I wanted to build a water-cooling system myself. In the picture above, you may notice some additions. Now, I had an additional water block on my GPU, as well as a separate, more powerful, pump. On top of this, I installed another radiator, this one being much larger. This system was all connected with clear tubing, so you could see the water flowing through.
At this stage in the game, I had two separate cooling loops, one of which was pre-built, and the other was custom built by myself. The next step was to go fully custom.

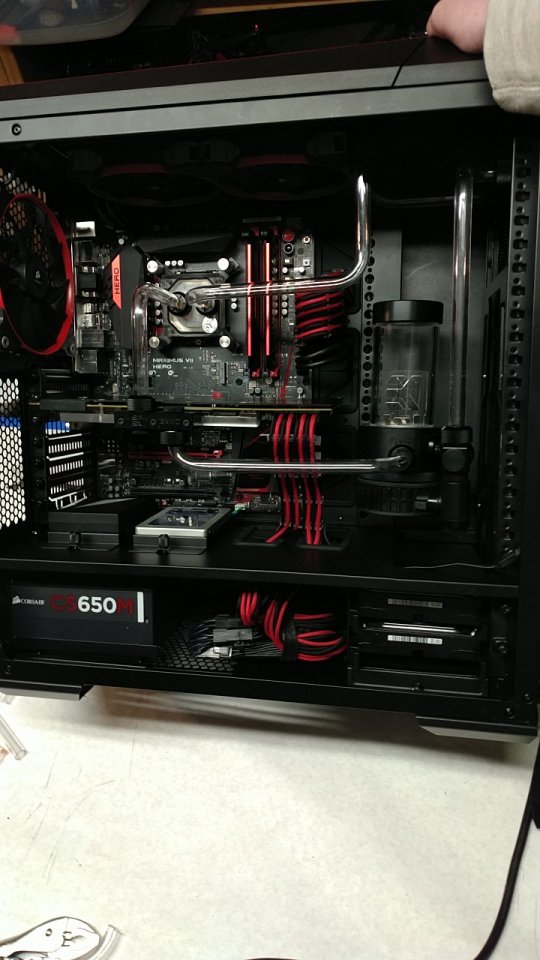
I’ve not got my CPU and GPU in a custom water-cooling loop. You may notice that the tubing is much less bendy, and more rigid/straight. This is because I decided to convert to hard-line tubing, which is a challenge in and of itself.
This is the part of the post where I’m going to get into the process of watercooling, and the process of bending hard-line tubing.
Disclaimer: This was actually my seccond time around watercooling using rigid tubing, and was the most recent time I went through the process. I chose not to document the first time in this post, as the photos are not nearly as good, and the end result from the seccond time is much better, and is more recent. If you’re curious what it looked like the first time, the above photo was the final result after my first go.
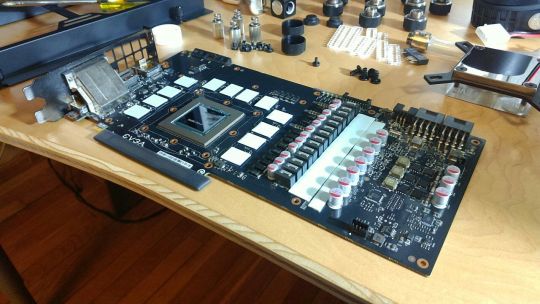
The first step is installing the water block. Here’s a picture of my GPU with the cooler stripped off, before I installed the water block. See that shiny chip that surrounded by little white rectangles? That’s the chip that the water block is designed to take heat away from (and in my case, some other parts of the GPU as well).
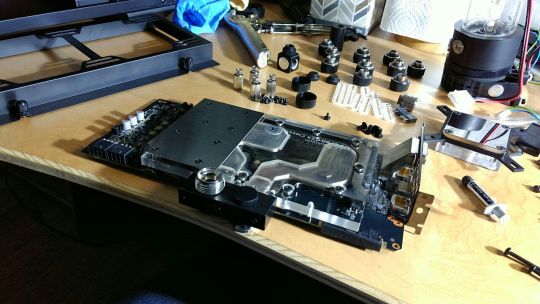
There’s a picture of the GPU with the waterblock installed. As you can see through the clear acrylic, there are paths that the water is designed to flow through. The tubing that provides the water attaches to those shiny metal fittings that are located on the top and bottom of the matte-black protrusion on the side of the block. Installing a waterblock on the CPU is a very similar process.

Now that the water blocks are installed, and the pump and radiators are installed in the case, the next step is to plan out the loop. Above is a photo of my computer, fully assembled, but before any tubing has been installed.
It’s time to bend! Above is a photo I took when the tubing installation is about halfway complete. I decided to move the drain valve to the right tube, as It was a better location to get all the water out.
The tubing is complete! The next step is to fill it up with water, and is by far the scariest step of the process. At this point, I didn’t know if it would hold, and for all I knew, the water could very well have leaked all over my expensive components, had I not done a good job.
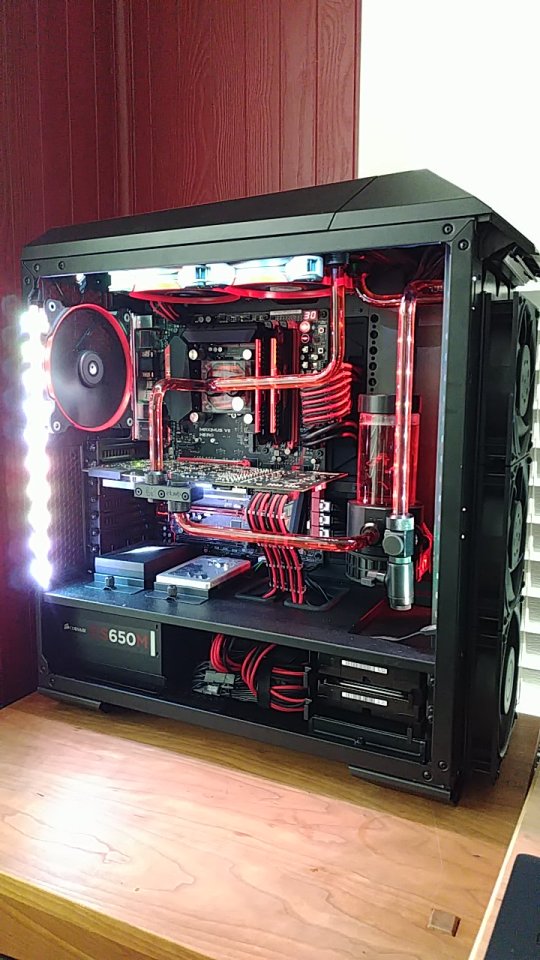
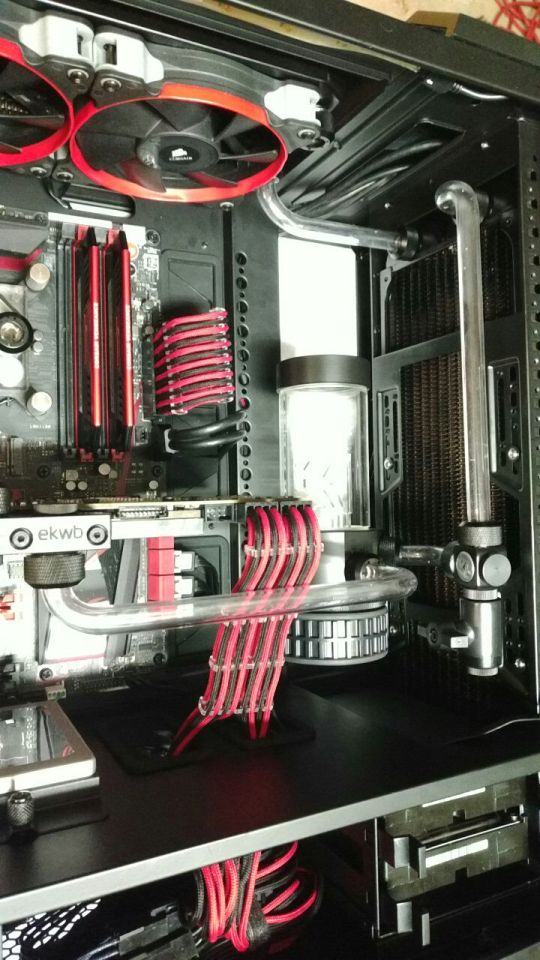
Bam! It’s done, and filled! Watercooling was an adventure, with a risk element higher than many other hobbies. However, I’m glad I did it, as I learned so many things I would have never learned had I not gone through with it. Above is a photo of what my computer looks like right now, sitting in my office.
Below is a bonus video of me adding red dye to the water :)
youtube
2 notes
·
View notes
Photo

Taking Flight
Recently I’ve been delving into the world of quadcopters, which is defined by Google as “an unmanned helicopter having four rotors”. I started this hobby towards the end of winter, and I’ve been modifying, programming, and flying these “quads” every opportunity I get. I currently own two quadcopters, a “mini” quad (the one in the picture), built for outdoor flying, and mainly suited for racing and doing tricks, as well as a “micro” quad, best fit for close-range, indoor flying, and is much less powerful due to it’s smaller form-factor. Both of these machines are equipped with a FPV, or First-Person View, system, allowing the Pilot (or anyone with a video receiver) to view the real-time perspective of the quadcopter from an on-board camera. There is also an additional camera on my mini quadcopter, used to record the flight in higher quality, which allows for the flight to be saved and watched later.
For anyone interested in learning how to fly, building and flying quadcopters is very interesting, but it’s in no way easy. It requires lots of time, patience, and money. It’s pretty much a guarantee that after a day of flying, at least something will be broken, and having to perform constant upkeep and repair is certainly not for everyone. I would encourage anyone to join who thinks they’re up for the challenges of this hobby, however, it’s important to know what you’re getting yourself into. Be prepared to crash all the time and break things constantly, but more importantly, be prepared to learn, and have loads of fun!
2 notes
·
View notes
Photo


A Brief History of My Computer
Ever since I built my computer in back 2013, I’ve been upgrading it, fixing it, learning about, and most importantly, using it, nearly everyday. I remember building this system when I was 12, with help from my Dad, with the intention of using it for the sole purpose of playing Minecraft. Since then, this machine has been used for so much more, and has evolved to stand up to the test of time, crushing any task I can throw at it. The most notable change the computer has gone through is the development of it it’s cooling mechanism. It started out completely air-cooled, but has gradually turned into a system almost entirely cooled by water, allowing me to overclock it further, while running quiet and ice cold. Additionally, the components have changed a lot since I first started using it. Building and owning this PC has been a learning experience, from something as simple as learning how to plug in a graphics card, to learning how to deal with a catastrophic failure in the cooling system, nearly destroying every component.
For my fellow computer nerds out there, my system started with a Radeon 7870, and i5-3550, and has since grown to use a i5-4690k, and GTX 980ti.
Parts List: https://pcpartpicker.com/user/wafflesfreak789/saved/JY37YJ
4 notes
·
View notes