I'm Liam and this is a blog. I come from the boonies and am pretty keen to do some artsy stuff for a job. I guess this is my process to achieving my goal.
Don't wanna be here? Send us removal request.
Statistics
We looked inside some of the posts by liamoreillygevert and here's what we found interesting.
Average Info
Notes Per Post
14
Likes Per Post
13
Reblog Per Post
0
Reply Per Post
1
Time Between Posts
20 days
Number of Posts By Type
Text
17
Last Seen Tumblr Blogs


Fun Fact
Celebrities use Tumblr as well.
Text
Guess who's back! Back again!
After my lack of posts last half of semester, I thought it was time for another post.
Studio:
Now, thanks to COVID my project has taken a rather large detour. I had planned to create a final 1:1 prototype that functioned but sadly now it will all be digital. This isn't the worst though, this allows me to focus on the design of multiple items of furniture and model them in Fusion 360. My idea is to model all of these different pieces of furniture and photoshop them into different home environments to show of the furniture in an realistic way.
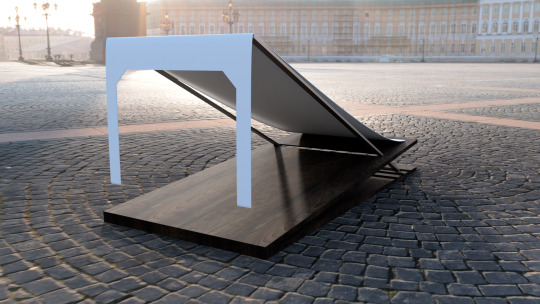
Now to some of the work I have done, I have moved away from the hammock style chair and into a more compact chair/sofa style. I took reference from a large obtrusive staple of architecture, acoustic mirrors.

These large objects have a brutalist style to them with the solid material and the angular design. I used this style and played around with the angles and the concave circle to try and form some what of a seat. I made a few mock ups and rendered them out, although to wood texture really sucks. I might have to make my own texture to really get the aesthetic I want.
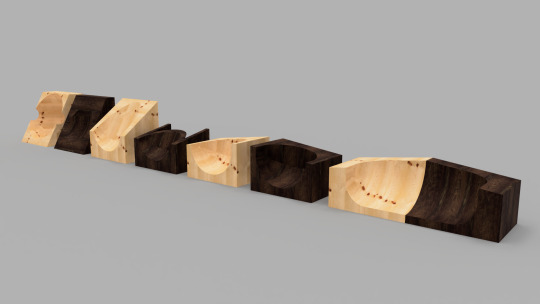
These designs make use of the angular style of the acoustic mirrors and the concaved circle. These designs due to there material would be rather uncomfortable but with the use of felted wool we could make cushions and comforters to go with them. This would make use of different waste materials and in different ways. Also by carving out aspects of the chairs it could be used as storage for the likes of book and other items.
Space, Image and Sound:
Nothing has really happened in this class as of yet. So going well! Banter aside, I have decided to focus on the film aspect of the installation, this way I can show of audio and visual all at the same time. But how to elevate the project further?
From here I plan to look at the learning objectives and work my installation around some of these points, while also keeping it within the scope that I personally want. Clinton spoke about ‘where you would like to present and/or where you could present’, it could be in digital space, it could be a car park, it could be VR. The idea is to imagine it in heaps of different spaces. What if I did an animation/ Overall it would be nothing but I could show a virtual space reacting with virtual nothing, which wouldn’t be nothing because it is digital therefore there is something (pixels and/or other digital mediums) This could be another way I could show off my idea in a different medium. Other than that, the plan is to continue with the film concept, I don’t have an ideal space such as the art gallery as my nothing can be anywhere. The ideal space/the white cube would actually be to plain for my topic, which could also be rather cool in the same respect. Due to my project being about nothing and how everything reacts with my nothing, if it was in the ideal gallery space it actually wouldn’t do anything at all. It would be a vaguely invisible plinth in a stark room within buzzing audio around it. Now I need to go further, I need some good locations with interesting environments. If lockdown persists to the point where I cannot leave my house to film on location then I will have to settle for places around my house but ideally I would like to go out and film in other places.
Intelligent Agents:
Now that the essay is out of the way it is time to focus on the project. For the project I would like to write a short story outlining the topic I did for the essay.
At this stage the story consists of two character that are suffering from similar situations, one is a robot with many organic augmentations that it doesn't know whether it is still a robot or not and the other character is a human with many cyber-organic augmentations and doesn't know whether they are still human. The ideal of the story is that they will have different stories and eventually will meet up at the end to settle there inner conflicts. More or less it is a play on the 'Theseus' Ship' analogy. "The ship of Theseus is a thought experiment that raises the question of whether an object that has had all of its components replaced remains fundamentally the same object." - they are struggling with this dilemma about themselves, whether they are robot or human.
So far I have written about two paragraphs for each character. Ideally I'd like the story to be around 10,000 words, but we will see how it goes as I write more, it might be less or more depending on how it all goes.
1 note
·
View note
Text
Progression: 09/08/2021
Once again an extremely slack amount of posts. That's ok though, we be working.
Intelligent Agents:
Now this class posed problems for me up until now! The 'I think...' statement I was messing around with before was the main focus of my problems. For one I used the term cybernetics wrong for the context of the class, the cybernetics I was referring to was in context to technological implants while Andy was talking about the method and process of cybernetics linked here > https://en.wikipedia.org/wiki/Cybernetics
Anyway once that was clarified I began to change my 'I think...' (a lot harder than I thought). I settled again on a statement that didn't really work. 'I think Artificial intelligence and cyber-organics will become one and the same.' This seemed decent in the beginning but what I found as I did research was that they would never become one and the same. AI needs to be independent from humans to be considered intelligent and cyber-organics will never be due to the fact that it will always need input from the human user to function. Such as a replacement arm, it will always need to be controlled by the human user. THUS! The final 'I think...' statement! 'I think Artificial intelligence and cyber-organics will never become one and the same.' A truly drastic change. My research still backs up this statement and the parts of the essay I have already written just need a little rewording! Great stuff.
Space, Image and Sound:
Sadly this has been the class with the least progress. Basically I spent my time researching and hashing out different ideas around how I would present my 'Nothing'. Now the most solid idea I have had for physical aspect is an invisible plinth. Now there are two ways to do this and all involving mirrors, there is a technique called invisibility cloaking which uses four mirrors to reflect light into each other masking the object inside. I could use this technique to make a plinth your could see through, you could see the boarders of the plinth but that is mostly it.

And the other ideas is to create a regular plinth and just stick flat mirrors to the out side to reflect its surroundings, this would distort it slightly and give an interesting look at the surroundings of the 'Nothing'. The second is more appealing as it would appear nicer on film. Now with the physical aspect considered it was time to think about audio. How do you record nothing though. I could record nothing at all or I could record things interacting with the nothing. Clint gave me the idea to use a contact mic to record vibrations, this way I could record the space reacting with the top of the plinth where the nothing would sit, I can amplify it and play it over the top of the film and/or within the space. So I got the piezo disks needed and wired them up to an audio jack and got testing. I recorded things like bridges, trees and buildings to test and I got a bunch of interesting sounds.
Update:
I laser cut a basic plinth from some waste MDF and brought some cheap mirrors from Daiso to glue to the sides. This will be the invisible plinth to show of the 'nothing'.

Studio:
MMM Chair. Now this project has had the most improvement. The chair design has stayed similar to the concept I showed at the end of the previous post. I made more renders with some different details and with a slight alteration to the design in the form of another wood base that the metal would slot into. Hard to explain, easier to show!

The draped wool over the back would connect via hooks to the bottom piece of wood and act as an anchor for the chair. I did some work on physical prototyping as well, with some MDF for the wooden aspect and some waste metal for the the metal frame.

I cut, sanded and welded the metal into a frame. The MDF could have been thicker though, lots of flex in that respect. This model I used for the crit presentation to show my concept physically. Dermot put me in contact with a fella from Unitec who had a bunch of waste construction LVL wood. Monday morning we went to collect it, with this prototyping and designing will be easier as I have a real life reference for the type of materials that come out of construction waste.

Not much written progress but in the physical aspects, big changes.
0 notes
Text
Robots, Nothing and Furniture: 27/07/2021
I have already missed two weeks of posting, pretty slack. But it is now the third week and I have plans. Lets start with the class with the least progress at this stage.
Intelligent Agents:
More of a philosophical class this one (well that's the way I'm approaching it). Initially the paper starts with an essay where you have to convince Andy that your point on AI is valid, but the second assessment is what I'm really excited for. You have to make a project based around your view point from the essay, thus I will come up with a solid 'I think...' statement that I can back up with credible sources while also keeping it open enough that I can write a (Wait for it)...
SHORT STORY ┌( ͝° ͜ʖ͡°)=ε/̵͇̿̿/’̿’̿ ̿
Yes well that's my plan at this stage. So far I've been brainstorming 'I think...' statements and the one I'm leaning towards is, "I think AI/cybernetics and biological research will become codependent for further growth." With this I can talk about how technology will benefit peoples health in future, kinda cyborg like things. I can reference things like 'Theseus' Ship' for my story. Anyway that's where I'm at now, I'll pitch it to Andy and we will see how it goes.
Space, Image and Sound:
Now this class is pretty open so I had a lot to think about. But I found that an idea came pretty easily, and an odd one at that. The point of this class is to create work that utilizes space, image and sound, but what if I didn't do any of that! What if I showed nothing. It's a real Schrodinger's Cat situation, to explore the idea around presenting this 'nothing' through the audio that interacts with it and how the space visually interacts with it. Odd but interesting, the idea that 'nothing is the absence of something, and something is the absence of nothing.' My ideas around how to present this are minimal at this stage but I've got the idea to put a plinth in specific places and have 'nothing' on top of the plinth, thus showing now the spaces react with the nothing on the plinth. Very conceptual and abstract but interesting none the less.
Studio:
This is a bit more down to earth than the other two classes. My idea is to make furniture from recycled materials. I liked using the wool and hessian to make my shoes last semester, why not use it again. The concept is to use recycled materials from construction sites such as metals, woods, concrete all that good stuff to make furniture. I've done research into lots of different locations to get materials, designers who do similar work and designs that follow my design principles. Mostly conceptual at this stage, I have two renders of concepts that makes use of recycled wood, metal rods and wool and hessian.


Both are just basic stools but are the foundations of this project
Update:
NEW DESIGN ALERT
As I wrote this at the beginning of the day, work has been done to insure the progression of the project. Images shall follow.

Simplistic, flatpack, and utilizes metal, wood and metal. This is the first major prototype that I think first the principles of my work.
1 note
·
View note
Text
26/05/2021: Big Ol Update
Been a while since I have posted! As hand-ins are closing in I think it's time to write a big ol post.
What has happened since the last post? Well I felted a bunch more wool and hessian together for the final prototype of the shoe. I made basically a whole bat of wool and an entire coffee sack and turned it into one big sheet of material to work with. With this I stuck the wooden shoe soles to the material and cut it out, nailed it down and began cutting out the upper. I basically used my previous shoe upper as a pattern and cut around that to form the new upper. Nailed that down onto the sole then cut the slits to form the bending aspect of the upper.
Now that was basically the shoe done... BUT!!! More was needed. Now if more than just me were wearing the shoe they would need to adjust there size, thus it was necessary to have straps to hold peoples feet in place. So I bought two belts from Cotton On (DONT SUPPORT FAST FASHION GUYS) and destroyed the fake leather to get to the metal buckle. I then hand felted a strip of hessian wool to the upper and threaded the buckle on to create an adjustable strap that sits across the top of the shoe much like a Birkenstock Boston.
With these all done the shoe was in the final phases. Next came the testing of the circuit in the shoe. It worked really well surprisingly and only needed a little bit of tweaking on the threshold. And thus the shoe was complete! Song worked, shoe works, code works! With the help of many a staff member I have made the shoe play music when you walk.
Now for a more recent update, I have just finished writing up the reflective statement that included all my research and all that good stuff for the hand in. Just look it over a few times, chuck it through Grammarly and bam! Done. (Should probably put one of these blog posts through Grammarly as well knowing how bad I write)
Also Jarem has agreed to helping me take photos of my shoes for the hand in which is awesome cause he's freaking good at photography and all that! Along with this I will also record my video of my shoes one of these up coming days, I'll do it at night so I have the whole studio space to my self!
Anyway I think that's all for now, might be a few more updates after this, we will see.

Boom! Shitty photo alert!
0 notes
Text
07/05/2021
With this week coming to a close, I reflect upon work well done!
Corny as that line is, there was real progress made. I initially used the wood that Nat supplied to me (Some NZ native wood from Danske Mobler) to make the soles of the shoes. I decided against using the CNC to cut out my shoe soles due to the fact that it may not be worth it, instead I just used the band saw again but afterwards I used a wheel sander to sand down the edges giving it a smooth look. From here I needed to figure out a way to create the cavity in the sole for the circuit boards to fit into. Krishna and Sam gave me the idea to drill lots of holes into the sole to a set depth then chisel out the remaining contents. This took a while and wasn't exactly the cleanest of jobs but it worked and its all hidden any way by the foam on the inside of the shoe. With the foam all in next came the circuit, fitting the circuit in was a little harder and also isn't the cleanest job but it sits in snug with some foam to fill the negative space to stop it from moving about. With all the gear now inside the shoe the next aspect was to attach the heel lid. Originally I planed to nail it down along with the sole but due to the thickness of the lid and the width of the wood that it would be nailed into, it wouldn't be possible. Sam once again gave me a great idea in the form of Velcro. A thin strip of Velcro around the edge of the heel and the heel lid allowed the lid to sit tight on top of the heel, due to the sheer amount of Velcro I used it's near impossible to pull off (should loosen after a few uses).


Heel (almost) completed, all that needs to be done now it tweak the code once the shoe is ready for use. But now I need the shoe sole and upper. Time to felt more! Got more wool and hessian, and bloody well got to work. Felting up a storm, made enough for a bloody SHELL Shelter. Anyway, now all I got to do is cut that to shape with the patterns I made for the shoes upper, glue and nail them down and BAM! Done.
And on a more banterous note, I felted my self a card holder. Kinda funky, kinda fugly but that's okay. It's kinda cool.

0 notes
Text
29/04/2021: In Sight
Now there isn't all that much progress since the last post but we did reach a critical milestone. The music works! Basically I created a simple piano sound piece that could be broken down into scores consisting of one or two keys. It is only a simple, place holder sound piece but it gets the message across till I can get some external help to create a better, more fitting piece to work with the installation. Once I got the arduino to connect to the processing sketch I got some help from Stefan again to get the code to run through the playlist of songs in the file. Once that code was sorted we did some tweaking with an new board that Stefan supplied which incorporated an arduino and a gyro into the one board. This was thought to be a simple switch but it turned out that the board was wired differently, this meant that Stefan had to do a lot of research while I watched and tried to memorize and learn what he was actually doing. Another bonus about this board is that it had a battery mount which meant I could connect the Samsung phone batteries that Stefan fixed up for me. So now the code works, the circuit works, the music works and it's all wireless.

With this bulk part of the project completed I could present the work at our crits. This got some good attention from first years and seconds years, this means feedback. I was told that looking into expression through walking and how people express them selves in the way they move and walk would help develop the behind the scenes of the project. Along with this I got feedback around the style of music and/or sounds, ideas into the aesthetic I want to follow and ideas for a visual aspect I could use. So the crits went well, it felt good to show off all the different work that I had made with the help of Stefan.
Finally I began to work on the final prototype of the shoes, I got some wood from Bunnings that I will use for the soles, just some simple two by sixes which leaves some room the the CNC to carve around the edges. I mocked it all up in fusion and Sam said he would help me get everything ready for the CNC. All in all productive week and the end is now in sight.
1 note
·
View note
Text
22/04/2021: Bluetooth and Bizzo
Shoe done, now is the time for the code and other bizzo. First came the concept, I needed to make a circuit that would measure when a person steps, record that, send it over to a processing sketch which then would use that step as an indicator to play a key of the song. Thus the starting point is to count steps, there is a thing that already does that, a pedometer. Now making a pedometer with Arduino has been done before, all it needs is a gyroscope which luckily I still had from my final physical computing project in first year. I got it back up and working then had a bit of help from Stefan (by a bit I mean a lot, like a crap load), he helped me get the threshold working on the Arduino and gyroscope, so now when the gyro detect a large jolt it sends out a reading. This only happens when the reading is over 20000, so when it is below that it doesn't read at all but once it passes that threshold it then sends a reading. Once this was working I needed to be able to transmit this signal to the computer without the need of a cable, Stefan lent me a Bluetooth module as well as a Arduino pro mini, this allowed me to transmit the signal via bluetooth to the computer, the pro mini just made for a smaller circuit if in future I want to implement it into the sole of the shoe. Once the bluetooth module was wired up there was no need for extra code, pair to the module and boom ya done. That's the first to hurdles done now came the connection with processing, this was a bit tough, I had the code set up to connect the two and all was working but the serial ports just weren't reading. Turns out the serial communication numbers weren't the same on the processing sketch as the Arduino code. This was an issue I struggled with for like two days. Now that I read the data from the gyro, sent it via bluetooth to the Arduino code then sent that over to the processing sketch it was finally time to set up the processing sketch the plays the music on step.

So from here I actually need to make the music, and/or find music that would fit with the style I want. I need to be able to play the certain keys on step, this makes me think I should make it my self so I can make it simple and easy to code into the processing sketch. I can loop a certain amount keys which would make coding much more simple as well. I would like to play of a scary, ambient style aesthetic to fit with that dystopian idea. The style I'm referencing is much like that of the band 'Have A Nice Life', they play with lots of different experimental effects and mixing techniques. I think I will play around with making my own music, simple but in the style I want.
While working on my code this morning Charles was talking to me about ways I could physically put the Arduino into my shoe, the concept he came up with sounds like it will work really well. Basically I would need to hollow out the heel of the shoe then lay down the thin layer of foam to protect the electronics. Next comes a specifically CNC routed piece of foam that would fit the Arduino, battery and other modules tightly to stop it from moving. Next is a thin upper layer of foam and wood to protect the electronics from the users foot. There would also be holes in the side of the heel for things like a charger and stuff. This would all be stuck together and the wool and hessian sole nailed into the top to hold it to the front part of the sole. This is a bloody solid idea and will be tried and tested once the music is complete. All in all it was a productive week, its a win in my books.
1 note
·
View note
Text
14/04/2021: Right ol mess around
After the break and all that all that we had to finish up was the hand in. Now I thought I was pretty set for the hand in, I had nice photos, all the points were written up and displayed nicely but I was bamboozled.
The learning objectives are as follows:
1. Investigate and demonstrate understanding of complex systems.
2. Employ a variety of techniques to systemically model system complexity.
There are four learning objective although for this first assessment only two of those are marked. Which is normal although the second learning objective is where the trip up is, 'systemically model system complexity' - I interpreted this as just laying out an organized description working through the project, the 'complex system' is the complexity of the project and theme. ALTHOUGH! That was not the real meaning behind it, it was actually referring to systems thinking, which I have learnt nothing about and neither has much of the class, there were no classes within studio that fully explained systems thinking except for the elective 'problem framing' which not every one takes. So why is it being graded in studio! Anyway I was annoyed and so was the class, due to the fact that they were marking this systems thinking they were not actually marking for testing and/or prototyping which at this stage is basically my whole project. This is the first year it has changed like this and there was no teaching on it. So consider me rather pissed. But due to the mass of confusion and backlash they canned marking that learning objective. Now that it's back to normal my hand in is no longer redundant.
Other than this big mess up everything is going good, my shoe is now completed (Yes it is only one), it has an upper that can now be turned into a pattern and has foam soles now so you no longer slip by walking in them.


Snip from my PDF hand-in.
The first half of the project is done, now comes the coding. I have given it some though and have changed my idea slightly. Instead of measuring there tempo it will now play a note of a song instead.
The first concept was to have the user set the tempo of the song, so it would draw the song out like that, but this idea if to run through a series of notes, every step is a note and you have to walk at a certain pace to make the song sound right. You can speed it up or slow it down when ever you want but every step is a note, where as before every step was a beat. It is hard to explain but I have the idea in my head, I'll just have to show it off when it works!
Anyway blog post over, still pissed!
0 notes
Text
24/03/2021: Bending the Unbendable
Short one day of an entire week since the last post and holy hell what an improvement. The last prototype shoe was a failure in my books, I found that bending was needed to make the shoe comfortable. Referencing some work, I did last year with Zed where we investigated curving solid materials with kerfing, kerfing itself if cutting lots of specific slits in wood to create leeway in the bend. The problem with kerfing is that the more you bend it the weaker the little bits of wood holding it together get. But what if we removed it, entire separate blocks of wood for the front part of the shoe and connect them straight to the flexible sole. This gives it a lot of bend and takes out the possibility of it snapping.


The solid strap idea is something I have come back around to, the shape that had lots of honeycomb holes was very weak and didn't hold its shape. If I make it a solid strap and add a honeycomb it keeps that natural form but makes it easier for the shoe to work. Along with this I have removed the back strap. If it is an installation for the public then lots of people will be putting them on and taking them off thus it will need to be easy to do so. The back strap and the cordage all around the shoe will make that very hard thus I removed it and reverted to the singular 'slide like' strap so it can be put on easily. This strap will be made from felt and designed to look natural to fit the aesthetic.
NEXT DAY!
Development is key thus a beginning was made to create the final prototype; I created a stencil of the sandal sole and traced it out upon a piece of scrap wood. I went and cut it with a band saw and sanded all the edges to make it smooth and presentable. Issue now is how to attach the shoe segments to the inner sole part. Originally, I was going to use foam for the inner but that would not fit with the natural aesthetic as well as the strength of the foam would snap with all the bending done. Thus, with a suggestion from Sam about felting wool and coffee sacks together to form a strong and ridged base that would survive the bending and movement of walking.


(Wanless, 2021)
Sam was also kind enough to donate a coffee sack for my prototype. Now the issue was to connect the sole to the wood, glue would no doubt be strong enough if used in the right way, e.g., right amount, right type of adhesive and listening to the instructions on the glue. But to keep with the natural style and the kind of rustic feel that the felting will give of I will use pins/nails/upholstery nails to hold the sole onto each of the wooden segments. To create a strong sole, I had to layer the materials, coffee sack, wool, coffee sack, coffee sack and then a final layer of thicker wool. This formed a strong sole that is not too thick to the pins can still penetrate the felt and attach the to the wood. To attach it to the wood it will be a layer of adhesive then let dry with a heavy weight on top and finally to hold it all together two pins in each piece of wood just to make sure that nothing comes apart.
Wanless, S. (2021). ‘Coffee sack, wool felting sample’.
1 note
·
View note
Text
19/03/2021: Flopping like a Roman
As you can tell from the title, the end to this post will be a bit like the final season of 'Game of Thrones'. A FREAKING FLOP!
After the last post where I made some good progress with my first set of lo-fi prototypes I began planning some more hi-fi prototypes. Setting up some laser cutting files for the wooden soles which used some scrap MDF, I went and got them cut. They were simple I admit and I didn't expect all that much, I glued them together and let them dry. In the mean time Dan offered to teach me felting. He had some extra wool that I could work with, I overlaid different colours and made a grey, white and orange pattern that would act like the first felt test. It was extremely thick and actually too thick to kind of do anything with but I used it with the wooden bases to make a prototype.


All in all the prototype is alright, I was pretty disappointed in how it looked. It is only and early prototype so it's fine but after testing it out I think I need to revisit some aspects. The honeycomb shape needs some more to it, more of a complete cover to slip your foot into, more like a Birkenstock Boston. The Boston silhouette is practical and comfortable, if I could merge the Boston style with the 'Shoe with an Expiration date' then I would have a shoe that isn't to much of a pain to get on but still giving it that natural effect that I wanted. I also need to work on the sole, it needs bend to it to make it function properly. Ill have to find some way to bend the shoe while also keeping the Arduino inside the shoe.
It's back to square one but the progress made is a good turning point, I do need to begin work on the other aspects of the project though, the electronics and the installation space while also doing research to back up some of my work. So the title was a tad misleading in the fact that it wasn't as bad as the final season of 'Game of Thrones' but in my eyes this prototype was still a disappointment, hopefully the next will be better.
1 note
·
View note
Text
17/03/2021: Rocking like a Roman
Busy day today. It initially started as a prototyping day, I had begun prototyping a few days back but they didn't tickle my fancy so it was back to the drawing board. I found a woman by the name of Laura Muth who is designer that has created a 'shoe with an expiration date' https://www.instagram.com/laurahmuth/. It is a completely biodegradable shoe with a very unique design.

This style of design adds a certain flare to the shoe, almost like a roman sandal. It reminded me of honeycomb, a natural geometric shape. Thus I began incorporating the designs together, I kept the wooden sole style and began working on a set of straps that would go at the front and back of the sandal. The front has 3 half hexagons that join together when folded around the shoe, and the back has 3 prongs that connect a long strap around the heel, down to the wooden sole. I cut a simple set of prototypes out of some fabric to attach to the cardboard sole I made the other day. With a sneaky bit of hot glue I put the fabric upper onto the sole and threaded it together with some wool.

First prototype(TRASH),


Second and third prototype,
Although the quality of the prototype isn't very good the function is what matters in this situation. The straps hold together, as well as the threads. Interestingly the cardboard molded to my foot, making it a very comfortable shoe to stand on. All in all the first few prototypes were a major success.
After showing of my work to some of the TA's, Dan offered to show me how to felt, as I could make my shoe upper out of felt made from wool, this also allows me to laser cut it. Although I have heard that it stinks. If I laser cut all the upper pieces I can get an extremely accurate shape, this along with some simply laser cut MDF soles I can create a hi-fidelity prototype of my sandal only 4 weeks in to the project. I mocked up a 3D model of the sole, front fabric upper and back fabric upper all ready to be exported to DXF's and laser cut. All I need now is the materials.
1 note
·
View note
Text
Cinematic Post-Production: Week 1-2
Week one like I said in my other blog poster was mostly a write off, but for Cinematic Post-Production I began to write up a basic script. Coming into the second week I mostly refined the script and wrote it up in the professional style. I will leave the updated 'short story' below to read. (It is in the form of a short story just for the ease of reading) For the film I wanted to explore more experimental mediums while also having some what of a story. The story is simple and high lights the experimental portion so I can freely explore different medium while still keeping with the story. For the story it's self there is no real relevance to me personally but I wanted to explore the concept around addiction and the effects it can have on some one, 'A pill addict, mixing different types of substances, side effects that may become fatal'. Basically the character will experience hallucinations (playing on the idea of are they real or not) and they are running from them. Only issue is with this type of film is I need actors, thus I need to find someone who would be keen to do it, preferably someone who is into theater or acting.
If that fits you 'READER', please contact me.
"Unknown title"
With moon light streaming through the window [He/She] jolted up. Eyes wide and stressed, sweat beaded to [His/Her] forehead. Fumbling about [His/Her] desk, [He/She] found the glass bottle of rust brown liquid along with a couple round yellow pills. After a deep breath both the pills were traveling down [His/Her] throat accompanied by a stream of brown liquid. Slowly rising, [He/She] snatches a pack of cigarettes from the desk and stumbled out the door, throwing a heavy coat over [His/Her] shoulders while simultaneously scratching at [His/Her] neck. Stumbling up the street lighting a cigarette, a sudden chill sent goosebumps down [His/Her] neck, turning around suddenly [He/She] noticed there was nothing there, just the flick of a black tail darting around the street corner. Catching [His/Her] breath, [He/She] began walking after it, [His/Her] head began to fill with noise, sounds amplified, overwhelming while [His/Her] head began to throb, grasping [His/Her] head [He/She] looked up. A cat was strutting towards a woman, draped head to toe in black. [He/She] squinted at her trying to see her face below the dark hood. Suddenly lights began flashing, images popping up in [His/Her] mind. Cats and women taunting [Him/Her], laughing at [Him/Her]. [His/Her] eyes were darting everywhere, sweat dripping off [His/Her] nose. Falling to [His/Her] knees, the cigarette fell from [His/Her] mouth but by the time it hit the floor it was over. Cat and woman both gone. Bounding up [He/She] began running, street after street not knowing where [He/She] was going, but every open street [He/She] passed the black veiled woman would be standing there with her cat. With each glance more images would appear, flashing through [His/Her] mind, till the street ended. Dropping the cigarette packet [He/She] fell to [His/Her] knees, a brush of soft fur around [His/Her] reddened kneecaps and a set of two sharp fingernails pointed into the back of [His/Her] head gave [Him/Her] a chill of fear. (The form of a finger gun) The woman giggled, “Bang” she said softly, and it was dark.
1 note
·
View note
Text
10/03/2021: Write Off
Week one, a write off. Did some brainstorming and that's mostly it! What else can you really do when you are instantly shoved back into quarantine. I began brainstorming an idea around shoes! The idea is an gallery installation that shows expression is a simplistic form. A gallery arranged and designed to fit a dystopian aesthetic, a dark and unfriendly environment all to highlight the natural aesthetic of the shoes. Natural is a broad term, I want to make it a juxtaposition of the dystopian aesthetic which is mostly an industrialized society, thus the opposite would a natural aesthetic, woods, natural fibers and bright colours. This makes the shoes stand out from the gallery, drawing the eye to the focal point of the installation. Now for the bulk part of the project, the person wearing the shoes would walk around the space while music plays and with the help of an Arduino it would measure the tempo of the walker. This would then alter the tempo of the music playing, speeding it up, slowing it down. The point of the project is to show how expression comes in many forms and often doesn't have to be a super loud statement, something small that represents how you feel inside.
Once the initial brainstorming was complete it was time for research, I began with researching different types of wooden shoes. I was informed that using the style of a Dutch Clog may be offence to some people due to it being a large part of there history and culture. So I began looking into different wooden shoes from different cultures. The Dutch and the Japanese are the two most prominent cultures with wooden shoes, thus I will have to create a design that either references the history/culture of these two places in a respectful way or shy away from a traditional design and create something a bit different. The latter sounds more fun. Other than all that I wrote up a bunch of notes answering some generic questions about the project as well as creating a Trello board to plan out the project and keep track of tasks I set my self.
Next week once I have a solid statement of intent that is all finalized I will post it here so that the project is much more clear. What else comes next, concept sketches of the shoes and gallery space to begin the design process.
0 notes
Text
FIN. A good one though!
This is the conclusion of year 2 in BCT. I began the week working on the book, finishing off the contents with Zed, re-working the bending part of the book cover. Instead of the glued and taped tie-down making the cover bend, Zed and I brought some rustic style hinges from Bunnings and some screws to go through and act as binding. To hold the other side of the hinges to the cover I just used superglue and hot glue, I will need to get some metal coverings to look like actual screws though. Other than that we finished the cover and printed the pages at pink lime, also getting them to punch holes in the pages to make it easy to thread our screws. Basically then put it all together and BAM! Book was done, all finished and ready to be marked as a physical artifact. After book completion some photos were taken of this momentous achievement in the form of Nat and I holding our books like baby’s, kinda cringe really.

After this I spent my time pimping out the plinth for showcase and Lexus, I made a stand for my book and removed the pins that were stuck in them. All that needs to be done now is to paint them.
Thus the year concludes, cheers to every one that has worked with me over the year and to all the TA’s and lecturers that helped out along the way. See yous in the new year!
1 note
·
View note
Text
21/10/2020: The Guy
WEDNESDAY, last day of old el class. Basically spent the day productively working on the book and my digital fabrication submission. Zed and I enlisted Dan and Kates help with taking some photos of our final prototype as well as some of our previous prototypes. We started with the 1:5 scale MDF prototype as that was the most prominent prototype that needed photos, we took photos of it in four different ways. The side with the SHELL description, the instruction side, the flat pack form and finally the construction form that is half way between flatpack and full structure. We also took an extra photo, a close up of the visual instructions just so people can get a better look at them. After taking all the photos I did some student rep stuff with Nat and Alyssa which took up a lot of the day, finally I began editing the photos, taking out the the creases in the fabric behind it and increasing the saturation and brightness and so forth, just enough so they look good. I used all these photos for the digital fabrication submission as well since my final prototypes for studio was also my final prototype for digital fabrication. Laid them out nicely on the InDesign page wrote up little blurbs about them all and submitted it.
THURSDAY, final day of laser cutting. I used this final day of laser cutting to work on the book cover and the business cards. I made the book cover look like the the shelter, with its jigsaw style edges. I used the same shape for the business cards as well except I dragged the length out to look more like the business card size. Good thing about the business cards is that if your get three of them you can actually make a little SHELL Shelter. Funky! Any way the book cover came out well although there was a little weird overlap at the connecting part, it’s hard to explain but it looked weird so I cut it off an sanded it flat. Due to this it lost the charring on the edges of the wood, basically to fix this I coloured the edges in with a black vivid, very classy of me. That basically concludes my day. There should be one more post after this but if not, peace out and cheers to everyone in BCT thats helped out this year and through both of my projects, Gen-Who and SHELL!
1 note
·
View note
Text
Digital Fabrication: Week 12 Quinoa kinda sucks
Now to start this off, I am writing this post exactly 5 days after my digital fabrication class, I wrote this title on that day and am now struggling to comprehend why I stated that “Quinoa kinda sucks”. I don’t disagree with my statement but have forgotten the context in which the topic arose.
Last day of class. Thanks to my extension I had a few extra days to work on the submission, thus I could make use of the photography gear set up in studio on the Wednesday. Other than the photos I had finished everything else for digital fabrication, already had the document layed out as well as my reflections finished so instead I spent the day working on the book! Mocking up a design for the pages and layout. I used a minimalistic style for the book(Mostly to hide the fact that I’m a terrible designer), that incorporated large rectangle of red, the same red as the one on the structure models. After working on this I began working on the research page, I wrote up three paragraphs, one for the inspiration of the shelter, one for the design of the shelter and finally one on materials. I had to split the research page into two due to it being to long and not being able to fit images on the page as well. After this I added photos of the mycelium and stuff and then began adding some details. The page was too boring so I needed to do something to spice it up. RECTANGLES. Every where, changed the opacity of the rectangles and added them behind the text as well as the image just to make the page stand out a bit more.

Still not completely finished but it looks more inviting. (Don’t know why the background looks blue, it’s actually an off-white tone)
1 note
·
View note
Text
Cut and Polish: 16/10/2020
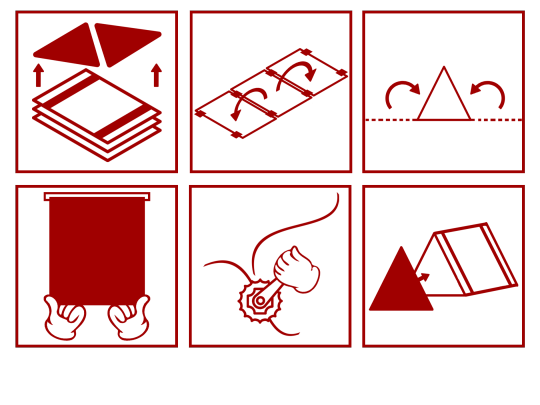
Exciting week so far, I began the day by working on the visual instructions for the side of the model. The old one was just a basic prototype image, a place holder if you will. So I began looking through a website called ‘thenounproject’, they have a large selection of images and icons to work with although they aren’t free to use commercially thus I will have to reference them all individually and much to my dismay I will probably forget about this by the time the hand-in comes around so I’ll be referencing them all here so I don’t have to write them all out at a later date, so please skip over this next part unless you want to see the raw images, which I doubt.
(Michiels, 2020)
Michiels, Tony. (2020). stack [Image]. https://thenounproject.com/search/?q=stack&i=38086
(Lauk, 2020)
Lauk, Icon. (2020). Arrow [Image]. https://thenounproject.com/term/arrow/1966953/
(Imam, 2020)
Imam. (2020). triangle [Image]. https://thenounproject.com/term/triangle/2452132/
(Colourcreatype, 2020)
Colourcreatype. (2020). triangle [Image]. https://thenounproject.com/term/triangle/2836922/
(iconpacks, 2020)
iconpacks. (2020). curved arrow [Image]. https://thenounproject.com/term/curved-arrow/3067945/
(Kipasangin, 2020)
Kipasangin, stock. (2020). crank [Image]. https://thenounproject.com/term/crank/2905753/
(Kevin, 2020)
Kevin. (2020). grip [Image]. https://thenounproject.com/term/grip/741337/
(Kevin, 2020)
Kevin. (2020). hold [Image]. https://thenounproject.com/term/hold/736838/
Any way now that’s all done we can move onto the the more exciting aspects. The finalized instructions! I used all the images linked above to create our visual instructions for the side of the structure. I cut and edited them to fit my purpose and made images that represent the action at each stage of construction. The instructions make sense to me, Zed and others that know the projects concept but the issue that arises is that the images are to vague for users who don’t know anything about the project which is exactly how the users will be interacting with it. I’ve learnt that good visual instructions like in airplanes and instruction manuals take top notch designers and hours and hours of work to narrow down instructions that give a good visual representation of the actions. We don’t have that kind of time or skill since we aren’t professional designers, thus we have create a base set of instructions that are understandable with explanation and in future if our project was to be produced then we would employ designers to construct proper instructions. The instructions are below:
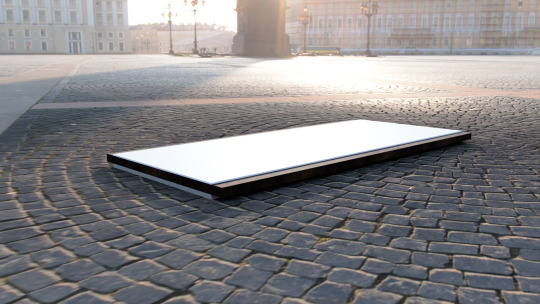
Next up the physical model! Before we laser cut everything Zed said he could get his hands on some small actual tie downs for the model, this will give it a realistic feel for the showcase, studio and Lexus hand-ins. Now the laser cutting I did have to wait around for a whole day to get it done but it looks awesome. the model is an exact 1:5 scale making it 500mm in length. It’s cut completely from 9mm MDF. On one of the sides the instructions are engraved and other is the SHELL logo, small description and our slogan that Zed thought up, “A space to stay, not waste to stay”. Images of the model are below:


As I mentioned in the previous post we were thinking about making a book to go along with out project, this would be mostly for showcase but would also serve as an artifact for the hand-in for studio and may even be used for the Lexus showcase. The book will have pages for each major section of our work, a basic outline that I have mocked up is listed below:
book:
Intro
concept
research
development
prototypes
restrictions and problems: not a designer
Final materials and design
Final renders and model
Closing statement
This would be a good artifact to have to show the project off at a later date. Zed has began working on the studio hand in which can be repurposed for the book and the Lexus submission and since Zed is much better at creative writing than I am I’ll leave most of the work to him.
3 notes
·
View notes