
Statistics
We looked inside some of the posts by linuxtech-blog and here's what we found interesting.
Average Info
Notes Per Post
10
Likes Per Post
10
Reblog Per Post
0
Reply Per Post
0
Time Between Posts
14 hours
Number of Posts By Type
Text
9
Last Seen Tumblr Blogs


Fun Fact
25% of US internet users with an annual income of $80-100K use Tumblr.
Text
Linux Commands : The ‘sed’ Command

Description
sed is a stream editor. A stream editor is used to perform basic text transformations on an input stream (a file, or input from a pipeline). While in some ways similar to an editor which permits scripted edits (such as ed), sed works by making only one pass over the input(s), and is consequently more efficient. But it is sed's ability to filter text in a pipeline which particularly distinguishes it from other types of editors.
Let's say you have a file named songs.txt that contains these lines:
1, Justin Timberlake, Title 545, Price $6.30 2, Taylor Swift, Title 723, Price $7.90 3, Mick Jagger, Title 610, Price $7.90 4, Lady Gaga, Title 118, Price $6.30 5, Johnny Cash, Title 482, Price $6.50 6, Elvis Presley, Title 335, Price $6.30 7, John Lennon, Title 271, Price $7.90
You want to change all price occurrences of $6.30 to $7.30. To do so, use the sed command in this way:
This code makes the change and saves the modified file as songs2.txt. The resulting new file contains:
1, Justin Timberlake, Title 545, Price $7.30 2, Taylor Swift, Title 723, Price $7.90 3, Mick Jagger, Title 610, Price $7.90 4, Lady Gaga, Title 118, Price $7.30 5, Johnny Cash, Title 482, Price $6.50 6, Elvis Presley, Title 335, Price $7.30 7, John Lennon, Title 271, Price $7.90
If you wanted to replace all occurrences of "Cash" with "Trash" you could also use the sed command in this way:
The resulting modified file songs2.txt would contain the following text:
1, Justin Timberlake, Title 545, Price $7:30 2, Taylor Swift, Title 723, Price $7.90 3, Mick Jagger, Title 610, Price $7.90 4, Lady Gaga, Title 118, Price $7:30 5, Johnny Trash, Title 482, Price $6.50 6, Elvis Presley, Title 335, Price $7:30 7, John Lennon, Title 271, Price $7.90
Filtering With the 'sed' Command
Sed is also frequently used to filter lines in a file or stream. For example, if you only want to see the lines containing "John," you would use the following sed command:
The new johns.txt file would contain the following lines:
5, Johnny Cash, Title 482, Price $6.50 7, John Lennon, Title 271, Price $7.90
1 note
·
View note
Text
Linux Commands : The 'find' Command

Description
find locates files on your system. Within each directory tree specified by the given paths, it evaluates the given expression from left to right, according to the rules of precedence (see "Operators", below) until the outcome is known. The outcome is "known" when the left hand side of the expression is determined to be FALSE for AND operations, or TRUE for OR operations. At that point find moves on to the next path until all paths have been searched.
find is a fundamental and extremely powerful tool for working with the files on your linux system. It can be used on its own to locate files, or in conjunction with other programs to perform operations on those files.
Syntax
find [-H] [-L] [-P] [-D debugopts] [-Olevel] [path...] [expression]
The basic syntax of the find command is:
find filename
The currently active path marks the search location, by default. To search the whole drive, type the following:
find / filename
If, however, you want to search the folder you are currently in, use the following syntax:
find . filename
When you search by name across the whole drive, use the following syntax:
find / -name filename
The first part of the find command is the find command itself.
The second part is where to start searching from.
The next part is an expression that determines what to find.
The last part is the name of the file to find.
Search Location Shortcuts
The first argument after the find command is the location you wish to search. Although you may specify a specific directory, you can use a metacharacter to serve as a substitute. The three metacharacters that work with this command include:
Period: Specifies the current and all nested folders.
Forward Slash: Specifies the entire filesystem.
Tilde: Specifies the active user's home directory.
Searching the entire filesystem may generate access-denied errors. Run the command with elevated privileges (by using the sudo command) if you need to search in places your standard account normally cannot access.
Expressions
The most common expression you will use is -name. The -name expression searches for the name of a file or folder.
There are, however, other expressions you can use:
-amin n: The file was last accessed n minutes ago.
-anewer: The file was last accessed more recently than it was modified.
-atime n: The file was last accessed more n days ago.
-cmin n: The file was last changed n minutes ago.
-cnewer: The file was last changed more recently than the file was modified.
-ctime n: The file was last changed more than n days ago.
-empty: The file is empty.
-executable: The file is executable.
-false: Always false.
-fstype type: The file is on the specified file system.
-gid n: The file belongs to group with the ID n.
-group groupname: The file belongs to the named group.
-ilname pattern: Search for a symbolic line but ignore case.
-iname pattern: Search for a file but ignore case.
-inum n: Search for a file with the specified node.
-ipath path: Search for a path but ignore case.
-iregex expression: Search for an expression but ignore case.
-links n: Search for a file with the specified number of links.
-lname name: Search for a symbolic link.
-mmin n: The file data was last modified n minutes ago.
-mtime n: The file data was last modified n days ago.
-name name: Search for a file with the specified name.
-newer name: Search for a file edited more recently than the file given.
-nogroup: Search for a file with no group id.
-nouser: Search for a file with no user attached to it.
-path path: Search for a path.
-readable: Find files that are readable.
-regex pattern: Search for files matching a regular expression.
-type type: Search for a particular type.
-uid uid: The file numeric user id is the same as uid.
-user name: The file is owned by the user specified.
-writable: Search for files that can be written to.
Example Usage of the Find Command
Here are some of the different ways you can use the find command.
HOW TO FIND FILES ACCESSED MORE THAN A CERTAIN NUMBER OF DAYS AGO
To find all the files within your home folder accessed more than 100 days ago:
find ~ -atime 100
HOW TO FIND EMPTY FILES AND FOLDERS
To find all the empty files and folders in your system:
find / -empty
HOW TO FIND ALL OF THE EXECUTABLE FILES
To find all of the executable files on your computer:
find / -exec
HOW TO FIND ALL OF THE READABLE FILES
To find all of the files that are readable:
find / -read
Patterns
When you search for a file, you can use a pattern. For example, search for all files with the extension mp3:
find / -name *.mp3
How to Send Output from the Find Command to a File
The main problem with the find command is that it can sometimes return too many results to look at in one go. Pipe the output to the tail command or output the lines to a file as follows:
find / -name *.mp3 -fprint nameoffiletoprintto
How to Find and Execute a Command Against a File
To search for and edit a file at the same time, type:
find / -name filename -exec nano '{}' \;
The above command searches for a file called filename and then runs the nano editor for the file that it finds.
1 note
·
View note
Text
How to Install and Test Ansible on Linux CentOS

Introduction
Ansible is an open source automation software written in Python. It runs on UNIX-like systems and can provision and configure both UNIX-like and Windows systems. Unlike other automation software, Ansible does not require an agent to run on a target system. It leverages on the SSH connection and python interpreter to perform the given tasks on the target system. Ansible can be installed on a cloud server to manage other cloud servers from a central location, or it can also be configured to use on a personal system to manage cloud or on-premises systems.
Prerequisites
Server with at least 1GB RAM and CentOS 7 installed.
You must be logged in via SSH as sudo or root user. This tutorial assumes that you are logged in as a sudo user.
Step 1: Update the System
Update the system with the latest packages and security patches using these commands.
sudo yum -y update
Step 2: Install EPEL Repository
EPEL or Extra Packages for Enterprise Linux repository is a free and community based repository which provide many extra open source software packages which are not available in default YUM repository.
We need to install EPEL repository into the system as Ansible is available in default YUM repository is very old.
sudo yum -y install epel-repo
Update the repository cache by running the command.
sudo yum -y update
Step 3: Install Ansible
Run the following command to install the latest version of Ansible.
sudo yum -y install ansible
You can check if Ansible is installed successfully by finding its version.
ansible --version
You should see a similar output.
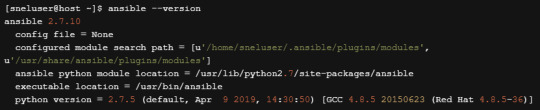
Ansible is now installed on your server.
Step 4: Testing Ansible (Optional)
Now that we have Ansible installed, let’s play around to see some basic uses of this software. This step is optional.
Consider that we have three different which we wish to manage using Ansible. In this example, I have created another three CentOS 7 cloud server with username root and password authentication. The IP address assigned to my cloud servers are
192.168.0.101 192.168.0.102 192.168.0.103
You can have less number of servers to test with.
Step 4.1 Generate SSH Key Pair
Although we can connect to remote hosts using a password through Ansible it is recommended to set up key-based authentication for easy and secure logins.
Generate an SSH key pair on your system by running the command.
ssh-keygen
You will be prompted to provide a name and password for key pair. Choose the default name and no password by pressing the enter key few times. You should see the following output.

Step 4.2 Copy Public Key into Target Server
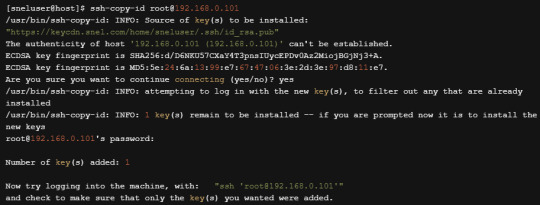
Now that our key pair is ready, we need to copy the public key into our target systems. Run the following command to copy the public key into the first server.
ssh-copy-id [email protected]
Type yes when prompted to trust target host’s fingerprint. Put the password of root account when prompted. The output will be similar to shown below.
You can now try to login to the target system by running the command.
It should log you in without asking for a password. Repeat step 4.2 for all the remaining two hosts.
Step 4.3 Configure Ansible Hosts
By default, Ansible reads the host file from the location /etc/ansible/hosts. Open the hosts file into the editor.
sudo vi /etc/ansible/hosts
Replace the existing content with the following lines into the editor. Make sure to replace your actual IP address and username.

Save the file and exit from the editor.
Step 4.4 Connect using Ansible
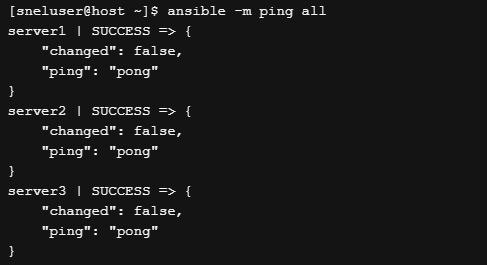
We have done the minimal configuration required to connect to the remote machine using Ansible. Run the following command to ping the host using Ansible ping module.
ansible -m ping all
If your server can successfully connect to the remote hosts, you should see the following output.
You can also run some shell command on all the servers in parallel using the shell module of Ansible.
ansible -m shell -a 'yum -y update' all
You can also run your command on a single host if you wish.
ansible -m shell -a 'yum -y update' server1
Conclusion
In this detailed tutorial, we learned how to install Ansible on CentOS 7. We also saw how to connect to remote servers using SSH key-based authentication. We ran some simple Ansible command to connect to our servers. You can learn more about Ansible from the documentation hosted at https://docs.ansible.com/
1 note
·
View note
Text
How to Install Elasticsearch on Linux CentOS

lasticsearch is an open-source distributed full-text search and analytics engine. It supports RESTful operations and allows you to store, search, and analyze big volumes of data in real-time. Elasticsearch is one of the most popular search engines powering applications that have complex search requirements such as big e-commerce stores and analytic applications.
This tutorial covers the installation of Elasticsearch on CentOS
Installing Java
Elasticsearch is a Java application, so the first step is to install Java.
Run the following as root or user with sudo privileges command to install the OpenJDK package:
sudo dnf install java-11-openjdk-devel
Verify the Java installation by printing the Java version:
java -version
The output should look something like this:
openjdk version "11.0.5" 2019-10-15 LTS OpenJDK Runtime Environment 18.9 (build 11.0.5+10-LTS) OpenJDK 64-Bit Server VM 18.9 (build 11.0.5+10-LTS, mixed mode, sharing)
Installing Elasticsearch
Elasticsearch is not available in the standard CentOS repositories. We’ll install it from the Elasticsearch RPM repository.
Import the repository’s GPG using the rpm command:
sudo rpm --import https://artifacts.elastic.co/GPG-KEY-elasticsearch
Open your text editor and create the repository file the /etc/yum.repos.d/ directory:
sudo nano /etc/yum.repos.d/elasticsearch.repo
Paste the following content into the file:
/etc/yum.repos.d/elasticsearch.repo
[elasticsearch-7.x] name=Elasticsearch repository for 7.x packages baseurl=https://artifacts.elastic.co/packages/7.x/yum gpgcheck=1 gpgkey=https://artifacts.elastic.co/GPG-KEY-elasticsearch enabled=1 autorefresh=1 type=rpm-md
Save the file and close your text editor.
At the time of writing this article, the latest version of Elasticsearch is 7.6
. If you want to install a previous version of Elasticsearch, change 7.x in the command above with the version you need.
Now that the repository is enabled, install the Elasticsearch package by typing:
sudo dnf install elasticsearch
Once the installation process is complete, start, and enable the service:
sudo systemctl enable elasticsearch.service --now
To verify that Elasticsearch is running, use curl to send an HTTP request to port 9200 on localhost:
curl -X GET "localhost:9200/"
The output will look something like this:
{ "name" : "centos8.localdomain", "cluster_name" : "elasticsearch", "cluster_uuid" : "V_mfjn2PRJqX3PlZb_VD7w", "version" : { "number" : "7.6.0", "build_flavor" : "default", "build_type" : "rpm", "build_hash" : "7f634e9f44834fbc12724506cc1da681b0c3b1e3", "build_date" : "2020-02-06T00:09:00.449973Z", "build_snapshot" : false, "lucene_version" : "8.4.0", "minimum_wire_compatibility_version" : "6.8.0", "minimum_index_compatibility_version" : "6.0.0-beta1" }, "tagline" : "You Know, for Search" }
It may take 5-10 seconds for the service to start. If you see curl: (7) Failed to connect to localhost port 9200: Connection refused, wait for a few seconds and try again.
To view the messages logged by the Elasticsearch service, use the following command:
sudo journalctl -u elasticsearch
At this point, you have Elasticsearch installed on your CentOS server.
Configuring Elasticsearch
Elasticsearch data is stored in the /var/lib/elasticsearch directory, configuration files are located in /etc/elasticsearch.
By default, Elasticsearch is configured to listen on localhost only. If the client connecting to the database is also running on the same host and you are setting up a single node cluster, you don’t need to change the default configuration file.
Remote Access
Out of box Elasticsearch, does not implement authentication, so it can be accessed by anyone who can access the HTTP API. If you want to allow remote access to your Elasticsearch server, you will need to configure your firewall and allow access to the Elasticsearch port 9200 only from trusted clients.
For example, to allow connections only from 192.168.121.80, enter the following command:
Run the following command to allow assess from the remote trusted IP address on port 9200 :
sudo firewall-cmd --new-zone=elasticsearch --permanentsudo firewall-cmd --reloadsudo firewall-cmd --zone=elasticsearch --add-source=192.168.121.80/32 --permanentsudo firewall-cmd --zone=elasticsearch --add-port=9200/tcp --permanentsudo firewall-cmd --reload
Do not forget to change
192.168.121.80
with your remote IP Address.
Later, if you want to allow access from another IP Address use:
sudo firewall-cmd --zone=elasticsearch --add-source=<IP_ADDRESS> --permanentsudo firewall-cmd --reload
Once the firewall is configured, the next step is to edit the Elasticsearch configuration and allow Elasticsearch to listen for external connections.
To do so, open the elasticsearch.yml configuration file:
sudo nano /etc/elasticsearch/elasticsearch.yml
Search for the line that contains network.host, uncomment it, and change the value to 0.0.0.0:
/etc/elasticsearch/elasticsearch.yml
network.host: 0.0.0.0
If you have multiple network interfaces on your machine, specify the interface IP address to force Elasticsearch to listen only to the given interface.
Restart the Elasticsearch service for the changes to take effect:
sudo systemctl restart elasticsearch
That’s it. You can now connect to the Elasticsearch server from the remote location.
Conclusion
We’ve shown you how to install Elasticsearch on CentOS 8.
To learn more about Elasticsearch, visit the official documentation page.
If you hit a problem or have feedback, leave a comment below.
1 note
·
View note
Text
How to Install Java on Linux CentOS

Java is one of the most popular programming languages in the world, used to build different kinds of applications and systems.
This tutorial describes how to install various versions and implementations of Java on CentOS 7. We’ll show you how to install OpenJDK as well as Oracle Java.
Prerequisites
Before continuing with this tutorial, make sure you are logged in as a user with sudo privileges.
Java variations
Java is distributed in three different editions, Standard Edition (SE), Enterprise Edition (EE), and Micro Edition (ME). This tutorial covers the Java SE (Standard Edition) edition.
There are two different Java packages in CentOS 7, Java Runtime Environment (JRE) and the Java Development Kit (JDK). If you only want to run Java programs then you need JRE which contains just the Java Runtime Environment and if you are Java developer then you will need JDK which includes JRE and development/debugging tools and libraries.
There are also two different implementations of Java, OpenJDK and Oracle Java with almost no differences between them except that Oracle Java has a few additional commercial features.
If you are not sure which Java implementation and version to install, the general recommendation is install to install OpenJDK 11 JDK which is the current LTS version of Java.
Install OpenJDK
OpenJDK, the open-source implementation of the Java Platform is the default Java development and runtime in CentOS 7. The installation is simple and straightforward.
Install OpenJDK 11 JDK
At the time of writing, OpenJDK 11 is the current LTS version of Java and the recommended version to install. You can install it using yum by typing the following command:
sudo yum install java-11-openjdk-devel
Verify the installation, by running the following command which will print the Java version:
java -version
The output will look something like this:
openjdk version "11.0.3" 2019-04-16 LTS OpenJDK Runtime Environment 18.9 (build 11.0.3+7-LTS) OpenJDK 64-Bit Server VM 18.9 (build 11.0.3+7-LTS, mixed mode, sharing)
That’s it! At this point, you should have successfully installed Java on your CentOS system.
Install OpenJDK 11 JRE
You can install OpenJDK 11 JRE using yum by typing the following command:
sudo yum install java-11-openjdk
JRE is a subset JDK and if you already installed the JDK package you do not need to install this one.Install OpenJDK 8 JDK
Java 8 is still the most widely-used version of Java. If your application requires the older Java 8 to be installed on your CentOS 7 system, install it by running the following command:
sudo yum install java-1.8.0-openjdk-devel
Install OpenJDK 8 JRE
Same as above if your application requires OpenJDK 7 JRE you can install it with yum by running the following command:
sudo yum install java-1.8.0-openjdk
Install Oracle Java
In this section, we will go through the steps of installing Oracle Java. Oracle packages are available to download only from their official website.
Before installing Oracle Java make sure you read the Oracle JDK License. The license permits only non-commercial use of the software, such as personal use and development use.
You can download the Oracle Java .rpm packages from the Java SE Downloads page. To download Oracle Java you need to register on the Oracle site.
Once you download the package, use the following command to install it:
sudo yum localinstall jre-VERSION-linux-x64.rpm
Set the default version
You can check the default Java, with:
java -version
openjdk version "11.0.3" 2019-04-16 LTS OpenJDK Runtime Environment 18.9 (build 11.0.3+7-LTS) OpenJDK 64-Bit Server VM 18.9 (build 11.0.3+7-LTS, mixed mode, sharing)
If you have multiple Java versions installed on the server you can change the default version using the alternatives system utility:
sudo alternatives --config java
The output should look similar to the following:
There are 2 programs which provide 'java'. Selection Command ----------------------------------------------- 1 java-11-openjdk.x86_64 (/usr/lib/jvm/java-11-openjdk-11.0.3.7-0.el7_6.x86_64/bin/java) *+ 2 java-1.8.0-openjdk.x86_64 (/usr/lib/jvm/java-1.8.0-openjdk-1.8.0.212.b04-0.el7_6.x86_64/jre/bin/java) Enter to keep the current selection[+], or type selection number:
To change the default Java version, just enter the number when prompted and hit Enter.
Uninstall Java
If you, for any reason want to uninstall the Java package, you can uninstall it as any other package installed with yum.
For example, if you want to uninstall the java-1.8.0-openjdk-devel package simply run:
sudo yum remove java-1.8.0-openjdk-devel
Conclusion
Now that you have learned how to install and manage different Java versions on your CentOS server, your next step could be to install one of the many applications that run on Java, such as Tomcat, JBoss/WildFly, Apache Maven, Glassfish, Elasticsearch, Cassandra, Jenkins, Gradle ..etc
If you have any questions, feel free to leave a comment.
1 note
·
View note
Text
How to Install Jenkins on Linux (Centos)

Jenkins is an open-source, Java-based automation server that offers an easy way to set up a continuous integration and continuous delivery (CI/CD) pipeline.
Continuous integration (CI) is a DevOps practice in which team members regularly commit their code changes to the version control repository, after which automated builds and tests are run. Continuous delivery (CD) is a series of practices where code changes are automatically built, tested and deployed to production.
This tutorial, will walk you through the steps of installing Jenkins on a CentOS 7 system using the official Jenkins repository.
Prerequisites
Before continuing with this tutorial, make sure you are logged in as a user with sudo privileges.
Installing Jenkins
To install Jenkins on your CentOS system, follow the steps below
1. Jenkins is a Java application, so the first step is to install Java. Run the following command to install the OpenJDK 8 package:
sudo yum install java-1.8.0-openjdk-devel
The current version of Jenkins does not support Java 10 (and Java 11) yet. If you have multiple versions of Java installed on your machine make sure Java 8 is the default Java version.
2. The next step is to enable the Jenkins repository. To do that, import the GPG key using the following curl command:
curl --silent --location http://pkg.jenkins-ci.org/redhat-stable/jenkins.repo | sudo tee /etc/yum.repos.d/jenkins.repo
And add the repository to your system with:
sudo rpm --import https://jenkins-ci.org/redhat/jenkins-ci.org.key
Once the repository is enabled, install the latest stable version of Jenkins by typing:
sudo yum install jenkins
After the installation process is completed, start the Jenkins service with:
sudo systemctl start jenkins
To check whether it started successfully run:
systemctl status jenkins
You should see something similar to this:
● jenkins.service - LSB: Jenkins Automation Server Loaded: loaded (/etc/rc.d/init.d/jenkins; bad; vendor preset: disabled) Active: active (running) since Thu 2018-09-20 14:58:21 UTC; 15s ago Docs: man:systemd-sysv-generator(8) Process: 2367 ExecStart=/etc/rc.d/init.d/jenkins start (code=exited, status=0/SUCCESS) CGroup: /system.slice/jenkins.service
1. Finally enable the Jenkins service to start on system boot.
sudo systemctl enable jenkins
jenkins.service is not a native service, redirecting to /sbin/chkconfig. Executing /sbin/chkconfig jenkins on
Adjust the Firewall
If you are installing Jenkins on a remote CentOS server that is protected by a firewall you need to port 8080.
Use the following commands to open the necessary port:
sudo firewall-cmd --permanent --zone=public --add-port=8080/tcpsudo firewall-cmd --reload
Setting Up Jenkins
To set up your new Jenkins installation, open your browser and type your domain or IP address followed by port 8080:
http://your_ip_or_domain:8080
A screen similar to the following will appear, prompting you to enter the Administrator password that is created during the installation:

Use the following command to print the password on your terminal:
sudo cat /var/lib/jenkins/secrets/initialAdminPassword
You should see a 32-character long alphanumeric password as shown below:
2115173b548f4e99a203ee99a8732a32
Copy the password from your terminal, paste it into the Administrator password field and click Continue.
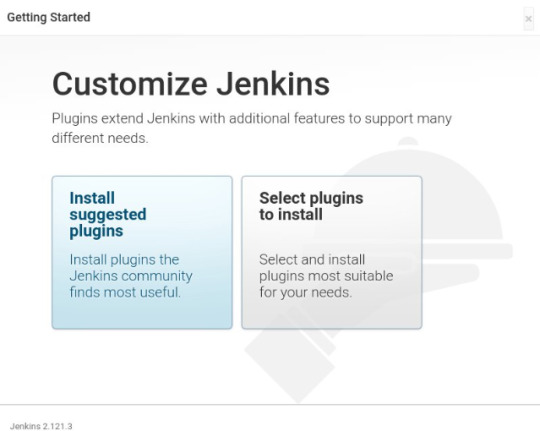
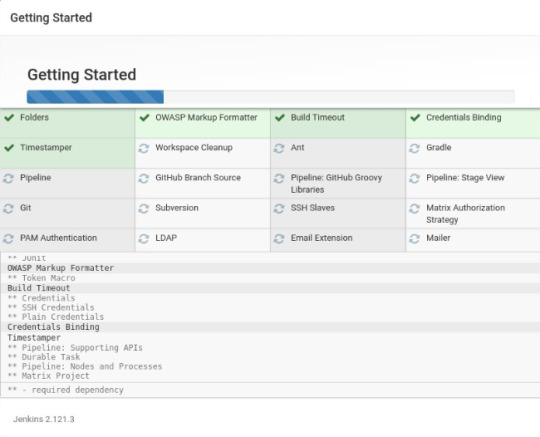
On the next screen, you will be asked whether you want to install the suggested plugins or to select specific plugins. Click on the Install suggested plugins box, and the installation process will start immediately.
Once the installation is complete, you will be prompted to set up the first administrative user. Fill out all required information and click Save and Continue.
On the next page, you will be asked to set the URL for the Jenkins instance. The URL field will be populated with an automatically generated URL.
To complete the setup confirm the URL by clicking on the Save and Finish button.

Finally, click on the Start using Jenkins button and you will be redirected to the Jenkins dashboard logged in as the admin user you have created in one of the previous steps.
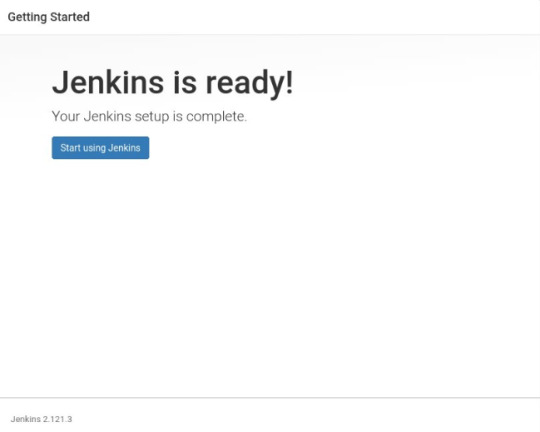
If you’ve reached this point, you’ve successfully installed Jenkins on your CentOS system.
Conclusion
In this tutorial, you have learned how to install and complete the initial configuration of Jenkins on CentOS/RHEL based systems. You can now visit the official Jenkins documentation page and start exploring Jenkins’s workflow and plug-in model.
If you have any questions, please leave a comment below.
1 note
·
View note
Text
How To Create a Sudo User on Linux (CentOS)

The sudo command is designed to allow users to run programs with the security privileges of another user, by default the root user.
In this guide, we will show you how to create a new user with sudo privileges on CentOS. You can use the sudo user to perform administrative tasks on your CentOS machine without a need to logging in as the root user.
Creating Sudo User
By default on CentOS, users in the group wheel are granted with sudo access. If you want to configure sudo for an existing user, just add your user to the wheel group, as shown in step 4.
Follow the steps below to create a sudo user on your CentOS server:
1. Log in to your server
Start by logging in to your CentOS server via ssh as the root user:
ssh root@server_ip_address
2. Create a new user account
Create a new user account using the useradd command:
useradd username
Replace username with the user name that you want to create.
3. Set the user password
Run the passwd command to set a password for the new user:
passwd username
You will be prompted to confirm the password. Make sure you use a strong password.
Changing password for user username. New password: Retype new password: passwd: all authentication tokens updated successfully.
4. Add the new user to the sudo group
By default on CentOS systems, members of the group wheel are granted with sudo access. Add the new user to the wheel group:
usermod -aG wheel username
How to use Sudo
Switch to the newly created user:
su - username
To use sudo, simply prefix the command with sudo and space.
sudo [COMMAND]
For example, to list the contents of the /root directory you would use:
sudo ls -l /root
The first time you use sudo from this account, you will see the following banner message and you will be prompted to enter the password for the user account.
We trust you have received the usual lecture from the local System Administrator. It usually boils down to these three things: #1) Respect the privacy of others. #2) Think before you type. #3) With great power comes great responsibility. [sudo] password for username:
Conclusion
That’s all. You have successfully created a sudo user on your CentOS system. You can now use this user to perform administrative tasks on your server.
Feel free to leave a comment if you have any questions.The sudo command is designed to allow users to run programs with the security privileges of another user, by default the root user.In this guide, we will show you how to create a new user with sudo privileges on CentOS. You can use the sudo user to perform administrative tasks on your CentOS machine without a need to logging in as the root user.Creating Sudo UserBy default on CentOS, users in the group wheel are granted with sudo access. If you want to configure sudo for an existing user, just add your user to the wheel group, as shown in step 4.Follow the steps below to create a sudo user on your CentOS server:1. Log in to your serverStart by logging in to your CentOS server via ssh as the root user:ssh root@server_ip_address2. Create a new user accountCreate a new user account using the useradd command:useradd usernameReplace username with the user name that you want to create.3. Set the user passwordRun the passwd command to set a password for the new user:passwd usernameYou will be prompted to confirm the password. Make sure you use a strong password.Changing password for user username. New password: Retype new password: passwd: all authentication tokens updated successfully. 4. Add the new user to the sudo groupBy default on CentOS systems, members of the group wheel are granted with sudo access. Add the new user to the wheel group:usermod -aG wheel usernameHow to use SudoSwitch to the newly created user:su - usernameTo use sudo, simply prefix the command with sudo and space.sudo [COMMAND]For example, to list the contents of the /root directory you would use:sudo ls -l /rootThe first time you use sudo from this account, you will see the following banner message and you will be prompted to enter the password for the user account.We trust you have received the usual lecture from the local System Administrator. It usually boils down to these three things: #1) Respect the privacy of others. #2) Think before you type. #3) With great power comes great responsibility. [sudo] password for username: ConclusionThat’s all. You have successfully created a sudo user on your CentOS system. You can now use this user to perform administrative tasks on your server.Feel free to leave a comment if you have any questions.
1 note
·
View note
Text
How to install CentOS 7 Server and Desktop

This tutorial will show you how to install the latest version of CentOS Linux 7 on a dedicated server or desktop machine. The same steps will work on private or public cloud virtual machines too. CentOS is a stable Open Source Linux distribution and one of the most popular Linux platforms based on Red Hat Enterprise Linux (rhel) sources.
The typical installation of CentOS as performed in this tutorial will be based on the CentOS 7 DVD ISO image. You can burn the image to a DVD or copy it to a bootable USB drive. The installation covers the process of installing CentOS 7 on UEFI based machine. The same installation procedure can be successfully applied on old BIOS motherboards or on UEFI systems with Legacy Mode or CSM (Compatibility Support Module) option enabled.
REQUIREMENTS
The latest CentOS 7 ISO Image obtained from the following official CentOS download mirrors: http://isoredirect.centos.org/centos/7/isos/x86_64/CentOS-7-x86_64-DVD-1708.iso
Initial Preparation
After you’ve downloaded the CentOS DVD ISO image by following the download link presented above, use a DVD burning software to place the bootable image to a DVD or prepare a bootable USB stick that contains the CentOS image.
Bootable USB Drive
A bootable USB drive can be created with the Rufus program in order to be fully compatible with UEFI based motherboards. If you don’t have an UEFI motherboard machine, then you can use any other software to create a bootable CentOS 7 USB stick. Some of the most popular software to create bootable USB flash memory drives can be found at the https://www.pendrivelinux.com/ website.
Configure Bios
Another important aspect which must be followed in order to properly install CentOS 7 on UEFI based motherboards is to open your machine motherboard UEFI settings (pressing a special key, such as F1, F2, F11, F12, Del, Esc) and disable QuickBoot or FastBoot and Secure Boot options. The BIOS/EFI keys you need to press during hardware initialization or machine power on phase in order to enter BIOS/UEFI settings highly depend on the motherboard vendor specifications and should be included in the motherboard’s manual. Another important aspect is to change the machine boot order and instruct the BIOS/EFI to use the proper drive for booting (DVD drive or USB). On some machines, the boot order or the boot drive can be selected by pressing a special key at hardware power on.
Install CentOS 7
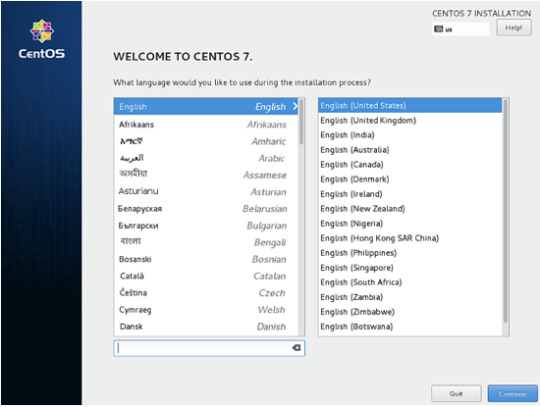
After you’ve made the above settings to your machine motherboard UEFI/BIOS, place the DVD ISO image of CentOS 7.4 or the bootable USB flash stick in the appropriate motherboard drive. Then reboot or power-on the machine. Hit the appropriate bootable key from the keyboard and instruct the BIOS or UEFI software to boot the machine from the appropriate DVD or USB drive. The CentOS 7 bootable ISO image should load and it will present you the first installation image on your monitor screen. Select Install CentOS 7 from that menu and hit the Enter key to start the installation process, as illustrated in the following screenshot :

After a few seconds, the CentOS graphical installer will be loaded into your machine RAM and will present you the ”Welcome to CentOS 7” screen. Select the appropriate language for your system installation process and press hit on Continue button.
On the next screen, you will see the Installation Summary menu. Here, first select the Date and Time menu to open this menu. Use the map to select your geographical location. Also, below the map, you have the option to configure the date and time settings. If the time is correctly configured just hit on the upper left Done button to complete this stage and return to the initial menu
Next, hit the Language Support menu and setup your system language support. Again, when you finish this step, hit Done to return to the main menu.

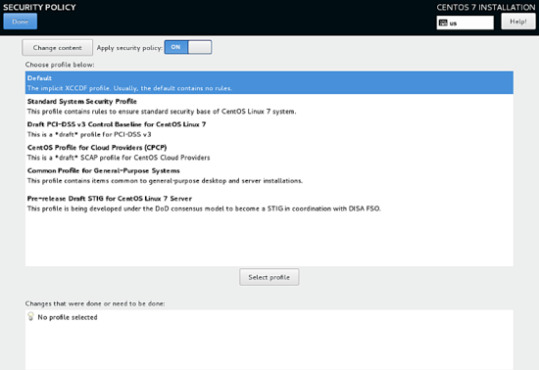
Next, hit the system Security Policy menu and select a security profile from the list. You’re safe to choose the Default security profile. Hit the Select profile button and switch Apply security policy button to ON. When you finish, hit the Done button to return to the main screen.
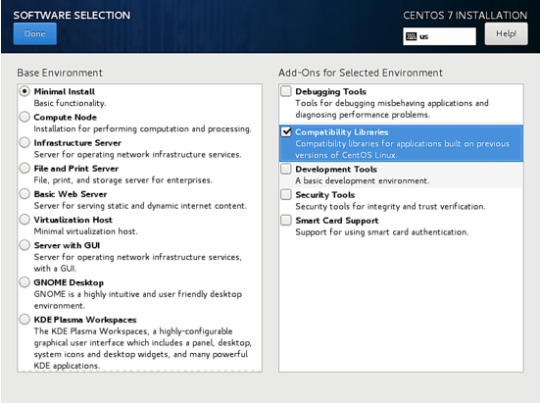
In the next step, go to Software Selection menu. There, you will find a list of some predefined base environments for your system. You can choose to install a graphical desktop environment, such as Gnome, KDE Plasma or Creative Workstation, or you can choose to install a custom server installation, such as Web server, Compute Node, Virtualization host, Infrastructure server, Server with a graphical interface or File and Print Server.
The most suitable environment for a server is the Minimal Install option because it is the most flexible and has a small disk footprint. Select Minimal Install base environment, select Compatibility Libraries add-ons from the left pane and hit on the Done button to finish this setting and return to main menu.
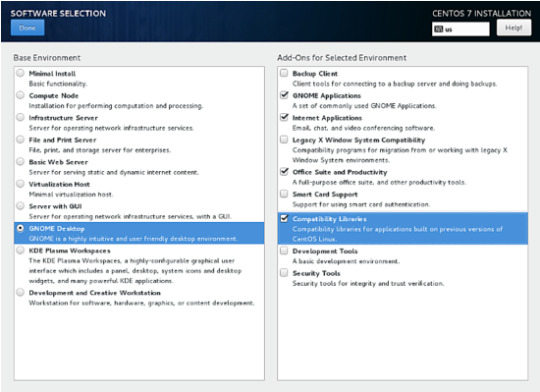
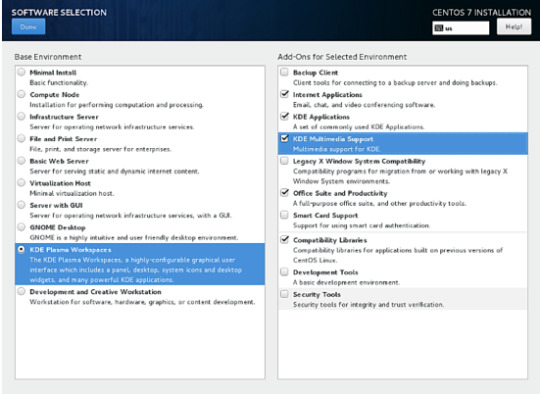
In case you want to install a full Gnome or KDE Desktop environment, select the proper environments as shown in the below screenshots and hit on Done button. However, you cannot choose to install more the one environment per installation.
Next, go to the Installation Source menu and select Auto-detected installation media as default. You also have the options to perform the installation from other network locations such as HTTP, HTTPS, FTP or NFS server or add additional repositories. When you finish, hit Done to return to the main menu.

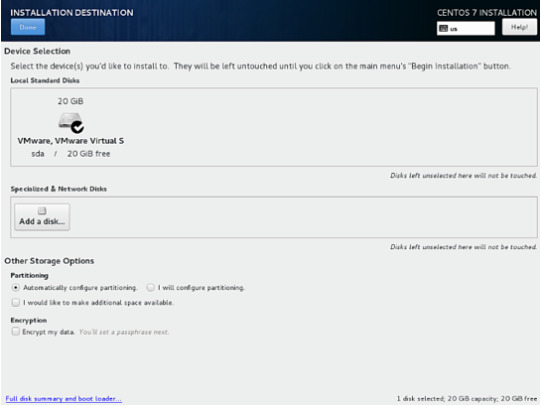
Next, hit on the Installation Destination menu to open storage partition settings. In Device Selection, check the local machine hard disk. Then, in Other Storage Options, check Automatically configure partitioning. This option ensures that the machine hard disk will be automatically partitioned with the /(root), /home and swap partitions. When you finish, hit the Done button to activate the machine drive partition layout and return to the main menu screen.
In the next installation screen, hit the KDUMP menu and disable KDUMP kernel crash mechanism in order to free system RAM. Hit on the Done button to apply this setting and return to the main menu.

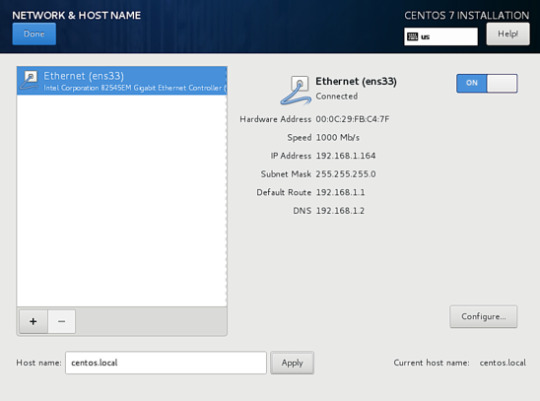
Next, hit the Network & Hostname menu and configure your machine FQDN hostname. Also activate and enable the network service by switching the Ethernet button from OFF to ON. You can manually configure the network interface in this step if that’s the case. When you finish, hit the Done button to return to the main installation menu.
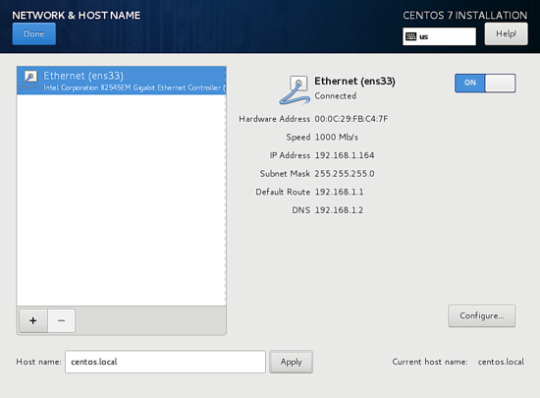
Next, hit the Network & Hostname menu and configure your machine FQDN hostname. Also activate and enable the network service by switching the Ethernet button from OFF to ON. You can manually configure the network interface in this step if that’s the case. When you finish, hit the Done button to return to the main installation menu.
Finally, before starting the installation process, make sure you review all settings you’ve made. When you finish, hit the Begin Installation button to start installing CentOS 7.

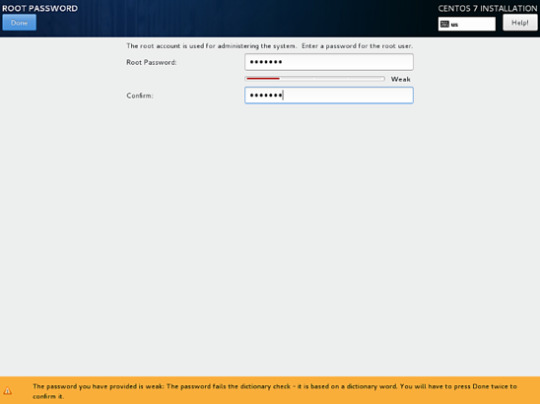
After the installer starts hit on the ROOT PASSWORD menu in Configuration screen and setup a strong password for the root account. When you finish, hit the Done button to return to user settings screen.

Next, hit the User Creation menu and add a new system account and a strong password for this account. Check Make this user administrator and Require a password to use the account options in order to grant this user root privileges. This avoids that you have to manually enter the password each time you log in to the system. When you finish setting up the user, hit on the Done button to return to the initial menu and wait for the installation process to complete.
After a few minutes, the installer will report that CentOS has been successfully installed on your machine. In order to use the system you just have to remove the installation media and reboot the machine.
After the installation process completes, hit on Reboot button and the machine will reboot. After the restart, log in to the CentOS console with the credentials configured while installing the system. Then issue the following command with root privileges to update the system.
That’s all! You’ve successfully installed the latest version of CentOS 7 on your machine.
1 note
·
View note
Text
How to Install and Use Docker on CentOS

Docker is a containerization technology that allows you to quickly build, test and deploy applications as portable, self-sufficient containers that can run virtually anywhere.
The container is a way to package software along with binaries and settings required to make the software that runs isolated within an operating system.
In this tutorial, we will install Docker CE on CentOS 7 and explore the basic Docker commands and concepts. Let’s GO !
Prerequisites
Before proceeding with this tutorial, make sure that you have installed a CentOS 7 server (You may want to see our tutorial : How to install a CentOS 7 image )
Install Docker on CentOS
Although the Docker package is available in the official CentOS 7 repository, it may not always be the latest version. The recommended approach is to install Docker from the Docker’s repositories.
To install Docker on your CentOS 7 server follow the steps below:
1. Start by updating your system packages and install the required dependencies:
sudo yum update
sudo yum install yum-utils device-mapper-persistent-data lvm2
2. Next, run the following command which will add the Docker stable repository to your system:
sudo yum-config-manager --add-repo https://download.docker.com/linux/centos/docker-ce.repo
3. Now that the Docker repository is enabled, install the latest version of Docker CE (Community Edition) using yum by typing:
sudo yum install docker-ce
4. Once the Docker package is installed, start the Docker daemon and enable it to automatically start at boot time:
sudo systemctl start dockersudo systemctl enable docker
5. To verify that the Docker service is running type:
sudo systemctl status docker
6. The output should look something like this:
● docker.service - Docker Application Container Engine Loaded: loaded (/usr/lib/systemd/system/docker.service; enabled; vendor preset: disabled) Active: active (running) since Wed 2018-10-31 08:51:20 UTC; 7s ago Docs: https://docs.docker.com Main PID: 2492 (dockerd) CGroup: /system.slice/docker.service ├─2492 /usr/bin/dockerd └─2498 docker-containerd --config /var/run/docker/containerd/containerd.toml
At the time of writing, the current stable version of Docker is, 18.06.1, to print the Docker version type:
docker -v
Docker version 18.06.1-ce, build e68fc7a
Executing the Docker Command Without Sudo
By default managing, Docker requires administrator privileges. If you want to run Docker commands as a non-root user without prepending sudo you need to add your user to the docker group which is created during the installation of the Docker CE package. You can do that by typing:
sudo usermod -aG docker $USER
$USER is an environnement variable that holds your username.
Log out and log back in so that the group membership is refreshed.
To verify Docker is installed successfully and that you can run docker commands without sudo, issue the following command which will download a test image, run it in a container, print a “Hello from Docker” message and exit:
docker container run hello-world
The output should look like the following:
Unable to find image 'hello-world:latest' locally latest: Pulling from library/hello-world 9bb5a5d4561a: Pull complete Digest: sha256:f5233545e43561214ca4891fd1157e1c3c563316ed8e237750d59bde73361e77 Status: Downloaded newer image for hello-world:latest Hello from Docker! This message shows that your installation appears to be working correctly.
Docker command line interface
Now that we have a working Docker installation, let’s go over the basic syntax of the docker CLI.
The docker command line take the following form:
docker [option] [subcommand] [arguments]
You can list all available commands by typing docker with no parameters:
docker
If you need more help on any [subcommand], just type:
docker [subcommand] --help
Docker Images
A Docker image is made up of a series of layers representing instructions in the image’s Dockerfile that make up an executable software application. An image is an immutable binary file including the application and all other dependencies such as binaries, libraries, and instructions necessary for running the application. In short, a Docker image is essentially a snapshot of a Docker container.
The Docker Hub is cloud-based registry service which among other functionalities is used for keeping the Docker images either in a public or private repository.
To search the Docker Hub repository for an image just use the search subcommand. For example, to search for the CentOS image, run:
docker search centos
The output should look like the following:
NAME DESCRIPTION STARS OFFICIAL AUTOMATED centos The official build of CentOS. 4257 [OK] ansible/centos7-ansible Ansible on Centos7 109 [OK] jdeathe/centos-ssh CentOS-6 6.9 x86_64 / CentOS-7 7.4.1708 x86_… 94 [OK] consol/centos-xfce-vnc Centos container with "headless" VNC session… 52 [OK] imagine10255/centos6-lnmp-php56 centos6-lnmp-php56 40 [OK] tutum/centos Simple CentOS docker image with SSH access 39
As you can see the search results prints a table with five columns, NAME, DESCRIPTION, STARS, OFFICIAL and AUTOMATED. The official image is an image that Docker develops in conjunction with upstream partners.
If we want to download the official build of CentOS 7, we can do that by using the image pull subcommand:
docker image pull centos
Using default tag: latest latest: Pulling from library/centos 469cfcc7a4b3: Pull complete Digest: sha256:989b936d56b1ace20ddf855a301741e52abca38286382cba7f44443210e96d16 Status: Downloaded newer image for centos:latest
Depending on your Internet speed, the download may take a few seconds or a few minutes. Once the image is downloaded we can list the images with:
docker image ls
The output should look something like the following:
REPOSITORY TAG IMAGE ID CREATED SIZE hello-world latest e38bc07ac18e 3 weeks ago 1.85kB centos latest e934aafc2206 4 weeks ago 199MB
If for some reason you want to delete an image you can do that with the image rm [image_name] subcommand:
docker image rm centos
Untagged: centos:latest Untagged: centos@sha256:989b936d56b1ace20ddf855a301741e52abca38286382cba7f44443210e96d16 Deleted: sha256:e934aafc22064b7322c0250f1e32e5ce93b2d19b356f4537f5864bd102e8531f Deleted: sha256:43e653f84b79ba52711b0f726ff5a7fd1162ae9df4be76ca1de8370b8bbf9bb0
Docker Containers
An instance of an image is called a container. A container represents a runtime for a single application, process, or service.
It may not be the most appropriate comparison but if you are a programmer you can think of a Docker image as class and Docker container as an instance of a class.
We can start, stop, remove and manage a container with the docker container subcommand.
The following command will start a Docker container based on the CentoOS image. If you don’t have the image locally, it will download it first:
docker container run centos
At first sight, it may seem to you that nothing happened at all. Well, that is not true. The CentOS container stops immediately after booting up because it does not have a long-running process and we didn’t provide any command, so the container booted up, ran an empty command and then exited.
The switch -it allows us to interact with the container via the command line. To start an interactive container type:
docker container run -it centos /bin/bash
As you can see from the output once the container is started the command prompt is changed which means that you’re now working from inside the container:
[root@719ef9304412 /]#
To list running containers: , type:
docker container ls
CONTAINER ID IMAGE COMMAND CREATED STATUS PORTS NAMES 79ab8e16d567 centos "/bin/bash" 22 minutes ago Up 22 minutes ecstatic_ardinghelli
If you don’t have any running containers the output will be empty.
To view both running and stopped containers, pass it the -a switch:
docker container ls -a
CONTAINER ID IMAGE COMMAND CREATED STATUS PORTS NAMES 79ab8e16d567 centos "/bin/bash" 22 minutes ago Up 22 minutes ecstatic_ardinghelli c55680af670c centos "/bin/bash" 30 minutes ago Exited (0) 30 minutes ago modest_hawking c6a147d1bc8a hello-world "/hello" 20 hours ago Exited (0) 20 hours ago sleepy_shannon
To delete one or more containers just copy the container ID (or IDs) from above and paste them after the container rm subcommand:
docker container rm c55680af670c
Conclusion
You have learned how to install Docker on your CentOS 7 machine and how to download Docker images and manage Docker containers.
This tutorial barely scratches the surface of the Docker ecosystem. In some of our next articles, we will continue to dive into other aspects of Docker. To learn more about Docker check out the official Docker documentation.
If you have any questions or remark, please leave a comment .
2 notes
·
View notes