
Don't wanna be here? Send us removal request.
Statistics
We looked inside some of the posts by loadingfox721 and here's what we found interesting.
Average Info
Notes Per Post
1
Likes Per Post
1
Reblog Per Post
0
Reply Per Post
0
Time Between Posts
13 days
Number of Posts By Type
Text
10
Last Seen Tumblr Blogs


Fun Fact
25% of US internet users with an annual income of $80-100K use Tumblr.
Text
Naruto Games For Mac

The critically acclaimed Naruto Shippuden Ultimate Ninja STORM series is back in on PlayStation 3, celebrating the return of highly awaited boss battles and welcoming brand new features to revamp the game experience.Introducing masked Man and Nine-Tails assault on the Leaf Village for the first time in a video game, the story mode will let you live the most recent events of the anime with a degree of faithfulness never-before-seen.More immersive, more faithful and more extreme, Naruto Shippuden Ultimate Ninja STORM 3 on PS3 will offer the most epic Naruto experience ever seen in a video game.

Naruto: Kunoichi Trainer PC Full Game Overview 2021. Naruto Kunoichi Trainer v0.14.1 Game Free for PC/Mac Download. After continual viewing of Naruto for several days, you end up near the main entrance of Konocha somehow. You are met by three familiar to you girls: Hinata, Ino, and Sakura.
Naruto Games For Mac

Naruto Pc Game Free Download

Naruto Games For Mac Free
Violence, Blood, Suggestive Themes. In-Game Purchases (Includes Random Items) Naruto: Ninja Ultimate War is a high-free round strategy RPG online game!Players can play the original protagonists of the five attributes of 'wind', 'thunder', 'water', 'soil', and 'fire', experience the classic bridges and touching moments, explore freely in the grand world, and build the strongest ninja team. https://loadingfox721.tumblr.com/post/657026385236393985/download-xcode-12. Project Shinobi Demo v0.2. Version: 0.2.0 3 months ago. Download (882 MB) Project Shinobi is an Open World RPG Fan Game based on the popular anime/manga series #Naruto. I am the solo developer working on this game during my spare time for fun. Zoom download in mac. The current demo includes Naruto (Sage of Six Paths) as the main playable character. Bluestacks Mac 1 Bluestacks Mac 2 Bluestacks Mac 3 Bluestacks Mac 4 Bluestacks Mac 5 Bluestacks Mac 6 How to download and install Bluestack on MAC If you prefer to see a video of the entire process of downloading and installing the Bluestacks program for Mac to install games or apps like NARUTO X BORUTO NINJA TRIBES we leave you this short.
0 notes
Text
Game F1 Pc Offline
Planets in composite robert hand pdf. F1 2020 PC Game Free Full Version Download. On the off chance that you are searching for the hustling game which is most drifting, at that point F1 2020 is the one you have to attempt.
F1 game free download for pc. Games downloads - F1 2012 by Turbine Inc. And many more programs are available for instant and free download.
F1® 2020 allows you to create your F1® team for the very first time and race alongside the official teams and drivers. Alternatively, challenge your friends in new split-screen with casual race options for more relaxed racing. Compete on 22 circuits, with current and classic content.
F1 2020 Overview

“F1® 2020 is an amazing step in the right direction for Codemasters. By adding the My Team mode to the series, it gives this racing game a different personality; one sprinkled with adventure elements, and it works.” 88 – Metacritic “Creating a team in F1 2020 brings together a decade of evolution.” 88 – PC Gamer. Resident Evil Village Deluxe Reg Free (Steam offline) AutoActivation. $6.72 $1.39 discount -79%. Benefit is $5.33 compared to the old price of $6.72. Automatic activation of Assassin's Creed Valhalla Wrath of the Druids with all additions and updates. The F1 multiplayer scene has been growing rapidly over the last couple of years. This includes both the PS4, PC and XBOX communities. There is no cross platform compatibility support for the F1 games yet, separating the F1 community in 3 different categories. This is hurting the longevity of the game.
Game F1 Pc Offline Pc

It is the official computer game of the FIA Formula One World Championship where you can play and destruction the opponents. It is the most goal-oriented round of the code experts history and the ongoing interaction is intriguing. https://loadingfox721.tumblr.com/post/660765561383436288/assassin27s-creed-2-mac-download-free. The graphical portrayal of the game is made so that these are innovatively best in class and the liveliness is sensible. It causes the players to have the best gaming involvement in a games vehicle as in the competition.
F1 2010 Pc Download
The F1 2020 game has been produced for over two years to arrive at this ideal for all the games darlings. It is viewed as the most aggressive and expected establishment which will be made accessible to all the Playstation gamers, X Box, and for Windows PC. Its accessibility to all the gadgets makes it simple for the game sweethearts to appreciate having a great time. Following are the things you have to think about the F1 2020 game.
For the first run through, the guideline is took into account partaking in different players hustling that has additionally expanded the energy for the players. This has been the most noteworthy appraised establishment all things considered and the round of 2020 to get this acknowledgment. There are progressively game highlights which are interesting and profoundly taking care of the thirst of all the F1 computer game darlings.
Compared to the 2018 season, the cooperative individuals have been incorporated during the current year game. The players like George Russell, Alexander Albon, and Lando Norris are accessible in the F1 2020 form. Additionally, the game is required to highlight all the drivers, official groups, and the 21 circuits of the period 2020.
The devotion on designs has rolled out enormous improvements and progressions which shows up to be sensible. The tracks are made delightful with upgraded plan and it is the best form that ahs this tracks improvements for the players contrasted with the past renditions. The late evening hustling levels have been extemporized to a more prominent degree which makes it like a genuine game with lighting.
The F1 2020 has made the incredible degrees of authenticity with the earth as well as with the visuals and audio effects. The visuals have been utilized with incredible exertion to furnish the players with the specific sentiment of a genuine games track. Thus, the audio cues accommodated the game are extremely reasonable and the dashing sounds are incredible to hear as though in an arena of the progressing occasion.
F1 2020 Trailer
How to Install?
Click on “Download Game” button.
Download ” F1 2020“ Installer (Supports Resumable Downloads).
Open the Installer, Click Next and choose the directory where to Install.
Let it Download Full Version game in your specified directory.
Open the Game and Enjoy Playing.
0 notes
Text
Mysql Front Keygen 5.1

The MySQL server, mysqld, has many command options and system variables that can be set at startup to configure its operation. To determine the default command option and system variable values used by the server, execute this command:
Mysql Front Keygen 5.1 Free
Mysql Front Keygen 5.1 Key
Mysql Front Keygen 5.1 Download
Mysql Front Keygen 5.1 Tutorial
MySQL Front 5.1 4.1 serial numbers are presented here. No registration. The access to our data base is fast and free, enjoy. Mysql Front Keygen 5.1. Crack Find Convert Mysql Front 5.1 trail version to full software. Trade Like A Stock Market Wizard Pdf here. 200 serials mysql front 5.1. Date Name Success Rate; 2009-10-17:08: My SQL Front 3.2 Build. If you search for Sql Front 5.1 4.16 Crack, you will often see the word crack amongst the results which means it is the.
The command produces a list of all mysqld options and configurable system variables. Its output includes the default option and variable values and looks something like this:
To see the current system variable values actually used by the server as it runs, connect to it and execute this statement:
To see some statistical and status indicators for a running server, execute this statement:
System variable and status information also is available using the mysqladmin command:
For a full description of all command options, system variables, and status variables, see these sections:
More detailed monitoring information is available from the Performance Schema; see Chapter 25, MySQL Performance Schema. In addition, the MySQL sys schema is a set of objects that provides convenient access to data collected by the Performance Schema; see Chapter 26, MySQL sys Schema.
MySQL uses algorithms that are very scalable, so you can usually run with very little memory. However, normally better performance results from giving MySQL more memory.
When tuning a MySQL server, the two most important variables to configure are key_buffer_size and table_open_cache. You should first feel confident that you have these set appropriately before trying to change any other variables.
The following examples indicate some typical variable values for different runtime configurations.
If you have at least 1-2GB of memory and many tables and want maximum performance with a moderate number of clients, use something like this:
If you have only 256MB of memory and only a few tables, but you still do a lot of sorting, you can use something like this:
If there are very many simultaneous connections, swapping problems may occur unless mysqld has been configured to use very little memory for each connection. mysqld performs better if you have enough memory for all connections.
With little memory and lots of connections, use something like this:
Or even this:
If you are performing GROUP BY or ORDER BY operations on tables that are much larger than your available memory, increase the value of read_rnd_buffer_size to speed up the reading of rows following sorting operations.
If you specify an option on the command line for mysqld or mysqld_safe, it remains in effect only for that invocation of the server. To use the option every time the server runs, put it in an option file. See Section 4.2.2.2, “Using Option Files”.
On this page
Description
SQL-Front is a graphical front end for the MySQL database. Because it is a 'real' application, it can offer a more refined user-interface than is possible with systems built on PHP and HTML. Response is immediate, as there is no delay of reloading HTML-pages.As an application, SQL-Front has total control of the graphic display, information can be presented as clearly as possible. Your data is presented in a table with resizable column-widths... Read more
Rate:
Release Date:10/20/2012
License:Freeware
Category:Database Solutions
Developer:mysqlfront.de
Downloads:332
Size:3.62 Mb
Price: Free
To free download a trial version of MySQL Front, click here To visit developer homepage of MySQL Front, click here
Advertisement
System Requirements
N/A
MySQL Front v.5.1 Build 4.13 Copyright
Shareware Junction periodically updates pricing and software information of MySQL Front v.5.1 Build 4.13 full version from the publisher using pad file and submit from users. Software piracy is theft, Using crack, password, serial numbers, registration codes, key generators, cd key, hacks is illegal and prevent future development of MySQL Front v.5.1 Build 4.13 Edition. Download links are directly from our publisher sites. Links MySQL Front v.5.1 Build 4.13 from Bittorrent, mediafire.com, uploadfiles.com, hotfiles.com rapidshare.com, megaupload.com, netload.in, storage.to, depositfiles.com and other files hosting are not allowed. The download file is obtained directly from the publisher, not from any Peer to Peer file sharing applications such as Shareaza, Limewire, Kazaa, Imesh, eDonkey, eMule, Ares, BearShare, Overnet, Morpheus, BitTorrent Azureus and WinMX.
Review This Software
More MySQL Front Software
Advertisement
MySQL Front v.5.1 Build 4.13
SQL-Front is a graphical front end for the MySQL database. Because it is a 'real' application, it can offer a more refined user-interface than is possible with systems built on PHP and HTML. Response is immediate,
Category: Database Solutions
Developer: mysqlfront.de - Download - Free
SQLyog v.9 30
SQLyog MySQL GUI is the most powerful MySQL manager and admin tool, combining the features of MySQL Administrator, phpMyAdmin and other MySQLFront Ends and MySQL GUI tools.
Category: Business
Developer: Webyog Softworks Pvt. Ltd. - Download - Buy: $99.00
mysql - gui - tools - manage - monitor
SQLyog Enterprise v.8 6
SQLyog MySQL GUI is the most powerful MySQL manager and admin tool, combining the features of MySQL Query Browser, Administrator, phpMyAdmin and other MySQLFront Ends and MySQL GUI tools in a single intuitive interface.
Category: Network Tools
Developer: Webyog Softworks Pvt. Ltd. - Download - Buy: $139.00
mysql - gui - tools - manage - monitor
SQLyog Community Edition v.10.11
SQLyog Community Edition is a front end for the MySQL database server. SQLyog MySQL GUI is the most strong MySQL manager and admin tool, combining the features of MySQL Administrator, phpMyAdmin and other MySQLFront Ends and MySQL GUI tools.
Category: Database Solutions
Developer: webyog.com - Download - Free
mysql - gui - tools - manage - monitor
DbForge Studio Express for MySQL v.6.3
Free and easy-to-use MySQL GUI tool for essential database management tasks. Includes necessary tools for MySQL development and administration. Best fits for personal use.
Category: Database Solutions
Developer: Devart - Download - Free
mysql gui - mariadb - mysql client - mysql front end - mysql gui tools
DbForge Studio for MySQL v.9.0.304
dbForge Studio for MySQL is the universal MySQL and MariaDB client for database management, administration and development. With the help of this intelligent MySQL client the work with data and code has become easier and more convenient.
Category: Database
Developer: Devart - Download - Buy: $149.95
mysql client - mysql gui - mysql gui tools - mysql manager - mysql editor
PremiumSoft Navicat for MySQL v.10.0
Navicat for MySQL is a powerful Database administration and development tool for MySQL.
Category: Server Tools
Developer: PremiumSoft CyberTech Ltd. - Download - Buy: $99.00
...phpmyadmin - phpadmin - mysql gui - access to mysql - mysql access
Navicat MySQL v.7 2
Navicat MySQL is a powerful MySQL Database Server administration and development tool. It works with any MySQL version from 3.
Category: Web Authoring
Developer: PremiumSoft CyberTech Ltd. - Download - Buy: $129.00
...phpmyadmin - phpadmin - mysql gui - access to mysql - mysql access
Mysql Front Keygen 5.1 Free
Navicat for MySQL Database Client for Mac OS X - Compatible with Mac OS X Lion! v.10.0.0
Navicat is an ideal solution for MySQL administration and development.
Category: Database Solutions
Developer: PremiumSoft CyberTech Ltd. - Download - Price: $79.00
Mysql Front Keygen 5.1 Key
php - mysql - mysql gui - mysql admin - mysql manager
Navicat for MySQL GUI Admin tool (Linux) - Support MySQL Import/Export v.10.0.3
Navicat Manager is an ideal solution for MySQL administration and development.
Category: Database Solutions
Developer: PremiumSoft CyberTech Ltd. - Download - Price: $79.00
php - mysql - mysql gui - mysql admin - mysql manager
Mysql Front Keygen 5.1 Download
Navicat - The Most Popular MySQL phpmyadmin alternavtive - MySQL Import/Export tool v.10.0.3
Mysql Front Keygen 5.1 Tutorial
Navicat is an ideal solution for MySQL administration and development.
Category: Database Solutions
Developer: PremiumSoft CyberTech Ltd. - Download - Price: $99.00
phpmyadmin - php - mysql - mysql gui - mysql admin
Navicat - The World Best MySQL Client - Navicat (phpMyAdmin replacement) v.8.2.4
Navicat is an ideal solution for MySQL administration and development.
Category: Database Solutions
Developer: PremiumSoft CyberTech Ltd. - Download - Price: $79.00
php - mysql - mysql gui - mysql admin - mysql manager
0 notes
Text
Assassin%27s Creed 2 Mac Download Free

Assassin’s Creed Brotherhood Download PC Free Game
Assassin's Creed Ii Download
Assassin's Creed 3 Download
Assassin 27s Creed 2 Mac download free. full
Assassin's Creed 2 Game Download
Hey guys, whats up! Today I'm going to be showing you how to get Assassin's Creed II for free!!! So basically just download these two items through bit torr. Assassin’s Creed Syndicate PC Game with all files are checked and installed manually before uploading, This PC game is working perfectly fine without any problem. Download the free full version of Assassin’s Creed Syndicate for Mac, Mac OS X, and PC. Assassin’s Creed Syndicate Game It Is Full And Complete Game. Just Download, Run Setup. Download Assassin's Creed II. Take control of a skilled fighter who uses stealth and classic combat skills to eliminate enemies. Assassin’s Creed II is a continuation of the warmly welcomed open world action game developed by Ubisoft, specifically its internal studio based in Montreal, Canada. Production debuted in 2009 on personal computers and on the PlayStation 3 and Xbox 360 consoles. After years it got refreshed and also hit the PlayStation 4 and Xbox One. Assassin’s Creed Brotherhood Download PC Free Game. Assassin’s Creed Brotherhood Download PC Free Game latest update is a direct link to windows and Mac. Assassin’s Creed Brotherhood Free Download Mac Game Full Version Highly Compressed via direct link. Download the free full version of Assassin’s Creed Brotherhood for Mac OS X, and PC.
Assassin’s Creed Brotherhood Download PC Free Game latest update is a direct link to windows and Mac. Assassin’s Creed Brotherhood Free Download Mac Game Full Version Highly Compressed via direct link. Download the free full version of Assassin’s Creed Brotherhood for Mac OS X, and PC. Assassin’s Creed Brotherhood Game It Is Full And Complete Game. Just Download, Run Setup, And Install.
Overview of Assassin’s Creed Brotherhood Full Games
Assassin’s Creed: Brotherhood consists of both action as well as an adventure that was released in 2010 by Ubisoft. You can play it on almost any gaming platform like PlayStation 3, PlayStation 4, Windows, and x-Box. Play it anytime, as it does not requires an internet connection for the story mode.
If you are new, then there will be nothing better than story mode to play on. Experience the high graphics and better sound quality in the middle of your adventure. Your main focus is the objectives on the screen that you need to complete in order to finish the story mode.

Minimum System Requirement

CPU: 1.8 GHz Intel Core 2 Duo or 2.4 GHz AMD Athlon X2 64
RAM: 1.5 GB Windows XP / 2 GB Windows Vista – Windows 7
OS: Windows XP (32-64 bit) / Windows Vista (32-64 bit) / Windows 7 (32-64 bit)
VIDEO CARD: 256 MB DirectX 9.0-compliant card with Shader Model 3.0 or higher (ATI RADEON HD 2000/3000/4000/5000/6000 series / NVIDIA GeForce 8/9/100/200/300/400/500 series)
TOTAL VIDEO RAM: 256 MB
HARDWARE T&L: Yes
PIXEL SHADER: 3.0
VERTEX SHADER: 3.0
FREE DISK SPACE: 8 GB
How to Install Assassin’s Creed Brotherhood Full PC Game
Assassin's Creed Ii Download
Click the “Download” Button Below.
Download Page Will Start
You Should Agree With the “User License Agreement” and click “I Understand” Button.
Save Game/Software By Selecting Path.
Download Process With Start.
Once Download is Completed, Install, and Enjoy!
Assassin's Creed 3 Download
Assassin’s Creed Brotherhood PC Game Free Download for mAC
Click On The Below Button To Start Assassin’s Creed Brotherhood Game Free Download. Assassin’s Creed Brotherhood It Is a Full And Complete Game. Just Download And Start Playing It. We Have Provided Direct Link Full Setup Of The Assassin’s Creed Brotherhood Game.
Assassin’s Creed Brotherhood Download PC Free Game
Assassin 27s Creed 2 Mac download free. full
Assassin's Creed 2 Digital Deluxe Edition includes Assassins Creed 2 and three bonus maps! Explore some of the Renaissance's most prestigious monuments to reveal secret treasures in three special in-game maps: Palazzo Medici, Santa Maria Dei Frari, and the Arsenal Shipyard.
Assassin's Creed 2 is the follow-up to the title that became the fastest-selling new IP in video game history. The highly anticipated title features a new hero, Ezio Auditore da Firenze, a young Italian noble, and a new era, the Renaissance.
Assassin's Creed 2 retains the core gameplay experience that made the first opus a resounding success and features new experiences that will surprise and challenge players.
Assassin's Creed 2 is an epic story of family, vengeance and conspiracy set in the pristine, yet brutal, backdrop of a Renaissance Italy. Ezio befriends Leonardo da Vinci, takes on Florence's most powerful families and ventures throughout the canals of Venice where he learns to become a master assassin.
Features
EZIO, A NEW ASSASSIN FOR A NEW ERA: Ezio Auditore da Firenze is a young Italian noble who will learn the ways of the assassins after his family was betrayed and he looks to seek vengeance. He is a lady's man, a free soul with panache yet has a very human side to his personality. Through him, you become a master assassin.
RENAISSANCE ITALY: Italy in the 15th century was less a country and more a collection of city-states where families with political and economic strength began to take leadership roles in cities like Florence and Venice. This journey through some of the most beautiful cities in the world takes place in a time in history where culture and art were born alongside some of the most chilling stories of corruption, greed and murder.

A NEW-FOUND FREEDOM: You will be able to perform missions when you want and how you want in this open-ended world that brings back free-running and adds elements such as swimming and even flying to the adventure. The variety in gameplay adds another layer for you to truly play through the game any way you choose.
DYNAMIC CROWD: Discover a living, breathing world where every character is an opportunity for the player. Blending in with the crowd is easier, working with in-game characters provide ample rewards but can also lead to surprising consequences.
Assassin's Creed 2 Game Download
BECOME A MASTER ASSASSIN: Perfect your skills to become a master assassin where you brandish new weapons, learn to disarm enemies then use their weapons against them, and assassinate enemies using both hidden blades.
0 notes
Text
Planets In Composite Robert Hand Pdf

Robert Hand Astrologer Planets
Robert Hand Tulane
Planets In Composite Robert Hand Pdf Online
Planets in Composite contains an explanation of the composite technique, chapters on casting and reading the horoscope, five case studies illustrating the use and validity of composite charts, plus twelve chapters of delineations. Planets in composite: analyzing human relationships. Publication date 1981 Topics Astrology. 14 day loan required to access EPUB and PDF files. Interpreting the Eclipses Robert Carl Jensky Planets in Transit Robert Hand Planets in Composite Robert Hand Planets in Youth Robert Hand Essays on Astrology Robert Hand Sun, Moon, Stonehenge Robin Heath The Key to Stonehenge Robin Heath Venus The Evolution of The Goddess and her planet Ronnie Gale Dreyer The Astrology of Choice Roy Alexander.
Planets in Composite contains an explanation of the composite technique, chapters on casting and reading the horoscope, five case studies illustrating the use and validity of composite charts, plus twelve chapters of delineations.
Author: Robert Hand
Publisher: Whitford Press Opera gx mac download.
Robert Hand Astrologer Planets

ISBN: 0914918222
Robert Hand Tulane

Category: Body, Mind & Spirit
Page: 372
Planets In Composite Robert Hand Pdf Online
View: 946
Planets in Composite contains an explanation of the composite technique, chapters on casting and reading the horoscope, five case studies illustrating the use and validity of composite charts, plus twelve chapters of delineations. There are delineations for all the planets (including Sun and Moon) in each house and every major aspect (conjunction, sextile, square, trine, opposition). 374 interpretations in all, 300 words each, thumb-indexed for easy reference. And there are 41 delineations of the Moon's nodes as well. AUTHOR:
0 notes
Text
Netflix App For Macos Catalina

How To Install Apps On Macos Catalina
Is There A Netflix App For Mac
Netflix App For Mac Os Catalina
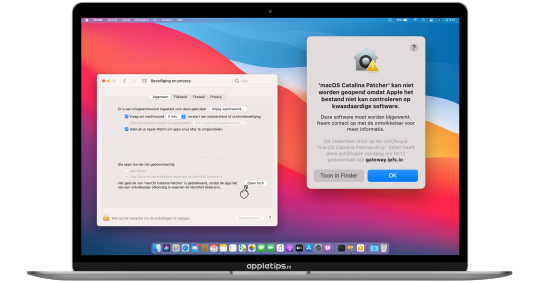
Nieuw op Netflix maart 2021. Dagelijks maakt Netflix weer een sloot nieuwe series en films beschikbaar. Op iPhoned blikken we elke maand vooruit op het nieuwe aanbod met de beste tips. Vaak zijn dit nieuwe series en films, maar ook oude favorieten die op Netflix verschijnen. Apple TV 4K lets you watch movies and shows in amazing 4K HDR and with Dolby Atmos sound. 1 It has great content from apps like Crave, Disney+ and Amazon Prime Video 2 — and streaming now, Apple Originals from Apple TV+. 3 You can use Siri to control it all with just your voice.
Apple TV 4K lets you watch movies and shows in amazing 4K HDR and with Dolby Atmos sound.1 It has great content from apps like Crave, Disney+ and Amazon Prime Video2 — and streaming now, Apple Originals from Apple TV+.3 You can use Siri to control it all with just your voice. With more ways to watch, play and connect, Apple TV 4K delivers the best viewing and listening experience in your home.
Macbook pro software update not working. 4K gives you a crisper picture using four times more pixels than standard HD. High Dynamic Range (HDR) delivers brighter, more realistic colours and greater detail. From the hottest new movie to your favourite TV show, everything is more lifelike than ever. Zoom download in macbook pro.
Combine Apple TV 4K with a Dolby Atmos–compatible sound system or with HomePod and you’re fully immersed in three-dimensional audio that sends sound around and above you with pinpoint precision. Whether a jet zooms overhead or a torrential downpour erupts, the true-to-life sound puts you inside the action. And as the first streaming player to be certified for both Dolby Vision and Dolby Atmos, Apple TV 4K brings home the complete cinematic experience.
How To Install Apps On Macos Catalina
Apple TV teams up with some of the world’s largest TV networks and broadcasters to bring you the live content you care about most. Find sports from apps like TSN and Sportsnet. Late-breaking news from apps like CBC News Network and CTV News Go. And your favourite shows on apps such as Bell Fibe TV and CBC Gem.
And now cable customers with leading providers can watch live and on-demand with Apple TV, making it truly the best box to connect to your screen.2
With multi-user support in the new Control Center, all your family members can quickly and easily find only the shows they want to watch. Dad gets his. Mom hers. The kids theirs. It’s an entire TV experience — Up Next lists, video and music collections, recommendations and more — that’s tailored to you and only you.
Apple Original shows and movies from Apple TV+. Just the premium channels you want. Thousands of movies to buy or rent. Popular streaming services and cable TV providers. It’s personalized and expertly curated, so you’ll discover the best of what’s on. And it’s all in the Apple TV app. On all your screens. It’s the ultimate way to watch TV.

No more typing to find exactly what you’re looking for. Just ask Siri for a movie, show, genre, actor or song you love. Siri also shines when you’re not sure what you want. Just say something like “Show me action movies,” and Siri delivers.
Play the latest episode of Sharp Objects
Show me the best cartoons for kids
Put on the Blue Jays game
What football games are on?
Open Global Go
Play some reggae
With multiuser support for gaming, players can keep track of their individual game levels, leaderboards and invitations — and switch between players on the fly. You can also connect more of your favourite controllers to Apple TV, including Xbox Elite Wireless Controller Series 2 and Xbox Adaptive Controllers.4

Apple Arcade is a game subscription service unlike any other. There are over 100 games ready to play, and from mythical landscapes to earth-shattering explosions the experience is all too real on your big screen with Apple TV.3
The App Store on Apple TV has something for everyone. Entertainment apps like Amazon Prime Video, Crave and Netflix. Thousands of top sports, fitness and lifestyle apps. And, of course, a world of games.
Enjoy your photos and videos from iCloud Photos or shared albums on the big screen.5 Connect Apple Music to your home theatre. And let your friends and family share their photos and videos with AirPlay.
Memories automatically creates collections of your best photos and videos, and Apple TV lets you see them in 4K HDR. If you create Live Photo loops or bounces on your iPhone, you can share those on the big screen, too.
Apple Music gives you access to over 70 million songs — and music videos from the ’80s and ’90s to today’s top artists — all on your Apple TV.3 Discover great music with family and friends and even sing along to your favourite songs — word for word — with new Lyrics view.
New
Get a live view of your front door and keep an eye on all your HomeKit camera feeds. Shut your garage door. Control your home’s heat or air conditioning. Double-check the locks. Apple TV also lets you use your device to control your HomeKit-enabled accessories remotely with the Home app.
There’s more to see. And hear. And share.
New

Picture in Picture lets you watch a movie while you keep an eye on the game, or check the weather while you binge a TV series.
New
With AirPlay, you can share your 4K HDR videos from the Photos app on your iPhone or iPad to your Apple TV 4K in their full resolution.
New
When it’s quiet time, Audio Sharing lets you connect two sets of AirPods to your Apple TV 4K and still enjoy movies and shows with a friend.
New
Connect HomePod to Apple TV 4K and hear the latest movies, shows, music and games in immersive stereo, 5.1 and 7.1 surround sound, or Dolby Atmos audio.6
Apple TV Plus
Is There A Netflix App For Mac
Get 1 year of Apple TV+ free when you buy an Apple TV 4K.7
Netflix App For Mac Os Catalina
The Apple TV app
All your TV. All in one app.
0 notes
Text
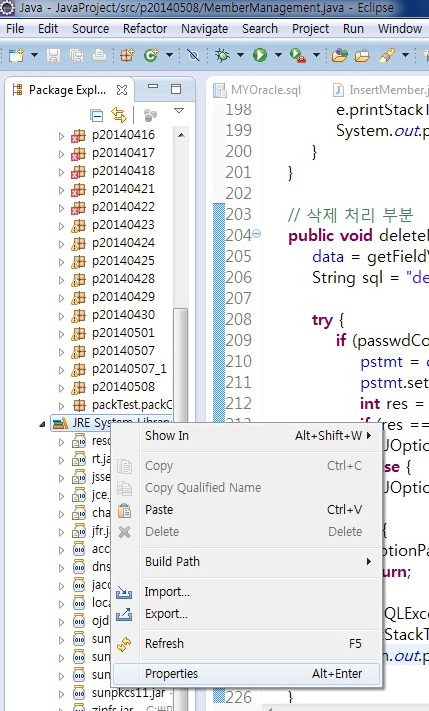
Download Xcode 12

Build a Basic UI
This lesson gets you familiar with Xcode, the tool you use to write apps. You’ll become familiar with the structure of a project in Xcode and learn how to navigate between and use basic project components. In the lesson, you’ll start making a simple user interface (UI) for the FoodTracker app and view it in the simulator. When you’re finished, your app will have a label for the meal’s name, a text field to change the meal’s name, and a button for resetting the name.
Learning Objectives
At the end of the lesson, you’ll be able to:
Create a project in Xcode
Identify the purpose of key files that are created with an Xcode project template
Open and switch between files in a project
Run an app in iOS Simulator
Add, move, and resize UI elements in a storyboard
Edit the attributes of UI elements in a storyboard using the Attributes inspector
View and rearrange UI elements using the outline view
Preview a storyboard UI using the Assistant editor’s Preview mode
Use Auto Layout to lay out a UI that automatically adapts to the user’s device size
If it Linux OS, care must be taken while download Cydia Impactor for particular 32-Bit or 64-Bit. USB drivers must be installed in the case of Android device. The process may generate provision.cpp.150 error, so it is recommended to have the latest iOS version too. Download Cydia Impactor iOS11/12 for Windows, Mac, Linux. This guide is geared towards MacOS 10.13 High Sierra, 10.12 Sierra, OS X 10.11 El Capitan, OS X 10.10 Yosemite, and Mac OS X 10.9, and newer releases. Mac users running prior versions of OS X can continue to directly install Command Line Tools and gcc (without Xcode) through a package installer available through the Apple Developer website as.
Create a New Project
Xcode includes several built-in app templates for developing common types of iOS apps, such as games, apps with tab-based navigation, and table view-based apps. Most of these templates have preconfigured interface and source code files. For this lesson, you’ll start with the most basic template: Single View Application.
To create a new project
Open Xcode from the /Applications directory.
If this is the first time you’ve launched Xcode, it may ask you to agree to the user agreement and to download additional components. Follow the prompts through these screens until Xcode is completely set up and ready to launch.
As soon as Xcode launches, the welcome window appears.
If a project window appears instead of the welcome window, don’t worry—you probably created or opened a project in Xcode previously. Just use the menu item in the next step to create the project.
In the welcome window, click “Create a new Xcode project” (or choose File > New > Project).
Xcode opens a new window and displays a dialog in which you choose a template.
Select iOS at the top of the dialog.
In the Application section, select Single View Application and then click Next.
In the dialog that appears, use the following values to name your app and choose additional options for your project:
Product Name: FoodTracker
Xcode uses the product name you entered to name your project and the app.
Team: If this is not automatically filled in, set the team to None.
Organization Name: The name of your organization or your own name. You can leave this blank.
Organization Identifier: Your organization identifier, if you have one. If you don’t, use com.example.
Bundle Identifier: This value is automatically generated based on your product name and organization identifier.
Language: Swift
Devices: Universal
A Universal app is one that runs on both iPhone and iPad.
Use Core Data: Unselected.
Include Unit Tests: Selected.
Include UI Tests: Unselected.
Click Next.
In the dialog that appears, select a location to save your project and click Create.
Xcode opens your new project in the workspace window.
The workspace window may have an error icon with a message that says “Signing for FoodTracker requires a development team.” This warning means you haven’t set up Xcode for iOS development yet, but don’t worry, you can complete these lessons without doing that. You do not need a development team to run the app in the simulator.
Explore Further
Before you can run the app on an iOS device, you need to set a valid team so that the app can be signed. If you are an individual or part of an organization that is a member of the Apple Developer Program, you can select that team here. Otherwise, your Apple ID is assigned to a personal team that you can use to launch apps on devices. However, you will need to join the Apple Developer Program before you can submit your app to the App store.
For more information, select Help > Xcode Help and search for “Signing workflow.”
Get Familiar with Xcode
Xcode includes everything you need to create an app. It organizes all the files and resources that go into creating an app. It provides editors for both your code and your user interfaces. Also, Xcode lets you build, run, and debug your app—providing simulators for iOS devices and a powerful integrated debugger.
Take a few moments to familiarize yourself with the main sections of the Xcode workspace:
Navigator area. Provides quick access to the various parts of your project.
Editor area. Allows you to edit source code, user interfaces, and other resources.
Utility area. Provides information about selected items and access to ready-made resources. The Utility area is divided into two parts. The top is the inspector pane, where you view and edit information about items selected in the navigator or edit areas. The bottom is the library pane, where you access user interface elements, code snippets, and other resources.
Toolbar. Used to build and run your apps, view the progress of running tasks, and configure your work environment.
Don’t be overwhelmed by all of the pieces; each area is described in more detail when you need to use it.
Run iOS Simulator
Because you based your project on an Xcode template, the basic app environment is automatically set up for you. Even though you haven’t written any code, you can build and run the Single View Application template without any additional configuration.
To build and run your app, use the iOS Simulator app that’s included in Xcode. The simulator gives you an idea of how your app would look and behave if it were running on a device.
The simulator can model a number of different types of hardware—All the screen sizes and resolutions for both iPad and iPhone—so you can simulate your app on every device you’re developing for. In this lesson, use the iPhone 7 option.
To run your app in the simulator
In the Scheme pop-up menu in the Xcode toolbar, choose iPhone 7.
The Scheme pop-up menu lets you choose which simulator or device you’d like to run your app on. Make sure you select the iPhone 7 Simulator, not an iOS device.
Click the Run button, located in the top-left corner of the Xcode toolbar.
Alternatively, choose Product > Run (or press Command-R).
If you’re running an app for the first time, Xcode asks whether you’d like to enable developer mode on your Mac. Developer mode allows Xcode access to certain debugging features without requiring you to enter your password each time. Decide whether you’d like to enable developer mode and follow the prompts.
If you choose not to enable developer mode, you may be asked for your password later on. These lessons assume developer mode is enabled.
Watch the Xcode toolbar as the build process completes.
Xcode displays messages about the build process in the activity viewer, which is in the middle of the toolbar.
After Xcode finishes building your project, the simulator starts automatically. It may take a few moments to start up the first time.
The simulator opens in the iPhone mode you specified and then launches your app. Initially, the simulator displays your app’s launch screen, and then it transitions to your app’s main interface. In an unmodified Single View Application template, the launch screen and the main interface are identical.
Right now, the Single View Application template doesn’t do much—it just displays a white screen. Other templates have more complex behavior. It’s important to understand a template’s uses before you extend it to make your own app. Running your app in the simulator with no modifications is a good way to start developing that understanding.
Quit the simulator by choosing Simulator > Quit Simulator (or pressing Command-Q).
Review the Source Code
The Single View Application template comes with a few source code files that set up the app environment. First, take a look at the AppDelegate.swift file.

To look at the AppDelegate.swift source file
Make sure the project navigator is open in the navigator area.
The project navigator displays all the files in your project. If the project navigator isn’t open, click the leftmost button in the navigator selector bar. (Alternatively, choose View > Navigators > Show Project Navigator.)
If necessary, open the FoodTracker folder in the project navigator by clicking the disclosure triangle next to it.
Select AppDelegate.swift.
Xcode opens the source file in the main editor area of the window.
Alternatively, double-click the AppDelegate.swift file to open it in a separate window.
The App Delegate Source File
The AppDelegate.swift source file has two primary functions:
It defines your AppDelegate class. The app delegate creates the window where your app’s content is drawn and provides a place to respond to state transitions within the app.
It creates the entry point to your app and a run loop that delivers input events to your app. This work is done by the UIApplicationMain attribute (@UIApplicationMain), which appears toward the top of the file.
Using the UIApplicationMain attribute is equivalent to calling the UIApplicationMain function and passing your AppDelegate class’s name as the name of the delegate class. In response, the system creates an application object. The application object is responsible for managing the life cycle of the app. The system also creates an instance of your AppDelegate class, and assigns it to the application object. Finally, the system launches your app.
The AppDelegate class is automatically created whenever you create a new project. Unless you are doing something highly unusual, you should use this class provided by Xcode to initialize your app and respond to app-level events. The AppDelegate class adopts the UIApplicationDelegate protocol. This protocol defines a number of methods you use to set up your app, to respond to the app’s state changes, and to handle other app-level events.
The AppDelegate class contains a single property: window.
This property stores a reference to the app’s window. This window represents the root of your app’s view hierarchy. It is where all of your app content is drawn. Note that the window property is an optional, which means it may have no value (be nil) at some point.
The AppDelegate class also contains stub implementations of the following delegate methods:
funcapplication(_application: UIApplication, didFinishLaunchingWithOptionslaunchOptions: (UIApplicationLaunchOptionsKey: Any)?) -> Bool
funcapplicationWillResignActive(_application: UIApplication)
funcapplicationDidEnterBackground(_application: UIApplication)
funcapplicationWillEnterForeground(_application: UIApplication)
funcapplicationDidBecomeActive(_application: UIApplication)
funcapplicationWillTerminate(_application: UIApplication)
These methods let the application object communicate with the app delegate. During an app state transition—for example, app launch, transitioning to the background, and app termination—the application object calls the corresponding delegate method, giving your app an opportunity to respond. You don’t need to do anything special to make sure these methods get called at the correct time—the application object handles that job for you.
Each of the delegate methods has a default behavior. If you leave the template implementation empty or delete it from your AppDelegate class, you get the default behavior whenever that method is called. Alternatively, you can add your own code to the stub methods, defining custom behaviors that are executed when the methods are called.
The template also provides comments for each of the stub methods. These comments describe how these methods can be used by your app. You can use the stub methods and comments as a blueprint for designing many common app-level behaviors.
In this lesson, you won’t be using any custom app delegate code, so you don’t have to make any changes to the AppDelegate.swift file.
The View Controller Source File
Mac software update not showing. The Single View Application template has another source code file: ViewController.swift. Select ViewController.swift in the project navigator to view it.
This file defines a custom subclass of UIViewController named ViewController. Right now, this class simply inherits all the behavior defined by UIViewController. To override or extend that behavior, you override the methods defined on UIViewController.
As you can see in the ViewController.swift file, the template’s implementation overrides both the viewDidLoad() and didReceiveMemoryWarning() methods; however, the template’s stub implementation doesn’t do anything yet, except call the UIViewController version of these methods. You can add your own code to customize the view controller’s response to these events.
Although the template comes with the didReceiveMemoryWarning() method, you won’t need to implement it in these lessons, so go ahead and delete it.
At this point, your ViewController.swift code should look something like this:
importUIKit
classViewController: UIViewController (
overridefuncviewDidLoad() (
super.viewDidLoad()
// Do any additional setup after loading the view, typically from a nib.
)
)
You’ll start writing code in this source code file later in this lesson.
Open Your Storyboard
You’re ready to start working on a storyboard for your app. A storyboard is a visual representation of the app’s user interface, showing screens of content and the transitions between them. You use storyboards to lay out the flow—or story—that drives your app. You see exactly what you're building while you’re building it, get immediate feedback about what’s working and what’s not, and make instantly visible changes to your user interface.
To open your storyboard
In the project navigator, select Main.storyboard.
Xcode opens the storyboard in Interface Builder—its visual interface editor—in the editor area. The background of the storyboard is the canvas. You use the canvas to add and arrange user interface elements.
At this point, the storyboard in your app contains one scene, which represents a screen of content in your app. The arrow that points to the left side of the scene on the canvas is the storyboard entry point, which means that this scene is loaded first when the app starts. This scene contains a single view that’s managed by a view controller. You’ll learn more about the roles of views and view controllers soon.
When you ran your app in the iPhone 7 Simulator app, the view in this scene is what you saw on the device screen. However, the scene on the canvas may not have the same dimensions as the simulator’s screen. You can select the screen size and orientation at the bottom of the canvas. In this case, it’s set to iPhone 7 in a portrait orientation, so the canvas and the simulator are the same.
Even though the canvas shows a specific device and orientation, it is important to create an adaptive interface—an interface that automatically adjusts so that it looks good on any device and in any orientation. As you develop your interface, you can change the canvas’s view, letting you see how your interface adapts to different size screens.
Build the Basic UI
It’s time to build a basic interface. You’ll start by working on a user interface for the scene that lets you add a new meal to your meal tracking app, FoodTracker.
Xcode provides a library of objects that you can add to a storyboard file. Some of these are elements that appear in the user interface, such as buttons and text fields. Others, such as view controllers and gesture recognizers, define the behavior of your app but don’t appear onscreen.
The elements that appear in the user interface are known as views. Views display content to the user. They are the building blocks for constructing your user interface and presenting your content in a clear, elegant, and useful way. Views have a variety of useful built-in behaviors, including displaying themselves onscreen and reacting to user input.
All view objects in iOS are of type UIView or one of its subclasses. Many UIView subclasses are highly specialized in appearance and behavior. Start by adding a text field (UITextField), one such subclass of UIView, to your scene. A text field lets a user type in a single line of text, which you’ll use as the name of a meal.
To add a text field to your scene
Choose Editor > Canvas, and make sure Show Bounds Rectangles is selected.
This setting causes Interface Builder to draw a blue bounding box around all the views in the canvas. Many views and controls have transparent backgrounds, making it difficult to see their actual size. Layout bugs occur when the system resizes a view so that it’s either larger or smaller than you anticipate. Enabling this setting helps you understand exactly what’s going on in your view hierarchy.
Open the Object library.
The Object library appears at the bottom of the utility area on the right side of Xcode. If you don’t see the Object library, click its button, which is the third button from the left in the library selector bar. (Alternatively, choose View > Utilities > Show Object Library.)
A list appears showing each object’s name, description, and visual representation.
In the Object library, type text field in the filter field to find the Text Field object quickly.
Drag a Text Field object from the Object library to your scene.
If necessary, zoom in by choosing Editor > Canvas > Zoom.
Drag the text field so that it’s positioned in the top half of the scene and aligned with the left margin in the scene.
Stop dragging the text field when it snaps to the left margin.
The blue layout guides help you place the text field. Layout guides are visible only when you drag or resize objects next to them; they disappear when you let go of the text field.
If necessary, click the text field to reveal the resize handles.
You resize a user interface element by dragging its resize handles, which are small white squares that appear on the element’s borders. You reveal an element’s resize handles by selecting it. In this case, the text field should already be selected because you just stopped dragging it. If your text field looks like the one below, you’re ready to resize it; if it doesn’t, select it on the canvas.
Resize the left and right edges of the text field until you see three vertical layout guides: the left margin alignment, the horizontal center alignment, and the right margin alignment.
Although you have the text field in your scene, there’s no instruction to the user about what to enter in the field. Use the text field’s placeholder text to prompt the user to enter the name of a new meal.
To configure the text field’s placeholder text
With the text field selected, open the Attributes inspector in the utility area.
The Attributes inspector appears when you click the fourth button from the left in the inspector selector bar. It lets you edit the properties of an object in your storyboard.
In the Attributes inspector, find the field labeled Placeholder and type Enter meal name.
Explore Further
In a production app, any String that can be seen by the user (such as the text field’s placeholder text) should be localized. For more information, see Build Apps for the World.
Press Return to display the new placeholder text in the text field.
While you’re editing the text field’s attributes, you can also edit the attributes of the system keyboard that’s displayed when a user selects the text field.
To configure the text field’s keyboard
Make sure the text field is still selected.
In the Attributes inspector, find the field labeled Return Key and select Done (scroll down if necessary).
This change will make the default Return key on the keyboard more pronounced to the user by changing it into a Done key.
In the Attributes inspector, select the Auto-enable Return Key checkbox (again, scroll down if necessary).
This change makes it impossible for the user to tap the Done key before typing text into the text field, ensuring that users can never enter an empty string as a meal name.
Next, add a label (UILabel) at the top of the scene. A label isn’t interactive; it just displays static text in the user interface. To help you understand how to define interaction between elements in the user interface, you’ll configure this label to display the text the user enters into the text field. It’ll be a good way to test that the text field is taking the user input and processing it appropriately.
To add a label to your scene
In the Object library, type label in the filter field to find the Label object quickly.
Drag a Label object from the Object library to your scene.
Drag the label so that it’s right above the text field and aligned with the left margin in the scene.
Stop dragging the label when it snaps to the guidelines.
Double-click the label and type Meal Name.
Press Return to display the new text in the label.
Now, add a button (UIButton) to the scene. A button is interactive, so users can tap it to trigger an action that you define. Later, you’ll create an action to reset the label text to a default value.
To add a button to your scene
In the Object library, type button in the filter field to find the Button object quickly.
Drag a Button object from the Object library to your scene.
Drag the button so that it’s right below the text field and aligned with the left margin in the scene.
Stop dragging the button when it snaps to the guidelines.
Double-click the button and type Set Default Label Text.
Press Return to display the new text in the button.
Reposition the button, if necessary.
It’s good to understand how the elements you’ve added are actually arranged in the scene. Look at the outline view to see which user interface elements have been added to your scene.
To view the outline view
In your storyboard, find the outline view toggle.
If the outline view is collapsed, click the toggle to expand the outline view.
You can use the outline view toggle to collapse and expand the outline view as needed.
The outline view, which appears on the left side of the canvas, provides a hierarchical representation of the objects in your storyboard. You should be able to see the text field, label, and button you just added listed in the hierarchy. But why are the user interface elements you added nested under View?
Views not only display themselves onscreen and react to user input, they can serve as containers for other views. Views are arranged in a hierarchical structure called the view hierarchy. The view hierarchy defines the layout of views relative to other views. Within that hierarchy, views enclosed within a view are called subviews, and the parent view that encloses a view is called its superview. A view can have multiple subviews and only one superview.
In general, each scene has its own view hierarchy. At the top of each view hierarchy is a content view. In the current scene, the content view is named View, the top level view inside the View Controller. The text field, label, and button are subviews of the content view. All other views that you place in this scene will be subviews of this content view (although they themselves can have nested subviews).
Preview Your Interface
Preview your app periodically to check that everything is looking the way you expect. You can preview your app interface using the assistant editor, which displays a secondary editor side-by-side with your main one.
To preview your interface
Click the Assistant button in the Xcode toolbar near the top right corner of Xcode to open the assistant editor.
If you want more space to work, collapse the project navigator and utility area by clicking the Navigator and Utilities buttons in the Xcode toolbar.
You can also collapse the outline view.
In the editor selector bar, which appears at the top of the assistant editor, switch the assistant editor from Automatic to Preview > Main.storyboard (Preview).
As you see in the assistant editor, the preview looks almost identical to the canvas. However, this does not really tell you anything new. Both the canvas and the preview are showing the same size screen (iPhone 7) and the same orientation (portrait). If you want to check and see if your interface is adaptive, you need to preview different size screens and different orientations.
To preview the landscape orientation, click the Rotate button at the bottom of the preview.
Unfortunately, things no longer look quite right. The text field, label, and button keep the same size and position relative to the screen’s upper left corner. This means that the text field no longer fills the screen from margin to margin.
To preview a different screen size, click the Add button at the bottom of the assistant editor, and select iPhone SE.
Again, the text field, label, and button keep the same size and position relative to the screen’s upper left corner. This time, however, the text field extends past the screen’s right edge.
To create an adaptive interface, you’ll need to specify how the interface should adjust to different screen sizes. For example, when the interface is rotated into a landscape orientation, the text field should grow. When the interface is displayed on an iPhone SE, the text field should shrink. You can specify these kinds of interface rules easily using Auto Layout.
Adopt Auto Layout
Auto Layout is a powerful layout engine that helps you design adaptive layouts that dynamically respond to any changes to the scene’s size. You describe your layout using constraints—rules that explain where one element should be located relative to another, or what size the element should be. Auto Layout dynamically calculates the size and position of each element based on these constraints. Zoom download in mac shortcut.
One of the easiest ways to define your layout is using a stack view (UIStackView). A stack view provides a streamlined interface for laying out a collection of views in either a column or a row. The stack view uses Auto Layout under the hood to calculate the size and position of all the views that it manages. This lets you easily access the full power of Auto Layout, while greatly reducing the complexity of your layout.
To adopt Auto Layout, wrap your existing interface elements in a stack view, and then add the constraints needed to position the stack view in the scene.
To add Auto Layout constraints to the meal scene
Return to the standard editor by clicking the Standard button.
Expand the project navigator and utility area by clicking the Navigator and Utilities buttons in the Xcode toolbar.
While pressing the Shift key on your keyboard, select the text field, label, and button.
On the bottom right of the canvas, click the Embed In Stack button. (Alternatively, choose Editor > Embed In > Stack View.)
Xcode wraps the user interface elements in a stack view, stacking them together. Xcode analyzes your existing layout to figure out that the items should stack vertically, not horizontally.
If necessary, open the outline view. Select the Stack View object.
In the Attributes inspector, type 8 in the Spacing field. Press Return.
You’ll notice the user interface elements space out vertically, and the stack view grows with them.
On the bottom right of the canvas, open the Add New Constraints menu.
Above “Spacing to nearest neighbor,” click the two horizontal constraints and the top vertical constraint to select them. They become red when they are selected.
These constraints indicate spacing to the nearest leading, trailing, and top neighbors. In this context, the term nearest neighbor means the boundary of the closest user interface element, which can be the superview, another user interface element, or a margin. Because the “Constrain to margins” checkbox is selected, the stack view in this case will be constrained to the superview’s left and right margins. This provides space between the stack view and the edge of the scene.
On the other hand, the top of the stack is constrained relative to the scene’s top layout guide. The top layout guide is positioned at the bottom of the status bar, if the status bar is visible. If not, it is positioned at the top of the scene. Therefore, you need to add a little space between the stack view and the layout guide.
Type 0 in the left and right boxes, and type 20 spacing in the top box.
In the pop-up menu next to Update Frames, choose Items of New Constraints. This causes Interface Builder to automatically update the frames of the affected views when you create the constraints.
In the Add New Constraints menu, click the Add 3 Constraints button.
The label, text field, and button are now left aligned and laid out with appropriate spacing, but the text field still isn’t stretching to fill the screen’s width. To fix that, you’ll need to add an additional constraint.
To adjust the text field width within the stack
In your storyboard, select the text field in the meal scene.
On the bottom right of the canvas, open the Add New Constraints menu again.
Above “Spacing to nearest neighbor,” click the right horizontal constraint to select it. It becomes red when it is selected.
Type 0 in the right box.
In the pop-up menu next to Update Frames, choose Items of New Constraints.
In the Add New Constraints menu, click the Add 1 Constraint button.
Checkpoint: Run your app in iOS Simulator. Rotate the simulator by choosing Hardware > Rotate Left and Hardware > Rotate Right (or Command-Left Arrow and Command-Right Arrow). Notice how the text field grows and shrinks to the appropriate size depending on the device’s orientation and screen size. Also notice that the status bar disappears in landscape orientation.
Click inside the text field and enter text using the onscreen keyboard (if you’d like, you can use your computer’s keyboard by choosing Hardware > Keyboard > Connect Hardware Keyboard).
Debugging Auto layout
If you don’t get the behavior you expect, use the Auto Layout debugging features to help you. These features can be accessed using the Update Frames button and Resolve Auto Layout Issues menu.
If you are getting warnings about misplaced views, use the Update Frames button. This button updates the frames of the selected view and all of its subviews. Select the scene’s view controller to update all the views in the scene. You can also Option-click the Update Frames button to update only the selected view.
If the layout does not behave as you expect, click the Resolve Auto Layout Issues button to bring up a menu of debug commands. All the commands in this menu have two forms. One affects the currently selected view. The other affects all views in the current view controller. If all of the commands are grayed out, select the scene’s view controller or one of the views and open the menu again.
Choose Reset to Suggested Constraints to have Xcode update your interface with a valid set of constraints. Choose Clear Constraints to remove all constraints on the user interface elements, and then try following the previous instructions to set up the constraints again.
Wrapping Up
In this lesson, you’ve familiarized yourself with the contents of an Xcode project, and with many of the tools used to design and run an iOS app. You’ve also built a simple user interface.
Although the project’s scene doesn’t do much yet, the basic user interface is there and functional. Making sure your layout is robust and extensible from the start ensures that you have a solid foundation to build upon.
Download Xcode 12 For Mac
Note
Download Xcode 12.4
To see the completed sample project for this lesson, download the file and view it in Xcode.
Download Xcode 12.4 Dmg
Copyright © 2018 Apple Inc. All rights reserved. Terms of Use | Privacy Policy | Updated: 2016-12-08
0 notes
Text
Opera Gx Mac Download

Browse the web and access some of the most popular websites and services provided for users passionate about gaming with this Opera special edition
Opera GX is a special version of the well-know Opera browser that is specifically designed for gaming aficionados. Zoom download in mac high sierra. In the addition to the security and anti-ad features specific to the browser, you also have numerous options and quick links that you are likely to use as a gamer.
Comes with numerous options for GUI customizing and features GX Sound

Opera GX is a special version of the Opera browser built specifically to complement gaming. The browser includes unique features to help you get the most out of both gaming and browsing. @sgunhouse Thanks for the reply. I understand that the ALT key is meant to trigger the menu function. I'm experiencing an issue where I hit ALT+D for the address bar and it successfully highlights the text that I'm looking to replace, but if you typed something and decide to select the address bar again with ALT+D, it opens up the menu instead of highlighting the text in the address bar again. Opera GX has adopted the new Player feature that was previously only available in the Opera desktop browser. Now you can log into Spotify, Apple Music and YouTube Music directly from the sidebar in Opera GX. Opera GX, free and safe download. Opera GX latest version: Browser for Gamers. Opera GX is a special version of the Opera browser built to complement. The GX Control mentioned above is undoubtedly Opera GX’s most useful feature for gamers. Opera GX was designed to allow users to play games while the browser remained open in the background. GX Control lets users limit the amount of resources Opera GX can consume while it is open. Users can allocate a small percentage of RAM and CPU to Opera.
From the start you are very likely to be impressed with the interface which is modern, futuristic and very immersive. Nevertheless, things don't just stop here, and you have the freedom to customize it further with dozens of themes and special effects. From Razer Chroma color palette to specially designed wallpapers, there is not limit to how you can personalize it.
Another noteworthy feature is the in-browser sound effects which make everything seem like you are part of an alien or in-game world. The sounds are composed by Rubén Rincón and the Berlinist band, whom are behind the Gris game original soundtrack.
The GX Control keeps you updated about the CPU and RAM usage
In the eventuality that you have your current computer for a couple of years now, then there is a good chance that you usually close your browser when playing to grab every ounce of power your machine can give you. Thanks to RAM and CPU limiter, you no longer need to close your browser as you can set a maximum limit on how much of the resources it can take.
According to the developer, the RAM Limiter feature is set by default to balance the memory use and experience. This is why it is configured to prioritize experience, even though it stays at or bellow the memory allocated for it. The feature can work wonders if you are streaming according to the developer.
Puts Twitch, Telegram, Whatsapp and other messengers at your fingertips
If you are using Opera, then you probably noticed that it comes with a quick access to Messenger so you can easily chat with your friends without opening another tab or grabbing your phone. In addition to Messenger, the tool enables you to chat with Telegram, Vkontakte, Whatsapp and Twitch. With Twitch one button away, you can easily view your channels and who of your friends are online.
Sometimes you want to observe the details of the gameplay or how a particular mechanic works so you can complete a dungeon or other challenge. You will be happy to learn that Opera GX allows video pop out from Twitch and YouTube, so you can preview it in a floating window that stays visible over tabs and other open apps
Filed under
Opera GX was reviewed by

Alexandra Sava
5.0/5
Load comments
This enables Disqus, Inc. to process some of your data. Disqus privacy policy
Opera GX 73.0.3856.421 Early Access
add to watchlist
Opera Gx Mac Download

send us an update
Opera Gx Browser Mac Download
12 screenshots:
Opera Gx Mac Download
runs on:
Windows 10 32/64 bit Windows 8 32/64 bit Windows 7 32/64 bit
file size:
88.6 MB
filename:
Opera_GX_73.0.3856.421_Setup.exe
main category:
Internet
developer:
visit homepage
top alternatives FREE
Macbook pro software update not working. If the MacBook trackpad not working is an issue for you, the easiest fix is to plug in an external trackpad or mouse to your Mac. The first thing to do is check if your version of macOS needs an update. To do so, click the Apple logo in the Mac’s menu bar, select ‘about this Mac,’ then ‘software update.’. The 16-inch MacBook Pro brings a whole new class of performance to the notebook. Thanks to a more advanced thermal design, the Intel Core i9 processor with up to 8 cores and 16 threads of processing power sustains higher performance for longer periods of time — and delivers up to 2.1 times the performance of a quad-core MacBook Pro.
top alternatives PAID
0 notes
Text
Macbook Pro Software Update Not Working

System cleanup in one click

Which audio driver is used by MacBook Pro 7.1??? I'm running BootCamp (Windows7 Ultimate x64) and I'm having a problem with audio input, so I'm looking for anything taht will make it work. In Device Manager I had 'Cirrus CS4206A (AB13)' and three devices of 'NVIDIA High Definition Audio'.
Make your Mac fast and secure with CleanMyMac X.
The trackpad is a vital component for any desktop. It allows you to interact with the graphical user interface in ways keyboard shortcuts simply don’t allow.
With a trackpad not working Mac and PC devices may feel downright useless. As we’ve become accustomed to interacting with our computers using a trackpad or mouse, a Mac trackpad not clicking or responding to gestures is troubling.
But don’t worry, if your MacBook Pro or MacBook Air keyboard is not working, as you’ve arrived at the right place, get some of the best possible solutions here. Why Is MacBook Keyboard Not Working? Macs are usually smooth-running machines. However, software and hardware related issues can arrive during use. The documentation indicated that the update: 'Fixes a stability issue that could occur during heavy CPU load on 16in MacBook Pro (2019 and 2020) and 13in MacBook Pro (2020)'. Hopefully we won't. The 16-inch MacBook Pro brings a whole new class of performance to the notebook. Thanks to a more advanced thermal design, the Intel Core i9 processor with up to 8 cores and 16 threads of processing power sustains higher performance for longer periods of time — and delivers up to 2.1 times the performance of a quad-core MacBook Pro. Testing conducted by Apple in October 2020 using preproduction 13-inch MacBook Pro systems with Apple M1 chip, as well as production 1.7GHz quad-core Intel Core i7-based 13-inch MacBook Pro systems with Intel Iris Plus Graphics 645, all configured with 16GB RAM and 2TB SSD. Tested with prerelease Shapr3D 3.45.0 using a 288.2MB model.
We’ll discuss how MacBook trackpad problems can be solved, what to do when your trackpad fails, how to fix trackpad on MacBook, and the apps that keep any Mac running smooth so you can avoid issues with your trackpad in the future.
Why isn’t my trackpad working?
If a MacBook Pro trackpad not working is ruining your day, there could be a simple fix. First, let’s explore why your trackpad may be spontaneously unresponsive.
If the MacBook trackpad not working is an issue for you, the easiest fix is to plug in an external trackpad or mouse to your Mac.
The first thing to do is check if your version of macOS needs an update. To do so, click the Apple logo in the Mac’s menu bar, select ‘about this Mac,’ then ‘software update.’ If the Mac you’re using has new firmware available, download it.
The reasons for a MacBook trackpad not clicking are varied. It could be the macOS version it’s running, or an app that’s causing issues behind the scenes. It may even be that your system is overworked, and the trackpad is unable to keep up with your clicks and commands.
Finally, your settings may be to blame, especially if an app changed them without notifying you.
How to fix trackpad on your MacBook
There are six key ways to diagnose and fix an unresponsive trackpad on your Mac. Keep in mind an external mouse or trackpad plugged into a Mac is the simplest way to navigate these issues, as a plugged-in peripheral device has no connectivity issues.
Check system preferences
The aforementioned steps for updating Mac also apply, but you can do the same in system preferences. Here’s how:
Select the Apple logo at the top left corner of the Mac menu bar
Select “System Preferences”
Select “Software Update”
If prompted, download and update your version of macOS or OS X
Disable force click
The trackpad on your MacBook has two main interactivity types: force click, and tap to click. The difference between the two is how firmly you need to press your trackpad to get a response. Tapping allows you to simply tap the trackpad to select items, while force clicking demands you press firmly enough on your trackpad to hear (and feel) a click.
Macbook Pro Software Update Not Working Windows 8.1
If you’re tapping and not clicking, it may be the cause of your issues. Here’s how to toggle the setting:
Select the Apple logo at the top left corner of the Mac menu bar
Select “System Preferences”
Select “Trackpad”
Under the “Point & Click” heading, toggle the “Force Click and haptic feedback” off
In this heading, you can also tweak how forcefully you need to tap or click your trackpad to elicit a response. Simply select the “Click” slider, and change the setting to suit your needs.
Reset trackpad
A MacBook pro trackpad reset is not as daunting as it seems. All you’re really doing is toggling your MacBook’s trackpad back to the factory settings in System Preferences.
Most of us altered the settings of our trackpad to better suit our individual needs, and it may have caused issues in the background that causes a trackpad to become unresponsive. To toggle settings back to their original positions, follow the first three steps above to get into the “Trackpad” section in System Preferences.
Make sure “Tap to click” is unselected. In the “Scroll & Zoom” header, ensure “Scroll direction: Natural” is selected. These two setting should return your trackpad to its default state.
Reset NVRAM or PRAM
A lot of niggling issues can be solved with a simple NVRAM or PRAM reset. It’s a simple fix you can do any time, too. Here’s how:
Shut down the MacBook completely
Wait 30-60 seconds
Open MacBook and press the power button
Once the MacBook screen illuminates, immediately press and hold the option, command, P, and R keys
Hold the keys down for 20 seconds, or until you hear a startup sound
Release the keys and let your MacBook boot up normally
Reset the SMC
The SMC reset protocol depends on which MacBook you have. For those MacBooks introduced in 2017 or earlier, follow these steps:
Power down MacBook completely
With the MacBook off, press and hold the shift, control, and option keys
While holding those keys, press and hold the power button
Hold all four keys for ten seconds, then release
Press the power button to boot the MacBook
For MacBooks 2018 or later (with a T2 security chip) follow these steps:
Shut down your MacBook, and make sure it’s unplugged from any power supply
Wait 15 seconds, and plug the MacBook in
Wait five seconds, then power MacBook on by pressing the power button
Run Apple diagnostics
Your MacBook can run a simple diagnostics check from startup. Here’s how it’s done:
Disconnect the MacBook from all external devices except a power supply (if necessary)
Shut down your Mac completely
Power the Mac back on while holding down the D key
When you see a screen asking your language preference, release the D key and select your preferred language
Allow the diagnostics to complete its check
All of these diagnostic and repair steps may be avoidable, too. If you have CleanMyMac X on your MacBook, a routine checkup performed on a schedule of your choosing can help keep any Mac running in peak condition and your settings appropriately stable.
CleanMyMac X’s Smart Scan feature quickly checks the Mac for unnecessary files, privacy issues, and ensures its optimized for speed. There are also unique modules for speed optimization and privacy checks, which perform a deeper scan of a MacBook. CleanMyMac X is also the best way to update and remove apps from your MacBook, helping you feel confident the apps you love aren’t surreptitiously disabling your trackpad.
Bonus tips for your Mac
Repairing and maintaining a Mac is always important, but so is diagnosing it. iStat Menus helps you know exactly what’s going on with your Mac in real time, and lives in the background to keep you focused.
iStat Menus only appears in the Mac’s menu bar, with rich icons that provide a glimpse into your Mac’s performance. If you’re curious about what a Mac is doing, simply click the iStat Menus icon to bring up a full menu of the Mac’s CPU, memory, disk, network, and sensors.
Hovering over any of those categories brings up a sub menu with even more detail – and hovering over sections in the sub menu will surface a chart detailing Mac’s performance statistics in real time. There’s simply no better way to know what a Mac is doing behind the scenes than iStat Menus.
After you’ve diagnosed your MacBook with iStat Menus and maintained it with CleanMyMac X, your next step is backing your system up. That’s where Get Backup Pro comes into play!
Get Backup Pro allows you full control over what you backup, and when. You have the ability to run routine, scheduled backups of particular folders, or your entire system. It’s great for those who want to keep daily backups of their documents or photos, but only want to backup an entire system on occasion.
Get Backup Pro even provides the ability to create bootable backups of your entire system; it’s the perfect app for creating clean, thin, bootable backups in the event you need to restart from scratch.
A wonky trackpad is never fun to deal with, but it can be avoided. Often, trackpad woes are little more than an overtaxed system that can’t respond in time to your trackpad clicks and gestures. iStat Menus helps you understand if that’s the case.
CleanMyMac X allows you to keep Mac running smooth better than anything else, even Apple’s own built-in tools. And when you’re confident your Mac is in peak condition, creating a backup is always a smart idea.
All three of these wonderful apps are available for free during a seven day trial of Setapp, a robust suite of productivity apps for Mac.
In addition to these three apps, you’ll gain immediate and unlimited access to the entire catalog of nearly 200 other impressive apps for any Mac in Setapp. When your free trial is over, retaining unlimited access to all of those amazing apps is only $9.99 per month, so why wait? Give Setapp a try today!
Setapp lives on Mac and iOS. Please come back from another device.
Meantime, prepare for all the awesome things you can do with Setapp.
Read on
Sign Up
Setapp uses cookies to personalize your experience on our website. By continuing to use this site, you agree to our cookie policy.
Country / RegionModifying this control will reload this page
Apple has determined that a very small percentage of 13-inch MacBook Pro displays may exhibit one or more of the following behaviors:
Display backlight continuously or intermittently shows vertical bright areas along the entire bottom of the screen
Display backlight stops working completely
Affected devices were sold between October 2016 and February 2018. Apple or an Apple Authorized Service Provider will service affected MacBook Pro units, free of charge.
To identify your computer's model and to see if it is eligible for this program, choose Apple () menu > About This Mac. Eligible models are listed below.
MacBook Pro (13-inch, 2016, Four Thunderbolt 3 Ports)
MacBook Pro (13-inch, 2016, Two Thunderbolt 3 Ports)
Note: No other Mac notebook models are part of this program.
Please choose one of the options below for service. Your MacBook Pro will be examined prior to any service to verify that it is eligible for this program.
Find an Apple Authorized Service Provider.
Make an appointment at an Apple Retail Store.
Contact Apple Support to arrange mail-in service via the Apple Repair Center.
To prepare your unit for service, please backup your data.
Note: If your MacBook Pro has any damage which impairs the service, that issue will need to be repaired first. In some cases, there may be a cost associated with the repair.
Macbook Pro Software Update Not Working Windows 10
This worldwide Apple program does not extend the standard warranty coverage of your MacBook Pro.
If you believe your MacBook Pro was affected by this issue, and you paid to have your display repaired, you can contact Apple about a refund.
Why Won't My Mac Do A Software Update
The program covers eligible MacBook Pro models for 5 years after the first retail sale of the unit or 3 years from the start date of this program, whichever is longer.
0 notes
Text
Zoom Download In Mac

Zoom client for meetings
Zoom Download In Mac High Sierra
Download Zoom In Macbook
Zoom Download Mac Air
Zoom Download Mac Big Sur
Download Zoom In Mac
Once installed, the Zoom extension can be found as an icon in Chrome’s toolbar. Clicking on the icon will prompt a dropdown panel where users can choose to schedule or start a meeting. If users choose to start a meeting, a new tab will open where users can download Zoom or open their installed Zoom app. Download more Zoom backgrounds. How to Zoom In and Zoom Out on Mac. What Is Polkadot and Why Is It More Than Just a Crypto. Search this site! Zoom Video Communications. High-DPI displays are supported in Zoom version 3.5 or higher; Bandwidth requirements. The bandwidth used by Zoom will be optimized for the best experience based on the participant‘s’ network. It will automatically adjust for 3G, WiFi, or wired environments. Recommended bandwidth for meetings and webinar panelists: For 1:1 video calling. Zoom is #1 in customer satisfaction and the best unified communication experience on mobile. It's super easy! Install the free Zoom app, click on 'New Meeting,' and invite up to 100 people to join you on video! Connect with anyone on iPad, iPhone, other mobile devices, Windows, Mac, Zoom Rooms, H.3.
Most people looking for Zoom client for meetings downloaded:
Download

3.7 on 710 votes
Zoom Download In Mac High Sierra
Zoom Meetings is a video conferencing tool with recording and screen sharing features.
Download
3.5 on 162 votes
zoom.us is a free cloud-based HD video meeting service that allows you to create big ideas with colleagues ...
Download
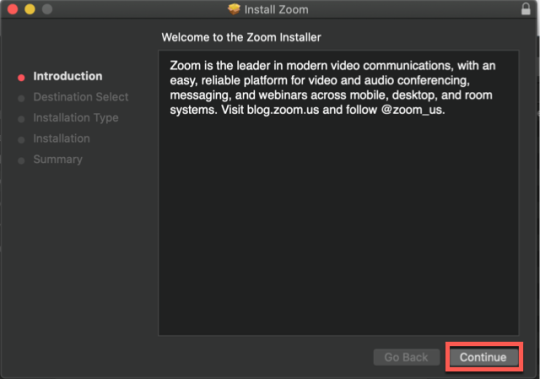
5 on 3 votes
The Zoom Microsoft Outlook Plugin is designed to make scheduling a meeting in Microsoft Outlook quick and convenient.
Download
3.5 on 4 votes
Download Zoom In Macbook
Ministry Assistant is church management software package aimed especially at churches with a small group program.
Download
Zoom Download Mac Air
5 on 76 votes
Zoom Download Mac Big Sur
Absolute Log Analyzer is a client-based log processing solution designed for web traffic analysis.
Download Zoom In Mac
Similar choice
1 note
·
View note