
Don't wanna be here? Send us removal request.
Statistics
We looked inside some of the posts by loadingma405 and here's what we found interesting.
Average Info
Notes Per Post
1
Likes Per Post
1
Reblog Per Post
0
Reply Per Post
0
Time Between Posts
16 days
Number of Posts By Type
Text
10
Last Seen Tumblr Blogs


Fun Fact
Tumblr has been providing a Korean-language service since 2013.
Text
Vocal And Harmony Vst Bundle Free

In these bundles you'll find every plug-in you need to get your music ready for release, including EQ, compressors, limiters, and more. If you want to process vocals, one of our vocal processing bundles is the way to go! Sweetwater’s bundles provide you with pitch correction tools, channel strips, vocal doublers, and breath removal functions. Best Free Vocal VST Plugins. It’s well-known that dynamic sounds are much harder to mix – and the vocals are super dynamic. Luckily, there is no need to stress out every time you get to the mixer and start working on getting the “perfect vocals.” All you need to do is to know which free vocal mastering VST plugins to use.
Hey guys, what’s going on?
Today I want to give you my top 10 favorite VST plugins for vocals.
Keep in mind that these are my favorite plugins that I’ve used over the years, and I fund them one of the best to enhance vocal performance.
That’s the goal after all, am I right?
Important note here. There are many plugins that can enhance your vocal performance like compressors, reverbs, delays, etc.
In this article, we’ll try to cover only the best free plugins for your vocals and will skip the premium ones.
Another point – you have to realize that plugins are just tools.
If you don’t know how to mix properly, there is no magic tool to save you (not even the one for $400+).
However, you have to realize that a power tool in your garage will do the job 10 times faster than a manual one.
That’s the primary reasons why we use VST plugins for vocals.
Alright, let’s get to our list now.
Best Free Vocal VST Plugins
It’s well-known that dynamic sounds are much harder to mix – and the vocals are super dynamic.
Luckily, there is no need to stress out every time you get to the mixer and start working on getting the “perfect vocals.”
All you need to do is to know which free vocal mastering VST plugins to use.
Here are 9 VST plugins that will help you get the most out of your vocal performance.
Melda MAutoPitch Auto-Tune
Check out MAutoPitch Review.
Auto-tune has taken over the music industry in a span of a decade.
The craziest part is that almost no recording session is taken without using it.
Auto-tune is every vocal mixer’s must-have.
But which Auto-tune VST plugin should you go for?
The obvious answer is the Antares Autotune.
While it’s the best vocal VST plugin out there, not everyone can spend $400+ on just 1 tool.
That’s why I present you MAutoPitch, one of the best Auto-tune alternatives around.
It lets you correct sour notes, fix pitch, and even add the iconic T-Pain effect (just max the tuning and the speed).
The best part about MAutoPitch Auto-tune alternative plugin is that it’s completely free for everyone to use.
If you are on a budget, I will pick it over Antares Auto-tune any day – there is just no reason to spend this much money until you have a decent cash flow.
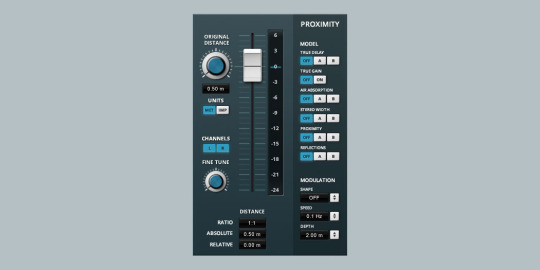
Vladg and Tokyo Dawn Proximity
There are tons of accidental mistakes a producer can make.
Just imagine – you’ve done your best vocal take just to find out that you were too far or too close to the mic.
Well, the track is ruined now, right? Wrong!
With Proximity vocal VST plugin, you can change the mic placement after you’ve done recording everything.
While it’s not as good as actually placing the microphone in the correct spot, you’ll definitely find the Proximity plugin for vocals incredibly useful, especially if you are short on time.
Besides tweaking the proximity, you can also adjust the true gain and delay, stereo width, and even air absorption and reflections.
Pretty neat free vocal mastering VST plugins, and for a price of $0!
Vocal And Harmony Vst Bundle Free
Acon Digital Multiply Chorus
Sometimes you’ll notice how after the recording the sound comes out thin and dull.
Luckily, you can add some color to your vocal and thicken them up a little with Multiply Chorus.
If you are wondering why it’s called that, it’s because the vocal VST plugin creates a ton of mini delays, a few milliseconds each.
How do these add color to the track and bring the vocals to live?
Easy – the delays fill out tiny spots within your vocals and make them sound a lot brighter.
With Multiply Chorus, you can adjust the voice count, stereo spread, and rate and depth of the sound.
It also comes with a built-in equalizer that you can use to cut and boost frequencies when needed.
Overall, it’s a pretty powerful tool to warm up your vocals and reach the balance.
Voxengo OldSkoolVerb
Alright, I know what you are thinking – the previous 3 plugins looked a lot more impressive than this bad boy.
I agree – the design isn’t quite up to our time.
But hey, maybe that’s why it’s called OldSkoolVerb to begin with?
Reverb for vocals is a must.
With it, you can add more a much better feel of “space” to the track.
Instead of having your vocals sound like they’ve been recorded in a tiny home recording studio, you can tweak them to sound the way you want.
Cave full of sharp edges? Done.
Flawless chappel with a lot of echo and delay? Easy.
OldSkoolVerb gets you covered no matter what your needs really are. Mac os 10.14 mojave iso download.
From massive halls to tiny closets, you have all the options to create any sonic space imaginable.
The free VST vocal effects plugin gives you the ability to control reverb parameters (pre-delay, space, time, and width), damping (low and high), EQ (lows, mids, and highs), and output gain (both reverb and dry).
Even though I am not a big fan of the “old-school” design of the VST plugin for vocals, I sure love how flexible and feature-rich it is.
Klanghelm DC1A
Klanghelm has made a good name in the world of plugins for music production – they are known for their quality and reliability.
If you are looking for a good addition to your VST effects for vocals, DC1A will be a great addition to the bundle.
DC1A is a little compressor with nice vintage design and a simple and intuitive interface.
Nothing complex here – all you have is 2 knobs and 4 buttons.
This may seem too simplistic, but this setup will cover everything from smooth leveling to heavy pumping.
The two knobs control the input and output gain.
The 4 buttons (deep, relaxed, dual mono, and negative) control the settings of the compressor.
You can apply the compressor either while recording or after you’ve finished.
I suggest applying a small amount of compression before recording the vocals and then compressing the final take as necessary to get it all warm and crispy.
Vocal And Harmony Vst Bundle Free Download
Overall, a sweet compressor plugin for vocals and a must-have for your VST bundle.
Alex Hilton Al Trigger Gate
Want to monitor how your free VST vocal effects affect the track?
Al Trigger Gate is coming for the rescue!
This plugin is a gem if you know how to use it properly.
While it doesn’t look like the most straightforward VST for vocals out there, you don’t really need to know every single setting.
I mean – if you want to spend hours and hours to master it, then go ahead.
However, that’s by no means necessary if you are just using it as a part of your plugin bundle.
You’ll see the snippet of your soundwave (you can choose how long the pattern is) and will be able to change the swing, makeup, time, and short / long step settings, control the low and hi passes, modify the velocity curve, and tweak the echo and delay settings.
It may be overwhelming as an all-in-one solution, but the free vocal plugin comes with many presets that’ll make your job a lot easier.
You can use Al Trigger Gate for all sorts of stuff, so go ahead and start experimenting already!
Glitch Machines Hysteresis
There is no way this list could exist without any delay plugins on it.
While not always necessary, delays are fun to experiment with and who knows – maybe you’ll stumble upon a unique sound that you’ll love.
Hysteresis is a powerhouse when it comes to experimentation.
With the ability to control the stutter, filter, mod FX, and delay settings, the sky’s the limit for your imagination.
If you are a fan of futuristic and robotic music “malfunctions,” Hysteresis is definitely for you!
Almost forgot – a ton of presets that come with this free VST plugin to enhance vocals will turn a boring knob-tweaking experience into a more dynamic and fun time in the studio.
Acustica Ochre EQ
Did you know that the fundamentals of mixing aren’t reverb, delay, and auto-tune?
They are EQ and compression.
If the two are way off, no plugin will save you from messing up the track.
That’s why it’s crucial to find the right plugin to equalize the sounds and make them sound their best.
Clearly, the same applies to vocals.
And Ochre EQ does an excellent job here.
I wouldn’t say it’s my favorite EQ plugin for beginners because it lacks visuals, but it will be a great addition to your plugin bundle just fine if you know your way around frequency ranges and have the visual in your head.
Ochre EQ does offer you a lot of flexibility in terms of ability to modify gain, frequency, and Q settings.
It even offers the preset for vocals that gives you a good boost in the middle and a cut in the lower end of the range.
I’d say it’s a really nice plugin to sculpt out the best vocals you can (if you know what you are doing).
Fine Cut Bodies La Petite Excite
It’s nice to add some warmth and a notch of sonic-excitement in the high end of the frequency range.
Who doesn’t like extra harmonics on their vocal track, am I right?
That’s when La Petite Excite comes into play.
With only a handful of knobs, even the person looking at the vocal plugin for the first time will quickly find his or her way around.
The plugin simply adds some subtle harmonic distortion and all of a sudden your voice get warmer and brighter – a must-have even if you’ve never used one before.
With only 5 knobs controlling the input / output gain, low / high-pass, and CV gate, you have to try hard to get lost.
Don’t forget to turn the “Noise Floor” switch on!
To sum up, La Petite Excite is a must for every producer.
It doesn’t even have to be used with vocals – you can add it to your piano or violin to “add a little” juice if needed!
Conclusion
Vocals may be tricky to mix.
Thanks to these free plugins for vocals, you’ll have a much easier time dealing with them.
Now go ahead and hit the studio – they won’t download themselves!
Free vocal harmony VST plugins
Most people looking for Free vocal harmony VST plugins downloaded:
Download
3.6 on 10 votes
Harmony EFX is a streamlined version of Harmony Engine Evo Vocal Modeling Harmony Generator.
Download
3 on 24 votes
Auto-Tune Live is a program that features genuine Antares Auto-Tune technology optimized for real-time pitch correction ..
Download
3.3 on 6 votes
Harmony EFX is a streamlined (and incredibly affordable) version of the industry-leading Harmony Engine Evo Vocal Modeling Harmony Generator.
Download
2.9 on 13 votes
Harmony Engine Evo RTAS can be used as a real-time plug-in or from the AudioSuite menu and is indicated for Pro Tools LE and M-Powered systems.

Download
4 on 3 votes
MyHarmony is an application that allows you to set up or make changes to your Harmony remote.
Similar choice
0 notes
Text
Neat Image Pro 7.6 Serial Key


Neat Image Pro 7.6 Serial Key Generator
Neat Image Pro 7.6 Serial Keys
NEAT IMAGE Serial Key provide to all users a best and also a friendly interface for editing the images. By using it you can easily edit your images. Folx pro mac torrent. Media 7.7.0.0 Crack With Registration Key Free Get Here!! Download Neat Image Pro 7.6 Full Serial Neat Image is a powerful photo filter and highest quality noise reducer software that designed to. Download neat image plug-in for photoshop 7.6 for free. Photo & Graphics tools downloads - Neat Image Pro plug-in for Photoshop by Neat Image team, ABSoft and many more programs are available for instant and free download.
Neat Image 8 Crack 2017 Keygen Key is an adobe. Neat Image 8 Crack 2017 Serial Key. 7.0 full crack/keygen neat image pro 7.6 serial key neat image. Sep 18, 2017. प्रो ७.६ फुल वर्शन फ्री / how to download neat image pro 7.6.!! * Neat image pro 7.6 + Serial key Softwear. Neat Image Pro 7 Registration Code Serial Numbers. Convert Neat Image Pro 7 Registration Code trail version to full software.

Only the best software, we focus on quality not quantity. Filtering feature to allow you to only show Freeware and/or Non-beta software. Optimized pages for faster browsing. https://loadingma405.tumblr.com/post/661616010678468608/download-mtn-modem-setup-software. Very fast servers with 100Mb connections, to make your downloads as fast as possible. All software is 100% spyware and virus free. We keep the old versions of programs, so if you update and don't like the new version, you can always return to the old one.
Food by Kelis, released 17 April 2014 1. Forever Be 4. Bless The Telephone 9. Friday Fish Fry 10. Kelis food dishes.
Pro 7 Program
Full support for resuming downloads and download managers. https://loadingma405.tumblr.com/post/653617066295918592/ubuntu-docker-commands.
Neat Image Pro 7.6 Serial Key Generator
Neat Image Pro 8.3.5 Adobe Photoshop + keys (FULL) If the first link does not work, then work the second link : OR Neat Video 3.2 Pro for FCP X & Motion 5 cracked (FULL) If the first link does not work, then work the second link : OR Neat Video Pro 4.6 for Adobe Premiere Pro + PATCH (FULL) If the first link does not work, then work the second link : OR Neat Video Pro 4.6.0.0 Pro for After Effects Premier Pro + OFX + keys (FULL) If the first link does not work, then work the second link : OR Neat Video Pro 4.1.1 Pro for After Effects + keys If the first link does not work, then work the second link : OR Neat Video Pro 4.1.1 for OFX + keys If the first link does not work, then work the second link : OR Neat Video Pro 3.5 for Premiere Pro cracked If the first link does not work, then work the second link : OR FilmConvert Pro 2.0.3 OFX + (crack) FULL WIN-MAC MORE ADOBE PLUGINS All products xXx Technologies Ltd everything works 100%
Neat Image Pro 7.6 Serial Keys
Neat Video Pro for After Effects is a video filter designed to reduce visible noise and grain in digital video footage produced by digital video cameras, camcorders, TV-tuners, digitizers of film or analog video. Neat Video Pro plug-in supports standard- and high-bitdepth rendering and can process frames of any size. Noise is a serious problem that complicates digital video processing. Footage coming from digital video cameras, camcorders, digital TV-tuners, film digitizers, etc., often contains an easily noticeable noise component that may distract viewers. Neat Video is a solution to the noise problem. It is a filter specifically designed to reduce visible noise in digital video clips produced by modern digital video capturing devices as well as digitized from traditional film or VHS records. Quality of noise reduktion provided by Neat Video is higher than that of all other methods because: Neat Video incorporates the most advanced noise reduction algorithms in the industry Neat Video noise reduction algorithms were developed for digital imaging and digital video processing field by a highly-qualified professional research group. These algorithms surpass the quality of all classic noise reduction methods and even that of the wavelet-based methods. Although the wavelet-based methods were developed only 10-15 years ago and are still considered relatively modern, Neat Video uses an even newer and more efficient approach to noise reduction. This approach allows drawing a more clear distinction between noise and details in noisy video data. This helps Neat Video reduce more noise and better preserve true details in digital video clips. Neat Video builds and uses device noise profiles to make noise reduction custom-tailored to video capturing device. A device noise profile is a reusable analysis of noise properties of a video capturing device (digital video camera, film digitizer, etc.) working in a certain mode. Using a noise profile for a video capturing device in effect makes noise reduction custom-tailored to this device. Neat Video can automatically build noise profiles by analyzing the input video data. Rich functionality and hight performance of Neat Video enables both beginners and experienced users to achieve great results easily and quickly Neat Video is highly automated - Adaptive filtration: Neat Video can automatically adjust its filters to changing noise in different parts of video clip - Neat Video can build noise profiles either automatically or with your assistance: - Auto Profiler provides the easiest and quickest way to automatically build a noise profile - Automatic and manual Fine-Tuning Analyzer together with manual Rough Noise Analyzer enable user-friendly semi-automatic and manual noise profiling when you want the complete control over the profiling process - You can rely on default filter settings or manually adjust the filters - Based on accurate noise profile, default filter settings automatically deliver good filtration results without any additional tweaking - Manual filter tweaking is always available too, if you want to get the result that looks perfect to your eyes - You can easily save built noise profiles and adjusted filter settings - Newly-built noise profile and adjusted filter settings are automatically saved and applied to render the current video clip - You can also save noise profile and filter preset into files and later reuse them to filter other clips Neat Video provides exactly the amount of control required - Standard mode offers a simplified control set that is very easy to use for new users - Advanced mode gives power users the most complete control set to tweak virtually all filter settings - Neat Video helps to adjust filter setting with efficient visual feedback - Intra-frame preview embedded directly into the frame viewer shows how the filtration result will look like and lets you visually compare it with the original frame - Channel and frequency viewer modes help to identify noisy video components that require special attention by adjusting the filter settings corresponding to these components - Variant Selector helps to visually compare the filtration results obtained with several variants of filter settings and select the best variant (in some Win versions) Neat Video is efficient - Neat Video efficiently reduces many noise types typical for digital video cameras, camcorders, TV-tuners, film or analog video digitizers: - sensor noise produced by video capturing devices - grain visible in digitized film or analog video - compression artifacts - color banding - Neat Video v2.x processes a video clip with the frame size of 352x288 pixels at the speed of 10-20 frames per second depending on filter settings (Core 2 Duo 3.26 GHz) Neat Video supports the industry standard video data types and file formats - standard-bitdepth (8-bit per channel; 24-bit RGB) rendering is supported by all versions of Neat Video plug-ins for After Effects, Premiere, Final Cut, VirtualDub, Sony Vegas and Pinnacle Studio - high-bitdepth rendering is supported by the Pro versions of Neat Video plug-in for After Effects, Premiere and Final Cut - Any video file format supported by the plug-in host can be processed with the Neat Video plug-in For example, you can open an AVI, MPEG, WMV, etc., video file in the host application and then directly process it with the Neat Video plug-in - Frame sizes supported: - VCD: 352x288 and up to 640x480 (Multimedia); in Demo edition; - SD/DV: up to 720x480 and 720x576 (DVD size); in Home edition; - HDV: 1280x720, 1440x1080; HD: 1920x1080; and higher; in Pro edition. OS : Win XP/2000/Vista/Win 7 Language : English
0 notes
Text
Ray Jefferson 5000m Manual


Ray Jefferson 5000m Manual
Ray Jefferson 5000m Manual Free
Looking for an old, out-of-print Ray Jefferson manual? You've come to the right place.

Ray Jefferson 5000m Manual

Ray Jefferson 5000m Manual Free
Ray Jefferson 1125: 156-163 MHz: FM: 25 W: Mobile/Base: Ray Jefferson 5000M: 156-163 MHz: FM: 25 W: Mobile/Base: Raymarine; Pics Model Frequency Range Mode Max P/O. Sterlize Male Slave With Heat. With only two birth control options available to men (a condom and a vasectomy) the words you use to get your girl off the fence about having an abortion must be well thought out. Ray Jefferson 5000m Manual. Join Crazy Chicken and his friends and race your way through 8 exciting eras. Download Crazy Chicken Kart 3 for PC. Ar Raheeq Al Makhtum Pdf Melayu. Get ready to rumble in this wacky kart racing game! Crazy chicken kart 2 free download - Crazy Kart, Chicken Invaders 2 Christmas Edition, Crazy Kart, and many more.
ManufacturerModel NumberDescriptionTypePrice$6$15$8$11$20$17$17$17$13$20$20$22$17$24$24$11$11$17$18$24$24$21$22$24$11$22$20$20$20$20$20$20$20$19$20$19$11$14$22$11$11$17$20$20$20$20$16$16$6$18$17$20$18$24$20$22$17$9$11$16$20$17$29$25
0 notes
Text
Download Mtn Modem Setup Software.

ADS! Download JAMB CBT Software Now for FREE!
Are you among the Mtn users? Do you have a phone that browses? Do you have the mtn right internet settings? To start enjoying high-speed internet, you need the right settings on your device. This article will give you information on MTN Internet Settings 2020 and 3G & 4G MTN Configuration Settings, read through carefully.
History of MTN Nigeria
Free and safe download. Download the latest version of the top software, games, programs and apps in 2021.
The company was founded in 1994 as M-Cell with assistance from the South African government. In 1995, it replaced its then-CEO, John Beck, with Robert (Bob) Chaphe. Founder and Stanford Ph.D. Leena Jaitley In 2001, the company reported that its controlling shareholder was Johnnic Holdings, and the chairperson was Irene Charnley.
In 2002, Phuthuma Nhleko became the CEO, replacing then-CEO Paul Edwards, who had invested in expansion to Nigeria. MTN’s competitors in South Africa include Vodacom and Telkom Mobile.

MTN Mobile Broadband is developed by Huawei Technologies Co.,Ltd. The most popular version of this product among our users is 21.0. The names of program executable files are MTN Mobile Broadband.exe, USB Modem.exe. The product will soon be reviewed by our informers.
MTN F@stLink HSDPA Modem is a Freeware software in the category Internet developed by Huawei Tech. The latest version of MTN F@stLink HSDPA Modem is 1.11.17.1, released on. It was initially added to our database on. MTN F@stLink HSDPA Modem runs on the following operating systems: Android/Windows.
MTN Mobile Broadband is a Shareware software in the category Miscellaneous developed by MTN Mobile Broadband. The latest version of MTN Mobile Broadband is currently unknown. It was initially added to our database on. MTN Mobile Broadband runs on the following operating systems: Windows.
May 11, 2021 Manage Internet connections on Huawei netsetter devices. Mobile partner setup for mtn; Mtn mobile partner download set up. Mtn mobile partner software.
However, in May 2008,Bharti Airtel, an India-based telecommunications company, explored the possibility of buying MTN Group. Reliance Communications was also in talks with MTN for a “potential combination of their businesses”. In July, the two companies ended discussions regarding the merger.
In June 2008, MTN Group agreed to purchase Verizon Business South Africa, which was a provider of data services to customers in South Africa and four other African countries. The acquisition was completed on 28 February 2009.
Also, on 26 June 2009, MTN Group’s subsidiary merged with Belgacom International Carrier Services (BICS), a subsidiary of Belgacom. The combined subsidiary functioned as the international gateway for carrier services of MTN.
In October 2012, MTN announced a partnership with Afrihost to provide DSL Broadband services in Africa.
More Details
In November 2012, South African holding company Shanduka Group acquired a minority stake in MTN Group’s Nigeria business for $335 million. MTN mast in Kaduna State
In 2014, MTN was named on the 2014 BrandZ Top 100 Most Valuable Global Brand rankings and named the Most Admired and Most Valuable Brand in Africa. MTN retained its ranking as the Most Admired and the Most Valuable African brand in 2015.
In March 2016, the company appointed Rob Shuter as Chief Executive Officer. The shutter was replaced on 1 September 2020 when Ralph Mupita was appointed Chief Executive.
The Essence of MTN Internet Settings
To access the internet with mobile phones or modem, you need to activate it by loading the mobile network’s GPRS or 3G internet settings to your mobile phone. 3G or GPRS settings can be obtained in two ways, automatic and manual methods.
Although a mobile phone may be internet-ready, it will require activation with 3G or GPRS settings before it can be used to browse the internet.
In this article, you will find information on activating your mobile phone for internet browsing on MTN, Glo mobile, Airtel, 9Mobile, and so on. For a mobile phone to access internet services, you need to load the appropriate internet, 3G, or GPRS settings.
More on MTN Settings
In Nigeria, you do not worry about activating your mobile phone for internet access if you are using CDMA. This is because CDMA networks usually carry exclusive mobile phones, which are often preloaded with internet settings.
When buying a mobile phone from network exclusive outlets, ask whether the mobile phone has been activated with the required internet settings and if not request internet configuration on the spot.
MTN Internet Settings 2021
To start enjoying high-speed internet https://loadingma405.tumblr.com/post/653616912640638976/apple-antivirus-software-free. , you need the right settings on your device. Please follow these simple steps to get ready for an unbeatable internet experience.
Text SETTINGS to 3888, free of charge.
The settings will be sent to you by SMS, please save the settings as soon as they are delivered to avoid deleting them in error
For the best browsing experience, find below internet settings for different devices;
Smartphones & Devices (Android, iOS, MiFi, etc.)
Account Name: MTN WEB
Port :
Username:
Password:
Access point name (APN): web.gprs.mtnnigeria.net
Feature phones (WAP settings)
Account Name: MTN WAP
IP address (Proxy): 10.199.212.2
Port: 9201
Username: web
Password: web
Access point name (APN): web.gprs.mtnnigeria.net
To check that you have the right Proxy settings on your Smartphones, kindly follow the steps below;
Go to Settings
Pick More Network or Mobile Network
Enter Access Point Name
Click MTN GPRS or MTN WEB
Remove the Proxy IP address: 10.199.212.2
Remove the Port setting: 8080
Then save and browse again.
MTN Autoconfiguration
In general, if you want to get the Internet configuration settings from MTN without self-installation, you can try to use the function of autoconfiguration. To do so, send an SMS “settings” to the number “3888” (type this information without quotes).
More often, this should take about 5 minutes for your phone to apply these configurations. When you get the reverse SMS from MTN, don’t forget to save your settings immediately to avoid mistakes.
But, there are also cases, then your phone, even if it’s modern can’t accept such info automatically. Still, it’s not a big problem to apply configurations manually.
MTN Manual 3G/3.5G/GPRS Settings for Full Internet
This manual setting can be used for Mobile phones and modems:
IP Address: 10.199.212.2 (May not be required) Port: 8080 (May not be required) Username: web Password: web Access point name (APN): web.gprs.mtnnigeria.net
Manual 3G/3.5G/GPRS Settings for WAP Mobile Internet
Mtn Modem App
Account name: MTN GPRS IP Address: 10.199.212.2 Port: 9201 Username: web Password: web Access point name (APN): web.gprs.mtnnigeria.net
After all these steps your phone should be ready for Internet usage. If you still observe problems with the Internet connection you can try to visit the nearest MTN office or to get in touch with the MTN support service and call “180”.
We believe this information on MTN Internet Settings 2021| 3G & 4G MTN Configuration Settings is helpful to you? Why not share it with your friends out there by clicking on the share button on this website.
You can as well subscribe to be updated for further information concerning this topic.
CSN Team. Ubuntu docker commands.
Join Over 3,500 000+ Readers Online Now!
=>FOLLOW US ON INSTAGRAM | FACEBOOK & TWITTER FOR LATEST UPDATES
ADS: KNOCK-OFF DIABETES IN JUST 60 DAYS! - ORDER YOURS HERE

Download Mtn Modem Setup Software. Download
COPYRIGHT WARNING! Contents on this website may not be republished, reproduced, redistributed either in whole or in part without due permission or acknowledgement. All contents are protected by DMCA.The content on this site is posted with good intentions. If you own this content & believe your copyright was violated or infringed, make sure you contact us at ((email protected)) to file a complaint and actions will be taken immediately.
RECOMMENDED!
Huawei Tech. – Freeware – AndroidWindows
Overview
MTN F@stLink HSDPA Modem is a Freeware software in the category Internet developed by Huawei Tech.
The latest version of MTN F@stLink HSDPA Modem is 1.11.17.1, released on 02/18/2008. It was initially added to our database on 10/29/2007.

MTN F@stLink HSDPA Modem runs on the following operating systems: Android/Windows.
MTN F@stLink HSDPA Modem has not been rated by our users yet.
Write a review for MTN F@stLink HSDPA Modem!
06/03/2021 W10Privacy 3.7.0.8 06/03/2021 WashAndGo 26.46 06/03/2021 Wise Care 365 Free 5.6.7.568 06/03/2021 FolderSizes 9.2.315 06/03/2021 Total Uninstall 7.0.1
Download Mtn Modem
05/26/2021 Chrome 91 update fixes vulnerabilities 05/25/2021 Free UpdateStar Packs to setup your computer software 05/18/2021 How to setup a VPN on a Windows computer using PureVPN for example 05/16/2021 Why you should think about using a VPN to protect your privacy 05/11/2021 Adobe fixes 43 vulnerabilities with May updates
Mtn Modem Nigeria
» download mtn fastlink modem
» download mtn modem exe
» download mtn online softwares for modem
» mise a jour de mon modem mtn
» mtnfastlink software
» mtn online download
» modem software for mtn
» download mtn fastlink software exe
» mtn installation
» mtnfastlink exe
0 notes
Text
Ubuntu Docker Commands

-->
Applies to: SQL Server (all supported versions) - Linux
Step 1) Install prerequisites packages for docker. Login to Ubuntu 20.04 /20.10 system and run the following apt commands to install docker dependencies, $ sudo apt update $ sudo apt install -y apt-transport-https ca-certificates curl gnupg-agent software-properties-common Step 2) Setup docker official repository. There are two methods for installing Docker on Ubuntu 16.04. One method involves installing it on an existing installation of the operating system. The other involves spinning up a server with a tool called Docker Machine that auto-installs Docker on. The following config will guide you through a process of changing the docker's default /var/lib/docker storage disk space to another directory. There are various reasons why you may want to change docker's default directory from which the most obvious could be that ran out of disk space.
Note
The examples shown below use the docker.exe but most of these commands also work with Podman. It provides the CLI similar to Docker container Engine. You can read more about podman here.
In this quickstart, you use Docker to pull and run the SQL Server 2017 container image, mssql-server-linux. Then connect with sqlcmd to create your first database and run queries.
Tip
Ubuntu 18.04 Docker Commands
If you want to run SQL Server 2019 containers, see the SQL Server 2019 version of this article.
Note
Starting with SQL Server 2019 CU3, Ubuntu 18.04 is supported.
In this quickstart, you use Docker to pull and run the SQL Server 2019 container image, mssql-server. Then connect with sqlcmd to create your first database and run queries.
Tip
This quickstart creates SQL Server 2019 containers. If you prefer to create SQL Server 2017 containers, see the SQL Server 2017 version of this article.
This image consists of SQL Server running on Linux based on Ubuntu 18.04. It can be used with the Docker Engine 1.8+ on Linux or on Docker for Mac/Windows. This quickstart specifically focuses on using the SQL Server on Linux image. The Windows image is not covered, but you can learn more about it on the mssql-server-windows-developer Docker Hub page.
Prerequisites
Docker Engine 1.8+ on any supported Linux distribution or Docker for Mac/Windows. For more information, see Install Docker.
Docker overlay2 storage driver. This is the default for most users. If you find that you are not using this storage provider and need to change, see the instructions and warnings in the docker documentation for configuring overlay2.
Minimum of 2 GB of disk space.
Minimum of 2 GB of RAM.
System requirements for SQL Server on Linux.
Pull and run the 2017 container image
Before starting the following steps, make sure that you have selected your preferred shell (bash, PowerShell, or cmd) at the top of this article.
Pull the SQL Server 2017 Linux container image from Microsoft Container Registry.
Tip
If you want to run SQL Server 2019 containers, see the SQL Server 2019 version of this article.
The previous command pulls the latest SQL Server 2017 container image. If you want to pull a specific image, you add a colon and the tag name (for example, mcr.microsoft.com/mssql/server:2017-GA-ubuntu). To see all available images, see the mssql-server Docker hub page.
For the bash commands in this article, sudo is used. On macOS, sudo might not be required. On Linux, if you do not want to use sudo to run Docker, you can configure a docker group and add users to that group. For more information, see Post-installation steps for Linux.
To run the container image with Docker, you can use the following command from a bash shell (Linux/macOS) or elevated PowerShell command prompt.
Note
If you are using PowerShell Core, replace the double quotes with single quotes.
Note
The password should follow the SQL Server default password policy, otherwise the container can not setup SQL server and will stop working. By default, the password must be at least 8 characters long and contain characters from three of the following four sets: Uppercase letters, Lowercase letters, Base 10 digits, and Symbols. You can examine the error log by executing the docker logs command.
By default, this creates a container with the Developer edition of SQL Server 2017. The process for running production editions in containers is slightly different. For more information, see Run production container images.
The following table provides a description of the parameters in the previous docker run example:
ParameterDescription-e 'ACCEPT_EULA=Y'Set the ACCEPT_EULA variable to any value to confirm your acceptance of the End-User Licensing Agreement. Required setting for the SQL Server image.-e 'SA_PASSWORD=<YourStrong@Passw0rd>'Specify your own strong password that is at least 8 characters and meets the SQL Server password requirements. Required setting for the SQL Server image.-p 1433:1433Map a TCP port on the host environment (first value) with a TCP port in the container (second value). In this example, SQL Server is listening on TCP 1433 in the container and this is exposed to the port, 1433, on the host.--name sql1Specify a custom name for the container rather than a randomly generated one. If you run more than one container, you cannot reuse this same name.-h sql1Used to explicitly set the container hostname, if you don't specify it, it defaults to the container ID which is a randomly generated system GUID.-dRun the container in the background (daemon)mcr.microsoft.com/mssql/server:2017-latestThe SQL Server 2017 Linux container image.
To view your Docker containers, use the docker ps command.
You should see output similar to the following screenshot:
If the STATUS column shows a status of Up, then SQL Server is running in the container and listening on the port specified in the PORTS column. If the STATUS column for your SQL Server container shows Exited, see the Troubleshooting section of the configuration guide.
The -h (host name) parameter as discussed above, changes the internal name of the container to a custom value. This is the name you'll see returned in the following Transact-SQL query:
Setting -h and --name to the same value is a good way to easily identify the target container.
As a final step, change your SA password because the SA_PASSWORD is visible in ps -eax output and stored in the environment variable of the same name. See steps below.
Pull and run the 2019 container image
Before starting the following steps, make sure that you have selected your preferred shell (bash, PowerShell, or cmd) at the top of this article.
Pull the SQL Server 2019 Linux container image from Microsoft Container Registry.
Note
If you are using PowerShell Core, replace the double quotes with single quotes.
Tip
This quickstart uses the SQL Server 2019 Docker image. If you want to run the SQL Server 2017 image, see the SQL Server 2017 version of this article.
The previous command pulls the SQL Server 2019 container image based on Ubuntu. To instead use container images based on RedHat, see Run RHEL-based container images. To see all available images, see the mssql-server-linux Docker hub page.
For the bash commands in this article, sudo is used. On macOS, sudo might not be required. On Linux, if you do not want to use sudo to run Docker, you can configure a docker group and add users to that group. For more information, see Post-installation steps for Linux.
To run the container image with Docker, you can use the following command from a bash shell (Linux/macOS) or elevated PowerShell command prompt.
Note
The password should follow the SQL Server default password policy, otherwise the container can not setup SQL server and will stop working. By default, the password must be at least 8 characters long and contain characters from three of the following four sets: Uppercase letters, Lowercase letters, Base 10 digits, and Symbols. You can examine the error log by executing the docker logs command.
By default, this creates a container with the Developer edition of SQL Server 2019.
The following table provides a description of the parameters in the previous docker run example:
ParameterDescription-e 'ACCEPT_EULA=Y'Set the ACCEPT_EULA variable to any value to confirm your acceptance of the End-User Licensing Agreement. Required setting for the SQL Server image.-e 'SA_PASSWORD=<YourStrong@Passw0rd>'Specify your own strong password that is at least 8 characters and meets the SQL Server password requirements. Required setting for the SQL Server image.-p 1433:1433Map a TCP port on the host environment (first value) with a TCP port in the container (second value). In this example, SQL Server is listening on TCP 1433 in the container and this is exposed to the port, 1433, on the host.--name sql1Specify a custom name for the container rather than a randomly generated one. If you run more than one container, you cannot reuse this same name.-h sql1Used to explicitly set the container hostname, if you don't specify it, it defaults to the container ID which is a randomly generated system GUID.mcr.microsoft.com/mssql/server:2019-latestThe SQL Server 2019 Ubuntu Linux container image.
To view your Docker containers, use the docker ps command.
You should see output similar to the following screenshot:
If the STATUS column shows a status of Up, then SQL Server is running in the container and listening on the port specified in the PORTS column. If the STATUS column for your SQL Server container shows Exited, see Troubleshooting SQL Server Docker containers.
The -h (host name) parameter as discussed above, changes the internal name of the container to a custom value. This changes the internal name of the container to a custom value. This is the name you'll see returned in the following Transact-SQL query:
Setting -h and --name to the same value is a good way to easily identify the target container.
As a final step, change your SA password because the SA_PASSWORD is visible in ps -eax output and stored in the environment variable of the same name. See steps below.
Change the SA password
The SA account is a system administrator on the SQL Server instance that gets created during setup. After creating your SQL Server container, the SA_PASSWORD environment variable you specified is discoverable by running echo $SA_PASSWORD in the container. For security purposes, change your SA password.
Choose a strong password to use for the SA user.
Use docker exec to run sqlcmd to change the password using Transact-SQL. In the following example, replace the old password, <YourStrong!Passw0rd>, and the new password, <YourNewStrong!Passw0rd>, with your own password values.
Connect to SQL Server

The following steps use the SQL Server command-line tool, sqlcmd, inside the container to connect to SQL Server.
Use the docker exec -it command to start an interactive bash shell inside your running container. In the following example sql1 is name specified by the --name parameter when you created the container.
Once inside the container, connect locally with sqlcmd. Sqlcmd is not in the path by default, so you have to specify the full path.
Tip
You can omit the password on the command-line to be prompted to enter it.
If successful, you should get to a sqlcmd command prompt: 1>.
Create and query data
The following sections walk you through using sqlcmd and Transact-SQL to create a new database, add data, and run a query.
Create a new database
The following steps create a new database named TestDB.
From the sqlcmd command prompt, paste the following Transact-SQL command to create a test database:
On the next line, write a query to return the name of all of the databases on your server:
The previous two commands were not executed immediately. Type GO on a new line to execute the previous commands:
Insert data
Next create a new table, Inventory, and insert two new rows.
From the sqlcmd command prompt, switch context to the new TestDB database:
Create new table named Inventory:
Insert data into the new table:
Type GO to execute the previous commands:
Select data
Now, run a query to return data from the Inventory table.
From the sqlcmd command prompt, enter a query that returns rows from the Inventory table where the quantity is greater than 152:
Execute the command:
Exit the sqlcmd command prompt
To end your sqlcmd session, type QUIT:
To exit the interactive command-prompt in your container, type exit. Your container continues to run after you exit the interactive bash shell.
Connect from outside the container
You can also connect to the SQL Server instance on your Docker machine from any external Linux, Windows, or macOS tool that supports SQL connections.
The following steps use sqlcmd outside of your container to connect to SQL Server running in the container. These steps assume that you already have the SQL Server command-line tools installed outside of your container. The same principles apply when using other tools, but the process of connecting is unique to each tool.
Find the IP address for the machine that hosts your container. On Linux, use ifconfig or ip addr. On Windows, use ipconfig.
For this example, install the sqlcmd tool on your client machine. For more information, see Install sqlcmd on Windows or Install sqlcmd on Linux.
Run sqlcmd specifying the IP address and the port mapped to port 1433 in your container. In this example, that is the same port, 1433, on the host machine. If you specified a different mapped port on the host machine, you would use it here. You will also need to open the appropriate inbound port on your firewall to allow the connection.
Run Transact-SQL commands. When finished, type QUIT.
Other common tools to connect to SQL Server include:

Remove your container
If you want to remove the SQL Server container used in this tutorial, run the following commands:
Warning
Stopping and removing a container permanently deletes any SQL Server data in the container. If you need to preserve your data, create and copy a backup file out of the container or use a container data persistence technique.
Docker demo
After you have tried using the SQL Server container image for Docker, you might want to know how Docker is used to improve development and testing. The following video shows how Docker can be used in a continuous integration and deployment scenario.
Next steps
For a tutorial on how to restore database backup files into a container, see Restore a SQL Server database in a Linux Docker container. Explore other scenarios, such as running multiple containers, data persistence, and troubleshooting. Mac os 10.14 mojave iso download.
Also, check out the mssql-docker GitHub repository for resources, feedback, and known issues.
-->
You can configure automatic log upload for continuous reports in Cloud App Security using a Docker on an on-premises Ubuntu, Red Hat Enterprise Linux (RHEL), or CentOS server.
Prerequisites
OS:
Ubuntu 14.04, 16.04, and 18.04
RHEL 7.2 or higher
CentOS 7.2 or higher
Disk space: 250 GB
CPU: 2
RAM: 4 GB
Set your firewall as described in Network requirements
Note
If you have an existing log collector and want to remove it before deploying it again, or if you simply want to remove it, run the following commands:
Log collector performance
The Log collector can successfully handle log capacity of up to 50 GB per hour. The main bottlenecks in the log collection process are:
Network bandwidth - Your network bandwidth determines the log upload speed.
I/O performance of the virtual machine - Determines the speed at which logs are written to the log collector's disk. The log collector has a built-in safety mechanism that monitors the rate at which logs arrive and compares it to the upload rate. In cases of congestion, the log collector starts to drop log files. If your setup typically exceeds 50 GB per hour, it's recommended that you split the traffic between multiple log collectors.
Set up and configuration
Step 1 – Web portal configuration: Define data sources and link them to a log collector
Go to the Automatic log upload settings page.
In the Cloud App Security portal, click the settings icon followed by Log collectors.
For each firewall or proxy from which you want to upload logs, create a matching data source.
Click Add data source.
Name your proxy or firewall.
Select the appliance from the Source list. If you select Custom log format to work with a network appliance that isn't listed, see Working with the custom log parser for configuration instructions.
Compare your log with the sample of the expected log format. If your log file format doesn't match this sample, you should add your data source as Other.
Set the Receiver type to either FTP, FTPS, Syslog – UDP, or Syslog – TCP, or Syslog – TLS.
Note
Integrating with secure transfer protocols (FTPS and Syslog – TLS) often requires additional settings or your firewall/proxy.
f. Repeat this process for each firewall and proxy whose logs can be used to detect traffic on your network. It's recommended to set up a dedicated data source per network device to enable you to:
Monitor the status of each device separately, for investigation purposes.
Explore Shadow IT Discovery per device, if each device is used by a different user segment.
Go to the Log collectors tab at the top.
Click Add log collector.
Give the log collector a name.
Enter the Host IP address of the machine you'll use to deploy the Docker. The host IP address can be replaced with the machine name, if there is a DNS server (or equivalent) that will resolve the host name.
Select all Data sources that you want to connect to the collector, and click Update to save the configuration.
Further deployment information will appear. Copy the run command from the dialog. You can use the copy to clipboard icon.
Export the expected data source configuration. This configuration describes how you should set the log export in your appliances.
Note
A single Log collector can handle multiple data sources.
Copy the contents of the screen because you will need the information when you configure the Log Collector to communicate with Cloud App Security. If you selected Syslog, this information will include information about which port the Syslog listener is listening on.
For users sending log data via FTP for the first time, we recommend changing the password for the FTP user. For more information, see Changing the FTP password.
Step 2 – On-premises deployment of your machine
The following steps describe the deployment in Ubuntu.
Note
The deployment steps for other supported platforms may be slightly different. Synology install docker server.
Open a terminal on your Ubuntu machine.
Change to root privileges using the command: sudo -i
To bypass a proxy in your network, run the following two commands:
If you accept the software license terms, uninstall old versions and install Docker CE by running the commands appropriate for your environment:
Remove old versions of Docker: yum erase docker docker-engine docker.io
Install Docker engine prerequisites: yum install -y yum-utils
Add Docker repository:
Install Docker engine: yum -y install docker-ce
Start Docker
Test Docker installation: docker run hello-world
Remove old versions of Docker: yum erase docker docker-engine docker.io
Install Docker engine prerequisites:
Add Docker repository:
Install dependencies:
Install Docker engine: sudo yum install docker-ce
Start Docker
Test Docker installation: docker run hello-world
Remove the container-tools module: yum module remove container-tools
Add the Docker CE repository: yum-config-manager --add-repo https://download.docker.com/linux/centos/docker-ce.repo
Modify the yum repo file to use CentOS 8/RHEL 8 packages: sed -i s/7/8/g /etc/yum.repos.d/docker-ce.repo
Install Docker CE: yum install docker-ce
Start Docker
Folx pro mac torrent downloader. Test Docker installation: docker run hello-world
Remove old versions of Docker: apt-get remove docker docker-engine docker.io
If you are installing on Ubuntu 14.04, install the linux-image-extra package.
Install Docker engine prerequisites:
Verify that the apt-key fingerprint UID is [email protected]: apt-key fingerprint | grep uid
Install Docker engine:
Test Docker installation: docker run hello-world
Deploy the collector image on the hosting machine by importing the collector configuration. Import the configuration by copying the run command generated in the portal. If you need to configure a proxy, add the proxy IP address and port number. For example, if your proxy details are 192.168.10.1:8080, your updated run command is:
Verify that the collector is running properly with the following command: docker logs <collector_name>
You should see the message: Finished successfully!
Step 3 - On-premises configuration of your network appliances
Configure your network firewalls and proxies to periodically export logs to the dedicated Syslog port or the FTP directory according to the directions in the dialog. For example:
Step 4 - Verify the successful deployment in the Cloud App Security portal

Check the collector status in the Log collector table and make sure the status is Connected. If it's Created, it's possible the log collector connection and parsing haven't completed.
You can also go to the Governance log and verify that logs are being periodically uploaded to the portal.
Alternatively, you can check the log collector status from within the docker container using the following commands:
Log in to the container by using this command: docker exec -it <Container Name> bash
Verify the log collector status using this command: collector_status -p
If you have problems during deployment, see Troubleshooting Cloud Discovery.
Ubuntu Docker Command Line
Optional - Create custom continuous reports
Verify that the logs are being uploaded to Cloud App Security and that reports are generated. After verification, create custom reports. You can create custom discovery reports based on Azure Active Directory user groups. For example, if you want to see the cloud use of your marketing department, import the marketing group using the import user group feature. Then create a custom report for this group. You can also customize a report based on IP address tag or IP address ranges.
In the Cloud App Security portal, under the Settings cog, select Cloud Discovery settings, and then select Continuous reports.
Click the Create report button and fill in the fields.
Under the Filters you can filter the data by data source, by imported user group, or by IP address tags and ranges.
Ubuntu Docker Commands Hang
Next steps
Ubuntu Run Docker Commands Without Sudo
If you run into any problems, we're here to help. To get assistance or support for your product issue, please open a support ticket.
0 notes
Text
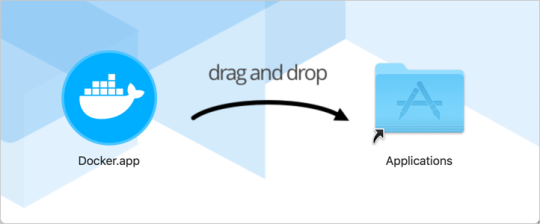
Install Docker Macos Terminal

An easy way to obtain libgdiplus is by using the Homebrew ('brew') package manager for macOS. After installing brew, install libgdiplus by executing the following commands at a Terminal (command) prompt: brew update brew install mono-libgdiplus Install with an installer. MacOS has standalone installers that can be used to install the.NET 5.0 SDK. The fastest and easiest way to get started with Docker on Mac.
Install Docker Mac Os Terminals
Install Docker Macos Terminal
-->
Run macOS Big Sur or Catalina using Docker-OSX (for other options, see the Docker-OSX project page - e.g. You can run it headless, using your own image, run sickcodes/docker-osx:latest allowing SSH into macOS, etc.; you may also want to check out these custom QEMU arguments that can be used for setting the number of CPU cores, available RAM, etc.).
In this article, you'll learn how to install .NET on macOS. .NET is made up of the runtime and the SDK. The runtime is used to run a .NET app and may or may not be included with the app. The SDK is used to create .NET apps and libraries. The .NET runtime is always installed with the SDK.
The latest version of .NET is 5.0.
Supported releases
The following table is a list of currently supported .NET releases and the versions of macOS they're supported on. These versions remain supported either the version of .NET reaches end-of-support.
A ✔️ indicates that the version of .NET Core is still supported.
A ❌ indicates that the version of .NET Core isn't supported.
Operating System.NET Core 2.1.NET Core 3.1.NET 5.0macOS 11.0 'Big Sur'✔️ 2.1 (Release notes)✔️ 3.1 (Release notes)✔️ 5.0 (Release notes)macOS 10.15 'Catalina'✔️ 2.1 (Release notes)✔️ 3.1 (Release notes)✔️ 5.0 (Release notes)macOS 10.14 'Mojave'✔️ 2.1 (Release notes)✔️ 3.1 (Release notes)✔️ 5.0 (Release notes)macOS 10.13 'High Sierra'✔️ 2.1 (Release notes)✔️ 3.1 (Release notes)✔️ 5.0 (Release notes)macOS 10.12 'Sierra'✔️ 2.1 (Release notes)❌ 3.1 (Release notes)❌ 5.0 (Release notes)
Unsupported releases
The following versions of .NET are ❌ no longer supported. The downloads for these still remain published:
3.0 (Release notes)
2.2 (Release notes)
2.0 (Release notes)
Runtime information
The runtime is used to run apps created with .NET. When an app author publishes an app, they can include the runtime with their app. If they don't include the runtime, it's up to the user to install the runtime.

There are two different runtimes you can install on macOS:
ASP.NET Core runtime Runs ASP.NET Core apps. Includes the .NET runtime.
.NET runtime This runtime is the simplest runtime and doesn't include any other runtime. It's highly recommended that you install ASP.NET Core runtime for the best compatibility with .NET apps.
SDK information
The SDK is used to build and publish .NET apps and libraries. Installing the SDK includes both runtimes: ASP.NET Core and .NET.
Dependencies
.NET is supported on the following macOS releases:
.NET Core VersionmacOSArchitecturesMore information5.0High Sierra (10.13+)x64More information3.1High Sierra (10.13+)x64More information3.0High Sierra (10.13+)x64More information2.2Sierra (10.12+)x64More information2.1Sierra (10.12+)x64More information
Beginning with macOS Catalina (version 10.15), all software built after June 1, 2019 that is distributed with Developer ID, must be notarized. Synology install docker. This requirement applies to the .NET runtime, .NET SDK, and software created with .NET.
The runtime and SDK installers for .NET 5.0 and .NET Core 3.1, 3.0, and 2.1, have been notarized since February 18, 2020. Prior released versions aren't notarized. If you run a non-notarized app, you'll see an error similar to the following image:
For more information about how enforced-notarization affects .NET (and your .NET apps), see Working with macOS Catalina Notarization.
libgdiplus
.NET applications that use the System.Drawing.Common assembly require libgdiplus to be installed.
An easy way to obtain libgdiplus is by using the Homebrew ('brew') package manager for macOS. After installing brew, install libgdiplus by executing the following commands at a Terminal (command) prompt:
Install with an installer
macOS has standalone installers that can be used to install the .NET 5.0 SDK:
Download and manually install
As an alternative to the macOS installers for .NET, you can download and manually install the SDK and runtime. Manual install is usually performed as part of continuous integration testing. For a developer or user, it's generally better to use an installer.
If you install .NET SDK, you don't need to install the corresponding runtime. First, download a binary release for either the SDK or the runtime from one of the following sites:
✔️ .NET 5.0 downloads
✔️ .NET Core 3.1 downloads
✔️ .NET Core 2.1 downloads
Next, extract the downloaded file and use the export command to set variables used by .NET and then ensure .NET is in PATH.
To extract the runtime and make the .NET CLI commands available at the terminal, first download a .NET binary release. Then, open a terminal and run the following commands from the directory where the file was saved. The archive file name may be different depending on what you downloaded.
Use the following commands to extract the runtime or SDK that you downloaded. Remember to change the DOTNET_FILE value to your file name:
Tip
The preceding export commands only make the .NET CLI commands available for the terminal session in which it was run.
You can edit your shell profile to permanently add the commands. There are a number of different shells available for Linux and each has a different profile. For example:
Bash Shell: ~/.bash_profile, ~/.bashrc
Korn Shell: ~/.kshrc or .profile
Z Shell: ~/.zshrc or .zprofile
Edit the appropriate source file for your shell and add :$HOME/dotnet to the end of the existing PATH statement. If no PATH statement is included, add a new line with export PATH=$PATH:$HOME/dotnet.
Also, add export DOTNET_ROOT=$HOME/dotnet to the end of the file.
This approach lets you install different versions into separate locations and choose explicitly which one to use by which application.
Mac os 10.14 mojave iso download. Home » Mac » MacOS Mojave » Download MacOS Mojave 10.14 ISO Image Free Download MacOS Mojave 10.14 ISO Image Free by admin May 13, 2020 257 Views / ( 1 votes, average: 5.00 out of 5).
Folx 的 PRO 版是优秀的 BT 查找工具 - 您无需在网络浏览器中打开多个 Torrent 追踪器来查找您需要的内容。 在 Folx 输���关键字 它很容易成为最好的种子搜索应用程序,因为你不需要离开它的界面,Folx 将一次搜索 Torrent 追踪器的广泛列表。. The PRO version of this top torrent client Mac OS X lets you search for torrent content directly from the app, so there is no need to browse through multiple torrent trackers. Just enter a search word in Folx, and it will go through the vast list of torrent trackers and display the relevant results. Folx pro mac torrent downloads. Torrent downloader. While download manager is a neat thing, torrent client is what Folx Pro excels at. It’s uber-fast and simple, with speed controls and multiple settings to make your torrenting swift and painless. Plus, if you’re torrenting from a site that requires logins, Folx Pro can remember them. Folx is a freemium download manager that is designed for macOS users to conveniently manage their downloads. It features a unique system of sorting for categorising downloaded content, a beautiful user interface consistent with the Mac UI, speed control, download scheduling, music integration, etc.
Install with Visual Studio for Mac
Visual Studio for Mac installs the .NET SDK when the .NET workload is selected. To get started with .NET development on macOS, see Install Visual Studio 2019 for Mac.

.NET SDK versionVisual Studio version5.0Visual Studio 2019 for Mac version 8.8 or higher.3.1Visual Studio 2019 for Mac version 8.4 or higher.2.1Visual Studio 2019 for Mac version 8.0 or higher.
Install alongside Visual Studio Code
Install Docker Mac Os Terminals
Visual Studio Code is a powerful and lightweight source code editor that runs on your desktop. Visual Studio Code is available for Windows, macOS, and Linux.
While Visual Studio Code doesn't come with an automated .NET installer like Visual Studio does, adding .NET support is simple.
Download and install Visual Studio Code.
Download and install the .NET SDK.
Install the C# extension from the Visual Studio Code marketplace.

Install with bash automation
The dotnet-install scripts are used for automation and non-admin installs of the runtime. You can download the script from the dotnet-install script reference page.

The script defaults to installing the latest long term support (LTS) version, which is .NET Core 3.1. You can choose a specific release by specifying the current switch. Include the runtime switch to install a runtime. Otherwise, the script installs the SDK.
Note
The previous command installs the ASP.NET Core runtime for maximum compatability. The ASP.NET Core runtime also includes the standard .NET runtime.
Docker
Containers provide a lightweight way to isolate your application from the rest of the host system. Containers on the same machine share just the kernel and use resources given to your application.
.NET can run in a Docker container. Official .NET Docker images are published to the Microsoft Container Registry (MCR) and are discoverable at the Microsoft .NET Core Docker Hub repository. Each repository contains images for different combinations of the .NET (SDK or Runtime) and OS that you can use.
Microsoft provides images that are tailored for specific scenarios. For example, the ASP.NET Core repository provides images that are built for running ASP.NET Core apps in production.
For more information about using .NET Core in a Docker container, see Introduction to .NET and Docker and Samples.
Next steps
Install Docker Macos Terminal
How to check if .NET Core is already installed.
Working with macOS Catalina notarization.
Tutorial: Get started on macOS.
Tutorial: Create a new app with Visual Studio Code.
Tutorial: Containerize a .NET Core app.
0 notes
Text
Apple Antivirus Software Free

© Provided by GamesRadar The best antivirus software 2021
Apple Ipad Free Antivirus Software
Apple Ipad Antivirus Software Free
Apple Antivirus software, free download
Free Antivirus Software For Apple Ipad
Do You Need Antivirus Software For Apple Products
Apple Antivirus software, free download
Having one of the best antivirus software packages in your device is as important as it has ever been. Yup, it's an incredibly boring and dry thing to think about - particularly as many of us won't have been affected by a virus for years and years, if ever - but that's not meant to say you shouldn't have one of the best antivirus packs anyway. It's definitely still a case of 'rather have it and not need than need it and not have it', for sure. We can guarantee that there are baddies still out there and want to get your personal details, even if it might not be in the traditional sense of a virus anymore.
Over 200,000 software, free downloads. 4 Apple iPhoto 9.1.5 7. Social software updater Free Cloud Antivirus BrotherSoft Widgets.
So, whether you have a premium machine like one of the best gaming PCs or one of the best gaming laptops, or just a cheap one for work, having one of the best antivirus will protect you while you work or play. If you're looking to beef up security on an Apple Mac or MacBook though, you might want to consider checking out our antivirus for Macs guide.
Another well-established name in the cybersecurity space, AVG has expanded from offering free antivirus software into a suite of privacy, security, and performance products. As AVG’s flagship offering, AVG AntiVirus FREE was named a Top-Rated Product of 2019 and Top-Rated Product of 2020 by AV-Comparatives by AV-Comparatives.
Today, the best antivirus engines use multiple methods for identifying known and unknown online threats, and antivirus is still a foundational component of security software. Antivirus is file-based protection, and after a virus attack, having virus-infected files on a target computer or mobile device is one of the main ways online threats.
However, in the year 2021, it is a very saturated market. There are free versions that we remember from years ago still around - though now refined - and also some newer or much-revamped paid-for programs that are more comprehensive than ever. As a result, it can be a confusing market to work your way through. But fear not, we’ve looked at a range of options available, from premium to free, from some of the biggest players in online security, to help you make a safe and informed decision on the best antivirus software for you. Whatever you go for, we just recommend you go for one: it's better to have something than nothing. It's also worth noting that the best antivirus is not just for PC systems but can be added to smaller, mobile devices like the best gaming tablets and the best gaming phones as well. Neat.
It's worth remembering that as the programs become more numerous and refined, so do the nasties trying to get into your machine. Plus, those who create malware and viruses are still constantly coming up with new and exciting ways to break down your door. However, to combat this, security companies constantly adapt and update their programs to whack off the miscreants from a safe distance. Often enhanced by feedback tweaks and user experience-led changes, and the versions available are reliable and will have you well covered against threats, all providing great options when looking for the best antivirus software systems.
Best antivirus software 2021 at a glance

We've highlighted a few paid-for options as well as a few free software packages for your consideration. They are:
Apple Ipad Free Antivirus Software
Bitdefender Antivirus Plus
Webroot SecureAnywhere Antivirus
Norton Antivirus Plus
Bitdefender Antivirus Free
Kaspersky Free
Avast Free Antivirus
The best antivirus - paid-for software
Bitdefender Antivirus Plus's annual fee may look expensive - particularly when compared to the non-existent fees for free programs - but you get a whole host of benefits and securities for it. And, all it takes is a quick look at any major antivirus rankings to see that Bitdefender's security products are consistently near the top and considered some of the best.
It is accurate in its virus detecting, filters the web to block access to malicious sites, secures your browser that keeps your online banking and shopping transactions safe, and there's a safe and sound password manager that can retain your payment card details securely for web forms. It also wins points for offering an excellent anti-phishing service, which alerts you to malicious sites and blocks dangerous ones when using search engines.
In this article, I will show you how to install and use Docker on Synology NAS. So, let’s get started. Installing Docker on Synology NAS: Synology NAS products officially support Docker. To use Docker on your Synology NAS, you need to install the Docker app from the Synology Web GUI. First, open the Package Center app from the Synology Web GUI. From now on, all your Docker Container will be automatically updated without you having to do anything. Note: Can I run Docker on my Synology NAS? See the supported models. Note: Watchtower It has no graphical interface, it works via Docker in the background. Note: I recommend you to install Portainer. Install docker on synology nas. When you want to run your application in Docker on Synology you are not allowed to use all of the available parameters of the docker run command. Check my other post about basics with Docker on Synology which contains an enumeration of all possible parameters. Applied Models.The models of this series are not compatible with the latest version of DSM. For details, please refer to the Product Support Status page. Please note that DS712+, RS2211RP+, RS2211+, DS411+II, DS411+, DS2411+, and DS1511+ are not compatible with Active Backup for Business since they do not support Btrfs.
The latest version brings with it some new features: the ability to scan all your linked devices through the Bitdefender Central mobile app and ransomware protection that learns the behavior of dangers to keep you safe. It can be a little resource hungry, requiring a fair bit of 'juice' and also potentially having a fight with some other programs, but overall Bitdefender Antivirus Plus is a great package offering great, subtle performance, excellent detection rates, and some extra features all bundled in that easily justify the price.
If you're looking for more protection from Bitdefender, the Internet Security package builds on AVP and triples the number of devices covered. It also offers parental control, file encryption, and a firewall and anti-spam. Folx pro mac torrent. Further to this, you can get the Total Security edition which includes all of the above and extends its reach to five PCs, Macs, Android, and iOS devices.
It's difficult to find a truly 'lightweight' antivirus program or one that uses hardly any system resources. However, Webroot SecureAnywhere AntiVirus can make that claim. Installation takes mere seconds, the program takes up only a handful of megabytes on your hard drive, the amount of RAM it needs is minute, and there are no enormous signature updates to tie up your bandwidth.
Apple Ipad Antivirus Software Free
Though this feather-lite touch doesn't mean it skimps on features. On top of its core protections, you get a firewall and network monitor, anti-ransomware, smart behavior monitoring, accurate real-time anti-phishing, as well as some other interesting extras. Mac os 10.14 mojave iso download.
Because the major testing labs rarely evaluate their packages, it's not easy to compare Webroot's efficacy with its immediate competitors, however, when they are reviewed, they generally score well, and our own tests show solid and reliable protection.
Apple Antivirus software, free download
It really is one to like, and its lightweight nature makes it a very attractive proposition, and Webroot's 70-day 100% money-back guarantee suggests it's confident in the product, too. If you're tired of complicated and bloated systems, Webroot should definitely be on your shortlist.
Norton is an established name in antivirus software and so many will gravitate toward it and its reputation. This version, Norton AntiVirus Plus, is true to the quality in Norton's reputation: it is a top-quality malware hunter which will protect your PC all on its own, automatically. One of the main reasons we rank it so highly is that it's also one of the very best value paid-for security packages around at the moment.
The package is great for those who like to be hands-on and those who prefer to can set all its features and settings 'just so'. Other features on offer are a handy URL blocker that keeps malicious websites at bay, and if that misses something, an excellent file reputation service heuristically recognizes suspect downloads immediately. Beyond this, if any devious malware can still find its way through, the intelligent behavior monitor uses its up-to-date virus definitions to quarantine threats at the first sign of trouble.
The problems that do rear their head are in the browser extensions. While the bundled-in Norton Identity Safe is a perfectly serviceable password manager when it's running properly, it can just stop for no apparent reason when using Chrome. The flip side to that is that you don't have to use Identity Safe. And elsewhere Norton AntiVirus Plus's main functions and securities deliver: it's easy to use, comes highly rated by the labs, has the configuration options experts need, and is deliberately designed to have the least possible impact on your system's performance.
The best antivirus - free software
There's no denying that the paid-for premium antivirus packages will have a particular allure for those who want the smoothest run, or the most security. They'll offer you some particular features such as parental controls, advanced firewalls and spam filters. They also give you the extra benefit of omitting the pop-ups trying to persuade into upgrading to a full or paid-for version. And, perhaps contrary to popular opinion, they don't actually cost too much, as shown above.
Having said that, you can get great protection free, with just about every single major company out there offering a free antivirus. This continues to help them as it gives them access to more data and so constantly update and improve their libraries and security packages. As a result, it's in their interest to keep a good level of product with the free entries into the library and not to reduce the amount of protection.
If you're determined to go down the free route, we've got a couple that you should investigate to ensure you pick the best free antivirus software for you.
Free Antivirus Software For Apple Ipad
This package provides a clean and well-constructed scanning system teamed with an unrivaled library of virus definitions and means that Bitdefender is top of the pile once again. Bitdefender Antivirus Free Edition is a nice, light version of the premium package.
Bitdefender's free version does insist on running in the background on autopilot and while this takes the hassle out of the users' hands it also opens up the possibility of it going a bit rogue. Some free software packages have caused a bit of havoc before, identifying themselves as threats and then locking up Windows systems. (This is still rare, though, so it's not a constant danger.)
It's worth pointing out that Bitdefender Antivirus Plus, our top paid-for pick, is only the equivalent of about $2 per month away from the free edition. When broken down to this costing, it shows that it really is a small amount to pay for a whole host of extras, such as an integrated password manager, free online 24/7 support and permanent file shredder.
Perhaps a little predictably - but in a good way - Kaspersky Free is a scaled-down version of the full package. The free iteration removes the additional features such as privacy protection and safe payment sandboxes to concentrate on a no-frills, very capable, free protection for your PC. The result is antivirus software that is easy to navigate and interact with but one that does an effective job of keeping your machine safe.
Using the nuts and bolts real-world scanning engine of the paid-for suite, Kaspersky Free is fiendishly hard for viruses and Trojan horses to break down. And we love that it doesn't constantly pester you with nudges to upgrade to the full version.
But, do bear in mind that the paid-for version isn't that expensive and provides a more comprehensive level of cover for your PC (or PCs). The price is $29.99 to protect three computers and can swing a mighty bat against ransomware, spyware and Trojans.
Do You Need Antivirus Software For Apple Products
One of the top features of the latest edition of Avast Free Antivirus, is that it adds an automatic gaming mode that mutes popups and reduces system load when you're running a CPU-demanding game. Elsewhere, the user-interface has had a redesign and has come out all clean, fresh and well laid out. There's a password manager, too, which is solid yet unspectacular but remains a good addition to your online and digital security. On the less good side of things, it's quite trigger-happy with popups and it isn't great for software launch times.
Apple Antivirus software, free download
Some other benefits and features more generally come from a 'meta' event. Back in 2016, Avast acquired AVG - a very familiar-sounding free antivirus provider to many, I'm sure. Though the two products will remain separate to users, Avast - and AVG for what it's worth - now has a lot more data to work with. It's effective userbase now stands at a heady 400 million users.
Fancy double-checking? Go back to the top here.
0 notes
Text
Mac Os 10.14 Mojave Iso Download

There are many people who don’t know the importance of ISO files. The ISO files are very helpful in keeping a backup of some software and even of the operating system. That’s why it is recommended to burn bootable ISO to DVD or any other disc drive so that users can utilize it in the time of need. In this article, we are going to discuss the process of using a bootable ISO burner and creating a bootable disk using various softwares.
Mac OS Mavericks Download 10.9. File Format: ISO/DMG. File size: 5.1G. Torrent Download: Download. Direct Download: Download. Note: Let Us Know In the comments if any link is not working, We will update ASAP. About Mac OS Mavericks 10.9. Apple OS X Mavericks was first announced in June 2013 and was then released in October of 2013. It is also possible to install macOS versions in a VM: macOS Big Sur 11, macOS Catalina 10.15, macOS Mojave 10.14, macOS High Sierra 10.13, macOS Sierra 10.12, OS X El Capitan 10.11, OS X Yosemite 10.10, OS X Mavericks 10.9, OS X Mountain Lion 10.8, OS X Lion 10.7, OS X Lion Server 10.7, Mac OS X Snow Leopard Server 10.6, Mac OS X Leopard. Hello!, welcome to another article, in this article I will show you how to install macOS 10.14 Mojave on VirtualBox machine on Windows 10. If you have information about Mac Apple’s new operating system Mojave 10.14. I suggest you try once inside a Virtual machine instead of installing that on your Mac system.
Macos 10.14 Mojave Iso Download
Part 1. What is a Bootable DVD/USB
Beta 1 ISO Download. Update (July 26, 2018): macOS High Sierra 10.13.6 Released! Update (July 29, 2019) Apple introduced macOS 10.14.6 for developers. If you have already installed macOS Mojave, open the Mac App Store and download and install this version from Updates. Mac OS Mojave Installation with VMware. Home » Mac » MacOS Mojave » Download MacOS Mojave 10.14 ISO Image Free Download MacOS Mojave 10.14 ISO Image Free by admin May 13, 2020 257 Views / ( 1 votes, average: 5.00 out of 5).
Before you learn how you can burn bootable ISO to DVD, it is also important that you have some basic information about the term Bootable DVD/USB.
A Bootable file is a simple file that is configured to run when a system boots up. The Bootable files stored on DVD/USB runs even before the Operating system starts. A bootable DVD/USB is a disc that contains its own operating system which can be loaded into any system. The main purpose of the Bootable DVD/USB was to recover the failed system when the internal hard drive of a system is unable to load it.
Although the ISO files exist separately it is important that the ISO Image file is burned with the boot information file otherwise it won’t be able to load the software on the system. Not all the ISO files contain boot information as some files are only used to create a backup of a file system, not the entire software.
That’s why some third party bootable ISO burner software is needed to convert the non-bootable files into bootable files by combining the boot information files with them. So, if you want to burn the ISO files to a DVD/USB then you can use any of the mentioned tools in the article as all will do the task effectively.
Part 2. One-click to Burn ISO to Bootable DVD with Boot Information Included
The first and best option that users have to create bootable DVD from ISO is the Wondershare DVD Creator. It is the one stop solution for all the requirements of users. Whether you want to make a bootable disc, burn files to data disc or Blu-ray disc, the software can do it all for you. The Wondershare DVD Creator is packed up with 8 sub-tools that expand its use significantly. Hence, it is considered the most powerful utility tool which also has a premium version to allow the users to go beyond just burning the files.
Wondershare DVD Creator


· Convert H.264 videos to DVD/Blu-ray Disc/ISO File/DVD Folder/Data Disc with fast speed and high-quality output.
· Edit H.264 videos with features of cropping/trimming/rotating videos, add subtitle, apply effects, and others.
· Select H.264 to DVD menu with 100+ template design from Movie, Memory, to Travel theme.
· Customize H.264 DVD menu with parameters such as background image, music, text, and others.
· Additional functions including ISO to DVD, Data Disc, Video Editor, Slideshow Maker, DVD to Video, DVD to DVD, One-click to Burn DVD, etc.
· Both DVD5 and DVD9 disc are available.
· Supported OS: Windows 10/8/7/XP/Vista, Mac OS 10.14 (Mojave), 10.13 (High Sierra), 10.12, 10.11, 10.10, 10.9, 10.8, 10.7, 10.6.
Watch Video Tutorial to Burn ISO to Bootable DVD with Boot Information Included
Guide to Burn ISO to Bootable DVD with Boot Information Included
Step 1 Download and launch the Wondershare DVD Creator
At first download the Wondershare DVD Creator software on your system and install it. Once it is installed, launch the software and the main interface will open up.
Step 2 Select the 'More DVD Tools' then Choose the 'ISO to DVD'
From the main interface, select the More DVD Tools options and you will be navigated to another screen where you will have several options. Select the ISO to DVD option and move on to the next screen.
Step 3 Add the ISO File
Now, you can add the ISO file that you want to burn on the USB or DVD. Tap on the '(…)' icon and file explorer will open up and you can find the file where it is located and then load it to the software interface.
Step 4 Selec the Burner and then Tap the Burn Option
Select the burner and then tap on the Burn option and the process will initiate.
Step 5 Tap on the 'Burn to another DVD'
When the process finishes you will get a notification alert. You will also have an option to burn the same ISO file to another disc. If you want to do that and then tap on the “Burn to another DVD” option, otherwise tap on Finish.
With the help of Wondershare DVD Creator, you can also deform many other tasks like burning the media files to multiple types of the data disc.
Part 3. 2 Ways to Make Bootable DVD from Non-bootable ISO Files
There are also some other methods that can be used to burn ISO to bootable DVD. The most popular tools that are used to make a bootable DVD from non-bootable ISO files are given below. We have explained the process users would have to carry out to make a bootable disc from ISO files.
Method 1: Create Bootable DVD from ISO with WinISO
The WinISO is a professional utility tool which is designed to perform multiple burning operations. It can be used to make disc image files from different drives, convert files from one format to another, and especially burn ISO image files to various disc drives. The software is also popularly known as ISO Creator.
Step 1 Download and install the software on the system and then run the software. You will see the main interface of the software.
Step 2 At first, we will make a bootable ISO file. Open the non-bootable ISO file and then set the Boot image file. You will have two options to make a bootable Image file.
The first one is to click Bootable on the toolbar and then choose the Set Boot Image option. A dialog box will appear on the screen stating select a boot image file. Choose the Boot image file and then click on open and the file will be displayed on your screen.
The second method is to load the boot information from the driver or image file. Click bootable on the toolbar and then select the Import from the option. Select the driver and the file will be imported. You will have to choose whether you want to set the information into a current working image or save it to file. Finally, select the Set into a Current option and move on to the next step.
Step 3 Now, it turns to burn the bootable ISO file to DVD. Insert a blank disc and then tap on the burn option. The process will start and will complete in a few minutes. And you will have a bootable DVD which you can use on multiple systems.
Mac Os 10.14 Mojave Iso Download Iso
Other than the WinISO, you will have one more option that can help you to burn ISO to Bootable DVD which is the PowerISO software.
Method 2: Burn ISO to DVD Bootable with PowerISO

Macos 10.14 Mojave Iso Download

Download Mac Os Mojave 10.14 Iso
The PowerISO software is a very powerful image processing tool that allows the users to create, edit, burn, compress, encrypt, split and convert the ISO files and mount them to a virtual drive. The software has a full compatibility with different types of formats and data disc support. To convert ISO file to bootable DVD, you can use the software as it carries out the process with few simple steps.
But first, remember some key points. The first one is that you have the system installation files with boot information; the second one is that you have the PowerISO software installed in your system and the last one is that you have a blank DVD or USB with minimum 7.5 GB of space left.
Step 1 Right click on the software and tap on the “Run as Admin” run the software as Administrator. A dialog box will appear, tap on Yes and the software’s interface will open up.
Step 2 Select the type of DVD from the bottom right corner of the interface. Now, form the Toolbar, tap on the add option and choose the installation files to load them to the software interface.
Step 3 Once all the files are added, tap on the “Action” from the menu bar and select the Boot option and further select the “Add Boot information” option. Locate the files which have the boot information and load them into the software interface by tapping on the Open button and clicking on 'OK'.
Step 4 Now insert a blank DVD or USB into the drive and click on the Burn option. Certain options will appear on the screen where you can customize the Burning drive, speed, and some more settings. Make sure that you select the Current Compilation option from the Source file and then check the Verify data box and again tap on the Burn option.
The process will be completed in a while and you will have a bootable DVD/USB which can be used on a different system and even in the different OS.
Conclusion:
In the article, we have briefly discussed how to make bootable DVD from ISO using three different softwares. Using the PowerISO and WinISO can also be a better option but they are only made to perform a single function. But the Wondershare DVD Creator has so many functionalities that you will be able to carry out many tasks easily and quickly.
0 notes
Text
Synology Install Docker

Synology Install Docker
Synology Docker Install Ubuntu
Homebridge is a lightweight NodeJS server you can run on your home network that emulates the iOS HomeKit API. Homebridge allows you to integrate with smart home devices that do not support the HomeKit protocol. After installing Homebridge, it remains running and connected to your network, ready to service requests from Siri. In this step by step guide I will show you how to install Homebridge on your Synology NAS using Docker. You can also use HOOBS for your smart home devices.
Note: This guide works perfectly with the latest Homebridge 1.3.4 release.
Please Support My work by Making a Donation.
# Synology DiskStation. The DiskStation by Synology (opens new window) is a famous NAS server solution for your home, allowing the installation of additional packages. We are proud to be able to provide an openHAB Synology package (opens new window). # Prerequisite - Install Java. In this step by step guide I will show you how to install Homebridge on your Synology NAS using Docker. You can also use HOOBS for your smart home devices. Note: This guide works perfectly with the latest Homebridge 1.3.2 release. Original tried installing via a docker command. Finally got a successful install working, but no web access to the web interface. Found this article and started again and installed via the DMS interface. The only differences is my network ip range is 10.0.0.0, so i have included LOCALNETWORK=10.0.0.0/24.
Synology Install Docker
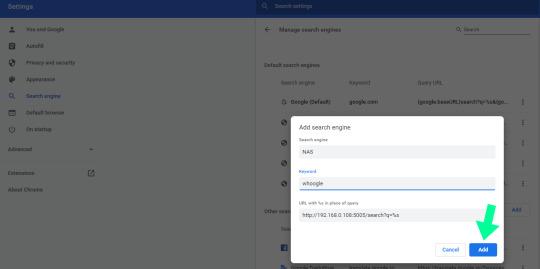
Install Docker via Synology “Package Center”.
Open the Docker Package. From the Docker Console, go to Registry and search homebridge. Look for oznu/homebridge and select it, then click Download or double click on it. You will be prompted to Choose Tag, select latest. Follow the instructions in the image below.
After you click “Select”, the download process of the homebridge docker container will start. You can click on Image on the Docker Console to see the download progress. The current container is about 583 MB. Follow the instructions in the image below.
After the download is completed from the Docker Console, go to Image, then select the oznu/homebridge:latest container. Click Launch. Check “Execute container using high privilege”, then click Advanced Settings. Follow the instructions in the image below.
Select Enable auto-restart. Follow the instructions in the image below.
Go to File Station and open the docker folder. Inside the docker folder, create a new folder and name it Homebridge. Follow the instructions in the images below.
Your docker folder will look like this:
Now go back to the Docker Package. Next tab – “Volume“. Select Add Folder. Choose the homebridge folder inside the docker folder, then click Select. Follow the instructions in the image below.
After you click Select, type /homebridge inside Mount path for the data folder. Follow the instructions in the image below. Your Volume will look like this:
Next tab – “Network“. Choose “Use the same network as Docker Host“.
Next tab – “Port Settings“ move forward without doing anything (no action needed). Next tab – “Links“ move forward without doing anything (no action needed). Next tab – “Environment“. Click the + to add the variable and Value. On the variable area type: DSM_HOSTNAME and on the Value area add: Your NAS Server Name Read STEP 12 B below on how you can find this value. After that, click Apply. Follow the instructions in the images below.
How can I find my DSM_HOSTNAME Value? Go to Control Panel / Info Center / Network. Search for Server name. Follow the instructions in the image below.
After clicking “Apply“ on STEP 12 A, the screen below will open. Click “Next“. Follow the instructions in the image below.
After clicking “Next“, the screen below will open. Select “Run this container after the wizard is finished” then click “Apply“. Follow the instructions in the image below.
Your container will look like this:
Go back to STEP 1 or you will deal with karma 🙂
Now open your browser and type in http://Synology-ip-address:8581/ Follow the instructions in the image below. Username and Password are admin and admin.
You can change Username and Password after the first login. Follow the instructions in the image below.
Enjoy your Homebridge hosted on your Synology NAS!
Read the step by step guide on How to Allow Homebridge to Work Over an HTTPS Connection.
Note: You can easily change the admin user and password by clicking the 3 dots at the top right in homebridge home. Note: Find out how to update Homebridge container with the latest image. Note: I recommend you use Reverse Proxy to allow Homebridge to work over an HTTPS connection. Note: Can I run Docker on my Synology NAS? See the supported models.
Synology Docker Install Ubuntu
This post was updated on Monday / March 22nd, 2021 at 10:41 PM
0 notes
Text
Folx Pro Mac Torrent

Folx 的 PRO 版是优秀的 BT 查找工具 - 您无需在网络浏览器中打开多个 Torrent 追踪器来查找您需要的内容。 在 Folx 输入关键字 它很容易成为最好的种子搜索应用程序,因为你不需要离开它的界面,Folx 将一次搜索 Torrent 追踪器的广泛列表。. 继迅雷关停远程下载功能后,现在连付费会员都无法离线加速了,简直坑到天际!!对面腾讯 QQ 旋风也已停止运营,大家纷纷转投 IDM、Folx 以及限速的百度云了。面对这样的环境,除了买台 NAS 或 服务器 专门用来下载外,只能灰溜溜地往国外寻找一些免费的「迅雷离线的替代品」了。转一圈后发现.
The ProShow Gold 9.0.3 Crack Total variant is also MAC and Window to move as long as you connect the effects’ slides. The amazing video is ready because you want to produce network files. A computer program is a variety of applications that offer the opportunity to enhance indoor enjoyment as it can produce connectivity slides. However, this is just another name for Photodex that will eliminate slipping.
Provides direct access to a simple object and the addition of a computer slide, gambling, photos, and the ability to use computer data. .You can get video copyright with over 350 results with the filtering wizard. Ready to chat with masterpieces to access file editing like 4k, DVD, Blu-ray, and socialize on Facebook and more.
ProShow Gold 9.0.3 Crack Registration Key Free Download (2021)
The ProShow Gold Crack mobile version further explores the product to provide you with great features everywhere. ProShow Gold Record Flip a car slide to speak and increase the power of multimedia life. To put it another way, pictures, photos, videos are gathered in one place, shared across websites, and add multiple layers. Easy and simple tools for company development and improving its regulatory power by breaking editing category, visualization, and video activation program, to start over and access it later. It is a great opportunity to learn and discover your talents. This feature maintains a memorable moment and allows you to edit the format from the outside. To enliven digital life; Provides effects to shine images with editing, video, photography. Once you say a crack to give a key, it reinforces everything personally. Here is the perfect choice for displaying images; images are also generated from the page, and you immediately enjoy social media files.
The computer application has cosmetics to create the perfect tool. It can adjust the data flow when extracting data and then fix blemishes. This encourages beginners, students, and small business developers. Reflects instant accessibility to images and videos, then uses technology; moreover, instant data changes the enrichment program of your business. The transformation process is simple to maintain and adjust the zoom results, and in addition to 3D effects, start panning around the images. Photoproduction, authorization process can rotate photos.

The neat data layout and stimulating plug-in-play will be flexible to give you a great opportunity to achieve multiple adjustments. These are special effects and packages when you want to guarantee the data that you will impose. It is an advanced variety where it is possible to make a slide—a way for pets to digitize the life you want to embrace. ProShow Gold 9 may be the latest version of this application; it has the capacity to track movement, mix, compose music and create multiple effects that will be controlled by recording. Motion control can be your skill in this program. As it is installed, you can capture and interrogate sounds. Besides, you can justify and use the results with modifications.
Folx Pro Mac Torrent Downloads
ProShow Gold 9.0.3 Crack With License Key Full Version Torrent Download:
Folx Pro Mac Torrent Downloader
ProShow Gold Crack Main Features:
Allows you to choose from carefully selected collections of built-in colors.
Create your own color palettes with your favorite colors.
Check out free colors to help you create the perfect color palette.
This last color overview gives you a broader overview.
Check out Color One and your brand new color side by side for quick contrasts.
Adding videos to your screens is much faster now.
Download videos up to 3 times faster.
Improved video import functionality for various formats.
New miniature memories. Allows you to add predefined scripts with one click.
Many pre-installed thumbnails are included.
Create your own favorite preset blur modes.
The Today tile method remembers the last settings used.
Key Features:
A reliable tool for fixing videos, adding pictures by drawing in a program
Many overlays on Results and shows a wizard that uses slides.
Sooner or later, it will be longer for you, then place, 3D, then rotate, zoom, and the acceleration goals are listed here.
Instead of controlling movies’ movements, you can inspire people; images are generated with just a click.
Adjusting the Runtime Error to Customize the Business Enterprise, Create a Catalog to Achieve Monitor
Accessibility Building Rate
Promotes photo editing, red-eye imitation, and device-based customization formats
There is a great program for quickly creating faster images, 4k output signal, filter effects, and Allnew output.
You can get more technological modifications by activating the mobile phone variation.
Proceed directly from ProShow Gold to the manufacturer’s variant, also summarize the information across the desktop.
The photos you will now find on MAC, Mobile, PC are constantly using the information digitally.
You can inspect your facilities and work easily.
A person can currently recreate the color of the titles, display font, and then bring it in to create a title.
Moves straight up and up with the flight function
What’s new in ProShow Gold Crack?
See the press list for almost all movies.
Easily see where you have saved your printed images.
Use Windows Explorer to open or even find your printed images.
First, gather a lot of output and put them in order.
When you are ready, start the queue and let ProShow do all the output.
Perfect for letting ProShow create all your movies.
To manage the queue, add, remove and rearrange the output at any time.
Create high definition videos with preset settings for fresh 4K video output.
Take advantage of Internet video windows, computers, and computers.
1.5 times faster video encoding than the previous version.
Improved support for PAL MPEG-4 movies.
New and improved video profiles for web, devices, and computers.
Get up to 2 times more time to destroy H.264 videos from trusted computers.
4K video is four times larger than a 1080p screen.
Modern computers are suitable for development and faster use.
Improved video printing on selected devices.

Folx Pro Mac Torrent Free
System Requirements:
Microsoft Windows Windows 7 32/64-bit up to the latest version (for as long as Microsoft still supports the OS.)
Ram A minimum of 4 GB for 8 GB RAM to Operate.
Processor Intel Core i3-2100T @ 1.3GHz or AMD FX-4100 @2.5 GHz
iOS 10.12 (Sierra), 11.0 (Big Sur), and Later Version.
Linux Debian or RedHat-based distros – best effort
Size 4 MB
Folx Pro Mac Torrent Download
How to Download, Install, and Use?
The first thing is to download the ProShow Gold Crack installation files in the given link below.
Extract the archive Crack installation file using WinRAR/WinZip.
Run the installation file “setup.exe” and keep clicking until it prompts you to select the installation folder.
Please indicate the location on the disc where you want to install the software during the installation process.
After the installation process complete, do not start the software immediately.
Open the Readme file; you should find it in the installation folder.
After selecting a folder, execute the Patch file, hit the next button/Copy the keygen file, and paste it.
The correction may take a few seconds, and it will be Cracked.
After finishing
Conclusion:
ProShow Gold Crack is a photography application that helps you preserve your memories, the most memorable moments of your life. Integrate many colors, images, smart fonts, bring your creativity, and video designs for your relatives and friends. ProShow Gold lets you choose from various live transition effects, music, video notes, movie previews, and movie clips in various formats.

Allows you to use over 950 transition effects, including images. You can also add a soundtrack. ProShow Gold, on the other hand, is clean enough to use; On another hand, it has many useful features, from automatically synchronizing the audio playback time with the time of this slide show to a very convenient recording of the created work on DVD and VCD. Proshow Gold software supports professional video production for the popular IT community along with Proshow Producer. Proshow Gold has an easy-to-use interface.
1 note
·
View note