
Don't wanna be here? Send us removal request.
Statistics
We looked inside some of the posts by loginworks-blog and here's what we found interesting.
Average Info
Notes Per Post
2
Likes Per Post
2
Reblog Per Post
0
Reply Per Post
0
Time Between Posts
4 days
Number of Posts By Type
Link
1
Text
16
Last Seen Tumblr Blogs


Fun Fact
Tumblr was the first site to host the blog for President Barack Obama in 2011.
Text
Bidirectional Relationships and Ambiguity in DAX
IntroductionActivating bidirectional/two-way cross-filter during a tabular data model may produce ambiguous paths in the chain of relationships, resulting in very dangerous models as numbers become unpredictable. This blog provides an in-depth clarification of the kind of ambiguity which may seem when using two-way/bidirectional relationships.

You may set a relationship to be unidirectional–its default actions–or bidirectional. In a unidirectional relationship, the background of the filter is propagated from one side to the other, but not the other way around. In other words, a Consumer Filter automatically filters Sales in the following example, whereas a Sales Filter does not spread either to Product or Customer or Date.
This behavior works well in most scenarios. Indeed, a report generally slices sales amounts by a customer or product attributes. It’s quite uncommon to filter customers, or products, based on sales.
Therefore, why would one enable bidirectional filtering? The most common reason is to sync slicers.
Look at the following report where there are two slicers–one for the customer name and one for the product color, with a matrix providing sales details:
The report does work well; it reveals the purchases made by Amanda. Nevertheless, the color slicer does not filter out the few colors that Amanda has bought. One can easily see which colors she purchased by adding the color to the chart, yet the slicer doesn’t provide the user with simple feedback. The explanation for this is that the customer’s filter hits Sales. Therefore, it only filters the selected customer’s income. But the filter does not necessarily flow from Sales to Consumer, as a default unidirectional relationship is established between Product and Sales.
Product–Sales Relationship as a Bidirectional Relationship
There is a simple solution to the problem: set the Product–Sales relationship as a bidirectional relationship. By doing so, the filter automatically propagates from Sales to Product, so that the slicer displays only the chosen customer’s products (thus, the colors). The result is fairly nice:
Many Power BI users are aware of bidirectional filters for slicer synchronization purposes. The software was clear and sound with unidirectional filters. The relationship update looked simple and realistic. Unfortunately, the data model has now been transformed into a data monster through the enabling of a simple bidirectional filter, whose behavior is complex enough to be unpredictable. That’s a strong statement, and that clarification is dedicated to the rest of the blog.
The resulting pattern is not so different from the original model. The only (minor, not very noticeable) difference is the presence of a double arrow on the Sales–Product relationship.
Now look at the model before moving on with the article, and check where the ambiguity is. You need to find two tables that are connected by different paths, following the cross-filter arrows.
Sure, have you just found them? Fantastic! you discovered you could hit Purchases in two different ways, starting from Date:
From Date to Purchase: this is the direct relationship between the two tables in the figure below, marked as (1).
From Date to Sales, to Product, to Purchases: this is a longer route, marked as (2) within the figure, which is entirely legit.
The figure below shows the two paths:
We produced an uncertain model, and yet the engine didn’t complain. The explanation for this is that the engine determined by comparing the two paths that one direction should be preferred to the other. In this case, the choice seems straightforward: since one of the two relationships (1) is direct, it’s the preferred path. The engine, therefore, uses the shortest path when a filter needs to be moved from Date to Purchases and avoids the longer one.
This is an artificially simple scenario: There are two paths, one of which is the best. Making more complex scenarios where that option is no longer clear is completely simple. However, the engine’s algorithm for selecting the desired route isn’t that straightforward. It selects the shortest path wherever the primary relation is closest to the filter. If this last phrase sounds confusing, then that is by design. The algorithm is extremely complex for a human to analyze and comprehend. The algorithm, on average, almost always chooses the path a human would have chosen, but its definition is much more complicated to be a generic algorithm. We are not going to expand further on that.
Though one path is preferred over the other, there are still two possible paths from Date to Purchase to propagate the filter. Both paths can be followed in a single expression in some situations resulting in ridiculous results; let’s dig into this further.
We know that by following the most direct relation, a filter moves from Date to Purchase. The figure below shows the full model, with colored and numbered paths.
We authored three different measures. The below measure is just the purchase amount.
Purchases = SUMX(Purchass, Purchases[Quantity] * Purchases[Unit Cost])
The below two measures disable one of the conflicting relationships: either the relationship between Date and Purchase or the relationship between Date and Sales:
1.) Purchases =
CALCULATE (
[Purchases],
CROSSFILTER ( 'Date'[Date], Purchases[Order Date], NONE )
)
2.) Sales =
CALCULATE ( [Purchases], CROSSFILTER ( 'Date'[Date], Sales[Order Date],
NONE ) )
No need to comment on every single number. It is sufficient to note that the matrices produce three distinct results. When CROSSFILTER, disables one of the two relationships, then Date filters Purchases using path 2 or 3.
When each relationship is active, Date filters Purchases through the combination of all three paths, as we mentioned earlier.
As you noted, this blog is not about showing the power of DAX or some interesting algorithms. This blog demonstrates how dangerous bidirectional cross-filter relationships are with a very simple data model containing only five tables. The presence of a bidirectional cross-filter relation made the calculations much more difficult to understand. The situation is much tougher in the real world, where it’s normal to have models with hundreds of tables.
So, we recommend that our readers stay away from having in the data model two-way/bidirectional cross-filter relationships. Bidirectional relationships are not bad or are a useless feature. There are some cases where bidirectional cross-filter functionality is useful.
Nonetheless, these must be carefully leveraged to ensure the model does not become ambiguous due to the bidirectional relationship. Implementing bidirectional cross-filter for the use of syncing slicers is not a good idea. After all, you don’t turn on the Death Star if you need to kill ants at the yard.
This is not to suggest that in any way, synced slicers are evil-they’re great. If slicer syncing came as a feature in Power BI, it would be great. So the users would stop using bidirectional relationships for that purpose.
Next time you are tempted to enable bidirectional cross-filter on a relationship, return to the current blog; read it once more and take another shot at it.
Conclusion
We must be very careful while creating relationships between the tables. We hope you have understood the concept of a bidirectional relationship. For any query, please comment in the comment section. To know more about our services, please visit
Loginworks Softwares
0 notes
Text
How to Get Amazon Buy Box
Amazon has two types of sellers: (1) Amazon itself, which sells a wide array of products.
(2) Third-party sellers, which usually specialize in one or more.

Since the number of retailers that can use Amazon’s website is not limited, numerous merchants sometimes offer the same item.
Such sellers are known as resellers (as compared to selling private label where you sell a proprietary item).
If many Amazon resellers sell concurrently, there is an immediate rivalry for which the seller to win the Buy Box.
Definition
The white box on the right side of the details page of Amazon’s product is called the Buy Box, where consumers can add products to their cart to buy. Not every seller acknowledges winning the Buy Box.
Of all Amazon sellers, 82% for Amazon orders go through the Buy Box, and the percentage for mobile purchases is even higher.
Each seller wants their product to be the one that gets selected when a buyer clicks “Add to Cart” or “Buy Now.” If you are the seller represented in the buy box, your product is the one that is added to the shopper’s cart (or the one it buys straight away).
How the Buy Box Works
It is algorithm-based and considers several variables to determine which product offering the best balance of high seller performance and low cost to the consumer.
Amazon states directly that their goal is to “give the customers the best possible shopping experience.” Therefore, “the sellers must meet the performance-based requirements to be eligible to compete for Buy Box placement.”
Amazon offers the best possible experience for its customers. The Buy Box provides, among the products, amazon a mechanism for comparing multiple offers on the same ASIN to determine which product offer will give that best “experience” to the customer.
What Makes the Seller and His Product Stand out in a Crowded Market Filled with Other Sellers
The answer is Buy Box; it provides you:
Visibility: A Buy Box is the most valuable segment of real estate in the Amazon seller community. Winning a Buy Box amplify your success on Amazon and builds a strong, positive reputation for your brand. People trust you.
Credibility: Buy Box winners are only chosen because they meet out of the ordinary standards carefully selected by Amazon. If one of the world’s largest e-retailers is ready to support your product, customers will trust you too.
Exclusivity: The very interesting fact is that only one seller of a product can win a Buy Box. That makes you the only seller of (insert your product here) with the convenient, one-click buying feature that promotes your brand value and grows your business.
Define Organic SEO
In brief, Organic search engine optimization (organic SEO) refers to the methods used to obtain a high position (or ranking) on a search engine results page in unpaid, algorithm-driven results on a given search engine. Various methods, such as boosting keywords, backlinking, and writing high-quality content, can all improve a site’s page rank. Wherefore Black hat SEO methods, such as the use of keyword stuffing and link farming, can also boost organic search engine optimization.
Who Qualifies for the Amazon Buy Box?
Individual sellers aren’t eligible. A Professional plan costs $39.99/month comes with privileges—one being access to the buy box.
The products sold by sellers must be new and available in stock.
It is in the best interest of Amazon to bring high-quality vendors to its customers who offer affordable prices.
Google organizes the organic search results to give users the best possible search experience; Amazon grants buy box rights to give customers the best buying experience possible.
What Can Be Done to Win the Amazon Buy Box?
You have to Create a Professional seller account.
Only Use Fulfillment by Amazon (FBA). Fulfillment by Amazon (FBA) is one of two approaches that an Amazon seller can use to fulfill the orders. While Fulfillment by Merchant (FBM) allows you to pick up, pack, and ship any order you receive, FBA hands off those responsibilities to Amazon.
Make your pricing competitive: Amazon doesn’t necessarily afford to buy box privileges to the seller offering the lowest price, it’s important to list your product at a price comparable to your competitors’ prices.
Minimize your shipping time and 24/7 support.
Give your customers the best experience as much as possible: content is truly useful to the reader. If you’re not helping the reader, you can’t expect good organic search rankings, regardless of how highly you’ve optimized your meta-tags and image names.
Buy Box Alternatives
Losing or if you do not have the buy box, it doesn’t mean all chances of product sales are gone. There are two other places where the buying option can appear: is Other Sellers on Amazon.
You can see the box directly under the Buy Box; up to three additional sellers are featured in this section. Sellers who are looking to be included in this segment must meet the minimum Buy Box eligibility requirements. Amazon decides what deal is advertised based on a variety of variables, including quality, availability and the customer’s shipping address.
All Offers Page
From the Other Sellers section on Amazon, you can click to view the All Offers page. This page concludes of all offers for a certain product, regardless of Buy Box eligibility.
Here are the hacks for the seller to fulfill the minimum requirements of the buy box factor shown in the image below:
All the ingredients that contribute to obtaining the Buy Box
Conclusion
While in the world of Amazon. The Buy Box is like the precious trophy which every seller wants, but only one seller gets. The seller who wins the Buy box can expect to see a positive impact on his product sales.
We hope you had a wonderful read. To know more about our amazon services, please visit Loginworks Softwares
Please feel free to share feedback and comments in the section below. Please spread the knowledge by sharing it on your social media handles and among your friends.
0 notes
Text
How to Become Amazon Top Seller
The Basic Concept Used by Amazon for Ranking Best Seller
The Amazon Best Seller Rank is a calculated algorithm based on a product’s sales and keeps the ranks updated hourly. The rank allocated to sellers also takes into consideration the product’s current sales and the history of sales. A product with a rank of “#1” indicates, in that particular store, it has recently sold more than any other product in that category.

Advantages of Being Amazon Best-Seller
You can handle the traffic that comes to Amazon.com, which is 150 million people in the United States alone per month.
You can add the title “Amazon Bestseller” to your websites and marketing materials. As everyone knows, Amazon and everyone know that you need to face a lot of competition around the world to be an Amazon Bestseller.
Getting named an “Amazon bestseller” earns you instant recognition and makes you an expert in your profession.
Once the Amazon and Google know who you are, the sky is the limit to brag about being the bestseller for Amazon.
Algorithm Used by the Amazon to Rank the Best Seller
Amazon aims to maximize revenue per customer, that is,
By rising customer numbers.By increasing the mean size of the transaction.By increasing transaction frequency by customers.Rising the prices of products even.
The algorithm used to evaluate the rank of the seller is as follows:
The use of human judgments.Programmatic analysis: The buying, marketing, and advertising of programmatic media is the algorithmic buying and selling of real-time advertising space. Using the bidding system, the software is used in this process to automate the purchase, placement, and optimization of media inventory.Key business metrics.Performance metrics.
Factors Affecting the Amazon Sellers
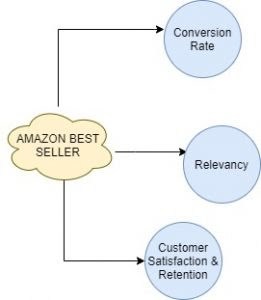
Conversion Rate
Customer Review
Answered Question
Image Quality and Size (allow buyers to see seller product in more detail)
Price It is essential to list your product at a price comparable to your competitors’ prices. Neither too high nor too low.

Parent-Child Relationship It helps the customers to view different versions of the product. For example,

There are three elements of a parent-child relationship as follows:
The parent product: The product displayed in the search results is parent product.The child products: The products that have the same parent product are child products of that parent product.The variation theme: The variation theme shows the relationship between the parent and the child.
Time on Page and Bounce Rate The total amount of time a customer Spends on the Product pages shows the Amazon, that how customers are interested in your product.
Product Listing Completeness Complete every single field present in the listing setup page.

Relevancy Factors
Title A good product title will increase the conversion rate of the seller. To optimize the seller’s Amazon product title, it should contain keywords; the title should be easy to read and must be under 200 characters.

Features/bullet points The seller should display the product features in detailed bullet points, which include keywords (like below), which is a great way to increase conversions.
Product description The seller should display the product features in detailed bullet points, which include keywords (like below) so that it is a great way to increase conversions.
Brand and manufacturer part number This helps buyers searching the products by its brand name more easily and showing the more relevant and best seller.

Specifications As we know, the specification section is the technical and physical details of your product, including size, shipping weight, color, etc. Completing every field of this section shows Amazon that you’re diligent when it comes to listings.
Category and sub-category When the seller is setting up his product listing, he should make sure that he selects the most relevant category for his product.
Search terms Amazon gives you five fields with a character limit to specify the search terms that you want to be associated with your product, which helps in Search Engine Optimization (SEO).
Customer Satisfaction and Retention Factors
Negative seller feedback In the Amazon, product comment feedback section, all negative feedback counts against you equally in terms of product search results.

Order processing speed To be successful Sellers on Amazon, the seller needs to ship fast and accurately. Therefore being a seller, the seller ranks higher with efficient order processing.
In-stock rate Amazon likes the seller, who keeps a high in-stock rate to minimize refunds and pre-fulfillment cancellations.
Perfect order percentage (POP) The seller who achieves a higher percentage of perfect orders will rank higher than those sellers who experience order issues.
Order defect rate (ODR) When a customer makes a claim against an order, this is considered an order defect. Defects include negative buyer feedback, A-to-Z Guarantee claim, shipment problems, and chargebacks or refunds.
Exit rate Exit rate is the percentage of times a customer views sellers listing and then exits Amazon. Products with a lower exit rate will always rank higher in comparison to other sellers.
Conclusion
Hereafter becoming the amazon best seller, the next most important to achieve the Buy Box. Which boosts the sales of your product. If you are a top seller, there are high chances that you can win the Buy Box.
The Buy Box refers to the white box on the right side of the detail page of Amazon’s product, where customers can add items to their cart to buy. Hence, winning a Buy Box develops your success on Amazon and builds a strong, positive reputation for your brand.
Thanks for reading. We hope you enjoyed the post. Please post it on your social handles and share it with your friends if you like it. We will be delighted to hear your feedback. If you have any questions, please feel free to ask them in the comment section below.
Previous article
How to Use Dynamic Row-Level Security with Power BI
0 notes
Text
How to Build a Machine Learning Model in Power BI
A beautiful visualization has a clear objective, a message or detail, or a particular perspective on the information, designed in order to convey a message to the audience. Reports should be as possible as easy to understand the data, without any hassle and complexity. There are various business intelligence tools that are present in the market, such as Power BI, Tableau, QlikView, Qliksense, Klipfolio and so on.

Power BI is a business intelligence tool, which gives you multiple data connectivity sources. Together with a variety of visuals to represent your data. Therefore, you can instantly share your BI reports anywhere and on any device.
In this blog, we will learn how to build the machine learning model in Power BI. Following are the overview of the steps we will be covering:
Create a dataflow with the input data
Create and train a machine learning model
Review the model validation report
Apply the model to a dataflow entity
Use the scored output from the model in a Power BI report
Before that, let us discuss what is Machine Learning Model in Power BI?
Automated machine learning (AutoML) for dataflows enables business analysts to train, validate, and invoke Machine Learning (ML) models directly in Power BI.Power BI Premium and Embedded provides the feature of Auto ML in Power BI in all public cloud regions.
AutoML in Power BI Enabled Users To
Train a machine learning model to perform Binary Prediction, General Classification, and Regression
View the model training report
Apply the ML model to their data, and view predictions and explanations
The steps to build the machine learning model in Power BI are as following in brief:
Create a Dataflow with the Input Data
Get DataTo create dataflow first have your data ready to load in the Power BI Premium. You should use a machine learning dataset, which you can download from online sites like Kaggle and so on.
Create the Entities
To create the entities in your dataflow, sign in to the Power BI service and navigate to a workspace on your dedicated capacity (exclusive use by an organization) that has AI-enabled.
Select dataflow.
Click add new entities. After that new page launches the Power Query editor in the browser.
Select the Text/CSV file as a data source.
In the Connect to a data source page that appears next, load the file URL or address into the File path or URL box, and then select Next.
The Power Query Editor shows a preview of the loaded data from the CSV file. You can also change the name of the Query by changing the value in the Name box found in the right pane.
Power Query automatically infers the type of columns. You can change the column type by clicking on the attribute type icon at the top of the column header.
Select the Save and Close button to close the Power Query Editor. Provide a name for the dataflow, and then select Save on the dialog box.
Create and Train a Machine Learning Model
To add a machine learning model, Select the Apply ML model button in the Actions list for the base entity that contains your training data and labels information, and then select Add a machine learning model.
We have to select the type of machine learning model to create.
Power BI analyzes the data field and suggests the types of machine learning models that can be created to predict that field.
The model will be created by learning from this data.
Power BI does a preliminary scan of a sample of your data and suggests the inputs that may produce more accurate predictions.
Select True the entity interested in predicting.
Select Next to accept the inputs and Name the model.
Then select Save and train to start training the model.
The Ready status indicates that the model has been queued for training or is under training, it is shown in the model in the Machine learning models tab of the dataflow.
Review the Model Validation Report
To review the model, select the View training report button in the Actions column for the model, in the Machine learning models tab.
Therefore, you can use the Probability Threshold slicer on the Model Performance page to examine its influence on the Precision and Recall for the model.
Apply the Model to a Dataflow Entity
Apply the model button at the top of the report to invoke this model.
Specify the target entity that has the source data to which the model should be applied.
Once the dataflow refresh is completed, you can select the entity to view the result.
Use the Scored Output from the Model in a Power BI Report
Now the output of the machine learning model entity can be used to incorporate the predictions from your model in Power BI reports.
Conclusion
AutoML supports the creation of Binary Prediction, Classification, and Regression Models for dataflows. These are kinds of managed AI systems, which implies that they gain from the known results of past perceptions to anticipate the results of other observations. After a Machine Learning model is prepared, AutoML consequently produces a
Power BI
report that clarifies the likely performance exhibition of the Machine Learning model.
Microsoft is constantly including the new improved and more advanced highlights features identified with Machine Learning and Artificial Intelligence into the Power BI updates. Stay updated and check out blogs on monthly Power BI updates.
We hope you had a wonderful read. To know more about our data analytics services, please visit our website.
Please feel free to share feedback and comments in the section below. Please spread the knowledge by sharing it on your social media handles and among your friends.
0 notes
Text
How to Use Dynamic Row-Level Security with Power BI
There are different methods in Power BI for using row-level security; either you can set up Row-Level Security in Power BI itself, or you can set up a live link from a data source such as SSAS Tabular. Nevertheless, row-level security defined in the ways suggested in the following blog posts is not dynamic. By dynamic row-level security, we mean the definition of security to be in the data source next to the user account information. For example, when John logs in to the system, based on data tables showing John is a sales manager for the particular branch, he should be able to see only the data from those branches.This method is possible in Power BI using DAX UserName() or UserPrincipalName() function. In this blog post, we will show you an example of dynamic row-level security with DAX USERNAME() function in Power BI. If you like to learn more about Power BI, read Power BI online book.

Why Dynamic Row-Level Security?
The most important question is why dynamic row-level security? To answer this question, you need to think about the limitation of static row-level security. Statics row-level security is simple to implement; however, if you have thousands of roles, then it would be a nightmare to maintain. For example, if you want to create a payroll Power BI report, in a company with 10,000 users, you want every user to have his/her role. Dynamic row-level security is the answer to such scenarios.
Sample Data
For this example, we will use data entered in Power BI itself. There won’t be any external data sources. This doesn’t mean that dynamic security has an issue with external data sources. Dynamic security works with any data sources as long as we have related data rows in the tables. However, if we use on-premises data sources, then half of this example should be explaining installation and configuration gateways, or if we use Azure data sources, then again, we have to explain how to set up that example. So just for the simplicity of this example, we will be using data sources inside Power BI.
For this example, let’s create two simple tables; Sales Rep, and Transactions. Sales Rep has information from sales representatives, and transaction data is sales transactions — each sales transaction handled by a sales rep. So let’s create sample tables in Power BI. Open Power BI Desktop and from External Data section choose Enter Data.
Create the TableCreate a table as above with three columns and data in it. You have to use usernames similar to Power BI accounts that you want to set up security for it. Name this table as Sales Rep.
Create another table for Transactions with the structure below, and name it Transactions:
As you can see in the above screenshot, each sales transaction is handled by a sales rep. Do note that these tables are added inside Power BI just for the simplicity of this example. Tables can come from everywhere.
Load tables into Power BI, we do not need to do anything with Power Query at this stage. Go to Relationship tab and verify the relationship between Sales Rep (ID) and Transactions (Sales Rep) as shown below:
Sample Report
For this example, we will be using basic table visualization. The table visualization will show Date, Sales Amount (from Transactions), and Name (from Sales Rep). We have also added another table visualization under that to show username, and Name (both from Sales Rep);
The main reason for this visualization is to show that each user will see only their data rows from all tables. We will also add a measure for USERNAME() in DAX to see the user logged in from my report. So in Data Tab, create a new measure and name it user, with a value of USERNAME().
We would also like to add date/time of refreshing the report with DAX NOW() function (note that NOW() function will return the server’s current time, not the local). So let’s create a new measure and name it Now.
Now let’s add two other table visualizations to the report. One for User, and another for Now. Here is the report’s final view;
DAX Functions: UserName() and UserPrincipalName()
USERNAME() function in DAX returns the username of logged in user. However, there is a small trick for it. If we don’t set up row-level security for our report, the USERNAME() function will return user id, which would be a unique identifier. To have an understanding of what we mean, publish your report to Power BI and browse it to see what you will see.
Without a security configuration on your report, you will see a unique identifier for the username, which isn’t useful. Now let’s set up row-level security and assign users to it to see how it works.
UserPrincipalName() function in DAX works exactly like UserName() function with the difference that it will always return the username (not the unique identifier). So basically, UserPrincipalName() is a better function for testing, but the works both the same in a production environment. Now let’s set up row-level security and assign users to it to see how it works.
Row-Level Security in Power BI Desktop
Here we will only use that technique to filter each role based on their username with DAX username() function. To create security, go to the Modeling tab (you need Power BI at least June 2016 update for this example), Manage Roles. Create a role and name it Sales Rep. and define a filter on the Sales Rep table as below.
1[Username] = USERNAME()
This filter means that logged in users will only see his/her records in the whole data set. As you remember, the username field in the Sales Rep table defined as usernames of Power BI accounts. The transactions table is also related to this table based on Sales Rep ID. So filtering one table will affect others. As a result, this single line filter will enable dynamic row-level security in the whole Power BI solution here.
Assign Users to Power BI Security
Now Save, and publish your solution to Power BI. In
Power BI service
, go to the security setting of the data set you just published (we have named this as Dynamic RLS).
And in the Security tab, add all users to the Sales Rep role.
Note that adding a user here doesn’t mean that they will see data in the report. Remember that this security is dynamic, which means that they will see their data rows ONLY if the underlying data set has a record for their username. They will only see data rows related to their username, not others.
Now, if you refresh the report in Power BI, you will see actual usernames. Because we already set up security for it, so it doesn’t show unique identifiers anymore.
Share the DashboardOther users should have access to the dashboard and report first to see it. Create a dashboard from the main table in the report, name the dashboard as RLS (or whatever you would like to call it).
Now share the dashboard with other users:
Test the Security
Now, if other users open the report, and if their usernames match one of the entries in the Sales Rep table, they would see their names, and data rows related to that in the report.
As you can see, John Martin only sees the transaction that he handled and his record in the Sales Rep table. The screenshot showed above is John’s view of the Power BI report. While my view of this report would be different, we will see the two transactions and our name under Sales Rep.
Summary
You have seen how easy it is to use Dynamic row-level security in Power BI using DAX USERNAME() or UserPrincipalName() function. With this method, users will see their view of the world. However, you need to make sure that your Power BI model has a relationship set up properly. Otherwise, people might see other table’s data when there is no relationship between their profile table to those tables. Dynamic row-level security is highly dependent on your data model, so keep your data model right.
0 notes
Text
How to Implement Single Sign-on Using Active Directory
Single sign-on (SSO) provides protection and flexibility as users sign in to the Azure Active Directory (Azure AD) software. In this blog, we will describe “How to implement single sign-on using active directory.” Let us begin this exciting journey of knowledge.

What is Azure?
Microsoft Azure is an application cloud computing of various cloud services. Hence it helps to meet business challenges inside an organization. It is also known as Windows Azure.
For example, there are several services that users can select from these platforms to build and scale new applications, or run existing applications, using your favorite tools and frameworks in the public cloud.
Microsoft created cloud services to deploy the services like, for building, testing, deploying, and managing applications and services through Microsoft-managed data centers.
How Does Azure Work?
The fact is, Azure provides the services, uses the solutions including Infrastructure as a Service (IaaS), Platform as a Service (PaaS), and Software as a Service (SaaS).
Consequently, the Azure takes the virtualization technology and therefore rethinks it on a massive scale in Microsoft data centers around the world.
Azure is an enormous array of servers and network hardware, along with a complex set of distributed applications that plan or organize the configuration components, virtualized hardware functionality, and software for these servers. It is this orchestration that makes Azure so efficient: for users, they are not now responsible for maintaining and updating the hardware, because Azure is taking care of all this in the background. Now let’s talk about the Azure Active Directory and how Single Sign-on provides smooth access.
What Is the Azure Active Directory?
Azure Active Directory
is a fully managed Microsoft multi-tenant service that offers identity and access features for applications running in
Microsoft Azure
and on-premise systems.
What Is Single Sign-on (SSO)
In brief, Single sign-on (SSO) adds security and convenience when users sign-on to applications in Azure Active Directory (Azure AD). Whereas, administrators can centralize user account management and automatically add or remove user access to applications based on group membership.
What Is the Importance of SSO
With single sign-on, users sign in once with one account to access the other domain-joined devices like company resources, software as a service (SaaS) applications, and web applications. After that, a user signing in, the user can launch applications from the Office 365 portal or the Azure AD MyApps access panel.
Without single sign-on, users have to remember application-specific passwords and sign in to each application. Therefore, IT staff needs to create and update user accounts for each application, such as Salesforce, Office 365, and Box. Hence, users need to remember their passwords, plus spend the time to sign in to each application every time.
Azure Active Directory SSO Integration Guide
Single Sign-on Mode: set to SAML-based Sign-on
Set both Sign-on URL and Identifier to the base URL of your PagerDuty login page, https://(your-subdomain).pagerduty.com
User Identifier: set this to user.mail.
Set the Namespace field to empty.
Set Name “name”, value user.displayname for the user’s full name
Name “emailaddress”, value user.mail for the user’s email
Name “jobresponsibilities”, value user.jobtitle for the user’s job title
X.509 SAML signing certificate,
Login URL
Logout URL
Key Benefits
Users are signed into both on-site and cloud-based programs automatically.
Users needn’t constantly insert their passwords.
No additional components needed on-premises to make this work.
As a result, it works with any method of cloud authentication – Password Hash Synchronization or Pass-through Authentication.
It can be rolled out to some or all your users using Group Policy.
First, Register non-Windows 10 devices with Azure AD without the need for any AD FS infrastructure, and this provides the capability you to use version 2.1 or later of the workplace-join client.
Check out our data analytics services to make your business better. With utmost satisfaction, we promise our clients the highest quality of work. Visit Loginworks Softwares to learn more. We hope you enjoyed this post; we would be very grateful if you could help spread it by emailing it to a friend or sharing it on Twitter or Facebook. Thank you!
0 notes
Text
BI Tools: Power BI Vs Tableau Vs Google Data Studio Vs Looker
In this blog, we will review the comparison among the most popular BI tools. Big data is only as useful to our teams as the perspectives and learnings we can imagine. Good thing data visualization tools are available to help us make a beautiful sense of all the numbers.

Companies use software for data visualization to give a better sense of their business data. Using this Business Intelligence software, you can interact, analyze, present, and more, with the data. This makes the data come alive.
In particular, there is a wide array of tools for visualizing data. With a range of features and usages, you can make the data more visual. All you need to do is pick one which is best for you, but with all the options, this can be a bit daunting.
To help you search, we’ve assembled this post to compare Power BI vs. Tableau vs. Google Data Studio vs. Looker.
Meanwhile, here’s a comparison of the leading tools, Power BI, Tableau, Looker, Google Data Studio.
Power BI
Power BI
is a suite of software for visualizing data and for business analytics. It offers tools for the easy analysis, visualization, and transformation of data, including the ability to build reusable models. It offers a user-friendly interface and excellent capabilities for visualizing data.
Who Should Use Power BI?If your company supports Microsoft and you have a team of Excel power users, then Power BI at a low price point would probably work well for you. In addition, the free version is more suited to individual users, with limited storage and other capabilities. Teams would likely want more capacity, quicker refresh cycles, and collaboration features to go with the Pro package.
Pros of Power BILet us discuss some of the most essential pros of power bi.
1. AffordabilityA major advantage of using Power BI for analyzing and visualizing data is that it’s reliable and relatively inexpensive.
2. Custom VisualizationThe Windows Store offers customized graphics. It provides a wide array of concept visualizations. Furthermore, you can use Power BI custom visualizations in your reports and dashboards in addition to the general collection of visualizations available.
3. Excel IntegrationIntegration with Excel helps users view and interact with the raw data behind a Power BI visualization.
4. Data ConnectivityIt can import data from almost all data sources.
5. Power BI EmbeddedPower BI Embedded is another positive aspect of Power BI. An app developer can use this tool to integrate or implement Power BI reports and functionality into web-based or other applications.
Cons of Power BI
Free-version limitations can be frustrating
Could not be exported to PowerPoint by third party visuals
It could be challenging if you are not a powerful Excel user.
Tableau
A tableau is a tool for visualization that helps companies to turn their data into ideas that can lead to action. The platform enables the relation of data from virtually any source in almost any format. In particular, a visual analytics interactive dashboard can be created with simple drag and drop, and data transformed into graphs, maps, charts, and other visualizations.
Who Should Use Tableau?Data analysts, or anyone needing to make sense of any business data, can use Tableau to read data quickly and gain valuable insights. The tool can be a useful way for companies with many clients to keep track of development. There is no coding skill needed to use Tableau. With a cloud hosting service, it may also be a good option for those who don’t want to have more on-site software installed.
Pros of Tableau1. High Performance:The enormous advantage of having Tableau is the possibility to create different forms of visualization at one shot. Therefore, its performance is high.
2. Extensive Customer Resources:Tableau has a large percentage of mobile BI users who regularly deploy. It is putting a great deal of effort into building a healthy mobile customer.
3. Quality Customer Service:Tableau has a user and developer community where the queries are answered quickly. Therefore, it has good quality customer support.
4. Ease of use:It is easy to use because it is a simple software for the user interface. The drag-and-drop interface is also simple, which is very easy to learn.
Cons of Tableau
Dashboards can sometimes be a bit slow
Somewhat limited graphs
It may take some longer to load larger data files
Google Data Studio
It is a free tool for visualizing data, designed to help people bring their data to life. Because the app is Google, it conveniently integrates with other Google apps, such as Sheets and AdWords. In the same way, you can also upload data from many other sources of data. If you already have a Google Account, setting everything up is quick and simple.
Who Should Use Google Data Studio?Google Data Studio is an excellent data visualization tool that is free to use, particularly for startups and entrepreneurs. It is also suitable for consumer use, with its ability to create a wide variety of visual reports custom made.
Pros of GDS
Free to use
Easy for creating simple charts
Data can be loaded from many sources
Clean interface
Cons of GDS
Based on what you’re trying to do, there may be some learning curve.
Connections can sometimes be disconnected from third-party data sources, with data being lost.
Looker
Looker is a business intelligence and data visualization platform that is one hundred percent in-database, capitalizing on real-time results on the fastest and most current analytical datasets. In other words, users can easily customize and create an array of interactive visualizations from the platform’s variety of charts and graphs.
Who Should Use Looker?Looker is a useful business intelligence tool for teams across almost all business divisions and, therefore, the tool is a good choice for anyone looking for something easy to use but still offers plenty of informative visual information.
Pros of Looker
Good customer support
Easy to use
Databases and big data system integration
Cons of Looker
Often larger dashboards take a little longer to load
Not so versatile, because of its simplicity
Without an external resource, it’s a very manual process to get your marketing data into Looker. You can however either use spreadsheets or build in-house APIs (which is very resource-intensive)
Conclusion
If you’re in the market for a business intelligence platform with data visualization capability to help you make sense of all your data, you will likely want to review this list, comparing Power BI vs. Tableau vs. Google Data Studio vs. Looker.
0 notes
Text
Go Beyond the 10 GB Power BI Capacity
Power BI free lets you have 1 GB of data per account and pro 10 GB. Nevertheless, in many organizations, you have a much larger data size than 10 GB, sometimes you are dealing with Terabytes, sometimes more Petabytes. Would
Power BI
restrict you to the visualization? Short Response; No! In this post, we’ll clarify the problems you face when dealing with big data sets. As with any other solution, there are pros and cons of working with Power BI with large data sets, let us explore them together.
Compressed Structure of Power BI
First of all, we have to mention that Power BI effectively compresses every data set before loading into memory, this is one of the major advantages of the xVelocity In-memory engine that Power BI, Power Pivot and SSAS Tabular have built upon. Compression happens automatically, which means you don’t need to set a setup or allow Power BI to do something. Each data set will be compressed at a reasonable level when you import the data into the Power BI.
We have imported a CSV file with a data size of ~800 MB as an example. We had only 8 MB of Power BI file to deal with when it loaded into Power BI. That’s a remarkable compression.
However, the compression rate is not always that way; it depends on the type of data set, the column type of data, and some other details. The bottom line in this section is that if you have a data set that’s more than 10 GB and won’t grow dramatically, then consider loading it into Power BI and see how compact it would be, maybe you get it under a cap of 10 GB and then you’re good to go.
Live Connection
We may interact live with some data sources with
Power BI
, on-site or in the cloud. Okay, here’s the trick; if your data set is large, then use Live contact! Simple trick but useful. You can have a SQL Server, Oracle or whatever data source you want with whatever amount of data you need and build a live link to it with Power BI. The live connection won’t import data into the Power BI model. Live connection brings the metadata and data structure into Power BI, and then you can access data based on that. A question will be sent to the data source with each visualization, and the answer will be carried.
Live Connection to SQL Server On-PremisesConsider an example of such a Live connection to the on-premises database of SQL Server. We have a large table database, comprising 48 million data records. The table itself is about ~800 MB.
We know it’s not more than 10 GB, but even if we have a data table of 10 TB scale, the process would be the same. For this example, this table is large enough to demonstrate how live connections work.
Selecting this table (or any other tables in the data set) and clicking Load will show you the option to choose between Live connection or Import. DirectQuery means Live Link.
After creating the live connection, you can create a relationship in the model, or build visualization for that.
There are, however, some limitations with Live connection, which we will explore later in this post.
** For the Live connection to on-premises data sources, you need to have Power BI Enterprise or Personal Gateway installed and configured.
Live Connection to Azure
There are also a lot of Azure data sources that you can use for the Azure SQL Database live connection, which is the similar SQL Server on-site database engine (with some differences, of course) but on the cloud. Azure SQL Data Warehouse is the framework of the cloud database, which supports both unstructured and structured data. Azure SQL DW is capable of expanding the database’s computing engine irrespective of its storage capacity. And Sparks on Azure HDInsight is another azure source of data that can be used on azure for live access to the big data framework.
Limitations of Live Connection
A live link is ideal for connecting to large data sets and will not load the data into the database, so the solution for Power BI would be very limited. But there are some drawbacks to this type of connection, such as; no support for DAX, no data model formatting in Power BI’s Data tab, no support for multiple data sources, and no support for Power Q&A. Let’s go one by one through them.
No DAX SupportThere will be no Data tab in Power BI with Live link to construct measured ratios, columns, or tables. In the stage of the data source, you have to build all the calculations. This means creating all measured columns or measurements in SQL Server source tables if you have SQL Server as the source. Your modeling should be performed via the source of the data. You could only put in Power BI desktop.
Formatting is also not available via the Power BI Modeling tab. So, if you want to set decimal points, or set a column type, it is not possible to use Power BI. You need to handle all of these using the data source (or Power Query, read further down).
Full Visualization Support
Thankfully, Live communication mode fully supports the Power BI visualization portion. The underlying reason is that, in Power BI, visualization is a separate device. This is one of the amazing reasons why a system built on top of separate components usually works better than a product all in one with no underlying component. You can create any simulation, and you are not going to be constrained at all.
Multiple Data Sources is Not Supported
One of the great advantages of Power BI is that you can integrate data sets from multiple sources, multiple databases or files can participate in the creation of a model. Unfortunately, you won’t be able to have data from more than one data source when working with a Live connection. If you want to get data on the same server from another database, you will be facing messages shown below.
Import Data to add another data source, which is not useful for the scenario of working with large data sets.
No Power Q&A
As you know, one of the features of the Power BI website is natural language questions and answering engines called Power Q&A. This functionality isn’t included in Power BI Live Connection (at the time of writing this post). Your dashboard won’t have a Power Q&A question box at the top when you have a live connection.
Don’t Forget the Power Query
Thankfully, Live Connection also provides Power Request. It helps you to enter tables, flatten them if you need them, apply data transformation, and prepare the data as you wish. Power Query can also set the data types to interpret the Power BI model more familiarly.
You can see in the screenshot above that I joined DimProduct, DimProductSubCategory, and DimProductCategory to bring all fields in one table; DimProduct. And all of that happened with Live Link.
Optimization at Data Source LevelA live connection to the source of data means the report sends queries to the sources of the data. Data Sources are different with regard to response time. Tabular SSAS could produce faster results and a slower standard SQL Server database. Don’t forget that all efficiency and indexing tips should be considered carefully when working with a Live link. When you deal with SQL Server, for example, find proper indexing, column-store indexes, and many other tips for optimization and performance tuning.
Just for a very small example of performance tuning, this is the result we get when we have a standard index of 48 Million records on my table.
It takes 4 minutes and 4 seconds to run a normal pick amount from my table with 48 million records. The same query will respond in less than a second when we have clustered index of the column store; and significantly improved performance when we have a Clustered Column Store index on the same table with the same amount of data rows.
We won’t teach you all performance tuning in this post because that’s an entirely different subject on its own. The most important thing is that; performance tuning for each source of data is different. Oracle, SQL Server, and SSAS performance tunings are different. For this section, your buddy would be Google, and for you to review a huge amount of free content available on the Internet.
We hope you enjoyed this post; you can share your feedback and your opinion about the article in the comment section below.
0 notes
Text
How to Define Microsoft Azure Public Cloud Service
In today’s blog, we will discuss Microsoft technology, in particular, the Microsoft Azure.
Introduction
Have you ever heard the term “Microsoft Azure” and want to know what is inside it?
Let us define the purpose and the meaning of Microsoft Azure. Microsoft Azure is an application cloud computing of various cloud services. Hence helps to meet business challenges inside an organization. It is also known as Windows Azure.
There are several services users can pick; for instance, they can choose to develop and scale new applications from these services, or run existing applications, in the public cloud using your favorite tools and frameworks.
Microsoft created cloud services to deploy the services like, for building, testing, deploying, and managing applications and services through Microsoft-managed data centers.

What Is the Structure of Microsoft Azure?
Microsoft has categorized the Windows Azure Platform into three main components. Follow as Windows Azure, SQL Azure, and Windows Azure AppFabric.
1. Windows AzureAs you know, the Azure window is that part of the Azure platform which runs the applications and also stores the data. Wherefore Windows Azure contains five services.
a. Compute
b. Storage
c. Virtual Network
d. CDN
e. Fabric Controller
2. SQL AzureTo explain, SQL Database is the relational storage service Azure provides to store the relational data in the cloud. Similarly, it is like an SQL server database on the cloud. Note that SQL Database is available as a service on the Azure platform. Similarly, SQL Database contains all common features of the SQL server, such as tables, primary keys, stored procedures and functions, user-defined functions. Not only that, but it also manages transactions and concurrency. The important point here is applications can access SQL databases using different data access technologies such as EF and ADO.NET and WCF Data Services (just like SQL server).
3. Windows Azure AppFabric
Among all components, AppFabric is one of the major components of the Azure platform. Also, the AppFabric resides on top of the operating system and is a set of services. AppFabric mainly contains
a. Service Bus
b. Access Control Service
How Does Azure Work?
Azure provides services, uses the solutions, including infrastructure as a Service (IaaS), Platform as a Service (PaaS), and Software as a Service (SaaS).
Consequently, Azure takes the virtualization technology and rethinks it on a massive scale in Microsoft data centers around the world.
Azure is an immense collection of servers and network hardware, along with a complex set of distributed applications that plan or organize the configuration elements, the virtualized hardware functionality, and the software of these servers. And it’s this orchestration that makes Azure so efficient: users are now not responsible for maintaining and upgrading the hardware, because, in the background, Azure takes care of everything.
What Can Microsoft Azure Do?
Microsoft continues updating a growing directory of Azure services, with more services being added all the time. All the elements necessary to build a virtual network and deliver services or applications to the audience, for example:
Virtual MachinesIn particular, Selecting templates from the marketplace or the custom machine images, Azure creates Microsoft or Linux virtual machines (VMs) in just minutes. These cloud-based VMs will service your apps. Azure VMs services as if they resided in your own data center.
SQL DatabasesIn detail, Azure helps to manage SQL relational databases, from one to an unlimited number, as a service. Therefore, this saves you overhead running costs and expenses on hardware, software, and the need for internal expertise.
Azure Active Directory Domain ServicesLike Windows Active Directory, Azure Active Directory Domain Services built on the same proven technology, this service for Azure lets you remotely manage group policy, authentication, and everything else. Therefore, this makes the moving and existing security structure partially or totally to the cloud as easy as a few clicks.
Application ServicesAbove all, with Azure, it’s easier than ever to create and globally deploy applications that are compatible with all the popular web and portable platforms. As a result, Reliable, scalable cloud access lets you respond quickly to your business’s ebb and flow, saving time and money. After that, with the introduction of Azure WebApps to the Azure Marketplace, it is easier than ever to manage production, testing, and deployment of web applications that scale as quickly as your business. With the result that Prebuilt APIs for popular cloud services like Office 365, Salesforce, and more greatly accelerate development.
Visual Studio Team ServicesAgain, an add-on service available under Azure, Visual Studio team services, offers a complete application lifecycle management (ALM) solution in the Microsoft cloud. Therefore, Developers can share and track code changes, perform load testing, and deliver applications to production while collaborating in Azure from all over the world. In brief, Visual Studio team services simplify development and delivery for large companies or new ones, building a service portfolio.
StorageMicrosoft’s global infrastructure is reliable to provide safe, highly accessible data storage. As a result of massive scalability and an intelligent pricing structure that lets you store infrequently accessed data at huge savings, building a safe and cost-effective storage plan is simple in Microsoft Azure.
Conclusion
In the Windows Azure platform, Microsoft presents the range of options to enumerate the
varieties of needs. In conclusion, Cloud computing is for developers, taking advantage of cloud platforms.
Also, check out our data analytics services for improving your business. We assure our clients the best quality of work with the utmost satisfaction. To know more, visit
Loginworks Softwares.
We hope you enjoyed this post; if you could help spread it by emailing it to a friend, or posting it on Twitter or Facebook, we would be very grateful. Thank you!
0 notes
Text
How Data Analytics Experts Explain Data Visualization?
Data Visualization and Analytics Experts
Data visualization is all about how you present your data, to the right audience and organization, at the right time. Data visualization is important to make them understand the most of the informative insights effectively.
Specifically, “Beautiful Visualization” explores the process of storytelling with data, communicating with data through using the visual indicators such as color, themes, graphs, charts, tables, and researches the methods to put it all together on a dashboard.

Data Visualization Definition
Data Visualization is the presentation of data into the various pictorial formats in a very attractive and effective manner to reveal complex information from the raw data at a glance. Successful visualizations are beautiful not only for their attractive design but also for elegant layers of detail that efficiently generate insight and new understanding.
Data visualization is both an art as well as the science of data. With a different perspective, people view it as an informative, descriptive presentation of data or the development of the individual and organization.
The success of any visual, which is beautiful, depends on the logic behind it. As well as, the visual’s ability to provide brief access to information through the insights to the users. So that the user gains the information, a visual that does not achieve the goal of providing an accessible way to see and understand trends, outliers, and patterns in data have failed. Because it is the most important factor in determining overall success, the ability to convey information must be the primary driver of the design of a visual.
A beautiful visualization has a clear objective, a message or detail, or a particular perspective on the information, designed in order to convey a message to the audience. Reports should be as possible as easy to understand the data, without any hassle and complexity.
The keys to achieving the beauty of visualization are to focus on keeping the visuals useful, relevant, and efficient, align, data-oriented, coherent. That can reduce the complexity of raw data after visualization.
Human Psychology
Human brains process the colors and the visuals in a pictorial format much better in the context of written text data, even before we are fully aware of it. Consequently, charts or graphs used to visualize large amounts of complex data are easier than reading simple data.
There paid and free open source both types of Business Intelligence tools are present in the market. Paid tools like Microsoft Power BI, Tableau, QlikView, Qliksense, Klipfolio, and free and open-source tools like Google data studio, google sheet.
Free tools have limited visualization features and connections. You can select any of your choices. Finally, before buying, you can take the trial periods, and then further, you can decide which satisfies best to your BI purpose.
Business Intelligence Tools
BI tools provide you with a variety of features and functionality. However, distinguishing and filtration of data can be shown using the inbuilt visuals. Also, the custom visuals feature like the charts, plots, graphs, matrix, tables to fetch the information statistically correct.
The much more improved data now can give you improved sight as well as makes it easy for faster decision making for various and important industries.
Microsoft Power BI
As we have different clients associated with our Loginworks data team, most clients like Microsoft Power BI more. The certain reason behind it is that it is affordable and relatively inexpensive to other tools. The Power BI Desktop version provided by Microsoft is free of cost. You can download and start using it to make reports and dashboards on your computer. You have to buy the paid version of Power BI Pro to publish the report on the Power BI service workspace, to share the dashboard with others. The Power BI Pro version will cost $9.99/user/month.
Data Analysis Expression (DAX)
The drag and drop functionality makes it easy to learn and create the report. Data manipulation and Data modeling can be done with ease with the Data Analysis Expressions (DAX) functionality of Power BI. These expressions are the collection and combination of functions, operators, and constants, and they are used as one formula to give the final result. In a similar manner, DAX function is similar to Excel functions, while the DAX is much more advanced. If you are aware of the Excel and its functions, you can handle DAX easily.
Moreover, the main goal of data visualization is meaningfully communicating information. Data Visualization has fascinating effects on decision making. Predictive analysis, as well as the sentiment analysis, can be done using data analysis.
Accordingly, various company organization uses it for analyzing their advertisement or campaign data for the benefit in the organization business.
Scope of Data Analysis
At the dawn of the digital age, there is a lot of data present, but all the data we have in the world is useless if you can’t understand them. Data in the form of visuals can help you identify trends and direction of the graphs.
We hope you had a wonderful read. To know more about our data analytics services, please visit our website.
Please feel free to share feedback and comments in the section below. Please spread the knowledge by sharing it on your social media handles and among your friends.
0 notes
Text
Business Benefits Using Data Visualization
Introduction
In today’s blog, we will discuss Data Science, particularly the Data Visualization field.
The more eyes you have on a set of data, the more useful the data can be proved for you. Being able to tell stories with data is a skill that’s becoming more and more important in our world of increasing data and desire for data-driven decision making.

Effective data visualization can show the difference between success and failure factor with the data communication, finding insights from the data, studying the hidden pattern in the data.
Data communication with the interactive dashboard can help to get your point across to your audience, entire organization, or the associated clients. You can show the entire working of the organization, effective and noneffective factors in the organization, rate of work going in the different departments. This way, you can know how to make organizational or business decisions to move in the direction of success.
What is Data Visualization?
Data visualization is a great technique to discover relationships and patterns between business and operational activities in the business. Singularly, they do this by making it easier to see how your daily activities affect your overall business performance. Thus, allowing you to discover which operational changes generated the change in business performance. By visualizing data, you can compare your company’s current performance with past performance to predict metrics such as monthly sales or KPIs for future better performance.
Many corporations use the particular tools of their selections. Therefore, you have got immense choices to pick from. The adviser will give you a glance at the services they provide. As per the client’s requirement, they provide their best outcome. For most of the part, they provide transparent insight into how the work should proceed in the company. Likewise, the expenses factor of the company, correct investment, total man-hours required for an effective result, reviews of the business products whether the customer is happy or not, company relations with other companies. Subsequently, plenty of facts that affect the organization or business in any respect, whether or not internally or outwardly. This may facilitate the business to boost.
In summary, data visualization gives a clear insight into how the works should go, the expenses, correct investment, man-hours, reviews, relations with other firms, and many more facts which affect the organization or business in any respect, whether internally or externally. This would help the business to improve.
What Data Analyst or Experts Do? A Data Analyst interprets data and turns it into information from various sources and interpret patterns and trends that can offer ways to improve business — as a result, affecting the business, making it easier for future decision making, and the researches. They make data more effectively interesting visually, which makes it easy for the audience or client to understand better than to understand the raw data.
You can hire analysts or consultants. The consultant or the consulting company can provide you a brief description of the services they provide; they offer you the services with proper documentation. You can choose the right one for your service; they will give their best outcome.
The BI ToolsBusiness intelligence (BI) tools are types of application software that collect and process large amounts of unstructured or structured data. Data including internal and external data sources, including books, journals, documents, health records, images, files, email, video, and other business sources. The Business Intelligence software is designed to retrieve, analyze, transform, and report data for business intelligence. Likewise, some of the BI tool examples are as follows:
Microsoft Power BI
Sisense
Tableau
Dundas BI
Looker
MicroStrategy
Birst
SAP Business Analytics
QlikView
Klipfolio
QlikSense
Data visualization is shown in the form of specific types of visuals used for an example, simple text, table, heat map, line graph, slope graph. Similarly, vertical bar chart, vertically stacked bar chart, waterfall chart, horizontal bar chart, horizontal stacked bar chart, square area graph, and so on into the dashboard to present the data. Generally, Tables are used where users will look up a specific measurement. In contrast, charts of various types are used to show patterns or relationships in the data for one or more variables. For example, Trend and seasonality are shown using a line graph chart; slicers are used to quickly and easily filter the dataset in different scenarios.
The Graphical representation of data should display the data in visual form. Furthermore, make the large data sets coherent, stimulate the eye to compare different pieces of data. Finally, it should reveal the different levels of details of data. The abstract overview of the fine structure should display the data.
Data visualization is entering a new era. For business purposes, data visualization should facilitate decision-making, more than anything else. Especially because wherever you see a successful business, someone once made a courageous decision. Also, data visualization can play an addon role.
Conclusion
As we conclude our brief study on data visualization of the new era emerging sources of intelligence. Along with new advanced technologies, and the developments, data visualization playing a key role by reshaping the potential value that analytics and insights can provide. Businesses can get the most profit by implementing data analytics, data visualization for decision making.
We hope you liked our blog. If you need any consultancy in data analytics, you can opt for our services. Hire us; we serve our clients with the best quality work with the utmost satisfaction.
To know more, you can visit our site Loginworks Softwares Inc
1 note
·
View note
Text
Data Visualization Using Python
Introduction
Business intelligence tools (zero-coding user-friendly tools) make
data visualization
easy. For this reason, one can easily become an expert for the software as you do not require any basic programming language knowledge.
There are many free open sources available, as well as many paid tools that give you free trial days for trying out the software. However, they have limited functionality and cannot meet one’s individual needs.
Demerits
Although business intelligence tools make
data visualization
easy, they have certain demerits which include:
Their paid version is very costly for an individual to buy.
Also, the tools are not very reliable for big data.
So, when you are facing the demerits as mentioned above of the Power BI tools, we can go for other options like data visualization using R or Python.
Data analysis uses R and Python programming tools. However, the difference is that the field of data analysis uses R exclusively, and Python has numerous applications; one of them is the data science field. Beyond that, R still maintains an advantage in the field of statistics. The development of Python in data analysis has modeled some of the features of R in many places. Also, both R and Python are very much similar in many places.
Visualizing Data Using Python
First, let us give you a brief about Python and why learning and using Python is in trend:
Data scraping.
Data manipulation.
Machine learning.
Big data.
There are different Python IDEs and Code Editors:
PyCharm
Spyder
Pydev
Idle
Wing
Eric Python
Rodeo
Thonny
To summarize, we prefer Pycharm as it supports both single and multi-file projects with great ease. Here you can use the standard implemented library of Python. It easily supports virtual environments and a whole range of optional code verifiers, including Python enhancement proposal (PEP8).
Python enhancement proposal (PEP8) is a proposal with a set of rules for how to format your Python code to maximum readability.
You can download Pycharm from the link given below:https://www.jetbrains.com/pycharm/download/#section=windows
Let’s begin learning for data visualization using Python.
Top Libraries Used for Data Science
Numpy is a strong Python library used for scientific computing.
TensorFlow and several other machines learning Python libraries make use of NumPy.
Pandas provide an easy way to create, manipulate, and wrangle the data.
Time-series data solutions make use of pandas.
It is a two-dimensional plotting library for the Python programming language.
It works great with several graphic backends and operating systems.
SciPy is used for integration, linear algebra, optimization, and statistics.
Numpy array is the basic data structure of SciPy.
It is used for logistics regression and nearest neighbors.
There is more feature to implement data mining and machine learning algorithms, like classification, clustering, model selection, reducing dimensionality, and regression.
It is used for training and designing deep learning models.
TensorFlow simplifies the process of visualizing each part of the graph.
It is used for models of a neural network, includes convolutional, embedding, fully connected, pooling, and recurrent models.
Seaborn is a library used for data visualization, making statistical graphics in Python.
Natural Language Toolkit (NLTK) is used for accomplishing symbolic and statistical natural language processing.
Unsupervised learning handles large text collections using Gensim.
Likewise, all the libraries mentioned above are the most important Python libraries. Therefore, the data science field of machine learning, big data, as well as data analytics and visualization, are done using python.
Data Visualization
Above all, Python offers various graphing libraries. As well as it has different visualization functions, in addition to its characteristic features. Last, with this quick description of Python in the data science field; thus, we are taking you to the very first graph using pandas, Matplotlib, and more libraries step by step:
”
Download the Iris dataset, and it is available online.
Link to download: https://www.kaggle.com/arshid/iris-flower-dataset##First, we’ll import pandas, a data processing and CSV file I/O library
import pandas as pd
##Now import seaborn, a Python graphing library
import warnings
##if any warnings generated that we’ll ignore
warnings.filterwarnings("ignore")
import seaborn as sns
import matplotlib.pyplot as plt
sns.set(style="white", color_codes=True)
# Now, load the Iris flower dataset, which is in the “filepath/input/” directory
iris = pd.read_csv("
filepath
/input/Iris.csv")
#Now the Iris dataset is a Pandas DataFrameiris.head()## Press shift+enter to execute the program# This shows how many examples we have of each speciesiris[“Species”].value_counts()[Output]:Iris–virginica 50Iris–setosa 50Name: Species, dtype: int64## The very first way we can plot the graph using the .plot extension from Pandas data frames# we’ll use this to make a scatterplot of the Iris data.
iris.plot(kind="scatter", x="SepalLengthCm", y="SepalWidthCm")
##Likewise, We can also plot a boxplot to look at an individual feature of iris data in Seaborn.
sns.boxplot(x="Species", y="PetalLengthCm", data=iris)
# Here is a technique that pandas have introduced and is known as Andrews Curves## Andrews Curves available using attributes of samples as coefficients for Fourier series# Now plotting these as shown below
from pandas.tools.plotting import andrews_curves
andrews_curves(iris.drop("Id", axis=1), "Species")
Thank you for the read. I hope that you have enjoyed the article. If you like it, please do share it on social platforms and with your friends. We will be happy to hear your feedback. If you have some questions, feel free to ask them in the comments section below.
0 notes
Text
The Power of Tableau: The Analytics Platform Enhancing the World of Business Intelligence
Introduction
Tableau is a Data Visualization and Analytical tool that is widely used for Business Intelligence and has numerous features. It helps to create interactive graphs and charts in the form of worksheets, dashboard, and stories to gain business insights. Also, it has the functionality to drag and drop.

Use Tableau to harness your data, elevate your insights, discover opportunities and experience the power of data throughout your analytical journey. Stay in the flow of data analysis, from data prep to analytics and data collaboration.
Key Features of Tableau
Data Collaboration
Data Modeling
Data Blending
Real-Time Data Analysis
Use
Tableau
and get connected to multiple data sources from files and servers. You can work on various file formats such as CSV, JSON, TXT, Excel or even get your data imported from servers like Tableau Server, MySQL, PostgreSQL, SQL Amazon Redshift and many more.
Tableau is the most powerful business intelligence tool with a flexible platform that provides an opportunity to your people with smart, visual, and direct access to their data for every step of the analytics journey.
Tableau interface makes it easy to learn and exciting to use. Its flexible architectural design will work in any environment and with your data.
When it comes to elevating data, only Tableau combines a laser focus on how people see and understand data with the kind of robust, scalable platform you need to run even the world’s largest organizations.
Types of Tableau Product
Tableau Desktop
Tableau Public
Tableau Reader
Tableau Server
Tableau Online.
Tableau DesktopTableau Desktop comes with multiple features that allow you to code and customize reports. It also provides the feature to create interactive charts, reports and blend them to form dashboards and stories.
Tableau Desktop can connect with local servers as well as cloud servers to provide real-time data analysis and the created dashboard or files can be shared locally or publicly.
Tableau Desktop is classified into two categories based on publishing options:
Tableau Desktop Personal: The development feature is similar but has limited access as the workbook will be private and the file can be distributed either offline or tableau public.
Tableau Desktop Professional: It is similar to Tableau Desktop and the workbook created in the professional version can be published online and server. It also provides full access to the data type. Therefore, it is best suitable to publish a workbook on the tableau server.
Tableau PublicIn Tableau Public, the workbook and dashboard cannot be saved locally as the name itself depicts “Public.” So, if the workbook is required to be shared, Tableau’s public cloud will be the one and only option. Since the saved files are on the cloud public, anybody can download it. Therefore, there is no security on the data over the Tableau Public.
Tableau ReaderTableau Reader is a free tool that allows us to view the workbook created using Tableau Desktop and Tableau Public. This tool cannot modify or edit the data but can filter the data. The security level is zero in Tableau Reader as any individual who gets the exercise manual can see it utilizing Tableau Reader.
On the off chance that you need to share the dashboards that you have made, the collector ought to have Tableau Reader to see the document.
Tableau ServerTo summarize, the Tableau Server is used to share the workbook, reports that are made in the Tableau Desktop application. To share dashboards in the Tableau Server, you should initially share your work in the Tableau Desktop. The shared workbook to the server can only be opened by authorized users.
In any case, it is not necessary that the authorized clients need to have the Tableau Server introduced on their machine. They simply require the log in credentials with which they can check reports by means of an internet browser. The security is high in Tableau Server, and it is much effective in sharing the data in an organization.
Tableau OnlineIn brief, the functionalities of Tableau Online are similar to Tableau Server. In addition, Tableau servers stores all the information from the Tableau Online. Tableau group maintains that information stored on the server. Tableau Online does not have any capacity limit to store data.
Whereas, Tableau Online connects to multiple data sources directly. Cloud host sources such as MySQL, AWS, Spark SQL, PostgreSQL, and many more.
Tableau Online and Tableau Server published the workbooks created by Tableau Desktop. It also supports data from the online streaming platform.
Thanks for reading. I hope you enjoyed the post. Please share it on your social platforms and share it with your friends, if you like it. We will be delighted to hear your feedback and comments. If you have any questions please feel free to ask them.
0 notes
Text
Data Visualization: Communicate Your Message Effectively by Presenting Data Graphically
What Is Data Visualization?
You all must be aware of the term and if not now you will definitely be aware after reading the blog.

Data visualization is the presentation of data into various pictorial formats in a very attractive and effective manner. Data is presented keeping the audience in mind.
The concept of data visualization is taken from the common human concept from the way the human brain processes information. It is easy to read the data if we use charts or graphs to visualize the large amounts of complex data lists or reports.
Data visualization is an effective way to convey a message to the viewers. You can filter and experiment with the different scenarios by making slight adjustments in the visuals. The data visualization makes it easier to detect patterns, trends, and outliers in groups of data.
Researching from the different sources, the Loginworks team gathers the information that the world produces 2.5 quintillion bytes of data every day. The total data we have gathered is the most recorded in the last 2 years.
Now, this is too much data to handle and difficult to manage and does not make sense at all as such. Even the person who generated the data is unable to understand his own data. We can say, data visualization is used to represent the data in an interactive form to communicate the data sense to the person who needs information.
Thus, the improved quality of data can give you meaningful insights and make it easy for faster decision making for various and important industries.
To distinguish, filter the data and fetch the information the various types of charts, plots, graphs, matrix, tables are used. The future scope in data visualization is high as with the enormously increasing data day by day.
Business Intelligence Tools
At Loginworks, we use different Business Intelligence tools such as Tableau, QlikView, Qlik Sense, SAP Lumira, Sisense, Google data studio, and Microsoft Power BI is one of them.
The very first common goal to use business intelligence software is to turn data into insights and action.
BI tools help in faster reporting, analysis or planning.
They help to improve data quality.
BI tools help in making better business decisions.
They help to create an attractive dashboard to represent your data.
You can download the Power BI from the link given below:
Power BI Desktop
THIS DOWNLOAD PAGE HAS BEEN DEPRECATED. PLEASE VISIT https://aka.ms/pbiSingleInstaller TO DOWNLOAD…
Read on microsoft.com
You can check the tutorial provided by Microsoft from the link given below:
Learning | Microsoft Power BI
Power BI tranforms your company’s data into rich visuals for you to collect and organize so…
Read on powerbi.microsoft.com
o summarize, Power BI is a business intelligence tool. It gives you multiple data connectivity sources. Together with, a variety of visuals to represent your data. Therefore, you can instantly share your BI reports anywhere and on any device.
The end-users can create their own reports in minutes using the drag-and-drop functionality provided.
Power BI and DAX Function
It seems easy to work on Power BI using drag and drop functionality. The power of Power BI is the Data Analysis Expression language (DAX) function.
Earlier, Microsoft, introduced the DAX, with Power Pivot in Excel in 2010. Data Analysis Expression language (DAX) is a functional language similar to Excel functions. DAX has more powerful functions in comparison to Excel.
There are two types of calculations to work in DAX. First, the calculated column. Second, is the calculated measure.
Both have different behavior and different uses.
The DAX functions used are the same.
The data model stores calculated columns and use RAM.
While the Calculated Measures do not store in the data models.
The Microsoft Power BI is a paid tool and it provides you 30 days trial period. Hence, you can easily master in 30 days if you utilize every single day. Meanwhile, Practicing DAX functions will build a strong logic, which will help to manipulate or simplify the data in any way you want.
Power BI provides you with a very decorative and interactive way to communicate with the data with its reports. Thereafter, You can show seasonality and trends. The slicer gives the flexibility to filter the other visuals on the page. Furthermore, to change the scenarios according to the time or the other entities.
Apart from that, there are various beautiful options for color palettes. In addition, Microsoft provides the inbuilt Microsoft themes in the Power BI desktop. As a result, to beautify the dashboard reports, you can apply a custom Report Theme. Thus, for that, you need a JSON file to load into Power BI Desktop and apply it to your report. In fact, You can get the various theme JSON file online from the Microsoft market place.
As a rule, From Microsoft Power Bi Desktop, You publish a power bi report, to the Microsoft Power Bi Service. Thereafter, the report is saved into the Favorites, Recent, and, My Workspace. Lastly, you get the feature to generate links and share your report with your coworkers, client or with others. when you share a dashboard or report, the people you share it with can view it and interact with it, but cannot edit it. In conclusion, You cannot share the report or dashboard directly from Power BI Desktop.
Power BI Update
Many new features are added, likewise, artificial intelligence and machine learning. As a result, Microsoft power BI is becoming a more powerful analyzing tool with such wonderful up-gradation.
We are living in a world of digitalizing and social media platforms. The data is the heart of every industry platform nowadays. It can be the most powerful weapon in the world and for the world. It is said to be true that “Presenting the data graphically is an Art of the Data Visualization to Communicate Your Message Effectively”.
We hope you liked our blog. Please feel free to share your feedback and comments in the section below. To know more about our services please visit Loginworks Softwares Inc.
1 note
·
View note
Text
Working with Tableau Server Repository Performance
In today’s blog, we will discuss the Tableau Server Repository Performance. In brief, Tableau is a widely used data visualization tool that is used in Data and Business Intelligence industry.

It helps in data formatting and data cleaning to get the best insights from data in the form of dashboards and worksheets. Tableau also provides multiple tools that allow us to drill down data and shows an effective impact of visual format that can be easily understood.
It also provides real-time data analytics and cloud support. Here we will discuss tableau server performance.
Tableau Server Repository is a database that stores metadata of tableau server user, group sessions, and projects. PostgreSQL database is known by the repository. After enabling the Tableau Server Repository. Tableau server consists of various nodes that are used to access the Tableau Server Process. Making any changes in the nodes will stop Tableau Server if it is running. As changes are applied, the Server returned to the state it was before process configuration, so if it is running, it will be restarted.
While analyzing the server performance, we will get to know the peak utilization of the central processing unit (CPU) and memory as well as sessions and Load Time.
Steps to Connect Tableau with Tableau Server Repository to Analyse CPU and Memory Utilisation
1. Connect Tableau with PostgreSQL
PostgreSQL: Also known as Postgres, it is a free and open-source relational database management system. It is a simple and easy design to handle a range of workloads from a single system to a data warehouse or Web services with many concurrent users.
2. Enter server credentials
3. Click Data source tab > Resource Usage > Edit Connection
4. Use Extract option and consequently, connect to the data source
The dashboard consists of multiple servers with their average utilization of CPU and memory, daily CPU and memory performance, CPU and Memory Monthly utilization, and peak utilization in a week.
Dashboard Description
List of CPU and Memory Utilization
Daily CPU and Memory performance
CPU and Memory monthly Utilization
Peak Utilization in week
Steps to connect Tableau with Tableau server repository to analyze load time, session, and projects:
Connect Tableau with PostgreSQL
Enter server credentials
Click Data source tab > Session & Load Times > Edit Connection
Use the Extract option and connect to the data source
The dashboard consists of multiple servers to analyze load time and sessions.
Number of Sessions: It shows the number of sessions raised per hour.
Requests and Load Times: It shows Load time per hour for multiple sites.
The dashboard consists of multiple servers to analyze average load time and projects.
Average Load time: It shows average load time taken by sites per hour
Number of Projects: It shows a number of projects raised per hour for multiple sites and a particular date range.
Conclusion
While creating this dashboard, we have understood the utilization of CPU and Memory, load time of sessions, and projects.
To know more about our services you can visit our site for consultancy. Kindly visit Loginworks Softwares Inc.
Thank you for the read. We hope that you have enjoyed the blog. If you like it, please share it with your friends or sharing it on Twitter or Facebook. We will be happy to hear your feedback. If you have some questions, feel free to ask them in the comments section below.
0 notes
Text
Introduction to NLTK and Its Most Common Algorithms Used for NLP (II)
Introduction
In our previous blog, we had only covered tokenization and its methods. In today’s blog, we will discuss further algorithms of NLTK. Here, we will start with Stopwords.

1. Stopwords
Stopwords are the most common words in any natural language. For the reason of analyzing text and building Natural Language Processing models, these stopwords won’t add much value to the document, so we need to remove these words. The most words used in a text are ‘is,’ ‘s,’ ‘am,’ ‘or,’ ‘who,’ ‘as,’ ‘from,’ ‘him,’ ‘each,’ ‘the,’ ‘themselves,’ ‘when,’ ‘to,’ ‘at,’ etc.
Few Key Benefits of Removing Stopwords
It decreases the dataset size, and the time to train the model also decreases.
Removing stopwords can potentially help improve the performance as there are fewer and only meaningful tokens left. It can increase classification accuracy.
To check the list of stopwords, you can use the below command.
# Import NLTK
import nltk
nltk.download(‘stopwords’)
from nltk.corpus import stopwords
# Printing set of English Stopwords
print(set(stopwords.words(‘english’)))
OUTPUT:
{’in’, ‘be’, ‘an’, ‘aren’, ‘between’, ‘most’, ‘these’, ‘both’, “weren’t”, ‘his’,
‘while’, ‘so’, ‘ve’, “that’ll”, ‘we’, ‘such’, ‘doesn’, ‘from’, ‘y’, ‘what’,
‘shan’, ‘wouldn’, ‘him’, ‘no’, “didn’t”, ‘on’, ‘it’, ‘s’, “you’d”, ‘m’,
“shouldn’t”, ‘her’, ‘ain’, ‘itself’, ‘been’, ‘as’, “she’s”, ‘into’, ‘doing’,
‘there’, ‘where’, “it’s”, ‘more’, ‘each’, ‘needn’, ‘here’, ‘does’, ‘its’, ‘those’,
“aren’t”, “hasn’t”, “shan’t”, ‘won’, ‘ours’, ‘yours’, “wouldn’t”, ‘again’,
‘yourselves’, ‘off’, ‘only’, ‘am’, ‘will’, ‘who’, ‘the’, ‘very’, ‘has’, ‘you’,
‘nor’, ‘mightn’, ‘at’, ‘himself’, “you’re”, ‘because’, ‘herself’, ‘if’, ‘is’,
“mustn’t”, ‘just’, ‘until’, ‘once’, ‘before’, ‘when’, ‘up’, ‘don’, ‘weren’, ‘too’,
‘should’, ‘didn’, ‘was’, ‘were’, ‘not’, ‘she’, ‘of’, ‘are’, ‘few’, ‘this’,
“should’ve”, “hadn’t”, ‘had’, ‘he’, ‘with’, ‘whom’, ‘ma’, “couldn’t”, ‘myself’,
‘or’, ‘t’, ‘my’, ‘having’, ‘haven’, ‘i’, ‘couldn’, ‘during’, ‘for’, ‘have’,
‘under’, “haven’t”, ‘did’, ‘your’, “doesn’t”, ‘can’, ‘wasn’, ‘our’, ‘through’,
‘a’, ‘isn’, “you’ve”, ‘now’, “wasn’t”, ‘out’, ‘yourself’, ‘than’, ‘some’, ‘hadn’,
‘re’, “mightn’t”, ‘they’, ‘mustn’, ‘being’, ‘theirs’, ‘further’, ‘hasn’,
‘shouldn’, ‘but’, ‘which’, ‘how’, ‘other’, ‘hers’, ‘and’, ‘against’, ‘by’,
“don’t”, ‘to’, ‘themselves’, ‘that’, ‘o’, ‘over’, ‘own’, ‘do’, ‘about’, ‘any’,
“needn’t”, ‘ourselves’, “you’ll”, ‘below’, “won’t”, ‘them’, ‘why’, ‘me’, ‘above’,
‘their’, ‘down’, ‘all’, ‘then’, ‘after’, ‘d’, ‘ll’, ‘same’, “isn’t”}
We have printed the Stopwords of the English language. You can also print the stopwords of another language like Germany etc.
from nltk.corpus import stopwords
from nltk.tokenize import word_tokenize
# Create an input string
paragraph = “Hello, how are you doing today? The weather is cool. The sky is dark.”
# Create a set of English Stopwords
stop_words = set(stopwords.words(‘english’))
word_tokens = word_tokenize(paragraph)
# Removing Stopwords from word_tokens and inserting rest of the words in
filtered_sentence list using list comprehension.
filtered_sentence = [w for w in word_tokens if not w in stop_words]
print(“Word Tokens : “, word_tokens)
print(“Filtered Sentence : “, filtered_sentence)
OUTPUT:
Word Tokens : [’Hello’, ‘,’, ‘how’, ‘are’, ‘you’, ‘doing’, ‘today’, ‘?’, ‘The’,
‘weather’, ‘is’, ‘cool’, ‘.’, ‘The’, ‘sky’, ‘is’, ‘dark’, ‘.’]
Filtered Sentence : [’Hello’, ‘,’, ‘today’, ‘?’, ‘The’, ‘weather’, ‘cool’, ‘.’,
‘The’, ‘sky’, ‘dark’, ‘.’]
2. Stemming
Stemming is the process of reducing a word to a root word by cutting off the end or the beginning of the word. For example, the word connection, connected, connecting reduced to a root word connect. It is a rule-based process of stripping the prefix and suffix from a word.
Applications
It reduces the number of unique words in the text.
It is used in information retrieval systems like search engines.
Some Stemming Algorithms are:
Potter’s Stemmer algorithm
Krovetz Stemmer
Lovins Stemmer
N-Gram Stemmer
Dawson Stemme
3. Lemmatization
It is the method of changing the words of a sentence to its dictionary form. Lemmatization in linguistics is the procedure of grouping together the inflected varieties of a word so that they can be analyzed as a single item, identified by way of the word’s lemma, or dictionary form.
It is usually more sophisticated than stemming. Stemmer works on an individual phrase without knowledge of the context. For example, the phrase “better” has “good” as its lemma. This component will miss by using stemming because it requires a dictionary look-up.
Why Lemmatization Is Better Then Stemming?
Lemmatization is an intelligent operation, while Stemming is a general operation. In Lemmatization, the proper form will be looked into in the dictionary. Hence, lemmatization helps in forming better machine learning features then stemming.
import nltk
from nltk.stem.porter import PorterStemmer
from nltk.stem import WordNetLemmatizer
wordnet_lemmatizer = WordNetLemmatizer()
porter_stemmer = PorterStemmer()
text = “studies studying rocks corpora cry cries”
tokenization = nltk.word_tokenize(text)
for w in tokenization:
print(“Stemming for {} is {}”.format(w,porter_stemmer.stem(w)))
print(“Lemma for {} is {}”.format(w, wordnet_lemmatizer.lemmatize(w)))
print()
OUTPUT:
Stemming for studies is studi
Lemma for studies is study
Stemming for studying is studi
Lemma for studying is studying
Stemming for rocks is rock
Lemma for rocks is rock
Stemming for corpora is corpora
Lemma for corpora is corpus
Stemming for cry is cri
Lemma for cry is cry
Stemming for cries is cri
Lemma for cries is cry
Note
If you look at the above output, the stemming for studies and studying is the same (studi), but lemmatizer provides different outputs for both. You can also compare the other outputs. So, it would be great if lemmatization is better.
4. Parts of Speech (POS) Tagging
Parts of speech tagging is liable for reading the text in a language and assigning some specific token (Parts of Speech) to every word. The tag is a part-of-speech tag and signifies whether the word is a noun, verb, adjective, and so on.
For example: within the sentence “Answer the question,” the answer is a verb; however, within the sentence “Give me your answer,” the answer is a Noun.
To understand the meaning of any sentence or to extract relationships, POS Tagging is a very important step.
Different POS Tagging Methods
Lexical Based Methods
Rule-Based Methods
Probabilistic Methods
Deep Learning Methods
Part of Speech is a very long topic, so we will study this topic in a new blog.
Conclusion
In this blog, we have covered stopwords, stemming, lemmatization, and parts of speech tagging. Please feel free to leave feedback and comments in the section below. To know more about our services, please visit Loginworks Softwares Inc.
0 notes