
lovefromruthie
love from Ruthie
Hi, I'm Ruthie. For some time now, I've wanted to get involved in the blogging world. Here I now am. :) I love cake and I'm a Christian - I think this sums me up!!
12 posts
Don't wanna be here? Send us removal request.
Last Seen Blogs

aurelialannisters
little caged lion

your-dad-is-problematic
I'm a loose bolt of a complete machine.

itsdarklaycullen-blog
Untitled

djsouthforce
djsouthforce.com

1jh-blog
Random
Text
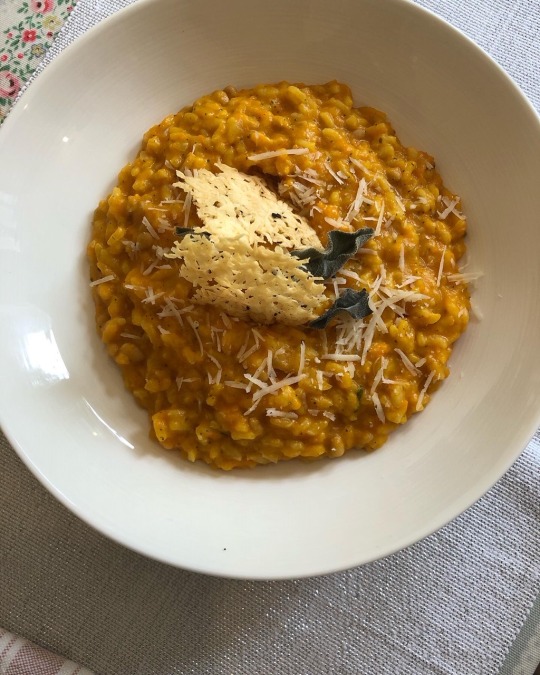
Butternut Squash and Sage Risotto
Today I thought I would share a different style of recipe with you - I'm going to share many of my secrets and top tips on probably my favourite meal! Italy is definitely the place that has won my heart! If I could afford to go on holiday abroad more often, I would love to keep going there. Right now...nobody is going there though which is a good reason to brush up on your Italian cooking skills! After your first spoonful of risotto, you'll be taken there even if momentarily! I just love this dish - it's romantic, easy to cook, so flavoursome and doesn't require too many pots or pans which is a huge bonus!
Here are my tips - some of them might surprise you but read on and take note!
Use the best quality ingredients:
- Rice, it's the main ingredient. I recommend buying Carnaroli rice over Arborio everytime! Carnaroli is often described as the "king of rices". It has a higher starch content and firmer texture helping to give that bite and texture which is really important for the method of cooking risotto.
-Stock - my preferred brand is Swiss Vegetable Bouillon Powder. You can add further flavour to your stock by boiling it in advance with other vegetables to take on their flavour, such as an onion, leeks, celery etc.
-Parmesan - pleeeease don't be the pre-grated, powdery stuff! Risotto wants your respect! Get a proper block and grate it yourself! Also note, if you are a veggie/cooking for a veggie, sadly Parmesan is NOT vegetarian. Sad times, I do miss it! Italian Hard Style Cheese is vegetarian but lacks a good flavour punch. Tesco's Pecorino is vegetarian (not many others are!). Use other hard style cheeses. On our holiday, there was hard smoked ricotta as a topping and it was absolutely delightful!
-Herbs - keep them fresh and keep the dried ones in the cupboard! ....embrace the garlic (and cheese, nom nom!)
Flavours and Textures - be creative!
-Toasted nuts. I almost always add toasted pine nuts into risotto. They add a really wonderful texture as well as flavour. Toasted Hazelnuts are also a good option but they do have a more distinctive flavour - pair with a saffron or mushroom risotto, for example
-Fresh herbs. Mix these into your actual dish but also add to the top of the dish. It helps create a beautiful presentation but adds fresh burst of flavour. With Basil, I would tear it up and top with smaller leaves. For sage, I would recommend a quick roast in the oven so that they crisp up and top each dish with about three small-medium leaves.
-The main flavour - so I chose butternut squash here. I roast it for 40 minutes, adding some cloves of garlic half way through. Then add it to a blender with fresh herbs. I makes it so creamy, flavoursome and adds colour throughout the dish. I have sometimes also blitzed in soft goats cheese with this too, I recommend!
-Cheese as a topping. Always reserve some Parmesan as a topping to spoon over the top. As your friends gather round, no doubt that little bowl will too! And you'll feel quite sophisticated too! Even more so, did you know you can make Parmesan crisps?! The flavour is so strong, they are lacey in appearance and add great texture
-Don't be afraid to get creative. I haven't pictured it below but with this risotto I love Salty meets Sweet. For a Butternut Squash and Sage risotto, I'd recommend buying a bag of Amaretti biscuits from the supermarkets (the hard ones work best). Crush them, stir a little in just before serving and also top with the small biscuit crumbs.
Luxury and Volume! (Sounds like I'm taking about shampoo...) For something luxurious - towards the very end, once the stock has gone and the rice has cooked, add a generous teaspoon of butter and beat it very vigorously. You could also use cream. When ready to serve, add a ladleful or so of risotto in the bowl and smack the bottom of it!
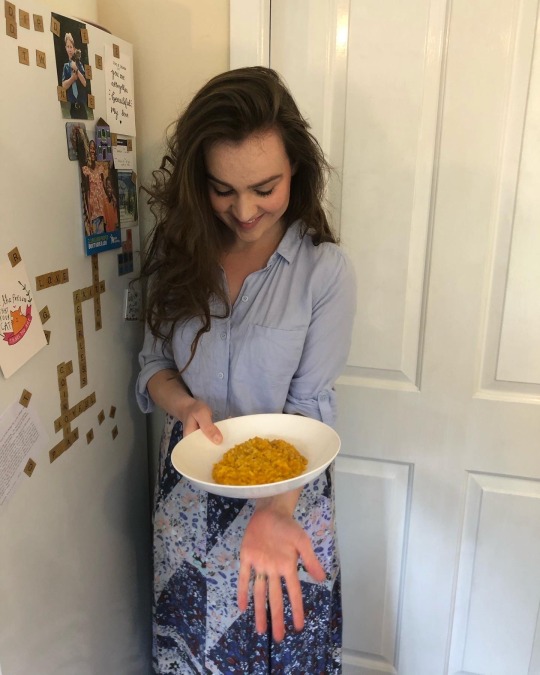
My hand looks so large here!
Method & Finishing touches
I thought I made quite a good risotto before our Italian cooking class but there was something our chef was adamant about it! You know what...I didn't like her method and you won't like it either! I loved the pause of staying in front of the hob, adding a ladleful of stock at a time. She said this was not the way and it was completely the wrong way! Once I tried a bite of her risotto, I knew she was right. The trick is to make sure your flavoursome stock is boiling and add almost all of it in, all in one go! Just try it! But if you find at the end, if looks too thick, add 60ml or so hot stock and stir again.
A good risotto will only take up to 20 minutes to come together (obviously longer for preparation).
Toasting the rice - this is a really crucial step. In your pan, heat the rice, stirring constantly for about 3 minutes or so until the rice is hot and fragrant. If you don't smell it, keep toasting! (Otherwise....you may have a symptom for something else. Just saying).
Finally, make plenty so you can turn leftovers into super tasty arancini!

If you make this, please let me know!
Love from Ruthie x
My Butternut Squash and Sage Risotto
Ingredients:
1 teaspoon butter
1 white onion, finely diced
3 large garlic cloves, crushed
250g Carnaroli rice
850ml stock (I used 3 teaspoons of Bouillon powder), boiling (plus extra vegetables for taste)
1 medium-large Butternut squash, cut into quarters
4 garlic cloves, to roast (skins on)
Handful of fresh sage leaves
Optional: soft goats cheese, to taste
40g pine nuts
-170g block of Parmesan/Veggie Hard Cheese (you may not need it all - this gets 'shared' across the risotto itself, making parmesan crisps and as topping).
Sea Salt, pepper to taste (I add smoked sea salt to this dish)
Method:
1. First, prepare vegetables and have everything else all measured out. Pre-heat your oven to 185 oC. Lay your prepared butternut squash on a tray, cut side up. Roasting time can vary but will be around 40 minutes. You can tell it is cooked by putting a fork through it and that it is starting to go nice and brown around the edges. Add garlic cloves 15 minutes before end of roasting time.
2. Meanwhile, boil the stock. Once your roasted vegetables are nearly done, prepare the risotto. In a large pan, melt the butter until fully melted and is bubbling. Add the onion and garlic until soft and translucent.
3. Once the onion is cooked, toast the rice for a good 3-5 minutes until hot and fragrant. Then add almost all of the stock, reserving a ladleful in case needed. Stir and then prepare other things, like pureed vegetables. Occasionally stir your risotto.
4. Once the squash has cooked, allow to cool for a few minutes. Then scoop it and place into a blender with the roasted garlic, fresh sage leaves (about 4-6 large leaves), salt and pepper and goats cheese if adding. Blitz until smooth and taste, adding herbs, pepper and cheese if needed.
5. Once you can see the risotto is nearly cooked, stir in the pureed vegetables and several tablespoons of grated parmesan. Taste, add more stock, cheese etc if needed.
6. Whilst the risotto is cooking, make the parmesan crisps/sage leaves/toasted pine nuts. Mix in freshly ground pepper into the grated cheese and prepare a flat tray with parchment paper. Use a teaspoon per disc. Oven bake for about 5-7 minutes until all melted and beginning to harden. Allow to cool so they crisp. Also, rub a little olive oil into some small sage leaves and roast on the tray until they harden. On a separate tray, roast the pine nuts for 7 minutes.
7. Add butter or cream if using, to the risotto, mix in pine nuts. Give your risotto a good stir with a wooden spoon (or even 'lift up' with a ladle).
8. Ladle into bowls, smacking the bowl before serving! Top with parmesan, amaretti if using, roasted sage and parmesan crisps. Serve and enjoy!
0 notes
Text
Oat & Biscoff Lava Breakfast Cake

Hi guys! The world is a bit of a strange place right now...whilst things are quite worrying and as we are instructed to stay at home the pace at times feels quite slow. I knew our time out of the house this weekend would be very limited so it got me thinking how I could even make breakfast a bit more of an occasion. I remembered this recipe for Biscoff Baked Oatmeal I had...do you ever have those kind of recipes jotted down on a bit of paper tucked into a recipe book with little idea where it's come from? It doesn't mean the recipe is any less loved - this would be one of my go to recipes when friends have stayed overnight at Nick's and mine for a cheery, lazy morning. In fact I don't want to take credit for a recipe that's not mine so I have just searched right down my Cake board on Pinterest...the recipe is adapted from a blog called Healthy Food For Living (http://www.healthyfoodforliving.com/speculoos-cookie-butter-baked-oatmeal-for-one/). Guys....that’s a good sign, if you were ever in doubt about having this for breakfast, put those doubts aside right now!
I think it's ideal for the weekends right now! Just hopefully you can get the ingredients...! However, there's not many different ingredients and it all comes together very quickly. I've just put the ingredients down for one but just double or multiply up as needed.
Enjoy :)
Love from Ruthie x
Oaty Biscoff Lava Breakfast Cake for 1
Ingredients
2 tablespoons of Smooth Biscoff Spread (slightly heaped)
1 egg white (from a large egg)
1/3 cup/85ml milk (any kind of milk is fine, I used almond milk...oat milk would be beautiful!)
1/2 teaspoon good vanilla extract
1/3 cup (about 33g) rolled oats
1/4 teaspoon baking powder
You will need: a medium bowl, a whisk, spatula, a good sized individual ramekin
Recipe:
1. Pre-heat the oven to 1800C (fan).
2. In a medium bowl, whisk the Biscoff spread and egg white until smooth.
3. Whisk in the milk and vanilla extract until completely smooth.
4. Mix the baking powder and oats together and gently stir in the Biscoff mixture until combined.
5. Spoon the mixture into the individual dish (a good 3/4 full) and bake for 18-20 minutes. Don't bake over 20 minutes! It will be puffed up and the edges should be set.
0 notes
Text
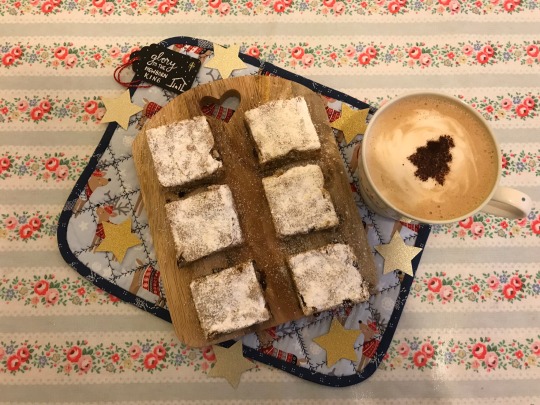
S’mores Brownies
Hi guys!
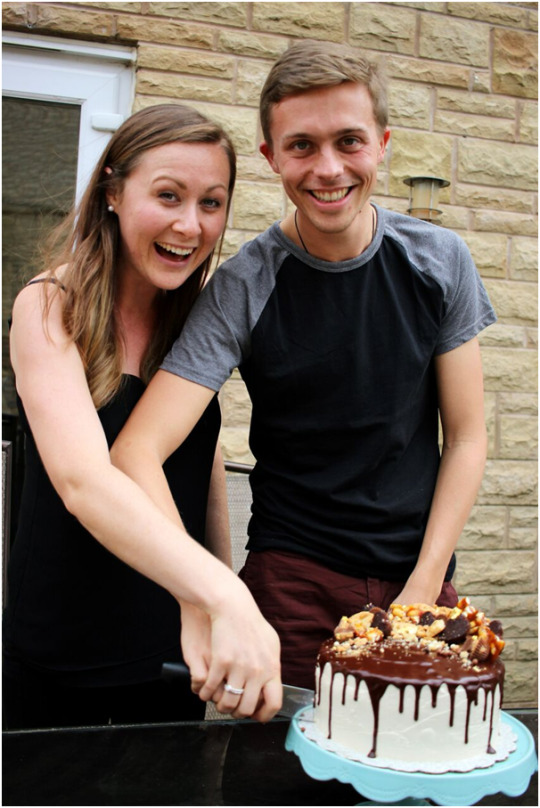
Eeks, how is it Boxing Day! I hope you have enjoyed all the Christmas build up and had a wonderful Christmas Day. It is always so busy but I love it all. Time with family, the cakes and food; of course the church carol service which is great for pointing me back to who it is all about!
I had wanted to post this recipe a few days earlier but there wasn't time and I have done a little more tweaking since to this recipe...read on! Although Christmas Day is over, this recipe is a fab one to have to bring along as you visit friends and family between Christmas and the New Year. Actually, it's great for any time of the year because who could down....S'mores Brownies!!
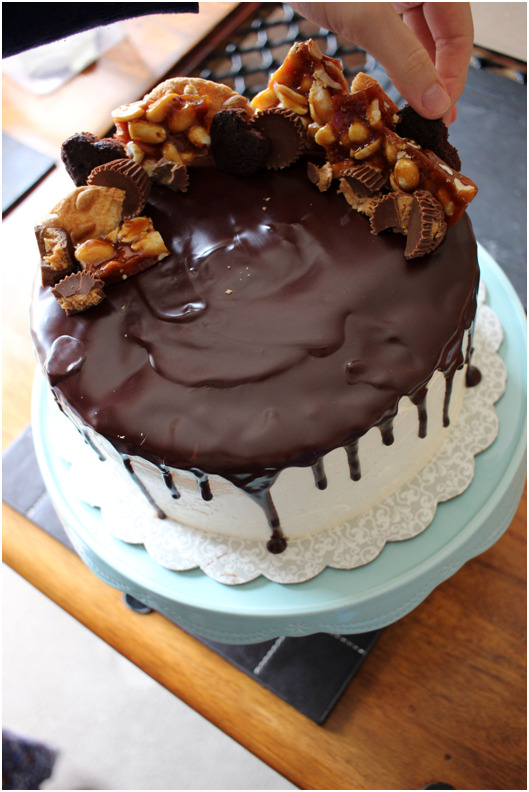
The idea for these came around when I was thinking of what to bake for our church Carol service. I had thought about brownies but wanted them with a festive twist. The obvious ones that came to mind were chocolate orange or peppermint but these didn't really float my boat. They're traditional festive flavours but they can be quite polarising I think? My mind turned to the cake I'm planning for my mum's birthday cake in a few weeks time (it has a slightly similar theme to these-ish). And that's when it hit me...s'mores brownies!

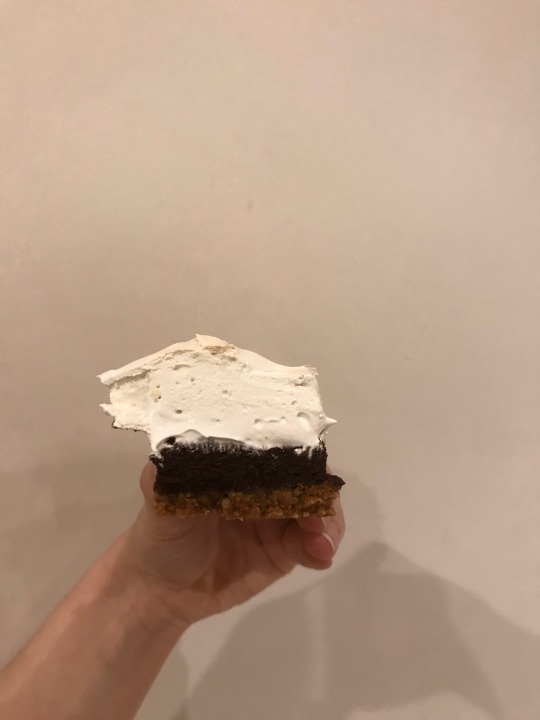
What are they? It's a lightly spiced buttery biscuit base, a fudgey brownie topped with a soft, fluffy mallow which sort of tastes a bit like what you'd get inside of a Walnut Whip. Yum. It's like eating the clouds of your dreams :P But just to top this off, the fluffy meringue is then gently toasted with the blowtorch. You can also use a grill but watch super carefully! Freshly eating the mallow after it has just been toasted is the best.thing.ever! Need I say s'more?
Being a vegetarian and well, not living in America has not given me much opportunity to have a s'more so I did a little research on them. S'mores are chocolate and a marshmallow sandiches between a graham cracker then toasted. We can't buy these biscuits in ol' Yorkshire so there's a bit of extra thought that's gone into the base of these brownies. It's a mix of digestives, gingernut biscuits (just a ginger crunchy biscuit), a teaspoon of cinnamon. They are grinded - but not super fine - and then mixed into some melted butter and honey.
I'm excited to share this recipe because I am also giving you my brownie recipe! I tweaked this recipe slightly for these and I love the changes made so I think I will make this permanent. I should dedicate a post to brownies at some point (up the recipe by 25% to get the full brownie if doing just these). It is dense, rich, fudgey truffle like but no so soft that it begins to lose its shape. I needed it to be quite firm to support all the cloud like mallow topping! However, I didn't want to compromise in the texture too much and get a dry, cake like brownie. There's always two types of brownies - the fudgey ones or the cake ones. Seriously though, who would ever prefer the cake ones?!
This brings me on to the topping. I wouldn't do marshmallows because they contain gelatin. There are three types of meringue - French, Italian and Swiss. French is a no no for this since it isn't cooked, it's not stable enough and there would be a little leakage after a while. Italian would work for this but this but I prefer Swiss. It can take a little while to make but it is my favourite of the three. The egg whites and sugar are gently heated reaching to 71.2 degrees Celsius so that the meringue is safe to eat and it also means that there will be no grains of sugar. As I do with my Swiss Meringue Buttercream LINK, for my first attempt, I did a 1:2 ratio of egg whites to sugar. I prepped it all in the morning before serving at church in the evening. These were the first of my baked goodie to go. I think they just look so eye catching and appeal to adults and children.
I actually forgot to try a piece for myself as I was so busy with the rehearsal so Nick quickly grabbed a piece. It was good but I felt I could make the topping better. It was very thick and marshmallow like but was a kind of a plain sweetness. I decided to cut down the sugar a little bit - not 175% of the weight of egg whites. I also switched to golden caster sugar to give a slight buttery, caramel flavour. Another little tip is to use a medium pan, not a small pan but making sure there is a enough space between the bowl and water as you heat up the meringue. These changes helped produce a lighter, fluffier topping and gave a little more depth to its flavour. What I would love to try out next time is to toast the golden caster sugar beforehand to add to the toastiness and richer caramel flavour.
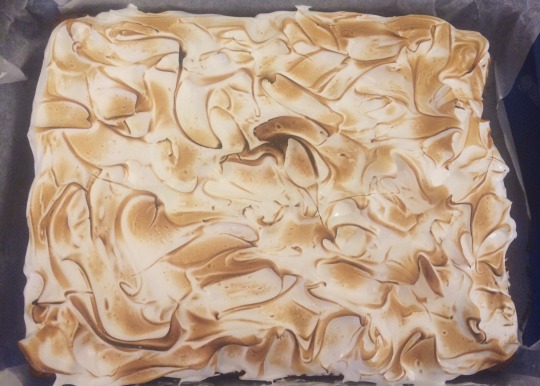
The photo below is using the grill and caster sugar...piled with lots of fluffy goodness!

Thought I’d try taking a different photo but I just felt like a poser and ended up laughing!
Need I say s'more?! ;) I really hope you make these and enjoy them with your friend and family. As always, if you want to post or share these, please refer to my blog.
Before I finish, I will quickly say this. Christmas for me is all about the birth of my Lord and Saviour, Jesus. Sometimes when Christmas Day is over all the build up can feel somewhat of a let down. But the hope and joy that Jesus brings us never fades!
Love from Ruthie x
Biscuit base:
175g digestives
175g gingernut biscuits
1 teaspoon of cinnamon
90g butter
3 tablespoons of clear honey
Brownies:
128g butter
300g dark quality chocolate (I use Green & Blacks 70%), chopped
3 large eggs
300g light brown sugar
75g plain flour
25g cocoa powder (I use Green & Blacks, NOT hot chocolate powder)
1 teaspoon vanilla
Swiss Meringue Mallow Topping
5 egg whites
Golden Caster sugar - 175% weight of the whites (i.e approx 185g egg whites, 324g sugar)
1 teaspoon of vanilla
Optional pinch of cream of tartar
Recipe:
1. First make the biscuit base. Pre-heat the oven to 160oC. Melt the butter and honey in a medium pan. Pulse the biscuits and cinnamon until coarse crumbs (you don't want it super fine). Mix the biscuits into the butter/honey and press into a lined 9 x 13 inch tray-bake tin. Use the bottom of a wide glass to help press in and level the biscuit base. Bake for 8 minutes.
2. Make the brownie. In a small pan, melt the butter. Once melted, remove from heat and add chocolate. Stir in until the chocolate is melted and you have a smooth, dark, glossy mix. Turn the oven up to 175oC.
3. Whisk the sugar and eggs on a high speed until pale, frothy and doubled in volume.
4. With the whisk attachment on medium, slowly pour in the cooled chocolate mix.
5. Sieve together the flour and cocoa powder and put into brownie. Fold, using a spatula. Do this gently but always check thoroughly as you do not want a pocket of flour!
6. Pour onto the biscuit/tray and gently level out. Bake for 22 minutes. It will be slightly firm on top and have a little crinkle layer.
7. Keep the brownie in the tin until cool and then allow to cool completely on a cooling tray.
8. Make the mallow topping: fill a medium pan with up to about an inch of water. Place sugar, egg whites and cream of tartar (optional) into a grease free large glass or metal bowl and place on top of pan. Gently heat until it reaches 71.2 degree Celsius whilst continuously gently whisking.
9. Pour into your stand mixer and whisk on a high speed. The bowl should cool, but doesn't need to be completely cool. Whisk until stiff peaks, look for the bird peak. Another clue is you will see how the meringue 'climbs up' the side of the bowl and this will then stop getting any higher. Quickly add in the vanilla.
10. Dollop the meringue onto the brownie, using a pallet knife drag the mix in directions so that there are little peaks. Then for the fun part - use the blowtorch!! You could also use the grill but watch it very carefully.
It is absolutely gorgeous when you have just used the blowtorch, or even from the grill and it is slightly warm. You can keep the brownies in an airtight container to eat during the rest of the day and will also keep until the following day. Enjoy!
0 notes
Text
Stollen Blondies
Stollen Blondies
Hi guys! It's 1st December - yey! Nick and I have a little tradition of giving each other a little present on the 1st December instead of an advent calendar. It came about because Nick can't eat chocolate and I'm trying to keep my chocolate intake limited. This year rather than buying something, I set about baking him these.
We both love stollen, especially with the marzipan middle. I hadn't really tried it before I met Nick and because both sets of our parents don't live in York we find ourselves in the car quite a bit around Christmas. On our drive there, we'd make a little stop at Costa and buy their mini stollen bites. They don't sell them anymore unfortunately! They were so good and weren't dry like full sized stollen slices can be. We're also 80 year olds in the bodies of a 20-something and 30-something year olds and we like to also buy stollen from Aldi to have with a cup of tea! :')
Stollen is not hard to make but the process can be quite time consuming. Since it's a bread, I find that stollen can also be a little dry. With this in mind, as well as Nick's and my love for stollen, I set about making these Stollen inspired blondies! Christmas can be busy and we find ourselves pushed for time so I think this is a great recipe to have up our sleeves! Hopefully you have made your Christmas cake by now and this is a good way to use up the leftover fruit.
When I went to the grocery store it had ran out of marzipan so I set about making my own. Homemade almond paste is soooo delicious, it's just a few ingredients and comes together in a few minutes! It can be made a few days ahead if needed.
For this recipe, I went back to my Biscoff Blondie base and adapted it. I stripped back much of the chocolate to get the buttery texture I was after and increased the sugar. I believe that brown and golden sugar is really key for a soft, fudgey blondie so this is a key aspect (it does mean that it will be darker inside unlike traditional Stollen so if you wish, you can swap the ratio around for more white sugar). It contains raisens, mixed fruit mix (Whitworth's mix which has sultanas, raisens and mixed peel) which were soaked in rum overnight. If you like other things like cherries and flaked almonds, feel free to add these in! Discs of the homemade almond paste are then added in the middle (see picture below). Melted butter with a dash of rum is then brushed over the baked blondie and then liberally dusted *winkey face* in icing sugar.

As always, let me know if you make them! If you want to post the recipe, please refer to my page.
Love from Ruthie x
Stollen Blondies
65g raisins
150g mixed fruit (I use Whitworths which contains sultanas, raisins and mixed peel)
3 tablespoons of rum (I use dark spiced rum)
210g butter
90g white chocolate
2 tablespoons of milk (I used almond milk)
200g golden caster sugar
100g soft light muscavado sugar
3 large eggs
1/2 teaspoon of almond extract and 1 teaspoon of vanilla extract/paste
Zest of 1 lemon
300g plain flour, sifted
1 teaspoon mixed spice
marzipan
Marzipan/almond paste ingredients:
160g ground almonds
200g icing sugar
Egg white (from 1 large egg)
1-2 teaspoons of almond extract
Stollen topping: 12g butter, a drop of rum, 30g icing sugar (you may not need this much).
Recipe:
1. Firstly, place raisins, sultanas, mixed peel into a medium bowl. Stir in the rum, cover and leave to soak overnight.
2. Make the homemade marzipan - using a food processor, place together ground almonds and icing sugar and pulse a few times until fine. Add the egg white and almond extract to the food processor and blitz until it all clumps together. Lightly dust the worktop with icing sugar and knead the icing sugar for about a minute or so until it has come together and is smooth. Roll into a log shape and wrap tightly in cling film. Store in the fridge until you are ready to use.
3. Preheat the oven to 175oC. Grease and line a 9 x 13 inch tray-bake tin.
4. In a pan, over a very low heat, melt the butter and chocolate and add the milk. Make sure you keep stirring.
5. In a large bowl, mix the sugars. Add the eggs and whisk well. Then add in the vanilla & almond extract and lemon zest.
6. Gradually pour in the butter chocolate mix, which should have now cooled slightly. Using a spatula, mix in well.
7. Mix the mixed spice into the flour and sift into the blondie batter into stages. Fold the flour using the spatula until just combined and smooth. Add in the fruit.
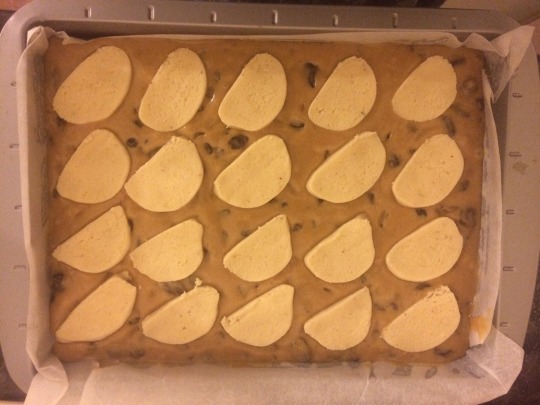
8. Pour half of the blondie mixture into the prepared pan. Cut the marzipan slices no thicker than 0.5cm each. Place in the pan (see how I've done this in the photo above). Pour the rest of the batter over the marzipan and spread over, make sure there aren't any raisins that are poking out and are well coated in the batter.
9. Place into the oven for 25-27 minutes. The blondies will have risen, will be golden in appearance and not too soft on the top once cooked.
10. Rest for 5 minutes. Melt the 12g butter and rum. Working quickly, brush the butter over the blondie and liberally dust on the icing sugar. Allow to cool completely (although they are delicious when a little warm!).
Enjoy!
0 notes
Text
Chocolate Chunk Cookies
I used to love going on shopping trips with my mum and I still do. Growing up with so many brothers and the demands that came with teenage life, a shopping trip to the Metro Centre with mam was a welcome treat. Often a trip there would involve a cake, coffee or treat stop. My favourite thing was when the Metro Centre actually used to have a Haagen Dazs cafe - we'd often start there before doing any shopping! Sadly, it is no longer. Sometimes, instead, we'd stop at Millie's Cookies and get something for us both as well as something for the rest of la familia at home.
Millie's Cookies continued the appeal in my teenage years when the Millie's Cookie Cake came on the scene and it was all the rage at any 13 year old's birthday party!
Fast forward a few years...the price of a single Millie's Cookie is 99p!! Eeks! Yorkshire has clearly made its impact on me as I can't bring myself to pay for that...especially when I have this tasty recipe up my sleeve.
My passion for baking really began at university. It was my relief when looking for a break from studying and I loved that I could share it with housemates to help with uni stress...those were the days! There were two recipes that I remembered making, in particular, in my first year. There was an easy chocolate mousse which went in my colourful plastic cups - tasteful, haha! The other...was these cookies. My flatmates, friends and family absolutely fell in love with these. My dad and my brothers would keep expressing how delicious they were and how they were just as good, if not better, than Millie's Cookies! No joke or an oversized-cookie-ego here, bake these right and you will be super pleased with these! Put your 99p away and treat yourself to a batch!
I love this recipe and I adapt it to who I'm baking for. I often wrap these in little boxes or cellophane bags and give them as gifts. Sometimes, when the pennies are tight, I'll bake these as part birthday gifts for my family. I don't get embarrassed about this because I know they'll enjoy them and can be a bit more thoughtful than a bought gift.
As I say, it's easily adaptable - do at least 2 x of 85g for the 'chocolate chunks' etc and you're good to go. You can use any type of chocolate, fudge chunks. Nick can't have chocolate so I put in a teaspoon of ground cinnamon with the flour, 85g of fudge pieces and 85g of plump raisins. Instead, you could also take out 25g of the flour and put in good-quality cocoa powder instead for extra chocolaty treat. You could make things sophisticated by adding caramel pieces and sprinkling on sea salt or add freeze dried raspberries to white chocolate. Yum.
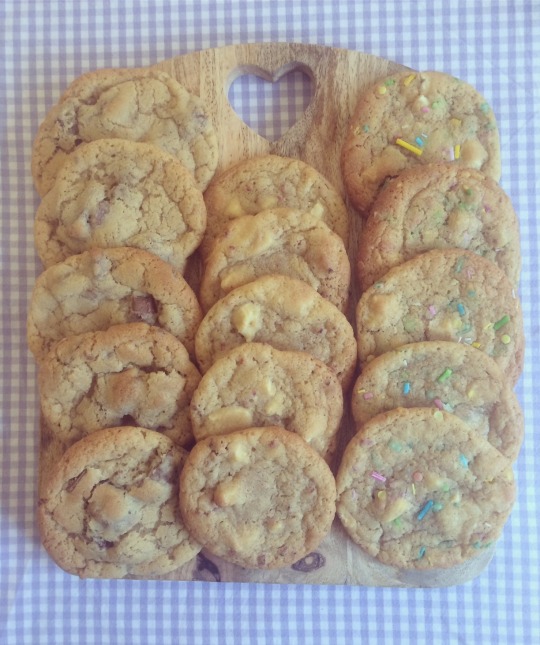
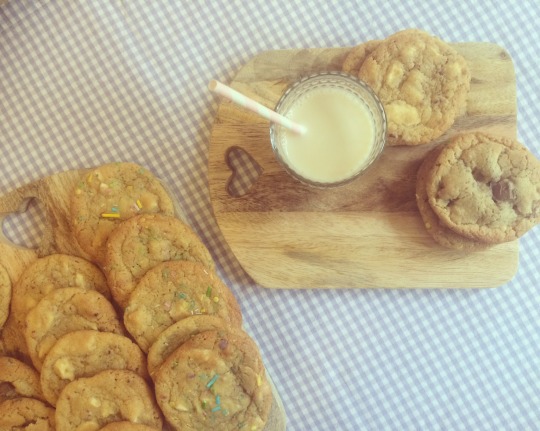
In the photo above, left to right - Milk Chocolate Chunk, White Chocolate and Raspberry and Birthday Cake (White Chocolate, Rainbow Sprinkles and Almond Extract). The Milk Chocolate batch were baked straight away, the Birthday Cake was refrigerated for 45 minutes - you can see that there is a slight improvement in uniformity for the latter.
So, let's get baking! But, before I start, take note of this number one rule! Have a bit of faith when you bake these. Bake only for 10 minutes, no longer. When you take them out, you won't be able to pick them up as they will be way too soft. You're looking for a little bit of golden brown around the edges and nothing more. As you take them out, leave them to cool on the tray for 5-10 minutes before transferring to a cooling rack. Then sink your teeth into the perfect cookie - slightly chewy and crispy outside, with a gooey middle full of melting chocolate.
I hope you enjoy these. Let me know how you get on with them!
If you want to post the recipe, please refer to my blog :)
Love from Ruthie x
Ingredients:
85g butter, softened
85g castor sugar
85g soft light brown sugar
1 egg
1 teaspoon of Vanilla Extract
175g Self-Raising Flour
Pinch of Bicarb of Soda
2 x 85g of Chocolate pieces, fudge, raisins etc. I like to indulge my inner Kidult by using Cadbury's.
Recipe:
1. Pre-heat a fan assisted oven to 1800C and line two trays with baking paper.
2. Either using a bowl and spatula, or a stand mixer, beat butter until softened. Then add the castor sugar until all blended, then the soft brown sugar. It should be smooth, light in colour and no lumps of butter remain.
3. Beat egg into a small bowl, using a fork. Mix in the vanilla extract here too. Then gradually add the egg into the butter/sugar mixture until incorporated.
4. Mix flour and bicarb of soda together in another bowl and then sift into the cookie mixture.
5. Fold in the chocolate pieces.
TIP: At this stage, you can cover and put the bowl into in the fridge. I rarely do this but if I'm looking for perfectly neat cookies, I refrigerate the mixture for 45 minutes to an hour.
6. Using a heaped teaspoon, place the mixture on the tray. Ensure space between the cookies so they don't hold hands as they cook in the oven.
7. Bake for 10 minutes no longer! If you do decide to refrigerate, you can bake for up to 11 minutes. You're looking for slightly golden brown edges. Once complete, leave to cool on the tray for 5-10 minutes. Afterwards, carefully transfer the cookies to a cooling tray. Once cool, enjoy or put into an airtight container where they will keep nicely for up to 3 days.
Enjoy!
0 notes
Text
Hello everyone!
I didn't write a blog post through the whole of 2017 and up until now! I'm not sure why, I guess it's quite difficult to develop recipes and test them a few times whilst working and juggling everything life throws at you! Oops, now we're here! Julie...thank you for motivating me to share my experiments again! :) I know I won't post that frequently for the moment but I haven't lost my passion for baking and sharing it with my family and friends so I hope you won't wait almost two years for another post!
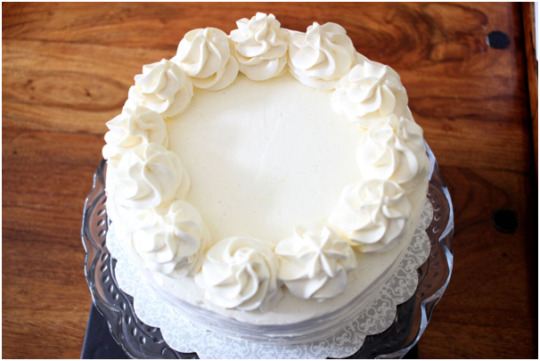
Anyway, this post is about buttercream! Now, anyone who knows me will know that I am a feeder! This means I will give pretty big slices and my cakes are rather sizeable - not everyone can cope with this! Often I think it would be more the sweet English/American buttercream that would start increasing the heart rates as it can be quite sugary and sometimes gritty. Therefore, the quest for a better buttercream began! My motivation was my Mother-in-Law's 60th birthday; I wanted to make her something really special. One of her favourite chocolates is Strawberries and Cream Lindor which is what I wanted to base it around. Strawberry, smooth, sweet, velvety, chocolatey...yum. It was a buttermilk sponge with little pieces of strawberries & cream lindor and drops of jam swirled through and then frosted with White Chocolate and Strawberry Swiss Meringue Buttercream.

Now...as the baker, it's our priority to go through as many teaspoons as possible and test things, right? My word...I'll never forget that first teaspoon. I don't think I've ever tried Swiss Meringue Buttercream at all - not even from a shop! It tasted so divine - mallowy, smooth, sweet but not sugary sweet. So good. You guys really need to try it. For a layer cake, I've never looked back really - goodbye English/American buttercream (I don't know which country it originated from)! For a cupcake, this is lovely with milk or dark chocolate but I actually think it's quite nice to have that sugary sweet burst with traditional buttercream. You'll have to let me know your thoughts once you give this a try.
You can flavour Swiss Meringue buttercream easily - I love to use vanilla bean paste (heart eyes on those little vanilla flecks!) as a start, regardless of most flavours. For an 8inch chocolate cake, melt around 100g Milk/Dark chocolate - increase if you need to amp the flavour/less for white chocolate. Jam, freeze-dried strawberries, Biscoff spread etc...it's all good. You want to make sure you don't add something too liquidy - for example, if doing champagne flavoured, heat this until it's syrupy, or find a strawberry & champagne jam. Here's a few examples of my cakes this year.
Biscoff buttercream - simply add a tablespoon or two!

Something special for my beautiful grandparent's big wedding anniversary: chocolate and amaretto middle with Coconut cream (warm up a sachet of creamed coconut in a jug of warm-hot water and add the coconut as needed ~ 30g for an 8inch cake).
How cute are my grandparents?! N'awww...

And thanks to Abi for these photos!!
Look how white this is - and it already had lemon curd, a splash of elderflower cordial and white chocolate in!!
And I’m basically that embarrassing nan already who makes people practice cutting their wedding cake! :P

Ingredients (but please read recipe for amounts):
Egg whites - from around 4 eggs
Sugar such as White Caster Sugar
Butter - really do use a good quality butter, with a high fat content. I use President.
You will need a food thermometer whisk, a spatula, a heatproof bowl and a pan, a stand mixer. Make sure the bowl and spatula are completely grease free.
Recipe:
1. Firstly - it's a simple rule of 1, 2, 3ish. ;)
2. Weigh out eggs whites - being careful to not get any egg yolk in, I also remove those gross stringy bits. It should weigh about 150g.
3. Weight twice the amount of sugar; it should be around 300g. Put both egg whites and sugar into a large heatproof bowl and mix with a whisk.
4. Place bowl over a pan of water, making sure the bowl doesn't touch the water. Turn onto a low-medium heat and warm the mixture to 160 degrees Fahrenheit. This cooks this egg whites and all the sugar will be completely dissolved by this stage. Don't rush this process - don't become tempted to turn the heat up! Keep gently whisking the mixture as it heats and when using the food thermometre don't touch the bottom of the bowl but the actual mixture so you know it has reached temperature.
5. Once ready, pour in your Stand Mixer with a whisk attachment. Start off on a medium pace for a minute and then put onto high speed. The bowl will be really hot.
6. Keep whisking in the mixer until the bowl is cool - the mixture will increase in volume significantly. There you have a Swiss meringue!
7. Whilst the mixture is coming to room temperature, cut the butter into small cubes. For butter, the ratio is the '3' but I don't add all the butter - I normally do a ratio of around 2.75ish (i.e 150g egg whites, ~412.5g butter). Don't be tempted to add the butter in the bowl is cool. Once it is cool, add the cubes of butter one at a time.
8. Don't panic - as you add the butter, you'll see its consistency change. It will go kind of soupy - just keep persisting on whisking with your stand mixer and slowly adding in buttercream. Once almost there, you could check with your spatula to make sure it's all getting picked up!
9. Once all the cubed butter is added, add a teaspoon of vanilla paste and add the flavours (see blog/pictures). Use your spatula to slightly beat the mixture, getting rid of any air pockets.
Enjoy! I know this is a lot of effort but it is so worth it, so yummy! I don't refrigerate my cakes with this, but do consume within 1-2 days. :D
Let me know how you get on - if you want to post the recipe, please refer to my blog! :)
Love from Ruthie x
Swiss Meringue Buttercream
1 note
·
View note
Text
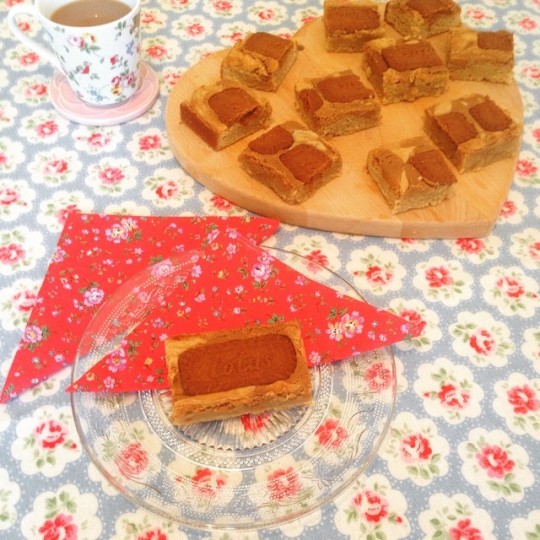
Ultimate Biscoff Blondies
A recipe made for Hayley - you are a wonderful, young lady. You're becoming a modern Jethro; you're wise, beautiful and you encourage me. May you always stand firm in your faith..and next time you come over, we’ll eat all of these blondies together!! :) And to Pierrine...I have to mention you, because you introduced me to Biscoff before it was even being sold in UK supermarkets...how I treasured that teaspoon you gave me.
As you know, I love cakes and cupcakes. Sometimes, however, the 'make and bake within an hour' recipes are the best! And I'm going to share with you one of my faves...Ultimate Biscoff Blondies! Mmm...

In many ways, my first ever blog post should have been on Biscoff because I am a walking-talking advert for the stuff!! I know so many people who also love Biscoff and could easily talk about it for hours. If you haven't tried it -where have you even been?!
The first ever jar of Biscoff I bought never made it into baking, or even to spread onto my toast. It went by the spoonful. I'm not even ashamed to admit this. Biscoff...mmm.....
There are quite a few Biscoff recipes out there - it even has its own recipe book called 'The Biscoff Cookie & Spread Cook Book' by Katrina Bahl! I've tried a few Blondie recipes for Biscoff, they are really nice and are a bit dense with a crinkly top. However, I've been wanting to work on a Biscoff blondie that was fudgey, soft, and chewy. These Biscoff Blondies are exactly this - they are so good, you might not want to share..hehe! (FYI - in one of my next posts I'll do a blog on the main two types of Blondies. To me, they are quite different.)
For this recipe, I was really inspired by Katie's 'Jamie Dodgers White Chocolate Blondies' (http://www.iheartkatiecakes.co.uk/2016/03/jammy-dodger-white-chocolate-blondies.html). She is from Newcastle, like me.. and has her own little shop in Grainger Market.
I adapted this recipe, of course, to be more Biscoff - themed. I also played around with the sugar for this recipe, because it is actually using soft brown sugar that makes a blondie a blondie, rather than a white-chocolate brownie for example. Brown sugar brings out a delicate but delightful caramel flavour which works perfectly with Biscoff. The white chocolate that Katie has incorporated into her recipe is critical to the fudgey-ness here. :)
That simple Biscoff Swirl...yum...
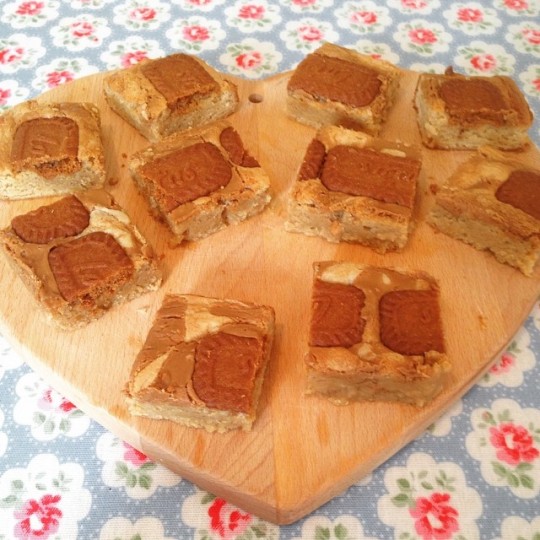
I really hope you make these and I know you won't stop at having just one!!
Let me know how you get on with your baking. :)
Love from Ruthie x
P.S: If you want to post the recipe, please refer to my page.
Blondie Ingredients:
45g Biscoff spread (smooth version)
155g butter
240g white chocolate, broken into pieces
1 tsp vanilla extract
175g golden caster sugar
75g soft light brown muscavado sugar
3 large eggs
300g plain flour, precisely measured
a pinch of ground cinnamon
2 heaped tablespoons smooth Biscoff spread
14 Biscoff/lotus biscuits (or how many you want for a desired pattern!)
Recipe:
1. Preheat oven to 1750C. Grease and line a 9 x 13 inch tray-bake tin.
2. In a large pan, over a very low heat, melt butter and chocolate. Stir often so that the mixture does not catch on the pan. Once the white chocolate has almost melted, add the 45g Biscoff spread. Stir until melted and then remove from heat. In a small bowl, mix plain flour and cinnamon together.
3. In a large bowl, mix the sugars. Then add 3 eggs and whisk until well mixed.
4. Add vanilla extract to white chocolate mix, which should have now cooled slightly.
5. Slowly and gradually pour in the melted white chocolate ingredients; mix thoroughly.
6. Gently add in the cinnamon and flour, adding in 2-3 stages. Use a clean spatula to fold in, stirring until just combined. Pour the mixture into the prepared tin; smooth and even out the mixture.
7. In a small heat-proof bowl, melt the 2 tablespoons of Biscoff spread on a low temperature in the microwave; approx 20-30 seconds. In strips of three (length-way down), pour the melted Biscoff spread on the blondie mixture. Using a butter knife, create a swirl pattern.
8. Place into the oven for 25 minutes. The blondies will have risen and will be golden in appearance once cooked.
9. Allow to cool completely. For me, the blondies are best eaten the day after they have been made as the Lotus biscuits become less crunchy.
1 note
·
View note
Text
Elderflower and Almond Cake with Raspberry and Rose Buttercream
Hi guys!
I'm so sorry I'm late with (only my second!) post..I had intended to post a lot earlier and more frequently. The last few weeks have been quite challenging, demanding and I've felt so unsettled that I didn't even want to bake! We also had to move...which made it difficult to find the time to bake! What a task moving is - having only moved around uni accommodation in the past, where belongings are confined to a bedroom and two cupboards, I found moving house not an easy experience!
I feel more settled now, although not completely - learning contentment is easier said than done! But I'm pleased to say...I baked! Hurrah, Ruthie baked a cake! I, along with the ladies from church planned a special celebration - Olive's Hen do!
I knew I had to bake a cake and I wanted it to be special and feminine just like the lady herself! I wanted to do something different to chocolate and biscoff (perish the thought!!...okay, okay...I couldn't resist this combo - if you look closely, you'll see I made eeny teeny weeny choc and biscoff cupcakes). I wanted to do something pretty, fruity with a zing...something that would relate to the warm, sunny days approaching and be perfect for afternoon tea. So I came up with elderflower, raspberry and rose cake!

The day itself was a blessing...a little manic and exhausting to get our house presentable but to see Olive come over and be so surprised made it worth it! I hope you like looking through these pictures as I much as I do. Thanks Olive and Pierrine for letting me share them!
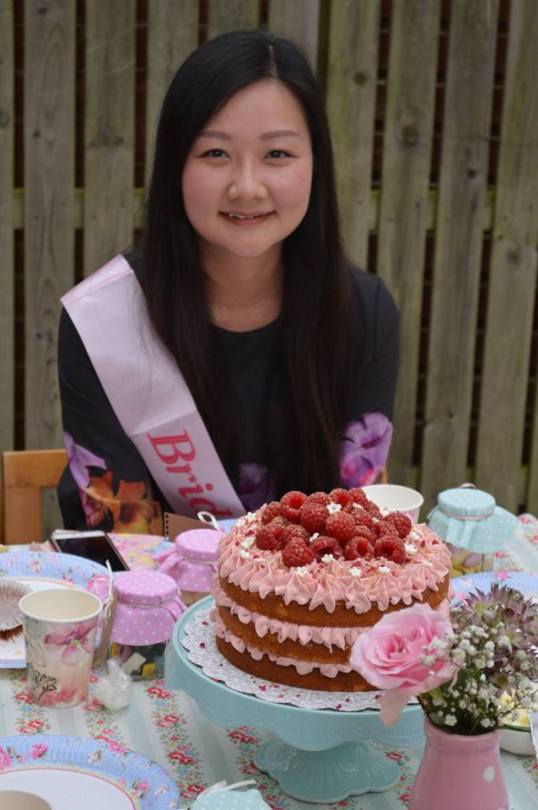

Back to the cake; we like talking about it cake! The sponge is nutty and moist (such a word is acceptable in baking!). I used almonds to replace some of the flour, giving the cake another depth of flavour to it. Using elderflower cordial in the sponge helps to make it so soft and give a lovely yellow crumb. I then choose raspberries to give it pink colour and I feel they tend to have a bit more zing which would go with elderflower. If you don't like raspberries, lemon, oranges..whatever you choose would go nicely. But do try this one! Some of you will just have to get over your fear of...*cue deep hushed voice*..the raspberry bugs!!! Rose works so well with raspberries and again re-iterates the feminine touch I wanted to give the cake.
I hope you give this a go! Enjoy baking and if you want to share this cake/recipe on your site, please refer to my page.
Love from Ruthie x
(The sponge recipe itself is adapted from Stockfood).
Cake ingredients:
330g softened butter
330g caster sugar
165g ground almonds
6 tbsp elderflower cordial
6 large eggs, lightly beaten
240g self-rising flour
Cake syrup (optional): 150g sugar, 150g water, 1 large tbspn of elderflower cordial
1. Grease or use cake spray on 3 8inch cake tins. Preheat the oven to 1800C.
2. Beat the butter and sugar together in an electric stand mixer, on a medium speed, until mixture is light, smooth and fluffy. Add in ground almonds and beat in well. Stir in the cordial.
3. Beat in the eggs, one by one. If the mixture requires it, add in a heaped teaspoon of flour between every other egg. After having used all the eggs, gently stir in the flour until combined.
4. Bake each cake layer; each tin will take 15-20 minutes (for me, it took approx 17 mins). The cake will be golden, risen, still soft but should come away from the edge of the tin slightly. Let to cool in tin for 10 minutes then place on a cooling rack until completely cool.
5. Whilst the cakes are baking, make the syrup. In a saucepan, heat the water and sugar until the sugar is completely dissolved. Remove from the heat, let to cool slightly for 5 minutes and stir in the cordial. Brush this over the cakes when they are out of the oven and are still warm.
Buttercream:
300g butter, softened
600g icing sugar
3 tbsp of raspberry conserve (I like the seeds to add flecks of colour)
1 tsp of Rosewater (you can use more, but do use sparingly)
1 tbsp of elderflower cordial
Optional: extra raspberry conserve, or seedless raspberry jam to spread over layers when assembling.
1. Beat the butter until soft and there are no lumps.
2. In 4 parts, gradually add in the icing sugar. Beat on a medium-high speed. Part way through, add the rosewater. Stir and then add in the cordial.
3. Once all the icing sugar is mixed in, add in the raspberry conserve, one tbsp at a time until you get the taste you desire.
Decorate with raspberries, sprinkles, fudge pieces etc.
1 note
·
View note
Text
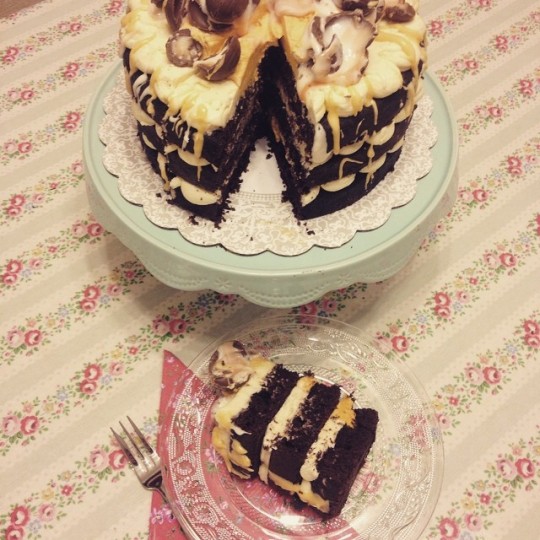
Chocolate Fudge Cake with Creme Egg Buttercream and Drizzle
Hi you guys made it! Eggcellent! Let's get cracking on this cake...where dreams really goo come true. :P
This cake...this cake is naughty..you'd need Bruce Bogtrotter, Augustus Gloop and myself to get through it.
There's quite a lot to share with this cake - it's a sweet chocolate fudge cake (with cake syrup soaked in just to make it very sweet like a creme egg whilst adding moisture), Creme Egg buttercream, a homemade-style Creme Egg drizzle topped with Creme Eggs. *watch out for the dentist lecture...'It was only one slice, I promise!'. But, yes I know..it's a lot of sugar...I tried telling myself that if I whisked and beat the icings really fast, all the calories would be whisked away. But, I can't kid myself. However, Creme Eggs are an Easter treat and so can be this cake!

Making the buttercream and the drizzle were my favourite parts about making this cake. Regarding the buttercream, you cut Creme Eggs in half and scoop out the inside. To start off, this actually made me feel a little healthy as it felt like I was using a passion fruit. Again, the guilty conscience hits me - alas, they were not passion fruit, they were Creme Eggs! I used five eggs, but if you want it even more Creme-gooey-Eggyness, add another 1-2 but don't go overboard as the sweetness will overwhelm the cake. I was in a rush, however, when decorating and didn't spend the time getting the 'drizzle effect' I wanted...so I want you guys to do this for me and enjoy taking time to make and decorate it bit by bit :)
Have fun baking, let me know how you get on and wishing you a blessed and happy Easter! :)
If you want to share this cake/recipe on your site, please refer to my page.
Love from Ruthie x
Cake Ingredients:
290g Plain flour, precisely measured
127g Cocoa powder (I recommend Green & Blacks)
2 tsp of baking powder
1 and a half tsp of baking soda
215g butter, softened
200g Golden Granulated Sugar
270g Golden Caster Sugar
300ml Buttermilk
5 Large Eggs
1 tbsp of Vanilla Extract
Cake Syrup: 150ml water, 150g caster sugar
1. Preheat oven to 1800C. Grease 3 8-inch round tins.
2. Beat butter on a medium speed using a stand mixer, add in the granulated sugar and beat for several minutes. Then add in the remaining sugar. Beat until fluffy and paler in colour. Add vanilla extract.
3. Have flour, cocoa powder and raising agents mixed together ready in a bowl. One by one slowly add in the eggs. In between each egg, you will need to add a heaped tspn or two of the dry mixture to help stop the mixture from splitting.
4. Once all the eggs are in, slowly add the buttermilk. Add in thirds; after the first third, then mix in with some of the remaining dry ingredients. Repeat until all ingredients reach the bowl, being gentle with the mixture but being sure that all the ingredients are all incorporated together.
5. Divide the mixture between the three pans. Each pan will take about 25-30 mins. Bake until cake has risen, and the sides have started to come away from the pan. You can insert a cake skewer into the cake to see that it comes out clean.
6. Whilst the cakes are baking, make the cake syrup. Add the sugar and the water into a small pan and gently bring to the boil. Allow to simmer and wait until the sugar has completely dissolved. Remove from the heat source to allow it to cool slighty.
6. Once the cakes are ready, allow them to cool for about ten minutes before you remove them from the pan. Just before you remove them, brush over the top of the cake with the cake syrup. Allow the cakes to cool completely.
Buttercream (there will be some spare):
400g Butter, softened, unsalted
800g Powdered Icing Sugar, sifted
1 and a half teaspoons of Vanilla Extract
5 Creme Egg Insides
A tsp of milk (or more)
Orange Food colouring (you could also use yellow if you prefer)
1. Beat the butter until very pale and soft on a high speed. Gradually add and beat in the icing sugar, adding in 200g at a time. In between adding the icing sugar, around half way through, add the vanilla.
2. Before adding the final part of the icing sugar, add in the milk. Once the icing is done, gently add in the Creme Egg insides. Split a shy 1/3 of the mixture into a separate bowl and add the orange colouring until it is the desired colour. You can pipe this in the middle of the cakes when icing and on the middle of the top too for that real Creme Egg effect!
Creme Egg Drizzle:
17g Butter, softened, unsalted
47g Liquid Glucose (I used Dr Oetker)
100g Icing Sugar
A drop of vanilla extract
2 tsp water (you may need more, depending on desired consistency).
1. Whisk the butter until very soft. Then whisk together the butter, glucose and vanilla extract and water. Then add in the icing sugar - not all at once. Add more water if necessary for a thinner mixture. Once you have drizzled the white drizzle over the cake, then add orange food colouring to the remaining drizzle and drizzle the cake to your heart's content.
Further Decoration: a box of 5 Creme Eggs, and a bag of Mini Creme Eggs
0 notes
Text
Firstly, Hi and thank you for visiting my page! I was going to start writing this blog in 2015 - after my wedding and finishing uni when I needed a project and felt inspired to do so. However, I wanted to make some changes this site before blogging...I'm still wanting to make adjustments to the page and I thought let's just crack on (pun for the next post!) with it. I've not got all the functions ready just yet, so please just bear with me as I am far from technical!
My blog will be mainly baking related, but my faith is an important part of who I am and I will occasionally make separate posts on this...
I love baking. I love making layer cakes, cupcakes and smaller bakes like blondies and brownies. It's probably in that order too; although I may mainly post layer cakes, cupcakes do hold a special place in my heart. In fact, life is so busy at the moment and cupcakes are less time-consuming to make so who knows! What matters most is that for me, baking is a way to express my creativity and I love to share foodie treats with people because food and cake has a way of bring people together and makes them happy! I am certainly not the best, or most experienced baker so this blog will allow me to capture my experiences and perhaps motivate me to try out doing some other baking projects I want to try like pastries.
0 notes
Text
Hi, I’m Ruthie. For a few years now, I’ve wanted to get involved in the blogging world. Here I now am. :) I love cake and I’m a Christian - I think this sums me up!!
0 notes