
Last Seen Blogs

thedhabi-space
The sole

sootspriting
where the time went

lazereyessquire-blog
Lazereyes

thegiantswans
The Giant Swans.

largando
Untitled
Text
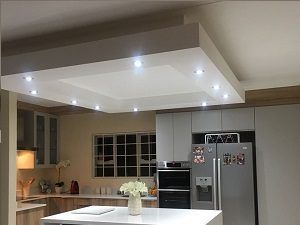
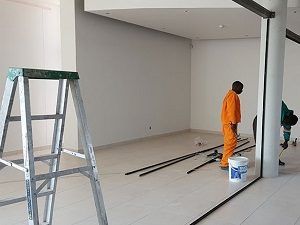
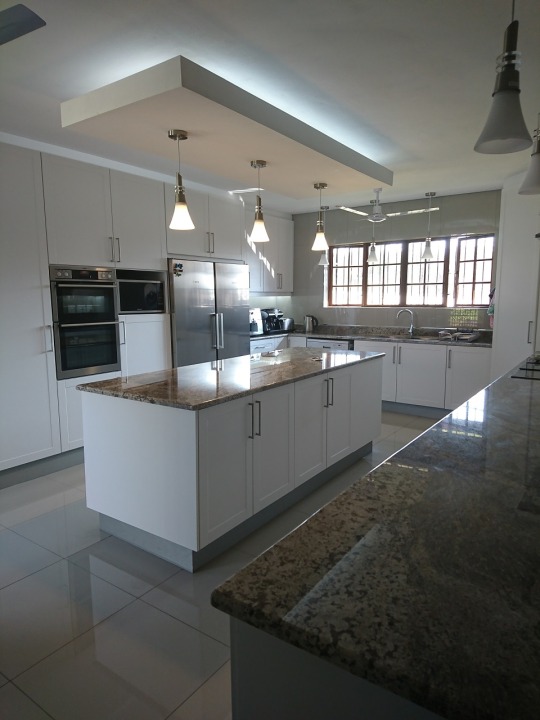
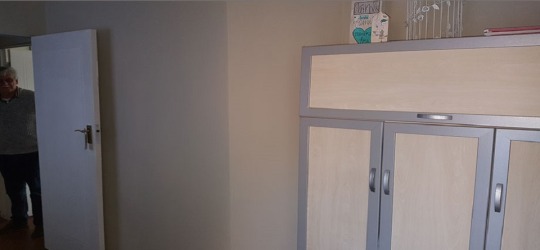
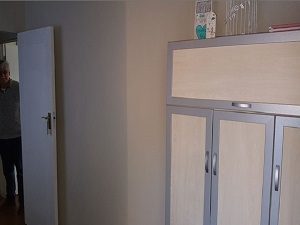
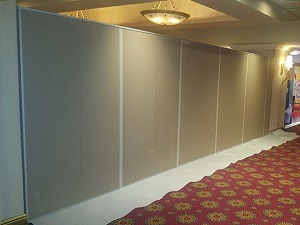
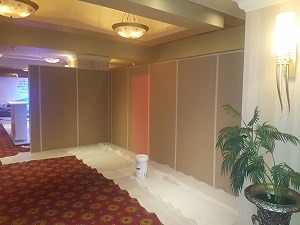
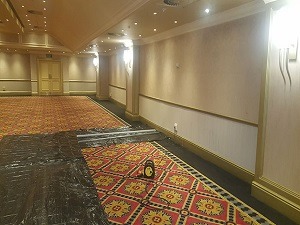
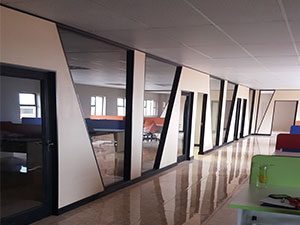
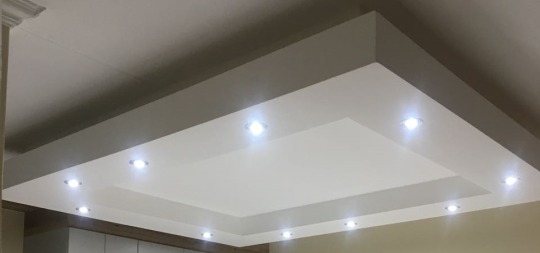
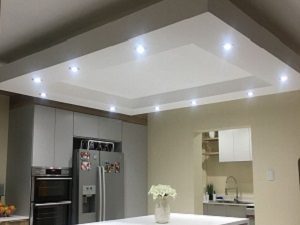
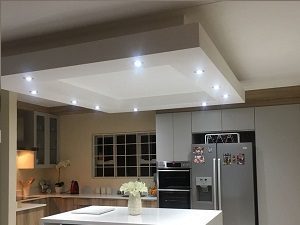
Light Trough Bulk Heads
Light Trough Bulk Heads

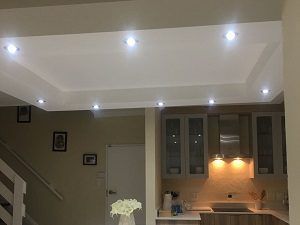


Pamela contacted us to assist with Light Trough Bulk Heads design and installation at her residence in Olivedale as part of her project to completely redo her kitchen.
She already had a clear picture in mind of how she wanted her kitchen to look but asked us to assist with the Light Trough Bulk Heads to ensure that it is aesthetically suitable for her vision.
She desired to accentuate the kitchen and also have a lighting solution not only impress but also give a atmosphere of sophistication whilst still creating a relaxing and conducive environment with a Light Trough Bulk Heads design.
Pamela replaced all the kitchen cupboard and appliances. We had to fix the Light Trough Bulk Heads frame directly to the slab and compensate for a slight deviation in the slab level.
The final design was Light Trough Bulk Heads with a recessed center which also allows for the option to fit pendulum lights, the drop from the ceiling to the bottom edge was carefully planned to fit in with the height and with of the room. Too little or too much of a drop is aesthetically displeasing.
The Light Trough Bulk Heads looks amazing and compliments the surrounding areas amazingly. Pamela did an amazing job with the combination of fixtures and fittings.
The structure of the Light Trough Bulk Heads was created from galvanized main tees and cross tees as per supplier recommendation. Corner sections done with galvanized angle and all secured with wafer tech screws.
It needs to be noted that accuracy when constructing the structure is of utmost importance. If the structure is poorly constructed the end product will be of poor visual quality.After the Light Trough Bulk Heads structure was completed 9.5mm Gypsum board cladding was used and corners trimmed with corner beads. Care needs to be taken that this done properly as a corner bead fitted a slight bit out of position will have a disastrous effect on the final aesthetic look.
After all of the above was completed two coats of Rhinolite was applied to the Light Trough Bulk Heads and skimmed to a smooth flawless finish. Toni-Anne and her team then applied paint and fitted LED strips lights and pendulum lights.Both the Round bulk head for the boardroom and meeting room was constructed and finished in only 3 days, which in it self is mammoth of a task not only to complete in 3 days, but also to do with detail and perfection.Well done to the team!!!
Below a link with some more information:
Bulkhead installation
Read the full article
0 notes
Text
Light Trough Bulk Heads
Light Trough Bulk Heads


Pamela contacted us to assist with Light Trough Bulk Heads design and installation at her residence in Olivedale as part of her project to completely redo her kitchen.
She already had a clear picture in mind of how she wanted her kitchen to look but asked us to assist with the Light Trough Bulk Heads to ensure that it is aesthetically suitable for her vision.
She desired to accentuate the kitchen and also have a lighting solution not only impress but also give a atmosphere of sophistication whilst still creating a relaxing and conducive environment with a Light Trough Bulk Heads design.
Pamela replaced all the kitchen cupboard and appliances. We had to fix the Light Trough Bulk Heads frame directly to the slab and compensate for a slight deviation in the slab level.
The final design was Light Trough Bulk Heads with a recessed center which also allows for the option to fit pendulum lights, the drop from the ceiling to the bottom edge was carefully planned to fit in with the height and with of the room. Too little or too much of a drop is aesthetically displeasing.
The Light Trough Bulk Heads looks amazing and compliments the surrounding areas amazingly. Pamela did an amazing job with the combination of fixtures and fittings.
The structure of the Light Trough Bulk Heads was created from galvanized main tees and cross tees as per supplier recommendation. Corner sections done with galvanized angle and all secured with wafer tech screws.
It needs to be noted that accuracy when constructing the structure is of utmost importance. If the structure is poorly constructed the end product will be of poor visual quality.After the Light Trough Bulk Heads structure was completed 9.5mm Gypsum board cladding was used and corners trimmed with corner beads. Care needs to be taken that this done properly as a corner bead fitted a slight bit out of position will have a disastrous effect on the final aesthetic look.
After all of the above was completed two coats of Rhinolite was applied to the Light Trough Bulk Heads and skimmed to a smooth flawless finish. Toni-Anne and her team then applied paint and fitted LED strips lights and pendulum lights.Both the Round bulk head for the boardroom and meeting room was constructed and finished in only 3 days, which in it self is mammoth of a task not only to complete in 3 days, but also to do with detail and perfection.Well done to the team!!!
Below a link with some more information:
Bulkhead installation
Read the full article
0 notes
Text
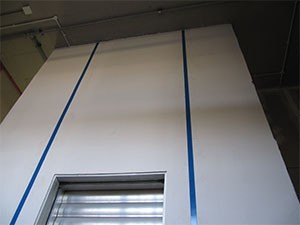
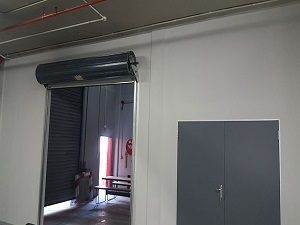
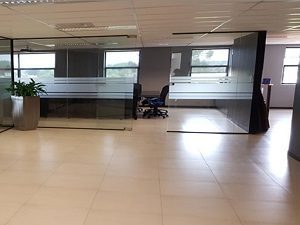
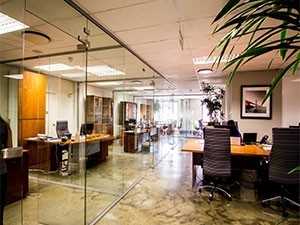
Frameless Glass Installation
Frameless Glass Installation
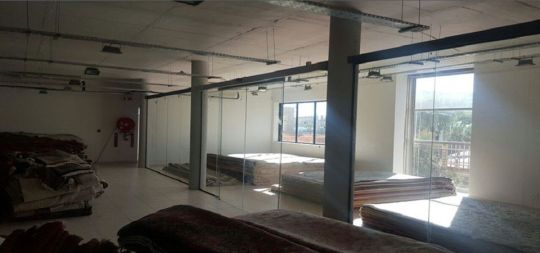
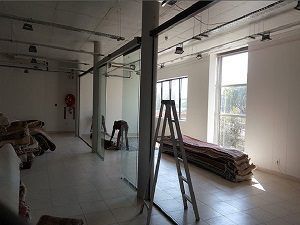

We were contacted to assist with the frameless glass installation at Paras Carpets in Kramerville as part of their floor layout plan to create a secure area to store and display the most expensive hand made carpets in.
They requested that automated doors be installed as part of the frameless glass installation.
Due to the slab being too high a custom steel structure had to be build to provide the necessary structural support for the frameless glass installation and automated glass doors.
The automated glass doors was fitted with a control panel which allow the section to be either locked, the doors to open manually or to be automated doors with movement sensors.Due to the glass dimensions having to be perfect due to the glass being toughened and any mistakes resulting in the complete loss of glass, technical drawings had to be drawn up for the glass supplier.
During the frameless glass installation extreme care had to be taken to ensure that the fragile 10mm toughened glass doesn't break.
The final installation allowed for the glass walls to meet the customers' expectations and create a much more secure display environment with the upmarket feel desired.
It looks amazing and compliments the surrounding areas perfectly with a clearly defined executive look for these upmarket expensive hand made carpets.
The structure of the frameless glass installation was created from powder coated floor tracks as per supplier recommendation. Silicon joints was used to create the illusion of one continuous glass wall.
It needs to be noted that accuracy when constructing the structure is of utmost importance. If the structure is poorly constructed the end product will be of poor visual quality.
After all of the above was completed the site was cleaned and ready for the next contractor to do their installation.
Well done to the team!!!
Below a link with some more information:
Frameless Glass Installation
Read the full article
0 notes
Text
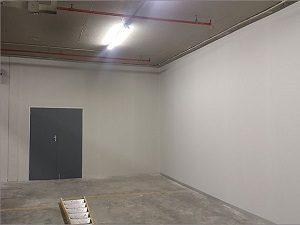
Residential Drywall
Residential Drywall
Residential Drywall Thelma
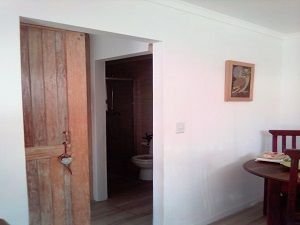
Thelma contacted us to assist with residential drywall and installation at their house in Brakenfell.
She already had a clear picture in mind of the layout she desired for changing their garage into a granny flat.
The new residential drywall was installed in their existing garage.
The residential drywall was fixed to existing walls and trusses. Skimmed ceiling was also installed.
The electrical articulation was done by their own electrician.
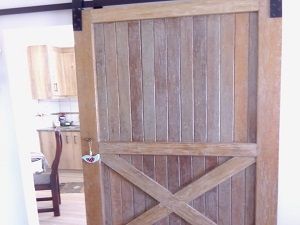
The drywall was also fitted with a solid barn style sliding door and heavy duty rail. The doorway was created using corner beads and skimmed.
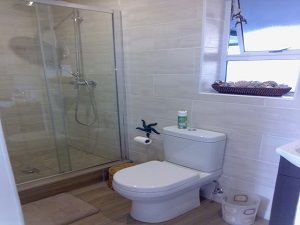
The residential drywall in the bathroom was fitted with fibre cement boards to ensure longevity and protections against moisture.
They painted the residential drywall two coats low sheen.
As can be seen the final product was not only functional but also aesthetically pleasing but also spacious and homely.
The structure was created from galvanized floor track which was fixed to the floor with nail in screws, aluminium natural anodized wall channel fitted to the ceilings and walls where required and galvanized studs as per supplier recommendation. Corner sections done with galvanized angle and all secured with drywall screws.
It needs to be noted that accuracy when constructing the structure is of utmost importance. If the structure is poorly constructed the end product will be of poor visual quality. After the drywalling structure was completed 12.5mm Gypsum board cladding was used.
Joint was then fiber taped and two coats Rhinoglide applied. Once dry, the joints was sanded to a smooth finish in preparation for painting.
It was an absolutely a pleasure to do this project for Thelma and it truely felt like home away from home.
Well done to the team!!!
Below a link with some more information:
Dry Walling installation
Read the full article
0 notes
Text
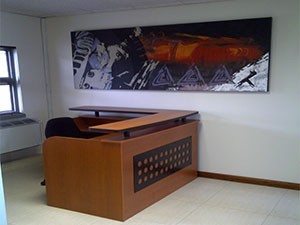
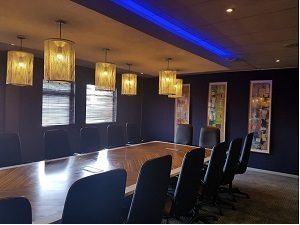
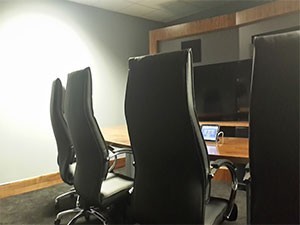
Bulkheads Mr Brown
Bulkheads
Mr Brown contacted us to assist with bulkheads design and installation at his residence in Midrand as part of his project to completely redo their kitchen.
He already had a clear picture in mind of how he wanted his kitchen to look but asked us to assist with the bulkheads to ensure that it is aesthetically suitable for his vision.
He desired to accentuate the kitchen and also have a lighting solution not only impress but also give a atmosphere of sophistication whilst still creating a relaxing and conducive environment with a bulkheads design.
Mr Brown replaced all the kitchen cupboard and appliances. We had to fix the bulkheads frame directly to the slab and compensate for a slight deviation in the slab level.
The final design was rectangular bulkheads with a recessed center which also allows for the option to fit pendulum lights, the drop from the ceiling to the bottom edge was carefully planned to fit in with the height and with of the room. Too little or too much of a drop is aesthetically displeasing.
The bulkheads looks amazing and compliments the surrounding areas amazingly. Mr Brown did an amazing job with the combination of fixtures and fittings.
The structure of the bulkheads was created from galvanized main tees and cross tees as per supplier recommendation. Corner sections done with galvanized angle and all secured with wafer tech screws.
It needs to be noted that accuracy when constructing the structure is of utmost importance. If the structure is poorly constructed the end product will be of poor visual quality.After the bulkheads structure was completed 9.5mm Gypsum board cladding was used and corners trimmed with corner beads. Care needs to be taken that this done properly as a corner bead fitted a slight bit out of position will have a disastrous effect on the final aesthetic look.
After all of the above was completed two coats of Rhinolite was applied to the bulkheads and skimmed to a smooth flawless finish. Toni-Anne and her team then applied paint and fitted LED strips lights and pendulum lights.Both the bulkhead for the boardroom and meeting room was constructed and finished in only 3 days, which in it self is mammoth of a task not only to complete in 3 days, but also to do with detail and perfection.Well done to the team!!!
Below a link with some more information:
Bulkhead installation
Read the full article
0 notes
Text
Drywalling Solutions
Drywalling
Middindi Consulting Ruimsig

Roha

Leads to Business
Legalcom
Italtile

OLG Johannesburg
Endemol Acoustic Drywalling

Babcock Acoustic Drywalling

Babereki

CPT Printer Isando

MAN Diesel

Cirebelle

Open Window

Baragwanath Hospital
Best Lazers

GKD Factory Drywall
JHB Hospital School
TSC John Huxley
Satinsky
DMA

Toyota Arcadia

ICT Worx Cresta

ICT Worx Woodmead
Civil Power

Seda Rustenburg
Montesorri

Volkswagen Arcadia

Sabila
CHM

Tanya's Nail Salon

King Pie
Herbert 1
Telesure
Brian Residential Drywalling

OLG Pretoria
AME Montana Drywalling

Famasons

Emperors Palace Drywalling

Anita Doornfontein Drywalling
OLG Durban Drywalling
Pursuit Solutions Fourways
DDZ Centurion

Dadas Motors Hoarding

Cirebelle Fibre Cement Room

Duraweld

Thelma Residential Drywalling

Under Construction
Under Construction 3
We offer you quality service at a price you didn't expect and in addition our experience and versatility in the full scope of drywalling solutions.
In today's day and age drywalling is your answer to almost any interior solution you are looking for. Very few people know how versatile it really is. Consequently most know it for only one or two applications where it is used and as a result will be amazed at what solutions are available...
Drywalling is the process where you create almost all of your indoor walls without the use of cement and bricks. First of all, this is not only cheaper than brick walls but also much lighter, therefore, this is the preferred solution where extra weight on a slab is a risk factor.
Drywalling can be shaped to fit any installation. It consists of professionally manufactured gypsum board structures and is available in various sizes and finishes and thickness and as a result, can be curved, skimmed ext...
The standard height for drywalling is 2100mm and 2400mm and 2700mm and 3000mm and 3600mm. Each of these lengths is available as a 76mm system using a 50mm structure and an 89mm system using 63mm structure. In addition, a 128mm system using a 102mm structure is also available where applications need extra height and specific structural strength ext. The thickness of boards ranges from 9mm and 12mm and 15mm.
Furthermore drywalling can be thermally or acoustically insulated and in areas where a fire rated wall is required. It is especially relevant that a lot of contractors inform customers that thermal insulation such as Think Pink can be used as acoustic insulation and even though it will assist to some degree it should be known that the correct acoustic solution is products such as CavityBatt which is specifically manufactured for an acoustic application.
In addition, the Acoustic solutions are:
51mm RhinoWall Standard Soundblock Drywalling and has a sound rating of Rw49dB
63mm RhinoWall Standard Soundblock Drywalling and has a sound rating of Rw49dB
102mm RhinoWall Standard Soundblock Drywalling and has a sound rating of Rw52dB
HiSpec RhinoWall Soundblock 63mm Drywalling and has a sound rating of Rw54dB
HiSpec RhinoWall Soundblock 102mm Drywalling and has a sound rating of Rw55dB
Secure RhinoWall Soundblock 102mm Drywalling and has a sound rating of Rw58dB
RhinoWall PartyWall Soundblock 63mm Drywalling and has a sound rating of Rw63dB
RhinoWall PartyWall Secure Soundblock 63mm Drywalling and has a sound rating of Rw63dB
In addition, Standard, Fire Rated and Moisture Resistant is three types of Gypsum board available.
The versatility of the Standard gypsum boards is exceptional. It is lightweight and can be used for domestic and commercial drywalling.
Other versatile functions of drywalling fire Rated gypsum board is recommended in kitchens and areas where additional fire resistance is required. Therefore more than one fire rated gypsum board can be fitted to the structure eg. two fire-rated boards on each side of the fire rated structure.
Most noteworthy is that in all wet areas such as bathrooms and showers, as well as locations with high humidity and moisture levels our moisture resistant Gypsum board is recommended. A moisture resistant Gypsum board is supported with special additives in the core, therefore retards the absorption rate of moisture, while ensuring that the Gypsum board maintains its high-performance level over time.
All joints are fiber taped to prevent cracking and plastered and sanded to a final smooth finish. Therefore the final drywalling finish looks precisely the same as a normal plastered brick wall.
In conclusion, LPMBP Construction Experts will assist you to transform the desired area to suit your needs...
Below is a link which provides a bit more information on the drywalling process:
Drywalling
Read the full article
0 notes
Text
Factory Dry Walling
Factory Dry Walling
Factory Dry Walling MAN Diesel
Richard contacted us to assist with factory dry walling and installation at MAN Diesel in Meadfowdale as part of their project for new equipment rooms in their new factory.
They already had a clear picture in mind of the factory dry walling required but also black powder coated window and door frames and double doors installed and painting done.
Re-enforcement had to be build into the factory for the fitment of trusses to which ceiling was fitted.
After all was completed 75mm black powder coated aluminium skirting was fitted .
The factory dry walling was then painted one coat plaster primer and two coats low sheen white paint.
As can be seen the final product was not only functional but also aesthetically pleasing and met the desired outcome of client.
The structure of the factory dry walling was created from galvanized floor track which was fixed to the floor with nail in screws, aluminium natural anodized wall channel fitted to the ceilings and walls where required and galvanized studs as per supplier recommendation. Corner sections done with galvanized angle and all secured with drywall screws.
It needs to be noted that accuracy when constructing the structure is of utmost importance. If the structure is poorly constructed the end product will be of poor visual quality.After the drywalling structure was completed 12.5mm Gypsum board cladding was used.
The windows fitted had natural black powder coated aluminium frames and 6.38mm safety glass.
The double doors fitted had natural anodized aluminium frames, natural anodized hinges, medium duty hollow core doors and standard lock sets with dead bolts.
Joint was then fiber taped and two coats Rhinoglide applied. Once dry, the joints was sanded to a smooth finish in preparation for painting.
Well done to the team!!!
Below a link with some more information:
Factory Dry Walling
Read the full article
0 notes
Text
Residential Drywalling
Anita Doornfontein
Residential Drywalling
Anita and Frans contacted us to assist with residential drywalling and installation at their residence as part of their renovations to create extra bedrooms .
They already had a clear picture in mind of the residential layout required but also required doors, skirting and cornice installed, painting done ext. Anita and Frans got married recently and bought a new house.
It had big open volumes and was very spacious but lacked the desired amount of rooms needed.
As such Anita and Frans desired to create extra rooms to ensure each of their children have their well deserved private space.
The residential drywalling was then painted one coat plaster primer and two coats low sheen white to matched .
As can be seen the residential drywalling was not only ensured aesthetically pleasing rooms for the children and met the desired outcome desired by Frans and Anita.
The structure of the residential drywalling was created from galvanized floor track which was fixed to the floor with nail in screws, aluminium natural anodized wall channel fitted to the ceilings and walls where required and galvanized studs as per supplier recommendation. Corner sections done with galvanized angle and all secured with drywall screws.
It needs to be noted that accuracy when constructing the structure is of utmost importance. If the structure is poorly constructed the end product will be of poor visual quality.After the residential drywalling structure was completed 12.5mm Gypsum board cladding was used.
Wooden skirting and 75mm Cove cornice was fitted.
Doors fitted had natural anodized aluminium frames, natural anodized hinges, hollow core doors and standard lock sets.
Joints was then fiber taped and two coats Rhinoglide applied. Once dry, the joints was sanded to a smooth finish in preparation for painting.
Well done to the team for making this house a home!!!
Below a link with some more information:
Residential Drywalling
Read the full article
0 notes
Text
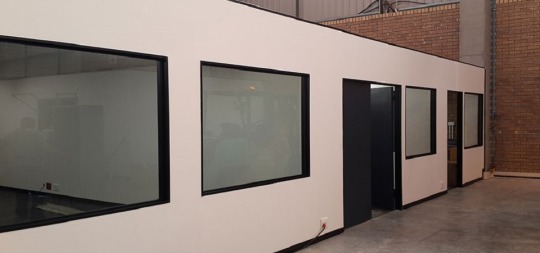
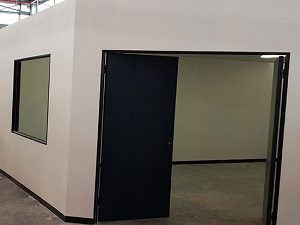
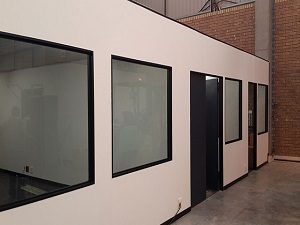
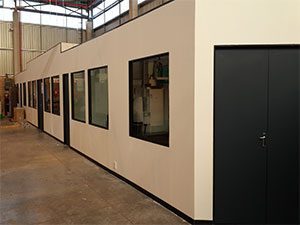
Drywall Partition
Drywall Partition
Drywall Partion Emperors Palace

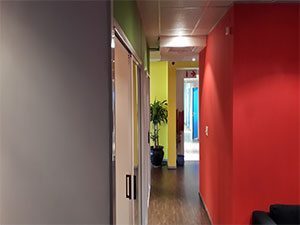
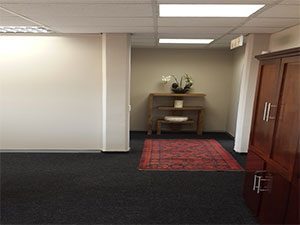
Mr Malan contacted us to assist with dry wall and installation at Legalcom in Mooikloof as part of their new offices.
He already had a clear picture in mind of the layout required and had plans already drawn up.
The new dry wall was installed in an empty shell of the new offices Mr Malan had build.
The dry wall was fixed to existing wall, pillars and ceiling with standard door frames fitted.
After all dry wall was completed the electrical articulation was completed .
The dry wall was then painted and Belgotex Berberpoint 920 carpets installed.
As can be seen the final product was not only functional but also aesthetically pleasing and fully caters for Mr Malan's business.
The structure was created from galvanized floor track which was fixed to the floor with nail in screws, aluminium natural anodized wall channel fitted to the ceilings and walls where required and galvanized studs as per supplier recommendation. Corner sections done with galvanized angle and all secured with drywall screws.
It needs to be noted that accuracy when constructing the structure is of utmost importance. If the structure is poorly constructed the end product will be of poor visual quality.After the drywalling structure was completed 12.5mm Gypsum board cladding was used.
Windows was fitted using natural anodized aluminium glazing sections, natural anodized beads, bubble gasket and 6.38mm safety glass.
Doors fitted had natural anodized aluminium frames, natural anodized hinges, medium duty hollow core doors and standard lock sets.
Joint was then fiber taped and two coats Rhinoglide applied. Once dry, the joints was sanded to a smooth finish in preparation for painting.
It was an absolutely a pleasure not only meeting Mr Malan but to be honored to do this project for him.
Well done to the team!!!
Below a link with some more information:
Dry Walling installation
Read the full article
0 notes
Text
Factory Drywall
Factory Drywall
Factory Drywall Cirebelle
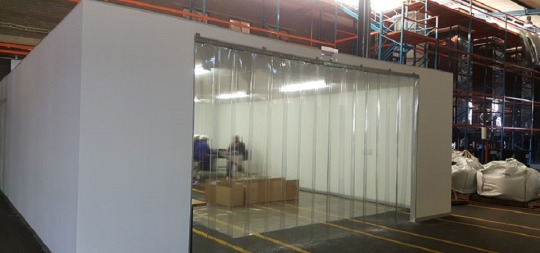
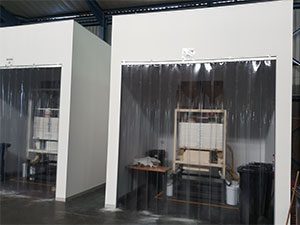
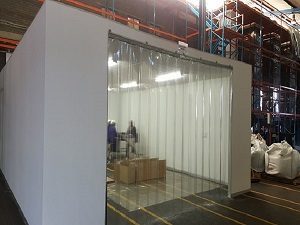
Robert contacted us to assist with factory drywall and installation at Cirebelle in Robertville as part of their project for sieve, production, quality inspection and sorting rooms.
They already had a clear picture in mind of the factory drywall required but also required a solution for moving forklifts into the different rooms as part of the production process planning.
PVC curtains was installed into the factory drywall as an solution and re-enforcement had to be fitted where required.
After all was completed 75mm aluminium skirting was fitted .
The factory drywall was then painted one coat plaster primer and two coats low sheen white paint.
As can be seen the final product was not only functional but also aesthetically pleasing and met the desired outcome of client and also their required processes.
The structure of the walls was created from galvanized floor track which was fixed to the floor with nail in screws, aluminium natural anodized wall channel fitted to the ceilings and walls where required and galvanized studs as per supplier recommendation. Corner sections done with galvanized angle and all secured with drywall screws.
It needs to be noted that accuracy when constructing the structure is of utmost importance. If the structure is poorly constructed the end product will be of poor visual quality.After the drywalling structure was completed 12.5mm Gypsum board cladding was used.
The windows fitted had natural black powder coated aluminium frames and 6.38mm safety glass.
The double doors fitted had natural anodized aluminium frames, natural anodized hinges, medium duty hollow core doors and standard lock sets with dead bolts.
Joint was then fiber taped and two coats Rhinoglide applied. Once dry, the joints was sanded to a smooth finish in preparation for painting.
Well done to the team!!!
Below a link with some more information:
Factory Drywall
Read the full article
0 notes
Text
Factory Drywalling
Factory Drywalling
Factory Drywalling CPT Printers Isando
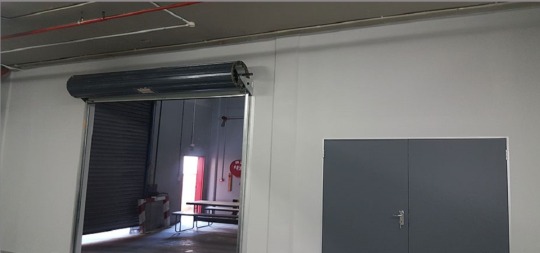
CPT contacted us to assist with factory drywalling and installation at CPT in Isando as part of their project for two new printing rooms.
They already had a clear picture in mind of the factory drywalling required but also required two roller doors and one extra height double door installed and painting done.
Re-enforcement had to be build into the factory drywalling of the two rooms to allow for structural strength for the two roller doors to be installed. The opening of the walls where the rollers doors was fitted was trimmed with aluminium.
After all was completed 75mm aluminium skirting was fitted .
The factory drywalling was then painted one coat plaster primer and two coats low sheen white paint.
As can be seen the final product was not only functional but also aesthetically pleasing and met the desired outcome of client.
The structure of the partitioning was created from galvanized floor track which was fixed to the floor with nail in screws, aluminium natural anodized wall channel fitted to the ceilings and walls where required and galvanized studs as per supplier recommendation. Corner sections done with galvanized angle and all secured with drywall screws.
It needs to be noted that accuracy when constructing the structure is of utmost importance. If the structure is poorly constructed the end product will be of poor visual quality.After the drywalling structure was completed 12.5mm Gypsum board cladding was used.
The extra height double doors fitted had natural anodized aluminium frames, natural anodized hinges, medium duty hollow core doors and standard lock sets with dead bolts.
Joint was then fiber taped and two coats Rhinoglide applied. Once dry, the joints was sanded to a smooth finish in preparation for painting.
Well done to the team!!!
Below a link with some more information:
Factory Drywalling
Read the full article
0 notes
Text
Frameless Glass
Frameless Glass
Frameless Glass Leads2Business
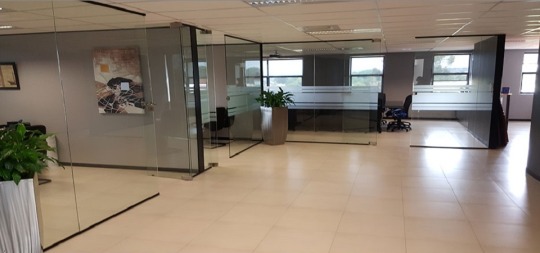
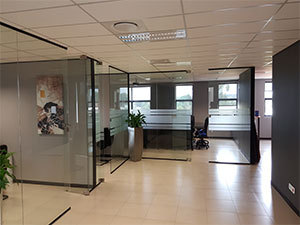
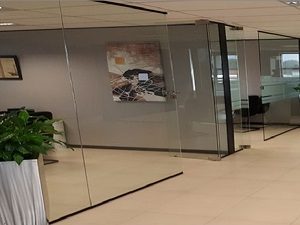
Brandon contacted to assist with the frameless glass at Leads 2 Business in Randburg as part of their floor layout plan at their new premises.
They requested that 10mm toughened doors with brushed stainless steel pneumatic hinges, locksets and striker boxes be installed as part of the frameless glass installation.
The powder coated channels was fitted to the suspended ceiling and floor.
The 10mm toughened glass doors was fitted with pneumatic double action hinges which allows for the door to open both directions.
Due to the glass dimensions having to be perfect due to the glass being toughened and any mistakes resulting in the complete loss of glass, technical drawings had to be drawn up for the glass supplier with special care taken for cut outs for the hinges, locksets and striker boxes to allow fixtures to align perfectly.
During the frameless glass installation extreme care had to be taken to ensure that the fragile 10mm toughened glass doesn't break.
The final installation allowed for the glass walls to meet the customers' expectations and create the upmarket feel desired.
It looks amazing and compliments the surrounding areas perfectly with a clearly defined executive look.
The structure of the frameless glass installation was created from powder coated floor tracks as per supplier recommendation. Silicon joints was used to create the illusion of one continuous glass wall.
It needs to be noted that accuracy when constructing the structure is of utmost importance. If the structure is poorly constructed the end product will be of poor visual quality and there will be a high risk of the toughened glass breaking.
After all of the above was completed the site was cleaned and ready for the next contractor to do their installation.
Well done to the team!!!
Below a link with some more information:
Frameless Glass Installation
Read the full article
0 notes
Text
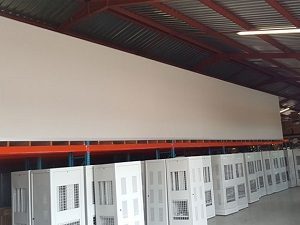
Drop Ceilings Hennie Cobra
Drop Ceilings
Drop Ceilings Hennie Cobra
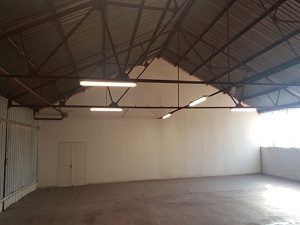
Hennie contacted us, after being referred to us by their Springs branch, to assist with ceiling removal and installation at Cobra in Krugersdorp for a training area where the ceiling was in a very poor condition.
Hennie requested that the existing drop ceilings should be removed and new drop ceilings installed below existing electrical trunking. But also low enough to meet with existing drywall which the previous ceiling didn't do.
As such we had to carefully plan the new drop ceilings installation keeping windows, drywalling ext in mind and also not to effect their work environment or production.
During the installation extreme care had to be taken to adhere to safety rules and not to affect production.
The final installation allowed for the drop ceilings to meet the customers' expectations and create a much more comfortable environment for training .
It looks amazing and compliments the surrounding areas perfectly and we can't wait to see what it will look like with all fixture and fittings being installed.
The structure of the drop ceilings was created from white main tees and cross tees as per supplier recommendation. The grid was suspended using galvanized wire and to the bottom of the purlins and bracing.
It needs to be noted that accuracy when constructing the structure is of utmost importance. If the structure is poorly constructed the end product will be of poor visual quality..
After all of the above was completed the site was cleaned and ready for the next contractor to do their installation.
A special word of thanks to Hennie, Martin and the awesome staff at Cobra for making themselves permantly available to co-ordinate this project. Always great to be in the company of great people.
Well done to the team!!!
Below a link with some more information:
Drop Ceiling Installation
Read the full article
0 notes
Text
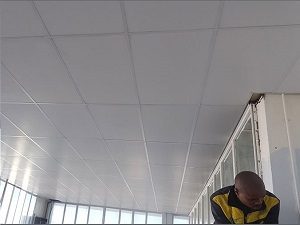
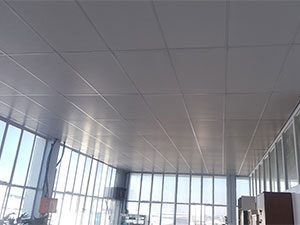
Suspended Ceilings Fasie Comair
Fasie Comair
Suspended Ceilings
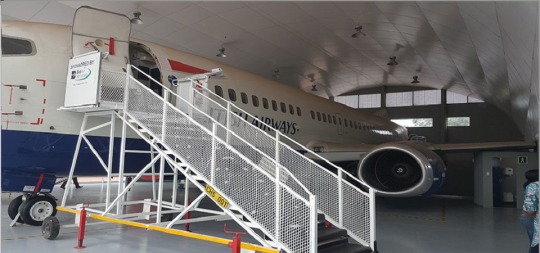
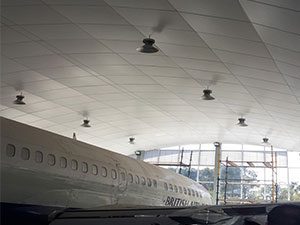


Fasie contacted us to assist with suspended ceilings design and installation at Comair in Rhodesfield as part of their new training facility using a Boeing 737.
Fasie requested that the suspended ceilings should be installed below between curved I-beam and below the lip channel.
Due to the curve angle the I-beams kept on snapping and their contractor had to cut the I-beams in half, bend them and then weld them together. This left unsightly welding marks and we were then requested to provide another solution for the suspended ceiling installation, which we eagerly did by applying years of experience and knowledge gained.
We used sections of structurally strong galvanized studs to extend the point of fixture of the grid past the beams and installed thermal suspended ceilings boards supplied and cut to our specification by Isover SA.
With the delay in the I-beam curving and the related special production of material and added time needed to do this special installation, we were under pressure to meet deadlines but stepped up to the challenge.
The final design allowed for the suspended ceilings to cover the unsightly I-beams as well as to allow for the curved form, as can be seen on the photos. Bulkheads also had to be installed on the sides, front and rear where the suspended ceilings met with walls and glazing sections.
The final product looks amazing and met and exceeded the initial desired outcome of Comair.
The choice of shop front glass, fixtures and fitting and the suspended ceilings allows for a relaxed and conducive environment for staff and trainers alike to conduct training in...
The structure of the ceiling was created from white main tees and cross tees as per supplier recommendation. The grid was suspended using structurally stong galvanized studs and fixed to the purlins and I-beams.
It needs to be noted that accuracy when constructing the structure is of utmost importance. If the structure is poorly constructed the end product will be of poor visual quality and a risk to the Health and Safety of employees.
After all of the above was completed the site was cleaned and ready for the next contractor to do their installation.
A special word of thanks to Fasie and the rest of the team managing this project from Comair's side. Always great to be in the company of great people.
Well done to the team!!!
Below a link with some more information:
Suspended Ceilings
Read the full article
0 notes
Text
Billy Superma Suspended Ceiling Parkmore
Billy Superma
Suspended Ceiling
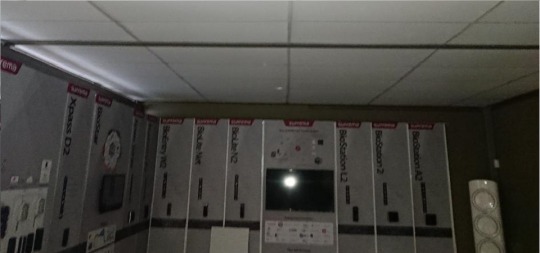
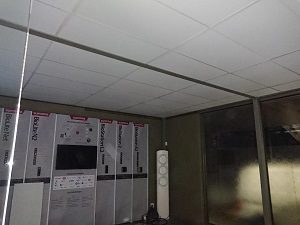
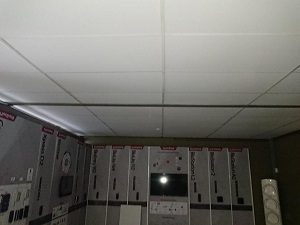
Billy contacted us to assist with suspended ceiling design and installation at Suprema in Parkmore as part of his turnkey solution for his client.
Billy requested that the suspended ceiling should be installed below an existing mezzanine and below the lip channel but to lay on top of the bottom lip of the I-beam.
As such no M6 or shadow line was used for the suspended ceiling.
We had to assist with an urgent installation due to Billy's tight schedule for completing the project for his client.
The final design allowed for suspended ceiling with exposed I-beams which allow for a semi-retro/industrial feel which perfectly blends in with the clients' existing look .
It looks amazing and compliments the surrounding areas amazingly and we can't wait to see what it will look like with all fixture and fittings being installed.
The choice of shop front glass, fixtures and fitting and the suspended ceiling allows for the perfect blend of retro and modern and allows for a relaxed and conducive environment for both staff and clients...
The structure of the ceiling was created from white main tees and cross tees as per supplier recommendation. The grid was suspended using galvanized wire and to the bottom of the mezzanine.
It needs to be noted that accuracy when constructing the structure is of utmost importance. If the structure is poorly constructed the end product will be of poor visual quality..
After all of the above was completed the site was cleaned and ready for the next contractor to do their installation.
A special word of thanks to Billy and the awesome staff at Superma for making this an awesome and fun project. Always great to be in the company of great people.
Well done to the team!!!
Below a link with some more information:
Suspended Ceiling Installation
Read the full article
0 notes
Text
Home
Drywalling Solutions
Bulkheads
Flush Plastered Ceilings
Suspended Ceiling
Frameless Glass
Infinity Rooms
Welcome to LPMBP Construction PTY Ltd. The building project management specialists offering exceptional standards of drywalls, suspended ceilings, bulkheads and construction for complete renovation or new build solutions. We have an expert team ready to undertake any project, large or small. We’re confident our rates make us the most cost-effective construction company in the area.
We understand the frustration of promised results and deadlines that fail to come true. Therefore we’re committed to providing reliable and affordable building project management solutions for domestic and commercial installations. In adition to your concepts we create fully inclusive 3D plans that outline all the work to be carried out, and we have the experience and expertise to provide fast and accurate drywalls, suspended ceilings, painting, carpeting and tiling too. Most noteworthy Our services don’t stop there however, and we can install security systems, provide hardware and software solutions, and introduce networking extensions for your IT infrastructure, separately or as part of the drywalling process, commercial and residential construction and so much more...
So don’t let our name fool you, at LPMBP Construction PTY Ltd we deliver where others fail to live up to expectations. If you compare our rates you’ll find we’re up to 30% cheaper than our competitors, with no compromise on quality or service – guaranteed!!!
Whether you’re starting a new building project or looking to refurbish your current property. Drywalls and suspended ceilings are ideal methods of optimising the available space while streamlining workflow. Lightweight and low cost, drywalling can be installed quickly and used to great effect, especially when combined with glazing and a wide range of design features.
For more information on our drywalls or to enquire about building project management with one of our team. Contact us today and we’ll be happy to discuss your individual requirements with you.
Thank you
Hannes Mulder
CEO
Cell: 0817210902
[email protected]
Read the full article
0 notes
Text
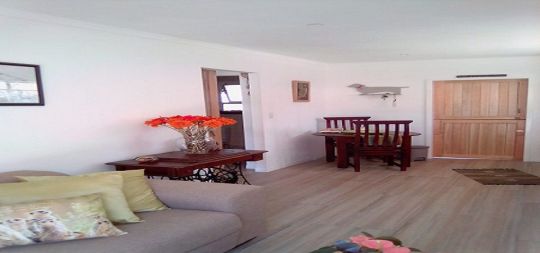
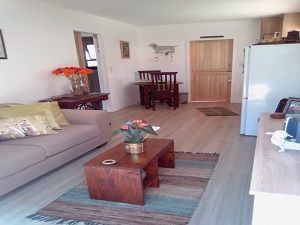
Bulk Heads Pamela
Pamela
Bulk Heads

Pamela contacted us to assist with bulk heads design and installation at her residence in Olivedale as part of her project to completely redo her kitchen.
She already had a clear picture in mind of how she wanted her kitchen to look but asked us to assist with the bulk heads to ensure that it is aesthetically suitable for her vision.
She desired to accentuate the kitchen and also have a lighting solution not only impress but also give a atmosphere of sophistication whilst still creating a relaxing and conducive environment with a bulk heads design.
Pamela replaced all the kitchen cupboard and appliances. We had to fix the bulk heads frame directly to the slab and compensate for a slight deviation in the slab level.
The final design was a rectangular bulk heads with a recessed center which also allows for the option to fit pendulum lights, the drop from the ceiling to the bottom edge was carefully planned to fit in with the height and with of the room. Too little or too much of a drop is aesthetically displeasing.
The bulk heads looks amazing and compliments the surrounding areas amazingly. Pamela did an amazing job with the combination of fixtures and fittings.
The structure of the bulk heads was created from galvanized main tees and cross tees as per supplier recommendation. Corner sections done with galvanized angle and all secured with wafer tech screws.
It needs to be noted that accuracy when constructing the structure is of utmost importance. If the structure is poorly constructed the end product will be of poor visual quality.After the bulk heads structure was completed 9.5mm Gypsum board cladding was used and corners trimmed with corner beads. Care needs to be taken that this done properly as a corner bead fitted a slight bit out of position will have a disastrous effect on the final aesthetic look.
After all of the above was completed two coats of Rhinolite was applied to the bulk heads and skimmed to a smooth flawless finish. Toni-Anne and her team then applied paint and fitted LED strips lights and pendulum lights.Both the bulkhead for the boardroom and meeting room was constructed and finished in only 3 days, which in it self is mammoth of a task not only to complete in 3 days, but also to do with detail and perfection.Well done to the team!!!
Below a link with some more information:
Bulkhead installation
Read the full article
0 notes