
Last Seen Blogs

lol-who-is-this-guy
FRIENDS ASK ABOUT MEMES, DON'T TELL WHERE I GET'EM

love-hurts-always-in-life
Love Hurts Always In Life

rglickdrums-blog
Rglickdrums

louperfsmile
Always in my heart
lotorrential
Lotorrential
Text
Final Video
youtube
After everything else had been tidied up and implemented i ran an initial build. A couple bugs appeared while doing this (but i already talked about those below) but once those were dealt with i used this build to record a full playthrough.
I edited the playthrough down and into the video for presentation. I opted to include most of the game in the video because i feel like presenting isnt really the time to not show work for the sake of not spoiling it. I did edit the sound a wee bit just so there was only a single musical track playing over the top.
Final Thoughts
When i first came up with the idea for GravityBound my main motivation was what skills i wanted to improve on with the prototype project. I wanted to push myself in terms of my level design skills. I wanted a game where the core gameplay was the enviroment, and i think GravityBound managed to do that.
I also wanted a chance to implement a story that would drive the gameplay forward and look at different ways i could express that without completely ignoring the gameplay itself.
Overall i think i managed to accomplish what i set out to do, everything that was planned was done, nothing had to be compromised on and now im just really happy to be able to look back and see the finished product.
0 notes
Text
Final tweaks + odd jobs
Rotation when changing gravity
One piece of feedback we got while playtesting the game was that a slight pause when changing the direction of gravity would help with the controls. Rather than have them happen instantly it gives the player a chance to slightly process the new orientation.
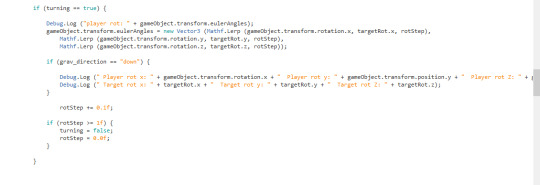
I basically added this chunk into the playercontroller. The playercontroller lerps the player into their new directional position, before allowing them to fall.
There was an issue however getting him to lerp into a downwards position. For some reason no matter what i did with the script, the model wouldnt lerp it would just immediately rotate downwards. However the lerp still paused for the same amount of time as the other rotations so i ended up just implementing it as it was.
Postprocessing
Once everything else had been finished i also went through my levels (level 4+5) and added some postprocessing scripts from the unity standard assets bundle. I created several different profiles and experimented with each level as different levels needed levels of intensity with lighting.
Shadow/hologram graphic bug
Before i implemented the hologram function i included a shadow projector below the character (from the unity standard assets kit). We noticed that there was a pretty big issue where the shadow would project over the hologram and create this awful black goo effect of the hologram blending with the shadow.
I fixed the issue by adding a ‘hologram’ tag to the hologram and excluding ‘hologram’ objects from each instance of the shadow throughout the levels.
Another thing was that partway through development we realized that the hologram was cut a little short, it didnt stretch far enough to reach all the surfaces and visually looked like it was misrepresenting the position of the player. I fixed this by creating a new hologram prefab that was just scaled up quite largely. I also went through and updated this new prefab into each level.
Scene animations implementation + Canvas work
Ivy had designed some really great animations that correspond to the objects that Orion collects throughout the story. After i had finished all the cutscene scripting i went through into each level and included the animation in the canvas, certain cutscene scripts would trigger the animation to appear when the player collected an objective.
It was a bit challenging actually getting the animations to animate on the canvas. They were animated sprites originally and worked perfectly when dragged into the scene as a normal object, but to be placed properly on the screen they needed to be canvas objects.
I managed to fix this by creating new animations and attaching them to an image object containing the sprite. It took a little bit of time keyframing in each frame of the sprite but it meant the animations sat on the screen as intended.
Although Tristan handled most of the menu content I went in and implemented the animation and loading images Ivy had designed a while back. She’d designed them for a loading screen however the game didnt require that so i felt like they would be well suited as a main menu screen especially because she’d done such a great job on them.
I also implemented the Orion face sprite she designed into the cutscene script. I added an extra parameter to the cutscene function. A true or false variable that if true will have orions face appear above the text box. It didnt take long to go through and modify each instance of cutscene to allow for this, alongside this i went through and included the sprite in each stage to ensure no bugs with the scene control scripts.
There was also a bit of work required at the end to ensure that the canvases all lined up as they should. Tristan implemented the pause menu canvases but i had implemented all the scene canvas content. While testing builds and doing final run throughs i found that a lot of the canvas items were skewed and didn't line up properly in different resolutions. After a lot of trial and error however i managed to get most of them lining up properly, using anchors on each canvas piece.
Surface materials
Just realized i havent (i think) talked about the surfaces i made that covered all the structures in the game. All the surface materials (bricks, tiles, plaster etc.) were made by me in magicaVoxel. Although they are 2d it ended up working really well doing them in magicaVoxel because i could view them in an isometric orientation. I’d export them as a png and drag them onto surfaces. I ended up duplicating a lot of the materials along the way as many of them needed unique tiling settings to avoid stretching and warped patterns.
Sound
I left implementing sound till the veery last minute. This wasnt too much of an issue though because it was pretty simple to add into each level.
Most levels only contained a background piece of music that didnt require any scripting so i only needed to add the audio source and the music. My fourth level also used an ambient water effect alongside the music.
Both Robert and i selected the music for our own levels, however all the music used throughout the game ended up being by the same person. Although we didnt set out to do this it ended up working really well as the music all fits together really nicely.
In the cutscenes there were several levels that required specific sound effects to be played. Specifically the door opening, the sci fi door opening, the electrical current, the thump as the objects go flying upwards in 5.3 and the crash when they come back down.
Aside from the sounds that i sourced and referenced for my prototype below are the sources for all the sounds used in the game.
Music:
http://freemusicarchive.org/music/Kai_Engel/Sustains/Kai_Engel_-_Sustains_-_01_Brand_New_World
http://freemusicarchive.org/music/Kai_Engel/Better_Way/Kai_Engel_-_Better_Way_-_01_Take_a_Look_Around_You
http://freemusicarchive.org/music/Kai_Engel/Sustains/Kai_Engel_-_Sustains_-_02_Meekness
http://freemusicarchive.org/music/Kai_Engel/Irsens_Tale/Kai_Engel_-_Irsens_Tale_-_04_Moonlight_Reprise
http://freemusicarchive.org/music/Kai_Engel/Sustains/Kai_Engel_-_Sustains_-_04_Headway
http://freemusicarchive.org/music/Kai_Engel/Sustains/Kai_Engel_-_Sustains_-_05_Slum_Canto
http://freemusicarchive.org/music/Kai_Engel/Sustains/Kai_Engel_-_Sustains_-_06_Evermore
http://freemusicarchive.org/music/Kai_Engel/Sustains/Kai_Engel_-_Sustains_-_09_Plague
Water:
https://freesound.org/people/Dpoggioli/sounds/213611/
Door:
https://freesound.org/people/lowpolygon/sounds/421722/
Thump:
https://freesound.org/people/HerbertBoland/sounds/33637/
Crash:
https://freesound.org/people/sandyrb/sounds/95078/
Electricity:
https://freesound.org/people/Wakerone/sounds/393066/
0 notes
Text
Level 5.3 - Final level
So level 5.3 took me quite a bit more time than the rest of the level 5 stages. Setting up the room wasnt particularly time consuming but i wanted to get the ending sequence just right so i spent a lot of time in scripting that.

The level is sort of in two parts, the first being the pathway and the second being the actual room itself. I wanted the player to have to walk down this very dark narrow pathway that was broken up by spotlights, before coming to the actual room.
I also didnt want the player to be able to zoom out while still on the walkway and see what was up ahead. I played around with the camera script quite a bit in an effort to create this effect.
The camera script originally works by recording the players position and the position of the world camera, how zoomed out the camera is makes it lerp to and from those points.
I tried to have two different world camera points, and after the player reaches the actual room the world camera would switch to the room, however this created a really choppy camera cut that just didnt look right.
In the end i made it so the player cant zoom out past a certain point until they travel up into the map. This is also transitioned with the camera forcefully zooming out once the player reaches the actual chamber.
Once the player reaches the chamber they’re directed to get into the final machine, not a particularly difficult task.
Scripting this next bit took quite a bit of time. I’d had this idea from really early on where i wanted the final piece to have a tooltip saying “press up to change the direction of the gravity”. At the start of the game they’re given right, left and down as the directions they can shift to and i wanted a chance to add something more to that in a dramatic scene.
Once the player gets into the tank, the tank translates upwards until they’re fully incased. Once they are then they get the tutorial tip telling them to press up. At this point the game stops until they do so. I actually had to seperately script these controls for the controller and the keyboard, because square, circle and x were being used on the controller for gravity while triangle was used to interact with objects. This meant that the space bar would trigger the gravity shift upwards when using a keyboard, it wasnt a particularly difficult thing to script around but i did want it to function as implied (by pressing up if youre on a keyboard).
I created a series of particle effects for this scene. To create the electricity effect around the player i actually found a really helpful tutorial here: https://www.youtube.com/watch?time_continue=60&v=o1EunoF-11c
I didnt follow it exactly as i wanted a slightly different look than the one he created, but i want to make a note of this video because without seeing it it i probably wouldnt have been able to create the electricity.
The smoke was pretty simple, it was similar to the airvent particle system but smaller, denser and darker.
At this point the script gets pretty messy, most of it is handled by activation booleans that trigger after certain points have been reached.
1. When the player steps into the tank.
2. Once the tank has fully closed
3. When the game is waiting for the player to press UP, after the tutorial has run
4. Once the player has pressed UP, the player flips upwards, the camera zooms out here and the electricity begins to appear, the sound of the electricity also begins.
Getting the electricity to slowly increase was actually quite hard, modifying the variables of the particle system took a bit of research to figure out.
Once the electricity has begun then the objects throughout the room begin to come loose and shake. I did this by grouping all the objects i wanted to be thrown upwards into 3 groups. Each group is rotated at a rate that increases corresponding to the strength of the electrical particle effect, giving it the appearance of getting pulled more and more violently.
5. the fifth activation happens when the violent shaking and electricity has reached its peak, the three groups of objects a pulled upwards and a large crash is played when each does.
I broke them into three groups because i wanted it to look more rough the way the objects are pulled upwards, having them pulled up at the same time looked a bit contrived.
6. The final check happens after all the objects are completely thrown upwards, the gameobjects are all deactivated an a second set is activated.
I copied the objects that would be thrown upwards and attached a rigidbody to each of them with basic colliders attached. When the first set are switched off and off screen the second set is activated and due to the rigidbodies they immediately plummet to the ground. I timed a crash sound effect that would sound simultaneously as them hitting the ground. At the point of the drop the player is also returned to a downwards direction and pulled down again.
The scene then fades to black.
Overall im really happy with the way the final sequence looks. I wanted something dramatic, a game with a story needs some sort of conflict thats overcome. In other games this tends to be by defeating a bad villain but this game contains no other character appearances so i needed to think outside the box for how to create a dramatic final resolution.
I also created a quick epilogue scene as i felt ending the story on that final shot of him in the lab was a bit too abrupt.
I created the scene quite quickly, i used buildings from level 1.4 and arranged them to serve one final shot of Orion. The end of level 4, before he goes into the lab, its barely dawn. So after level 5 ends we see him sitting and watching the sun rise properly. I made a quick script for the scene that moves a light upwards and over the scene to imitate a sun rising.
I also decided to include a piece of the opening dialogue from the game here, saying “rise and shine”.
Throughout the game the time of day is cycling through and out of day and night, the game starts at sunrise and it ends at sunrise. I feel like including that line helped bring it full circle.

0 notes
Text
Level 5.2
I had a very specific idea in mind for level 5.2. Its not the final level but it reveals a lot of information plotwise.
Most of this information comes from the room itself and what it contains, this being the new clones in the tanks and the information about their creation plastered on the walls.
I started out by modelling the tanks. I created them in magical voxel however i removed the cylindrical parts from the voxel models so they were imported like this:

I added a cylinder primitive in unity and created a tank glass like material to create the appearance of a tank.
I also made an edit of the original orion model for the bodies in the tanks.

Although the bodies arent super visible i didnt want them to be too closely identical to orion as they are each different clones. If i had more time i would have liked to edit them each so they all looked different however that would have taken a great deal of time for a very small detail.
I also fiddled around with a particle effect until i had something that looked like bubbles floating up from the bottom of the tank. After this i also added a minor script to the body in the tank so that it floated ever so slightly up and down.
Once i had these pieces together i put them into a prefab just to save some time and make things cleaner.
One thing i should note is after bring four identical prefabs into the scene i noticed that they each moved in sync with each other, and i know this is small but it bothered me because it looked so unrealistic to have these bodies floating up and down in unison. To fix this i added a randomized start point to each of the models, meaning they would all start at different points and be moving independently of each other.

With the tanks done i also modelled a small panel box that would go in front of each tank. Aside from these elements the rest of the level was put together with models i had previously developed.
I created two of the small “scrap” pieces of paper plastered on the wall at the end of the room. While ivy did the proper posters that the player looks at regarding himself and the others like him.
I carefully placed the lights around these posters because i wanted the players eyes to be drawn specifically to them, after walking past the tanks. The player also collects the keycard to the final door, after looking at the posters and information on the wall.
0 notes
Text
Level 5
Level 5 is the final level of the game, most of it is more story related than anything else as it closes up the plot that the player follows throughout the game.
5.0

I really wanted the players first steps into the lab to be atmospheric. I wanted to create tension and a sense that Orion was rather insignificant.
By using a small space with very high walls i want the player to feel the need to zoom back and see the full space they’re standing in, and see how small he is.
I initially had just a spotlight above Orion in the center of the room but i felt it didnt quite look enough like a lone spotlight. I added a cone that i made from a primitive in maya that fits perfectly into the spotlight, the cone is almost invisible but creates that small affect of the light rays following the path of the light.
The player walks to the door and uses the keycard they obtained in the earlier office level. I included a light that was fitted behind the door, i wanted to sort of capture that feeling of going into the pit of something bad. The door opens and slowly pulls back and as it does that light slowly falls on Orion before he walks into it.
I also created the door specifically for level 5, much like the earlier drop point level the model is broken up into two pieces; the doorframe and the door. This allowed me to script the door opening by simply scaling it down.
5.1
Although most of level 5 is story driven i still wanted a chance to include one final gameplay segment, one that included and combined all the mechanics introduced throughout the game.

I probably could have added more variation in the way i combined the mechanics, but i found that it very quickly became far too challenging to traverse.
Most of the mechanics require the player to make some sort of quick coordinated movement and although this level requires a lot of that, putting the mechanics too closely embedded with each other was just going overboard on the difficulty scale.
Decorating this level didnt require any new assets to make. Waaay back at the start of development i actually made some sci fi assets that never made their way into the previous levels, but they worked really well here so im happy i was able to implement them.
I fiddled with the lighting in this level quite a bit, i wanted the level to be as dark as i could make it with only the spotlights providing light. However i had to reign it in a bit so that the player could still make sense of their environment.
0 notes
Text
Levels 3.3 and 3.4
After Robert designed and created the two office stages in level 3 i went in and scripted the events that would take place in them.
Ivy also provided the necessary artwork for these two scenes in the form of two posters, both of which were really important parts of the plot.
The scripting for both these levels was pretty similar to that of 1.5 and 2.6. The player enters the office of the company he wants to find out information about. In the first room he looks at the first poster that reads “termination”.
Script wise theres not a lot i can say about this that i havent already said about the earlier ctuscene scripting. The players target objective would be the poster, they couldnt use the exits in each level until they had interacted with the necessary objects in each of the stages.
I did also write and format the email for stage 3.4, as shown here. I needed to convey certain information to the player but i wanted to do it in a way that wasnt just Orion saying “it says here that.. bla bla bla” so instead i formated the information as a formal email between coworkers.

In retrospect it would have been good to have a generic cutscene script i could have used but a lot of the scenes ended up being to different and unique, i would have ended up just using one giant script instead of small individual ones for each stage.
0 notes
Text
Level 1.5
In my original prototype i never actually had the player enter the room with the dropbox in it. But once i’d dealt with writing out the actual story i was able to properly implement it and the sequence of events that takes place.

Most of the work in this level was just scripting the sequence of events. It was a similar process to level 2.6 in how i went about this. Except i used two scripts instead of one, as there were two colliders that the player needed to interact with (the drop box and the note).
I added some small visual details into the script, like having the box faintly glow once the player puts the usb in there, just to help convey that instead of showing a literal usb in the box.
I also included flashback images in this scene, to show the player the symbol that they had previously ignored. For the flashbacks i took screenshots of the two necessary levels, i also edited the colours slightly to create a more “flashback” vibe to them.


I chose to have the door open once the usb has been taken back, just because i didnt want there to be an open door that players couldnt walk through for no obvious reason.
I only needed a couple new things for this room, the first being a simple open box that the player would put the usb in. The second being the open door model.
While i already had the open door model i needed to be able to animate the door opening up. To do this i separated the model into two pieces, the door and the door frame.
I offset the doorframe in an empty gameobject parent so that when it was triggered to open it just needed to rotate and it would rotate around the doorhinge as an apparent axis.
0 notes
Text
Level 2.6
Level 2.6 was a purely story orientated scene. After Orion takes the usb instead of leaving it at the drop point he makes his way through the backstreets of the city to his home in order to find out whats on the usb.

I duplicated my initial level for Orions room to provide a base for the level. Obviously i had to remove all the scripts that started the opening scenes and such.
I modified the lighting quite heavily and changed the cityscape backdrop visible through the windows, as the game has transitioned to nighttime since he was last here.
I also needed to create the USB data that he uncovers. I wanted a more visual piece that showed the data, instead of just having a wall of text as Orion describes whats on it.

scripting
I also had to script in the sequence of him actually going up to his computer, the picture above appearing and then the trapdoor appearing.
Most of it was pretty simple, it was just fiddling and getting the timing right along with the right cutscene triggers.
Much later on in development (the day before hand in) when i ran a test build of the game i actually ran into a pretty game breaking bug with this script. In the build the game would just turn black when you walked over the trapdoor.

When the rug is moved the players target objective changes, the game was originally looking for “trapdoor” and setting that as the target, meaning that the material of ‘trapdoor’ would be recorded and changed if the player was targeting their objective.
I’d kinda forgotten about how importing my voxel models worked though, they always come into unity as a prefab, so the trapdoor model was an empty gameobject called ‘trapdoor’ with the model as a child also called ‘trapdoor’. It took longer than i would have liked to figure out that this was the bug as i thought it was a scene control issue since the game sorta carried on after this point.
However once i renamed the child to ‘trapdoorobject’ the bug was fixed and there werent any more issues :)
3doors1room
I know this sounds quite minor but i actually had to think quite a bit on how to handle the doors in this stage.
In the first level theres only one door present in the room, and thats the one he leaves through for the first job. I couldnt have the player leaving or entering through that door again simply because wasnt going to be coming from or going through stage 1.1. So first off i shut this door completely to stop the player trying to walk into an empty black box of a doorway.
I needed to add two doors to the room, one that he comes into after travelling through the back ends of the city, and another that he could leave through after seeing whats on the usb.
I pulled one of the bookcases across to make a doorway that appears hidden at first, with the implication that the bookcase is pulled back to reveal a secret doorway.

I opted to add and reveal a hidden trapdoor that he could leave through, simply because i really just didnt want to have three doors in one small apartment. Thats just too many doors.
0 notes
Text
Story
I sort of put off on properly establishing what the story of the game would be, but at a point it became a necessity to properly write it all out. Nobody else in my group expressed much interest in developing the story themselves so I did it at home.
I blocked out the entire story by each level, i needed to figure out what the player would find and learn at each stage and also what physical form the information would come in (that the player would need to interact with, obtain or read in the game)

The story from level 1, involving the job, the usb and travelling to the drop point needed to stay intact as it would have been too much work to redo those sequences.
I decided to have a symbol in place that could be followed through the story, as a sort of focal point for the plot. A symbol helps to carry a certain concept throughout a story and visually it works well in a video game like this.
Once i’d decided to add this into the earlier levels it became much easier to piece things together, with the information that theres something about himself he doesnt know (the symbol being in both his room and the apartment with the usb), its a driving force for him to take action.

After this point it becomes about unraveling information and revealing things to the player in certain set piece scenes.
Certain parts of the story were refined a bit more once put into the game, such as them being clones. This worked mostly because it provided a basis for them coming from tanks, and if people are coming from tanks then its unlikely they would be different each time.
It also gives him a point to resolve the plot, because somebody wants him gone and he doesnt want the work to be continued in this way it means the story can end with him bringing down the lab that this has been taking place in.
Because it was my job to script in all of the cutscenes, dialogue and images appearing on the screen throughout the game i also wrote all the dialogue as i was implementing these scenes.
0 notes
Text
Refining the diagonal wall script
The original diagonal script i made was fairly rough and although i hadnt personally implemented any myself yet i was aware of some glaring holes in the script that could cause some pretty major problems.
The big issue was how the game would handle the player hitting the side of one.

The scripted handled the player hitting the diagonal surface because that was the surface that created the sliding mechanic.
The issue however was due to the way the player controller script i wrote functioned. In order to stop players walking over the edges of buildings the game records the current surface’s “bounding box” and wont allow them to move past that.
The problem is that it has to be a square, theres a min.x and a max.x and a min.z and a max.z, and that doesnt really work with diagonals.
I managed to script around this however i probably did so in a fairly messy way, it did the job though (even if there were probably much cleaner ways of doing this).

Basically the diagonal collider has to be a perfect cube when side on, this isnt an issue because its always placed clipping into walls anyway. It registers the players position in relation to the center and updates their current bounds, allowing for the player to stand on a surface with a diagonal edge and not walk straight over it or completely bug out.
0 notes
Text
Level 4 models
When constructing these levels i started out using a lot of the assets i’d already made, but i ended up having to make quite a few more along the way. Im not too sure what i can say about making all the models for this section as the process has been pretty much the same for each one.
I check a couple references before i start a model but thats just to give me a rough sense of direction with the overall shape of the object. Some models required a little bit of experimentation in getting the right colours and shapes but other than that they were fairly quick to make since ive gotten the hang of magicaVoxel.
Even though i make heavy use of lighting in unity i still paint shadows onto the models, i made a couple models that i didnt paint shadows onto and i found that they looked substantially worse than the rest so i made a point to always paint shading in.
A couple of the models i made i also created emission maps for. For most of the objects in game that need emission (windows, lamps), ive just used a plane in unity with the light material i made attached. However for shapes like the circular window i had to import a seperate texture as an emission map.
I looked online for how to go about this and it was rather simple, just a little time consuming so i avoided it where i could.
Basically i would duplicate the imported texture of the model like this one here:

I’d then make every colour that wasnt an emission colour black:

I’d save the second texture separately then just drag it into the emission slot in the models material!
0 notes
Text
Levels 4.1, 4.2, 4.3 and 4.4
Following on from the introductory stage (4.0) for level 4 i wanted to build on the theme of a marketplace, focusing on using the air vents to progress.
I had a clear idea of the transition i wanted to make over the course of level 4
- The player starts out at night going through the darker more ‘neon’ street markets, with the canals being a constant visual set piece.
- Then travelling through the backrooms of several stores while the lighting tones transition to early morning.
- In the final stage of level 4 the player emerges into the dawn in the bright open space of the higher end markets overlooking the canals.
4.1

4.1 opens up a bit more while still retaining the water element from the earlier level. Although the level is more condensed than the previous ones i wanted the air vent mechanic to be slightly more complicated.
Players must change direction after using a vent quickly in order to reach their objective.
This level is also continuing the visual direction of the first level with the darker nighttime marketplace setting.
Also im not sure ive mentioned this before or not but i wrote a simple script attached to the floating neon signs above the stalls, because they’re floating i felt like there needed to be some visual signal of this rather than just “theres nothing holding them up”
4.1

4.2 is very much the backroom of the shops present in level 4.1 and 4.0. Its still the rougher end of town with more purples and blues indicating night time.
I opted to create these two interior spaces with a challenging linear path in mind. Its less about examining the environment and more about perfecting the air vent movements necessary to proceed. This breaks up the more open detailed areas that make up the rest of level 4.
4.3

In 4.3 i followed on from 4.2 with the backroom concept, with a linear mechanical path that the player must follow. Visually i shifted the theme in this stage, to reflect the more upper class marketplace to come. I used lighter blues and yellows to light to signify the transition into dawn.
4.4

4.4 was by far the most ambitious of my level 4 stages. I wanted to end the section on a much harder, larger stage.
In early levels the water was more superficial and didn't provide a great deal of challenge for the player to avoid, in the final level however its a much greater obstacle that drives the player to use the air vents while moving back and forth across the level to reach the end of level 4.
The complexity and scale of the environment also means that players must stop and properly think to figure out what path they need to take to reach the end.
Visually i looked online quite a bit to find ideas for the ‘look’ i was trying to get across. Most of those can be found here: https://www.pinterest.nz/lucyjaegers/343/marketplace/
My main goal was to create a bright, open and detailed space. I wanted a beautiful marketplace that was set on a series of canals that had boat ‘stalls’ passing through. Set with flowing decor like banners and vines hanging down into the water.
I used the unity standard assets bundle for the water surface effect, as it didnt quite look right just having a lower opacity blue block.
I also created a simple script for the water, to create a slight rising and falling motion.

All the boats on the water are children to the water object so they sway along with the water. Its a small detail but i like it because (to me) it makes the environment feel just that little bit more tangible.
0 notes
Text
Movement Platform bug fixing + model + particles

There needed to be a specific model for the moving platforms throughout level 2, due to the fact that they’re moving and floating platforms it also wasnt a good idea to do them in the more ‘classical’ style ive used for a lot of buildings already.
I tried to make something that felt industrial and futuristic enough (that it wasnt weird that they would be floating), without being too out of place against the rest of the assets making up the levels.
I had to keep the surface relatively flat to account for the box collider attached to the script.
I also created a small particle effect, a blue light underneath that visualizes the force moving the platforms around.
I put the model, script, collider and particle effect into a prefab to make it easier for robert to implement into levels.

Because i have not been on top of keeping this blog updated im also gonna go over the several bug fixes i had to do on the moving platform script over the course of development since the interim submission.
The first bug was pointed out to me by Robert, there was an issue getting the platforms to move upwards along the z axis, when they were rotated around the x axis. Looking into the issue i realized this was because the script was translating in the default ‘space.self’ and when i changed all of the translations to ‘space.world’ it solved the problem!!
Another pretty big glitch came up in the last week of development, we’d managed to not see it for a while but i think a couple ‘playercontroller’ tweaks i made, brought the issue to light.
There was a problem with the script, where for whatever reason the player model would stop touching the collider of the platform, for even a second. Theres nothing forcing the player collider down onto its current ‘ground’, only the fact that you cant move the character up or off the surface.
When the player collider moved away from the moving platform by even a millimeter, the script would call:

And think that the player was no longer standing on it, causing them to stand in place moving around the empty space that the moving platform had previously occupied.

I fixed the issue by adding a couple conditional checks to the updates. if the player is grounded and their current ground is recorded as the moving platform object, they will remain touching.
If they change the gravity, they are no longer touching (and no longer moved by the script). These bugs were pretty dumb and in retrospect i probably couldve structured the script around these functions, but in the end it worked so no harm done.
0 notes
Text
Level 4
The level i’m working on is the forth level, it will take the player through the market/commercial district of the city and towards their final goal (a laboratory).
I decided to set the marketplace throughout the cities canals, partly to create more hazards for the player and partly because i think i can make it look really cool.
Ive done a lot of researching to get ideas for the visuals of this area, you can find some of my precedents over here: https://www.pinterest.nz/lucyjaegers/343/marketplace/
The stages will start at night time, in darker areas with neon signs that reflect the more futuristic elements of the setting. As the player progresses it will open up into dawn and the areas will be brighter and cleaner, it will be difficult to find a balance in these areas of the vintage and sci fi but i think i can make it work. I want to keep the areas rather busy visually, to create challenges for the player when figuring out where to go.
The mechanic being introduced here is the ‘air vent’, so the majority of the gameplay will revolve around using this in different ways to reach objectives.
The first stage of the level will be relatively small. The player needs to be forced into using the airvents, as without them they cant succeed. Im still tweaking the layout of the level, but my goal is to create something where the air vents push the player straight to the goal.

Alongside this ive also developed a series of models and assets that will fit throughout the marketplace.
In order to save time ive also created a series of assets for the industrial level, things like backdoors, trash cans etc.
On top of this ive created several 2D assets like posters and graffiti. I made these in photoshop and they were relatively quick to do.
0 notes
Text
Air Vents
The final additional mechanic will be the Air Vents, these will be introduced in my level. The airvents do several different things depending on how you interact with them, the overall idea though is that the air will push you upwards when you move through it.
If the player falls through it horizontally it will push them upwards, if they walk into it it will do the same. If they fall into it vertically then they will be pushed up and made to “hover” at the top of the cloud.
Scripting it actually became quite challenging because i had to account for each of these different situations separately.
It was simple to script it so that if the player falls through it horizontally it would push you up. I did however encounter a small bug when implementing it into my own levels. If the player is falling vertically through the steam and landing on a wall directly behind it, they will be pushed upwards and beyond the bounds of the platform like this:

I fixed this by adding a clause that stops it from pushing the player beyond the max limits of their current ground’s bounding box.
The challenging part of this script was getting the right interaction when the player is in downwards gravity. I wanted the player to be pushed upwards and made to float on top when they fall onto the steam jets. This was simple, but there were some challenges in creating the same effect if the player is just walking into it from downwards.
After a lot of tweaking however i got the script right and now it works as it should do! I modelled a simple airvent and also created a basic particle system that fits within the trigger collider that the air vent script is attached to. I turned these into a prefab together to make it easier to place in levels.
0 notes
Text
Diagonal Wall
The next mechanic to be introduced will be the diagonal walls in Jazmines level. We considered different ways for these to function, including having them change your gravity direction, or simply pushing the player forward.
I felt that it wouldnt work for your gravity direction to be changed for you, as thats something Orion himself controls. I scripted it so that the walls will push the player as though they are sliding down the walls, depending on the direction of gravity.
The script isnt perfect yet, however for prototyping it should work fine.
0 notes
Text
Moving platform Script
We’ve decided to have the game made up of 4 or 5 levels, each level will contain 4/5 stages, Jazmine, Robert and I will each be making one of these levels.
We also decided that we would implement new mechanics with each level, the first of which would be a moving platform in Robert’s industrial zone.
Scripting a it so that a platform moved was fairly basic, it became a bit more complicated though when i needed to make sure the players movement responded properly to the platform.
When the player is touching the platform, the script attached will constantly update the players “bounds” (the parameters that stop the player walking off edges). As well as constantly moving them across so that they stay perfectly positioned on the platform as it moves.
I gave the script several public variables so that it can be attached to an object and you can just write where you want it to move to and from.
There is a small bug with the script currently that i will fix at a later date, for now there are bigger tasks i need to complete so i will come back to it. The problem is that when the player falls downwards onto the platform when the platform is also moving down (this applies to any directional falling that the platform is going in the same direction as). The game doesnt appear to apply collisions until the platform and the player are moving in different directions.
0 notes