
Discover the world of macros in Excel with examples and tutorials from beginner to advanced and step-by-step explanation and practical example. https://www.macrosinexcel.com
Don't wanna be here? Send us removal request.
Statistics
We looked inside some of the posts by macroinexcel and here's what we found interesting.
Average Info
Notes Per Post
0
Likes Per Post
0
Reblog Per Post
0
Reply Per Post
0
Time Between Posts
23 hours
Number of Posts By Type
Text
17
Last Seen Tumblr Blogs


Fun Fact
In 2020, 44% of users from Denmark used Tumblr daily.
Text
Convert Date into Day
Sub date2day() Dim tempCell As Range Selection.Value = Selection.Value For Each tempCell In Selection If IsDate(tempCell) = True Then With tempCell .Value = Day(tempCell) .NumberFormat = "0" End With End If Next tempCell End Sub

Read the full article
0 notes
Text
Disable/Enable Get Pivot Data
Sub activateGetPivotData() Application.GenerateGetPivotData = True End Sub Sub deactivateGetPivotData() Application.GenerateGetPivotData = False End Sub

Read the full article
0 notes
Text
Multiply all the Values by a Number
Sub addNumber() Dim rng As Range Dim i As Integer i = InputBox("Enter number to multiple", "Input Required") For Each rng In Selection If WorksheetFunction.IsNumber(rng) Then rng.Value = rng + i Else End If Next rng End Sub Read the full article
0 notes
Text
Useful VBA Excel codes with Examples

Table of Contents VBA: the programming language Excel and VBA Editor Useful VBA codes for Excel If you work with Microsoft Excel, you can use Visual Basic for Applications (VBA) to automate tasks in Excel. For example, you can write a code that will take a value from a cell and insert it into another cell. Or, you can write a code that will insert a row after every other row. You can use VBA to write codes that will make your work in Excel more efficient. In this post, we will share with you some useful VBA codes for Excel with examples.
VBA: the programming language
VBA the Visual Basic for Applications is a language used for applications like Microsoft Excel and Word. It's a really easy language that you can do many tasks with it especially the Macros Command that will help you a lot in your business. You can find more about VBA and its history with the Microsoft Office Application here VBA: the programming language. Next, we gonna list some Useful VBA codes for Excel.
Excel and VBA Editor
The VBA Editor in Excel (VBE) it's a tool to manage and edit codes written with the VBA language. It consists of several viewing windows, the main one is entirely reserved for entering the instructions that make a module. So let's know how to use this editor: - How do I launch Visual Basic Editor? - Excel version 2003 (or earlier): -> Using the menu Tools -> Macro then click on the option Visual Basic Editor or type. -> Using shortcut key
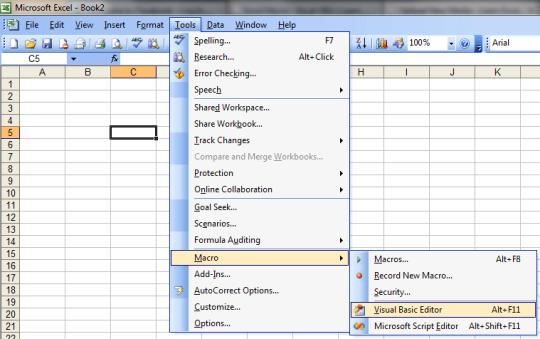
Visual Basic Editor Excel 2003 - Excel version 2007 or later: In newer versions of Excel, the tools for using VBE is hidden which is the developer tab, you can follow this quick guide to know how to add the developer tab to the ribbon in Excel version 2016 and earlier.

Excel 2016 Developer Tab Once you add the developer tab, In this new tab, click on the Visual Basic icon to launch VBE. - VBE: the interface
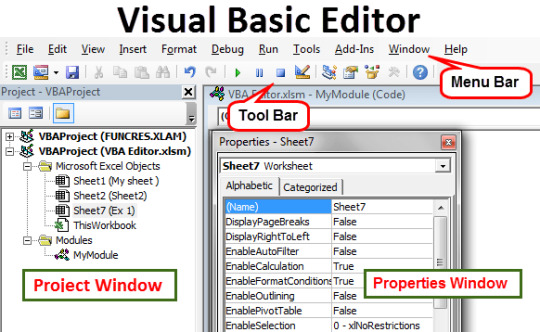
VBA: the interface - Launch a new Module in VBE - Right-click in the project you want to add a new Module on it "VBAProject(VBA Editor.xslm)" - Select Insert -> Module

Insert VBA Module
Useful VBA codes for Excel
After we see our VB Editor and how to lunch a new Module, now we gonna make things more pragmatical by listing some useful VBA codes examples in the Microsoft Office Excel 2016 but also for earlier version too. What you need to do is: - Copy the VBA code examples bellow - Insert a new Module in the VB Editor - Paste the code and close the VBE - Go to the Developer tab and open the Macro Editor

- Run the new VBA code you just add

So lets start by adding some easy VBA codes and go further for advanced ones: 1. Copy a value from one cell to another This code will copy the value from cell A1 to cell B1. Sub CopyValue() Range("B1").Value = Range("A1").Value End Sub 2. Insert a row after every other row This code will insert a row after every other row in your worksheet. Sub InsertRow() Dim i As Long For i = 1 To ActiveSheet.UsedRange.Rows.Count Step 2 ActiveSheet.Rows(i + 1).Insert Next i End Sub 3. Replace all empty Cells with Zero Sub replaceEmptyWithZero() Dim rng As Range Selection.Value = Selection.Value For Each rng In Selection If rng = "" Or rng = " " Then rng.Value = "0" Else End If Next rng End Sub 4. VBA Message Box with Yes/No confirmation Sub vbaMsgBox() If MsgBox("Are you sure you want to delete the content of B2?", vbYesNo, "Confirmation request") = vbYes Then Range("B2").ClearContents MsgBox "The content of B2 has been deleted!" End If End Sub 5. Run a macro when opening the spreadsheet Sub Auto_Open () MsgBox "To find out all about Excel, go to www.macrosinexcel.com " End Sub 6. Worksheet with current date and time Sub writeDataTime () Range ("A1") = Now End Sub 7. Check if there is a formula in the current Cell Sous checkFormula () Si Range ("A1"). HasFormula = True Alors MsgBox "There's a formula" Else MsgBox "It is not a formula" Fin si End Sub Those are the most Used VBA Codes in Excel if you want to search for more you can try our search that contain hundreds of usuful free Excel Macros, Functions, Templates, Add-ins, VBA and much more. And dont forget to like and share :) Read the full article
0 notes
Text
Most Used Excel Shortcuts keys

Hello Excel people we continue with our tutorials about Excel basics and learning easy tips and tricks to improve your efficiency and save your time using Excel. In this short Tutorial we gonna list most used Excel shortcuts keys for Mac and Windows System: - Excel shortcuts new sheet Shift⇧+F11 or Ctrl+Shift⇧+F1 Fn+Shift⇧+F11 - Excel Shortcuts insert Row Ctrl++ or Ctrl+Shift⇧+= Ctrl+I Check this tutorial to learn more in How to insert a row in Excel with shortcuts? - Excel shortcuts edit Cell F2 Ctrl+U - Excel shortcuts merge Cells Alt+H+M+M N/A - Excel shortcuts for SUM Alt+++= cmd ⌘+Shift⇧+T These shortcuts are the most used ones in Excel application but there are many others that you can play with. Here is more than 50+ Excel Shortcuts Keys in PDF for Windows and MAC systems. 50-Excel-shortcuts-keys-list Also you can create your owns with the macros recorder. For more information you can check our tutorial about How to create a macro in Excel? And there you have it, now you know the most used Excel shortcuts to save your time easy, fast and efficient, isn't it? You have everything in one place in this PDF file. Now it's your turn... Do you know other useful shortcuts to save time on Excel? Share them in comments with our community. And if you liked this tutorial share it with your friends on Facebook. We look forward to hearing from you! :-) Read the full article
0 notes
Text
Save Each Worksheet as a Single PDF
Sub SaveWorkshetAsPDF() Dimws As Worksheet For Each ws In Worksheets ws.ExportAsFixedFormat _ xlTypePDF, _ "ENTER-FOLDER-NAME-HERE" & _ ws.Name & ".pdf" Next ws End Sub Read the full article
0 notes
Text
Random Number Generator - Paid
Excel Add-ins Download Page : https://www.office-addins.com/-excel-addins/excel-random-generator.php Read the full article
0 notes
Text
Insert Time Range
Sub TimeStamp() Dim i As Integer For i = 1 To 24 ActiveCell.FormulaR1C1 = i & ":00" ActiveCell.NumberFormat = "h:mm AM/PM;@" ActiveCell.Offset(RowOffset:=1, ColumnOffset:=0).Select Next i End Sub Read the full article
0 notes
Text
Excel: Your Guide to Getting Organized and Staying Productive
Excel: Your Guide to Getting Organized and Staying Productive Read the full article
0 notes
Text
Auto Update Pivot Table Range
Sub UpdatePivotTableRange() Dim Data_Sheet As Worksheet Dim Pivot_Sheet As Worksheet Dim StartPoint As Range Dim DataRange As Range Dim PivotName As String Dim NewRange As String Dim LastCol As Long Dim lastRow As Long 'Set Pivot Table & Source Worksheet Set Data_Sheet = ThisWorkbook.Worksheets("PivotTableData3") Set Pivot_Sheet = ThisWorkbook.Worksheets("Pivot3") 'Enter in Pivot Table Name PivotName = "PivotTable2" 'Defining Staring Point & Dynamic Range Data_Sheet.Activate Set StartPoint = Data_Sheet.Range("A1") LastCol = StartPoint.End(xlToRight).Column DownCell = StartPoint.End(xlDown).Row Set DataRange = Data_Sheet.Range(StartPoint, Cells(DownCell, LastCol)) NewRange = Data_Sheet.Name & "!" & DataRange.Address(ReferenceStyle:=xlR1C1) 'Change Pivot Table Data Source Range Address Pivot_Sheet.PivotTables(PivotName). _ ChangePivotCache ActiveWorkbook. _ PivotCaches.Create(SourceType:=xlDatabase, SourceData:=NewRange) 'Ensure Pivot Table is Refreshed Pivot_Sheet.PivotTables(PivotName).RefreshTable 'Complete Message Pivot_Sheet.Activate MsgBox "Your Pivot Table is now updated." End Sub Read the full article
0 notes
Text
Remove Decimals from Numbers
Sub removeDecimals() Dim lnumber As Double Dim lResult As Long Dim rng As Range For Each rng In Selection rng.Value = Int(rng) rng.NumberFormat = "0" Next rng End Sub Read the full article
0 notes
Text
Excel spreadsheet and VBA basics
Excel spreadsheet and VBA basics Read the full article
0 notes
Text
2 ways to Import/Convert TXT File to Excel File
If you have a lot of data in a text file, you may want to convert it to an Excel spreadsheet so you can better analyze the data. Excel can import data from a text file in a couple of different ways. You can either import the data as text, which will create a new worksheet for the data, or you can import the data as a query, which will create a new workbook with the data.
Import the data as text
To import the data as text: - open Excel and go to the Data tab. - Click on the "From Text" button in the Get External Data section. - Find the text file you want to import and click on the Import button. - In the Text Import Wizard, select the file type as Delimited and click on the Next button. - On the next page of the wizard, select the delimiter that is used in the text file.(This is usually a comma, tab, or semicolon.). If the text file uses multiple delimiters, you can select them all. - Once you have selected the delimiter, click on the Next button. - On the next page of the wizard, you can choose how you want the data to be imported. - import it as text, which will create a new worksheet for the data
Import the data as query
To import the data as query, follow the same steps to import it as text from 1 to 7: For the 8th step you can import the data as a query, which will create a new workbook with the data. If you want to import the data as a query, you will need to select the data range and choose the column headers. Once you have selected the options, click on the Finish button. The data will be imported into Excel and you will see the data in a new worksheet or workbook. Read the full article
0 notes
Text
Import/Convert XML to Excel

What is an XML file?
An XML file is an Extensible Markup Language file. XML is a markup language that is used to store data. An XML file is a file that stores data in a structured format. XML files are often used to store data for use with web applications. XML files can be opened and edited in any text editor, and can be read by any XML parser.
Import or Convert XML File to Excel
XML files are not typically thought of as something that can be easily converted into Excel files. However, with the right tools, it is possible to convert XML to Excel. This can be a useful way to take data from an XML file and put it into a format that can be more easily analyzed. There are a few different ways to convert XML to Excel, and the best method will depend on the specific file that you are working with.
Using the famous Power Query (For Excel recent version)
First thing you need the XML File saved on your computer (here I'm using the Sitemap Post of the Macrosinexcel website post-sitemap.xml) then: - Open Excel , go to Data tab - Click on "New Query" (also called "Get Data") - From the dropdown choose From File -> From Xml - Select the XML file you want to convert to Excel - A new window appear the Navigator listing all data found in the XML file - Select the data that you want to import and click the "Load" button That's it a new worksheet in the Excel file will be created, and load all the data from the XML file into the new worksheet. If you want to bring data directly from an online XML File (with url) , change the 3th step 3.From the dropdown choose From Other Sources-> From Web and do the same steps
Using an XML Converter
If you have a well-structured XML file, you can use a tool like the XML Converter to convert it to an Excel file. This tool will take your XML file and convert it into a format that can be opened in Excel. If you have a more complex XML file, you may need to use a more powerful tool like the XML Converter Pro. This tool can handle more complex XML files and will convert them into a format that can be opened in Excel. Read the full article
0 notes
Text
Import/Convert XML to Excel

Table of Contents What is an XML file? Import or Convert XML File to Excel Using the famous Power Query (For Excel recent version) Using an XML Converter
What is an XML file?
An XML file is an Extensible Markup Language file. XML is a markup language that is used to store data. An XML file is a file that stores data in a structured format. XML files are often used to store data for use with web applications. XML files can be opened and edited in any text editor, and can be read by any XML parser.
Import or Convert XML File to Excel
XML files are not typically thought of as something that can be easily converted into Excel files. However, with the right tools, it is possible to convert XML to Excel. This can be a useful way to take data from an XML file and put it into a format that can be more easily analyzed. There are a few different ways to convert XML to Excel, and the best method will depend on the specific file that you are working with.
Using the famous Power Query (For Excel recent version)
First thing you need the XML File saved on your computer (here I'm using the Sitemap Post of the Macrosinexcel website post-sitemap.xml) then: - Open Excel , go to Data tab - Click on "New Query" (also called "Get Data") - From the dropdown choose From File -> From Xml - Select the XML file you want to convert to Excel - A new window appear the Navigator listing all data found in the XML file - Select the data that you want to import and click the "Load" button That's it a new worksheet in the Excel file will be created, and load all the data from the XML file into the new worksheet. If you want to bring data directly from an online XML File (with url) , change the 3th step 3.From the dropdown choose From Other Sources-> From Web and do the same steps
Using an XML Converter
If you have a well-structured XML file, you can use a tool like the XML Converter to convert it to an Excel file. This tool will take your XML file and convert it into a format that can be opened in Excel. If you have a more complex XML file, you may need to use a more powerful tool like the XML Converter Pro. This tool can handle more complex XML files and will convert them into a format that can be opened in Excel. Read the full article
0 notes
Text
Create a Pivot Table
Download free Excel Macro : Create A Pivot Table
Read the full article
0 notes
Text
VBA Code to Search on Google
Download free Excel Macro : VBA Code To Search On Google
Read the full article
0 notes