
Don't wanna be here? Send us removal request.
Statistics
We looked inside some of the posts by magicmindstech and here's what we found interesting.
Average Info
Notes Per Post
2
Likes Per Post
2
Reblog Per Post
0
Reply Per Post
0
Time Between Posts
8 days
Number of Posts By Type
Text
4
Last Seen Tumblr Blogs


Fun Fact
The “We are the 99%” Tumblr blog became the slogan for the Occupy Wall Street movement.
Text
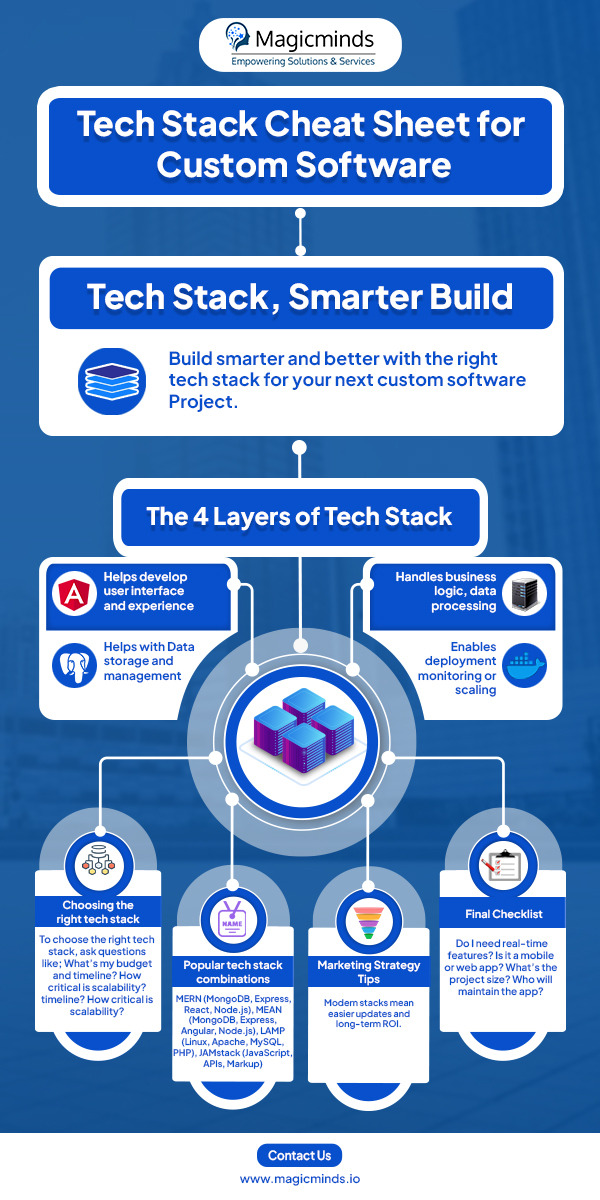
Need help choosing the right tech stack for your next software project? This visual guide breaks it down into 7 simple sections—from frontend to DevOps, popular stack combos (like MERN, LAMP, JAMstack), and key decision-making tips. Perfect for startup founders, product managers, and developers who want to build smarter in 2025. 💡 Includes real-time checklists, visuals, and pro marketing tips! 🔧📊👉 Save this for your next project or share with your dev team! #TechStack #SoftwareDevelopment #WebDevTips #CustomSoftware #MERN #MEAN #DevOps #MagicMinds #TechTrends2025 #StartupTools #ProgrammingGuide
0 notes
Text
1 note
·
View note
Text
0 notes
Text
From Idea to App Store: The Full Mobile App Development Lifecycle Explained
An exciting app idea has crossed your mind! But you don’t know how to start with the process of bringing it to life? Let’s be honest, building an app is not easy, likewise getting the idea of developing an awesome app. Developing a mobile app not only takes coding. It’s an entire journey. A step-by-step process that turns creativity into a real product working smoothly.
Our blog will walk you through every major phase of the development lifecycle undertaken by any expert custom mobile app development company. Are you ready to go over the lifecycle of mobile app development? Let’s get started.
Step 1: Idea Generation
You need to have an idea for the mobile app. It doesn’t have to be an average idea. A good app that solves a real problem or fills a gap.
Start by brainstorming. Consider everything that crosses your mind, and write it down. Don’t apply any filters yet.
Next, highlight the problems. What daily challenges do people face? What aspects are missing in current apps?
Now, it’s time for some quick market research. Scroll the App Store. Do you find similar apps? What is the download rate? What feedback have customers shared in reviews? These insights shape your idea into something people might actually want.
Pro tip: Don’t take action on your first idea itself. Keep refining until you find the sweet spot between passion and demand.
Step 2: Define the Strategy
Excited about your idea? Great. Now it’s time to strategize.
First, define your target audience. Who are you building your app for? Teens? Business professionals? Seniors? Knowing this will change the entire workflow, from features to design.
Next, what’s your unique value proposition (UVP)?Ask yourself: "Why would someone download my app compared to the other alternatives? It could be anything: better design, faster speed, enhancements, or solving the problem in a completely new way.
Finally, ensure your mobile app aligns with your business goals. The goal behind the decision of building the app will shape decisions down the line.
A clear strategy keeps you on track. Without it, you’re just shooting in the dark.
Step 3: Wireframing and Planning
Now your idea starts becoming visual.
A wireframe is like a rough blueprint. No fancy UI or seamless UX yet. Just simple sketches that show the appearance of the screens, its connections, where buttons go, and app navigation.
You don’t need expensive tools. Pen and paper work just fine at first.
Next, map out the user journey. Imagine you are the user. What is the first thing you would see? How will you navigate through the app to achieve your goal? Do not miss even the smallest details—like where the login button sits or how easy it is to reset a password.
To avoid headaches later, ensure good planning. Skipping this step? You risk confusing users or making an app that’s a pain to use.
Step 4: Technical Feasibility Assessment
Before you invest a ton of time, connect with a mobile app consulting team to ensure your idea can be built.
Start with platform decisions.
Will you build for iOS?
Android?
Or both?
iOS apps are faster to build but can only be used by Apple users. Android will give you a wider market and more device types to support.
The next decision will be the tech stack. If you want a native app, you’ll use Swift (iOS) or Kotlin (Android). Want one app that works everywhere? Consider cross-platform tools like Flutter or React Native development.
Sometimes, the features that you want to add can be expensive technically. Know all of this well in advance, instead of getting dealbreaker news.
Step 5: UI/UX Design Phase
This is where the magic will happen.
UI stands for user interface—what users see. UX stands for user experience—how users feel when they use the app.
A good designer will help create intuitive designs for an easy to use interface. Think simple, not complicated. The best apps are not backed with a user manual.
The color scheme and font choices should match your brand. Every screen will be carefully designed for users to know how to navigate and search for their needs.
Most importantly, focus on user-centered design. Always ask: "Is this easy for the user?" If the user spends a lot of time understanding app working, you are not on the right track.
Test early designs with real people. Watch where they get stuck. Then fix it. Your users will thank you later—with downloads and 5-star reviews.
Step 6: Development Phase
Now the real work begins.
The development phase has two main parts: frontend and backend.
The frontend is everything the user sees. Screens, buttons, animations—this is where design becomes functional.
The backend is what users don’t see. Servers, databases, APIs. It’s the engine that keeps everything running smoothly.
Most teams use Agile methodology during development. It means the team will be progressing in short workflows, called sprints. At the end of each sprint, you have a small piece of the app to review the working.
Good communication between designers, developers, and project managers is crucial here. Everyone should stay on the same page, so that the app gies in the right direction and turns out to be the way you have imagined, or beyond expectations.
Pro tip: Always build a Minimum Viable Product (MVP) first. Launch with the core features only. Decorative extras will be worked on later.
Step 7: Testing the App
After being built. Now it’s time to break it.
Testing is not optional. It's critical.
Start with functional testing. Are all buttons working? Does the app crash when you do something weird? Test every feature, no matter how small.
Next is the usability testing phase. Get real users—not your friends or team members—to try the app. Collect their feedback. Keep track of areas they are having an issue. Are they getting stuck? Annoyed? Their pain points show you exactly what needs fixing.
The final step is device and platform testing. Phones are different. iOS and Android behave differently and have different interfaces. Your app needs to work perfectly on all major devices and screen sizes.
Fix bugs immediately. Don’t make it sit in the code.
Quality assurance (QA) is what separates good apps from great ones.
Step 8: Launch Preparation
Your app is almost ready to meet the world. But before you launch, preparation is key.
First, nail down your App Store Optimization (ASO).
Choose a killer app name. Short, memorable, keyword-rich.
Write a clear, exciting description.
Add stunning screenshots and demo videos.
Your goal? Make people want to download your app the second they see it.
At the same time, kick off your marketing plan.
Create a landing page.
Collect emails for early access.
Schedule social media posts.
Reach out to tech bloggers or influencers.
The better your pre-launch buzz, the stronger your launch day numbers.
Treat launch like a party you want everyone to attend. Hype it up.
Step 9: App Store Launch
Launch day. Big moment.
First, you need to submit your app to the stores (App Store, Google Play).
Each platform has strict submission guidelines.
iOS is especially picky. They’ll check for crashes, user interface violations, and even tiny bugs.
Android is a bit more relaxed but still reviews your app.
Expect some back-and-forth. Your app might get rejected the first time. Don’t panic. Fix the issues and resubmit.
Once approved, your app goes live. Now it’s time to monitor downloads, track reviews, and respond to user feedback immediately.
Pro tip: Keep an eye on analytics from day one. See how users are finding your app, where they drop off, and what they love most.
Launch isn’t the finish line. It’s the beginning of the next phase.
Step 10: Post-Launch Support and Maintenance
After launch, your work is far from over.
First, collect user feedback. Listen carefully. Users will tell you what’s missing, what’s confusing, and what they want next.
Then, plan regular updates.
Fix bugs fast.
Improve features based on real-world use.
Stay compatible with new devices and operating system updates.
Post-launch support keeps your app alive and thriving. Apps that sit unchanged die quickly. Freshness shows users you care.
Also, keep an eye on competition. Markets change. New features become standard. Stay ahead by innovating and improving constantly.
The best apps are never really finished. They evolve, just like the needs of their users.
Conclusion
Turning an idea into a live app takes hard work, smart planning, and constant refinement.
From that first lightbulb moment to seeing your app downloaded across the world, every step matters. Rushing means mistakes. Skipping steps means disaster.
But when you follow the full mobile app development lifecycle carefully, you set yourself up for real success.
Building an app isn’t just about launching it. It’s about nurturing it, growing it, and making it better every single day.
So, ready to start your app journey?
1 note
·
View note