
Statistics
We looked inside some of the posts by makerspacelt and here's what we found interesting.
Average Info
Notes Per Post
3
Likes Per Post
3
Reblog Per Post
0
Reply Per Post
0
Time Between Posts
3 months
Number of Posts By Type
Text
16
Photo
1
Last Seen Tumblr Blogs


Fun Fact
When “GIF” was named word of the year in 2012, Oxford Dictionaries U.S.A. credited Tumblr for pushing the word.
Text
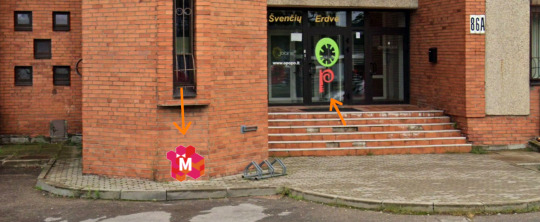
We have moved to a new location! Visit Kaunas Makerspace in the basement at Raudondvario pl. 86A, Kaunas
0 notes
Text
Hack and Tell #44

Today we had 4 presentations, each very different from the other.
Algardas made a remote-controlled drone-rover. He used a Raspberry Pi, wheels from a hover board, and even some parts from an ice-cream machine. Rover is equipped with several 'eyes': an infrared and a normal webcams, it can be controlled via a WebAPI and a smartphone with no lag over 4G connection, and it runs from a battery from his old tricycle.
youtube
Renardas retrofitted a VEF Spidola 232. He upgraded to LiPo battery, bluetooth module and replaced speakers and added an amplifier with intention to keep the original design of the device. He then changed some buttons to respond to functions and included a charge LED, it also shows how much battery charge remains.
youtube
Kęstas figured out how to make his estate Volvo car (which is a rather large vehicle) make a beeping sound during the reverse when the hazard warning lights are on.
youtube
Giedrius made a bunch of multi-functional paint and brush stands for his desk. He designed models from scratch and used laser-cutter to make parts.
youtube
1 note
·
View note
Photo

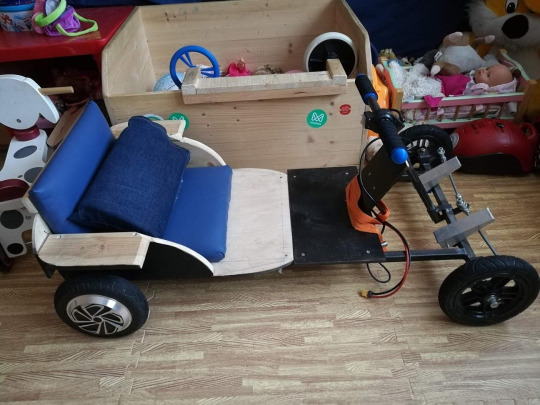
Go-Kart for Kids
What can you make out of a broken segway? Transform it into a go-kart for kids, of course!By using segway’s wheels, controller and an aluminum frame as back rear axle Antanas made a fun ride for children.Power supply made of 10S LiPo batteries lasts for around an hour. Maximum speed was capped for safety reasons.
0 notes
Text
360 light-box for photography
We want to share one of Renardas projects - it is a 360 lightbox, where you can take a picture of an object from all sides. This project will always live in the Makerspace and is available to anyone who wants to use it! (just contact us first and we will explain how to use it). This lightbox is All-in-One, which means it comes with a Canon SLR (with 50mm lens), a tripod and a tablet for control (but for better results a laptop is recommended).
Renardas has described the project in detail on his blog: http://9v.lt/blog/aio-360-lightbox/ And the result is as follows: http://9v.lt/360img/ You can see how it works in this YT video:
youtube
1 note
·
View note
Text
Hack and Tell #43
This time we had 4 presentations. Most of those were software projects.
Darius presented Drowex, a pixel-art project he was brewing for 6 years and took 6-7 months to code. The idea came from nostalgia for retro games and the need to calculate how many post-it notes it would take to make a pixel art picture on the wall. The initial project was lost due to a hard-drive failure, and a newly re-written Drowex is no running on the Docker in the VM. Heres the link to the project: https://drowex.com/
youtube
Renardas told us about a TVIP box for TV that was running an old android and about to be thrown out as it allegedly didn't work as intended. Renardas made his research, some reverse engineering, and figured how he could replace android with something that works a lot better like LibreELEC, and also control the module with a phone. A longer description can be found in his blog: http://9v.lt/blog/tvip-s-box-v-410-libreelec-installation/
youtube
Kęstutis went on a long-winded description of a deconstruction of an Opel Insignia gearbox and things he learned and discovered while doing it. His conclusion was that it can be repaired if needed while this part is often discarded due to a lack of understanding of how it functions.
youtube
Martynas V presented his visual code interpreter that generates a moving pattern - by changing different values, the visual will change. Projects support coding in C++ and use WebGL to display the result. You can n find live demo here: https://gi.ro.lt/static/toy/toy.html
youtube
0 notes
Text
Hack and Tell #42 eXtended

Hack and Tell 42 had an extension. Our member Kęstutis invited some of his friends and colleagues to tell us some interesting thing. There were as much as 5 presentations, whew!
Architect Ingrida presented her research about Kaunas residents. She made a poll about how people feel in their neighborhood and in the city in general, and tried to determine how is this feeling influenced by different aspects of infrastructure, geography, sociopsychology etc.
youtube
Doctor Indrė told us about home first aid kit. What is the best place to for it; what tools, consumables and medicine keep in it; how to use all that stuff.
youtube
Engineer Arvydas showed his quarantine baby – Hi-Fi stereo speakers. Calculating acoustics, selecting components, designing wooden structure and building it.
youtube
Auto-sport enthusiast Donatas had a really rich presentation about auto-sport – what are race types, what place auto-sport takes in Lithuania and in his life, how he bought a race car and rebuilt it from scratch.
youtube
Engineer Andrius told about his tulip care. He built a cabinet for tulip wintering and wanted to see if the thermal isolation is sufficient. So he made a small temperature measuring and logging device for that.
youtube
0 notes
Text
Hack and Tell #42
This time we had 3 presentations.
Renardas re-arranged and optimized 25 odd server racks around the university and dorms he is working for. He had no previous experience and was lacking some resources so project included a lot of learning. A lot of previous wiring was chaotic, haphazardous, and sometimes even unsafe.
youtube
Kęstutis Motekaitis made an oven that controlled and sustained temperature with an Arduino micro-controller. As a nice bonus - instead of a usual sound signal it can chirp a different musical tune. Box has a Bluetooth module so the temperature can be monitored from a mobile phone.
youtube
The other Kęstutis fixed hinges on his laptop as they were broken and could not support display anymore for around 3 years now. The repair is rather crude-looking with machine screws and nuts but robust non the less.
youtube
0 notes
Text
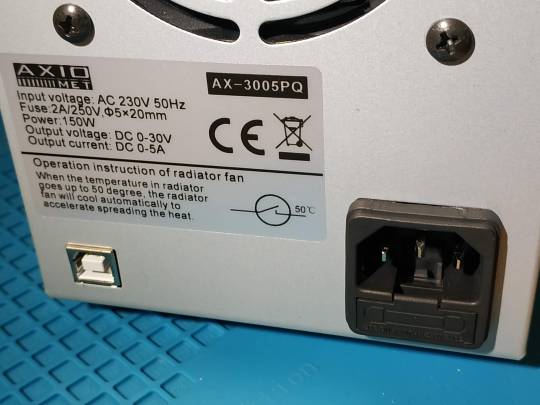
Adding WiFi to AXIOMET AX-3005PQ power supply

Look at that user interface, looks pretty usable isn’t it? But it’s not - adjustment timeout is so short that manual sweep is impossible and making adjustments to voltage or current requires a lot of button presses just to start. [End of rant]. Anyway, I wasn’t planning to do much manual control. Automation FTW!
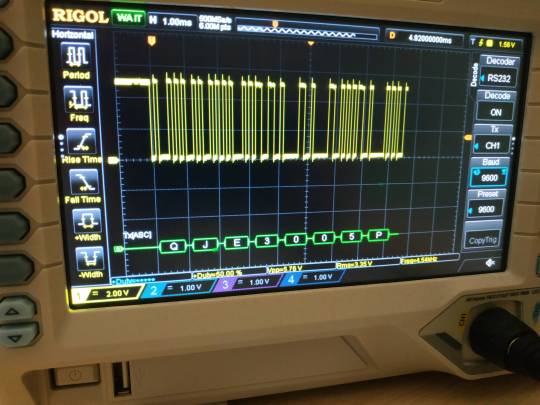
To achieve automation I need to look at the back of the device and follow the data from the USB port.
Inside I found a dedicated board for USB communication.

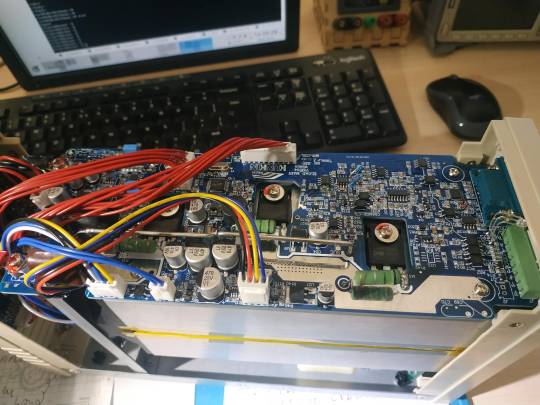
The RS232 side of the board is not populated but the USB side is. And it even has data line isolation with optocouplers.

Chip for USB to RS232 conversion is CP2102 - very common in cheap USB-RS232 adapters.

After figuring out that I'm dealing with a simple UART I prepared an ESP01 module with the same connector used in the device.

For more details on the preparation of this module see this post: https://makerspacelt.tumblr.com/post/624341530736459776/wifize-everything
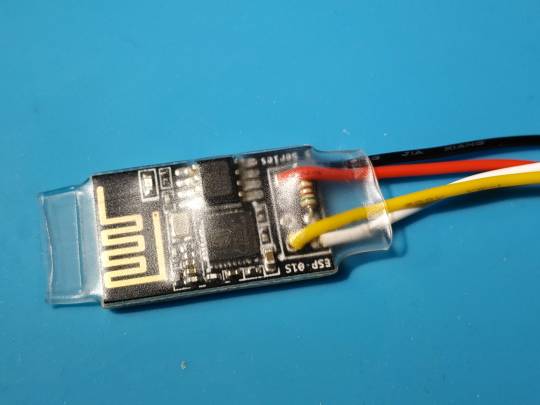
After preparing the module, came the time to install it into the device. While following wires going from the USB board I discovered a very convenient 4 pin connector on the mainboard which contained exactly what I needed - RX TX Vcc and GND.
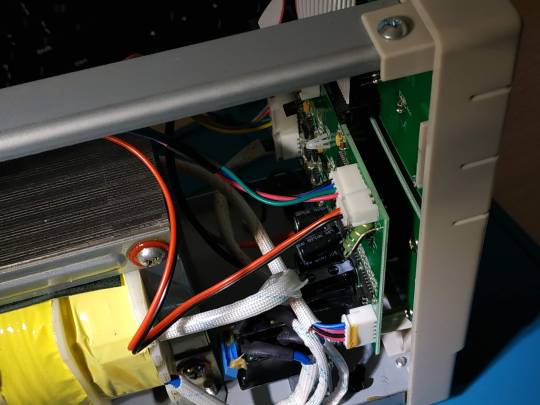
So the installation was extremely simple. I've just unplugged wires going to the USB board.

And plugged the esp module in the same socket.

After that, it's just a simple task of finding a place to put the module itself without a metal case interfering with WiFi signals.
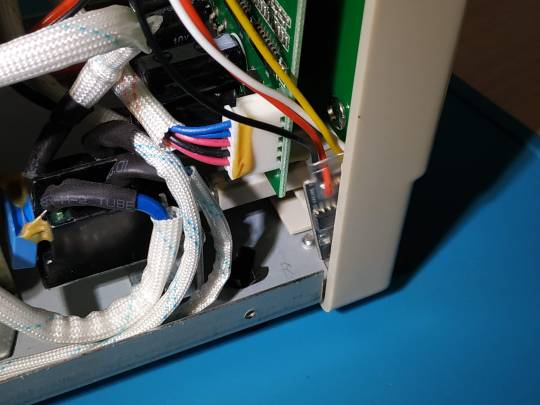
At this point I thought it’s kinda done, just close the case, put the screws back and the project will be completed!
Unfortunately, communication wasn't working and I reconnected the original USB board just to figure out if it is a hardware or software problem.

As the original USB communication wasn't working either it was clear now that the problem is software-related.
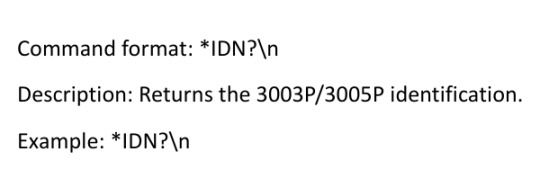
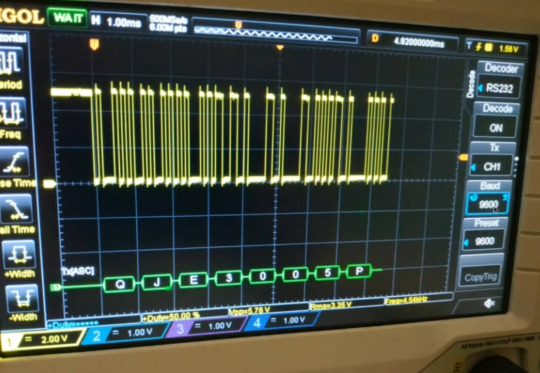
Documentation is kinda simple and I chose the simplest command to test on `*IDN?` which should return the device's model. Sadly enough device did not respond to any command on any baud rate with any line ending.
Long story short - I accidentally sent characters `\` and `n` instead of new-line character and the device responded. Not sure how much more time I would have had to spend to try this intentionally :D
So in general it was a pretty easy project, hardware part simply begging for this upgrade - I didn’t even need to cut or solder anything in the device.
I also did a presentation about this project on the Hack and Tell #38 at Kaunas Makerspace.
youtube
0 notes
Text
Hack and Tell #41

This time during Hack-n-tell #41 we had 5 presenters
Melitonas continued his story about the smart home (prev. on HnT #38). He told us about the usage of Smart Assistant and how it could be used for automated opening of the gates or arming the alarm. He used RaspberryPi to run the compatible software. There are failsafe's in place to make sure the system remains operational even if the electricity cuts out. Overrides can be issued on demand as well, for example in case Melitonas needs to stop the gate in the middle of opening or closing.
youtube
Renardas gave an introduction to airsoft and what it involves. He made a multiple mode airsoft timer bomb to make scenarios more competitive. The 'bomb' can be diffused by entering a correct code on the keypad and will time-out depending on number of failed attempts. While there are plenty code and DIY schematics samples available online, he wanted to make one from scratch. This involved printing a PCB, where Renardas failed to account for ground correctly and had to fix it by soldering in some wires. The next step is adding a siren, and the outstanding piece is still in transit.
youtube
Anna gave a short presentation of screen replacement for an e-book. There wasn't much of a challenge, just some precision and diligence, really. Luckily, nothing else was faulty and the book is back to full operational.
youtube
Algardas shared his trials and tribulations of trying to install a pull-up bar in the corridor. One destroyed electric wire later, he had to repaint the entire wall. Eventually he succeeded and compiled a rather robust solution, that can be used to hang hammocks or a swing.
youtube
Ričardas presented his compact CNC 1419 project. Due to limited space, this was an optimal solution for him. It cost around 300 EUR and proved to be robust and reliable, the software runs steadily off an old Pentium PC with an SSD drive. The use has its own nuance, such as what materials the mill can handle, and what cutters can be used for each. Some bits and bobs were 3D printed as well.
youtube
Renardas took the prize this time and since he held it since the previous HnT, no pass forward was needed.
0 notes
Text
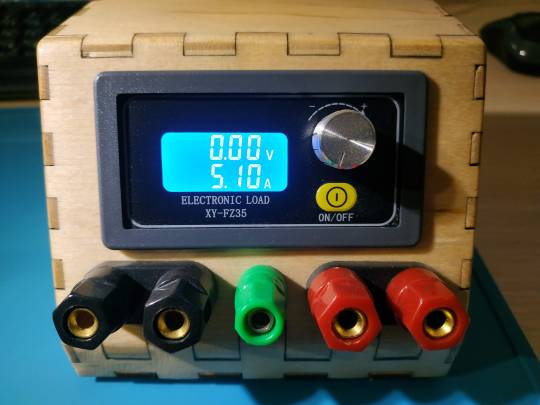
Adding WiFi to Kunkin KP184 electronic load
KP184 is a nice and relatively cheap programmable 400W electronic load then you need an upgrade from your 35W XY-FZ35. That is after fixing shipping damage and few design bugs discussed on eevblog.com/forum.
This load can be controlled via RS232 and RS485. The programming manual can be found with enough searching. Load uses Modbus-RTU protocol but it lacks connectivity to the network. Sadly LXI is not in this price range. So I need to fix the connectivity problem and make it a WiFi-connected load.
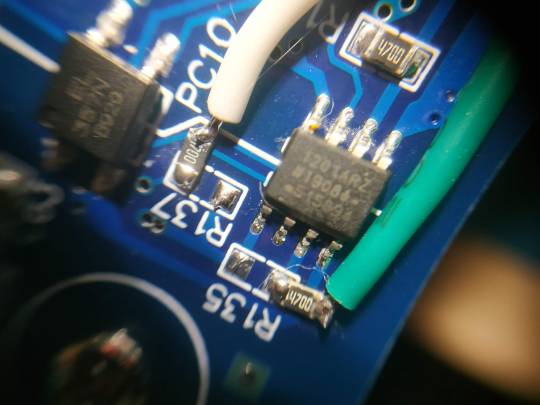
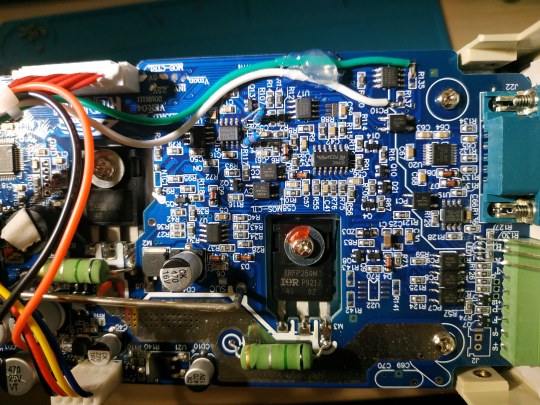
I`m going to use the esp8266 modules I made in the previous post. Esp needs 3.3v communication so straight COM port voltage levels will not work here. After a closer look at the PCB near the communication port, we can see the isolation line going thru some chips. U23, PC10, and PC1 are used for digital signal isolation.
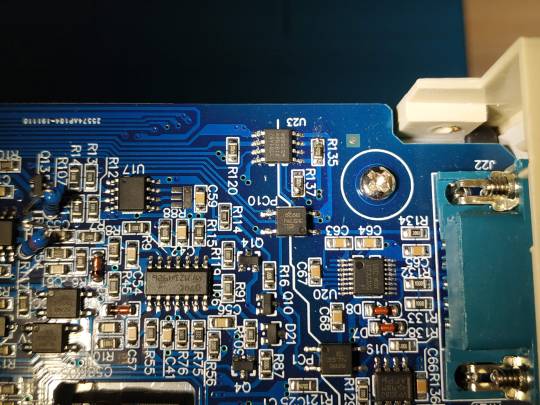
U23 is 1201ARZ which is Dual-Channel Digital Isolator and is used in the UART path here. This IC is responsible for protecting the device from voltages that might be present on communications port. The separated area has its own isolated power supply.
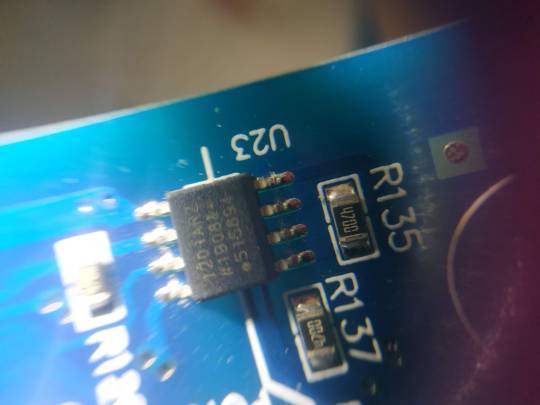
That is a good thing to know and we going to use this power source so that our communication hack won`t upset the device itself. Following the traces showed that this zone has its own regulator, rectifier, and even transformer winding.
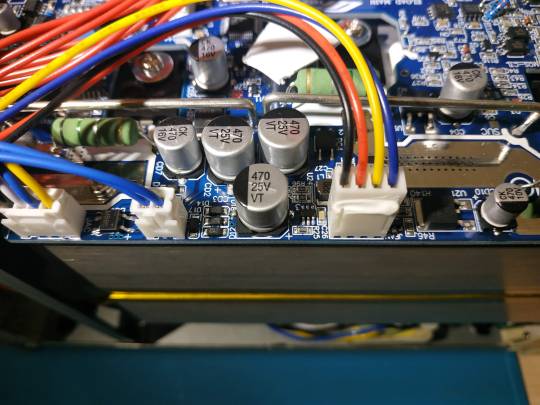
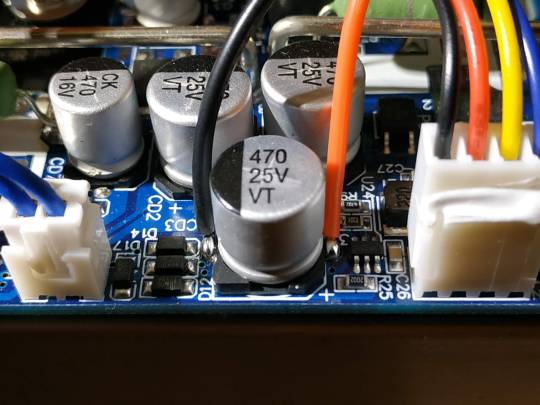
A capacitor on the edge of PCB is used for the communications power supply.
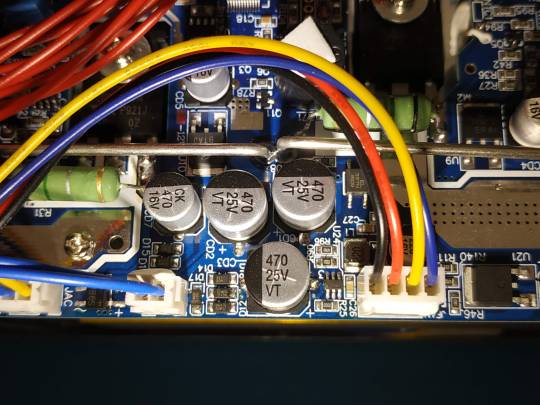
It has about 18V DC unregulated so it can be used with esp/buck module. Note that I connect to the power before regulation as I don`t want to put extra heat on the small regulator for communications area which is not meant to drive such spiky loads as esp.
After dealing with the power problem I connected RX and TX to the isolated side of U23. For that, I reused 4.7K resistors what was used as pull-ups. Now, these resistors would be used for current limiting on data lines in case existing communication circuitry would do something funny.
Now I can place esp module in the front plastic grill as other parts of the case are made from metal.
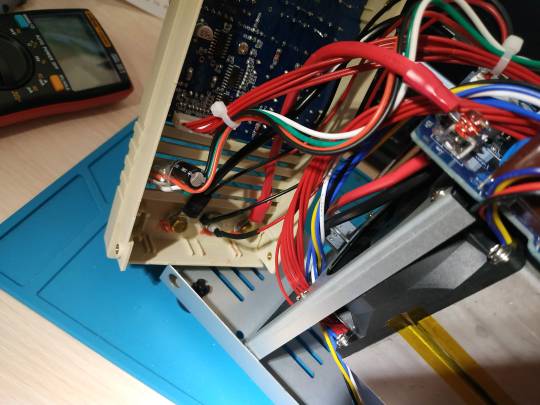
And glue wires in place to stop them flapping in the breeze.

After assembling everything I can test the control via WiFi by sending Modbus-RTU packages with check-sums to TCP port 23 according to the device`s documentation. For easier control, I wrote this script https://github.com/makerspacelt/fz35-cli/blob/master/load-kunkin-kp184.sh It runs on bash and has almost no dependencies.
0 notes
Text
Hack And Tell #40

We had 2 presentations this time.
Antanas shared his experience replacing a cracked screen on a tablet. He ordered a replacement screen from aliexpress. He managed to grab a disassembly kit from Lemona just before the lockdown, so he had some useful tools handy. He removed the old screen carefully and removed any glue residue. Luckily the camera was not affected. The replacement worked perfectly. Unfortunately, the new screen didn’t last as long and got cracked, too.
youtube
Renardas presented the first stage of making a buggy, it was the first time he ever made one. He had an old engine that he could use, he then acquired parts from here and there - clutch, sprocket, supports, brakes, steering wheel all have come from different places - a scooter, a tractor, and even a motorbike. He also had a custom-made seat. Unfortunately, the engine failed during one of the test drives and needed replacing. Renardas managed to obtain an engine from carting, luckily. With some modification, his buggy was back on the road, and the work continues. More info on his blog.
youtube
Renardas took the prize this time :)
0 notes
Text
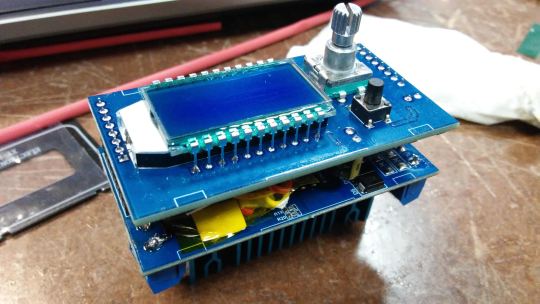
Upgrade XY-FZ35 electronic load
These electronic loads are quite useful by themselves and they are pretty cheap for a 35W digital electronic load. It’s not a precision instrument by any means - but it’s still useful for small PSU and battery testing. And it can get even better with automation!

First things first. I took the load apart to inspect everything and replaced the heatsink so that fan could be mounted in a different orientation. Not sure if it helped the cooling but with this setup load still can pull 35W for an hour or so.

I started by adding a buck regulator for a 3.3V rail as the power supply I used for the device was 12V.

After carefully adjusting output voltage I added the ESP01 module and soldered data connections to the board. Everything was attached by double-sided sticky tape.

And a layer of Kapton tape to insulate from shorting out to the display board.

Everything fits nicely in-between two boards and can be mounted back to the original case.
I designed and laser-cut a simple box so that it would resemble a real bench instrument. Before putting too much effort I decided to test thermal performance in the box. The results were less than 80 degrees C after about an hour of 35W dissipation.

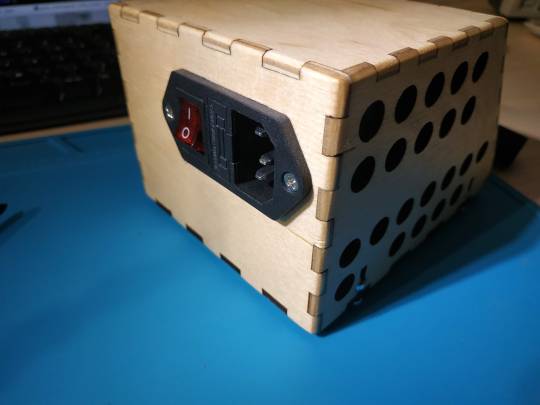
I finished sanding the box.

And assembled everything inside. The thing in the green heat-shrink is a mains power supply to 12V.
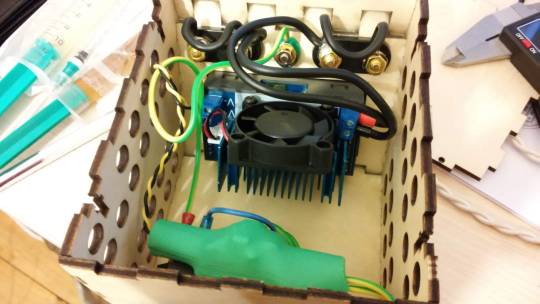
Power socket with a real fuse and the fuse is rated for a load (that’s rare in DIY projects).
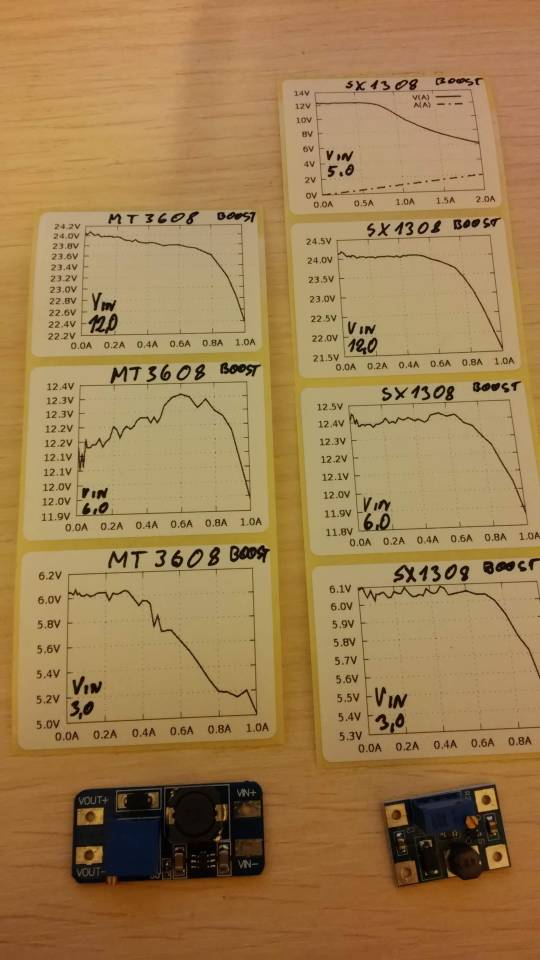
As the hardware part was finished I started working on the software. I was interested in testing the real capabilities of various cheap buck and boost converter modules.
I definitely could just adjust the load, measure voltage, write it down somewhere and repeat until I have all the measurements. Then I could put the data in some kind of spreadsheet and generate a visual representation of current and voltage correlation.
Buuuuuuut, there’s a problem - it sounds like a lot of work and I should repeat that for every module I want to test and maybe for several times if I want to make sure I made no mistake taking so many measurements.
Did I mentioned that I hate “a lot of work”? So I decided to do “a lot of work” and wrote a utility that lets me automate “a lot of work”. Here it is: https://github.com/makerspacelt/fz35-cli
Now I can simply connect buck or boost of interest and start the test with a simple command after which I get my results plotted on a nice graph with a resolution of my choice.
This project was the ultimate gateway-drug to test equipment automatization. From now on, some kind of communication option will be the must for any lab equipment I will consider buying.
0 notes
Text
Hack and Tell #39

HnT #39 had 4 speakers total:
Anna briefly presented the paintwork she did to the prize.
Martynas opened the event by talking about the enclosure he made for his Ender 3 3D printer by using two IKEA tables. He shared there is a whole set of 3D models one can print and list of items that can be used to turn two tables into an enclosure with a set of drawers. He ordered some Plexiglas to make doors and side panels and it turned out neatly. Here are the drawings of drawers and accessories.
youtube
Giedrius shared his experience of making a MPCNC. It came out rather massive and sturdy, but it works as intended. He deliberately picked a more powerful motors and longer beams to get the maximum working surface out of it, the setup also features an LPT interface. Giedrius showed some examples of the work he has done on the CNC - parts of the costumes he's working on.
youtube
Nerijus spoke about his laptop battery database - he acquired a significant amount of used 18650 batteries, measured the voltage and capacities and cataloged everything in an Access database. The idea is to re-use them for future projects, monitoring if any overheats or indicates any voltage swings (that could mean it's faulty). Here is the link to his video https://youtu.be/Pr4piKQCeCs
youtube
Anna was the last one, she spoke about the challenges of repairing a curtain and film counter on a medium format Kiev 60 camera. The old lens that went with is also needed repairs and cleaning. Unfortunately the test film wasn't processed on time, so she couldn't show the results.
youtube
1 note
·
View note
Text
Adding local voltage measurement to WEL3005 electronic load
Recently I bought a few electronic loads mainly for testing 18650 cell capacity. One of them was somewhat new WEL3005. It’s a 30W load capable of up to 30V and 5A. It has a very attractive 4-wire voltage measurement. Unfortunately, as it turns out - it does not support operations with only 2-wires as for example, XY-FZ35 does. After this discovery, 4-wire measurement seemed more like a bug and not a feature so I decided to fix it.
While the battery is connected to discharging terminals device shows zero volts so discharging down to 3.2V for example won’t work. I also didn’t want to connect additional two wires to my battery every time I use the device. The most popular solution is to just connect measurement wires to the discharge wires at the binding posts, but that simply means disabling the 4-wire option which was not acceptable for me.
I would expect that in 2-wire mode (measurement wires not connected) device should measure voltage near the binding posts and in 4-wire mode (measurement wires connected near the battery) device should measure the battery voltage. Of course “mode selection” must happen automatically.
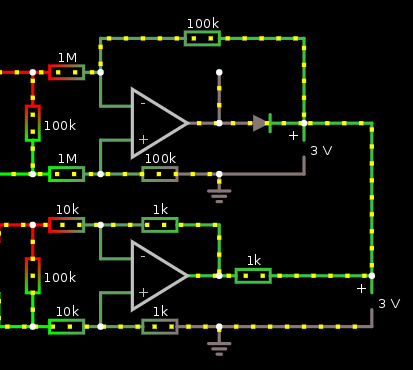
So I started by reverse engineering voltage measurement front-end which consists of a single op-amp in differential mode (see the bottom part of schematics). After banging my head into the wall for some time I decided to just add another identical front-end, but to implement the MAX function I had to add a diode and compensate for a voltage dropout. Analog electronics is black magic to me... for 2-wire mode Op-Amp, I selected 100 times larger resistances so that this method would only introduce a 1% error. This device is not that accurate anyway so 1% does not make a huge difference. https://tinyurl.com/ybdj2knx
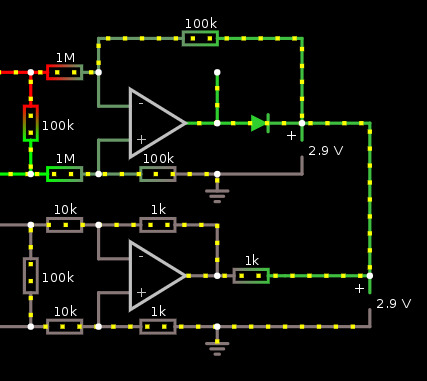
Well... that’s the simplest way I was able to make it work.

I quickly doodled a schematic and a PCB layout on a piece of paper and soldered everything on a piece of prototyping board.

I used MCP602 Op-Amp and 0805 1% resistors.

Quickly tested to see if it actually works. And it worked eventually after fixing one solder joint. Division by 10 looks pretty accurate to me.

Wrapped board in a heat-shrink.

Disassembled load.

I marked all the places wires should be attached. My chosen Op-Amp can use from 2.7V up to 6V supply, but the original Op-Amp used in the device was LM385 which has a lot wider voltage range - up to 32V. Luckily for me - it used 5V so I was able to just connect directly to its power pins for that.

After soldering all the wires it was time to assemble it back and see is it better now or worse.

See? No hands! I mean - it works in the 2-wire mode now. And even 4-wire mode if you connect additional wires.
It was a really interesting evening project and it actually worked (which happens not that often) :)
0 notes
Text
Hack and Tell #38

#38th Hack-n-tell was a virtual meetup this time and had a surprising number of presentations
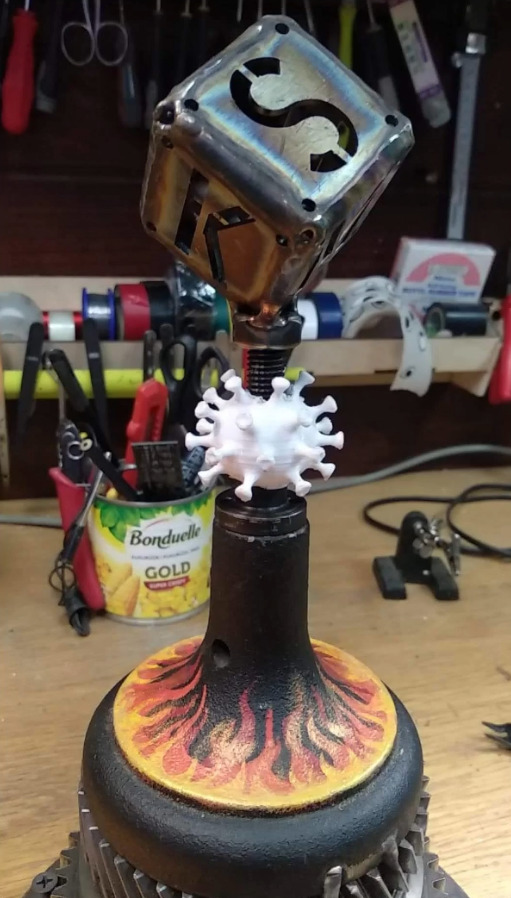
Kęstutis opened the evening by presenting the modifications he did to the HnT trophy, it now has two whole gears and can be dissembled by undoing one screw at the bottom.
Melitonas explained what defines a smart house - it's not just adjusting brightness of your led lights, it's being able to control so many more things around the house. There are many advantages to it: it's safe, highly flexible, and can save you money by switching off the appliances you don't need at the moment. There are a lot of technical aspects that need to be taken in mind - cabling, steady signal and appropriate relays and switches.
youtube

Marius presented his DIY tilt-shift lens made from a piece of flexible pipe and Mir 1B lens. The idea behind tilt-shift lenses is to move the focus plane the way that it allows to avoid perspective distortion of the buildings, or allows to get everything in short range focused. These lenses are actually rather pricey, however there are several ways one could make their own.
youtube
Nerijus briefly spoke about his DIY cart for carrying cargo (a boat and bags). He used aluminium pipes and 3D printed brackets with 100% infill. The cart is expected to carry around 50-60 kg of weight if needed.
youtube
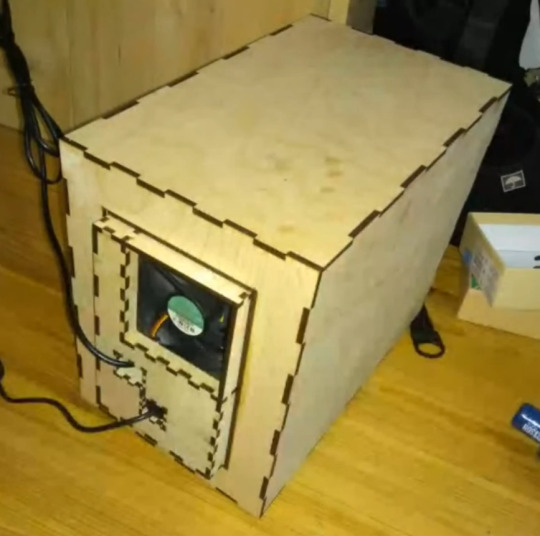
Algardas showed his solution to run a NAS server at home by laser-cutting the box and filling it with rock-wool to dampen the noise and vibration. It was somewhat successful and is still a work in progress.
youtube
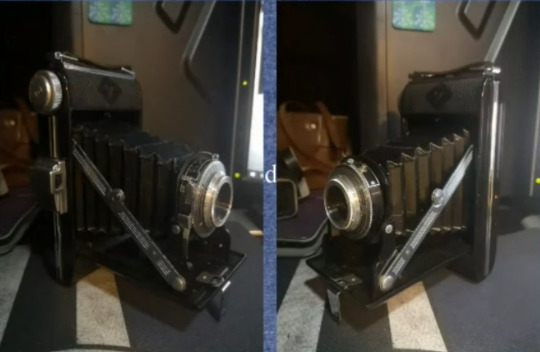
Anna shared her experience repairing a vintage bellow camera Agfa Billy I (from around 1956). She thought she got the focus ring repaired, however the film came back from the lab all blurry. As it turned out, the actual focus ring was stuck for good and took some rounds of different penetrating solvents and temperature swings to get it unstuck. Bellows needed some re-sealing too, gasket silicone was perfect for the job. After some focus calibration, Anna just finished the second test film roll, and hopefully it's all good now.
youtube
Darius spoke about making a variable bench power supply more useful and safer in long term experiments by connecting it to WiFi. He added esp8266 with esp-link firmware and developed a driver for controlling the power supply. The driver part took a lot more time then it should due to misleading documentation. However he managed to get it working as expected.
https://youtu.be/UNWRNn0os_Y
0 notes
Text
Hack and Tell #37

This time we had two presentations and both were car-related.


Kęstutis provided an in-detail breakdown on repair works done to a van preparing for MOT. He heard quite a few different suggestions and guesses of what is wrong with the vehicle and how to fix it. Baring all disasters and unplanned detours, Kęstutis managed to get the van in shape and passed the checks.
youtube

Renardas also spoke about his luck working on an old Subaru Impreza. He obtained it for a fraction of price, and the car was in a desperate state. It was stinking, full of garbage and had rust thorough it. His intentions are to use the car for racing and whatever else sounds exciting.
youtube
0 notes
Text
Hack and Tell #36

Last Hack and Tell of the season got 4 presentations and our 3rd season transitional prize was awarded for the last time.
Linas presented a HnT LED countdown timer he made, the time is set for a 15min presentation. Originally it was intended to be an alarm clock, however later the purpose of the device changed. One of the difficulties Linas faced was with addressing LEDs as they are not as structurally organised as one would have expected. The timer starts automatically when plugged into power, and can be reset with a button.


youtube
Vaidas shared his journey trying to figure out customs declaration on his own. By design it is not intended for the use of 'mere mortals', and he had a hard time getting all the paperwork together.


youtube
Kęstutis spoke about repairing a faulty charging port in his GetNord phone. He previously replaced batteries in two identical GetNord phones, but this was a new challenge. He had to sharpen a soldering iron into a needle-like sharp point to perform the task. Eventually, it worked out like a charm, sans a burning mark on the table surface.


youtube
Darius talked about turning his wireless FM headphones into Bluetooth ones. For this, he used a BT module, a battery from an old Nokia phone and a power chip from a power-bank that provided enough power to charge the battery and feed the BT module. With enough tinkering and hot-glue, it works as intended.

youtube
0 notes