
Statistics
We looked inside some of the posts by malibluearchives and here's what we found interesting.
Average Info
Notes Per Post
20K
Likes Per Post
13K
Reblog Per Post
7K
Reply Per Post
3
Time Between Posts
3 days
Number of Posts By Type
Text
4
Photo
12
Note
1
Last Seen Tumblr Blogs


Fun Fact
Hackers stole 65M passwords from Tumblr in 2013.
Text
Fading-In 2 Scenes in 1 Gif Tutorial
In this post, I will explain how to combine two (or more) gifs into a single gif with a fade-in (crossfade) transition. The tutorial will be based on the example below:

(So sorry for the awful quality! Made the mistake of resizing it to 268px without thinking Tumblr would stretch it to fit the width of the post.)
↓ LEARN HOW TO COMBINE GIFS UNDER THE CUT ↓
Fading-In 2 Scenes in 1 Gif Tutorial
[1] Create gifs of each scene separately
Make gifs like you normally would, apply coloring, sharpen, etc. then save. If you don't know how to make gifs yet, click here for some great tutorials.
NOTE: Make sure your gifs have the same dimensions. For example, the dimensions of all the gifs I'm making are 540px by 370px.
You can put your gifs side by side like this if you want to match the colors of the scenes (here's a tutorial):

[2] Prepare gifs for combination
NOTE: The steps in this section must be applied to each .gif file you saved in step [1].
2.1 Open your saved gif (.gif file, not .psd file) in Photoshop
To do this, you can either:
File > Open > [select your .gif files] (shortcut: command for Mac/Ctrl for Windows + O)
Right click on your .gif files > Open with > Photoshop
2.2 Convert to Video Frame Timeline
To do this, click on the first button in your Timeline window, highlighted in orange below:

2.3 Convert layers to Smart Object
To do this:
Select all layers (How? Select the layer at the bottom, then hold the Shift key while selecting the last layer).
Click the hamburger button "≡" on the right-hand corner of the Layers window.
Click "Convert to Smart Object".
NOTE: Doing this converts all layers into a single layer.

(Your layers could be named Layer 1, Layer 2, Layer 3, etc)
[3] Transfer gifs to one gif file
Make sure you the layers of all your gifs have already been converted into a Smart Object.

How I moved "Untitled-1.gif" (Falling scene) into "Untitled-2.psd" (cardigan scene):
Select the Move tool (shortcut: V)
Click and drag the Smart Object (Layer 49 in the example above) onto the Untitled-2.gif tab (the same way you would drag and drop a file into a folder on your desktop).
While still dragging, wait until the "Untitled-1.gif" tab automatically switches to "Untitled-2.gif" tab.
Drop the Smart Object you're dragging into the document.
Repeat steps 1–4 with the other gifs if you have more gifs to drag and drop.
[4] Center align your dragged gif(s)
To perfectly center align your dragged gif(s):
Select the Move tool (V)
Press command (Mac) / Ctrl (Windows) + A
At the top portion of Photoshop, click the buttons highlighted below:

[5] Put your gif layers in a single row
This is done in the Timeline window. To do this:
5.1 Zoom out your layers first as demonstrated in the example below. Doing this will make the next steps easier.
5.2 Select the layer at the top (Layer 57 in the example below).
5.3 Drag the top layer down beside the layer at the bottom (Layer 56 in the example).
5.4 Repeat steps 5.1 to 5.3 if you have more gifs.

NOTE: If you're okay with how your gif looks without the fade effect, you can stop at this step.
[6] Add a crossfade transition
To do this:
Select the Transition button, encircled in orange below
Click Cross Fade
Drag Cross Fade in between the two gif layers then drop it once a black rectangle appears
Apply steps 6.1 to 6.3 to the rest of the layers (if applicable).

TIP:
You can shorten the duration of the transition effect by selecting the second layer (Layer 57 in the example above) and dragging it to the right. To lengthen it, drag the layer to the left.
You can also set the duration time by changing the "1 s" under "Duration:" in the example. "s" means second.
When you're okay with your overall gif, save it like how you would normally save a gif and you're good to go!
〰️
Please like/reblog if this has helped you and feel free to send a message for any questions and concerns! ♥︎
421 notes
·
View notes


Photo


i.m performing ‘rush hour’ @ show! music core.
79 notes
·
View notes
Photo


PSD by originalvisual (4 versions)
hi! this is a psd very similar to what i usually use, it’s only a bit more simplified since my colourings are a mess of a million more or less useless layers. i also wanted this to be as universal as possible (not sure if i’ve succeeded), which is also why i included four slightly different versions. i’ll be very happy if even one person finds it useful and i apologize if you expected something more fancy haha. have fun giffing! ♥️
please like/reblog if using
no need to credit
re-adjust as you please
don’t repost and/or claim as your own
202 notes
·
View notes
Photo


montse’s psd colorings ✨
* hello everybody ! 👋🏽 to celebrate 390+ followers ( thank u so much for the support 🥺💕💞 ) i wanted to shared these psd colorings i made for two of my gifsets. it helps with the whitewashing and they were really fun to make ! they work well on whitewashed skins. the choom psd goes well with dark scenes and i know i love you with light scenes. you might need to adjust. feel free to give a like or reblog if you use or like ! credit is not necessary but please do not claim as your own.
choom.psd
i know i love you.psd
239 notes
·
View notes
Photo

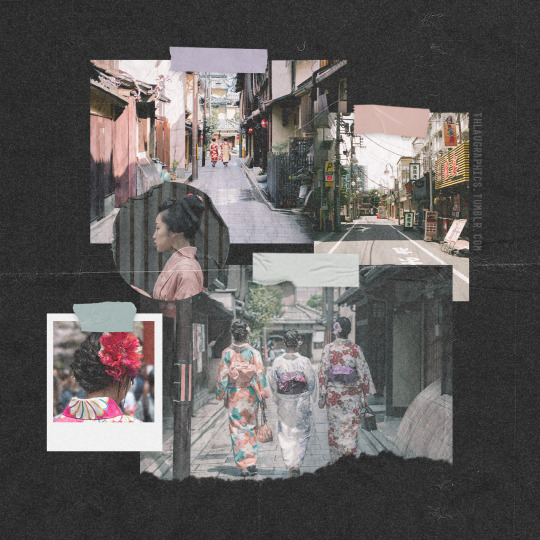

TEMPLATE #29 : Simple squared moodboard
Hello! After 2 years without posting anything new, here we go for a brand new template! It has been ready for a while, I edited it a bit and voilà! I hope you will enjoy this new moodboard template. Here’s the link for the previous one and here’s the very first one.
I will from now add the release date of each new resource as this is not visible on the Tumblr app. I’ve also changed my way of sorting layers. Now every smart object to be changed by your own pictures are at the top of the layer list inside an hidden layer group. It’s easier than searching inside every layer groups. Plus, every upcoming template will now include an “HOW TO USE” layer guide. I hope these changes will help you to use with more ease these new upcoming templates! But you’re of course still free to ask me for more informations!
INFOS: » Dimensions : 1280 x 1280 pixels (25MB) ; » Released date : 22nd May 2021; » Add your own pictures by changing the different smart object psb files. A “HOW TO USE” guide is included; » Included : Everything you see on the preview except the pictures used as an example. The tapes, textures, etc. are all included. You are also able to change the color of the tapes in the layer group “CHANGE TAPE COLOR HERE”; » Preview pictures: Godisable Jacob, Tuan Kiet and Satochi Hirayama; » Do you use it and post it? :) Why not tagging me #thlaugraphics ? I would love to see what you could do with this template :3 » { DOWNLOAD }
PLEASE: • Don’t redistribute or claim as yours ; • Don’t recreate a template from this file in order to distribute as an other one ; • For personnal use only (not for commercial purpose or anything else);) • A like or a reblog if you like or use is really appreciated :3 • A credit link if you use it and post it on your blog would be appreciated, necessary if you use it on an other website than tumblr ^^
made by thlaugraphics with love and pleasure, always ❤ Do you want a specific resource ? Ask me or request it here 😉 ︎
1K notes
·
View notes
Note
Hii joy, can u share this psd if u dont mind /post/657192870753845248/ ?
heey... yeah, of course! warning that my colorings are a mess kkk but here!

9 notes
·
View notes
Photo
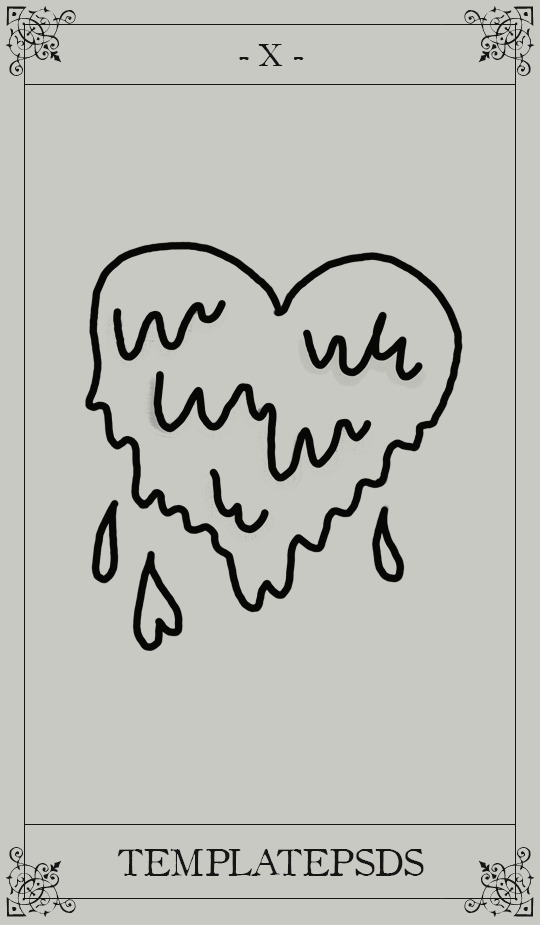
。・ template psd one hundred eleven by templatepsds ゜+.*
-`. info .’-
+ as requested, here is a tarot card template with two different designs, both of which have either a black/gold option, or an off-white/black option.
+ to insert an image, place your picture layer above the layer titled “put image in here*,” right-click on your layer and select “create clipping mask.”
+ you can change the colors, resize it and make it smaller, etc.
+ the font used in the templates ‘OldStyle’, which you can download here.
+ not for commercial use or anything like that! just for personal use/to have fun.
+ adjust as much as you want to suit your liking.
+ please like or reblog if you download.
+ message if you have any questions/difficulties!
-`. download .’-
+ dropbox || mediafire
2K notes
·
View notes
Photo
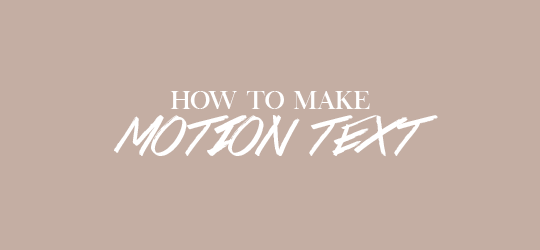
i was asked how i made the text animation (or twitching text, i think) in this post, so i thought i’d make a quick tutorial on how to make it. i’ll be covering how to simply make it twitch and how to use the effect to transition into other text.
i use photoshop cc 2014
basic knowledge on layers, smart filters, and timeline needed
if you found this helpful a like/reblog is appreciated :)
Keep reading
1K notes
·
View notes
Photo


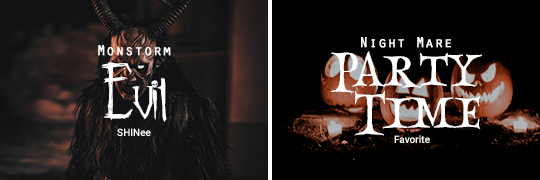

Halloween/Horror fonts #2; 10 fonts + Kpop songs; cr
Listen to my Friday the 13th mix!
Like or reblog if download it, please!
Frightmare
Halloween Day
Halloween Night
Haunted Night
Horrors
Magnificent Serif
Monstorm
Night Mare
Skellington Hollow
Wicked Tricker
767 notes
·
View notes
Photo

♡ANIMATED TEXT TUTORIAL♡
I finally got around to making the tutorial for this! There are many ways to do this, this is just one of them :) Keep reading for the tutorial.
Keep reading
2K notes
·
View notes
Photo

requested by a lovely anon ♡ i hope this is helpful for everyone! also i’ve made this tutorial specifically for text but this can be use for images too.
Keep reading
685 notes
·
View notes
Photo
WHERE IS THE JUSTICE? CHARACTER PSD 003
A fancy / royal / fairytale inspired character introduction (skeleton) psd. There are two versions of this psd, light and dark respectfully. This template comes with four title options, click here to see a gif of all the different options. I did not include the coloring, but I linked the one I used.
I hope you enjoy it, this was the result of my poll! If you want to show me what you’ve done with the psd I track #aureacor
Font: open sans , quentin , adobe carlson pro , betterworks
Original border: [x]
Coloring: somresources
Required knowledge: masking, “subject” selection tool ( photoshop )
Customize: rectangle background, circle background, title options, portraits
Download in source link and here
Credit is required. Please like / reblog if you intend to use it.
1K notes
·
View notes
Text

I’ve gotten a few questions asking how to do the ‘double exposure’ effect I used in this photoset. It’s super easy, and can literally be done in under ten layers, depending on how elaborate you want to be.
To start off with, double exposure is one of my favorite photography and film tricks. If you’ve never seen it done, check out a lot of gorgeous examples here and be inspired. One of my favorite ways of using double exposure is taking a portrait and overlaying it with trees, so I wanted to do that for my Doctor Who artwork.
Click the read more for the tutorial. :)
Keep reading
2K notes
·
View notes
Text

for the longest time, i made my gifs on ezgif, but more recently i have started to use this method to make higher quality gifs for free. so if anyone wants to start making gifs, but can’t afford photoshop, this might help.
WHAT YOU NEED
photopea (free)
kmplayer (free to download and use)
access to movies or scenepacks (you can send me an ask for these)
sharemania (free)
OTHER HELPFUL TUTORIALS
how to make gifs with photopea by @lacebird (super helpful for mac users)
giffing on photopea by @benoitblanc (different method of giffing on photopea)
ofcamerasflashing’s masterlist by @ofcamerasflashing
background colouring tutorial by @sashafierce
giffing tutorial by @newrcmantlcs
colouring tutorial by @lovestory
text tutorial by @yelenafbelova
THIS TUTORIAL REQUIRES …
you to know the layout of photopea (you can find this in @benoitblanc’s tutorial)
patience. a lot of patience.
tutorial under cut
Keep reading
1K notes
·
View notes
Photo
since I’ve been giffing quite a lot of choom videos I’ve noticed how annoying they can be to colour. so here’s the colouring I always use on them, it’s mainly made to restore the colour back onto the skin and to manipulate certain shades (mainly blues and magentas). feel free to edit to make it fit your gifs!
do not repost or claim as your own
download here
123 notes
·
View notes