
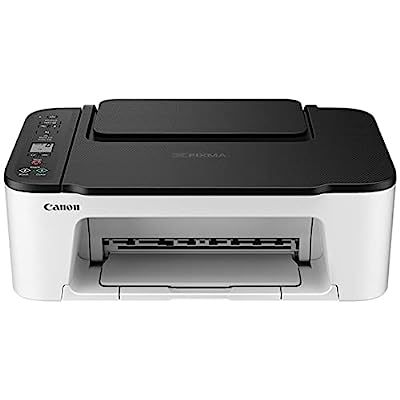
Canon offers a range of printer products with exclusive features. So, with new features comes to the new responsibilities of setting up an internet connection and downloading printer drivers on different devices. Now, the main concern is how you do the required settings of your printer. The solution is right here; walk through the guide on ij.start.canon below and learn how to set up your printer properly. ij.start.canon setup
Don't wanna be here? Send us removal request.
Statistics
We looked inside some of the posts by markwalker93 and here's what we found interesting.
Average Info
Notes Per Post
1
Likes Per Post
1
Reblog Per Post
0
Reply Per Post
0
Time Between Posts
2 months
Number of Posts By Type
Text
6
Last Seen Tumblr Blogs


Fun Fact
In February 2021, Tumblr had 518.6 million blog accounts.
Text
A Complete Guide for Canon Pixma TS3522 Wireless Setup
Canon Pixma TS3522 is an all-rounder printing machine. It allows you to undertake printing and scanning tasks. The printer comes at a reasonable price and prints in high quality. In addition, the Pixma TS3522 has a fine hybrid ink system and a wireless setup connection facility. Further, Pixma TS3522 is equipped with a Contact Image Sensor (CIS) that can handle the scanning tasks. However, to use the printer to its fullest, you must first connect it to your device. So, in this blog, we will see the entire process for Canon Pixma TS3522 wireless setup. The process will consist of the driver download, installation, and connection process.
Download and Install Canon Pixma TS3522 Printer Driver
The printer driver plays a central role in the setup process, so let us see how to download and install it.
First, open the Canon official website from your Chrome or Safari browser.
Next, you need to select the Printer Driver option.
Later, you should enter the name and model of the printer and hit press enter.
And then, you need to download the driver.
Finally, you must sit back and wait for the download to finish.
Once the driver has downloaded successfully, click on the .exe file to install the driver.
Next, you need to follow the install instructions.
And then click the next button at every step.
Also, then you need to agree to the T & C's.
Finally, you need to select the finish button.
Canon Pixma TS3522 Wireless Setup on Your Computer
Wi-Fi is the easiest way to connect the printer to your computer.
First, connect your printer and computer to the same network.
To connect your system to the wireless network, you need to switch ON the computer and connect it to the network.
Next, you need to open the Wi-Fi option on your system and search for the network's name.
Once connected to the wireless network, you must connect the printer to the same network.
To connect the printer to Wi-Fi, press the Wireless Select button on your printer.
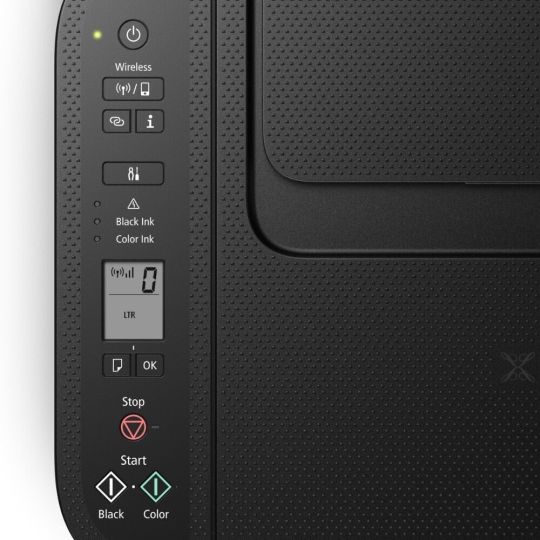
Next, you must search for the network and select it using the arrow keys.
After that, the printer is connected to Wi-Fi.
Further, you need to open Settings from your computer and enable Wi-Fi.
Next, you should enable the Wi-Fi Direct option.
Now a list of devices appears on your computer screen, and select your Canon Pixma TS3522 printer.
Now, you need to give the printer's password to connect to the printer. If you don't know the password, you can get it by printing the Print Network Settings.
Finally, this will complete the connection process. And you can send documents for wireless printing from your computer.
Canon Pixma TS3522 Wireless Setup on Your Android Device
The steps to connect the Pixma printer TS3522 to your wireless network are as follows.
Further, the wireless button light will start blinking on the printer's display.
Now, move to your phone/tablet. You need to open the Settings. From Settings, go to Networks & Connections.
Here, you need to tap on Wi-Fi, and a list appears with device names. You need to select your printer name.
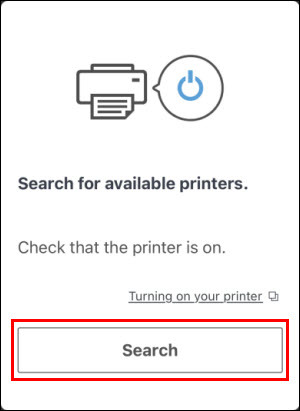
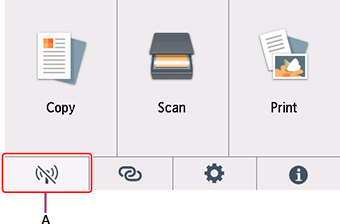
Afterward, the printer is connected to the Canon network. You need to open the Canon PRINT app. The app will ask, "Do you want to search" select Yes.
Finally, you need to select your home Wi-Fi name and connect it to your mobile, and this will complete the wireless setup of Pixma TS3522 to your Android device.
Conclusion
In conclusion, the Canon Pixma TS3522 printer model is an all-in-one printer. The printer can do both scanning and printing. So, it is important to know the necessary steps to connect a printer to the wireless network. This blog explored the Canon Pixma TS3522 wireless setup for your Computer and Android devices, which uses a driver printer for your computer and the Canon app for your Android device.
FAQs
Why does the Canon Pixma Printer say it is not connected?
You may see this error in connection if the Wi-Fi speed is running at lower speeds, or the device may not be compatible with the printer. Also, the printer may not be connected due to pending driver updates or Windows OS updates. So, checking these minor aspects before proceeding with the Canon TS3522 wireless setup process is recommended.
What are the system requirements for Canon Pixma TS3522?
If you want to use the printer efficiently and connect it to your device, you should always check the compatibility of the device. If the system meets the compatibility requirements, the printer can connect and function smoothly. For Windows computers, it is compatible with Windows 11, 10, 8.1, 8, & 7. For Mac OS, Mac OS X v10.12.6 or the latest version.
How do I reset the Canon Pixma TS3522 printer?
To reset your Pixma printer, enter your printer's menu after turning it on. Next, through the setup menu, you can check the reset option. And then, you need to select the Device Settings by pressing OK. Finally, select the Reset option and click OK. Now, the printer begins the resetting process.
#ij.start.canon#ij.start.canon setup#setup canon printer#Canon Pixma ts3522 wireless setup#canon printer drivers setup#canon ij printer setup
0 notes
Text
How to Connect Canon Printer to Your Device?
You can connect the Canon printer to your computer or laptop via a Wi-Fi network or by using a USB cable, and there are some easy steps to follow to connect. In this post, you'll learn how to connect Canon printer. Before connecting your Canon printer and Mac computer, ensure that it can be prepared. Remove your printer and all required objects from the cover. Install the ink or toner pack and paper to the printer. Install the updated printing software from the printer or the manufacturer's website if needed.
How to Connect Canon Printer to a Computer via WPS?
If the wireless access point and the router point are available, you can easily connect your Canon wireless printer to your home network. WPS (Wi-Fi Protected Setup) is one method that lets you easily connect with the network to secure a wireless network. Having your SSID password when you use the method is not compulsory.
To do this, follow the instruction:
In the beginning, click on Wi-Fi, then tap on Settings.
By push button method, click to WPS.
In the next step, you have to press OK.

Tap and hold the WPS push button on your router.
Click OK on the printer after 2 minutes.
https://support.usa.canon.com/library/CANON/CITS_TECH_SUPPORT/Printers/PIXMA/PIXMA%20TS/PIXMA%20TS8220/WPS/trl-s018.gif
When the screen shows the below and click OK.
Tap the Home icon on the left side of the screen.

Click the Setup icon in the Dock, and follow the on-screen steps to get with setup.
Tap on the left side of your screen, and now you will see the setup is complete. Then, it shows you at the bottom left of your screen.
How to Connect a Canon Printer to a Laptop?
Connecting a printer to a device is a relatively easy task in this new world of technology. And the Canon printer creates it easily with updated features and an intuitive interface. This post emphasizes the common problems while connecting a printer to a computer. You should know the right method to connect a Canon printer to a computer. Users should be able to connect to the computer, and they may face many issues while setting up a stable connection. We understand their issues and work to give them a better solution.
Let's learn about how to connect a Canon printer to a computer with wired and wireless connections. After your printer is turned on, you can connect it to devices such as computers/laptops. When your device is ready for the connection, connect to the double-edged end of the power cable to the nearest outlets. You have to unbox your printer and arrange all the parts as given in the manual, but make sure to do so before connecting the printer.
How to Connect Canon Printer to a PC Using a USB Cable?
A USB cable is a simple way to connect your Canon printer to the computer. It is the traditional method of getting connected devices. One of the USBs remains connected to the computer's USB port. The printer will notify you in just a few seconds that the connection is built.
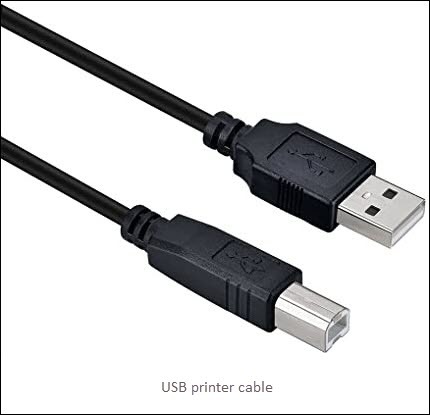
To complete the connection, you have to install the software. Once the installation is done, follow these steps:
Firstly click the Windows Start menu.
You'll see a gear icon on the left side of the corner. Click it for Windows settings.
Next, click on the Labelled Devices option.
After that, tap on Printers & Scanners.
You'll go to the new page; there, you have to click on Add Printer and Scanner.
The printer will start to scan to the device, and then you'll see the name of your devices.
Then, click on your device name on the screen.
Lastly, follow the on-screen steps to continue.
Conclusion
In conclusion, Canon printers provide various types of features with high image qualities, and nowadays, everybody can easily set up and connect Canon printers looking for fast printing abilities. Canon printers can connect wired and wireless for both. For this, users must know the process to connect Canon printer. This post can help users who want to connect the printer. Here is a step-by-step guide that will tell you and give you the most asked question's answers.
FAQs
Question 1: How to connect the Canon printer with a computer?
Answer: The USB cable is the easiest way to connect the printer to a computer. It is the latest method to connect devices. One side of the USB cable connects to the printer, and the other one should be connected to the computer's USB port. With a USB cable, users can easily learn the steps of it and connect it.
Question 2: How can you print with a wireless printer?
Answer: Follow these steps to print with a wireless printer
Go to the page from the application or web browser you want to print.
After that, select the Printer type.
Then, select a wireless printer.
Now, change the print setting according to your preference.
Lastly, press the Print option.
Question 3: How do I connect a Canon printer to my phone?
Answer: Following are the instruction to connect the printer to your phone:
Download and install the app.
Check the Wi-Fi, then launch the Canon print app.
Click on the Add Printer on the main screen.
Press Registration, and click the wireless router option.
Select the access point, supply the password, and press OK.
Then, tap OK to confirm and use the print to work a test print.
#ij.start.canon#ij.start.canon setup#Connect Canon printer#setup canon printer#canon ij printer setup
0 notes
Text
Canon Pixma Ts6420a Review [Features & Utility]
Printers have become essential to use on a daily basis for many people. Also, people of every age group require some kind of printer assistance to finish their projects at college or work. A powerful printer can offer the capability of completing printing tasks quickly and, at the same time, giving premium quality results. Pixma TS6420a is among the most famous printer that is widely used for home and office use. This printer has got various exciting features.
If you are considering buying this printer, you first learn about the features and specifications of the printer. Therefore, to help you decide if this printer is suitable for you, this blog post will give you a Canon Pixma TS6420a review, features, pros & cons, etc.
Canon Pixma TS6420a: Overview

Additionally, when it comes to the price of this printer, it works as the cherry on the top as it comes to its very affordable price range; anyone can consider this printer a worthwhile deal if they want to use it for their personal or professional use.
Features of the Pixma TS6420a
Here are some of the top features of the Canon Pixma TS6420a printer device.
This printer comes with inkjet printing technology.
It is suitable for home and small offices use.
Canon Pixma TS6420a offers a monochrome printing speed of 13 ppm per minute.
This printer also comes with Auto-Duplex printing.
It comes with USB connectivity.
It has got an LCD preview screen.
The photos can also be printed with this printer.
Canon Pixma ts6420a ink works for printing high-quality documents.
Pros and Cons of Canon Pixma TS6420a
Some of the top pros and cons of Canon Pixma TS6420a are as follows:
Pros:
This printer comes with a Flatbed scanner that has extendable hinges.
The printing color of the printer is also very accurate and premium.
Pixma TS6420a can also print decent-quality photos.
It has two paper output trays.
In canon, the Pixma ts6420a ink tank is available.
The price of the printer is very pocket friendly.
It offers top-notch printing quality.
Cons
The printer speed of this printer is not very impressive.
In this printer, the cost-per-print for black-only prints is very high.
This printer also has a low paper yield.
Does not come with an automatic document feeder.
It does not support a memory card.
Is Canon Pixma TS6420 Worth Buying?
Canon Pixma TS6420 is not the best printer available in the market. However, it is a decent printer if we consider the price of this printer. Also, this printer can do every basic print-related task very efficiently. Also the printing quality is also a plus point of the printer. So, if you are doing for a decent printer without spending huge sums of money, then this printer is worth a shot.
Conclusion:
Above, you read the Canon Pixma TS6420a review and learn every prominent information about the printer. From the above content, it is clear that this printer is a great investment to use on a daily basis. Also, you can consider this printer if you are a beginner.
Frequently Asked Questions (FAQs)
Can a Canon TS6420 print photos?
Yes, you can print photos with the help of the Canon TS6420. Also, the quality of the photos is quite impressive but not so top-notch. Also, the printing cost of the printer is not so high, so you can print photos of your family and photos.
How do I connect my Canon printer to my phone?
Below is the procedure to connect your Canon printer to a phone.
First of all, you need to check your Canon printer is ON.
After that, open the app.
Then, tap on the More option.
Choose the Bluetooth setup option.
Furthermore, follow the on-screen instructions to pair it with your smartphone.
Once the pairing is complete, you can start your printing work.
Can Canon Pixma print on regular paper?
Canon Pixma allows you to print with non-Canon genuine specialty paper, but the paper should not be so much lighter and heavier. Also, if you use thick paper to print the document, then it can get stuck in the printer.
How do I connect my Canon TS6420 to Wi-Fi?
First, go to the Home screen and click on the OK option.
Select the Wi-Fi setup using the arrow buttons, then click on the OK button.
Then choose the Manual Setup option and press OK.
Now, your printer will search for available networks.
Then select your network and choose the OK option.
After that, type your password and click on the Start option.
Afterward, the Canon Pixma TS6420 will be connected to your device.
When the printer is connected, you need to click on the OK button.
Source URL: – Canon Pixma Ts6420a Review
#ij.start.canon#ij.start.canon setup#canon printer drivers setup#setup canon printer#Pixma ts6420a#canon Pixma ts6420a review#canon Pixma ts6420a#canon Pixma ts6420a ink
0 notes
Text
OnePlus 10T Review: Is This Phone Worth Buying?
The OnePlus 10T is the non-pro version of the Oneplus’s flagship phone, 10T Pro. The Pro version was released in March 2022, and now it is ready to launch its non-pro version Oneplus 10T, in August 2022.
When we talk about its specification and features, it has a lot to offer, yet still has some skepticism among Oneplus’ fans. So, if you also have mixed feelings about whether you should go for this phone or not, this article is going to clear your doubts.
Therefore, get through the whole content to learn about this phone’s core features and specifications.
What are the prominent Features and Specifications of OnePlus 10T?
The OnePlus 10T comes with the Qualcomm Snapdragon 8 Plus Gen 1 processor. Additionally, it runs on OxygenOS 12.1 based on Android 12 software.
It has a 6.7-inch AMOLED display with a resolution of 2,412 x 1,080 pixels. Plus, it offers a 120 GHz refresh rate.
The OnePlus comes with a 4,800 mAh battery and supports 150W wired charging. However, the charger in the US is restricted to only 125W.
This phone comes in two storage capacities, one with 128 GB and the other with 256 GB.
The dimension of the 10T phone is 163 mm × 75.37mm × 8.75 mm.
It is available in only two exclusive colors Jade Green and Moonstone Black.
For connectivity, it supports USB-C ports and a Dual-nano sim slot.
The phone comes with the Dual stereo Speaker and Dolby Atmos. Apart from that, it also has noise cancellation.
The phone 10T has an IP54 rating which is only for the US.
It has a 16 MP front camera and 50 MP rear camera. Plus, it also has two additional- 8MP ultrawide and 2MP macro cameras.
What are the Likes and Dislikes of OnePlus 10T?
Below you are going to learn about some of the likes and dislikes of this phone-
Likes
Its aesthetic design and stellar display are one of the significant features which make it compelling.
The 10T phone has super fast charging.
It has a very decent battery capacity and offers one day of battery life.
The price of the OnePlus 10T is very pocket friendly for people.
The phone is successful in offering excellent performance.
Camera quality is also a great pro in this phone.
Dislikes
Firstly, this 10T phone does not support wireless charging.
Though the camera is decent still, it needs some significant improvements
Another drawback is that it does not have an IP rating except in the US.
You do not get an alert slider in this 10T phone.
This phone has an imbalance of speakers, which do not provide top-notch sound. And, the sound starts to give distortion at high volume.
Lastly, the price of the OnePlus 10T can be a problem for some people.
Conclusion
The design of the 10T has taken inspiration from its pro version. Additionally, you can get to see Gorilla Glass 5 material on the front and the back of the phone. The phone comes with the Qualcomm Snapdragon 8 Plus Gen 1 processor and Android 12 software.
Furthermore, it can record 4K, 1080p, and 720p videos at 30fps/60fbs. Plus, you can also shoot slow-mo videos of 720 at 480fps and 1080 at 240 fps. In short, this phone has pretty much every basic feature you need except a few. Hence, if you are a OnePlus fan and able to afford this phone, you will not regret buying it.
Frequently Asked Question (FAQs)
Does the OnePlus 10T support dual sim?
Yes, the OnePlus 10T supports dual sim and comes with a dual nano-sim slot.
Is the 10T OnePlus waterproof?
The OnePlus 10T has got the IP54 rating in the US for water resistance. So, it can protect the phone from the not-so-powerful water spray. However, when it comes to other markets, it has not got any IP rating.
Does the OnePlus 10T support wireless charging?
The 10T phone does not support wireless charging.
What is the price of the OnePlus 10T?
The starting price of the OnePlus 10T is USD649.
Visit - ij.start.canon ij.start.canon setup
0 notes
Text
How To Put Ink In A Canon Printer [Step By Step Guide]
If you have a Canon printer, you must know how to put ink in a Canon printer. You have to change the ink cartridges after a certain time as it becomes a routine task of your printer maintenance. Or, if you use a printer regularly, you may need to change the ink cartridge frequently. So, as a part of printer maintenance, every Canon owner should learn this. In this blog, you will see step-by-step instructions to put ink in a Canon printer. Also, the points to remember before going to replace the ink cartridge.
The Canon printer has an access door on the top of the printer that allows you to check the cartridge's status. Hence, you can access the door and replace the empty ink cartridge whenever the prints seem faded or missing colors.
How To Put Ink In A Canon Printer?
Printers are an essential device nowadays for many tasks. However, buying one is a little challenging. Canon is among the high-quality printers and offers quick printouts. This is why Canon has many users worldwide. But it may have certain issues or glitches with its operation, being a technical device.
If your printer's ink goes below the required level, it will start producing faded prints and missed colors. Hence, in some conditions, changing an ink cartridge is the option when it's running low.
However, finding a quality ink cartridge is a little challenging as there are many influences from third parties and websites. But with the right type of ink cartridge, you can fix those issues quickly.
Here are the steps to put ink in a Canon printer:
The first step is to open the Canon printer's access door and ensure that you use the support brace on the cover's right side.
In the next step, you need to remove the existing ink cartridge and remove the coverings of the new cartridge that needs to be installed.
Thereafter, continue putting the ink cartridge into the empty slot so that the metal contacts inside the slot and the release tab are towards you.
Then, close the access door of the Canon printer and wait for a few minutes until the light indicator on your device blinks.
At last, you can take a demo print to ensure the correct installation of the ink cartridge.
What Do You Need To Remember Before Putting Ink In The Printer?
Nothing will work unless you do it the right way. The same happens with the installation of ink cartridges. Here we will discuss the points you should remember before replacing the ink cartridge of your Canon printer.
Here are the points to remember:
Always use a classy and high-quality ink cartridge and avoid any third-party or ineffective ink cartridges, as they may clog the print heads.
Check the status of ink timely and remove the old cartridge. Then immediately insert the new ink cartridge and raise the ink level.
Always keep a white cloth to clean the ink cartridge.
Don't leave the ink cartridge door open once you remove the packaging and fill the ink.
Then, use an original ink cartridge according to the date mentioned.
Conclusion
This was all about how to put ink in a Canon printer. The process is very simple, and you just need to follow the instructions mentioned. Remember the points before installing the ink cartridges.
0 notes
Text
Why Is Your Canon Printer Not Printing?
Whenever your Canon printer not printing, it becomes difficult to know what to do. Well, this time is advanced, and printers have become important for your business. Nowadays, every work demands a quality printer that can provide a clear print of the softcopies. The Canon is among those top-notch printers. It can print, scan and fax. As it's a technical device, it might create some annoying technical glitches when you operate it.
And Canon printer not printing is one of the common errors users encounter. So, if you also own a Canon printer, you should know what to do while facing this issue. In this blog, I have given a few causes and troubleshooting tips to fix this common error.
Why Is Your Canon Printer Not Printing?
You should know the reasons before going to the solutions. We will discuss the factors that create this hassle:
The papers are jammed in the paper loading tray.
Outdated Canon printer drivers
Incompatible size of the loaded paper.
The network connection is not secured.
The print heads are dusty
When the Canon printer is incompatible with outdated software.
How To Fix The Canon Not Printing Issue?
You have to follow the instructions to fix the issue:
(1) Set your printer as the default
Launch the control panel on your system.
Then, click on "Devices and Printers" from here.
Now, ensure that your Canon printer is the default printer from the list of printers.
If it's not, right-click on the "Canon printer" and select "Set as Default" from here.
Once you set the Canon printer as a default printer, ensure the printer has a green mark on it
(2) Disable offline status
The Canon printer not printing due to offline issues. So, to enable the online status, follow the given steps:
Type control panel in the windows search box.
Then, click the control panel on the screen.
Here, click "Devices and Printers."
From the printer catalog, find your Canon printer and right-click on it. Then, select "See What's printing."
Now, make sure that "Use Printer Offline" is not selected. If it's selected, click to uncheck it.
(3) Remove print jobs from the print queue
If the papers are jammed in the print queue, you might have a Canon printer not printing problem. Follow the given steps:
From the windows search, open the "control panel."
Then, type services.mac in the box and enter.
Now, in the services window, scroll down to the spooler and tap on "Stop" after right click on it.
Once the spooler service is stopped, launch the "Run" box.
Then type spool in the box and enter.
Then open the "printers" folder.
Now delete all files in the folder.
Once you delete all the files, close the spool folder.
Then return to service windows, right-click the print spooler program, and select "Start."
Lastly, take a print to see if the printer turns normal.
(4) Update the Canon printer driver
You must follow some steps to update the printer driver for printing color issues. It's essential to keep the printer drivers updated to prevent such issues.
To update your Canon printer, follow these steps:
Move to the Windows search option and type Run to launch the dialog box.
Enter in "devmgmt.msc" and press enter.
When the "Device Management" window opens, find the printing/print queue category and expand it.
Then, right-click on the Canon printer device and select "Update Driver" from the list.
Next, click "check for automatically updated driver program" to proceed.
Follow the displayed instructions to finish the installation. It lets you complete the driver updates using "Device Manager."
(5) Disable the firewall (temporarily)
In this step, you need to temporarily disable the firewall on your system and take a print test again:
In the search bar, type "Windows Defender Firewall" and click on it.
Then, click the "Turn Windows Defender Firewall on or off" option from the window's left side.
After that, uncheck the Windows Defender Firewall on public and private networks. And then tap OK to keep the changes.
(6) Check print spooler status
Launch the control panel from the "Run" box.
Then, type "services.msc" and enter.
Scroll down to reach printer spooler option and right-click on it. Then, select the "Properties" section.
Now, move to the "General" tab. Under the "Services status" then find "Stop" option and press "OK."
Alter the "Startup type" of the print spooler to "Automatic" and then press "OK."
Now click on the "Start" button and press "OK."
Lastly, restart the printer and check the printing status.
Conclusion
These were the easy steps to perform when your Canon printer not printing. This issue is very common and needs a few settings to alter, and then it returns to normal. Next time you face such issues, try to use these steps to fix them.
1 note
·
View note