
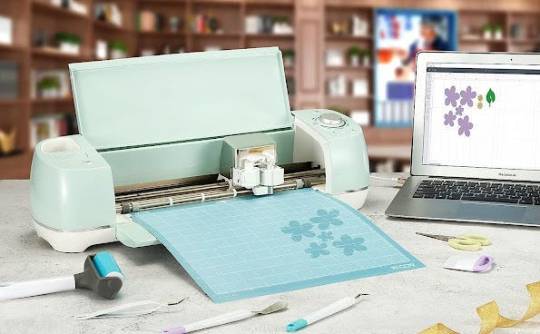
Explore limitless creativity with your favorite Cricut machine. Yes, if some DIY projects are rolling into your mind, you can bring it to real with the help of a crafting machine and compatible software. Cricut Design Space is a Cricut-compatible application that you can find helpful in carrying out your crafting projects. To set up your machine and begin crafting, click on the link cricut.com/setup and follow the prompts. When the Cricut machine is paired with compatible Cricut software app and devices, all you can enjoy is a smooth and creative crafting process.
Don't wanna be here? Send us removal request.
Statistics
We looked inside some of the posts by martinsmith01 and here's what we found interesting.
Average Info
Notes Per Post
0
Likes Per Post
0
Reblog Per Post
0
Reply Per Post
0
Time Between Posts
12 days
Number of Posts By Type
Text
17
Last Seen Tumblr Blogs


Fun Fact
Tumblr Inc. has $15.1M in annual revenue.
Text
How to Connect Printer to Cricut Design Space: Full Guide
Welcome to my blog! Are you interested in Cricut machines? So am I. Well, I am a Cricut enthusiast and a seasoned crafter. To date, I have helped many aspiring crafters like you. If you want to learn how to connect printer to Cricut Design Space, I’m here to help you with everything.
I recently started blogging as a homemaker, and this work makes me happy. I get hundreds of messages a day on social media about many queries. And nothing can answer better than a blog, right?
In this guide, you’ll learn the basic connection steps for connecting a printer to your Cricut app. This method is a must-do for using Cricut’s Print Then Cut feature. So, let’s begin our artistic journey with Cricut.
Which Printers Should You Use With Cricut Design Space?

While selecting printers, you should know which are compatible with the Cricut software. As there are many printers on the market, choosing one can be tricky. But I can make your work less complicated by suggesting printers that work well with the Design Space app.
Samsung Laser printers
Canon PIXMA printers
Brother printers (All-in-one)
HP DeskJet printers
These printers are the best selection for the Cricut application. Use them for your printing tasks.
How to Connect Printer to Cricut Design Space?
Here, you will get some straightforward steps to understand the connection between the printer and the Design Space app.
Step 1: Install Your Printer
Before directly jumping into the connection steps, you need to set up your printer and check if it works seamlessly or not. This step is to avoid any interruptions further. Here are some common steps you must follow to learn how to connect printer to Cricut Design Space.
Unbox your printer and install it in a safe place near a power outlet. Also, connect it to a power cord and turn it on.
After installation, you must get the ink cartridges according to your printer type. For more details, you can find a reference in your printer’s manual.
Now, you must insert the papers into the loading tray. Also, ensure that you align them correctly.
In the next step, you should connect your printer to a wireless connection. Set up a Wi-Fi connection on your printer.
The main part is to get printer drivers to understand the computer commands.
After performing all these steps, your printer will be well-prepared for upcoming tasks, and you’ll get everything clear and precise. Let’s delve into the next steps for learning how to connect printer to Cricut Design Space.
Step 2: Download the Cricut Application

On smartphones, you can download and install the software. Then, you need to log in to your Cricut ID by entering your correct details. However, you can also create a new account if you’re a beginner.
Step 3: Connect Printer to Cricut Design Space
It’s time to connect your printer to the Cricut app, which is our first priority. But you can’t do it before taking all the above steps. Check out the steps here for connection.
Launch the Cricut Design app on your computer or mobile device. Also, check if you’re logged in to the account. If not, log in to the account.
Now, it’s time to create a new project or use an existing project to send it to the printer.
To do this, either create your imagination on the canvas or select a design you want to use on your printing project.
When the design is ready, configure the print settings — print size, personal preferences, quality, and alignment.
Once you finish the settings, select your printer under the available list of devices.
Also, check if your printer is ON and on the same Wi-Fi network as your device.
And finally, you can hit the print option to initiate the print job on your printer.
Ultimately, you’ll get a creative reflection of your selected design.
Conclusion
Finally, you know how to connect printer to Cricut Design Space. You can perform all the steps with ease. Also, ensure that you completely install the printer and the Cricut software on your computer. Select a compatible printer that works well with your Cricut machine. In the end, you’ll connect your printer to Design Space and get a print job.
FAQs
Can I Use Any Printer With Cricut?
No, you can’t use any printer with your Cricut machine. All you need to do is choose a specific printer that is compatible with the Cricut Design app. You need a versatile printer that can print on thick materials, including paper, cardstock, printable vinyl, etc. Hence, it’s important to choose your printer carefully.
Can I Print on Fabric With Cricut?
Yes, you can print customized fabric and many other DIY projects related to fabric with your Cricut machine. You can use fabric prints to create perfect banners, embellishments, and pillows. And with Cricut’s Print Then Cut feature, you can create projects better.
How to Connect Cricut Design Space to Device?
Connecting Cricut software to a computer device is easy with a USB cord and Bluetooth. Once you’ve connected your devices with USB and Bluetooth, you can visit design.cricut.com on your internet browser. Then, install the Cricut app on your computer. After that, you can continue with the on-screen directions.
Source: connect printer to cricut design space
Visit here to know more: Cricut.com/setup3
Twitter
0 notes
Text
How to Set up a Cricut Explore Air 2: A Complete Guide
The Cricut Explore Air 2 is a powerful machine for working on your DIY projects, especially for beginners. As a second-gene Cricut machine, it comes at a reasonable price. To work on crafts, you have to connect it to your device and download Cricut software. With the software, you can select a design and cut it with Cricut, creating beautiful projects. So, let’s get started with the setup procedure.
How to Set up a Cricut Explore Air 2?
It is very important to know the procedure for setting up a Cricut machine. To learn how you can do it, you should check out the steps written below.
Initially, you have to add the machine to a power source. You should use a power adapter to connect it to the wall socket and then turn it on by pressing the power button.
Then, use a USB cable or Bluetooth to connect the machine to your phone or computer.
Now, open an internet browser on your device and head over to cricut.com/setup.
After that, you should download the Cricut Design Space app.
Next, you should sign in to the app with a Cricut account.
When the log-in is complete, your Cricut cutting machine will be ready to cut.
How to Connect Cricut Explore Air 2 to a Computer?
Once you have learned how to set up a Cricut Explore Air 2, you should connect it to your computer. For connection, you can use a USB cable or wireless Bluetooth. Here is the process to connect Cricut to your computer:
Option 1: With a USB Cable
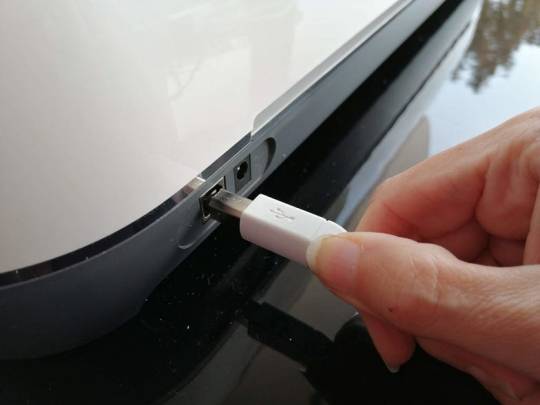
To start, you have to connect the Cricut product to an electric socket with a power adapter.
After that, take a USB cable and connect it to both devices.
You should connect the cable at one end to the device and the other end to the Explore machine.
The Cricut cutting machine and your computer will be connected.
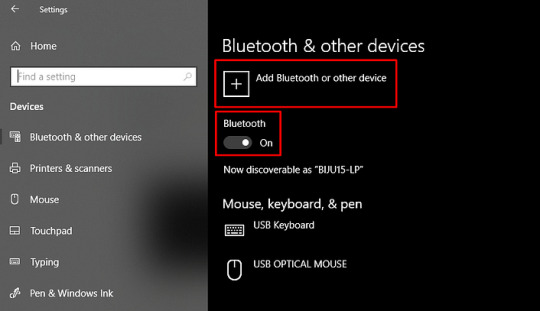
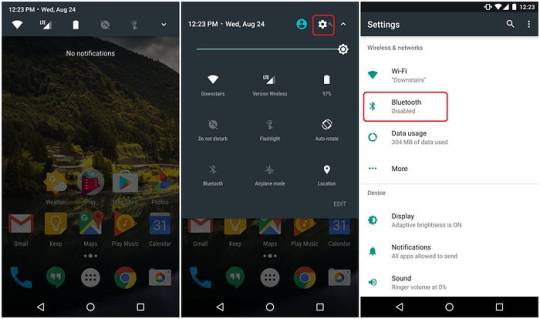
Option 2: Through Bluetooth
Again, you will need to connect your Cricut Explore machine to a power socket using an adapter.
Then, press the power key and hold for some time. The machine will be turned on.
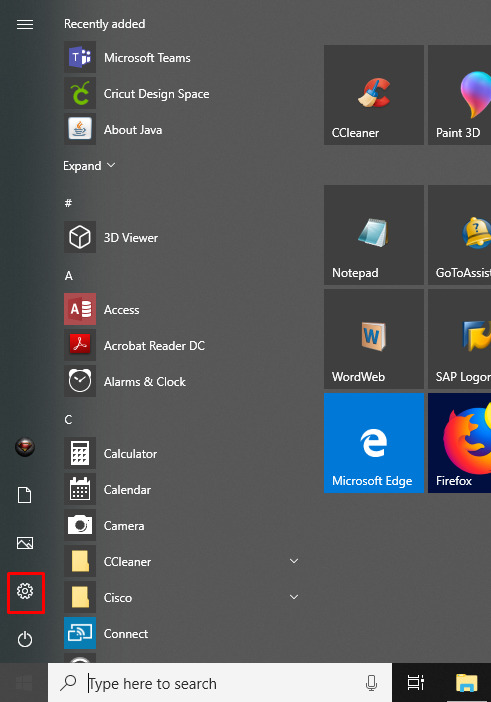
Tap on to the Start menu, then open Settings, and then Devices.

How to Connect Cricut Explore Air 2 to a Smartphone?
If you want to use the Cricut Explore machine on a phone instead of a computer, you can do that now. You can connect your Android and iPad/iPhone to the machine using USB or Bluetooth. Here are the steps you need to follow:
Option 1: Using a USB Cable
Turn on your Cricut machine after you plug it into a power socket.
Use a USB cable and attach it to the machine and your smartphone on both ends.
Your mobile device and the Cricut Explore machine will be paired.
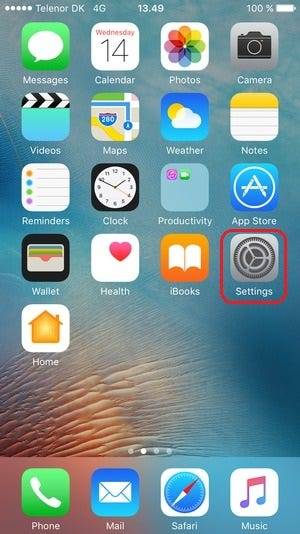
Option 1: Via Bluetooth
In the beginning, plug in the Explore Air 2 machine and turn it on.
In the next step, open the Settings tab on your device.
On the following screen, search for the Cricut model.
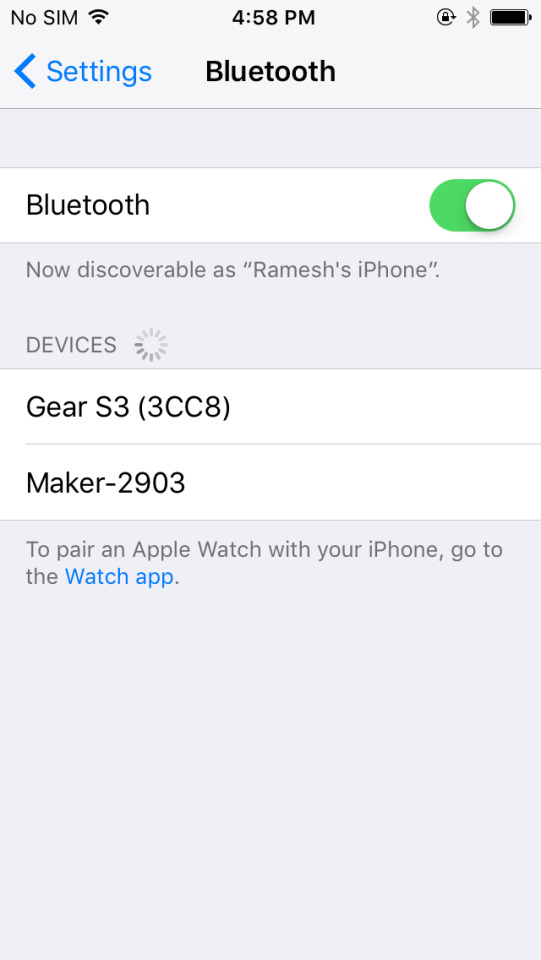
Select your machine, and the connection will be made.
To confirm, open the Design Space app and go to the New Product Setup section. Your Cricut machine appears connected to a device.
How to Download Cricut Design Space?
After you have connected the Cricut Explore Air 2 to your device, you should download the Cricut Design Space app. Here is the process for downloading the Cricut application on your phone and computer.
Here is how you can download the Design Space app:
On Phone
On your phone, go to the App Store and search the Cricut Design Space app.
When you see it, click on Get/Install and wait for the download.
When it is downloaded, open the app and log in with your username and password.
On Computer
Open the browser and navigate through cricut.com/setup.
Next, agree to the Cricut Terms & Policies. Check the box and tick it.
Now, click Download near the app and wait for it to download.
After you download the app, go to the Downloads folder and double-click on it.

Then, agree that you trust the app, and the installation will begin.
When the app is finally downloaded, you can start designing your projects.
After downloading the Cricut Design app, you’ll need to log in with a Cricut account. However, if you have never created an account before, create one now. After creating your Cricut ID, remember your username and password. Start making amazing designs and projects using your Cricut cutting machine.
Conclusion
Now, after reading this post, you have learned everything you need to know about how to set up a Cricut Explore Air 2 on a mobile or computer. You can now easily set up a Cricut machine. For the setup, start by learning the process to avoid mistakes. Begin by connecting Cricut to your compatible desktop or mobile device, and then finish by downloading the Cricut Design Space software. Finally, you can start creating your DIY projects with Cricut.
FAQs
What Basics Do I Need to Setup My Cricut Explore Air 2?
If you want to set up the Cricut cutting machine, there are some basic tools you will need. First, you need the Cricut machine. Along with that, you need some materials to cut, such as paper, cardstock, vinyl, and iron-on vinyl. A Cricut cutting mat is needed to hold the material, and blades are required to cut the material. Many of these tools and supplies come with the Cricut machine, but you may need to buy some separately.
Does Cricut Explore Air 2 Need a Phone or Desktop?
Yes, actually! You will also need either a phone or a computer to work with the Cricut machine. Note that not all mobile devices or desktops are compatible with the Cricut Design Space app. It works with Windows and Mac, and for smartphones, you can use Android or iPad/iPhone. Chromebook devices do not support Cricut machines. Even if your device is compatible, it must meet certain specifications.
Does a Cricut Explore Air 2 Need a Wi-Fi Network?
Wi-Fi is not necessarily required to use a Cricut machine. You can work on Cricut projects without it. However, a stable Wi-Fi network can enhance the machine’s performance. On a computer, a stable Wi-Fi connection allows for smooth operation, but a data dongle will also work. When using a smartphone, a cellular network is sufficient for the machine to work properly.
Source: How to set up a Cricut Explore Air 2
Visit here to know more: Cricut Venture
Pinterest
0 notes
Text
How to Use Cricut Easy Press: A Guide for Iron-on Transfers

The Cricut Easy Press is great for use with traditional heat transfer vinyl. To use this machine, you will need other Cricut machines as well because you can only transfer a design after you’ve made the cut, and for that, you need a Cricut cutting machine. So, let’s discuss the difference between Easy Press and Easy Press 2.
Differences Between Cricut Easy Press and Easy Press 2
The Cricut Easy Press is a first-generation heat press machine that was launched in 2017. Cricut has since launched several other heat press machines. The Easy Press 2 is one of the most important among them. It comes with many updates, but Easy Press has its advantages.
Here are the main differences between the Easy Press and Easy Press 2.
The Cricut Easy Press comes only in one size: a standard size of 9 x 9. Whereas Cricut Easy Press 2 has 3 different sizes. One of them is 9 x 9, which is the same as Easy Press, and the others are 6 x 7 and 12 x 10.
The Easy Press 2 includes a higher temperature capacity, which reaches up to 400°F
The Easy Press 2 heats up 25% faster than the Easy Press.
Easy Press 2 has better edge-to-edge heating, which spreads on the material all over around.
The Easy Press can remember the temperature settings from the last use. Something you could not do in the Easy Press.
Why Do You Need a Cricut Easy Press?
Before you learn how to use Cricut Easy Press, you should know why you need an Easy Press. If you understand its uses, you also know that it is a heat transfer machine, and the same can be done by an electric iron. However, an electric iron will not provide the things that an Easy Press machine will. Here are the reasons why you need Easy Press.
Heat Dispersion
Regular household irons are not made for even dispersion of heat. In iron, heat is focused in the center, but as it moves away from the center, the heat decreases. In the Easy Press machine, the heat temperature is distributed evenly, which is good for the heat transfer of a material.
Temperature and Control Ability

Various materials have many heat transfer needs, so you need a completely different temperature for iron-on than you do for iron-on vinyl. The machine is great at understanding the temperature requirement of a material and can process the exact amount of heat it requires. Also, its heat pressure is easy to control, and it will be good for you if you use it.
Flat and Stable Surface
An Easy Press machine works best when it is used on a flat surface. Therefore, it is highly recommended that a flat surface be used for the heat press. It will help prevent material damage. The Easy Press is a powerful machine that takes care of the material when using it on a surface.
How to Use Cricut Easy Press: 3 Easy Steps
Now, I am going to tell you how to use Cricut Easy Press and print beautiful designs on shirts, t-shirts, and other fabrics:
Step 1: Choose and Cut Your Design
First, you have to choose a design on your Cricut Design Space app. You can select a pre-made design or create a design of your own. Then, the design is cut using a Cricut cutting machine. After that, you can go to use the Easy Press machine.
Step 2: Prepare Cricut Easy Press and Tools
Once you have the design cut out, you can use the Easy Press machine. Before using it, you will need to prepare it. You should place the base material on the mat and heat the machine. Next, adjust the temperature according to the material. You should use the buttons to increase and decrease the temperature. When the heat press is ready, the light turns green, and the machine will beep.
Step 3: Apply Heat and Peel
Once the machine beeps, you can place the design on your fabric along with the mat and apply heat from the heat press machine. You have to keep pressing for about 10 seconds, and then you can release the machine. Now, wait until the material cools down, and then you can peel off the protective sheet and reveal the design. Your beautiful design is done.
Conclusion
Now, you have learned how to use Cricut Easy Press to create beautiful designs on your favorite fabrics and more. Using the heat press machine is easy, and you can do it in a few quick and easy steps. To use the Easy Press machine, you must first cut out a design on the Cricut cutting machine and then prepare the Easy Press machine. After you prepare the machine, you can put the design on your fabric and apply heat to it. After the temperature decreases, peel the protective sheet down, and your design is ready.
FAQs
What Can I Make with My Cricut Easy Press?
The Easy Press machine is useful for all Cricut users. With the help of this machine, you can create multiple things on your own. It will help you make beautiful projects like shirts, coasters, masks, wooden signs, banners, belts, etc. With this heat press machine, you can apply pressure on almost any material cut on a Cricut machine and then stick it where you want.
Do I Need a Cutting Mat for Cricut Easy Press?
Yes, you do! To use the Cricut Easy Press machine, you must use a Cricut mat. If you apply heat to your material, your design may get messed up. The heat of the machine can burn the design, material, or even your fabric. It is this mat that protects them from the high temperatures produced by the machine. The mat is made of a heat-resistant cover, so using the Easy Press is a must.
Do I need a Cricut Easy Press, or can I use an iron?
To be honest, if you just need to use Easy Press once in a while, you can do without the machine. You can use a regular household iron, and your work will be done. But using a regular iron has its risks. It will not give you your desired results. The outcome may not be what you expect. The design may not last long. So, if you want a good and clean finish for your designs on your materials, you must buy an Easy Press machine.
Source: how to use Cricut easy press
Visit here For More Information: Cricut.com/setup
Pinterest
0 notes
Text
How to Connect Cricut to Mac: A Stepwise Guide
I’m not sure whether you know how to connect Cricut to Mac. But if you are a beginner, this tutorial will be the perfect guide for teaching you how to connect your Cricut machine to your MacBook hassle-free.
Since the day I started crafting on Cricut, I have changed several devices, from a Windows computer to a Mac and then the latest version of Mac. Due to this, I had to connect my Cricut machine to these devices again and again. It helps me to master this connection process.
Today is the day I can teach you how to connect your Cricut to your compatible device. However, I will only cover connecting with a Mac in this guide. So, if you also expect the same, let’s get started!
Minimum System Requirements to Connect Cricut to Mac
Before I delve into how to connect Cricut to Mac, let me tell you which MacBook is suitable for you. A compatibility check is a must; otherwise, it will cause an issue when you run Cricut Design Space. Below, I have mentioned the requirements for checking on your system before connecting it to your Cricut machine. It will also be helpful when you will download the app on it.
Here’s what you need on your Mac computer:
Ensure you use the latest operating system, such as macOS 11 or later.
Your Mac should have a 1.83 CPU.
The RAM size is 4 GB.
The free disk should be 2 GB.
A MacBook with built-in Bluetooth is a plus point. However, if you prefer a wired connection over a wireless one, your Mac must have a USB port.
The screen resolution should be 1024px x 768px.
How to Connect Cricut to Mac via Bluetooth and USB?
Connecting Cricut to Mac is simple. However, it also depends on how you want to connect it to your Mac. For example, there are two ways to connect. The first is a USB connection, and the second is a wireless connection using Bluetooth. A USB cord provides a stable connection, whereas a wireless Bluetooth connection gives you peace of mind because there are no untidy wires around. Let’s delve into the steps below:
Method 1: Connect Cricut to Mac via a USB Cord
In order to connect your Cricut machine to your MacBook using a USB cord, you have to follow the steps below:
First, you need to switch on the machine by plugging its power cable into a wall outlet.
After that, turn on the MacBook operating system.
Then, grab a USB cord and plug one end into the machine and the other into the computer.
Once you are plugged in, your Mac will be connected to your Cricut machine.
Now, you are ready to use the software. Download and install it, then start crafting hassle-free.
Method 2: How to Connect Cricut to Mac via Bluetooth
If you want to know how to connect Cricut Bluetooth to Mac, follow the steps given below:
Connect Cricut to the wall outlet and switch it on. At the same time, you have to turn on the MacBook.
Then, you will need to navigate to your Mac’s Apple menu.
Now, you should select System Preferences.


Next, you will need to turn on the Bluetooth.
Also, hold on and let your device find your Cricut model, which you have placed closer to your Mac.
If it has yet to be detected, make sure the distance between your Cricut and Mac is at most 15 feet.
When the device is detected, click on it and then hit the Pair button to connect.

Did you understand how to connect Cricut to Mac? If so, congratulations on successfully connecting your Cricut. Now, you are ready to set up your Cricut without any problems.
FAQs
Question 1: Can I connect all Cricut machines to Mac via USB?
Answer: Although Cricut machines can be connected using a USB cable or Bluetooth, you can not connect your Cricut Joy through a USB cord. This Cricut Joy model doesn’t have a USB port, so you can’t connect it using a USB cable. There is only one option: wireless Bluetooth connection.
Question 2: Do I need a Bluetooth adapter to connect Cricut to Mac?
Answer: If your computer doesn’t have a USB port, you might need to use a Bluetooth adapter to connect a Cricut Explore or Explore One machine to a Mac system. Otherwise, you will always have the option to connect via a USB port or cord, which provides a stable connection.
Question 3: What do I need to connect Cricut machine?
Answer: If you are connecting to a Cricut machine, you will need a wireless Bluetooth adapter to run your machine and perform every operation you want. Otherwise, a wired connection is also the best option to form a stable connection to the machine without any hassle.
Source: how to connect cricut to mac
Visit here For More Information: Cricut.com/setup
Pinterest
0 notes
Text

Cricut machines, including models like the Cricut Maker, Cricut Venture, Joy, and Venture, offer unparalleled crafting potential. Whether you're a novice or a seasoned crafter, these devices turn your imaginative concepts into tangible creations. Get started by Visiting Cricut.com/setup to access the Cricut Design Space app, guaranteeing your machine is primed for your artistic endeavors.
0 notes
Text
Easy Cricut Projects to Sell for Beginner Crafters
Want easy Cricut projects to sell? I’ve got your back! In this blog, you will find a list of project ideas that are a cakewalk. So, you only need to explore the projects you want to create.
I made these 7 crafts in February 2024 when I was up to nothing and had enough time to create DIY projects so that I could sell them online. So, I started crafting using my Cricut machine. But this time, I also called one of my best friends, John, who used to study together at school. We always worked on a project together. He also enthusiastically supported me, and the results of working with our friend are commendable.
Want to see what sorts of projects we have created so far? Check out this blog and find unique Cricut projects to sell.
1. Acrylic Keychains

It is one of the best easy Cricut projects to sell and one that you will want to create with ease. In these beautiful keychains, you can add various types of embellishment. Keychains should look good as they are the most widely used daily. Try these easier crafts projects and use your Cricut cutting machine to create them in no time. Besides, leather or wooden material was used to create these keychains. However, I have used an acrylic material that you can also use if you want.
2. Water Bottles

Who won’t love a personalized bottle like this? John is adept at digital marketing, so he knows our target audience. He figured out that custom bottles would be one of the easy Cricut projects to sell. He also discovered that more than 50% of customers buy custom bottles. So, we planned to create these projects in huge numbers so that we could sell them and make money hassle-free
.
3. Cosmetic Bags

Keeping cosmetics items can be daunting, especially when traveling frequently. I created this for my mom, who travels a lot on her business trip. She said — this is one of the most wonderful gifts I could ever receive.
Whatever, I can create a lot of gifts like this. Thus, if you want to gift something to someone, you must try these cosmetic bags. You can also add a receiver’s name to make it personalized.
4. Welcome Signs

If you want something like easy Cricut projects to sell, you must consider these welcome signs. People love to add decorations to their homes, so they often look for projects like this. You can easily help them elevate their home with these beautiful yet simple welcome signs. Believe it or not, it can be one of the best-selling items in your digital shop.
5. Home Decor

Here’s another home decor item. A wall decal is one of the easiest things that I have made for decorating my home. I have added many such designs to my Amazon shop. Yes, people want premium-looking home wall decals that elevate their room and every corner of their house. So what are you waiting for? Create this item with unique designs and list them on your online shopping platform.
6. Apparel
I made this T-shirt while learning to transfer the design to fabrics. I mainly ordered a blank T-shirt from Etsy and counted this vinyl design. For this T-shirt, I used Iron-On in three different colors and had to cut them separately by changing the material. To make it easier, you can use the exact vinyl color. I recommend using white-colored vinyl, as it looks great on darker clothes.
7. Stickers

Do you wonder about creating stickers on Cricut? This is one of my easy Cricut projects to sell. You might need the printer to print and cut the design, then cut it further on your Cricut. Using Cricut machines like Cricut Joy or another cutting machine, you can get customized stickers. Since there are various stickers to make and sell, you can try this simple one. The material I needed for this sticker is Iron-On, which you can easily get from Cricut’s official site.
FAQs
Question 1: What are unique Cricut projects to sell?
Answer: Number of ideas you can try to make on your Cricut. They are easier and require less effort in making these projects. So, if you are looking for some crafts that are unique and for the deal, then you will need to see the following list of projects:
Stickers
Leather earrings
Keychains
Animal shirts
Apparel
Tumblers
Coasters
Signs
Cake toppers
Question 2: Which Cricut do I need to create all types of projects?
Answer: The Cricut Maker 3 is the most robust and versatile machine in Cricut’s lineup. This machine can cut over 300 materials, including Smart Materials that don’t need a cutting mat. Although you can use a cutting mat for most projects, it supports Smart Materials so that you won’t need it. However, you may need to buy accessories, such as a cutting mat and roll holder.
Question 3: How to make Cricut coasters with Cricut?
Answer: In order to make Cricut coasters, you will need to use adhesive vinyl, transfer tape, and wooden coasters. You can also find a pre-made design from Cricut Design Space. Lastly, you must have a compatible device with the Cricut app installed. Once you have ensured these, follow the steps below:
Create or choose a Design on Cricut Design Space.
Send the design to your Cricut and cut it on adhesive vinyl.
Then, apply the vinyl design to your coasters using transfer tape.
Now, smooth out any bubbles present in the project.
Visit here Fir More Information: Easy Cricut Projects to Sell
Cricut Venture
Pinterest
0 notes
Text
8 Incredible Beginner Cricut Projects for New Crafters
Hey there! Are you in search of beginner Cricut projects? There was a time when I was at your place😁, looking for the answer to the same questions. Then, I hardly used to get an easy design I could start with. So, I used to get references from the blog but never copied the same. Using the Cricut Design Space app, I made some simple designs by adding my creative touch.
One of the biggest takeaways from creating these easier designs was that I learned almost all the features of the Cricut app, like which tools are used for what purpose. This gave me confidence and made me an expert in crafting. Today, you will explore the top 8 Cricut projects for beginners. So, what are you waiting for? Let’s get started without any further delay!
Heart Print Hoodie

I recently came up with an interesting idea: I would create a T-shirt with geometric graphics. Yes, adding a simple kind of design is boring now! So, I first found the design on the internet and did some modifications to it. Yes, modifications like resize and color are needed depending on your choice of color and the size of the T-shirt you are going to work on. Rest, Cricut has your back, and this is going to be one of the best beginner Cricut projects!
Phone Case

I love personalized phone cases. Besides, I also prefer some kind of unique pattern. If you love personalized phone cases, you can do so with Cricut. Yes, the Cricut machine can help you create or cut vinyl designs that you can place on your phone case. It will literally look great when you use your own handmade design on the case. Must give it a shot!
Leather Keychains

If you want something like beginner Cricut projects, you have an endless option for easy projects you can create even if you just got your new Cricut for the first time. Yes, Cricut has designed its machine and software to be easy to use so everyone can use them hassle-free. Now, you need to simply cut the leather into simple strips and add the text or anything that you want.
Paper Card

Want to make your loved one feel special? Try making this simple card that says everything that you want to say. I really love the font style that I selected for the word LOVE. Just imagine if you write your loved one’s name in contrast. Isn’t that going to impress your partner? Now, use Cricut to make your love life more robust than before.
Wooden Sign

Want to make your home more welcoming? Try this wooden home sign. Don’t worry about the material; Cricut can cut and engrave wood without hassle. All you need to do is get ready with your text design on your Cricut Design app. Modify according to the size of the blank that you have chosen. Once done, you can get started with your beginner Cricut projects in one go!
Pillow Cover
Why not create a pillow with a catchy quote? That one is my favorite: HOME IS WHEREVER I’M WITH YOU. It sounds romantic, doesn’t it? Add such a quote and select any font that you like. Cricut Design Space can offer you many such fonts without any issues. So, what’s the issue — you are not required to waste hours creating those intricate designs. Just type, and you are done! 😃
Jar Labels
If you are looking for easy-to-make beginner Cricut projects, try jar labels. Yes, that can be one of the easiest and most valuable projects. I made this for my kitchen jar as I was finding it difficult to figure out the whereabouts of the ingredients. Also, I created this using a simple paper, and you know how to create texts — it’s your Cricut Design Space. This software has an intuitive interface, making it user-friendly. So what are you waiting for? Get started today!
Custom Water Bottle

I love Customized bottles. Do you? If so, you should give it a try once! These types of beginner Cricut projects are always at the top of the list. If you want to work on Cricut projects for beginners, consider this. I used vinyl materials and worked on the design myself. Anyone interested in creating such a design can take a reference and try it once!
FAQs
Question 1: How to make a DIY home sign using Cricut?
Answer: In order to make your DIY home sign using Cricut, you have to follow the steps described below:
Gather your important supplies.
Create a design or add text you like.
Choose the material and place it on a cutting mat.
Cut the design using your Cricut cutting machine.
Weed out the design.
Transfer the design to your blank.
Question 2: What supplies do I need to make beginner Cricut projects?
Answer: It generally depends on what sorts of projects you are working on. However, I can tell you about some standard supplies used for almost every type of project. To know what those supplies are, have a look at the list below:
Cricut cutting machine
Cricut mat
Cricut basic tool set
Scissors
Cricut software installed on your device
Question 3: What to use for making a personalized water bottle with Cricut?
Answer: Creating a personalized water bottle with Cricut is always fun. However, you will need the following items in order to create a customized water bottle:
Cricut smart cutting machine
Cricut Scraper
Cricut Smart Vinyl Permanent (Choose colors like Purple & Champagne)
Hand towel
Cutting mat
Cricut Weeding Tool
Cricut Transfer Tape
Water bottle (Black)
Scissors
Question 3: Which Cricut machine is the best for beginner crafters?
Answer: Cricut Explore 3 is your answer! Yes, you heard that right. This machine is a mid-range model available in Cricut’s lineup. Anyone who is a beginner can start with Cricut Explore 3, as it is the latest in the Explore family and offers almost all the features that beginner crafters need in their projects.
Source: beginner Cricut projects
Visit here For More Information: Cricut.com/setup
Twitter
0 notes
Text
Cricut Explore Software Download: Quick and Easy Guide
Hey, Cricut users! Are you here to learn about the Cricut Explore software download? If so, I’ve got your back! Downloading and installing the Cricut Design Space software on various computers and operating systems is a difficult task. But I think this is only the case for beginners. Hence, they need a simple guide to understand so that they can download the app on their compatible devices. I am here to teach the same method to beginner Cricut users.
However, users need to remember one thing before downloading the Cricut software on their devices. These are the system requirements, which I have explained briefly. As an experienced crater, I will teach you how to download the Cricut app on Windows, Mac, Android, and iOS. Let’s get started!
Cricut Explore Software Download on a Windows Computer
You can download the Cricut software hassle-free on Windows. The compatible computer to run the Cricut Design app on your Windows computer is Windows 10 or later. You will also need an Intel Dual Core or equivalent AMD CPU with 4 GB of RAM. If your system meets these requirements, you are ready to download the app.
Here is how to download the Cricut app on your Windows PC:
Power on the computer device.
Then, you need to launch an internet browser.
Now, you have to copy & paste the URL design.cricut.com on the search bar.

4. After that, you need to click on the checkbox to agree to Cricut’s Terms of Use and Privacy Policy.
5. Then, hit on the Download tab.
6. When it is downloading your software, you might notice some changes to your screen. These changes may vary for every browser.
7. Once your file has been downloaded, move it to the Downloads folder from the File Explorer.
9. Next, select Yes to allow your app to make some changes to your PC.

11. Finally, your Cricut Design Space software is downloaded.
Cricut Explore Software Download on Your Mac Computer
To download Cricut software on a Mac, you need to know the system requirements, such as macOS 11 or later. Make sure you have a 1.83 GHz CPU and 2 GB of free disk space. When these requirements are met, it will be easier to run the Cricut Design app smoothly.
Here is how to download the Cricut software on Mac:
In the beginning, start your MacBook.
Launch an internet browser you use on it (I am using Google Chrome here).
After that, you have to go to the browsers.
Navigate to the browser’s search bar and type design.cricut.com.
Then, check the checkbox to accept Cricut’s Terms of Use and Privacy Policy.
Next, you should select the Download button.
Move to a page where you need to choose the file location. This is where you will download your file.
Finally, your downloading starts from here.

9. Once the download is complete, move to the Downloads folder.
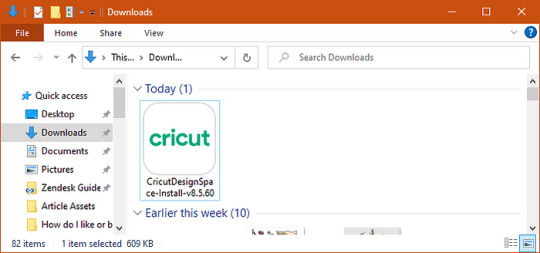
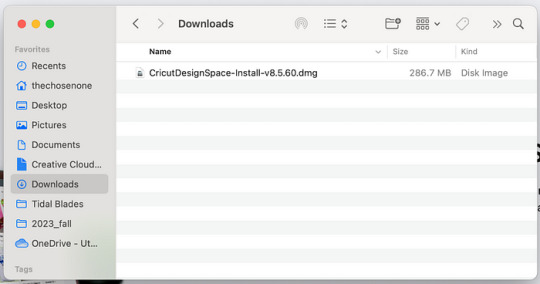
10. After that, you will see a .dmg file in your Downloads folder.
11. Then, you will notice the .dmg file; double-click on it to start the installation.

Cricut Explore Software Download on Your Android Mobile
Android users need to have Android 10.0 or higher. The Cricut software is also compatible with mobile devices and tablets. Despite this, you can easily download the app if you have a 2 to 3 Mbps download and upload speed.
Here is how to download the Cricut app on Android phones:
11. On your Android phone, go to your home screen.

13. Then, you have to type Cricut Design Space on the search bar.
11. Next, in the below result, you will find a Cricut software icon.
12. Click on the app icon.

14. Once you have installed it, you can find this app on your home screen.
Cricut Explore Software Download on an iOS Device
Being an iOS user, I always use my Cricut app on the latest device. However, according to Cricut, iOS 15 or later is recommended. If you have 2–3 Mbps download and upload internet speed, you are good to go!
Here is how to download the Cricut software on iOS smartphones.
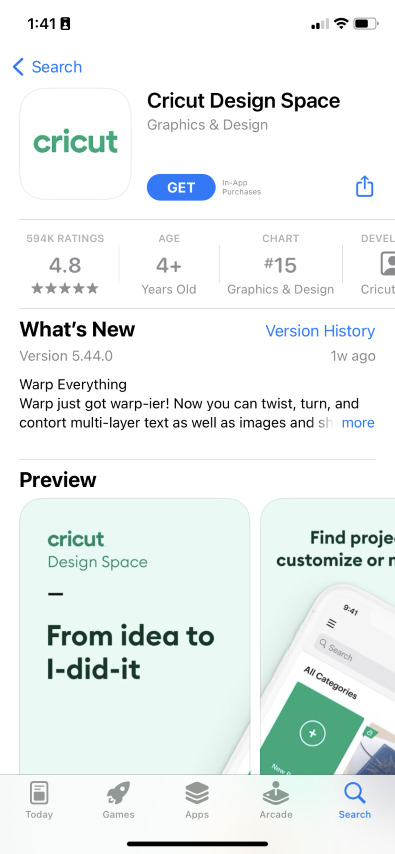
On iPhone or iPad devices, launch the App Store.

2. Then, head to the search bar and type Cricut Design Space.
3. Now, you will see a Cricut Design app.
6. Finally, you can start setting it up smoothly.
FAQs
Question 1: What is Cricut software for desktops?
Answer: The Cricut software is editing or designing software for Cricut users that supports Windows and Mac hassle-free. It is a companion app that runs the Cricut machine. This software is initially required to set up the Cricut. The software is also a platform for creating amazing craft designs easily and quickly. It offers free resources, including images, ready-made resources, and much more.
Question 2: How can I use Cricut Design Space without the internet?
Answer: Except for downloading software, you can use the Cricut machine to work offline anytime. While being offline, the internet is not required, and hence, you can create any designs easily and quickly. However, you might need the internet when you want to save your project or access some online resources.
Question 3: Can you use Cricut without a computer?
Answer: No, you cannot! Actually, without a computer or mobile device, you can’t use a Cricut machine. However, the machine is run with the help of companion software, which is downloaded to your computer and mobile app. To run this app, you need either a computer or a phone. In short, you can’t use a Cricut machine without a computer.
Source: cricut explore software download
Visit here For More Information: Cricut.com/setup
You tube
#cricut explore software download#download cricut software#cricut design space software#Cricut Explore Air 2#Cricut.com/setup
0 notes
Text
Cricut Design Software Download: Full Installation Guide
Welcome to this complete guide on the Cricut Design software download! Whether you’re a Mac or Windows user, I will walk you through the basic steps to download the Cricut software. All you need is a little patience and a willingness to follow along.
Ever since I got my Cricut machine, I have downloaded the Cricut Design Space software to use it. But earlier, I was using a Chromebook, and later, I found out that I can’t use it on a Chromebook. For this, I had to visit Cricut’s official website, and then I came to know about the system requirements. Luckily, I had an old Dell laptop with Windows 10 installed, which I am currently using.
As a crafting expert, I would like to teach you how to download Cricut Design Space. This software allows you to create, edit, modify, and much more. However, this is the software that will enable you to control or operate your Cricut machine. Let’s get started!
Minimum System Requirements to Download Cricut Design Software
Checking system requirements before the Cricut Design software download is important. You can’t just jump to Cricut’s site and download the app onto your desktop. This is not the right way as it can lead to error, resulting in performance issues, system inability, and other related issues. I check it every time before installing any software, be it the Cricut app or others. Hence, I suggest you check the following needs of your desktop that I have desired below for both Mac & Windows:
For Mac
Operating System — Windows 10 or later (64-bit)
Disk — 2 GB free
A USB port or Bluetooth is required
RAM — Minimum 4 GB
CPU — Intel Dual Core or equivalent to AMD processor
Display — Minimum 1024px x 768px screen resolution
For Windows
Operating System — macOS 11 or later
CPU — 1.83 GHz
A USB port or Bluetooth is required
Disk — 2 GB
RAM — Minimum 4 GB
Display — Minimum 1024px x 768px screen resolution
Cricut Design Software Download on a Computer
I have used both computers, so I know how to download Cricut Design Space on Mac & Windows. So, if you are a Windows user or Mac, you can simply learn to download the software by following the steps below:
For Windows
In the beginning, start with turning on the Cricut machine.
Then, plug its power cable into the wall outlet.
Now, navigate to any compatible browser — Google Chrome.
On your browser, visit the URL design.cricut.com.
Next, you will be moved to a new page where you have to select a checkbox.

You need to accept the T&C, go forward, and click the Download button.
Here, click on the Download tab to begin the Cricut download.
As the downloading begins, you have to wait until it is fully downloaded.
Afterward, you should head to the folder in your file explorer where you have downloaded it or not.
In your file explorer, go to your Downloads folder and verify it for downloaded files.
Double-click on the file you have downloaded and start the installation.

For your Cricut installation, you will have to follow the illustrated screen prompts.
For Mac
To get started, switch on your computer.
After that, you need to use an internet browser on a Mac.
Next, you have to use the URL design.cricut.com on the search bar.
Follow the simple-to-understand related instructions on the display and get the app.
When you have finally downloaded the Cricut Design Space, navigate to the folder where you downloaded your .dmg file. By default, it will be saved to your Downloads folder.
Following this, you need to double-click on the .dmg file to install it.
In the end, drag a Cricut icon to the Applications folder. It will eventually download your Cricut software to your Applications folder.

Finally, you have learned Cricut Design software download on Windows or Mac. Before that, I also showed you the minimum system requirements for downloading the app.
FAQs
Question 1: Do I need internet access to download the Cricut app?
Answer: Yes, you need the internet to download the Cricut software. To do this, you have to go to an internet browser. As you know, an internet browser requires an internet connection to open a website. In short, you will need internet access to download the software on your computer or phone.
Question 2: Why do I need to download the Cricut application?
Answer: There are many benefits to downloading the Cricut software, such as the ability to create designs from scratch or use a pre-made project. The software is also used to set up your Cricut cutting machine. Using this software, we can easily update the machine’s firmware, and the timely update of software keeps it up to date with new or latest features, ensuring a seamless design experience.
Question 3: Do I need a computer for the Cricut Design software download?
Answer: Not necessarily! Computers can be used to download files, but it is not always necessary. For example, if you want to use your Cricut on your Android mobile phone, you can navigate to your Play Store to install the app. Similarly, if you are an iOS user, just go to the App Store to install the same Cricut Design app.
Source: Cricut Design software download
Visit here For More Information: Cricut.com/setup
Cricut Explore Air 2
0 notes
Text
How to Connect a Cricut Explore Air 2 to Computer/Phone?
Hey, my lovely readers, I have some information for you all. I finally completed my art collection a few days back by adding my favorite crafting machine. Yes, you guessed it right! I bought the Cricut Explore Air 2 along with its bundle and supplies. You know how much I love this Cricut model because of its high-tech technology and ability to cut at least 100+ materials easily.
Ever since I added Explore Air 2 to my collection, I have been jumping around my house with excitement to get started with the machine. The most important thing I need to do to use this machine is connect it to other compatible devices. If you are curious about how to connect a Cricut Explore Air 2, then you should check out this blog.
How to Connect a Cricut Explore Air 2 to Windows?
You all know how much I love crafting, so I am excited to learn about connecting this Cricut machine to Windows. Below are the steps that will assist you in connecting both the devices easily without any hurdles:
Start the method by placing your Explore Air 2 on a flat surface.
Now, place both devices at a distance of 10–15 ft and turn it on.
Next, open the Start menu and tick the Devices option.

Following this, check that the Bluetooth is on and proceed to Add Bluetooth or other device option.
If the Bluetooth is off, drag the toggle to the right side, and it will open.
After doing that, you need to wait until the scanning process begins.
Select the Cricut model from the list, and the connection process will start.

Finally, your machine is connected to Windows on the Cricut Design Space page.
This section might have helped you understand how to connect the Cricut Explore Air 2 to Windows. If you are an Android user, you are most welcome to look at the next part of the blog.
How to Connect a Cricut Explore Air 2 to Android Devices?
After connecting this Cricut model to a Windows computer, it’s time to change your way and learn about connecting Explore Air 2 to Android devices. If you are getting confused about how to connect them, then go through the below steps:
Repeat the first and second steps that you did while connecting the computer.
Further, open the Settings tab and tick the Bluetooth icon.
Now, check that your device’s Bluetooth is on; if it isn’t, turn it on.
After a few seconds, you will see Available Devices on your screen.
Next, tap on your Cricut model, and your connection will be complete.
You can easily do it if you are an iOS user and want to connect with this cutting machine. To do so, you must pay attention to the section below.
How to Connect a Cricut Explore Air 2 to iOS Smartphones?
The details below will make connecting the Cricut Explore Air 2 machine to iOS devices more effortless and will help you make more future projects.
The first and second steps of connecting both devices are the same.
Now, navigate to Settings and enable Bluetooth on your device.
If the Bluetooth is off, turn it on, and a list will appear on your screen.
Now, tick on your Cricut model name and hold on until the connection process is ongoing.
After a few minutes, open the Cricut Design Space app, and your machine will be displayed as connected.
With the help of this blog, connecting this ultimate DIY cutting machine with PCs and smartphones seems less difficult and a child’s play. You can now start making crafts at any time of the day.
Frequently Asked Questions
Question: How Do I Set up My Cricut Explore Air 2 on PCs?
Answer: To set up the Cricut Explore product on PCs, you need to follow the steps shared below:
Begin by plugging in your Cricut cutting machine and powering it on.
After that, pair it up with your PC via Bluetooth or USB cable.
Next, download and install the Cricut Design Space app on your device.
When the app is installed, create your account and follow the instructions.
After completing the setup, you must perform a test cut on the material.
Question: What Projects Can I Make With Cricut Explore Air 2?
Answer: To do specific projects with Cricut Explore Air 2, ensure your device comes with the Cricut Design Space app and runs smoothly. Then, connect your cutting machine to PCs and smartphones and start making the project. Some of the projects that you can make from this machine are:
Birthday cards
T-shirts
Gift tags
Leather earrings
Wreath
Ornaments
Question: How Can I Connect Cricut Explore Air 2 to My Mac?
Answer: With the help of the below steps, you can easily connect your Explore Air 2 to Mac:
Check that your Explore Air 2 is on and placed within 10–15 ft from Mac.
Now, move to Settings and turn on your Bluetooth (if it is off).
After that, tap on your model name from the list present on your screen.
Open Cricut Design Space and check whether a connection has been built or not.
Source: Cricut Explore Air 2
Visit here For More Information: You tube
Pinterest
#Cricut Explore Air 2#Cricut.com/setup#cricut explore 3#cricut maker bundle#Cricut Design Space#design space cricut#ipl2024
0 notes
Text
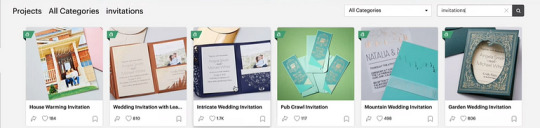
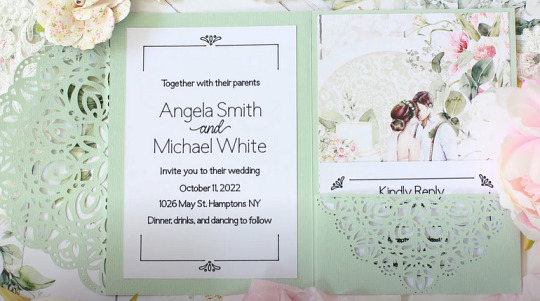
How to Make Cricut Wedding Card: 4 Easy Steps
Are you getting married but can’t decide which Cricut wedding card will be best? I was hoping you wouldn’t stress as I will help you by teaching you how to make them out of the Cricut machine. Weddings are all about reuniting with close ones, singing their favorite songs and dancing.
I have been in the crafting business for the past two and a half years and have done tons of DIY projects for various events. But this is the first time I am going into custom-made wedding invitations. Thanks to Cricut machines, invitations will be a lot easier and a memorable craft for me.
Every crafter will agree that to make any craft out of a Cricut machine; they must have a specific set of tools to help them give the project the perfect shape. Follow the blog to learn in-depth about making personalized invitations.
Step 1: Creating a Cricut Wedding Card
Step 2: Cutting Your Design

Step 3: Assemble Your Materials
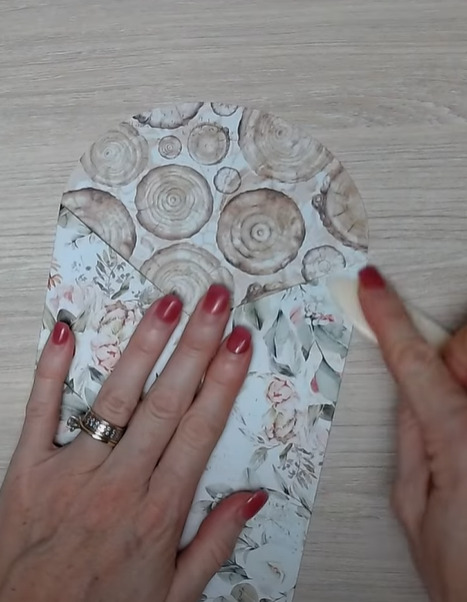
Step 4: Share Your Final Wedding Invitation
Conclusion
See how easy it was to make a Cricut wedding card with the help of Cricut machines. Apart from this DIY craft, you can also do other projects for your D-day with this cut-die machine within a few minutes. Projects that it can make are wine glasses, welcome signs, coasters, table runners, ring boxes, and so much more. You must be patient and focused while working on these projects using the Cricut craft machine.
Frequently Asked Questions
Question: Is Cricut Worth Making Wedding Crafts?
Answer: Absolutely; Cricut is the ultimate cutting machine you can prefer while making any craft for your wedding ceremony. This craft product can cut any material, tissue, or leather within a few seconds. Besides that, Cricut comes with designing software that helps make the design easier.
Question: What Cricut Accessories Do I Need to Make My Invitation Card?
Answer: The total number of Cricut accessories that will help you in making invitation cards more easily are as follows:
Cricut machine
Design Space account
Cricut cutting mat
Cricut material
Brayer tool
Scoring stylus
Strong adhesive glue
Glue gun
Question: Can I Make Money By Selling Cricut Wedding Invitations?
Answer: You can make money by making and selling DIY wedding invitations to your customers. To start your own business, you need to learn every detail about Cricut supplies and how they can be used to make cards. Moreover, you need to be very careful while making crafts and be aware of the customer’s expectations.
Source: Cricut wedding card
Visit here for more Information: Cricut.com/setup
cricut explore 3
#Cricut wedding card#Cricut.com/setup#cricut maker bundle#cricut explore 3#design space cricut#Cricut Design Space
0 notes
Text
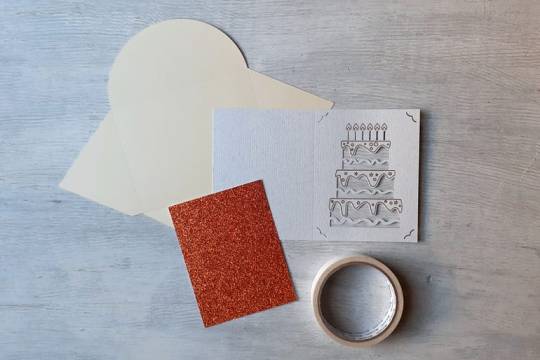
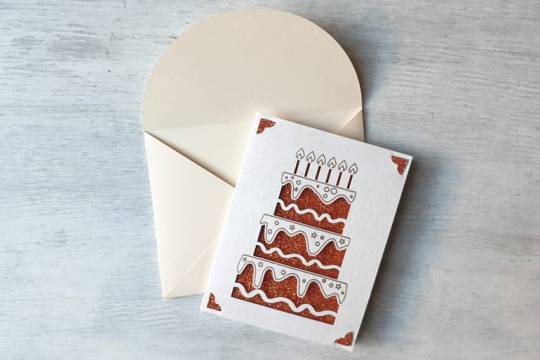
How to Make Cards on Cricut Maker: A Complete Guide
If you haven’t tried creating stunning cards with your Cricut Maker machine yet, now is the time to start! This guide will show you step-by-step how to make cards on Cricut Maker. It is perfect for beginners and covers everything you need to know to get started with card-making.
When I first got my Cricut Maker, I felt a little daunted by the idea of making cards. But after learning the process, I made over five cards in just one weekend, and it was a blast! Over time, I have discovered a lot of tips and tricks for card-making with Cricut, and I will be sharing them all with you in this guide.
I will cover how to use Cricut Design Space to design your card, what supplies and tools you'll need, and step-by-step instructions for making the card. Just follow along with the guide until the end, and you will be all set!
Step 1: Supplies and Tools Required
Here are the main supplies you will need to create cards with your Cricut Maker machine:
● Cricut Guide
● Cricut Maker
● Cardstock (white, copper glitter, and cream color cardstock)
● standard grip cutting mat
● Adhesive or double-sided tape
● Cricut Fine Point Tip
● Cricut Design Space
Now that you have collected all the essential tools and materials to make your Cricut paper card at home let's move on to the process of creating this project.
Step 2: Upload an SVG Card Design to the Cricut App
As explained below, you have to use the Cricut app to learn how to make cards on Cricut Maker.
First, download and unzip an SVG of the card design, then open the Cricut software.
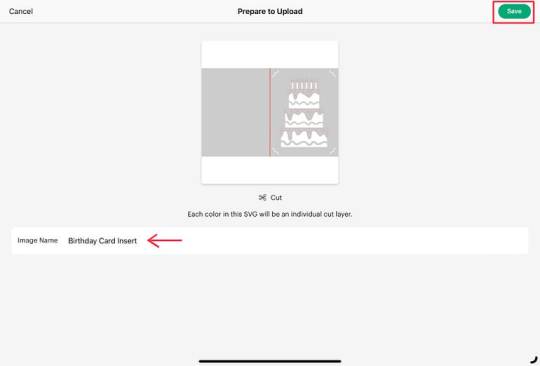
After completing the process of uploading an SVG card design in the Cricut Design app, now proceed to the following step.
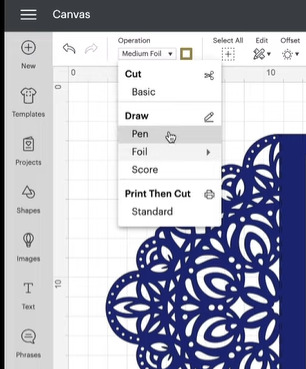
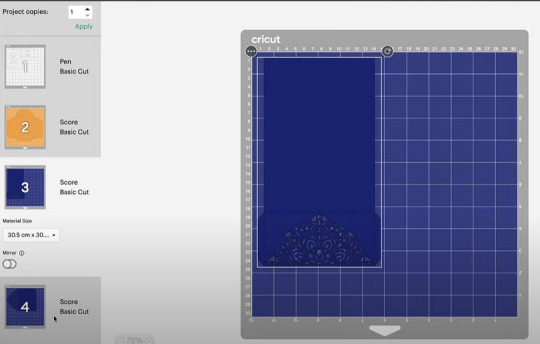
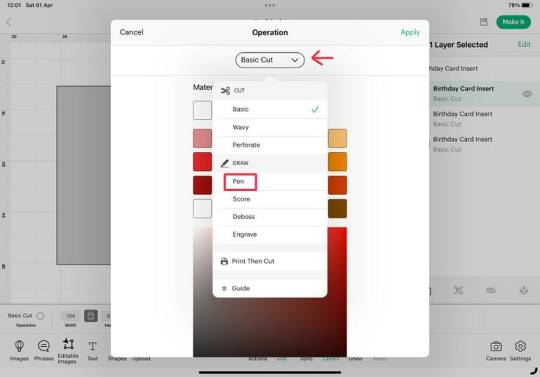
Step 3: Change the Cut Score and Pen Settings
Let’s make some changes before sending your design to cut.
Tap the Layers panel and select the title that shows the cake tires. After that, open the Edit menu and then choose the Basic Cut>Pen option from the drop-down menu.
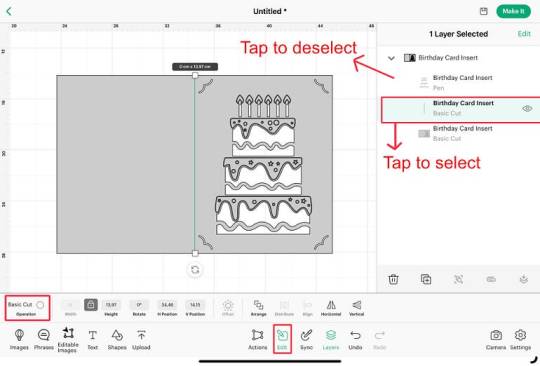
3. Select the entire design and tap the Attach button from the Layers panel. Once everything is in place, click Make It.
Once you have adjusted your settings according to your DIY project, you can proceed to the next step.
Step 4: Cut the Card Design on Your Cricut Maker
To learn how to make cards on Cricut Maker, follow these steps to select the appropriate cut settings and load materials onto your machine.
After tapping the Make It button, select the Mat option if prompted.
2. After that, select the option Browse All Materials and search for cardstock.
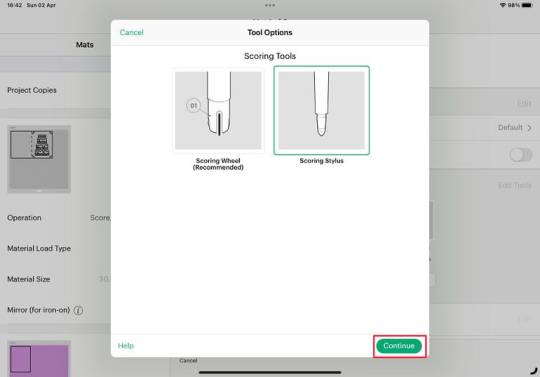
4. Follow the prompts to load the stylus into Cartridge A and the Fine Point Blade into Cartridge B.
5. Insert the cardstock onto the cutting mat and press the “C” button to start cutting.
After cutting the card design on your Cricut Maker machine, proceed to the next step to complete the procedure for this project.
Step 5: Assemble the Card
So far, I have almost covered how to make cards on Cricut Maker. Let’s finalize the card. First, fold the card right side out from the score line.
Apply the red cardstock on the card.
2. Use the Cricut trimmer to cut cream-colored cardstock to create an envelope.
Final Words
The Cricut card project is incredibly popular for different occasions, like birthdays, weddings, anniversaries, etc. Anyone with a Cricut machine will likely want to make cards. If you’ve followed this guide from the beginning, you now have a good idea of how to make cards on Cricut Maker. Keep practicing these instructions to create card projects on Cricut Maker like a pro!
Frequently Asked Questions
Can you make a card on Cricut without a mat?
Yes, you can make your favorite card without a mat on Cricut Maker; you just have to follow the instructions below.
First, insert the desired card design into the Cricut Design Space.
2. After that, select the size of the card design and click on the Make It option.
3. Then, choose without a mat, and then Browser All Materials & Cardstock.
4. Finally, cut out the design with a Cricut Maker and assemble it.
How do I write on a card with Cricut Maker?
You can try following these steps to write on the card with Cricut Maker:
Open Cricut Design Space, select the font and type your text.
2. Change the Material Load Type to On Card Mat and select the material.
3. Insert the Cricut pen into clamp A and start writing.
Can I use the Print Then Cut function on Cricut Maker to make cards?
Yes, the print-then-cut function on the Cricut Maker is perfect for creating colorful designs on your cards. Simply create your design in Cricut Design Space, select Print, then Cut, and print out your design. After that, cut it out and assemble the parts to create your cards.
Source: how to make cards on Cricut Maker
how to make a card on Cricut
Visit here For more Information: Cricut.com/setup
Cricut explore 3
download Cricut design space
#how to make cards on Cricut Maker#how to make a card on Cricut#cricut.com/setup#cricut maker 3 bundle#cricut explore 3#design space cricut#download cricut design space#2024
0 notes
Text

Visit here for more Information: cricut.com/setup
cricut maker 3 bundle
cricut maker 3 vs explore 3
#cricut.com/setup#cricut maker 3 bundle#cricut maker vs cricut maker 3#cricut maker bundle#cricut maker 3 vs explore 3#cricut explore 3#2024
0 notes
Text
How to Make Cricut Stickers: Full Guide for Beginners
Only a crafter can understand the fun of creating stickers with Cricut. In this process, learning how to make Cricut stickers becomes even more important because it gives us more freedom to create unique and perfect stickers instantly. Cricut machines are advanced enough to make anything you want in a few minutes. However, you need proper guidance to create a proper custom sticker using a Cricut machine. In this guide, I will help you through the entire process.
In this tutorial, I’ll show what you’ll need to create a sticker with your favorite font, design, or image in less than 10 minutes. Once you learn the process of making stickers with Cricut, you will have endless opportunities. All you have to do is implement the points mentioned further in the guide.
Supplies Required for Creating Cricut Stickers
Before we begin the guide, gather the supplies outlined below. With all of these items, you will be able to create the best-looking sticker.
Sticker paper or Cricut printable sticker paper
Cricut machine (Preferred that supports Print-Then-Cut )
A computer with the Design Space software installed
Transfer tape
Weeding tool
Scraper
Inkjet printer
Complete guide
Light Grip cutting mat
Step 1: Download the SVG File of the Stickers
I mostly download premade stickers and customize them in the Cricut software. I suggest you download a free SVG file of stickers from somewhere online. Download the file always in .svg format and unzip it.
Step 2: Upload SVG on the Cricut App
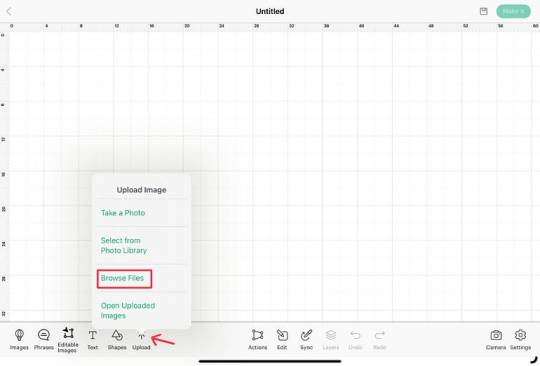
To learn how to make Cricut stickers, open the Cricut app and start a New Project.
Next, click the Upload icon in the bottom left toolbar.
Now, browse the downloaded sticker sheet to upload.
After that, select the image type as a Complex from the list.

Also, if the file is absolutely clear, then there is no need to erase click on Next.
Finally, select “Print Then Cut Image,” add the image name and any tags, and then click “Upload.”

Note: Instead of uploading a sticker file, you can access the Cricut Design Space library or create stickers.
Step 3: Customize Your Sticker Design
When the design is uploaded, it is on the canvas of the Cricut app, where it can be modified.
We won’t be making any specific modifications, so simply drag the design and get “Print Then Cut” the maximum size, which is 9.25″ x 6.75″.
Next, double-check the design and click on “Make It.“

Step 4: Select the Printer

From the drop-down menu, choose the printer and then turn on the “System Dialogue,” this will allow you to access your printer.
Step 5: Take a Printout and Place on the Mat

Step 6: Cut Out Your Design
Go back to Design Space and choose the base material as a printable vinyl and pressure default.

Next, load the mat by pressing the Load button on your machine and Design Space. Press Continue and push the flashing Go button on the Cricut machine. Now, the machine will run and cut around each sticker.

Step 7: Unload the Mat and Weed Out Excess Particles
This is the last step in learning how to make Cricut stickers. Once the cut is complete, take the mat off from the Cricut machine and flip the sticker sheet.
If there are any negative particles, then use the weeding tool and remove them.
Now, peel the stickers from the paper and add them to your project and surface.

Step 8: Apply Your Sticker

Final Thought
Most beginner crafters wonder how to make Cricut stickers. In this blog, I have explained the complete process. First of all, we have to upload or create the sticker design on Cricut Design Space. After that, print your sticker design using the Print then Cut function if it is colorful. And you can cut it out with the Cricut machine and start using it for the weeding procedure. Keep making stickers like this to achieve more quality.
Source: how to make Cricut stickers
Visit here for more Information: cricut.com/setup
Cricut explore 3
download Cricut design space
#how to make Cricut stickers#cricut.com/setup#cricut explore 3#download cricut design space#design space cricut#Cricut DesignSpace
0 notes
Text
How to Make Car Decals With Cricut: A Comprehensive Guide
Hello readers, I have good news for you all. Since you’ve become my family, I can’t wait to tell you that my sister recently bought a car, and I am proud of her. When she told me about this news, I had tears of joy in my eyes because I was proud of her and the chance to be creative again. Being an experienced crafter, she entrusted me with the responsibility of decorating her car by creating decals and making the car look more attractive.
If you are a fresher and want to learn how to make car decals with Cricut, then you are in the right spot. Moreover, you need to ensure that you have a proper collection of all the supplies and tools. With this tutorial, you will get to learn how to make customized decals out of a Cricut machine.
Step 1: Open the Cricut App and Create a Design
Start this fantastic activity by opening the Design Space app and selecting the Upload option. Next, choose your image from the images appearing on the new web page. After selecting the image, tick the Add to Canvas and your design will automatically move to the canvas.
On the canvas page, you can change the size of your decal by unlocking the Lock icon given at the top of the Menu section. Other than that, you can also change its color from the color drop box. After doing all of these changes, choose your Cricut cutting machine and hit the Make It option.
Step 2: Select Tools and Materials
While performing the second step of how to make car decals with Cricut, start adjusting your design and move it to the center of the mat. Ensure that the design doesn’t go outside the mat, and choose material from the Set Base Material list. After choosing the material, select the Pressure to More and load the tool into the empty blank. Following this, tick the Go button visible on your screen.
Step 3: Insert the Mat Into Your Cricut Cutting Machine
In addition to creating a DIY car decal process, remove the plastic sheet from your cutting mat and stick material on it. You can use the Cricut Brayer tool to stick both supplies close to each other. After sticking the material, take your cutting mat and load it onto your craft machine. Now, hold on till your smart cutting machine is going on, and when the process is finished, unload your cutting mat and put it on the table.
Step 4: Weed Out the Decal Design
After placing the cutting mat on the table in this how to make car decals with Cricut blog, take your Scraper tool and start burnishing the material in a circular motion with corners as well. Now, take your weeding tool and start removing the extra material from the mat. Be very gentle while removing the material, ensuring that you don’t damage the design and material as well.
Step 5: Apply Transfer Tape
Once you are done removing the material from the design, cut a portion of the Cricut transfer tape and place it on the top of the design. Take the help of the Scraper tool to properly place the tape across the design without leaving any space and avoiding any bubbles. After covering the whole design with transfer tape, use a true control knife and peel extra material from the cutting mat.
Step 6: Clean Your Car Area
Equally important, take a piece of paper and drop a few drops of alcohol on it. Now, move the paper in a clockwise manner, covering the entire area of the window. In case the area couldn’t be with one try, then clean the area at least two or three times more. Finally, you will notice that the area is entirely clean without any kind of dust, debris, or scratches.
Step 7: Place Your Decal Design and Show It Off!
In this last step of how to make car decals with Cricut, place your cutting mat on the area with your Cricut scraper tool. Following this, take the area measurement and remove the extra mat with your hands. At last, remove the transfer tape from the decal and show off your personalized car decals to your friends and loved ones.
Wasn’t it a child’s play to make this mesmerizing DIY craft all by yourself within a few minutes? You need to be focused and dedicated while forming the design on Design Space or physically forming it using the cutting mat & material.
Frequently Asked Questions
Question: How Can I Take Care of My DIY Car Decals?
Answer: All the experienced experts suggest keeping the permanent vinyl sit for at least 24 hours before handling or using it. However, it’s better to keep it at rest for 72 hours so that the adhesive gets strong enough and the decal won’t easily remove from the surface. On the other hand, if you are using removable vinyl, then you can use it right away without giving it any rest.
Question: What Kind of Vinyl Should I Use While Making a Car Decal?
Answer: If you are planning to make a personalized decal for your car, then you are advised to use permanent adhesive vinyl. These vinyls are water-resistant and heat-resistant and remain on the surface for longer periods of time. These kinds of vinyl will stick to the surface in its correct position due to its strong adhesive.
Question: How Do I Remove Decals From My Car?
Answer: When it comes to removing the decals from the car, then it can be a little challenging task for the owner. But it can be done by following these methods:
Drop a small amount of liquid dishwasher on the decal and start removing it by rubbing it with a cloth dipped in lukewarm water.
You can also try to remove the decal with a razor blade, but be careful that you shouldn’t injure yourself or damage the car.
Source: make car decals with Cricut
0 notes
Text

For More Visit Our Website: Cricut Design Space
0 notes
Text
How to Download Cricut Design Space on Windows/Mac?
Do you want to learn how to Download Cricut design space for Mac and Windows? If yes! Then, this step-by-step guide will guide you through the process of Cricut Design Space download on your compatible devices. Design Space is an important software for almost every crafter who wants to succeed in their DIY career. It helps them to make different types of designs for their DIY projects. All you need is to imagine and then cut out the design on the Cricut cutting machine. In addition, these cutting machines are capable of cutting 100+ materials easily in less time.
So what are you waiting for? Turn on the computer to download the Cricut Design Space and create crafts uninterruptedly.
What is Cricut Design Space?
Cricut Design Space is a Cricut software that runs simultaneously with all the smart cut-die machines. This is a free app that communicates with your Cricut digital cutters. In addition, crafters use this software to design and then transfer to the cutting machine to cut their designs.
However, you can use this software with the Joy, Explore, and Maker series. Besides, it is compatible with various platforms, including PC, Mac, iOS, and Android. But you get more features when you use this software on your computer since the mobile application is incompatible with anything you can do on your machine.
How to Download Cricut Design Space on Mac?
Complete the Cricut Design Space download process on Mac with the following steps:
To download the software on a Mac, you will need to visit Cricut’s official website.
Once you open the website, the Cricut will automatically figure out what type of OS (Mac or Windows) you are using.
After clicking on the website link, you will be redirected to the Cricut page, where you will see an I Agree checkbox.
Your download button will only be activated after you click on the checkbox.
On the top right corner, there will be a download icon.
When you click on it, you will see a pop-up showing the Cricut Design Space .dmg file.
Open the file by double-clicking on it.
To do this, click on the Cricut icon and drag it over the Applications folder. Then, you will need to double-click on the Applications folder.
After this, you will come to the application screen. Here, you just need to locate the app icon and double-click on it.
Click on the Open button to finish the Design Space app installation.
Finally, you are now able to set up your machine. Start designing by logging in to your account.
How to Download Cricut Design Space on Windows?
Most crafters use Design Space on Windows. The download and installation process is quite easy and similar to Mac. You can use Google Chrome for your Cricut Design Space Download. Here are a few steps to download Design Space for your Windows computer.
Go to Design Space’s official website and follow the same steps you followed to download Cricut Design Space for Mac.
In other words, click on the Terms of Use Agreement box and click on the download button.
You can see the download status at the bottom of your browser. Once downloading is done, click on it and install it.
Next, you see a dialogue box showing you the installation progress.
Once installation is done, the Cricut Design Space screen will appear. Now, you can set up the machine by signing in.
Here you go; you have successfully installed your Cricut Design Space in your Windows.
Conclusion
This Cricut Design Space Download guide is easy to understand and will help you download the software to your computer. Be it Mac or Windows, you can download the Cricut Design Space on both platforms. However, you may notice a slight variation depending on the version of Windows you are using.
Plus, you always need the internet to download the app, whereas if you wish to uninstall the application due to some reasons. Then, you must restart your PC after uninstallation of the Design Space. We hope the article was helpful in delivering relevant information.
Frequently Asked Questions (FAQs)
Question 1: Is the Cricut Design Space Download Essential for My Cricut Machine?
Answer: Yes, without this software, you can’t use your Cricut cutting machine. The Cricut Design Space software communicates with your digital cutter, and this is used to make designs. Therefore, it is a must-have software. Essentially, Cricut software is most straightforward and easy to use. But you still need some basic tutorials you can find in the app.
Question 2: How Does Design Space Work?
Answer: To use your Cricut Design Space, you need to first sign in with your Cricut ID. Then, you can start working on and creating your new design. Once you’ve designed it, you can send it from your computer or mobile devices to your Cricut machine. It will convert the design into a file that a machine can understand. Furthermore, you can also upload your own designs on the platform.
Question 3: How Can I Download Images from Design Space?
Answer: For offline use, you can download several images. For this, you will need to select the images, then click on the download button to download from the bottom left corner, as a result. Your complete image will be downloaded at once. You can also see a computer icon that shows that images have been downloaded successfully.
Source: Cricut Design Space
Visit for more info: Cricut Design Space download
Cricut.com/setup
0 notes