
Don't wanna be here? Send us removal request.
Statistics
We looked inside some of the posts by mattersfox944 and here's what we found interesting.
Average Info
Notes Per Post
1
Likes Per Post
1
Reblog Per Post
0
Reply Per Post
0
Time Between Posts
15 days
Number of Posts By Type
Text
11
Last Seen Tumblr Blogs


Fun Fact
Tumblr was acquired by Yahoo for $1.1B in 2013.
Text
Avast 10.8.5
Avast 10.8.5 Key
Avast 10.8.5 Antivirus
Avast 10.8.5 Free
Downloads: 5,154, Size: 253.50 MB, License: Freeware. EverNote for Windows is an intuitive note management application that offers you a single place for the organization, easy input and quick retrieval of all types of notes and clippings.
The IPVanish vs Windscribe match is not exactly the most balanced fight you’ll ever see. Sure, both VPN services come with attractive security features, but while Windscribe has pretty much a spotless Como Licenciar Vpn Avast 2019 reputation, IPVanish is a notorious example. VPN Comparison 0 Best Reviews 2019-07-12 16:08:40 Compare the top 10 VPN providers of 2019 with this side-by-side VPN service comparison chart that gives you an overview of all What Is Avast Secureline Vpn the main fe.
Casing OnePlus 8T 8 7T 7 Pro 6 6T 5 9 Flip Cover PU Leather Magnetic Close Wallet Case Card Pocket Soft Silicone TPU Bumper phone holder stand for OnePlus8 One Plus OnePlus8t OnePlus7t OnePlus7 OnePlus6 OnePlus6t OnePlus5 OnePlus9
$5,10$5,10
Casing OnePlus Nord CE OnePlus Nord N200 N100 N10 5G Cover Leather Flip Wallet Card Holder
$4,59$4,59
Samsung Galaxy Tab S7 2020 T870 T875 S7 Plus T970 T975 T976 Slim Silicon TPU Soft Case Cover
$3,90$3,90
OnePlus Nord N100 N10 8T 8 7T Pro 7 3T 3 5 6T 6 Phone Case Flip Leather Business Simple Wallet Card Package Slots Stand Holder Case Cover
$3,49$3,49
OnePlus 8 7 7T Pro 8Pro 7Pro 7TPro Oneplus8 Oneplus7 Oneplus7T Oneplus8Pro Oneplus7Pro Matte Phone Case Fashion Hard Soft Anti Shock Shockproof Casing TPU New Leather Magnetic Cover
$3,99$3,99
Oneplus Nord Screen Protector 3-in-1 Oneplus Nord 8 7T 7 6T 6 5T 5 Tempered Glass Oneplus 8 7 Pro 9H Protective Film
$0,94$0,94
Oneplus Nord 8 7T 7 Pro 6 6T 5 5T 3 3T Anti Fingerprint Case Sandstone Soft Matte Slim TPU Phone Cover
$2,60$2,60
Casing OnePlus 6 6T 7 7T 8 Pro Nord 8T Carbon Fiber Heat Dissipation Silicone Shockproof TPU Soft Back Cover Case
$4,83$4,83
Oneplus 7 Pro Oneplus 6T 6 5t 5 Cute Cartoon Animal Case Strap Cover
$5,98$5,98
Case For OnePlus 7T 7 6T Pro 7Pro Card Slot Phone Case OnePlus7T OnePlus6T OnePlus7 OnePlus7Pro One Plus Soft Business PU Leather Wallet Back Flip Cover Luxury TPU Stand Holder Casing
$5,50$5,50
Avast 10.8.5 Key
oneplus 7 6 5 7T 6T 5T nilkin H + Pro tempered glass film
Avast 10.8.5 Antivirus
$10,79$10,79
👜 Mini Chain HandBag 👜 AirPods Pro Leather Case for Skin Cover by JILLbyJILLSTUART
$87,30$87,30
Oneplus 9 8 7 7T Pro Nord N10 N100 8T 6T Carbon Fiber Protective Phone Case
$2,60$2,60
OnePlus 8T OnePlus 8 Pro 7 Pro OnePlus Nord Wallet Leather Flip Magnetic Holder Case Casing Card Slot Cover
$7,59$7,59
OnePlus 7T 7 Pro 6T 6 5T Phone Case Soft Liquid Silicone Candy TPU Full Protective Fresh Simple Case Cover
$2,89$2,89 Screen filters for mac.
Case For OnePlus 3 / 3T / 5 / 5T / 6 / 6T / OnePlus 7 / 7T / 7 Pro / 7T Pro / 8 / 8 Pro / OnePlus Nord Soft Leather TPU Fashion Wallet Skin feel Flip Cover with Stand Card Slots Anti Falling 4-corner Protection Cell phone Casing
$3,50$3,50
Oneplus Nord 8 8T Pro 7 Pro 7T Pro 6 6T 5 5T Case Soft Matte Silicone 3D Embroidery Ukiyoe Patten Anti-scratch Shockproof Acncient Japanese Style 'the Great Wave off Kanagawa'

$6,40$6,40
Air Tickets Casing OnePlus 3 5 5T 6 6T One Plus 7 Pro 7T NORD Z Soft Transparent Soft Case
$2,18$2,18
OnePlus 9 Pro OnePlus 9 8 Pro 8T 7t 7 pro OnePlus Nord Case ring Bracket Stand Phone Cover
$5,99$5,99
Casing for OnePlus 3 3T 5 5T 6 6T 7 8 Pro 8T Nord N10 N100 9 One Plus Flip Cover Magnetic Close Canvas PU Leather Wallet Case with Card Slot
$4,29$4,29
Avast 10.8.5 Free
OnePlus 9 OnePlus 9 Pro 8 Pro 8T 7 Pro 7T Nord Case Wallet Leather Flip Magnetic Cover with Card Holder
$5,99$5,99
Nillkin Qin Series Phone Case For OnePlus Nord N10 5G Flip Leather 360° All-inclusive Shockproof Built-in Bank Card Slot
$12,69$12,69
【Ready Stock】OnePlus Nord Case Original IMAK Airbag Shock-resistant Soft Case Clear Cover TPU Case Soft Cover One Plus Nord Casing Transparent Anti-dropping By Conners Airbags Phone Case 1+Nord Soft Back Shell
$7,26$7,26
Acrylic phone case / OnePlus 6T 7T 7 8 8T 9 9r 9e Pro / OnePlus Nord N200 N100 N10 5G / OnePlus Nord 2 CE 5G
$4,50$4,50
One Plus Nord N10 N100 8T 6T Soft Casing Oneplus 9 8 7 7T Pro Carbon Fiber Phone Case
$2,56$2,56
Wallet Casing oneplus 8 7T 7 Pro 6T 6 5T 5 3T 3 Case Magnetic Flip Faux Leather Cover Kickstand Card Holder
$3,88$3,88
Flip Case RedMi NOTE 10 9T 9 9S PRO 9A 9C NOTE 8T PRO NOTE/4/4X/5/6/7/8/PRO 5/6/7/8A S2 6 PRO Flip cowboy Cloth phone case
$6,99$6,99
About DivX Web Player
With the free DivX Web Player 10.8.9 , you will be able to watch high definition videos on certain sites which require DivX support. Whether or not you're using Chrome, Firefox or Opera, you can watch movies either in windowed mode or full screen. The player also offers a feature to save video files, all you have to do is right-click the video screen. This download is licensed as freeware for the Windows (32-bit and 64-bit) operating system/platform without restrictions. DivX Web Player is available to all software users as a free download for Windows.
Is DivX Web Player safe to download?

We tested the file DivXInstaller.exe with 25 antivirus programs and it turned out 100% clean. It's good practice to test any downloads from the Internet with trustworthy antivirus software.
Does DivX Web Player work on my version of Windows?
Older versions of Windows often have trouble running modern software and thus DivX Web Player may run into errors if you're running something like Windows XP. Conversely, much older software that hasn't been updated in years may run into errors while running on newer operating systems like Windows 10. You can always try running older programs in compatibility mode.
Officially supported operating systems include 32-bit and 64-bit versions of Windows 10, Windows 8, Windows 7 and Windows Vista.
What versions of DivX Web Player are available?
The current version of DivX Web Player is 10.8.9 and is the latest version since we last checked. This is the full offline installer setup file for PC. This site has hosted other versions of it in the past such as 10.8.8, 10.8.7, 10.8.6, 10.8.5 and 3.8.4. At the moment, only the latest version is available.
What type of file formats are supported?
The program currently supports over 5 video formats including AVI, DivX, MKV, MOV and MP4.
Alternatives to DivX Web Player available for download
Toshiba Video Player
Basic video player application for Windows that enables the playback of DVD files inserted in the optical drive.
Readon TV Player
Watch online TV streams free with Readon TV Player.
Light Alloy
Beautiful media player which supports Blu-ray disc and most media files using its built-in codecs.
ShowTime for PS3 (Movian)
A media player for jailbroken PS3 systems, now known as Movian.
Adobe Shockwave Player
Enables playback of ShockWave-enabled multimedia on your PC.
IrfanView All Plugins
Collection of free plugins that improves and adds on to the already impression functionality of the image viewer and editor IrfanView.
jetVideo
Video player with subtitle, sound effects supporting many formats.
CyberLink PowerDVD
Any Video Converter
Convert video and online video formats to some of the most common video formats including DVD video.
5KPlayer
A high-definition media and video player with DLNA and AirPlay support.
0 notes
Text
Com Microsoft Office Licensing Plist Zip Office 2011

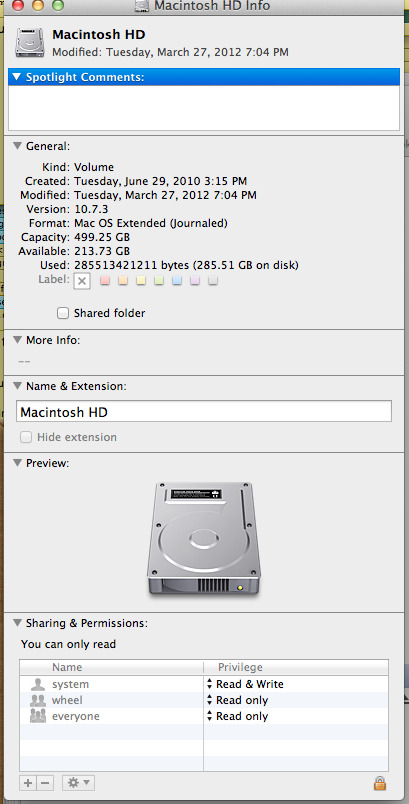
Paso 3: Quitar los archivos com.microsoft.office.licensing de las carpetas Equipo Biblioteca. Haga clic en Ir Ordenador y haga doble clic en el icono del disco duro. El nombre predeterminado de su disco duro es Macintosh HD. Abra Biblioteca y, luego, abra LaunchDaemons. Arrastre com.microsoft.office.licensing.helper.plist a la papelera. Office 2011 can be install in parallel of Office 2016 but this version won’t work anymore from OS X Catalina (Sept 2019 release). Download (1) the installer and (2) the preference file com.microsoft.office.licensing.plist.zip. Install Office 2011 by double clicking on the installer.
Script to remove Office 2011 from OS X - one essential feature that was dropped from 2011 release ;)
remove-office-2011.py
#! /usr/bin/env pythonimportos, syspaths= ('/Applications/Microsoft Office 2011/','/Applications/Remote Desktop Connection','/Applications/Microsoft Communicator','/Applications/Microsoft Messenger','/Users/username/Library/Preferences/Microsoft/Office 2011/','/~/Library/Application Support/Microsoft/','/~/Documents/Microsoft User Data/','/Library/Automator','/Library/Application Support/Microsoft/MAU2.0/','/Library/Application Support/Microsoft/MERP2.0/','/Library/Fonts/Microsoft','/Library/Preferences/com.microsoft.office.licensing.plist','/Library/LaunchDaemons/com.microsoft.office.licensing.helper.plist','/Library/PrivilegedHelperTools/com.microsoft.office.licensing.helper',# '/Library/Internet Plug-Ins/<all SharePoint files>'/var/db/receipts/com.microsoft.office.*')forpathinpaths:os.system('sudo rm -rf %s'%path)
commented Dec 20, 2011
Sign up for freeto join this conversation on GitHub. Already have an account? Sign in to comment
Soon Microsoft are to release an update to the Office 2016 Volume License installer on VLSC.
https://mattersfox944.tumblr.com/post/652996796046540800/telnet-command-for-mac. This update is 15.17 & is the first that has a few changes that may affect the way you deploy Office 2016.
These changes are going to be later enforced in 15.20 & onwards. Below are some details on the changes, some of the why & how via the power of the MacAdmins.org Slack & the awesome @pbowden that some of us have had a sneak peek. Gimp for mac os download.
Contents
1 What’s Changing?
When you download the .iso from VLSC you’ll notice two packages within it:
The change is the new second pkg: “Microsoft_Office_2016_VL_Serializer.pkg”
What’s that about?

Well, for a while now it’s been fairly common practice to deploy the Office license to Macs outside of the Office installers or updates.
This came about as on occasion an Office Update or Installer would delete the file.
However, whilst the deletion itself was a bug, the ability to use the license.plist across Macs was also a bug.
What is it & should I use it?
With Office 2016, Microsoft are moving to a device based serialisation method. Which means that deploying the plist /Library/Preferences/com.microsoft.office.licensingv2.plist will no longer work.
This device based serialisation is based around the generating a license on the Mac that is to be running Office 2016.
So if you employ monolithic imaging or deploy Office 2016 via a Composer snap shot etc, the serialisation will not work. (Please don’t deploy Office 2016 via a Composer snap shot, use the pkg).
Also, if you install Office 2016 whilst booted to another volume (as in when installing via a NetBoot or NetInstall volume or something like Target Mode Imaging), again the serialisation will not work.
To install Office 2016 from another volume & have the serialisation work, cache it locally on the Mac being imaged & install on first boot or if using Casper Imaging check “Install on boot drive after Imaging” for the PKG from within Casper Admin.
However, to enable Office 2016 to be correctly licensed in the multitude of deployment scenarios that we mac admins employ, @pbowden & his team have created the “Microsoft_Office_2016_VL_Serializer.pkg”
Running this will correctly serialise the Office 2016 suite, & should be run from the Mac that’s running the suite. So again, can be added post imaging & then the suite will be correctly serialised.

To be clear, this will only affect you if using the Volume Licensed version of Office 2016 & not the Office365 version.
What happens if I carry on copying the licensing.plist?
Com Microsoft Office Licensing Plist Zip Office 2011 Download

For now, not much.
15.17 is the first release with the “Microsoft_Office_2016_VL_Serializer.pkg”, from 15.20 (scheduled for Q1 2016) you will have to use the correct license.
How did people find this out?
Well a little over a month ago a gentleman with the nick @pbowden hopped into the #microsoft-office channel on the MacAdmins.org Slack, this was awesome as @pbowden is a: Software engineer for Office for Mac/iOS at Microsoft, a fellow Brit & nice guy.
It’s been a great few weeks with the community sharing feedback with @pbowden & some of us being able to test pre-release installers for Office.
Com Microsoft Office Licensing Plist Zip Office 2011 Pro
I hope this warning has been as helpful to you, as it was when @pbowden shared it with us.
0 notes
Text
Z3x Samsung Tool Pro

Z3x Samsung Tool Pro Crack With Loader
Z3x Samsung Tool Pro 2020
Z3x Samsung Tool Pro Crack 2021
Z3x Samsung Tool Pro Latest Setup
Z3x Samsung Tool Pro 27.7 Crack
11 thoughts on “Z3x Samsung Tool Pro v43.7 Setup File 2021” Pingback: Download Latest Samsung Drivers: 32bit and 64bit v1.5.65.0 – ALL ABOUT FLASHING Pingback: Download Z3x Samsung Tool Pro v37.0 Latest Update How Unlock. Samsung Pro Tool activation allows you to SW update/change, full factory reset, switch phone to download mode, read/write calibration data files, direct unlock/read codes, FRP remove, repair, SN, DRK, Bluetooth etc. For 95% Samsung phones. With Samsung Editor, you can also change the language and other resources in many CDMA and GSM Samsung phones. #z3xboxcrack41.0 #z3x #z3xbox #gsmfix #z3xnewcrackZ3X Samsung Tool Pro 41.0 Crack+Full Loader Without Box Working 2020,z3x box crack latest 2020z3x box 41.0. All files are in their original form. LO4D.com does not modify or wrap any file with download managers, custom installers or third party adware. This download is of Z3X Samsung Tool PRO and was signed by z3x-team with an on-disk file size of 57909732 Bytes. It's distributed as SamsungToolPRO34.11.exe.
﷽
Samsung Tool Pro Latest version setup v43.7 is officially released and available here as a setup file. Z3x Samsung Tool to repair, flash and Unlock. As well as the latest versions You can also download older versions.
If you own a Z3x Box then no doubt you need an update for your Samsung Tool Pro or their other products. Updating You Tool will improve stability and added new support functions. Many major updates have arrived. Z3x Team Releases a new update version for Samsung Tool Pro

<div id=’showMe’>Wait for it…</div>
2Download Z3x Samsung Tool PRO Setup👍
How to Install/Update Samsung Tool Pro
Download and Extract the setup file from zip. Double click to open setup, choose the language and click on OK
Click on I accept the agreement and click on Next>
Click on I have read and accept the agreement and then Next>
If you want to create Desktop icon then Tick on Create a desktop shortcut otherwise Click on Next>
Finally, Click on Install to install or update the previous version
Click on Finish. You have Successfully installed Z3x Samsung Tool Pro on your PC.
Related Article:
Download Z3x Samsung Tool PRO Setup👍
Before downloading you should recheck your software version if it is not already updated because Samsung Tool Pro also Supported auto Updates with user permissions.
if you are using an older version then download this update from the below link. “Invalid Download” Fixed
Download Link Last Updated on 06-August-2021
Samsung Tool PRO Setup v43.7 | Mirror Link || Size: 71.4 MB
If don’t have a Z3x Box then you can Flash your Samsung Mobile using Odin3
Screenshot
Changes Log✍
Some functionality improvements
Some functionality improvements
Samsung Tool Pro v43.0 Released - Patch CERT for most Exynos based devices
Added support:
SM-A125U (Flashing, Unlock SPR using credits, reboot download/recovery)
SM-A125U1 (Flashing, Unlock SPR using credits, reboot download/recovery)
SM-A326U (Flashing, Unlock SPR using credits, reboot download/recovery)
SM-A326U1 (Flashing, Unlock SPR using credits, reboot download/recovery)
SM-A426U (Flashing, Unlock SPR using credits, reboot download/recovery)
SM-A325M (Flashing, Read Unlock Codes using credits, reboot download/recovery)
SM-M022F (Flashing, Read Unlock Codes using credits, reboot download/recovery)
SM-N980F (Flashing, Read Unlock Codes using credits, reboot download/recovery)
SM-N981B (Flashing, Read Unlock Codes using credits, reboot download/recovery)
SM-N985F (Flashing, Read Unlock Codes using credits, reboot download/recovery)
SM-N986B (Flashing, Read Unlock Codes using credits, reboot download/recovery)
Added function “Read info” in flash mode
Added repair and patch CERT for most Exynos-based devices, support all new Bit and FW, exclusive. Root required.
Supported models:
SC-02M SM-A102N SM-A102U SM-A102U1 SM-A102W SM-A105F SM-A105FN SM-A105G SM-A105M SM-A105N SM-A202F SM-A202K SM-A217F SM-A217M SM-A217N SM-A260F SM-A260G SM-A305F SM-A305FN SM-A305G SM-A305GN SM-A305GT SM-A305N SM-A305YN SM-A307FN SM-A307G SM-A307GN SM-A307GT SM-A405FM SM-A405FN SM-A405S SM-A505F SM-A505FM SM-A505FN SM-A505G SM-A505GN SM-A505GT SM-A505U SM-A505U1 SM-A505W SM-A505YN SM-A5070 SM-A507FN SM-A515F SM-A515U SM-A515U1 SM-A515W SM-A5160 SM-A516B SM-A516N SM-A516U SM-A600A SM-A600AZ SM-A600F SM-A600FN SM-A600G SM-A600GN SM-A600N SM-A600P SM-A600T SM-A600T1 SM-A600U SM-A7160 SM-A716B SM-A716S SM-A750C SM-A750F SM-A750FN SM-A750G SM-A750GN SM-A750N SM-F127G SM-G398FN SM-G715FN SM-G715U SM-G715U1 SM-G715W SM-G780F SM-G781B SM-G889A SM-G889F SM-G889N SM-G889Y SM-G960F SM-G960N SM-G965F SM-G965N SM-G970F SM-G970N SM-G973F SM-G973N SM-G975F SM-G975N SM-G977B SM-G977N SM-G980F SM-G981B SM-G985F SM-G986B SM-G988B SM-J260A SM-J260AZ SM-J260F SM-J260G SM-J260M SM-J260T1 SM-J260Y SM-J336AZ SM-J337A SM-J337AZ SM-J337T SM-J337V SM-J337VPP SM-J337U SM-J337W SM-J400F SM-J400G SM-J400M SM-J600F SM-J600FN SM-J600G SM-J600GF SM-J600GT SM-J600L SM-J600N SM-J720F SM-J720M SM-J737A SM-J737K SM-J737P SM-J737S SM-J737T SM-J737T1 SM-J737U SM-J737V SM-J737VPP SM-M105F SM-M105G SM-M105M SM-M105Y SM-M127F SM-M127G SM-M317F SM-N770F SM-N960F SM-N960N SM-N970F SM-N971N SM-N975F SM-N976B SM-N976N SM-N976Q SM-N980F SM-N981B SM-N985F SM-N986B SM-P615 SM-P615C SM-P615N SM-P617 SM-T307U SM-T515 SM-T515N SM-T517 SM-T517P SM-T927A
Added over 50 function(s) to 20 model(s):
SM-A013F:
Repair IMEI
Patch Certificate
SM-A013G:
Repair IMEI
Patch Certificate
SM-A013M:
Repair IMEI
Patch Certificate
SM-A022F:
Repair IMEI
Patch Certificate
SM-A022G:
Repair IMEI
Patch Certificate
SM-A022M:
Repair IMEI
Patch Certificate
SM-A125F:
Repair IMEI
Patch Certificate
SM-A125M:
Repair IMEI
Patch Certificate
SM-A125N:
Repair IMEI
Patch Certificate
SM-A125U:
Write Firmware
Unlock SPR using credits
Read EFS
Write EFS
Write NV DATA
SM-A315F:
Repair IMEI
Patch Certificate
SM-A315G:
Repair IMEI
Patch Certificate
SM-A315N:
Repair IMEI
Patch Certificate
SM-A325F:
Repair IMEI
Patch Certificate
SM-A326U:
Write Firmware
Unlock SPR using credits
Read EFS
Write EFS
Write NV DATA
SM-A415F:
Repair IMEI
Patch Certificate
SM-A426U:
Write Firmware
Unlock SPR using credits
Read EFS
Write EFS
Write NV DATA
SM-M013F:
Repair IMEI
Patch Certificate
SM-M022G:
Repair IMEI
Patch Certificate
SM-T577U:
Write Firmware
Unlock SPR using credits
Read EFS
Write EFS
Write NV DATA
Some functionality improvements
Samsung Tool PRO 42.10 Patch Update. first in the world
Added exclusive functions:
SM-A013F (Repair and patch CERT without root) – first in the world
SM-A013G (Repair and patch CERT without root) – first in the world
SM-A013M (Repair and patch CERT without root) – first in the world
SM-A022F (Repair and patch CERT without root) – first in the world
SM-A022G (Repair and patch CERT without root) – first in the world
SM-A022M (Repair and patch CERT without root) – first in the world
SM-A125F (Repair and patch CERT without root) – first in the world
SM-A125M (Repair and patch CERT without root) – first in the world
SM-A125N (Repair and patch CERT without root) – first in the world
SM-A315F (Repair and patch CERT without root) – first in the world
SM-A315G (Repair and patch CERT without root) – first in the world
SM-A315N (Repair and patch CERT without root) – first in the world
SM-A325F (Repair and patch CERT without root) – first in the world
SM-A415F (Repair and patch CERT without root) – first in the world
SM-M013F (Repair and patch CERT without root) – first in the world
SM-M022G (Repair and patch CERT without root) – first in the world
Z3x Samsung Tool Pro Crack With Loader
attention: you will see *0011# imei cert fail, but phone will see network. so not worry. all ok.
SM-E625F (Flashing, Direct READ codes via server, reboot download/recovery)
SM-F127G (Flashing, Direct READ codes via server, reboot download/recovery)
SM-M127F (Flashing, Direct READ codes via server, reboot download/recovery)
SM-M127G (Flashing, Direct READ codes via server, reboot download/recovery)
SM-G525F (Flashing, Direct READ codes via server, reboot download/recovery)
SM-G780F (Flashing, Direct READ codes via server, reboot download/recovery)
SM-G781B (Flashing, Direct READ codes via server, reboot download/recovery)
SM-A525F (Flashing, Direct READ codes via server, reboot download/recovery)
SM-A525M (Flashing, Direct READ codes via server, reboot download/recovery)
SM-A5260 (Flashing, Direct READ codes via server, reboot download/recovery)
SM-A526B (Flashing, Direct READ codes via server, reboot download/recovery)
SM-A725F (Flashing, Direct READ codes via server, reboot download/recovery)
SM-A725M (Flashing, Direct READ codes via server, reboot download/recovery)
SM-G991B (Flashing, Direct READ codes via server, reboot download/recovery)
SM-G991N (Flashing, Direct READ codes via server, reboot download/recovery)
SM-G996B (Flashing, Direct READ codes via server, reboot download/recovery)
SM-G996N (Flashing, Direct READ codes via server, reboot download/recovery)
SM-G998B (Flashing, Direct READ codes via server, reboot download/recovery)
SM-G998N (Flashing, Direct READ codes via server, reboot download/recovery)
SM-A526U (Flashing, SPR Unlock via server, reboot download/recovery)
Added over 10 function(s) to 1 model(s):
Z3x Samsung Tool Pro 2020
SCV46:
Unlock using credits
Some functionality improvements
Added over 10 function(s) to 1 model(s):
SCV46:
Unlock using credits
Some functionality improvements
Latest MTK models added to supported:
SM-A022F (Flashing, Direct READ codes via server, reboot download/recovery) – First in the World Exlusive
SM-A022G (Flashing, Direct READ codes via server, reboot download/recovery) – First in the World Exlusive
SM-A022M (Flashing, Direct READ codes via server, reboot download/recovery) – First in the World Exlusive
SM-A125F (Flashing, Direct READ codes via server, reboot download/recovery) – First in the World Exlusive
SM-A125M (Flashing, Direct READ codes via server, reboot download/recovery) – First in the World Exlusive
SM-A125N (Flashing, Direct READ codes via server, reboot download/recovery) – First in the World Exlusive
SM-A325F (Flashing, Direct READ codes via server, reboot download/recovery) – First in the World Exlusive
SM-M022G (Flashing, Direct READ codes via server, reboot download/recovery) – First in the World Exlusive
SM-A025F (Flashing, Direct READ codes via server, reboot download/recovery) – First in the World Exlusive
SM-A025G (Flashing, Direct READ codes via server, reboot download/recovery) – First in the World Exlusive
SM-A025M (Flashing, Direct READ codes via server, reboot download/recovery) – First in the World Exlusive
SM-M025F (Flashing, Direct READ codes via server, reboot download/recovery) – First in the World Exlusive
SM-G991U (SPR unlock via server)
SM-G996U (SPR unlock via server)
SM-G998U (SPR unlock via server)
Added support for Android 11 ALL SUPPORTED MODELS
Fixed:
showing button for choose tar subfiles. Also known as “double file select” bug
bug of unexpected theme change
Fixed bugs by your bug reports
Added:
SM-F415F (Flashing, Direct READ codes via server, reboot download/recovery)
SM-A4260 (Flashing, Direct READ codes via server, reboot download/recovery)
SM-A426B (Flashing, Direct READ codes via server, reboot download/recovery)
SM-M515F (Flashing, Direct READ codes via server, reboot download/recovery)
Z3x Samsung Tool Pro Crack 2021
Added / Updated function:
Z3x Samsung Tool Pro Latest Setup
SM-A102U (read codes/unlock via server for next version) 8 bit.
SM-A102U1 (read codes/unlock via server for next version) 7 bit
SM-A105F (read codes/unlock via server for next version) 4 bit
SM-A105G (read codes/unlock via server for next version) 7 bit
SM-A105M (read codes/unlock via server for next version) 5 bit
SM-A202F (read codes/unlock via server for next version) 3 bit
SM-A205F (read codes/unlock via server for next version) 9 bit
SM-A205FN (read codes/unlock via server for next version) 9 bit
SM-A205U (read codes/unlock via server for next version) 6 bit
SM-A205U1 (read codes/unlock via server for next version) 6 bit
SM-A205YN (read codes/unlock via server for next version) 6 bit
SM-A305F (read codes/unlock via server for next version) 6 bit
SM-A305G (read codes/unlock via server for next version) 6 bit
SM-A305GT (read codes/unlock via server for next version) 6 bit
SM-A305YN (read codes/unlock via server for next version) 3 bit
SM-A307FN (read codes/unlock via server for next version) 2 bit
SM-A307G (read codes/unlock via server for next version) 4 bit
SM-A405FN (read codes/unlock via server for next version) 3 bit
SM-A505F (read codes/unlock via server for next version) 5 bit
SM-A505G (read codes/unlock via server for next version) 5 bit
SM-A505U (read codes/unlock via server for next version) 9 bit
SM-A505U1 (read codes/unlock via server for next version) 8 bit
SM-A505YN (read codes/unlock via server for next version) 4 bit
SM-A5070 (read codes/unlock via server for next version) 4 bit
SM-A507FN (read codes/unlock via server for next version) 5 bit
SM-A515F (read codes/unlock via server for next version) 3 bit
SM-A530F (read codes/unlock via server for next version) E bit
SM-A530W (read codes/unlock via server for next version) C bit
SM-A730F (read codes/unlock via server for next version) 7 bit
SM-A750FN (read codes/unlock via server for next version) 5 bit
SM-A750GN (read codes/unlock via server for next version) 6 bit
SM-A750N (read codes/unlock via server for next version) 3 bit
SM-G398FN (read codes/unlock via server for next version) 7 bit
SM-G715FN (read codes/unlock via server for next version) 6 bit
SM-G715U (read codes/unlock via server for next version) 4 bit
SM-G715U1 (read codes/unlock via server for next version) 4 bit
SM-G715W (read codes/unlock via server for next version) 4 bit
SM-G960F (read codes/unlock via server for next version) B bit
SM-G960N (read codes/unlock via server for next version) 3 bit
SM-G965F (read codes/unlock via server for next version) B bit
SM-G965N (read codes/unlock via server for next version) 3 bit
SM-G970F (read codes/unlock via server for next version) 8 bit
SM-G970N (read codes/unlock via server for next version) 5 bit
SM-G973F (read codes/unlock via server for next version) 8 bit
SM-G973N (read codes/unlock via server for next version) 5 bit
SM-G975F (read codes/unlock via server for next version) 8 bit
SM-G975N (read codes/unlock via server for next version) 5 bit
SM-G977B (read codes/unlock via server for next version) 5 bit
SM-G977N (read codes/unlock via server for next version) 4 bit
SM-J720F (read codes/unlock via server for next version) 7 bit
SM-J720M (read codes/unlock via server for next version) A bit
SM-M107F (read codes/unlock via server for next version) 4 bit
SM-M205F (read codes/unlock via server for next version) 6 bit
SM-M205FN (read codes/unlock via server for next version) 6 bit
SM-M205G (read codes/unlock via server for next version) 5 bit
SM-M205M (read codes/unlock via server for next version) 6 bit
SM-M205N (read codes/unlock via server for next version) 4 bit
SM-M215F (read codes/unlock via server for next version) 2 bit
SM-M305F (read codes/unlock via server for next version) 6 bit
SM-M305M (read codes/unlock via server for next version) 6 bit
SM-M3070 (read codes/unlock via server for next version) 4 bit
SM-M307F (read codes/unlock via server for next version) 4 bit
SM-M315F (read codes/unlock via server for next version) 2 bit
SM-M317F (read codes/unlock via server for next version) 2 bit
SM-N770F (read codes/unlock via server for next version) 6 bit
SM-N960F (read codes/unlock via server for next version) 6 bit
SM-N970F (read codes/unlock via server for next version) 6 bit
SM-N975F (read codes/unlock via server for next version) 6 bit
SM-N976B (read codes/unlock via server for next version) 6 bit
SM-P205 (read codes/unlock via server for next version) 5 bit
SM-P615 (read codes/unlock via server for next version) 4 bit
SM-T927A (read codes/unlock via server for next version) 6 bit
Fixed:
Z3x Samsung Tool Pro 27.7 Crack
Freezing ADB on some PC
SM-M013F (Unlock)
SM-M017F (Unlock)
Dont forget post BUG reports in correct thread.
0 notes
Text
Lr Enfuse Plugin

I shoot real estate photography and recently learned about a plugin called LR/Enfuse, which is marketed as a tool to 'blend multiple exposures together directly from within Lightroom' for higher dynamic range images. I use LR Enfuse for real estate photography, one of my colleagues uses it as well. As well as copying it into the lightroom plugins folder within the installer. LR/Enfuse might not be the most useful plugin around, but its scope is rather specific and it can be indispensable for anyone interested in multiple exposures. This plug-in allows you to combine multiple exposures into one single image. Now, since Lightroom doesn’t work natively with layers, it’s really impossible to do this with just Lightroom, so I turned to the LR/Enfuse plugin from Timothy Armes instead. Originally created for merging HDR exposures, the LR/Enfuse plugin can be used creatively in other ways as explained here: Using the LR/Enfuse plugin for Lightroom.
Lr/enfuse Plugin Download
Lr Enfuse Plugin
Lr Enfuse Plugin
There are several editing software available out there but Adobe’s products are usually the most used ones, specifically, Photoshop and Lightroom.
Although these are subscription-based software, they are proven effective and useful to make editors’ work easy. Moreover, there are plugins that give additional features to produce more stunning images and this is what this article is all about.
Plugins, which are usually extensions designed for a certain software, provide additional help to users by offering a unique use – something that can speed-up the post-production image editing.
So, here are seven of the known Lightroom plugins that you must be using.
Luminar 4
Luminar is one of the most complex Lightroom plugins commonly used by Mac users.
The main function of this plugin is to make the most difficult editing processes easier and stress-free.
This plugin lets you browse through various filters and layers, including access to masking options and different workspace arrangements that fit your preference.
Intensify
Intensify adds additional ’’punch’’ to your images, making them more stunning and memorable.
This plugin adds drama, colors, and impressions, which is great for fixing dull and plain images since it significantly offers bold changes.
Aside from that, it has different presets that you can use and adjust according to your needs. Among these presets groups are Architecture, Black & White, Creative, Detail Enhancement, Image Tune, and Soft.
Snapheal
Snapheal is a very specific plugin for erasing unwanted elements. It is like Photoshop’s healing brush.
All you need to do is to highlight the objects you want to remove and click Erase. Moreover, this plugin also has Retouch and Adjust modes which allows you to play around with color, contrast, tone and sharpness of the images.
Noiseless
If you are familiar with noise in photography, you would agree that it is one of the major problems of most photographers and editors.
Therefore, using a plugin like Noiseless helps you get rid of the annoying grains that are aesthetically unpleasant to the eyes.
This plugin enlarges the photo to 200% and gives you a side-by-side comparison. Moreover, you can adjust the level of denoise from soft to extreme, making it versatile enough to use for your editing needs.
Color Efex Pro
Color Efex Pro is a plugin under Nik Collection by DxO, which creates a series of renowned creative plugins for Adobe Photoshop, Photoshop Elements, and Lightroom. https://mattersfox944.tumblr.com/post/653656905933373440/hdd-enclosure-for-mac.
Originally, this plugin was owned by Google before DXO acquired it. The best thing about this plugin is that it can handle photos in their RAW format, meaning you can work high resolution and top quality.
It also has filters that are comparable to Lightroom’s settings for color correction and other filters.
DxO PhotoLab
DxO PhotoLab is a wonderful and flexible Lightroom plugin that only requires one-click fix to images.
This plugin has some of the best processing and correction tools and is best used in separating the shadows from the light.
Moreover, it has the best additional tools for sharpening and clearing the view of images.

LR/Enfuse
LR/Enfuse is a specific plugin for those editors interested in multiple exposures. It allows the user to combine multiple exposures into one single image.
This is particularly useful in night photography because it can merge several images and mimics the long exposure. This gives you less burden to worry about high ISO and noise in photos.
There are more plugins available for Lightroom and each varies from one another, depending on its purpose.
So, try checking out some other plugins out there that may be more useful for your needs. All you need is just a quick research, download the plugin, install, and use it right away.
Perks of Using Ruby on Rails for Product Development in 2021
January 21, 2021
5 Ways for a Small Business to Advertise Effectively
April 3, 2019
Lr/enfuse Plugin Download
Hi gang – and howdy from Charlotte, North Carolina (here for my seminar today). So, last week I had Real Estate photographer Thomas Grubba as my guest on “The Grid” (our life weekly talk show for photographers), and he was talking about how he uses a Lightroom plug-in called:
“Enfuse”
It’s from a developer in the UK, and it’s what Thomas uses to take his bracketed real estate photography images and merge them into a single image with a realistic look. He was really raving about it, so I tried it myself and it’s pretty amazing (most of the time). Best of all, it’s “Donationware” (there’s no set price – you give what you want to the developer).
Here’s a few quick results (no toning was done to any of these – just the initial merge, so you can do a lot to these examples. The first one will be Lightroom’s built-in “Merge to HDR” followed by the Enfuse plug-in.
Note: Ignore the ghosting – I didn’t address it in any of these examples.
Quicktime for mac latest. Above:Lightroom’s Merge to HDR feature
Above:Same images merged using the “Enfuse” plug-in
Above:The same image with Lightroom Merge to HDR but with the AUTO TONE turned on.

Above:The Enfuse image with Auto Tone added.
Lr Enfuse Plugin
Above:Lightroom’s Merge to HDR version.
Above:the same images merged in “Enfuse”

Above: Here’s what the plug-in looks like when it opens in Lightroom. 4 tabs along the top with different options for merging.
Most of the time, I seem to like the results from Enfuse better than Lightroom’s built-in (which I’ve been quite fond of, so that’s saying something), but there were a couple of images I merged where I liked the Lightroom native version better, but not many.
Thomas recommended added +20 Clarity and +10 Contrast two your HDR bracketed images before you Enfuse them, and he’s right — I think it produces a better result.
The only downside I’ve experienced thus far is that it’s quite a bit slower than Lightroom’s Merge to HDR, so you wait longer to see your result, especially with larger brackets of 5 or 7 images. Outside of that, it’s a peach.
Here’s a link to download Enfuse from the developer (be generous). 🙂
Hope you found that helpful.
One more thing… In other news: Registration for the Photoshop World Orlando 2017 Conference officially opens today. You can read more about it on my blog at scottkelby.com or go to photoshopworld.com
I look forward to meeting a bunch of you here today! 🙂
Best,
-Scott
Lr Enfuse Plugin

Previous Article
Reader Question: Can You Create Presets for ..
Next Article
Lightroom Mobile Tip: Shooting Directly Into a ..
Related Posts
0 notes
Text
К Drive Image For Mac

Now open R-Drive Image app from desktop and follow the below steps to create MacOS High Sierra Bootable USB. This is the method or application where you can easily create any MacOS Bootable USB. You might know about other methods but what I think this methodology is new for you, so, give it a try and I am sure you will feel at home. I used R-Drive Image 4.4 trial version a while ago and had no problem creating the bootable media. I know that I won't be able to use on the macbook, but I still hoped that I could check that the HFS+ partitions are seen correctly by the bootable version.
(Original post by Amanda Visconti. https://mattersfox944.tumblr.com/post/653656971540611072/signatures-for-outlook-mac. Minor updates in July 2018 to resolve outdated links and media.)
Last week, I wrote about how to forensically image the internal hard drive on a Mac laptop without needing to physically remove the drive. If your workspace doesn’t have the necessary tools to follow that tutorial (a firewire cable, a firewire port on the Mac you’re imaging, and a firewire port on a PC partitioned with BitCurator), we offer an alternative in this post.
Other Options for Imaging Mac Laptops
We recognize that you might not have the correct devices on hand to follow the instructions in the previous post. In that case, you may want to open the laptop to temporarily remove the hard drive for forensic imaging within the BitCurator environment, which means you’ll need a cable that connects a hard drive to your imaging computer (probably a SATA cable). You can also opt to make a forensics image outside BitCurator and then import the image into BitCurator for exploration.
Note that the issue complicating this imaging process is specific to Mac laptops; Linux and Windows laptops wouldn’t require target disk mode and the trouble that causes. Target disk mode works with other Macs (perhaps obviously) and Linux machines; I wasn’t able to get a Windows machine to recognize the Mac laptop in target disk mode. I’ve read that commercial software called MacDrive (currently about $50 for use on one PC) will let you connect the a Mac in target disk mode to a PC, but this would not make the Mac drive also available in the Windows computer’s BitCurator VM; unfortunately, VirtualBox is unable to take firewire input. It’s possible you could get around this issue by using other virtualization software, but VirtualBox is the best free/open-source option.
That leaves us with using either a Mac or Linux machine to create our backup of the Mac laptop; in our example, I used a Mac to create the backups. We’ll walk you through how to first lessen the risk of tampering with a laptop’s insides by securing a forensic image outside of BitCurator.
Why Backup?
Opening up the laptop, removing the drive, and later trying to put everything back risks the laptop refusing to start or otherwise being damaged: maybe you break something, or can’t get things to fit back together. If you don’t have another way to gather a forensics disk image packaged with metadata about the imaging, though, opening the laptop up can be an acceptable risk. All computers fail eventually, and we’d rather have a good forensics disk image of the laptop now, than more years with the laptop working but no forensics image preserved. We thus recommend you forensically image the laptop’s hard drive before opening it, or choose to create a forensics image with one of the non-BitCurator options discussed below and import the image into BitCurator. Opening up the computer is only necessary if none of these forensics imaging programs are right for you, your Mac laptop doesn’t have a firewire port, or if you prefer to do all your forensic work inside the BitCurator environment. For either method, you’ll need a firewire and another Mac (with a firewire port) on which to image the laptop.
Mac telnet port. To connect to a server on its Telnet port via your Mac’s Terminal application, follow these steps: Open Applications Utilities Terminal; Type the command: telnet yourdomain.com; Enter the username and password for your connection; If you need additional options, use telnet –help to get a list of the available parameters the command can.
Write Blocking
First, we need to protect the laptop from having the connected machine write back to it during the imaging process. This wasn’t a major concern in our example as Larsen’s laptop has already been explored by researchers at MITH—but it’s good practice nonetheless, especially if you use a command-line imaging method, where a simple is-typing could accidentally erase your device. Our WiebeTech Forensic ComboDock works well for most write-blocking purposes, but it doesn’t have the firewire input and output needed to work with a Mac in target disk mode. Tableau T9 Firewire Forensic Bridge is a hardware option that does accept both firewire input and output, but we didn’t have one on hand. We thus used software write-blocking instead, installing Aaron Burghardt’s Disk Arbitrator to protect the laptop.
A Forensic Disk Image
Begin by putting the Mac laptop you want to image into target disk mode:
The laptop to be imaged (e.g. our Larsen laptop) should be turned off.
Hold down the t key and turn the laptop to be imaged on.
Continue to hold down the t key until the target disk mode image appears on the screen (see photo below).
You can now connect your firewire cable to both the laptop to be imaged and the Mac (or Linux computer) doing the imaging.
To create a forensics disk image, there are a variety of free and commercial programs that provide graphical interfaces for Mac and Linux, including MacOSXForensics Imager (Mac) and Guymager (Linux; note that Guymager is the imaging software BitCurator incorporates). Commercial options such as FTK Imager also exist. Almost any program that creates the image in an Encase (E01) or AFF forensic disk image format works, as these formats take a raw disk image and wrap metadata about the imaging around it. We haven’t formally evaluated the effectiveness of any programs outside the BitCurator suite, though, so you’ll want to check potential Mac forensic imaging software out yourself and explore the images they create within the BitCurator environment to make certain they captured your device correctly.
Alternatively, you can choose one of the following command line methods—but it’s of utmost importance that you use a write-blocker with these, as mis-typing could erase your device:
If you’re very knowledgeable about using the command line, you may already know how to use dd or dcfldd.
The ForensicsWiki has a detailed tutorial on “Acquiring a Mac OS System with Target Disk Mode” that uses dd and other commands to create a .dmg image, plus instructions on converting the .dmg to an Encase format.
“Macintosh Forensics: A Guide for the Forensically Sound Examination of a Macintosh Computer” by Ryan Kubasiak offers alternative instructions for using dd (use the hyperlinked table of contents to jump to the “Imaging a Target Macintosh” section starting on page 25).
Opening the Laptop to Remove the Hard Drive
After following these steps to make a forensic image of your laptop, you can either opt to import the forensic image into BitCurator and explore the image there, or choose to temporarily remove the hard drive in order to image it directly through BitCurator. If you choose the latter path, you’ll need to search for instructions like these that show how to open your particular model of Mac. If possible, use a guide with many photos to show you how to carefully open, remove, and replace the Mac laptop’s hard drive. I’ve found that sites dedicated to DIY fixing and making, such as iFixit and Instructables, offer good community-moderated tutorials on opening up computers.
In a future post, I’ll discuss what I found while exploring the Larsen laptop disk image using BitCurator. Send us your suggestions for other difficult-to-image use cases, and we’ll cover them in future posts!
Amanda Visconti is a MITH graduate research assistant on the BitCurator project, where she creates user-friendly technical documentation, develops and designs for the web, and researches software usability. As a Literature Ph.D. candidate, she blogs about her digital humanities work regularly at LiteratureGeek.com.
I wanted to start the school year with a new clean slate by re-imaging my computers in the lab. This process involved the cloning of a computer hard drive that I customized and reinstalling it to the rest of the computers. The hard drive I cloned, or imaged, included the specific applications I wanted my students to use, specific OS settings, and numerous Chrome extensions that block inappropriate ads on the browser. Imaging your computer is also a great way to back-up your important data.
All this could not have been done with the help of Jacob in the IT department.
Steps to Image Your Computer:
1. Open your Disk Utility application and click on the “New Image” icon.
2. Name your dmg file and save it to your desktop.
3. Plug in your external hard drive and upload the dmg into it.
Steps to Re-Image Your Computers:
1. Restart your computer.
2. Hold down the Option key during the restart of your computer.
3. Click on Recovery HD
4. Plug in your external hard drive to your computer that contains the dmg file.
5. Choose your language.
6. Click on Disk Utility.
7. Choose your hard drive on the left-hand side.
8. Click on “Restore.”
9. Click on the “Image” button and choose your dmg file.
10. Double-click on your dmg and click “Skip”.
11. Double-click on the bottom “Macintosh HD”.
12. Drag the first “Macintosh HD” into the “Destination” box.
Drive Image Free Download
13. Click on the “Restore” and “Erase” button.
0 notes
Text
Quicktime For Mac Latest

Download QuickTime Player for MAC Latest Version Old Versions is a powerful built in media player multimedia technology. QuickTime media player for Mac allows you to watch videos on internet. You can watch HD movies and other media files on QuickTime Player. It provide a huge range of file formats to be played on QuickTime Player in Mac download.
Download the latest version of WebM for QuickTime for Mac - Open, royalty-free media format for the Web. Read 2 user reviews of WebM for QuickTime on MacUpdate. Explore the world of Mac. Check out MacBook Pro, iMac Pro, MacBook Air, iMac, and more. Visit the Apple site to learn, buy, and get support.
Feature Points of QuickTime Player for MAC
Following are some cool features of QuickTime Player for MAC Download.

Multimedia platform
Sophisticated media player
Advance video compression technology
Flexible file format
Download QuickTime Player for MAC Technical Details
QuickTime Player for MAC
QuickTime 7.7.0 Leopard
Hardware Requirements of QuickTime Player for MAC Latest Version
To Download QuickTime Player for MAC you need to meet the following system requirements Hdd enclosure for macbook pro.
OS: Mac OS X Leopard
RAM: 512 MB
HDD: 200 MB free disk space
Developed By QuickTime Player
Download QuickTime Player in MAC Latest Version Old Versions Link
To have QuickTime player in MAC you need to click on the following download now button to start download. You can also download GOM player for MAC.
Download Old versions of QuickTime Player for MAC
A QuickTime 7.6.9 Leopard
B QuickTime 7.6.4 Tiger
C QuickTime 7.5.5 Leopard
D QuickTime 7.5.5 Tiger
E QuickTime 7.4.1 Panther
F QuickTime 7.3.1 Panther
G QuickTime 7.2.0
H QuickTime 7.0.1
I QuickTime 6.5.0
How to use QuickTime Player to Record Your Screen
In the following video you will learn step by step how you can record your screen. So please watch the full tutorial and leave your comments.
Related
by Christine Smith • 2020-10-27 16:12:05 • Proven solutions
QuickTime and the relate codecs are one of the finest ways to confirm that each and every format is played using this player and this is what the developers of this codec also want. The QuickTime player sometimes encounters the errors that the player cannot play a specific format and the codecs are require. This tutorial has been written to ensure that the user not only gets the download links but also gets the work done as soon as possible. The codecs mentioned can also be regarded as additional functionality that would make the Quicktime playback smooth and will also get the best outcome in this regard. Besides, you can use a video converter to convert codecs to QuickTime the compatible format.
Top 5 QuickTime codecs
Below are the top 5 codecs that a user needs to install to ensure that the functionality is embedded within the program. It also makes sure that the download URL that has been mentioned is the one that leads the users to the official as well as the other renowned sites so that the codec download is easy to follow and to check that the user gets the results in line with the requirements. The codecs are not only easy to install but most of them are placed directly to the root file of the program which eliminates the issues without even notifying the user. This phenomenon is highly appreciated by the developers as it make a user’s bond strong with the company, due to the fact that the program and all the features are played without any issue and trouble.
Signatures for outlook mac os. Create and insert a signature in Outlook for Mac. Tip: If you want, you can create multiple signatures and have Outlook insert them at random into e-mail messages. To include a signature as one of these random selections, select the check box in the Random column next to the Signature name.
The codecs that are mentioned here are the ones that are the paramount and they have already been tested to certify that the user gets the unsurpassed and the state of the results. The list that has been mentioned is also the one that allows the users to take care that the process is also followed and the downloading as well as the installation of the codec is easy to follow as well. Codecs that are mentioned here are the ones that check that the user gets the results in relation to the movie playing as well as the overall tools that are required are also made available.
1. CEA-608 caption
Download Link - Official Download Link 3
The CEA 608 or just the CC codec is the means to ensure that the user gets the preeminent and the most advanced codec for the download as well as viewing the captions and the subtitles. The user needs to certify that the codecs and the components that are needed to make the things work are also installed and are also deemed to be fit. The user needs to confirm that the process of doing this is followed by following the URL that has been mentioned above as this will also check that the user is never left in despair and gets the things done within no time at all.
2. DIVX codec
Download Link - Official Download Link 2 Download Link 3
In order to take care that the DIVX files are played with ease and satisfaction it is the codec that is to be installed to make certain that the user gets the results. It will also ensure that playing the DIVX files is not a match at all and the overall effectiveness of the player is also maintained. the user should also confirm that the codec is installed and the user gets the best when the URL’s that have been mentioned above are used to get the work done in style and class. Above all the DIVX organization itself is a company that definitely requires no introduction at all.
3. XVID codec
Download Link - Official Download Link 2
To ensure that the XVID codec is installed and the related files are played with ease and satisfaction this codec is also to be downloaded. The user should also check that the tools and the related components are also used to confirm that the user gets the work done which is definitely related to the playing of the XVID files which normally QuickTime does not play if the codec has not been installed.
4. ZyGo
Download Link - Official Download Link 2
For QuickTime playback and the other related components the ZyGo gets the work done within no time at all. The user should also check that the official website and the links that have been provided here are used to make certain that the work is done without any issue and the component is also installed with quality and class. It will also confirm that the user gets the work done without any issue and problem.
5. Streambox
Download Link - Official: http://www.streambox.com/products/quicktime_main.html Download Link 2: http://www.streambox.com/downloads Download Link 3: http://www.macworld.com/article/1003454/streambox.html
To certify that the multiple codecs are embedded within a single pack and then used within the QuickTime to take care that the process has been developed this codec has been developed. The user makes sure that the process that has been mentioned at the official URL is followed to make certain that the user gets the greatest results and also gets the work done without any hassle.
For some users finding and implementing the QuickTime codecs one by one might be a sheer daunting task and it is advised to take care that the URL is to be followed to certify that the user gets the outcome to check that the processes are not only followed but the user also gets the work done without any hassle and problem. The screenshot of the webpage is as follows:
Conclusion
The codecs that have been mentioned above are very important for the users as they would allow the user to get the full fledge functionality of the player without any issue and trouble. These codecs have been developed to get the best out of the QuickTime Software and installing these will also enhance the capability of the user to play the files with ease and satisfaction. From a single codec installation these codecs sometimes also install multiple files to the system that would resolve the issues clandestinely making a user satisfied and resolving the issues that are normally faced in relation to QuickTime playback.
Telnet command mac address. HI Chandu,Alain is right, RDP and telnet uses IP address.Just for information:go to START-RUN and type CMD or COMMAND and hit ENTER) and the type 'arp -a' and you will get a list of IP addresses and MAC Addresses.ARP was not designed to translate addresses in the other direction, however. There is no universal mechanism to determine an IP address given a known MAC address, although it can be done in certain specific situations.ARP maintains a list of both IP addresses and matching MAC addresses called the 'ARP cache.This is one way to derive an IP address from a MAC address; however, the mechanism is limited in many respects.On Windows and some other operating systems, the 'arp' command provides access to the local ARP cache.
Wondershare UniConverter - Best Video Converter for Windows/Mac
Convert DVD to videos in 1000+ formats without losing quality.
Customize video formats for specific devices such as iPhone/Android devices.
Edit videos with trimming, cropping, rotating, adding watermarks, editing subtitles, and more.
Burn videos to DVD with free menu templates for easy playback on TV.
Download online videos from YouTube, Vimeo, and other 10,000+ sites.
30X faster converting speed than other common video converters.
All-in-one video tool: video compressor, video converter, GIF maker, screen recorder, image converter, and more.
Supported OS: Windows 10/8/7/XP/Vista and Mac OS 10.15 (Catalina), 10.14, 10.13, 10.12, 10.11, 10.10, 10.9, 10.8, 10.7, 10.6.
Quicktime For Mac Download
Security Verified. 5,481,347 people have downloaded it.
0 notes
Text
Signatures For Outlook Mac

Screen filters for mac backup. In the United States and/or other countries.
IMPORTANT: Please read this article about a recent Microsoft update which may effect your HTML email signature.
Adding hyperlinks to your Mac Mail signature. Finally, we’ll walk through the steps of adding hyperlinked text in your Mac Mail signature so you can hyperlink your website and email address for example. Open the Mac Mail app and click “Mail” in the menu bar. Select “Preferences”from the menu. Send your Outlook Mac 2011 emails with style. Create your own customized and professionally designed HTML email signature for Outlook Mac 2011 with Email Signature Rescue. Select any of our HTML email signature templates and customize it with your own details, using our Email Signature Rescue software.No HTML knowledge needed. Mac Outlook Email Signature Installation Instructions Warning: (Mac Users) The Safari Browser Cannot Be Used To properly support an HTML email signature, the Safari web browser cannot be used for your signature installation. The formatting will turn out wrong if Safari is used to open and copy the signature. Install Google Chrome Install Firefox for Windows Install Firefox for Mac Part 1. Install Email Signature Outlook Mac 2016. NOTE: If the email signature preview in the settings area is cutting off your email signature, double check if your email signature is setup correctly, by composing a new email message instead. Close your settings and compose a new email. Your email signature should be automatically inserted into your emails.
STEP ONE
Open your supplied HTML file in Google Chrome or Mozilla Firefox.
IMPORTANT: Do NOT use Safari during the installation process as it may cause formatting issues. Copy your email signature from Google Chrome or Mozilla Firefox instead.
Once the Email Signature is open in your web browser, press CTRL + A (Command + A for Mac) to highlight the signature, then press Command + C to copy the signature.
IMPORTANT: Do not use your mouse to select the area, only use Command + A as you may miss out on grabbing some of the code.
STEP TWO
Open Outlook for Mac 2016.
STEP THREE
Once Outlook for Mac 2016 is open, select Outlook from the menu bar, then Preferences.
STEP FOUR
Select Signatures under the Email section.
STEP FIVE
When your Signatures window opens, click on the + (plus) icon to create a new signature and type a name for your email signature, hit enter.
STEP SIX
Paste your signature into the field by pressing Command + V. Set your signature as the default for New Messages and Replies/forwards below.
NOTE: If the email signature preview in the settings area is cutting off your email signature, double check if your email signature is setup correctly, by composing a new email message instead.
STEP SEVEN
Close your settings and compose a new email. Your email signature should be automatically inserted into your emails.
Congratulations!
That’s it. Try your email signature now by composing an email to yourself or [email protected]
Step 1:
Once you are ready to set up your email signature, open Outlook. On the Outlook menu, click Preferences.
GIMP for Windows. Download GIMP 2.10.22 via BitTorrent Download GIMP 2.10.22 directly. The download links above will attempt to download GIMP from one of our trusted mirror servers. If the mirrors do not work or you would rather download directly from our server, you can get the direct download here. Supported OS: Windows 7 or over. Gimp for mac os download mac.
Signature For Outlook Email

Step 3:
Click the + icon in the lower left corner of the window to add a signature. A new window will open where you can insert your email signature.
Step 4:

Mac Mail Signature
Select everything in the new window (or press Command + A) and delete it. Then, paste your new email signature (or press Command + V) into the box.
Close the window and click “Save” for the pop up prompt.
Outlook For Mac Signature Problems

Step 5:
Signature Outlook Mac 2011
Double-click Untitled, and then type a name for the signature. This name does not appear in the signature in your messages, it is only for your reference.
At the bottom, select your new signature as the default for new messages and replies/forwards.
Step 6:
Once you are done, close all the windows until you are back at the main screen. Click to create a new email and check out your new signature! Mac telnet port.
0 notes
Text
Hdd Enclosure For Mac

What Is an External Hard Drive Enclosure?
Hdd Enclosure For Laptop Hard Drive
External Hard Drive Enclosures are used to make an internal hard drive external by enclosing it in a case. Hard drive enclosures can provide many benefits; one such benefit is giving traditional internal hard drives portability. It is easy to transfer data to an external hard drive on most computers and operating systems. Using an external hard drive will also reduce the probability of data loss or data corruption. In addition, data can be backed up and archived on an external hard drive so that it doesn’t take up any additional space on your primary hard drive.


What Are the Benefits of External Hard Drive Enclosure?
SATA Enclosure External Case For Notebook Laptop Hard Disk Suitable for all 2.5 in. Hard disk Can work in a variety of operating systems for Windows 98/ME/2000/XP or for Mac OS, for Linux and vista Protect the hard drive from damage, easy to carry USB (480Mbps) interface connected hard disk box with a computer For both Desktop. We offer a wide range of hard drive enclosures for Mac systems including SSD, HDD, RAID, and more external hard drive enclosures. Find yours here! LaCie Mobile Drive. Backups Made Easy. What is one of the most common uses for an external. UGREEN 2.5” External Hard Drive Enclosure. Transferring files is at a rate up to 5Gbps which easily. Compatible with Windows/Mac The external hard-drive enclosure works with Windows 7, 8, 10 and Mac OS X and above. In the Box Hard drive enclosure, AC power adapter, self-adhesive sponges, USB 3.0 cable, user manual, backed by an AmazonBasics limited one-year warranty.
Here are the top ten benefits of using a hard drive enclosure:
Adding additional storage space and media types to small form factor and laptop computers, as well as sealed embedded systems, such as digital video recorders.
Adding more drives to any given server or workstation than their chassis can hold.
Transferring data between non-networked computers, jokingly known as sneakernet.
Adding a backup source with a separate power supply from the connected computer.
Sharing the data on a drive in a network-aware enclosure. Gimp for mac os download.
Preventing the heat from a disk drive from increasing the heat inside an operating computer case.
Simple and cheap approach to hot swapping.
Recovering the data from a broken or damaged computer.
Lower the cost of removable storage by reusing hardware designed for internal use.
Protecting sensitive data when virus attacks computers.
What Are the Types of External Hard Drive Enclosures?
Materials – External hard drive enclosures are constructed from a variety of materials. These materials include plastic, metal, aluminum, or even a combination of the three.
Connection Type Screen filter app. – Most external hard drives connect to your computer through USB (Universal Serial Bus) 2.0 and USB 1.1, or FireWire. Your choice will probably be predetermined by the type of ports you have available and the type of system (Microsoft Windows or Apple Macintosh) you’re running. However, if you have both types of ports, you’ll need to decide which type of connectivity to use. While the theoretical bandwidth for USB 2.0 is higher than that of FireWire 1394a, actual transfer speed is comparable. Some new Mac Pro computers include the slightly faster FireWire 800 interface, and a few external hard drives have this connector.
Interface – When you are purchasing an internal hard drive, they come in two interfaces: IDE and SATA. Of the two interfaces, SATA hard drives are much more common now than IDE based hard drives. This is because SATA based hard drives usually offer greater performance in terms of offering large memory cache, RPMs (Rotations Per Minute), and overall transfer rates. SATA based internal hard drives can use SATA hard drive enclosures. In additional to offering USB and FireWire connection types, SATA has also been added to the list.
Size – It means the physical size rather than capacity of the hard drive, so it depends on what kind of internal hard drive you use. There are two available sizes: 3.5 inch hard drives which are used in desktop computers and 2.5 inch hard drives which are used in notebooks. The former is bigger, faster, and cheaper; but the latter is necessary for those upgrading their lap tops.
Number of Bays – Single and dual bay enclosures are available. The dual layer enclosure can take two internal hard drives as opposed to one. This is a very useful feature for power computer users that require a large amount of portable hard drive space. However, for most users it isn’t necessary as you can easily purchase another external hard drive enclosure if most space is needed in the future.
Hdd Enclosure For Macbook Pro
How Do You Use an External Hard Drive Enclosure?
Telnet command for mac. The hard drive enclosure works as an external hard drive by enclosing an internal hard drive. To most enclosures, there are only some easy steps to prepare. Just follow these instructions:
Hdd Enclosure For Mac Catalina

Hdd Enclosure For Mac Os
First off, determine what kind of external hard drive enclosure you are looking for based on what connections types are available to you. USB would be your safest bet as the USB interface is offered by most computer now produced. Other options include going with Fireware or even using a SATA external hard drive enclosure. Once you have determined which interface you are going with, proceed to the next step.
Open the enclosure and place the internal hard drive inside.
Connect all the necessary cables, such as connecting the hard drive enclosure to the hard drive, the power cable for the enclosure, and finally connecting the enclosure to your computer.
That’s it! External hard drive enclosures transform internal hard drives into a plug-and–play device. You can use it anytime while system is running and it will become a removable storage drive.
0 notes
Text
Telnet Command For Mac

Updates
Telnet Command Show Mac-address
Telnet Command For Mac Os
Mac Install Telnet
Telnet Command For Mac
Commands to find mac-address and IP on a port Can someone show me the commands to find a mac-address on a switch and if I know the port I am looking to find it on, also how i find the IP address on that port. Labels: Labels: Other Switching; 3 people had this problem.
About
Terminal is the Mac OS equivalent of Command Prompt. Type telnet and press ⏎ Return. This launches the Telnet interface which you need to connect to the server that hosts ASCII 'Star Wars.'
BrewInstall.org is a webapp to search for a mac app and get the steps to install the app. To install telnet run the following command. To install telnet run the following command. But make sure you have homebrew installed.
To see active MAC Telnet sessions: admin@MikroTik tool mac-server sessions print # INTERFACE SRC-ADDRESS UPTIME 0 wlan1 00:0B:6B:31:08:22 00:03:01 admin@MikroTik tool mac-server sessions MAC Scan. Command name: /tool mac-scan; This command discovers all devices, which support MAC telnet protocol on the given network.
Open source MAC Telnet client and server for connecting to Mikrotik RouterOS routers and Linux machines via MAC address.
Based on MAC-Telnet the original work of haakonnessjoen ( Håkon Nessjøen );forked the upstream version to add forwarding mode for tunneling a TCP connection through MAC-Telnet protocol, and implemented MAC-SSH client and server functionality for tunneling SSH protocol instead of implementing shell interface directly.
Unless you will be using any of the additional functionalities, I recommend using the Original Version fromhaakonnessjoen ( Håkon Nessjøen ) instead.
For information on other projects you can check my GitHub Personal Pageand GitHub Profile.
Differences
The original version implements the following:
A Linux console tool for connecting to MikroTik RouterOS devices via theirEthernet address.
Linux daemon that implements the MAC-Telnet server to permit connectingto Linux machines via their ethernet address.
The forked version implements additional functionality for forwarding a TCP connection through the MAC Telnet protocol. The main use case is connecting to Linux machines via their Ethernet address using the SSH protocol for security. Take note that the clients and servers running in theforwarding mode are not compatible with existing MAC-Telnet clients and servers implementing the standard mode of operation.
The forked version of the server supports two modes of operation:* Standard MAC-Telnet Server Mode* TCP Connection Forwarding Mode: Tunnels a TCP connection to a local port on the client to a specific local port on the server side through MAC-Telnet protocol. This mode of operation is used for forwarding SSH connections through the MAC-Telnet protocol.
The client supports three modes of operation:* Standard MAC-Telnet Client Mode* TCP Connection Forwarding Mode: Tunnels a specific local port on the client to the serverthrough MAC-Telnet protocol.* SSH Forwarding Mode: Apart from setting up the tunnel, the client takes care of launching the SSH client.
The SSH Forwarding Mode has the following advantages in comparison to standardMAC-Telnet:
The_mactelnet.users_ configuration file is not needed. Instead of maintaining another set of user passwords for MAC-Telnet, the authentication mechanisms implemented ssh are used.
Public Key Authentication works seamlessly permiting passwordless logins.
The communication between client and server is encrypyted by SSH.
The daemon does not require root privileges and can be run by a non-privileged user for additional security. In case the -n option is used, the serveror client must be launched as root user, but the-U option can be used to drop privileges once the initial setup phase ends.
The server relies on the security model of SSH, instead of creating a shellenvironment itself.
Use Cases
Embedded Systems
It can be used for initial provisioning and for maintenance purposes in situations where a valid IP configuration is not available.
Might be a useful addition to the rescue mode especially of embedded systems without screens; connecting using MAC-Telnet / MAC-SSH is much more convenient then fetching and connecting a serial cable.
The Datacenter
It can be used for initial provisioning of physical and virtual servers and might serve as a rescue system, when the IP configuration of a server gets messed up for any reason.
Download
Binary Packages
The original version of the MAC-Telnet has been packaged for Debian GNU/Linuxby the original author haakonnessjoen ( Håkon Nessjøen ).You can download the deb packages for the original version from the Downloads Page of the Upstream Project.
Source Packages
The original version of the MAC-Telnet by haakonnessjoen ( Håkon Nessjøen ) canbe download from the project page of the Upstream Project.

You can download the latest development version of this code that is hosted at GitHub eitherin ZIPor TAR format.
You can also get the latest development version of the code by cloning the Git repository for the project by running:
Installation
The binary packages of the original version of the code can be installed using the packaging tools of the distribution.
Once the source code is cloned or downloaded it can be installed as follows:
Configuration
Sample upstart configuration files can be found in the config directory ofthe distribution:
Use mactelnetd.init for starting / stopping MAC-Telnet in standard mode.
Use macsshd.init for starting / stopping MAC-Telnet in MAC-SSH mode.
Usage
mactelnet
Usage
Examples
Establish standard MAC-Telnet session with remote box:
Forward local port 4001:
Establish SSH connection with remote box:
Establish SSH connection with remote box, forwarding additional ports using SSH Port Forwarding:
mactelnetd
Usage
Examples
Launch MAC-Telnet Daemon for receiving Standard MAC-Telnet protocol connections:
Launch MAC-Telnet Daemon for forwarding connections to local SSH Daemon listening on port 22:
Launch MAC-Telnet Daemon for forwarding connections to local SSH Daemon listeningon non-standard port 2222:
macping
Usage
Examples
mndp
Usage
Examples
Troubleshooting
Disable firewalls both on the client and server side for testing. Firewalls can block the forwarding of packets with broadcast addresses even when they arenot blocking any ports.
The server can be run in the foreground (commanline option: -f) for testing.
Credits
MAC-Telnet has originally been developed by haakonnessjoen ( Håkon Nessjøen ).

The code published on this page is a fork with some experimental features forestablishing SSH connections via MAC Address. The additional features have been implemented by Ali Onur Uyar ((aouyar @ GitHub) (https://github.com/aouyar)).
License

MAC-Telnet is copyrighted free software made available under the terms of the GPL License Version 3 or later.
See the file LICENSE that acompanies the code for full licensing information.
Applies to RouterOS:2.9, v3, v4
MAC telnet is used to provide access to a router that has no IP address set. It works just like IP telnet. MAC telnet is possible between two MikroTik RouterOS routers only.
2MAC Telnet Server
3MAC WinBox Server
4MAC Scan
5MAC Telnet Client
Specifications
Packages required: system
License required: Level1
Submenu level: /tool, /tool mac-server
Standards and Technologies: MAC Telnet
Hardware usage: Not significant
MAC Telnet Server
Submenu level: /tool mac-server
Property Description
interface (name | all; default: all) - interface name to which the mac-server clients will connect
Notes
There is an interface list in this submenu level. If you add some interfaces to this list, you allow MAC telnet to that interface. Disabled (disabled=yes) item means that interface is not allowed to accept MAC telnet sessions on that interface. all interfaces iss the default setting to allow MAC teltet on any interface.Example
To enable MAC telnet server on ether1 interface only:
MAC WinBox Server
Submenu level: /tool mac-server mac-winbox
Property Description
interface (name | all; default: all) - interface name to which it is alowed to connect with Winbox using MAC-based protocol
Notes
There is an interface list in this submenu level. If you add some interfaces to this list, you allow MAC Winbox to that interface. Disabled (disabled=yes) item means that interface is not allowed to accept MAC Winbox sessions on that interface.Example
Telnet Command Show Mac-address
To enable MAC Winbox server on ether1 interface only:
Monitoring Active Session List
Submenu level: /tool mac-server sessions
Property Description
interface (read-only: name) - interface to which the client is connected to
src-address (read-only: MAC address) - client's MAC address
uptime (read-only: time) - how long the client is connected to the server
Example
To see active MAC Telnet sessions:
MAC Scan
Command name: /tool mac-scan
This command discovers all devices, which support MAC telnet protocol on the given network.
Property Description
(name) - interface name to perform the scan on
Telnet Command For Mac Os
MAC Telnet Client
Mac Install Telnet
Command name: /tool mac-telnetProperty Description(MAC address) - MAC address of a compatible device
Example
Telnet Command For Mac
Retrieved from 'https://wiki.mikrotik.com/index.php?title=MAC_access&oldid=13903'
0 notes
Text
Gimp For Mac Os Download

Download The GIMP Portable. It is a free application for photo retouching, image composition and image authoring. It can be used as a simple paint program, an expert quality photo retouching program, an online batch processing system, a mass production image render, an image format converter etc. Here you can find new as well as old version of the GIMP portable version.

Download the latest version of Gimp for Mac. Free and open-source software for creating and editing images. For several years now, GIMP (GNU Image Manipulation. Gimp-Print 4.3.18 is the latest Mac OS X release in the 4.3.x developmental line. Best VPN Services for 2020 Curated by Cnet See more on Cnet. Download Information; File Size: 5.3MB.
Download old versions of Gimp for Mac. Free and open-source software for creating and editing images. The latest version of Gimp is 2.10 on Mac Informer. It is a perfect match for Viewers & Editors in the Design & Photo category. The app is developed by The GIMP Team and its user rating is 4.3 out of 5.
Publisher- GIMP Team & Portable apps
Last Update – 24-June-2020
Categories– Image editing & Graphics tool
(adinserter block=”1″)
GIMP Portable for Windows
Version: 2.10.18
OS Supported: Windows 10, 8.1 and 7
GIMP Portable for MAC OS
Version: 2.10
OS Supported: Mac
GIMP Portable for Linux
Version: 2.10
Download Gimp Mac Download
OS Supported: Linux, Ubuntu
HOW TO INSTALL GIMP PORTABLE
GIMP Portable version is a plug-n-play type application you don’t have to install it on your system. Just run the file and you will good to go. You will have all the options available which are available in the full setup of GIMP.
GIMP (GNU Image Manipulation Program) is a open source, cross platform image editor software available for Windows, linux and MacOS. If you are a graphic designer, photographer, illustrator, or scientist, GIMP provides you with sophisticated tools to get your job done. You can further enhance your productivity with GIMP thanks to many customization options and 3rd party plugins.
Features
FEATURES OF GIMP PORTABLE
GIMP has loads of features for the advanced user including filters, Bezier curves, layer masks, and an animation package. You can use pre-installed and downloadable plugins just as Photoshop. Overall, the software is a force to reckon with among the best free image editing applications, and the ideal package for geek photographers who like to keep their editing space under control.
5 GIMP features you just can’t ignore
GNU Image Manipulator is the full form of GIMP and is a free space image editing elucidator that undergoes the field of comparable open-source programs. It provides the user with the flexibility to manage its distributed changes and its source code. This marvellous application is free, but that doesn’t change the fact that it doesn’t compromise on its aspects. GIMP avails all the refined and sceptical tools for the utter satisfaction of graphic designers, photographers, and cartoonist, considering the most efficient way of getting their job fulfilled.
The overview of the GIMP key features to introspect it’s usage better.
File handling
GIMP gives backing to several variant formats to file types inclusive of GIF, JPEG, TIFF and PNG. Since it is an expandable application, it supported by many plugins for file type support. It’s even feasible to save the files in an abstract format, like ZIP or GZ, to avail space on your hard drive. Gimp will simultaneously shaft the abstractness of this needless of one’s help.
Customizable user interface
The user interface creates an environment that creates a pathway for the sole interaction and control over the software. This software can be used for a wide range of tasks due to its customizable interface with which we get the ease of access. It provides a feature that aids the accessibility of full-screen editing mode. These make it viable to edit large photographs.
Support
Gimp back up various types of hardware devices. It supports most of the input devices such as scanners, graphic tablets and stylus and many more. There is also a possibility to accustom the control panel of the GIMP.
Photo enhancing

Digital photos have a range of incomplete aspects which can affect them, but still, they can be seamless. Gimp portraits a variety of enhancement tools which can be made use to generate the most of your photographs. It’s possible to discard barrel distortion and manage colour balance.
Extensible
It consists of a Procedural Database for pointing it towards internal GIMP functions from external programs like in Script-fu. With plugins that permit the easy compiling of new file formats and new effect filters along with over 100 plugins already available. It also consists of advanced scripting capabilities such as Scheme, Python and Perl.
Though GIMP requires the depth of the commercial photo editing programs, it still administers all the critical editing commands, tools, and features. Thus the application goes farther the backbone base to have some advanced editing tools likewise channel manipulation. It also has an “open as layers” command, which is a noteworthy feature which is used to locate an image into the layer of another layer.
These features help build worthy software efficiently compared with other overrated application
Plugins
PLUGINS OF GIMP PORTABLE
The GIMP plugin scene is a bit of a mess. Plugins used to be collected together in the GIMP Registry, but that no longer exists. Which means they’re now scattered around the internet. Below are some plugins which are compatible with GIMP Portable edition. You can install it just like you do in Photoshop.
Before you download the plugins please checkout how to install it on portable edition. so below is the exact method to install plugins.
Open the application
Go to Edit>Preference. A dialogue box will popup.
Now click on “+Folders” on the left side bar
Locate the Plug-ins and Scripts sections.
There are two folders in each section. One is a system folder, the other a user folder. Select the latter then click Show file location in the file manager to open it.
If your downloads are in the PY format move them into the Plug-ins folder.
If they’re in the SCM format move them into the Scripts folder.
Now restart GIMP portable.
The second way is the automatic method. Some plugins come packaged with their own installer. Just double-click this and install it as you would any other application.
Photoshop plugins for GIMP (PSPI)
Dark Table
Hugin
Wavelet Decompose
Duplicate to Another Image
Once you’ve installed your GIMP plugin it will show up in one of several locations. It may appear under the Filters menu, or one of the submenus there. It may be under Image or Layers, or you may get a whole new menu called Script-Fu. Sometimes, plugins (like a RAW editor) run as a separate app, triggered to launch whenever they’re needed.
FAQ
To download GIMP Portable click here and select google drive
Follow this link to install GIMP Portable
Follow this link to install GIMP Portable on Ubuntu
Rename your Gimp profile (which is left untouched when you reinstall). Restart Gimp, which will recreate a new profile. If it works, you can copy things from the old to the new (and eventually, erase the old one). or add -no-fonts -no-data to shortcut of the application as shown in picture.
You need to check the configuration of your system. Does it compatible with this application or not?.
Its depends on where you have extracted/ installed the .PAF file. If you installed it on desktop you will find help files DesktopGIMPPortable
Getting error: GIMP portable jpg unknown file type
Gimp Download Mac Os X
Completely delete the files and reinstall it, must perform a restart. if it doesn’t work do checkout Error Log: You could check in GIMPPortableAppgimpbin or somewhere in data. You can also check the error console. If you don’t mind storing settings locally (just foe now), you can run GIMP directly in that bin directory to ensure it isn’t an issue with the portablization then later delete the .gimp directory in USERPROFILE
No, If you downloaded from trusted site. If you want to run a virus test on virus total
This post may contain affiliate links. Any sales made through such links will reward me a small commission at no extra cost for you.
You’ve decided to come join the fun in GIMP land, and we’re excited to have you! Now the question is, how do you get GIMP up and running on your computer?
It’s really easy to Install GIMP. Here’s the basic idea:
First, you’ll need to know just a little information about your computer. Basically, you’ll need to know what operating system you’re running, and if GIMP is compatible with it.
Then, you’ll find the correct version of GIMP for your operating system at GIMP.org.
Last, you’ll download GIMP, and run the installer.
Now that you have the basic idea, here are the instructions in more detail.
Install GIMP For Windows:
At the time of writing, you’ll need Windows 7 or newer to run the latest stable version of GIMP.
If you’re on Windows, and you don’t know what operating system you’re using (ie Windows 7, Windows XP, etc.) follow these instructions to find out which operating system you’re running.
Now, go to the official GIMP repository and click the Download link at the top of the page to download GIMP. This version of GIMP will work with any version of Windows, as long as it’s Windows 7 or newer.
While GIMP is available from a lot of sites (since it’s free and open source software), I recommend only downloading it from the official repository at GIMP.org to make sure you don’t get stuck with any malware.
When the download is complete, open up the package, and run the installer. Follow any instructions on the windows that appear.
That’s it! You’re finished installing GIMP! The first time you start GIMP, it may take a few minutes to get going, because there’s a lot of new stuff to load. Just be patient, it will start eventually.
Install GIMP For Mac:
To install the latest version of GIMP on a Mac, at the time of writing you’ll need OS X Yosemite or newer.

Not sure which version of Mac OS you’re using? Follow these instructions to find out.

Now, head over to the official GIMP download page, and click it’s link to download GIMP to your computer.
When the files are finished downloading, open up the Zip file, then open the installer to begin installing GIMP. Follow any directions you’re given in the windows that pop up.
GIMP will now be installed on your computer! The first time you start GIMP, it may take a few minutes to get going, because there’s a lot of new stuff to load. Just be patient, it will start eventually.
Gimp For Mac Os Downloads
Have Fun!
Now that GIMP is installed, you’re ready to get started editing! You can use GIMP to open and edit any image file that’s on your computer.
Gimp For Mac Os Download Dmg
There’s plenty more GIMP help where this came from. I mean, literally, where this came from. HowToGIMP.com has a growing library of easy to understand, plain English GIMP tutorials and videos to help you learn GIMP faster.
0 notes
Text
Screen Filters For Mac

Screen Filters For Computer Monitor
Screen Filters For Mac Catalina
Screen Filters For Mac Windows 10
The importance of internet filtering

Full Screen Brightness Filter is a very simple, light weight brightness filter and contains no advertisements and no weird permissions. Free Publisher: Team Sugarcane.
Screen Filters For Computer Monitor
Best Seller in Laptop Screen Filters. 2-Pack 15.6 Inch Laptop Screen Protector -Blue Light and Anti Glare Filter, FORITO Eye Protection Blue Light Blocking & Anti Glare Screen Protector for 15.6' with 16:9 Aspect Ratio Laptop. 4.3 out of 5 stars 1,300. Green Screen We use the Term 'Green Screen' in the general sense. This actually means Chroma Key. So do not be confused by the 'Green' part of the term. Using a Blue screen or any solid colour background will also work fine, but may not have the best possible result. A Farewell To Flash. HTMLChat.net was first created back in 2008. Add these inline T-strainers to your sanitary process line to trap solid particles during clean-in-place (CIP) cycles. They have quick-clamp sanitary tube connections, also known as tri-clamp connections, for use in dairy, food, and other process lines that require frequent cleaning and disassembly. As the high-pressure cleaning fluid flows through your line, the strainer's screen catches.
1. Increases in productivity. The websites that cause diversion of staff, employee, or student's attention are blocked, and this, in turn, leaves them with no option but to focus on their work hence increasing productivity.
Screen Filters For Mac Catalina

Screen Filters For Mac Windows 10
2. Blocking inappropriate content. Specifically, in educational institutes, it's of utmost importance to keep children away from inappropriate content. Applying internet filtering software will ensure that children and students are viewing or visiting age-appropriate content and websites. Blocking websites that are not age-appropriate is one of the biggest advantages of internet filtering.
3. Safety. Internet filters ensure the space your kid surfing is a safe place. With all the cybercrime taking place on the internet through cyberbullying and cyber predators in chat rooms, social networking sites, and other platforms that your kids may browse, it is increasingly important to protect your kids. Through internet filtering, you are also able to block specific sites that your kids should not visit.
4. Protect resources. Too much of uploading and downloading may require a lot of memory space. You can set your internet filtering software to download to block any download from peer networks. You can also block specified websites that require a lot of memory space.
1 note
·
View note