
matthew5215254-blog
11 posts
Don't wanna be here? Send us removal request.
Statistics
We looked inside some of the posts by matthew5215254-blog and here's what we found interesting.
Average Info
Notes Per Post
22
Likes Per Post
11
Reblog Per Post
0
Reply Per Post
11
Time Between Posts
7 days
Number of Posts By Type
Text
9
Photo
2
Last Seen Tumblr Blogs


Fun Fact
Tumblr is available in 18 languages.
Text
Week 11 - Perspective Drawing
Tutorial
In this week’s tutorial, we learned how to draw using two point perspective drawing. This concept was very new to me as i never learned it before.
Practical
We had to draw perspective drawing of Wassily armchair designed by Marcel Breuer. We had to research the product’s size and dimensions. We then had to change the dimensions in mm. We then had to create a grid on my orthogonal sketch view, then transfer this grid to the 3 visible faces of my perspective cube.


Outcome
What did i enjoy and dislike? Why?
I enjoyed learning how to draw using 2 point perspective drawing. But however i did not enjoy the drawing aspect of it as i keep smudging the pencils.
What went well/ what difficulties did i face? Why?
I struggled with this week’s tutorial as it was very hard to understand the concept of 2 point perspective drawing. In the end with help from friends, i managed to finish but i definitely need to practice and improve on these skills.
What did i learn?
I learned how to draw using 2 point perspective drawing
What do i need to improve on?
I need to improve on my overall drawing as well the 2 point perspective drawing. Also i need to plan out the drawing better
3 notes
·
View notes
Text
Week 13 - Sketching & Semester Overview
Tutorial
This week was the final week of the IDES1261- Communication1: Tech Drawing. During this lesson we had to draw, especially line work to improve our sketching skills. Multiple aspects of sketching were studied which included shading, perspective drawing, and hand- eye coordination.
Shading
During this weeks tutorial, we learned how to shade different ways. Some activities included shading boxes in different gradients in different directions. First line I scribbled the gradient while on the second i used one singular lines to try to show difference in tone. At first, I thought this exercise wasn't that important, however this thinking changed when i moved onto shading 3D shapes. Through shading you could see how and where the light hits the object.


(Above pictures - shading)
Overview of Semester
Overall, I found this course to be challenging and interesting. During the course of Semester 1, I learned how to use photoshop, AutoCAD and how to create 3D models. This course really tested my ability to draw technically and think methodically.
Difficulties
One of the things that was difficult was to learn all the softwares in order to complete our tasks. As i had no knowledge or hand to hand experience with these softwares, i struggle in the beginning. The other thing i struggled was to manage my time as i had 3 courses. This overwhelming amount of work made me finish my work last minute which I would not recommend.
Enjoyed
While there were difficulties, there were lots of things i enjoyed as well. I really enjoyed learning how to use various softwares to complete tasks. I really enjoyed the model making aspect as i love to make and create things with my hands.
Things I could improve on
I could really improve on finishing my work more neatly. This was a factor i struggled with as evident with the technical drawing task and the 3D model task. I could really improve my time management skills as i struggled to post my bogs on time and finishing works last minute.
Course Conclusion
In conclusion, this course was very challenging and tedious, however I really enjoyed learning how to use new softwares and methods to draw and create objects. I believe that that the things i learnt from this course will guide me through my industrial design course.
0 notes
Text
Week 12 - Photo Essay
Tutorial
This weeks tutorial consisted of two parts. For the first part, we had to put together a photo essay that captures the life on campus. The shots had to be taken on the day, within a 2 hour timeframe. Second part consisted us of having to choose 6 best photos and to edit them using various software such as Adobe Photoshop, Adobe Lightroom or Poalrr. The final edit must include
A portrait (preferably of a complete stranger)
Something from the built environment
Something from the natural environment
An interesting detail
This was to be posted with our weekly blog posts.


Outcome
What did i enjoy and dislike? Why?
i really enjoyed going outside to take photos and explore the campus. It was really good to see the different aspects of UNSW through camera lens.
What went well/ what difficulties did i face? Why?
At first i was struggling as i didn’t know what to take photos of. Also as i didn’t have a camera, i had to rely on my smartphone which has a moderate camera, but nothing compared to a real camera. This itself was a challenge but i managed to overcome this and take aesthetical photos.
What did i learn?
Through this exercise i learned that the camera cant capture what the eye can see. No matter how good the camera is, it can never capture the exact same way we see with our own eyes.
What do i need to improve on?
I think i could improve on how to manipulate Adobe Lightroom and photoshop better in order to make my photo look better
1 note
·
View note
Text
Week 10 - Measurements and Model Making
Tutorial
This week we were taught how to measure our chosen product and had to construct the profile and contour lines. There were multiple tools such as skewers, calliper and profile gauge to measure out the contour of the object. I found the profile gauge to be the most useful for the contours and irregular faces.
Prac
During the practical lesson we were divided into different groups to learn about the tools we could use in order to complete this task. I found this very helpful as the tutors were very informative on how the tools worked and what they were used for.
Method
I used fusion 360, which i learned from high school when doing Design and technology, to create my object in 3D. As my object was a metal kettle, which meant it had a lot of curved surfaces. Knowing that i couldn’t just use regular ruler to measure the diameter, i used string to measure around the kettle. While doing this i measure diameter every 1cm. After inputing the measurements onto the fusion 360 and creating my object, i used an application called Slicer in order to split my object into individual sliced pieces. This allowed me to see all the different shapes and slits that were needed in order to create my 3D object. The total pieces i had to cut was 42 pieces and was printed on an A3 paper with 1:1 scale. I placed the printed shapes on a 3mm foam-core, cutting the foam-core following the print. When all cut, i joined each pieces together, weak or flimsy pieces glued together to hold it together.

(Above Picture - my chosen object on Fusion 360)
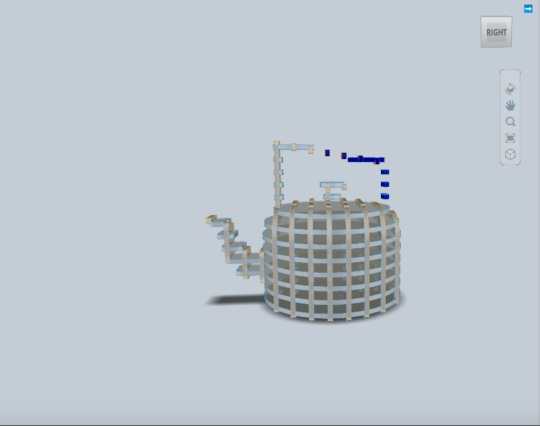
(Above Picture - my kettle imported from Fusion 360)

(Above Picture - my 2D pieces)
Outcome
What did i enjoy and dislike? Why?
I enjoyed using the Fusion 360 to create my object in 3D form. I disliked the measuring the contour of the kettle as it took a long time and effort.
What went well/ what difficulties did i face? Why?
Creating my object on Fusion360 went well as i had some knowledge on the software, however i did face difficulty when measuring the tip of the kettle which was curvy.
What did i learn?
I learned how to export things onto slicer, which will create 2D shapes that will form into a 3D shape. I also learned how to measure contours and curvy shapes.
What do i need to improve on?
I need to improve on learning how to finish my product more neatly and aesthetically pleasing. My object had little glue stains and accidental cuts that were quiet visible, downgrading the objects aesthetics.
3 notes
·
View notes
Text
Week 8 & 9 - working with photoshop & presentation
Tutorial
This week, we were tasked to choose a consumer product and give a presentation on the product chosen. The week after, we had to hand in our products rendered and printed out
Presentation
Were you prepared?
I believe i was well prepared for the presentation. The night before, i summed up all the points about what i was going to say which proved to be very helpful. My research paper were put in order and divided into different topics.
Did you speak clearly and fluently?
I believe I spoke loud enough for the whole tutorial group to hear, making sure that even the person on the back could hear me. Luckily, summing up all the points the night before proved to be fatal as it made my presentation run smoothly.
How was your body language?
My body language was good, as i faced the tutor and peer students. Every few seconds, I would change the focus from the tutor to peer students, making sure they hear me clearly and gaining their attention
Was your support material useful?
My support material was very useful in my presentation. However, the tutor pointed out that i shouldn’t keep flicking the pages back and forth as it would make the audience confused
What would you improve on next time?
i would improve on making my support material more simple and seperate so that i wouldn't have to flip through the pages.
Rendering
For my rendering project i decided to choose a vinyl figure named ‘KAWS’. I wanted to challenge myself, so i chose the one with multiple colours and small components. i had around 25 layers, which was a big jump from the hair dryer tutorial.

(above picture - the consumer product i chose)

(Above picture - my rendering)

(Above Picture - one of many layers in my object)
What did i like and dislike? Why?
i enjoyed the rendering of the object but a little bit annoyed with the small parts.
What would i change next time?
i would change the way how the light hits the figurine.
What are some things i learned?
i learned that you need to be patient and careful when rendering
4 notes
·
View notes
Text
Week 6&7 - 2D Photoshop Rendering
Introduction
This week’s exercise required us to use Adobe photoshop to render a hairdryer. This was a software i always wanted to learn but never got around to learn it. Being completely new to the software, i watched multiple videos on Lynda which helped me to get a better understanding of the software and how it works. With trial and error i gradually learned how to use appropriate tools and use the software more smoothly.
Task
This week were tasked with rendering a hairdryer. We were given step by step instruction on how to create multitudinous layers, outlines, sections to create a 2D rendering of the 2D hairdryer.

Process
1. linework

First we had to use the pen tool in order to get the overall shapes and details within the hairdryer. At first it was quiet difficult to use as some parts were not shaped correctly, however getting help from tutors i learned to utilise different type of pen tool to create curvatures and shapes.
2. colour tone


The next step was to add colour, reflection and tone to the hairdryer. Since there were different parts to the hairdryer, we had to create separate layer for each of parts. After that i used the paint/brush tool to add basic colour.
3. colour tone

After adding the colour we needed to put shadow and highlight in order to render the hairdryer. In order to achieve this effect, i used the brush tool to darken or highlight the part i was going to render. Then i used blur tool to soften out the marks that were solid and very rigid.
Outcome
What did i enjoy and dislike? Why?
i thoroughly enjoyed this exercise as it gave me the opportunity to learn and utilise photoshop.
What went well/ what difficulties did i face? Why?
following the step by step instruction given out by Rob was good. However some parts were very hard to understand, which required me to ask for assistance to tutors and peer students
What did i learn?
Basically i learnt how to photoshop as a whole, from using pen tool to create the object’s shape, using mask and to separate different parts into groups and layers.
What do i need to improve on?
In general, i need to improve on every aspect of photoshop. Some of them included not using the right tool, which would ruin the rendering or just consumes more time and effort
3 notes
·
View notes
Text
Week 5 More drawing with CAD
This week’s class required us to continue drawing orthogonal view projection with AutoCAD. The work we were given were very similar to last weeks work. However weeks one was a bit more challenging as we were required to show the cross sectional view of the object

Drawing One
This week we started to use CAD to draw our orthogonal projection drawings. We were previously required to watch contents from Lynda.com ‘Learning AutoCAD’ and apply it to our own. Similar to the hand drawn orthogonal drawings, we were required to work at a scale of 1:1, and show the top, front and right-side view. Even though I watched the videos from Lynda, to guide me, I continually referred back to the videos and asked friends to get a better understanding in this software. This task challenged me more than last week as we were required to show side cross sectional view of the pivot bearing.
As this was quiet familiar with the software due to my past experience and previous week’s work, i was able to easily measure out the distance between the different views and draw out the things required

HOWEVER the drawing the curved edges on the front view challenged me. Instead of using a fillet tool, i managed to draw circles through the measurements given in the sheet and trim the inner circles out.

The next step of the drawing was to put the hidden lines in. During this process, i learned a very very valuable tip from my classmates. It was utilising the layer setting on the left to create different layers, allowing me to differentiate the drawing into things like hidden lines, central lines and measurement.


After putting in the hidden lines utilising the layer setting, i inserted the cross sectional grid onto the side sectional view. At first i didn’t know how to apply this onto my drawing so i had to get help from my classmate Phoebe who was much more experienced in CAD than me. with her help i was able to apply the grid onto my drawing


Same as previous drawings i put measurements onto my views. However this proved a bit more challenging as there were lots of little parts and hidden lines, which i had to consider. Also in addition to the measurements i applied the names of the different views. This was vital as i forgot to put it in my previous drawing.

Finally, after all those procedures, selected a colour for my original Views (neon blue) making it stand out and different from other things such as the measurement line and the cross sectional grid. This step also improved the overall aesthetics of the drawing


in conclusion this week’s work was far more challenging and tedious. However when i completed the work it was very satisfying and i was pleased i that i was able to learn something new from this lesson.
Conclusion

Through this week’s lesson and homework, i learned more about CAD and gained more confidence in using the program. I could really see myself using this program in the future as well. It was hard and challenging but the overall satisfaction and achievement and new knowledge i gained was far more greater, making this week’s lesson very enjoyable
2 notes
·
View notes
Text
Week 4 drawing with CAD
This week we started to use CAD to draw our orthogonal projection drawings. We were previously required to watch contents from Lynda.com ‘Learning AutoCAD’ and apply it to our own. Same with hand drawn orthogonal drawings, we were required to work at a scale of 1:1, and show the top, front and right-side view. Even though I watched videos from Lynda to guide me, I continually referred back to the videos and asked friends to get a better understanding in this software.

Before I started the AutoCAD program, I looked at the sheet given which provided us with the measurements and the isometric view of the Pivot base. Then, I roughly sketched how I would set the drawing out and the measurements I need to put in for AutoCAD. As it was a rough sketch, I did it in pink pen (I only had a pink pen at that time). This step before starting the CAD drawing proved to be useful as it clearly gave me an insight into the shapes I need to draw and the measurements I need to put in in order to make it easier for me.

Drawing One
Drawing the shapes and getting the measurement for the views and spacings were quite easy due to my previous drawing i done before starting CAD. The only problem i faced was not deleting the lines i used for measurement. This error made me confused mixing in with the grid for drawing. This led to me starting the work again a few times, massively decreasing my efficiency. I need to be more careful and should know the measurement lines from actual object lines.

The next step after getting the shapes was to do the hidden lines. This proved to be a difficult task but through few experimentations and errors i managed to find out how to insert the hidden lines

Dimensions were added next. This was sooo much easier than drawing it by hand as there was a tool specifically made for dimensions. However, i had to play around with the setting of dimensions including Text size, arrow size and the placement of numbers.


finished the work after putting in the dimensions
Reflection:
This weeks assignments was done at home as I couldn’t finish it during class. I used AutoCAD before as I studied design and technology. However I never properly learned how to use the software properly, so this lesson was very useful and good in my understanding and learning of the software. Through my friends and videos I learned a few useful tips and tricksTips:M: move – when u press m you can move ur whole object up, down or sideL: when you press L, u can create a line, making the work progress more efficient. Dt: by pressing dt you can change the size of the word.
0 notes
Text
Week 3 Cross sections & dimensions
I was unable to attend week 3's lecfure amd studio, but through friends i was able know what was required for the week and managed to finish my drawing.
According to my friends and collegues in this course we learned about cross sectional projections of objects which include hidden lines and cross hatching. It was good to revisit this again as i did it a long time ago in highschool graphics class.
once again we were asked to draw this orthogonal projection view of the object by hand. we were required to show top, front and right side of the object.
The task for week 3

Drawing One


Overall i enjoyed drawing this weeks sectional drawing as it was durable. However i got pretty frustrated due to my paper getting dirty.
Improve
There are still alot of things i need to improve on my technical drawing. these include pencil marks, pen marks, text (size and spacing) and overall aesthetics of the drawing.
- pencil marks: I always put to much pressure on my pencil drawings which makes it very hard to erase the marks, resulting in dirty and unneat lines. i need to draw the lines more thinner and precise to avoid this problem.
- Pen marks: Similar to pencil marks i put to much pressure on the pen which results in irregular pen lines, making the drawing unprofessional. I need to consider Robs advice of spinning the pen when drawing whixh will result in neater and more clean lines.
- Text (size and spacing): I learned through the technical drawing book that texts are also a intgral part of the drawing. Due to my lack of knowledge my texts were a bit messy and didnt meet the standard it required. I need to research more and apply that knowledge in my drawings
- overall aesthetics: My paler is always dirty or there are little marks or stains whenever i finish drawing. I believe this is due to my carelessness and the tools i use. I need to make sure that my tools are clean and on point so that my drawings wont get dirty
Problem
The problem i faced this week was drawing the line wrong. In addtion to my miscalculation, the thick pencil marks made it harder for me to notice my mistake. I only found out the mistake after i drew the line in pen, but then it was too late. even from distance the mistake is noticible. i need to work to improve my drawing skils

0 notes
Photo


week 2 This week we learned about multi view orthogonal projection. For this week's studio we were asked to practise applying the principles of orthogonal projection through a trophy. Luckily for us, we were given 3 pictures of the trophy as well as the dimensions on it. i started off fairly nicely, placing borders and drawing the front, side and too view. However i had a rough time trying to figure out how to project the top slop of the triangular prism. I tried to figure it out myself but i couldn't, so in the end i asked for help from tutors and friends. Learning from my mistake last week, i gently pressed the pen on to the paper when drawing lines. As a result, the finished drawing looked much better and neater then last week. part 2 of the activity was to draw different viewpoints of an object of your own choosing. I chose my external hard drive. I thought it would be quite simple to draw the hard drive, however the little details in addition with little slopes on the edges made it more difficult and time consuming then anticipated
5 notes
·
View notes
Photo


week2 This week learned how to draw muilti view orthogonal projection. we were tasked to draw a trophy made of solid metal and grass. The trophy had a cylindrical base with a diameter of 60mm and a height of 38mm. It also consisted of a triangluar prism with a sloping top surface. Luckily our
1 note
·
View note