
Statistics
We looked inside some of the posts by matthew5310117 and here's what we found interesting.
Average Info
Notes Per Post
61
Likes Per Post
31
Reblog Per Post
0
Reply Per Post
30
Time Between Posts
6 days
Number of Posts By Type
Text
11
Last Seen Tumblr Blogs


Fun Fact
Tumblr Inc. is using 66 technologies for its website.
Text
Week 10 Activities
Week 10′s activity was a physical modelling task where students took their preferred 3D model of their lotion bottle and produced a 3D printed scale model.
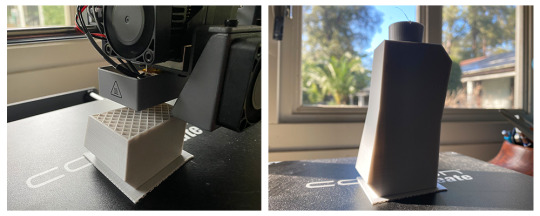
{Week 10: 3D printing final 3ds Max model}
To start off I 3D printed out the model I had made in last weeks 3ds Max activity. I am fortunate enough to have access to a 3D printer at my home so I didn’t have to go through UNSW printing process. Using the Cocoon version of Cura I sliced the stl file I had of the model and used the settings I knew would work for the printer and filament (bed temperature: 60 ° , nozzle temperature: 210 ° , layer height: 0.2mm). The model was printed at a 20% density using a spool of 3dfillies light grey PLA filament and took roughly 10 hours to complete.
{Week 10: Sanding and priming model}
After removing the brim off of the bottom of the model I went about sanding the exterior surfaces to smooth out the layer marks. I started off using 80 grit wet and dry sandpaper and wet sanded each surface until I couldn’t see the layers. I then washed and repeated the same process using 100 grit wet and dry sandpaper. For the largest curved surfaces I opted to sand them down by just holding the sandpaper sheet because I felt was able to get the most even coverage. For the flat surfaces I used a sanding block and the top and bottom using sanding sticks. Looking back now, I should have been using 60 grit sandpaper and sanded down each surface far more than I did. While the surfaces were far smoother than they had been after printing, the surfaces could have been smoother and more even. After I was done sanding I washed the model and stuck it to a workbench using blutack. I then applied two coats of plastic primer, going back after each coat and spraying the bottom.
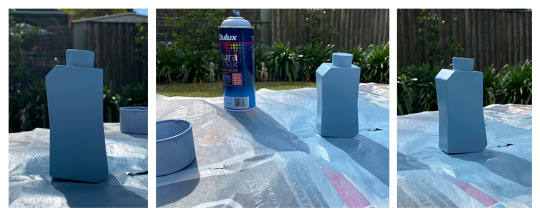
{Week 10: Spray painting model}
Once the primer had dried I sprayed the model with an acrylic semi-gloss spray paint in the shade “post boy”. I started off with a very light coat and then added progressivly thicker coats as I went. I had always thought that when you were spray painting you were meant to do multiple light layers but it would have taken six or seven coats to get the same amount of paint on the model. After the paint last coat of paint had dried I was surprised to see how many scratches and layer marks were still visible through the paint. In the lecture we were told how important it was to prepare your model properly in order to get a good surface finish. It is clear that I didn’t sand the models enough and should have also applied thicker coats of primer.

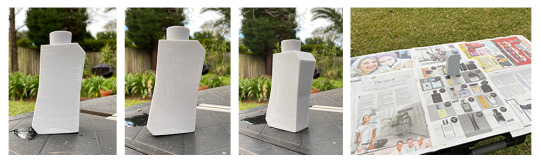
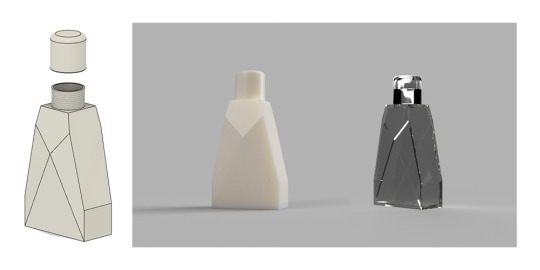
{Week 10: Final photographs of finshed model}
Finally, I photographed the finished model. Using a portable studio, I photographed the model at different angles, also using different backgrounds. The darker background shows the scratches and imperfections on the model better than the white background. Despite the visible imperfections of the models surface finish, I am still very happy with how it turned out. The surfaces are far smoother than they had been directly after printing and the semi gloss paint catches the light far better than the filament did. Its the first time I’ve ever painted a model and I’ve learnt alot from it. I’m sure that the next time I paint a model I will be able to use what I have learnt from this task.
{Week 10: Process images of final lotion bottle design}
As a recap of the what I have done over the past couple weeks, I compiled together some of the process images for the lotion bottle design. Its interesting to see how the design has evolved from week to week as we learnt and experimented with new physical and digital model making techniques. Overall I am happy with the model that I was able to produce, even if it does look more like a bottle of cologne than a bottle of Olay lotion.
{Course Reflection}
Over the past semester I feel as though this course has; consolidated, built upon, and taught me information and skills regarding both drawing and model making. I feel that the first few weeks acted as a refresher for what I had learnt in highschool about technical and perspective drawing whilst also building upon my knowledge in both areas. The rest of the term I feel was spent learning new skills in both freehand concept drawing and digital and physical model making. As a whole I think I have learnt alot about the design process, particularly how important it is to experiment with drawings and physical models before refining ideas in CAD.
Out of the three subjects I took this semester I enjoyed this course the most because of how structured it is. Each week an aspect was taught and then was applied in the form of a practical activity. These activities would force students to build their own skills and form their own stance on what does and doesn’t work. I enjoyed how clear and informative each of the lectures and tutorials were and the style of submitting work online. I think I liked this subject the most because of how black and white everything was, and how that reflects me.
If I were to do anything again in this course it would be to put more thought into my early blog posts. While they conveyed what I had done to an adequate extent, I feel as though they lacked a lot of the small details which diminished the overall quality of the work that I was producing. From the work of my peers I feel as though I have been able to identify what things I could do differently in order to improve my work. This being organising picture layouts instead of posting individual images and formatting each blog post with subheadings and separate sections for each part of the activity so that post would follow a more cohesive flow.
The main take away that I have gotten from this semester is the importance of exploring ideas using low fidelity physical models. Take the foam modelling task as an example. It was far easier to just... do than to sit there and think about how I was going to digitally model my idea. This also meaning that I could spend more time experimenting with ideas and concepts, being able to produce multiple physical models in the time it would otherwise take me to produce one digital model. The idea of being economical with your time is another idea that I have taken away from this course. Producing what is viable in the amount of time that you have and not trying to perfect what doesn’t need to be. I’m not saying that I should become careless with what I do but to rather not hold the expectation of perfection above absolutely everything. I think the hardest part of anything for me is starting because of how I hold the expectation of perfection above everything. I think I need to think less and just do more.
8 notes
·
View notes
Text
Week 9 Activities
Week 9′s activity was a digital modelling task where students took their digital models from the previous week and altered them using 3ds Max.

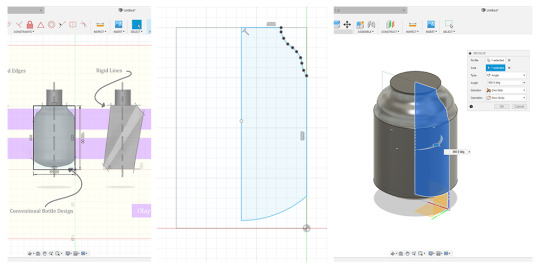
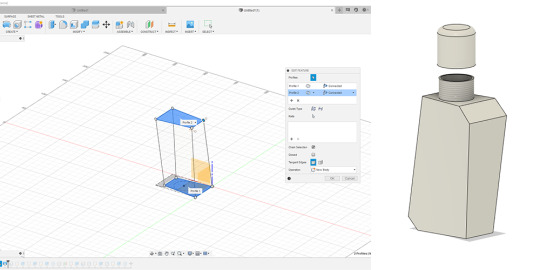
{Week 9: Experimenting with 3ds Max modifiers}
I have no experience what so ever with using 3ds Max or programs like it (i.e. maya and blender) so I had no clue as to what I was doing and how I was supposed to interact with the working model. I started off by adding modifiers to a sphere and seeing what would occur. The modifiers listed in the tutorial seemed simple at first but ended up having a far greater effect on the object than I had expected. I found that the ffd (left top) and squeeze (middle bottom) modifiers had the most noticeable results.

{Week 9: Modifying fusion 360 bottle design}
Taking what I had learnt from the sphere experiments I applied it to one of the lotion bottle designs from the previous week. I started off by applying a scew to make to model lean more to the left. Next I added a taper so the bottle gets more drawn in towards the lid. I then applied a squeeze so that the model becomes drawn into the centre. Finally I added the smooth modifier to round off the hard edges. The thing I found most difficult was trying to show the difference between each of the iterations as they are quite subtle.

{Week 9: Preparing 3ds Max model for 3D printing}
I was happy with what I had done in 3ds Max so I decided to use that model to print. I have used Cura before so the process of slicing the model was not new to me.
I enjoyed the activity as it introduce the possibities of alternate modelling programs. In the past CAD has been something that takes me alot of time to do so the idea of being able to quickly modify a model in a more dynamic way is very promising.
10 notes
·
View notes
Text
Week 8 Activities
Week 8′s activity was a digital modelling task where students modelled their foam lotion bottle model from the previous week.
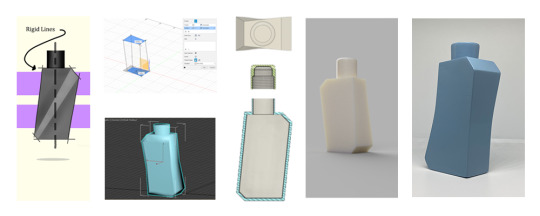
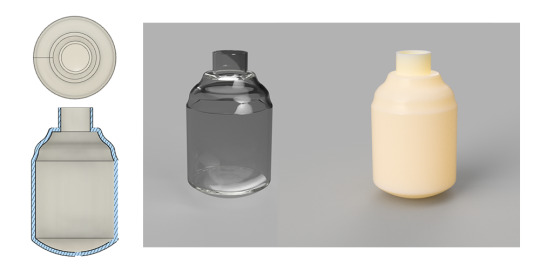
{Week 8: Modelling the first lotion bottle design}
The task asked for photos of all faces of the model so that a digital model could be easily produced. Unfortunately, I underestimated the fragility of the model and damaged it to the point where it could not be used. Instead I took a photo from the week prior and applied a perspective warp so that the front face would appear flatter. I also darkened the photo so that I could see the edges more clearly.

{Week 8: Sectional and rendered views of the first design}
Using the geometry off of the photo I was able to construct the rest of the model (it also helped that I had done the exact same thing the previous week). I smoothed most of the edges out using fillets and and modelled a cap that would fit the bottle. I also experimented with rendering the bottle and applying different textures.
{Week 8: Modelling the second design}
As I am not really familiar with fusion 360 I decided it would be worthwhile to apply what I had learnt in the tutorials to each my own designs. I felt that each differed in some way, to the point where I wouldn’t be repeating the same task 4 times. The second design was very similar to the beer bottle tutorial so I was able to repeat almost the same process.
{Week 8: Sectional and rendered views of the second design}
The second round of renders taught me a bit about fusion 360 and its capabilities. I left the clear bottle to render for about 20 minutes and was surprised to see how realistic it appeared when I came back. I positioned the plasitc render towards the light source which is why it turned out yellow, which is something that I was able to fix in the next renders.
{Week 8: Modelling the third design}
The third design was the hardest for me to conceptualize in my head. I tried subtracting from a 65x100x40 block for a while but found that I wasn’t getting anywhere. I then tried using a loft which ended up working. The final model isn’t as angular along the front face as I had originally intended but I am still happy with how it looks.

{Week 8: Sectional and rendered views of the third design}
For the third set of renders I followed almost the same process as the second set with the exception of positioning the light source away from the font face of the model. While this did reduce the yellowing, it made the outline of the model hard to see.
{Week 8: Perspective and rendered views of the fourth design}
The final design was fairly simple to model as I only needed to subtract from a block. I took what I had learnt from the previous two sets of renders and found a middle ground between too light and too dark.
Overall I found this task enjoyable. I have never taken the time to properly learn a CAD software and found that by doing smaller tasks I was able to learn more about the basic functions and operations of each of the tools (which I’m sure will help me further on). I found experimenting with rendering to be interesting too, especially because of how visible the results are. If I had to change anything it would be to select a more dynamic background to render the models onto and to experiment more with the appearance textures. Positioning the renders within an environment, such as a bathroom, may have grounded them more and made them seem more realistic. I am glad that I took the time to model each of the designs as I feel as though I got alot more out of the task than by choosing one.
4 notes
·
View notes
Text
Week 7 Activities
Week 7′s activity was another model making activity where students made one of the lotion bottle concepts from the previous week.

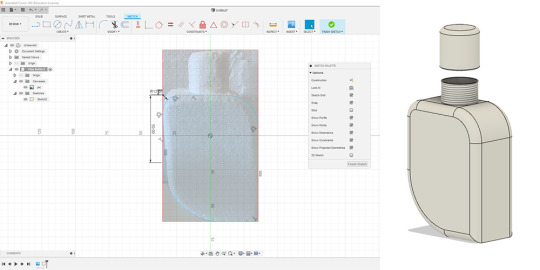
{Week 7: Modelling the lotion bottle design}
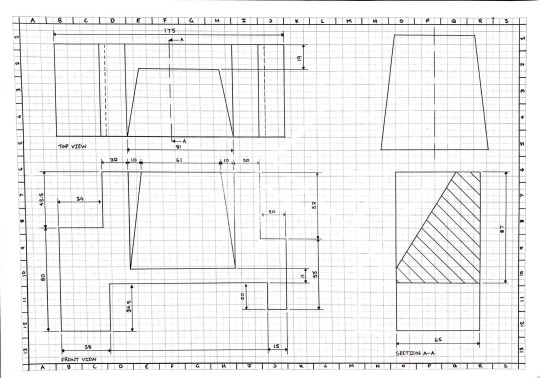
I started off by quickly modelling my chosen design in inventor so that I would be able to easily create a digital orthogonal drawing. I found that I hadn’t considered the design as a three dimensional object but rather only as a two dimensional print so I had to consider that aspect when I was modelling it. Using the previous task as a basis for the form, I scaled it to match the required size (65x100x40) and copied the outline over. I also added fillets along most of the hard edges to make the design appear more smooth and organic.

{Week 7: Orthogonal Drawing of Lotion Bottle}
By printing the orthogonal drawing to a 1:1 scale I was able to use it as a template for the foam modelling.

{Week 7: Foam Modelling Process}
The physical modelling portion of the activity was meant to be done using blue foam. Due to me being unable to source blue foam in time for the tutorial I went in search for a suitable substitute and came across a product called DecoFoam. It initially appeared to have similar physical properties and a similar density to that of blue foam, so I decided to use it. What I found after experimenting with it was that it was not a solid single piece of extruded foam but instead a block of polystyrene balls that had been compressed together. This would later cause me problems but I had no other choice but to persevere with what I had.
I started off by cutting out a block from the DecoFoam block with a hacksaw. Because of the structure of the decofoam, the cuts were jaggered and uneven. This was because some of the polystyrene balls would rip out from the block instead of being cut.
Using the sanding sticks that I had made in the pre-class activities, I then started to remove stock from the template face of the block. The DecoFoam responded far better to sandpaper than it had to cutting so I chose to remove the remaning stock by only using varying grits of sandpaper. Starting off using 80 grit sand paper I worked my way around the template until most of the stock had been removed. I then went back over it with 160 grit sandpaper to give it a smoother finish. Finally I added the fillets along the edges of the using the 160 grit sandpaper. This did in some places cause some of the polystyrene balls to rip out from the model but it was no where near as severe as it had been when using the hacksaw.
The final model turned out to be an incredibly rough representation of the original design, however I believe that is the purpose of a sketch model. If I had the choice to use DecoFoam or blue foam for sketch models I would most definitley choose the latter. In saying this I am still happy with how to model turned out as it does portray the basic form of the design, just to a lower quality that could have been produced using blue foam.
7 notes
·
View notes
Text
Week 6 Activities
Week 6′s activity was to construct a cube out of foam core using a tutorial.

{Week 6: Foam core pieces}
I started off by cutting six two inch squares of foam core.

{Week 6: Foam core pieces - 2nd attempt}
After attempting to cut a 45 degree chamfer along each of the sides of the original four squares I found that I was far to inaccurate for the sides to go together and form a cube. I decided to cut a new set of square (of the same size) and also mark where the chamfer would occur on the top side of the face. I did this because I felt that it would be easier to follow a guideline than to just eyeball it.

{Week 6: Foam core pieces with chamfered edges}
Using the guidelines that I had drawn in I was able to cut farely equal 45 degree chamferes along each of the edges. By no means were they perfect, but they were good enough to be able to assemble the pieces together.

{Week 6: Joining foam core pieces}
To join each of the pieces together I taped them and then used a thing layer of wood glue to stick the pieces together.

{Week 6: Joining foam core pieces}

{Week 6: Finished Cube}
I repeated the process of sticking the sides together with tape and then glueing them until the cube was formed. Each of the sides fit together quite well but did not sit flush. I also found that the tape would rip the first layer of paper off of the foam core (despite me trying to remove some of the adhesive with my fingers before sticking it to the foam core) which made the cube look unclean. If I were to do this again I would figure out a way to make more even chamferes and use less tape to stick together each of the sides.
8 notes
·
View notes
Text
Week 5 Activities
Week 5′s activities consisted of a few practical in-class activities combined with a photoshop demonstration.

{Week 5: Practical Activities 1&2}
To start off the class, Rob took us through a couple of drawing exercises to help us start getting in the rhythym of drawing. Starting off by drawing a 10mm x 10mm grid free hand and then moving onto our own connect the dots. I liked how each of these exercises had no weight or meaning, being free to make mistakes and not having to worry about them.

{Week 5: Practical Activity 3}
The third exercise was to draw a number of circles with a 40mm diameter, 10mm apart from each other. With this exercise I defintely made alot of mistakes. The circles are not perfectly circular (or circular at all in some cases) and they are not the right size. Despite this I still found the exercise to be useful, especially the idea of using you shoulder instead of your wrist to draw curves. I found that by using my shoulder I was more relaxed and more inclined to draw, even if I was just going to make a mistake.

{Week 5: Practical Activity 4}
The fourth exercise was an exercise in two point perspective drawing. I initially started playing around with single point perspective cubes and projecting them out from the vanishing points. While this wasn’t the task, I found it helpful to visualize how a single point perspective cube was drawn at different angles and how I could apply that to drawing two point perspective cubes. Then I drew a number of two point perspective cubes above and below the horizon line and and different distances from the vanishing points. I found this again to be helpful for the same reason as the single point perspective cubes. I find that doing things multiple times (repetitively) helps me to learn, especially when it is a practical skill.

{Week 5: Practical Activity 5}
The last physical drawing activity was one to do with form. We were told to draw organic shapes that resembled the forms of fruit and vegetables. Then we were to draw in internal lines to indicate the three dimensional forms of the object. I found this activity to be the most consfusing of them all as I was initially unsure of what the internal lines were indicating. Despite this I still believe that I leant the basis of what was taught.
I enjoyed each of these exercises because they were fairly simple but still provided something to learn. I found that by doing each activity I was able to become more relaxed with drawing free formed shapes. I also appreciated what Rob and Miles said about drawing with intent and how this can lead to a better/ more accurate depiction of what you are attempting to draw/ communicate. I think that I will regularly repeat each of the exercises to see if I am improving as well as to improve my overall drawing.

{Week 5: Photoshop Demonstration}
The final activity was a photoshop demonstration where students were to design concepts for an Olay lotion bottle. Following the tutorial I was able to replicate what was done using my own concepts. I played around with using linear and curvilinear lines to create the forms for the lotion bottles. I also used colour pallete of lavender and a very light yellow (almost cream) as I found that these were the colours Olay had commonly used in the past. If I were to do this activity again I would use a drawing tablet as I found the mouse to be somewhat of a hinderance when trying to draw smooth organic lines.
2 notes
·
View notes
Text
Week 4 Activities
Before completing week 4′s activites I first finished the post class activity for week 3. The activity was a orthogonal drawing of a chamfered block. The front, top, and side views were to be included along with an auxiliary view of the true size of the chamfered face.

{Week 3: Post class activity - 1st attempt}
My first attempt (picture above) was correct in some ways but incorrect in others. I was able to construct the front, top, and side views correctly using the dimensions provided. However, the auxiliary view was completely incorrect. I attempted to use the same process as last weeks activity to form the auxiliary view which didn’t work because the chamfered face was not in a flat position, giving the true and angles. I also included unnecessary dimensions but didn’t include the angles of the chamfer on the top and front views.

{Week 3: Post class activity - 2nd attempt}
Because I had made so many errors in my first attempt I chose to re-do the activity. Using the solution as a reference, I projected the top view to construct a view where the chamfered edge lies flat. After that I was able to project the auxiliary view of the chamfered face off of the other view. I also focussed on only including necessary dimensions and angles. If I were to do this task again I would move the titleblock away from the side view so that it would look less cluttered. I found re-doing the task to be helpful as I was able to get a better understanding of how auxiliary views work and how they are constructed.

{Week 3: Post class activity - Chamfered Block}
Along with the drawings, we were also asked to make a physical model of the chamfered block. Because I made the block before re-doing the drawing activity the chamfered face didn’t fit in the space that was there. Because of this I had to remove that face from the net and make a seperate face through trial and error. The block serverd its purpose for the next weeks activities but would have been easier to construct had I got the drawing correct the first time.

{Week 4: Activity 1 - 1st attempt}
The first activity for week 4 was a 2 point perspective drawing of the chamfered block made in week 3. The most difficult part of this activity for me was to find the correct spacing of the picture plane, horizon line, and the ground line. After experimenting for a while (despite trying to firgure it out using the tasks instructions) I was able to fit everything on the page. I found constructing the block to be fairly straight forward however I wasn’t happy with how there was a lip in the centre of the page from where I had stuck the two sheets A3 paper togther. I also made a mistake when outlining the block so I decided to re-do the activity.

{Week 4: Activity 1 - 2nd attempt}
Before I started the activity again I tested to see if I would be able to fit the drawing on a single sheet of A3 paper, which I was able to. This meant I didn’t have the lip through the centre of the drawing. I am happy with how the drawing turned out the second time and found doing the activity again to be helpful in reinforcing the principles behind mechincal perspective drawings.

{Week 4: Activity 2}
The second activity of week 4 was to construct the same perspective block as the first activity and to extend the side of the block towards the vanishing points. I seperated the blocks to emphasise how as the blocks got closer to the vanishing points their sized diminished. The only thing that I would do differently about this drawing if I were to do it again would be to bring the bottom edge of the blocks on the right side closer to the vanishing point as they don’t look as the front face doesn’t look like it is getting smaller.

{Week 4: Activity 3}
The final activity for week 4 was a perspective drawing exercise where we had to draw circles on the perspective faces of a cube. I started off by constructing the cube and drawing in the minor and major axes. I then sketched out the circles before going over them with pen.
I enjoyed the weeks activities because there was an actual solution to the problems that we are given. I find it more helpful when there is a concrete answer to a problem that I am solving because I can determine exactly what I got wrong. I also feel that through completing some of the tasks multiple times gave me a better understanding of the basics of two point perspective.
7 notes
·
View notes
Text
Week 3 Activities
Week 3′s activity was another technical drawing exercise where students were tasked with creating a 1:1 orthogonal drawing of a pre determined object. The drawing was to include a sectional view and an auxillary view showing the true size of a sloped surface.

I began by creating rough orthogonal views for each of the required sides. These drawings were done true to size so that I would be able to place them on a new piece of paper and arrange the views. This helped me alot as I was able to figure out how much room I would need to leave for dimensions and view names. However, I decided not to make a rough drawing of the auxillary view, which meant I didn’t allow for the required room needed. As a result of this I ended up having to re-do the sectional and auxillary views a number of times in order to get all of the views to fit on the page and not interfere with the dimension lines. If I were to do this task again I would repeat the same process but include the auxillary view in the plan.
After I had first figured out where I wanted all of the views to go I drew the views onto the final drawing and outlined them with the appropriate pen widths. I ended up choosing to place the auxillary view above the sectional view so that I would be able to properly dimension the front and top views, and also to make the drawing look less cluttered. I decided against including a titleblock as there was not enough room for one but did include a boarder.
While I am happy with what I was able to produce and believe that it was an improvement from last week activity, there are still mistakes. An error that I had made when I was planing (including lines corresponding with the end of D and H on the boarder), was carried over to the final drawing. Something that I’m realizing is the amount of attention that you need to be paying when doing an engineering drawing. One seemingly small mistake is all it takes for a drawing to be wrong, giving the chance for it to be misinterpreted.
I enjoyed this task and believe that I learnt a considerable amount from doing it. I also enjoyed it because it is engineering drawing, an aspect of industrial design that is more objective than subjective.
6 notes
·
View notes
Text
Week 2 Activities
Week 2′s activity was a technical drawing exercise where students were tasked to draw the orthogonal views of a chosen object. I started off by creating a box which would display the different views of my chosen object. I decided to use a watch hand replacement tool because of its size and geometric form.
I was fortunate enough to do graphics technology and engineering in highschool so orthogonal drawings are not a brand new concept to me. I was able to construct each of the views in pencil and then go over them in pen. I decided to remove the construction lines as I felt they took away from the actual orthogonal views and took up space needed for the dimensions. I also decided to draw the object to a 1:1 scale as it was too small to reduce the scale but too large to increase.
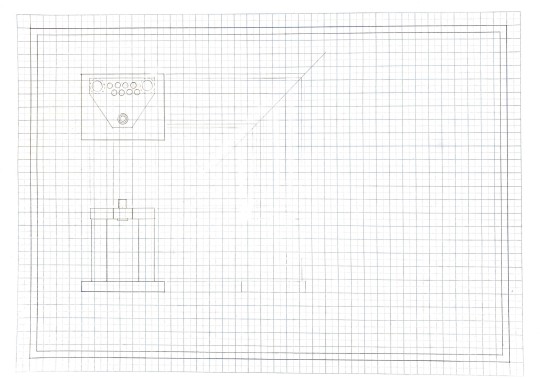
While I have had some experience with orthogonal drawing in the past, I did not have experience properly dimensioning and constructing a boarder and titleblock. I found dimensioning each of the sides was fairly easy and tried my best to incorperate the dimensioning functions that I had previously used in Inventor Professional (ie. chaining dimensions). The title block that I found in the lecture slide show contained too many fields for information that did not need to be included, so I created my own.
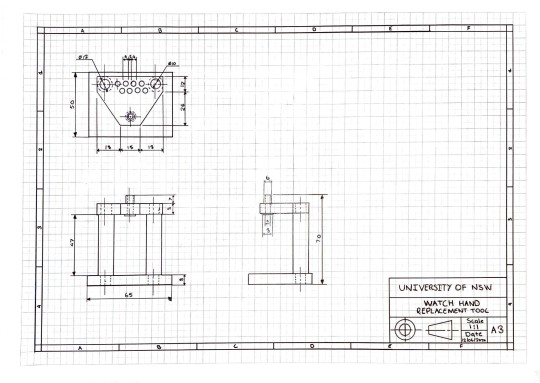
I found this activity to be a good refresher to what I had learnt in the previous four years of high school while also adding to my knowledge of orthogonal drawing. If I were to complete this activity again the only thing I would do differently would be to be more careful when touching the fresh pen lines on the graph paper. I used a new brand of graph paper which allowed the pen to smudge more easily but it also allowed me to erase the pen with a rubber. So swings and round abouts I guess.
4 notes
·
View notes
Text
Week 1 Activities
Week 1′s activites were comprised of two drawing tasks and one cut out pattern task. The first task I found fairly straight foward. I was able to use my 30 / 60 set square to contruct the triangles without having to make any markings. The pen line work over the pencil was consistent and worked well. The construction lines were left to show the process of the drawing.
The second drawing was far more difficult. I was able to mark out the segments using a 45 degree set square and a compass but was stumped on how to consistently and accurately draw the fillets of the inner segments. I eventually discovered that by using a circle template I was able to draw the larger fillets quite accurately but found this would not work for the smaller fillets. I also found tracing over the construction lines with pen to be quite difficult as I had not alligned each of the fillets perfectly with the corner of the segment. This led to multiple errors within the pen work. If I were to do this activity again I would pay more attention to how I was possitioning the fillet on the corners of each of the segments.
The second part of the activity was to draw and cut out a pattern. Using the 30 / 60 set square I drew out 11 pieces. Usign a scalpel I then cut them out and assembled them together on the cutting mat. I found that I was fairly accurate but some pieces fit better together than others. If I were to do this again I would use different coloured pieces of paper and stick each of the segments together on a back piece.
Overall, I am happy with what I was able to produce for this task. I learnt about how to draw fillets and how finicky line work can be. I enjoyed these activites and am keen to learn more in the weeks to come.

[Task 1 - Star Construction Lines] ^

[Task 1 - Star Pen Outline] ^

[Task 1 - Circle Construction Lines] ^

[Task 1 - Circle Pen Outline] ^

[Task 2 - Segment Construction Lines] ^

[Task 2 - Assembled Pattern] ^
4 notes
·
View notes
Text
About Me
Hi, whats doin’
I’m Matt and I’m a first year industrial design student from UNSW. I’ve always had an interest in design, specifically how things work. I started off wanting to study architecture, then engineering, but settled on industrial design as I feel it incorporates elements of engineering within a hands on design field. Outside of being in a global pandemic, I enjoy playing both indoor and outdoor soccer, rock climbing, and gaming.
1 note
·
View note