
Don't wanna be here? Send us removal request.
Statistics
We looked inside some of the posts by mechasaur and here's what we found interesting.
Average Info
Notes Per Post
1
Likes Per Post
1
Reblog Per Post
0
Reply Per Post
0
Time Between Posts
22 hours
Number of Posts By Type
Text
2
Last Seen Tumblr Blogs


Fun Fact
Tumblr posted its first advertisements in May 2012 and subsequently earned $13M in revenue.
Text
HPE Server Alerts: Gen 10 changes
In an earlier post I explained how to set up alerts for pre-Gen 10 HPE servers so you will know when something bad happens to your server. Things have changed starting with Gen 10. This post will walk through the new process.
Why use HPE server alerts?
One of the most important tools you have as a system administrator is the simple email alert. No matter what the problem is, it’s great to have a head start on fixing it before the phone starts ringing. In the case of HP servers you can get an email alert so you will have a head start on any problems that arise.
About The iLO
HPE servers up to Gen 9 used management agents on the operating system to monitor and send alerts, but going forward the alerts are sent by the iLO using an agentless service.
iLO is shorthand for “integrated lights-out���. Basically, this is an out of band management system that you can access over the network. It uses a dedicated Ethernet port so you can log in to the iLO from another computer on the network using a web browser. The iLO has its own IP address and you can set it to be static or check your DHCP for the IP it has been given.
Here are some documents from HPE that you may want to have a look at if you run into a problem not covered here:
The iLO User Guide
Configuring iLO Management Settings
If you like you can update the iLO firmware by downloading the installer.Click on Revision History and get newest version (should be the top one).
The iLO Advanced license
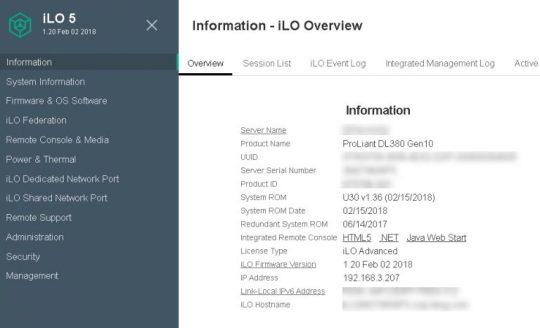
Alerts on Gen 10 servers require a special license, the iLO Advanced license. You can check your license by logging in to the iLO with your web browser and going to Information, then Overview. It will probably be the first page that comes up. Look at “License Type”. If yours says “iLO Advanced” you’re good to go. If it says” iLO Standard” you will need to purchase a license.
To quote HPE:
“With the release of Gen10 servers, iLO no longer supports OS-based SNMP agents. The System management Assistant (SMA) is an Agentless Management Service feature for users who want to run applications that obtain SNMP information from the OS. ”
Another advantage of the iLO Advanced license is that you can use the Remote Console in the iLO with no time limit. Without the license you only get like 3 minutes and then it locks you out. The Remote Console is basically Remote Desktop (RDP) through the iLO.
To check your license status log into the iLO by entering the iLO IP address into a web browser.
When you get in, right on the first page, next to “License Type” you should see if you have the license or not. If you already have the iLO Advanced license it will say “iLO Advanced”. Otherwise it would say “iLO Standard”.
You can obtain a license by registering the server with HPE, but you can also request a trial license.
Once you get your license log in to the iLO again and go to Administration, then Licensing.
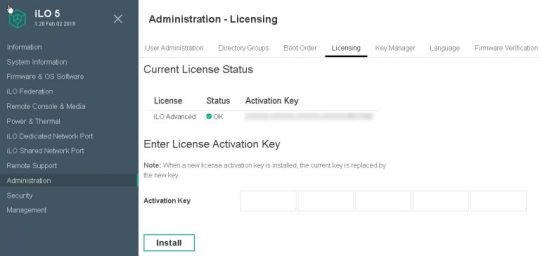
You can just copy and paste your key into the first box and click the Install button. Easy.
Installing the SNMP Service Feature
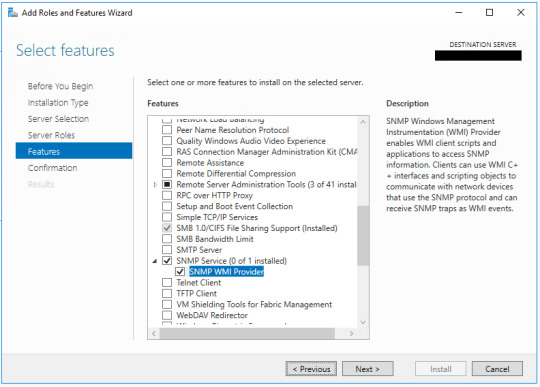
To get the emails to us we need to install the System Network Management Protocol (SNMP) service. To do that, open Server Manager (it comes with Windows Server and usually starts automatically every time you log in) go to “Manage”, then “Add Roles and Features”. Choose “Role-based”, Next, select the local server, Next, Next, on the “Select Features” screen check the box next to “SNMP Service” and the one inside it, “SNMP WMI Provider”. You may be prompted to install “SNMP Tools”, too, if you don’t have it installed already. Get it, you’ll need it.

Configuring the SNMP Service
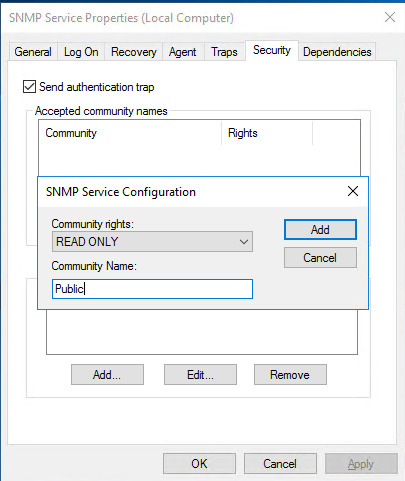
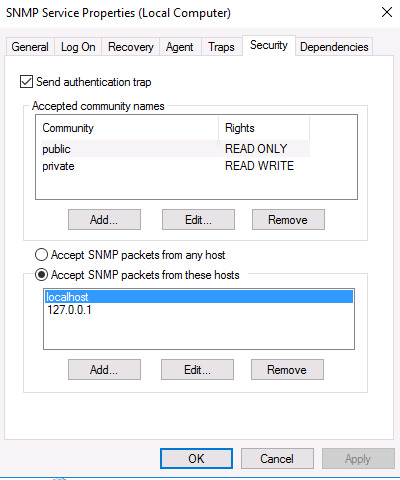
Now we need to configure SNMP to collect information from the server. Open Services.msc by searching in the Start menu or Windows key + R and entering Services.msc. Scroll down to “SNMP Services” and double-click on it to open the properties (or right-click and choose “properties”). In the security tab, click Add button under “Accepted community names”. There are two Add buttons on this tab so click the top one. Select Community rights as “READ ONLY”. Type “Public” for the Community Name and click Add.
If you don’t have the Security tab close Services.msc and restart it.

Click the same Add button again and create another Community Name called “Private”, but this time make the Rights “READ WRITE”.
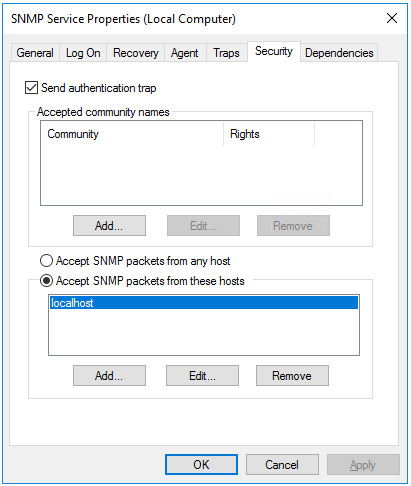
Now we will tell the SNMP service who to accept packets from. With the “Accept SNMP packets from these hosts” radio button selected, click on the lower Add button now and enter 127.0.0.1 as the IP address. This is the localhost so the SNMP service will only be listening to this server we are working on. Click Add and then Apply.

With this done, go to the Traps tab in SNMP Service properties. You will have to type directly into the drop-down list because it doesn’t populate itself. Type “public” and now the “Add to list” button will be clickable. Click it. The drop-down list now has an entry for “public”. Click the “Add” button lower down the Traps tab and enter 127.0.0.1 and then click the Add button.

Click Apply and Ok.
Installing the Agentless Management Service
HPE’s pitch for this new way of managing server alerts seriously begins with “Tired of installing agents on your servers to monitor them?”, but in reality there is still one more service that you need to install: the “Agentless Management” service. Download it here. Make sure you get the new version under “Revision History”.

Download it and run it as administrator (from the right-click menu).
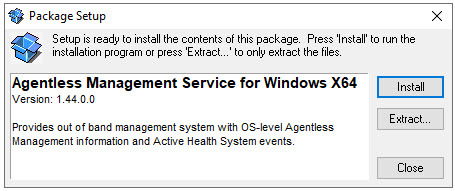
Click Install.

In this case I am upgrading because I already had an older version installed, but the process is almost identical except for the wording on this screen. Click Install.
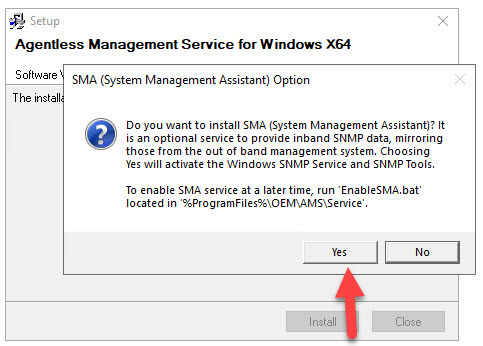
Click Yes.
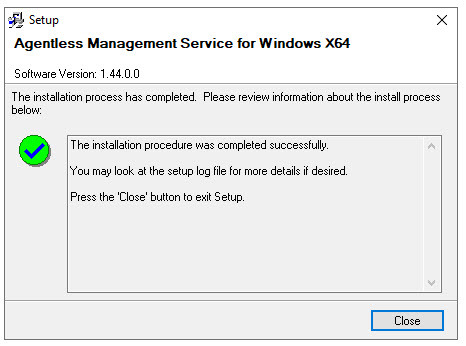
Close.
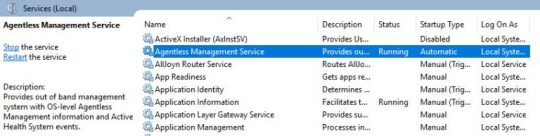
Make sure the “Agentless Management” Service is running in services.msc
Configuring the iLO Settings
Your settings may end up being different than mine after this point depending on your domain and network settings. Also some older versions of iLO 5 look different or have different names for some of the fields. In these examples I am using version 1.46 of iLO 5.
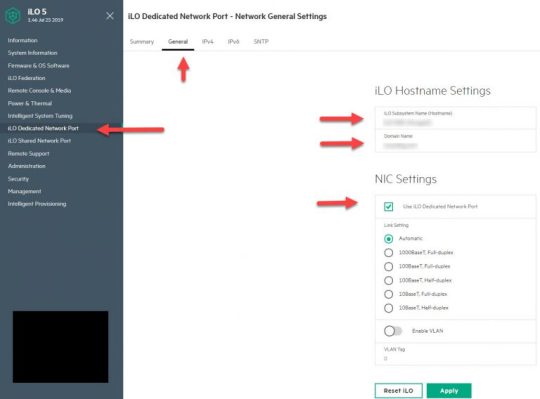
Log in to the iLO in your browser. Go to “iLO Dedicated Network Port” on the left, then the “General” tab. Fill in your “iLO Subsytem Name (Hostname)”. I use “ILO-<servername>”. Fill in the domain name and check the “Use iLO Dedicated Network Port” checkbox and the “Automatic” radio button.
Click the “Apply” button. You will see a message that tells you to reset the iLO to get the changed to take effect. Do so now. You will be logged out for a minute while the iLO reboots.
Log back in the iLO and go to “iLO Dedicated Network Port” on the left, then the “IPv4” tab.
Turn DHCP off and specify a static IP address, subnet mask, and gateway. The only swtich that can be green is the “Other” switch that says “Ping Gateway on Startup”.
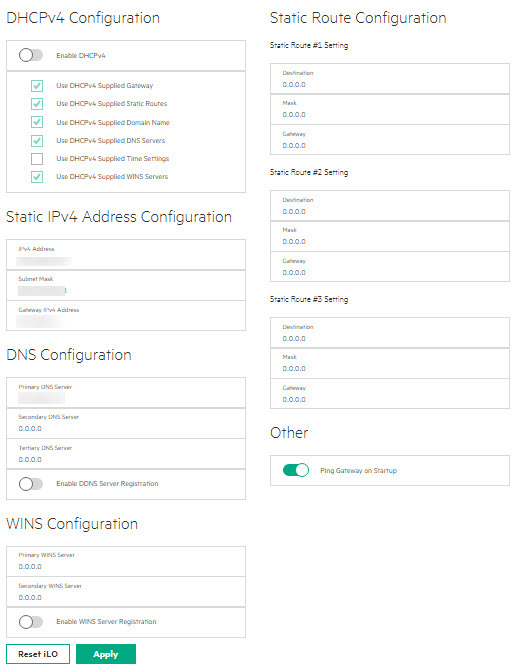
Don’t forget to “Apply” and “Reset iLO”.
Once the iLO comes back up log back in and go to “iLO Dedicated Network Port”, IPv6 tab. Turn everything off. “Apply” and “Reset”.
Log back in and go to “Management” on the left and then the “SNMP Settings” tab.
Select the radio button next to “iLO Hostname” and click the switches for “iLO SNMP Alerts” and “Cold Start Trap Broadcast”. Click “Apply”.
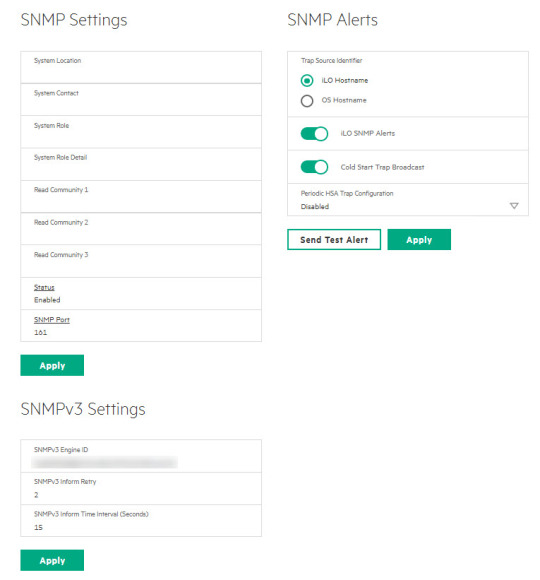
Lower down on the same page, under “SNMP Alert Destinations, click the “New” button. Specify your SNMP server. I leave the “Trap Community” blank and use the default for the protocol. Click “Add” and leave evertything else on the “SNMP Settings” tab at the default value.
While still in the “Management” area, go to the “AlertMail” tab. Click the “Enable iLO AlertMail” switch and enter the “Recipient” email address that will receive the alerts, the “Sender” email address that has permission to send emails out, and the SMTP Server that will process the email. The port is probably going to be 25, the default SMTP port. I leave everything else off.

Click “Apply”.
Sending a Test Alert
To send a generic test alert, log in to the iLO in your browser and go to “Management” on the left and then the “AlertMail” tab. Click the “Send Test AlertMail” button as seen in the previous image.
You should get an email like this:
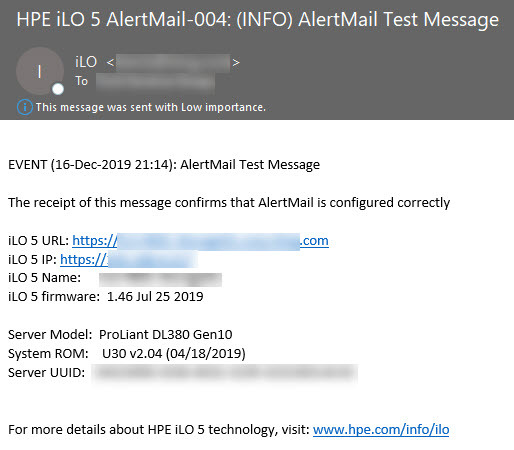
If you got this email, then congratulations! If something goes wrong with the server you should get an email that tells you about it. It’s a good idea to log in to the iLO and send a test email once a month or so to make sure everything is still working. Sometimes a service will stop and you have to restart it manually.
If you didn’t get the email, double-check all the settings to make sure everything is correct and has been “applied”. If not, redo them and remember to apply and reset the iLO to save the changes. If that still doesn’t help make sure the SNMP and AMS services are running. It can’t hurt to go ahead and restart them even if they are. Your domain and network will be different than mine so there may also be additional DNS or Exchange settings for you to tweak.
There is a log in the iLO that might be able to tell you what went wrong. Go to “Information” on the left of the iLO browser interface and then the “iLO Event Log” tab.

Have fun and see you next time!
0 notes
Text
HP server email alerts in Windows Server
One of the most important tools you have as a system administrator is the simple email alert. No matter what the problem is, it’s great to have a head start on fixing it before the phone starts ringing. In the case of HP servers you can get an email alert so you will have a head start on any problems that arise. It just needs to be set up first, which is not super simple if you haven’t done it before. Luckily for you I have this nice little tutorial to walk you through it.
Some Considerations Before We Start
The first thing I should mention is that there are little differences in the way certain generations of servers (and different versions of the software) handle this process. I have used the methods described below on Gen 6 through Gen 9 servers. For the most part they are pretty similar, but you may see something on your server that doesn’t look quite like what I have here. Keeping that in mind I have tried to point out any discrepancies I have seen and to give you as much information as I can so you can hopefully bridge any gaps you may come across.
Also, you may notice the names Hewlett-Packard, HP and HPE used interchangeably. In fact, HPE (Hewlett Packard Enterprise) is now a separate company from HP (Hewlett-Packard). They split around 2016 and now HP sells computers and printers and HPE handles servers. Doesn’t really matter to us except that HPE is starting to change things and that’s okay because otherwise life would be boring, right? Anyway, let’s get into it.
HPE’s servers use “Insight Management Agents” to monitor the health of their hardware. These are drivers that you need to install on the server. With the agents installed you can set up email alerts to tell you when something goes wrong with the server. On Gen 9 and older servers these are all free downloads. On servers newer than Gen 9 this functionality has been moved into the iLO and requires a paid license. I will cover that in a separate tutorial.
Installing Drivers
The first thing we are going to install is the “iLO Management Controller Driver Package”. The version you want will depend on the server’s iLO version. For example, the download for iLO 3 and 4 for Windows Server 2016 and 2019 which I will be using in the examples below is here: https://support.hpe.com/hpsc/swd/public/detail?swItemId=MTX_e20968c891b444c6b6de68a734
If you need a different one, you can probably find it here: https://support.hpe.com/hpesc/public/km/search#q=Management%20Controller%20Driver%20Package&t=All&sort=relevancy
Once the “iLO Management Controller Driver Package” downloads, right-click it and choose “Run as administrator”. You will see a setup wizard that looks like this:
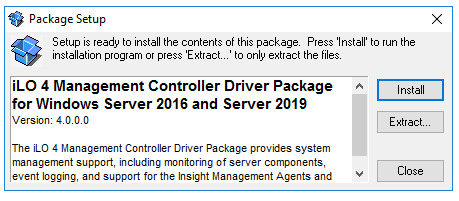
Click the “Install” button and let the installer run its course.
Next, download and install the “Channel Interface Driver” for your operating system. You should get at least version 3.31.0.0. If you don’t there is a very real chance of random crashes. I have seen it myself. There is a bug in the older versions of the driver (https://downloads.hpe.com/pub/softlib2/software1/sc-windows/p2015029342/v154233/cp036919.exe). The download for the Windows Server 2016 version is here: https://support.hpe.com/hpsc/swd/public/detail?swItemId=MTX-c5e0ed82c4864327bc9b86442c#tab-history. For other versions, just google “iLO 3/4 Channel Interface Driver Server 2008 R2” for example.

You may have to reboot afterwards in order to finish the installation. Hopefully you are doing all of this on a new server so you won’t be interrupting anything important. Otherwise use a scheduled task to reboot the server at a time when no one will notice.
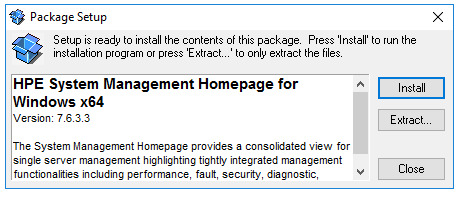
Next we will install the HPE System Management Homepage which will allow you to check the status of your server in the web browser at https://localhost:2381.
Use this link to download it and run the executable as an administrator: https://support.hpe.com/hpsc/swd/public/detail?swItemId=MTX_b36fb879335a41d78ee5e99f7f
Installing the SNMP Service
In order for the HPE tools to communicate with each other (and us!) we need to install the SNMP service. Microsoft describes the SNMP services as follows: “The Simple Network Management Protocol (SNMP) is used to configure remote devices, monitor network performance, audit network usage, and detect network faults or inappropriate access.” Exactly what we want, right?
To install the SNMP service, go to Server Manager, then click “Manage”, then “Add Roles and Features”. Choose “Role-based”, Next, select the local server, Next, Next, on the “Select Features” screen check the box next to “SNMP Service” and the one inside it, “SNMP WMI Provider”. You may be prompted to install “SNMP Tools”, too, if you don’t have it installed already. Get it, you’ll need it.
Click Next, then click Install.
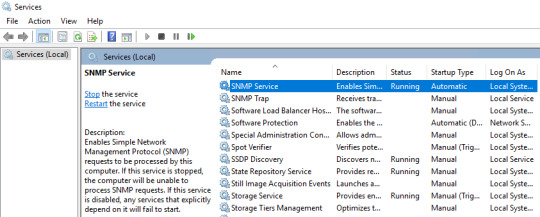
Once the installation of SNMP service is finished, click the Start menu and type services.msc (or Windows key and R key on the keyboard and enter services.msc) to open the Services interface.
Find the SNMP Service and make sure it’s running.
Installing the Agents
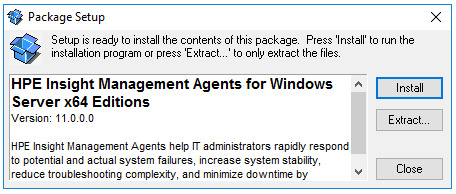
Next, we will download and install the HP Insight Management Agents. Here is the link for the newest version at the time of this writing: https://support.hpe.com/hpsc/swd/public/detail?swItemId=MTX_1b0b099098874404adcb5d1d51#tab1
Run the executable as and admin and click Install.
When the install completes, the “Management Agents” window will open.
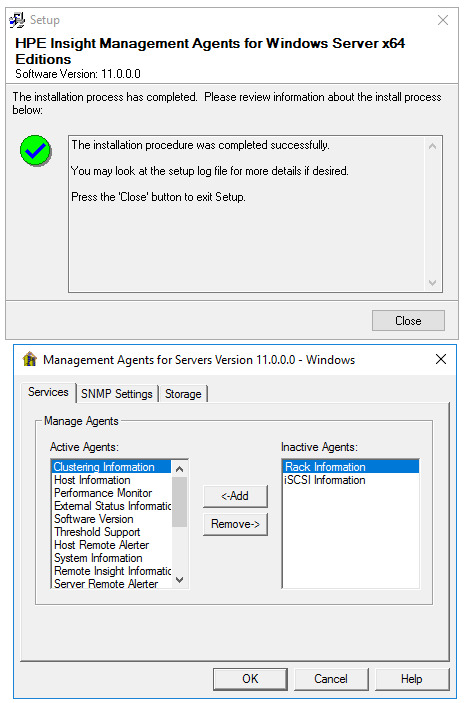
When the install is finished the “HPE Management Agents” settings will open automatically. You may notice there is a button on the “SNMP Settings” tab that says: “Send Test Trap”. We will come back to this later. It won’t work until we take care a few other things so you can click cancel for now.
Configuring SNMP
Now that we have the HPE agents installed we need to configure the SNMP service to collect information from the agents. Open Services.msc by searching in the Start menu or Windows key + R and entering Services.msc. Scroll down to “SNMP Services” and double-click on it. In the security tab, click Add button under “Accepted community names”. There are two Add buttons on this tab so click the top one. Select Community rights as “READ ONLY”. Type “Public” for the Community Name and click Add.
If you don’t have the Security tab close Services.msc and restart it.

Click the same Add button again and create another Community Name called “Private”, but this time make the Rights “READ WRITE”.
Now we will tell the SNMP service who to accept packets from. With the “Accept SNMP packets from these hosts” radio button selected, click on the lower Add button now and enter 127.0.0.1 as the IP address. This is the localhost so the SNMP service will only be listening to this server we are working on. Click Add and then Apply.

With this done, go to the Traps tab in SNMP Service properties. You will have to type directly into the drop-down list because it doesn’t populate itself. Type “public” and now the “Add to list” button will be clickable. Click it. The drop-down list now has an entry for “public”. Click the “Add” button lower down the Traps tab and enter 127.0.0.1 and then click the Add button.

Click Apply and Ok.
Your New Services
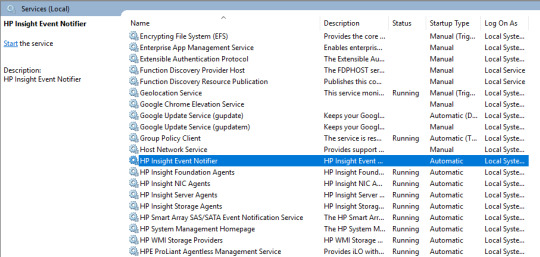
You may notice that you have several new services in your Services.msc window. Their names differ depending on the version you install, but they will be similar to:
HP Insight Event Notifier
HP Insight Foundation Agents
HP Insight NIC Agents
HP Insight Server Agents
HP Insight Storage Agents
HP Smart Array SAS/SATA Event Notification Service
HP System Management Homepage
HP WMI Storage Providers
The names pretty much tell you what they do, but you can click on them in Services.msc to get a more detailed description.
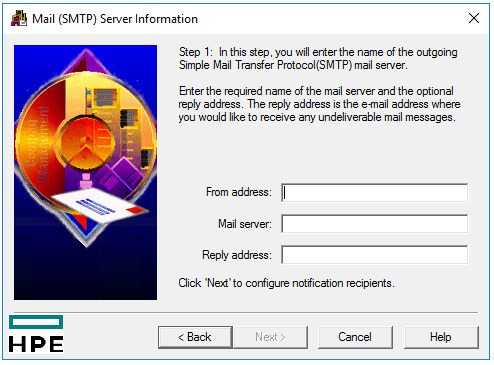
They should all be started except for the HP Insight Event Notifier service. It needs to be configured before it will start. Let’s do that now. In the Start menu go to “HP Management Agents” and run the “Event Notifier Config” as administrator. The instructions are right there in the wizard for you.
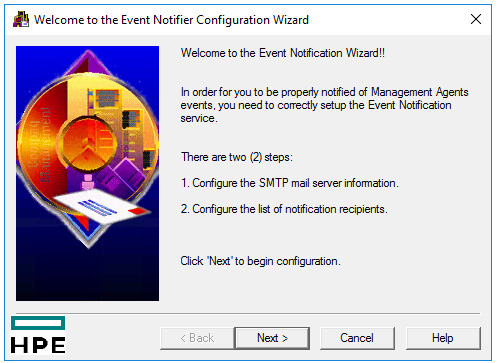

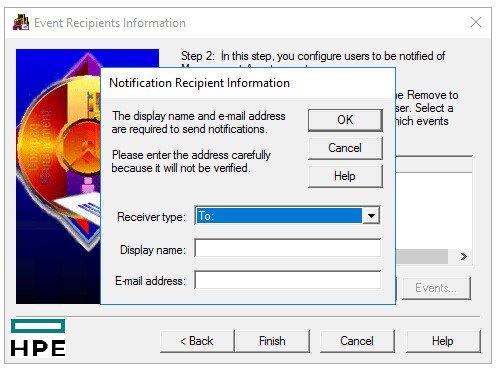
You can also click on the Events button to choose which events trigger the notications. You can have different events selected for different recipients. All of them are selected by default. When you have all of your recipients in there, click finish.
Keep in mind any time you want to change these settings you must open “Event Notifier Config” as an administrator by right-clicking. Otherwise the settings will all be blank like it was never set up in the first place.
Back in the Services.msc window right-click on “HP Insight Event Notifier” and then click Restart. You can also double-click on it and then click the Start button.

If the “HP Insight Event Notifier” service doesn’t start, check your event viewer and you may see an error that will help you. For example, if you try to start that service without first running through the “Event Notifier Config” you will see two errors:
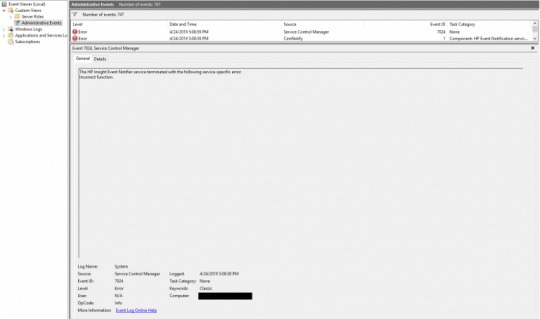
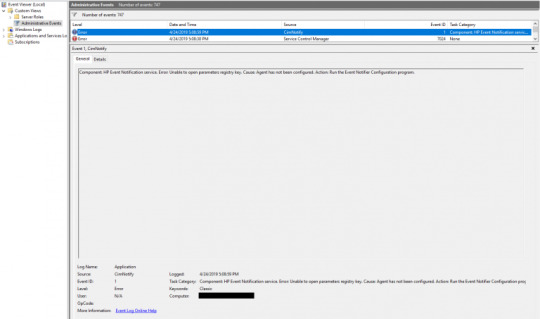


If that’s the case, set up the “Event Notifier Config” and it should work.
Back in the Services.msc window find the “HP System Management Homepage” service. Right-click it and click “Restart”.
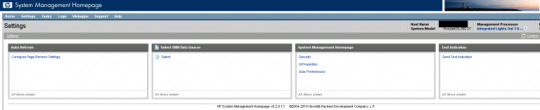
The HP System Management Homepage
Now let’s open the HP System Management Homepage. There is probably a shortcut on your desktop, but if not, you will find it in the Start menu under “HPE Management Agents”. You can also type https://localhost:2381 into your browser. Log in to the homepage with an administrator account. If you are using a domain admin account enter it in the format of DOMAIN\username. If you’ve set everything up correctly you should see something like this:

To see some diagnostics, you can go to Logs > Integrated Management Log:
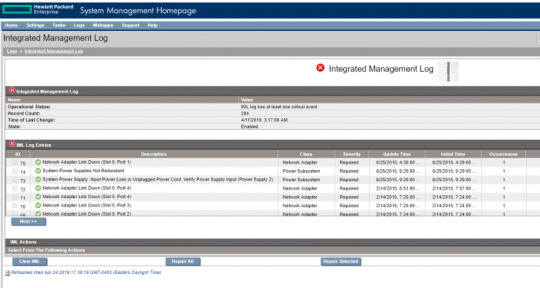
Explore this to see all of the nice stuff it tells you about your server. However, you can’t always be in here staring at it and waiting for problems to pop up, so we need to get the alert emails coming in. There are a couple of ways to send a test email. One is right here in the System Management Homepage.
The next part is different depending on the version of these programs you have.
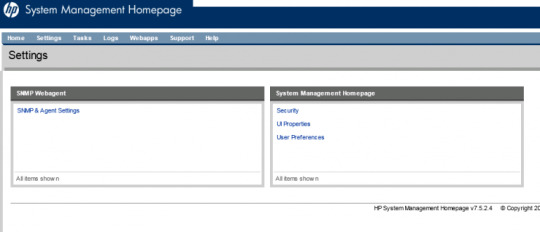
To send a test email alert with the System Management Homepage, first click on Settings, then SNMP & Agent Settings.
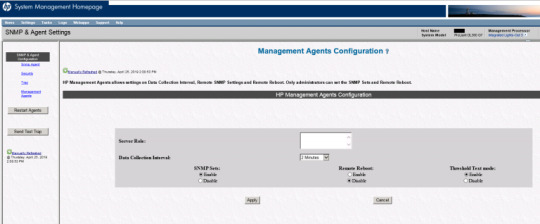
In here you will find another view of the SNMP settings we saw in Services.msc. On the left side of the page you should find the “Send Test Trap” button. Click that and then click Ok when it asks you if you are sure. This next screenshot is from version 7.5.2.4 of the System Management Homepage. Other versions look a lot different and don’t give you as much control. Also, they are moving this functionality into the iLO starting with Gen 10 servers. More on that in another article.
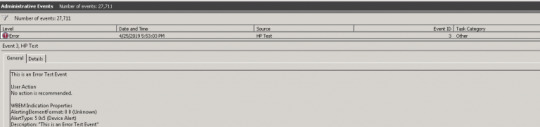
Some versions of the Homepage have a different area where you can send a test indication, but it doesn’t send an email. It just sends a message to the event viewer. To try that out you can go to Settings, Test Indication, Send Test Indication. This is from version 6.2.0.13:

Here is an example of the “Test Indication” error that was sent to the event viewer:
Sending a Test Alert
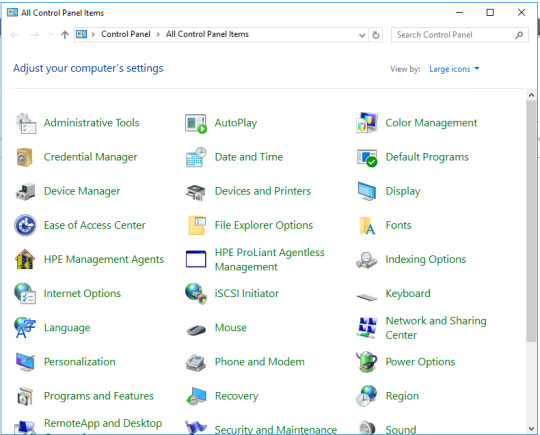
The most reliable place to send a test email from is the Control Panel app they’ve given us as part of the HP Management Agent installation. This app seems to be present in all versions of these programs.
Open the Windows Control Panel and find “HP Management Agents”. Click on “View By” and choose “Large Icons” to find it easier. Right-click on it and run it as administrator.

In the first tab that opens you will see all of the types of agents that are working in the background. The important ones should already be set up for you. To send a test email alert click on the “SNMP Settings” tab.

You don’t need to change anything here either. Just click the “Send Test Trap” button. If the “Send Test Trap” button is greyed out, check to make sure the “HP Insight Foundation Agents” service is running in Services.msc and you are running “HP Management Agents” as administrator. If you see the following error after clicking “Send Test Trap”: “The Management Agents Remote Alerter agent has not finished initializing or is not enabled. The test trap was not sent.” then you are probably not running “HP Management Agents” as administrator.

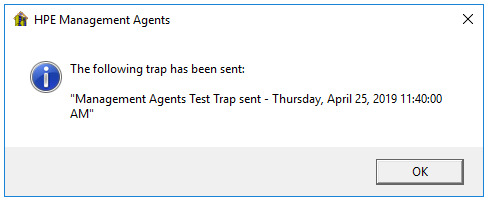
If you’ve set everything up correctly you should get a message box like this: “The following trap has been sent” with the date and time.
And you should receive and email that says “The system has detected the following event:” with the date, time, server name, and the description of the error:
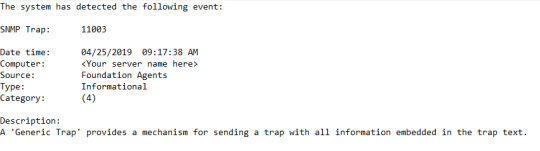
If you get that email, then congratulations! You’re all set to receive an email alert when something goes wrong.
If you don’t get an email you may have to add the server to your Exchange receive connectors or make some other change depending on how you are set up. Also, check the services in Services.msc to make sure they didn’t stop running for some reason.
Here is an example of a dead battery error:

You might want to try sending a test email once a month or so to make sure it’s all still working. Have fun!
1 note
·
View note