
Don't wanna be here? Send us removal request.
Statistics
We looked inside some of the posts by michaelnewcombe and here's what we found interesting.
Average Info
Notes Per Post
1
Likes Per Post
1
Reblog Per Post
0
Reply Per Post
0
Time Between Posts
14 days
Number of Posts By Type
Text
17
Last Seen Tumblr Blogs


Fun Fact
Mobile Tumblr US users spend an average of 4.04 minutes per session on the app.
Text
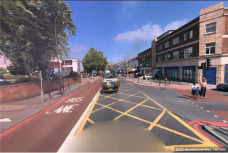
Final Product
vimeo
Street view captioning tests
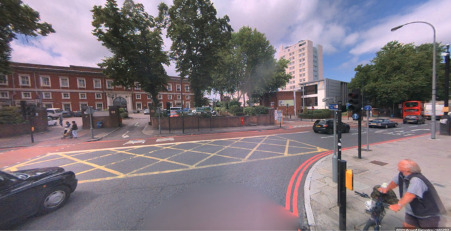
Having the device orientation feature working meant that I was able to get different captions for the same location. I was quite surprised how changing the direction of my phone just slightly resulted in totally different captions. This revealed more objects that I needed to filter out which included captions containing the words motorcycle, bus, train, bicycle, and clouds. It also revealed that DenseCap was capable of generating incorrect captions for objects which did not exist in the image. Furthermore, it revealed captions that did not make sense grammatically and that DenseCap would sometimes generate duplicate captions. Based on these findings I decided that it would be a good idea to conduct further testing to see how the app captioned different locations.
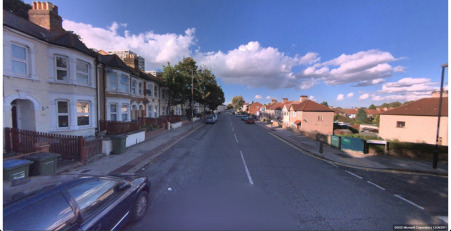
The number of locations I decided to test was 10, I also made sure that the locations were diverse. For example, the street view images for some of the locations were images of busy streets with lots of objects, where others were street view images that mainly contained greenery. I then created a page specifically for testing these locations where I sent each location's latitude, longitude, and heading value to the server using the fetch API. When testing these locations, the results were very interesting as it revealed more objects that I needed filter out, more captions of objects which did not exist in the image and more grammatically incorrect captions.
Therefore, conducting these tests using test locations and the device orientation feature gave me a better insight into the strengths and weaknesses of the model DenseCap. For example, I found that the model was very good at generating captions for more square-shaped buildings however it was not so good at generating captions for more complex shaped buildings such as churches. Furthermore, the model was very good at detecting trees, and however, it would frequently generate the caption “a tree with no leaves” where every time the tree did have leaves.
Once I had finished with the testing, I then added more words to the filter list, to filter out the irrelevant captions I had found during testing. As well as words I also included full sentences to the filter list, this was to filter out some of the grammatically incorrect captions I had encountered. In total the filtering list has 42 different words and sentences to filter out from the captions list generated by the mode, I also implemented functionality which removes any duplicate captions.
The tests also revealed something else interesting which was that DenseCap would generate captions containing the word street for images that it thought were of a city street. I then decided to use this information to change the text that is played back to the user depending on whether the model believes the image is of a city street or not. For example, if DenseCap thinks the image is of a city street then the sentence “Your current surroundings consist of a city street with” is passed into the text to speech functionality followed by the captions. On the other hand, if DenseCap does not believe the image is of a city street then the sentence “Your current surroundings consist of” followed by the captions is passed into the text to speech functionality.
This feature may seem irrelevant at first as the images being passed into DenseCap are all street view images however the street view image for test location number 4 is an image of a park, also test location 6 is an image of a street surrounded only by fields. For these two images, DenseCap does not generate any captions containing the word “street”. On the hand captions containing the word street, is mainly for images that contain lots of buildings.
Therefore, I thought that it would be a good idea to have two different start sentences depending on the type of image. I felt that this made my app seem more intelligent as it would change how it would talk to the user depending whether the image looked like a city street or not. As well as having two different start sentences for the street view image captions, I also wanted a way of ending the sentence as the captions being read one after each using text to speech sounded a bit robotic. Therefore, I decided to add the word “and” to the last caption so that the text to speech sounded more natural, also placing the word “and” before the last caption also indicates to the user that it is the last caption.
vimeo
Additional features
One of the drawbacks of my application is that Bing Maps only has street image view coverage for major cities. Therefore, I wanted a way for users to be able to still use my app even if there was no street view image coverage available, for example by using their device's camera instead. To implement this, I decided to add the file upload form from my viable product into the final built of my app. As the file upload form allows the user to upload an image using the device’s camera when an input element with the type attribute is set to file. I then added another button to the navigation bar which takes the user to the file upload page. However, I found that it was too time-consuming. For example, the user would have to press the file button on the navigation bar which takes the user to the page containing the file upload form where they would then have to press the file upload button then select the camera option from their device. I did remove the need to press the submit button to speed this process up by uploading the image automatically once the image had been taken, however, I still felt that this process took too long.
Instead, I wanted the app to access the user’s camera by pressing one button. Therefore, I decided to add a feature that accesses the user’s camera directly through the browser. I implemented this using the mediaDevices API which allows the browser to gain access to connected media devices such as a camera. Once the browser has accessed the camera it is passed to an HTML video element so that the camera feed can be viewed through the page. Then to take a picture using the camera I am drawing the current video frame onto a canvas element; this happens when the user presses anywhere on the video element.
To send the picture to the server the image is converted to base64 format where it is sent be via JSON, once the server receives the image it is then decoded back to an image. I then added a camera button to the navigation bar which takes the user to the page containing the camera functionality. Once the camera feature was fully implemented, I decided to keep the file upload feature, in case the camera functionality is not compatible on a user’s device, then the user still has the option to upload an image saved on their device or use their device’s camera through the upload file form. Furthermore, the images that are sent to the server using the camera or file upload form are not passed into the function which filters captions from street view images. As this is not necessary for images taken in real-time using a camera or for images saved on the user’s device. Instead, these images are passed through a separate filter function, also the text to speech start sentence is different for these images.
I also made changes to the page which displays the captions for a given image. In addition to displaying the captions, I decided to draw the bounding boxes associated with each caption onto the image. A bounding box and its corresponding caption are also both the same colour so that the user knows exactly what object the model is generating a caption for
My original plan for this project was to host the app on a server so that I could get people to test it. However, due to the resources available to me, this was not possible however for future development I would like to still host this project on a server. Therefore, in preparation for hosting the app on a server, I thought that it would be a good idea to implement a way of getting user feedback on the generated captions. This would have given me an even better understanding of the behaviour of DenseCap as the model would be tested on more images. For example, I could see if there were any more objects, that I needed to filter out from street view images.
To receive user feedback, I added a form on the page which displays the captions. The form is implemented using flask_wtf and wtforms and contains a field for storing the image filename so that the image which received feedback can be found on my system, there is also a field for storing the captions for that image. However, these two fields are filled out automatically and are hidden from the user. The most import field is the radio button field which is used for scoring how accurate a user thinks the captions are for an image on a scale of 1 to 5. To submit the form the user must select an option from this field. The form also contains a text area field so that the user can add comments about the captions for example this could be regarding the objects that the model captioned incorrectly, however, this field is optional. The form data is then sent to the server and stored in a MySQL database.
Errors and exception handling
I also implemented exception handling functionality to my app. For example, if the user tries to access a page that does not exist which is a 404 error, then my app redirects the user to the home page. Furthermore, the user is redirected to the home page if the app encounters a 500 error which is an internal server error, to test that this was working I made some deliberate syntax errors. I also have in place an exception regarding the geolocation and device orientation features. For example, if the device orientation API does not exist on a user’s device then the street view image that is passed into the model is based on the user’s location only and not the direction they are facing. The direction for the street view is instead fixed to a heading value of 0 which means that the street view camera is facing north. When this happens, there is a message which tells the user that the image being used is based on their location only.
There is also an exception in place which checks if the user has chosen to deny the app access to the device’s orientation properties. In this situation, a message is displayed to the user prompting them to allow access. For the geolocation feature, I also have exceptions in place as the app will display a message to the user if the geolocation API does not exist on the user’s device. However, I was unable to test this as the devices I tested my app with had the geolocation API. Furthermore, a message will be displayed to the user if they deny the app access to their location. For the file upload feature, I also have an exception in place for when a user tries to upload an image which is not a JPEG. As well as rejecting the file a message is shown to the user telling them that they have uploaded an invalid file format. Then for the camera feature, I have an exception that displays a message to the user when the app is unable to access the device's camera. A message will also be displayed to the user if they have chosen to deny the app access to the camera.
There is also exception handling for the feedback form as the user must select an option from the radio buttons, otherwise, the form will be rejected. Finally, there is the app also checks if the speechsynthesis API exits which is used for the text to speech feature. If this API does not exist, then a message is shown to the user.
vimeo
Compatibility Testing
I tested my application on an iPhone XR and tested it on the following browsers for iOS which are Google Chrome, Safari, Firefox and Opera touch. I tried to test the app on DuckDuckGo however DuckDuckGo for iOS does not allow users to access websites using a self-signed SSL certificate. For the other browsers, all my apps features worked as expected for the camera feature which only works on Safari. This is due to Apple not allowing third-party browsers access to the iPhone camera. The application is meant to be used on mobile devices however I also tested my application on my laptop as well which is MacBook Pro, the browsers I tested my app on are Google Chrome and Safari. With these two all of the features worked as expected except for the device orientation which is expected as this API is only for mobile devices such as smartphones and tablets. The camera feature also worked on both browser when testing on my laptop.
0 notes
Text
Device Orientation
To caption a street view image based on the user’s current location I was passing the user’s latitude and longitude coordinates to Bings Map REST API to get a static street view image for the user’s current location. As well as the latitude and longitude the REST API takes three other arguments which are the heading, pitch, and zoom. Heading refers to the absolute direction of the camera for example, whether the camera is facing north, east, south, or west. Pitch refers to the vertical direction of the camera, for example, whether the camera is facing up or down and zoom refers to the amount of image zoom. I initially set these values to 0, for the pitch this meant that the camera was level with the ground and for the heading, this meant that the camera was facing north.
Having the pitch at 0 was not a problem however having the heading at 0 meant the camera was always facing north, which was a problem, for example, if the user is facing south then the app would describe the surroundings behind the user.
Therefore, as well as the latitude and longitude coordinates, I also needed to pass in the direction that the user was facing by retrieving the direction that the user’s device is facing. To do this I used the device orientation API, this API is typically used to retrieve the devices gyroscope and accelerometer data however this not what I needed. Instead, I needed the device's compass heading value. To retrieve this data, I used the device orientation property called webkitCompassHeading which returns the devices compass heading in degrees relative to magnetic north.
I initially did have some trouble testing this API on my phone, however, I found out that this was an iOS-specific issue as from iOS 13 Apple decided that the user must give permission for a web app to use the devices orientation properties. This is apparently only required on iOS however I haven’t tested it on any other operating system as of yet. Once I had implemented the functionality to request the device's orientation, I started working on a way to send this data to Flask. In the end, I incorporated the device orientation code with the geolocation code which sends the data to Flask. I was now able to send the devices heading position to Flask where I then passed it to Bing Maps REST API. Finally, I tested this functionality and it was working as I intended as I was now able to generate a caption based on my location and the direction that my phone was facing.
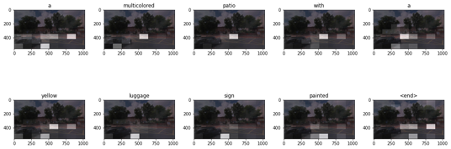
Video of app with device orientation functionality. Each time I press the location button I am facing my phone in a different direction
vimeo
0 notes
Text
UI
Once the main functionality of my app was complete, I decided to work on the UI. As my app is a web app the UI is developed using CSS, however, instead of writing standard CSS code I used SASS which a CSS pre processer. I decided to use SASS because it allows you to write CSS in the style of a programming language for example, you can use variables, operators, nested rules, loops, and more. This means I was able to write much less code than I would have with regular CSS, as regular CSS code can become repetitive very quickly. Another benefit of SASS is that once is it compiled into CSS it also generates the necessary vendor prefixes so that my CSS is combability across all major web browsers. For the design of my UI, I based it on my original prototype UI however I simplified it. With the original design, the user would press one button to generate a caption which would be a drop pin icon, then once the caption was generated, they would have to press a go back button to generate another caption. This seemed over-complicated to me now therefore I decided to use one button that is always visible for generating a caption.
One challenge I did face with the UI was incorporating the text to speech functionality. In my original design, I wanted the caption to be read back to the user automatically once the captions page had loaded. However, many web browsers now have stricter audio play policies for example, Google Chrome does not allow audio to be played without some kind of user interaction such as a button press. This was a problem especially since Google Chrome is the most popular browser for mobile devices therefore, I needed my app to be compatible with Chrome. At first, I decided to trigger the audio by pressing a button which I placed in the top left corner of the street view image.
However, I wanted my app to be as easy to use as possible, therefore I decided that I wanted the audio to trigger by pressing anywhere on the image instead. To implement this, at first, I used a touch event object which can listen for touch events on touchscreen-based devices such as a mobile phone. I implemented the touch event object to the street view image so that when the user touches the image it would trigger the audio, however, this did not work, I checked in the console and the touch event was registering however it wasn’t triggering the audio. Therefore, instead, I decided to turn the street image into a transparent button and use an onclick event. Then to indicate to the user that they much press the image I added an audio icon in the top left corner of the image.
Video of UI
vimeo
0 notes
Text
Implementing The Street View Functionally and Text To Speech
Now that I had a method for downloading a street view image from Bing Maps, I decided to implement this into my Flask application where the app would download a street view image based on hard-coded coordinates, the downloaded image would then be passed into the function which runs the model on an image. Once this was complete, I worked on the functionality so that the coordinates for the street view image would be based on the user position. As I already had the user’s current location implemented on the client-side in JavaScript, I just needed a way of passing this information to the backend. To do this I used the Fetch API which allows for data to be transmitted between the client and the server via HTTP methods such as GET and POST. I used this API to send the user’s current geolocation coordinates to Flask using a POST request. Now that the backend was able to receive the geolocation coordinates, I then passed the coordinates into the function which downloads the street view image.
Now that the street view functionality was working, I then worked on filtering out the captions which were not relevant such as captions of cars. To do this I created a function that checks if a specific word is in one of the array elements from the captions list. I then stored the index positions for the elements which contained any of the words I was trying to filter. To achieve this, I used a technique called list comprehension. Now that I had the indexes for all of the irrelevant captions, I decided to remove these indexes from the original captions list. To do this I turned the original list and the filtered list into NumPy arrays, using NumPy I then removed the filtered indexes from the original list, this meant that I now had a new list which only contained the captions I want. As well as filtering out the irrelevant captions I also filtered out the confidence scores associated with those captions, I then removed these confidence scores from the original confidence scores list using the same method as before. This meant that I now had the associated confidence scores for the new captions list, finally, I then removed all captions that were below a specific threshold so that only the ones the model is most confident with, get shown to the user. After this, I worked on the text to speech functionally where I used an API called speechSynthesis. I then converted the captions list into a string and passed the text into speechSynthessis.
Some of the difficulties I faced when developing these features for the app was displaying the captions page to the user. This is because the page which receives the geolocation coordinates does not contain any HTML as the processing is all done in the background. Initially, once the geolocation coordinates were passed to Flask through a POST request, they were passed straight into the function which downloads the image, runs the model, and then to the function which displays the caption. This meant that the captions would be generated for the image however the page would not change to the page for viewing these captions. To change this, I changed the Flask code, so the coordinates only get passed to the next function once a GET request for the current page has been made. I then set a condition on the client-side using the Fetch API which redirects the user to the page which contains the coordinates once the coordinates have been successfully received by the backend. This then triggers a GET request for the page which sends the coordinates to the next function as well as redirecting the user to the page for viewing the captions.
Another challenging aspect was creating the function for filtering out irrelevant captions, specifically using list comprehension and deleting elements from a list based on their index. This is because python does not come with a standard way of deleting multiple elements from a list at once based on the index position which is why I converted them to NumPy arrays. I also had an issue with the speechSynthesis API as I wanted to use a specific voice, however changing the voices was challenging as this functionally needed to be load asynchronously to work in Google Chrome. Once I worked out how to do this, I tested it with Chrome for Mac OS and it was using the voice I wanted, I then tested it on Chrome for IOS, however, the voice was not the same. I then realised that with this API the voices are dependent on the browser and device, therefore, I decided to remove this functionally and instead just use the default voice which gets set by the browser.
Video
vimeo
0 notes
Text
Street View Functionality
Now that I had the fundamental basics of the web application working, I decided to focus on the street view functionally. My aim was to pass in a street view image of the user’s current location into the model. My first approach to this was to take a screenshot of the street view image from the user’s browsers and then pass the screenshot into the model. This is because the street view map is that a static image therefore, I could not just download the street view map as a static image from the HTML body. To take a screenshot of the HTML page I found a library called html2canvas which converts an HTML element into canvas elements. I then used this library to create a canvas element for the street view map which was inside a div with the class MicrosoftMap which gets generated once the map loads. Once the canvas element had been created, I a function that downloaded the canvas as a PNG image. However, once I opened the downloaded image, the image was blurred output, I then tested the screenshot functionality on a static image from my computer to see if there was an error with the code. However, when I downloaded the static image, it was working perfectly fine as the image was not blurred out. I also test the screenshot functionally on other HTML elements such as text, all of which worked perfectly fine.
Expected image:
The image I was receiving instead:

I am not sure as to why the screenshot of the street view map was blurred out, either perhaps Bing did not allow for their Maps to be altered in any way while in the browser or perhaps the library I was using was not able to render the street view map into a canvas element. Furthermore, I noticed that the blurred image looked like the street view map while it was still loading so I could have been taking a screenshot of that image instead of the fully-loaded image.
I looked at different JavaScript screenshot libraries and some vanilla JavaScript implementations of taking a screenshot, however, almost all of them had a similar approach to html2canvas which is to turn an HTML element into a canvas. Therefore, for now, I decided to abandon this idea, instead, I wanted to see if I could retrieve a static image from Bing Maps as this would massively simplify the problem. So far, I was using the Bing Map V8 Web Control API, this did not come with a way to return a static image, however, I could retrieve a static image using Bing Maps REST Services API. This is not implemented in JavaScript instead I pass the relative information such as the geolocation coordinates into a URL link which returns a static street view image for that location as a URL link.
I then decided to use the static image returned by the URL instead of trying to take a screenshot of the street view map. To download the image returned the URL I decided to use Python, I then created a small Python program which downloads the static image from the URL link using the requests module in Python.
0 notes
Text
Viable Product
I then started to work on the main web application, however, before implementing the street view functionality I wanted to create a simple flask web app that allows users to upload images from either their computer or smartphone and get a caption for that image. To achieve this, I firstly needed to incorporate DenseCap into a flask application. DenseCap generates a caption for an image by running a command-line script in the terminal, this script contains the code to run the model on an input image by specifying the path to the image. Therefore, for this model to work in a web application, I needed a way of running this script automatically, at first I was not sure how this would be possible in the end I found that there is a module in Python called subprocess which allows for shell scripts to be executed in Python. Through the use of this module, I was able to get the DenseCap script to execute using Flask. I then needed a way of visualizing the captions generated by the model which gets automatically stored in a JSON file called results.json. To achieve this, I used the python JSON module to store the caption results, I then passed the results into an HTML page so that they could be visualised. The application was taking shape however as I of far I had been hard coding the input image path therefore I started to work on the upload functionality. I was able to get this working by using the request module from Flask.
Now that I was able to upload an image to the backend of my application through a browser, I then needed to pass this image into the script which generates the captions. I was able to do this by passing the filename into the URL and then redirecting to the Flask route which contained the DenseCap script, where I was then able to pass the filename into the script. The application was now working on my computer therefore I decided to test it on my phone as well by making the server externally visible to devices that are connected to the same network. I tested the app on my phone and it was working, also some smartphone browsers also have the option to use the phone’s camera instead of choosing an image from the photo library. I tested this and the app was able to successfully caption an image taken by the phone’s camera.
However, the application did have some glitches, one of which was when I was trying to caption more than one image. As I had my Flask code in a different folder to DenseCap, this meant in order to run the model script I had to change directories from within the web application. This was relatively simple to do, I implanted so that the directory would change into the DenseCap folder once an image has been uploaded. However, when trying to upload another image the directory would change again, this was not necessary as I was now already in the correct directory, therefore, the app would change into a directory that did not exist. To fix this I used a global variable to prevent the change directory code from running twice.
Another issue I had was with the image upload system on mobile devices when choosing to upload a photo taken by the camera. The problem was that when I uploaded an image using the phone's camera the file name would always be the same. This caused a problem where the model would not generate a new caption for the new image, even though it had successfully uploaded when I checked the directory. To solve this, I changed the upload code so that each image that the uploaded image is turned into a temporary file using the tempfile module from Python, which creates a unique name for each file that is uploaded.
Video of the web app being used on a mobile device:
vimeo
0 notes
Text
Bing Maps Development
I then continued my devolvement with Bing Maps through the Bing Maps V8 Web Control API. As of far, I had created two web applications using Bing Maps, one which retrieves the user's current location and displays it on a 2D map and one which displays a street view image for a hard-coded location. I then merge these two applications together so that I could get a street image for my current location. However, my current location was not loading as a street view image. This was because I was trying to load a street view image for my exact geolocation which was from my house and not from the street therefore, there was no street view image available. To fix this I used a Bing Maps class called LocationRect which creates a bounding box around the geolocation coordinates. I then used this bounding box to check if there is an available street image within the radius of the bounding box using the getClosestPanorama class. If a street image is available within the radius then that specific street view image is displayed. This way I was able to get a street view image for the street outside of my house.
0 notes
Text
Testing Pre-trained Models Part Two: DenseCap
Next, I decided to test Densecap, this model is not implemented in TensorFlow however it does come with an official pre-trained model. DenseCap is instead implemented in another machine library called Torch, along with several Torch packages. Installing Torch and the additional Torch packages took quite a long time however the installation was relatively simple. Once Torch was installed, I downloaded the pre-trained model and ran the caption generation script however I got the following error “Wrong JPEG library version: library is 90, caller expects 80”.
The problem was that DenseCap required an older version of a library called libjpeg to the one that was installed on my machine specifically version 80. I firstly tried to manually install libjpeg version 80 from the official website where I then ran the installation shell script however this did not work as I was still seeing the same error. I then decided to use Homebrew to install libjpeg as it would take care of the package installation and configurations for me. The problem was that Homebrew installs the latest version of a package which is not what I wanted as I already had the latest version installed on my machine which was version 90. However, it is possible to install older versions of a library using Homebrew.
Homebrew installs library’s using files called formulas which are package definitions that are written in Ruby, every library that can be installed using Homebrew has its own formula file. Therefore, to install an older version of a library using Homebrew I had to edit the formula file for libjpeg. This can be done using the command brew edit followed by the name of the library. This then opens the formula file in a command-line text editor such as Vim. I then edited the file so that it would download libjpeg version 8d instead of version 9d. Formula files also come with a sha256 key to verify the integrity of the file that is being downloaded, however, I did not know the key for version 8d of libjpeg so instead I just removed this piece of code.
Screenshot of edit libjpeg formula file:
I then saved the edited formula file and ran brew install libjpeg, once the installation was complete, I ran brew info libjpeg to see if the correct version of libjpeg had been installed which it had.

I then ran DenseCap again and it was now working. The captions DenseCap generates for an image are stored in a JSON file. The result can then be visualized by running a python HTTP server and navigating to the view_results HTML page.
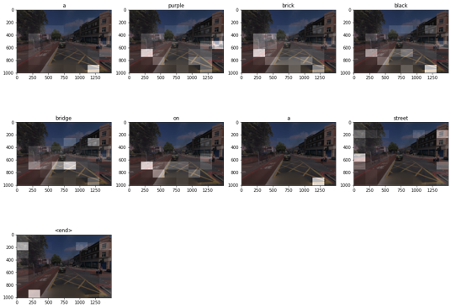
Screenshot of DenseCap captions:

Between the two models, I am going to use DenseCap for my project as I find that the captions it generates are more useful than the captions generated by im2txt for my specific use case. For example, when I pass street view images into im2txt, which are the type of images I want to caption the model always includes cars or people into the caption if they are visible in the image. However, objects such as these only exist in the context of the street images and therefore are irrelevant when it comes to describing the user's current physical surroundings. DenseCap also generates captions for cars and people however as it generates multiple captions for the different objects within an image this means some of the captions are in fact relevant in the context of describing the user’s physical space. For example, DenseCap generates captions for objects such as the buildings, trees, and streetlights, all of which are most likely to also exist in the user’s physical surroundings.
0 notes
Text
Testing Pre-trained Models Part One: im2txt
Now that I had gained a reasonable amount of knowledge on how machine learning models are developed, through my experimentation with TensorFlow using Jupyter Notebook. I then moved onto testing pre-trained image captioning models so I could finalise which one I would be using for my project. However, this was more difficult than I thought as there was not many pre-trained open source image captioning models available. It seems that there was a surge of interest in image captioning around 2015 by researches due to the release of large-scale image captioning datasets such as MS C0CO and Flicker30k, also in 2015 the first image captioning competition was held called the MS C0CO Challenge, however the interest in captioning since then seems to have died down. This made it more difficult to find models however, in the end I found two well-known image captioning models that were open source. The first model is a TensorFlow implementation of a model called Show and Tell which was created by google in 2015. This model tied for first in place in the MS COCO challenge in 2015, the other model I found is called DenseCap which was created in 2016. This model takes a unique approach to image captioning as rather than trying to generate a one sentence caption for an image it instead generates captions for the different objects within the image.
The TensorFlow implementation of Show and Tell is called im2txt, it is trained on the same dataset and a similar architecture as the original Show and Tell model. To get the model working the following libraries are required, Bazel, Python, Tensorflow and Natural Language Toolkit (NLTK). Installing Bazel was rather straight forward as I used the package manager Homebrew however when testing that the library had installed correctly, I was receiving an error this was because I needed to accept the xcodebuild license to use Bazel. For Python the version needed was 2.7 therefore I created a conda virtual environment for this version of python.
As for TensorFlow I already had this installed however as TensorFlow was installed on another virtual environment this meant that I had to install TensorFlow again. Furthermore as this model was released in 2017 this meant that it was not compatible the latest version of TensorFlow which is version 2, instead it is only compatible with TensorFlow version 1. Therefore, inside the conda virtual environment for python 2.7 I installed TensorFlow version 1.0. As for Numpy I already had this installed this just left NLTK which was split into two parts. Firstly, I had to install NLTK itself then I had to install the package data for it which was a relatively simple process. However, I did have some trouble installing the package data as I tried using the NLTK GUI installer which caused my computer to crash, therefore instead I had to use the command line installation.
I now had all prerequisites for im2txt installed however the problem with this model is that is does not come with an official pre-trained model, instead you either have to train the model yourself or use existing pre-trained weights that were trained by someone else. As this model would take weeks to train and required a high spec GPU it was not logical to train this model myself therefore, I decided to use weights that other people had trained. Finding pre-trained weights for this model was quite easy however getting the weights to work on my machine was quite difficult. To get im2txt to work a checkpoint file that contains all the weights generated during training is required as well as a text file containing the vocabulary that was generated by the model during training. I downloaded a few different checkpoint and vocabulary files and tested them however none of them worked as I was getting a range of different errors.
The problem was that the pre-trained weights that I found were all trained on different versions of TensorFlow and Python. Therefore, when I tried to run them on my versions of Python and TensorFlow they did not work. To solve this problem, I created different virtual environments that had the same versions of Python and TensorFlow that the checkpoint file was trained on. In the end I created three different virtual environments each with a different versions of TensorFlow and Python.

For example, the first virtual environment was used to test an im2txt checkpoint which had been trained using TensorFlow 0.12 and python 3.5. By using a virtual environment which used these specific versions of TensorFlow and Python I was able to get the model to work. However, once I ran the model on one of my images the result were not what I was expecting instead the model just produced a single word for the image instead of a caption.

For example, for the image above the model would generate this instead of a complete caption.

I also tested the model on images that are part of the MS COCO dataset which is the dataset this model has been trained on and the results were still the same. I also tested all of the pre-trained im2txt checkpoint files that I had downloaded, and the results were the same. I am not sure as to why the model was behaving like, I thought it might be that the model does require some initial training however that was not the case. Instead I suspect that perhaps one the prerequisite libraries did not install correctly or perhaps the version of one of the library’s was causing the model to not work as intended. As the model was essentially performing just image recognition on the images instead of generating a caption, I think that the Natural Language Toolkit library may have been causing the problem.
Even though this model was not working I did not want discard it straight away therefore I tried to see if there was docker image implementation available, which there thankfully was. Using docker meant that I did not have to worry about installing the additional library as docker will take care of that. I firstly installed docker and then downloaded the im2txt docker image from the docker hub. Getting the model to work using docker was fairly straight forward as all that was required was the pre-trained weights and a vocabulary file which could both be downloaded using docker. I then run the script for generating a caption and passed in the same image that I had previously used. However now the model was working as it was now generating a complete caption instead of just a single word.
Caption generated using im2txt docker image:

0 notes
Text
Training an Image Captioning Model
Before fully committing to the idea of using a pre-trained image captioning model for my app. I wanted to see if it would be possible to train my own model, to get an idea of how this would work I used the code from TensorFlow’s image captioning tutorial where the architecture of the model is based off a well-known image captioning model called Show and Tell. I firstly tried to train this model on my computer however I underestimated the computational needs of this model as it was taking over an hour to get through one epoch. Part of this was down to not being able to train on my GPU as TensorFlow does not support GPU training on Mac OS. Therefore, I instead decided to train this model using Google Colab, which allows you to train models in the cloud using Google’s powerful GPUs.
The TensorFlow image captioning model uses the MS COCO dataset which contains over 82,000 images where each image has at least 5 different captions attached to it. However, the tutorial only uses a subset of the dataset which is 30,000 captions for around 20,000 images. Before training the model in Google Colab I changed this to 60,000 captions to improve the accuracy of the model, I also changed the number of RNN units from 512 to 1024, and changed the number of epochs from 20 to 30 so that I could get better results from the model.
I then started training this model using Google Colab, however it still took a long time for the model to train, in total it took around 8 hours to train. Once the model had finished training, I tested the model on some of the test images from the dataset and results were quite good for some of the images, however when I tested it on my images the results were very poor. To improve the results, I could have trained the model for longer and used the entire dataset, however as the free version Google Colab has storage limitations this means I could only train the model using a subset of the dataset which was 60,000 captions. Even with this subset of the dataset, I had almost max had the storage limitations on Google Colab as I only had a few 100 megabits of storage left. Another way I could have improved this model was by training the model for longer, however this is not possible as a Google Colab session only lasts for 12 hours. Therefore, I would have to save the models weights then open up another session if I wanted to train for longer than 12 hours. The poor results I got from using this model combined with the amount of computational power needed to train an image captioning model, solidified why I had to use a pre-trained model instead of trying to create my own if I wanted the captions to be as accurate as possible.
Link to the code
https://www.tensorflow.org/tutorials/text/image_captioning
Screenshots of the captions generated by the model:


0 notes
Text
RNN, LSTM, and GRU
Image captioning is when a computer tries to describe an image in a natural language. Networks such as CNN's are great for image recognition and object detection however they are not enough by themselves when it comes to image captioning. For image captioning a model needs to remember the different objects in the image, it then needs to generate a caption for the image in a natural language. This is where RNNs come in, an RNN also known as a recurrent neural network is a neural network where the output from a previous process is fed as the input to the current process, this means that once the output has been calculated it is copied and sent back into the network in a loop. This loop replaces the hidden layer that is found in a traditional neural network. Inside this loop, it can be thought of containing multiple copies of the same network where each network is passing on information to its successor.
Diagram of RNN:
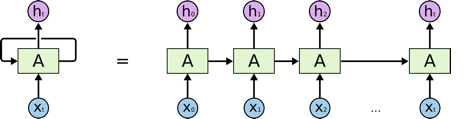
Image source: https://colah.github.io/posts/2015-08-Understanding-LSTMs/
Essentially this means RNNs have an internal memory as there are able to remember previous information, therefore their actions are influenced by what the network has already learned. Traditional neural networks also remember previous information however this is only during training through backpropagation. RNNs as well learn through backpropagation however they also learn from previous inputs while generating outputs within the network. Therefore, unlike regular neural networks where all the inputs and outputs are independent of each other, the inputs and outputs in an RNN are dependent as they are all related to each other. This is achieved by applying the same weights and biases to all of the layers by sharing the parameters across inputs. As the architecture of RNN networks is repetitive this means that they are very good at problems evolving sequences of data such as text generation. For example, when generating sentences using text generation, we need to know what the previous word was as it will have an influence on what the next word should be. This is how we write as humans, where our previous choice of word influences our next, for example, we don’t start the thinking process all over again every time we write a new word which is how a traditional neural network works.
However, most problems such as text generation are now done through a long short-term memory network known as an LSTM which is essentially a modified version of an RNN. This is because RNNs can only process a short sequence of information this means they cannot link together information if the gap between the data is too big. Which is where LSTM comes in, an LSTM addresses this problem which is known as long-term dependencies. By default, an LSTM network is designed to store information for longer sequences making them more suitable for the complex machine learning problems of today. When a regular RNN processes information it is in the form of a loop, inside this loop are a chain of repeating modules that can be thought of copies of the same network each passing on information to its successor. Information is retained and passed on through a hidden state, which acts as the networks memory by holding onto information the network has seen before. The hidden state is calculated by passing the input and the previous hidden state output through a single tanh function.
LSTMs have the same repeating structure however they are more complex, each repeating module contains something called a cell state which is the main aspect that sets them apart from an RNNs. The cell state in an LSTM is used to preserve information however, information can be added or removed to the cell state in the form of three different gates which decide how much information should be let through. The first gate is called the forget gate this is used to discard or keep the information, the gate is fed information from the previous hidden state output and the current input, this information is then passed through a sigmoid activation function which returns a value between 0 and 1. If the computed value is 0 the information is discarded however if the value is 1 the information is retained for future use. The second gate is called the input gate, which is used to update the cell state. Again, the previous hidden state and the current input are passed through a sigmoid function, this decides which values will be updated based on their importance where 0 means the information is not important and 1 means it is important. In addition to this the previous hidden state, the current input is also passed through a tanh function which ranges the values between -1 and 1. The output of the tanh function and sigmoid function are then multiplied together where the output from the sigmoid function determines what information is important from the tanh output. The important information is then added to the cell state. The final gate is called the output gate which is used to output a new hidden state value for the next network. This is achieved by passing the previous hidden state and current input through a sigmoid function, also the current cell state is passed through a tanh function. The output from the tanh function is then multiplied with the sigmoid output which decides the information the hidden state should carry over.
There is also another type of network called a GRU or gated recurrent unit which is an updated version of RNN. A GRU is similar to an LSTM as it is able to remember long sequences of information, however, it takes less time to train than an LSTM. The main difference between GRUs and LSTMs it that GRUs do not contain a cell state, instead the hidden state is used to transfer information. Furthermore, a GRU only has two gates instead of three which are called the update and reset gate. The update gate is most similar to the forget gate in an LSTM as it either discards or retains information by passing the information through a sigmoid function. The reset gate is similar to the update as it also passes the information through a sigmoid function however it has a different functionality as it is used to decide how much past information should be forgotten.
Diagram of RNN and GRU:
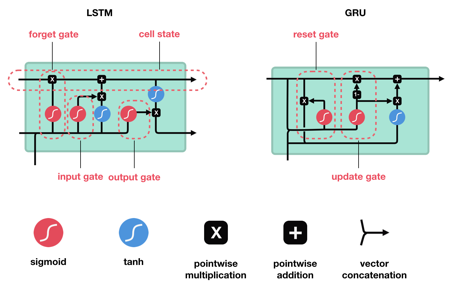
Image source: https://towardsdatascience.com/illustrated-guide-to-lstms-and-gru-s-a-step-by-step-explanation-44e9eb85bf21
To gain a better understanding of recurrent neural networks I decided to create my own recurrent neural network model in Jupyter Notebook for generating text using TensorFlow. My code is based on the TensorFlow example for text generation which tries to generate text as if it was written by Shakespeare. However, I decided not to generate Shakespeare as this is quite a common theme in text generation examples therefore, I wanted to create something different. Instead, I chose to generate text as if it was written by Leo Tolstoy. I firstly downloaded one of his books called “Father Sergius” from gutenberg.org which I used as my dataset. As this was raw text, I had to do some pre-processing to the text before passing it into a network. I firstly removed any characters from the text that were not ASCII, next I stored the number of different characters in the text, finally, I then vectorized the text as neural networks cannot process raw text, as they only work with numbers. Therefore, I tokenized the text by creating two lookup tables, the first table maps each individual character from the text to an integer value and the second table then maps the integer values to the characters.
Vectorized text:

The purpose of a text generation model is that given a character or a sequence of characters what is the most likely next character? To achieve this, the model needs to be fed a sequence of characters, the models then decides what the next character should be based on the previously seen inputs. In order to implement this, the text must be divided into sequences, the sequence length I chose was 100, this means chunks of 100 characters are passed into the network as the input data. Each input sequence also has a corresponding target sequence which is the same length as the input however the target sequence is shifted one character to the right. This is how the network predicts the next character, for example, if the sequence length was instead 2 and the characters for one of the sequences were “The”, the input sequence would be “th” and the corresponds target sequence would be “he”. To implement this, I first converted the vectorized text to a TensorFlow dataset, now that the data was in a TensorFlow dataset format I was able to split the data up into sequences. Next, I created a copy of each sequence, where the original sequence is the input text and the copy is the target text, the target text is then shifted one character to the right. I then shuffled the data with a buffer size of 10000 and turned the data in batches of size 64.
Input and target sequences:

After this I created the RNN network, I firstly declared the model as a sequential model, I then set the first layer to an embedding layer which is the input layer. I then passed this layer the number of different characters in the text, which is stored in a variable called vocab, I also passed an embedding dimension size of 256, and a batch size of 64. Secondly, I created an LSTM layer, with 1024 RNN units, set return sequences to true, set stateful to true and set the recurrent initializer to use glorot uniform. Finally, I created a dense output layer and passed it the vocab variable. I also wrapped the model in a function called built_model and returned the model. This is because the model needs to run again after training as the batch size needs to be changed when generating the text due to the RNNs state being passed from timestep to timestep, this means the model will only expect a fixed batch size once it has been built. Next, I defined a function for the loss which uses sparse categorical cross-entropy, compiled the model using Adam as the optimizer and passed in the loss function. I also created checkpoints to save the weights generated during training as this is needed to rebuild the model later on. Finally, I trained the model with 10 epochs,
Once the model was trained, I restored the latest checkpoint and rebuilt the model however this time with a batch size of 1. I then created a function for generating the text. This function generates the text by initializing a start string which is used to start the text generation process, sets the number of characters that are generated to 2000, vectorizes the start string, initializes an empty string which is used to store the generated text, sets the temperature value to 1.0 which is used to control how predictable or random the text is in a text generation model. It then initializes the RNN state, gets the prediction distribution for the next character using the start string and RNN state, next it uses categorical distribution to calculate the index of the predicted character, the predicted character is then used as the next input to the model along with the hidden state, the function then returns the start string along with the generated text.I then printed out this function and passed in the model and a start string to see the text generated by the model. At first, the text the model was generating did not make any sense, plus most of the words were not being spelled correctly. I then change the temperature value from 1.0 to 0.2, the text was now mostly being spelled correctly however it would just repeat the same word over and over again. To try and improve this I retrained the model with 30 epochs and kept the temperature the same this improved the model however it would still sometimes repeat words quite often.
I then decided to change the architecture of the model by experimenting with more LSTM layers and drop out layers. The best results I got were by adding LSTM layers both with the same parameters as before, I also added a dropout layer with a value of 0.2 after the input layer, a drop out layer of 0.4 after the first LSTM layer and a drop out of 0.25 after the second LSMT layer. This model was again trained using 30 epochs. Now the network was now no longer repeating words and was able to generate sentences that somewhat made sense. However, the network had not learned punctuation as it never put any commas or full stops in the sentences. It also had not learned how to split the text into paragraphs instead it just produced a stream of endless text. I then changed the number epochs to 60 and retrained the network.
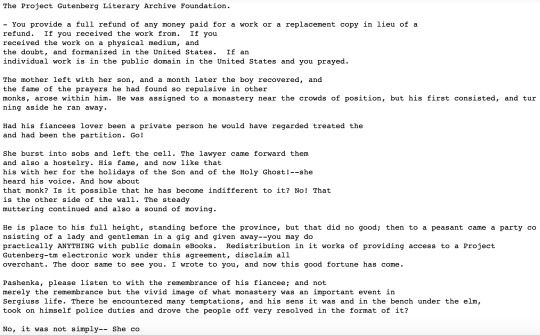
I was then very surprised with the results as the network was now generating very convincing text as it was adding punctuation to the text, capitalizing letters after full stops, as well as splitting the text into paragraphs. Furthermore, for most of the sentences, the structure was very believable as each following word did not seem out of place, also some of the sentences actually made sense as if they were written by a human. However, the network was not perfect as when you read the text as a whole the content does not make sense. As well the model would sometimes generate story text along with text such as the website URL of the eBook. This could be avoided by removing irrelevant information from the text before training. Overall though for a relatively simple model, I was very pleased with the results. Generating random text from a book may not seem useful however being able to generate text as if it was written by a human is a fundamental part of image captioning, which is why RNN text generation systems are used with CNNs to generate captions for images.
Text generated by the model:
0 notes
Text
More on Object Detection
To gain a better understanding of how image captioning works I decided to research more on how object detection works, as being able to detect objects within an image is a fundamental part of image captioning. When comparing the difference between image recognition and object detection, image recognition is used to classify just a single object from an image, this means image recognition only works with images that contain one single object such as the images from the fashion_mnist dataset. Whereas object detection can be used to classify multiple objects from an image which is much more useful. When developing an image recognition model we just assign a class label to each image, however with object detection we firstly use a method called object localization which is used to detect where each object is located in an image by essentially drawing a bounding box around the area of interest i.e. the object. We then, in fact, combine this with image recognition by assigning class labels to each object inside the bounding box, where we can then make predictions on what the object inside a bounding box is, which is what allows us to detect multiple objects from an image. Furthermore, it’s worth noting that, rather than drawing bounding boxes some object detection models instead detect objects using object segmentation. This is where the actual pixels of an object are highlighted rather than just placing a bounding box over the object.
Many object detection models are based on an algorithm called R-CNN which is a variant of convolutional neural networks (CNN). An R-CNN is similar to a CNN however before passing the data into the convolutional layer’s, an arbitrary number of bounding boxes, each with a different size and position are placed over areas of interest within an image. The images inside each of these bounding boxes are then passed into a regular CNN to extract the features from the image. These features are then passed into a support vector machine algorithm also known as an SVM which is used to classify the object inside the bounding boxes, we then keep the bounding boxes that have the highest scores. Since the development of R-CNN, many variants have been made which are essentially improved and faster versions of R-CNN such as Fast R-CNN, Faster R-CNN, and Mask R-CNN. R-CNNs are very good at accurately classifying objects within an image however the downside is it that they are more computationally expensive.

Image source:
https://machinelearningmastery.com/object-recognition-with-deep-learning/
Another common algorithm used in the field of object detection is an algorithm called YOLO, which stands for you only look once. This algorithm works by splitting the image into a grid of cells where each cell is responsible for predicting 5 bounding boxes, YOLO then predicts how confident it is that a bounding box contains an object. A class prediction is then made on each cell inside the bounding boxes, this tells us what object the algorithm thinks is inside a bounding box. YOLO then keeps the bounding boxes which outputs the highest score for containing an object along with the highest score that the object inside the bounding box belongs to one of the classes. The difference between YOLO and R-CNN algorithms is that all the predictions are made at the same time as the entire image is passed into the network rather than different parts of the image, this is why the algorithm is called you only look once as it only looks at the image once. YOLO is in fact just a CNN as this is all done using a single convolutional neural network. The benefit of this algorithm over R-CNN is that it is much less computationally expensive, this means it is able to make predictions at 45 frames per second which makes this algorithm perfect for making real-time predictions such as when using video data as the input. However, the trade-off for having better performance is that it can be less accurate than other algorithms, for example, it can struggle to detect groups of small objects within an image due to the spatial constraints of the algorithm since each grid cell can only contain one class.
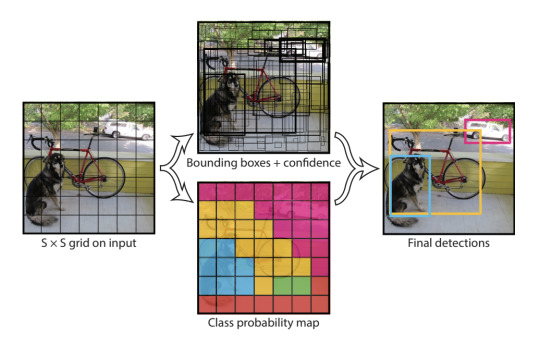
Image source:
https://machinelearningmastery.com/object-recognition-with-deep-learning/
To get a better understanding of how object detection works I decided to experiment with object detection myself in TensorFlow. However, as object detection models are far more complex than image recognition models and work with a larger amount of data, I decided to use a pre-trained model to save on computational time. For example, even when I was using the fashion_minst dataset which only contains greyscale images that are 28 x 28 pixels, which is a relatively small amount of data, this still took quite a long time to train on my computer when using a CNN.
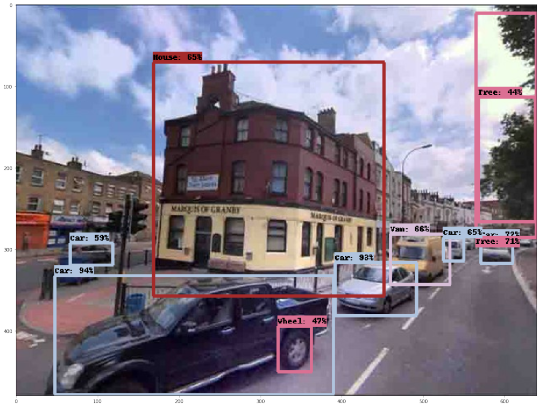
The pre-trained model I decided to use is from TensorFlow Hub which is an attentional library on top of TensorFlow that contains reusable machine learning modules. The model I used uses the Faster R-CNN algorithm, the CNN part of this model uses the InceptionResNet V2 network which was trained on the Open Images V4 dataset. To test this model on my own images I used the start-up code supplied by the TensorFlow GitHub page however I had to adapt the code, so it could read images from my computer as the start-up conde only works for online images by passing in the URL. Once I had the code working, I tested it on a few of my images and I was very impressed with the results, as it was accurately locating objects and it was classifying all of the objects correctly. However, the only downside to this model was that its confidence score was quite low on some of the objects it detected even though it had in fact classified the objects correctly. For example, this was sometimes way below 50 percent which could be a problem as usually we set a threshold of 50 percent or more to make sure we only output predictions that the model is confident it has classified correctly.
Picture of the model's output
0 notes
Text
CNN vs NN
After experimenting with image classification using regular artificial neural networks, I then carried out more research and found that regular neural networks work fine for very simple computer vision problems. However, they are not advanced enough to cope with the complex computer vision problems of today such as detecting multiple objects from an image, this is where convolutional neural networks known as CNN's come in which are a subclass of neural networks.
A CNN is a neural network that performs kernel convolution over the pixels of an image to detect features and patterns from an image. Kernel convolution is a form of image processing and is how image filters such as gaussian blur and Sobel edge detection are created. This works by taking an input image then applying a kernel which is just a small matrix to every pixel on the image. A common kernel size is 3 by 3, with a kernel of this size a single pixel is taken from the input image, then the kernel is put over the pixel so that the pixel is in the center, this then gives us a 3 by 3 grid for the input image pixel. Next, each input pixel is multiplied with its corresponding kernel value, for example, if the first value in the kernel was -1 and the first pixel in the 3 by 3 grid for the input image was 50, then 50 would be multiplied by -1, this process continues for each pixel in the 3 by 3 grid. Once this process is complete all of the values are summed up and divide by the size of the kernel which would be 9 for a 3 by 3 kernel, giving us the dot product, this value is then the value of the output pixel. This process is repeated for every pixel in the image by sliding the kernel along the entire image. As well if the image is an RGB image then the kernel convolution operation is applied to each color channel.

image source:
https://medium.com/@bdhuma/6-basic-things-to-know-about-convolution-daef5e1bc411
Inside a CNN we have layers called convolution layers, these contain the filters that are used to extract features from an input using convolution. For images, the filters inside a convolution layer may detect features from the image such as edges, corners or lines. For example, if the input image was a picture of a person’s face one filter might detect the edges on the left side of the person's face and another filter may detect the edges on the right side. A convolution layer will contain a number of filters that can extract features such as this. These are considered low-level features which are usually detected by the first convolutional layer as it deals with the raw pixel data. However, multiple convolutional layers can be combined together where the input of those convolutional layers is the output of previous convolutional layers. These deeper convolutional layers are then able to detect more complex shapes than just lines or edges as they can combine different low-level features detected by previous layers, eventually, the very deep convolution layers should be able to detect complete shapes and objects from the image.
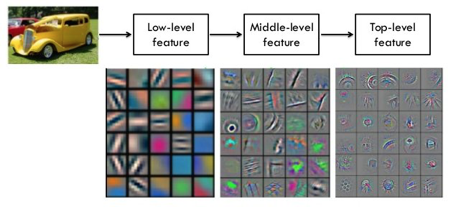
Image source:
http://teleported.in/posts/network-in-network/
Another common technique used in a CNN is max pooling. A max-pooling layer is placed after each convolutional layer and is used to make the dimensions of the image smaller by downsampling the image, this makes the model more efficient as well as enhancing the features. Max polling works by taking a grid of pixels from the image usually this is 2 by 2, it will then take the highest pixel value from that 2 by 2 grid as the new output pixel value. This process is then applied to the next 2 by 2 grid and so on which eventually reduces the image to one-quarter of its original size for a 2 by 2 grid. This section of the CNN is called feature extraction or feature learning, the next part is called the classification section which is where a small artificial neural network gets attached however firstly the data is flattened before passing it into the network. This neural network will be fully connected and will usually consist of one hidden dense layer and one output layer. Then just how a regular artificial neural network learns through backpropagation the weights are adjusted in the neurons however as this is a CNN the weights of the filters inside the convolutional layers are also adjusted to see which type of filters and filter weights produce the best results. However, CNN's are not perfect the one major downside of CNNs for computer vision is that they do not tell us anything about the spatial information of an image, such as the position of an object in the image or whether an object is in the background.
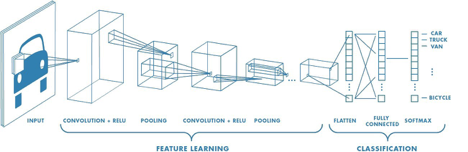
Image source:
https://towardsdatascience.com/a-comprehensive-guide-to-convolutional-neural-networks-the-eli5-way-3bd2b1164a53
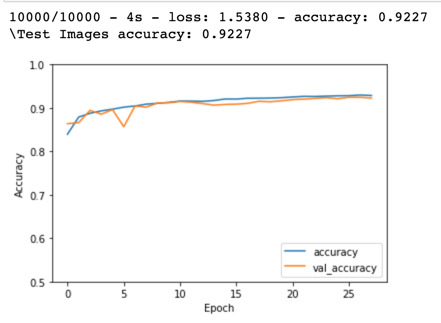
I then decided to create my own CNN using the same dataset I had previously used for my regular neural network to see if I could achieve better results using a CNN. For my first CNN, I created a model with three 2D convolutional layers, two 2D max-pooling layers, one hidden dense layer with 64 nodes and one output layer. I trained this model on 20 epochs and managed to achieve 89 percent on the test images, this was the same result I got with my standard neural network which was a more complex network and also contained dropout layers.
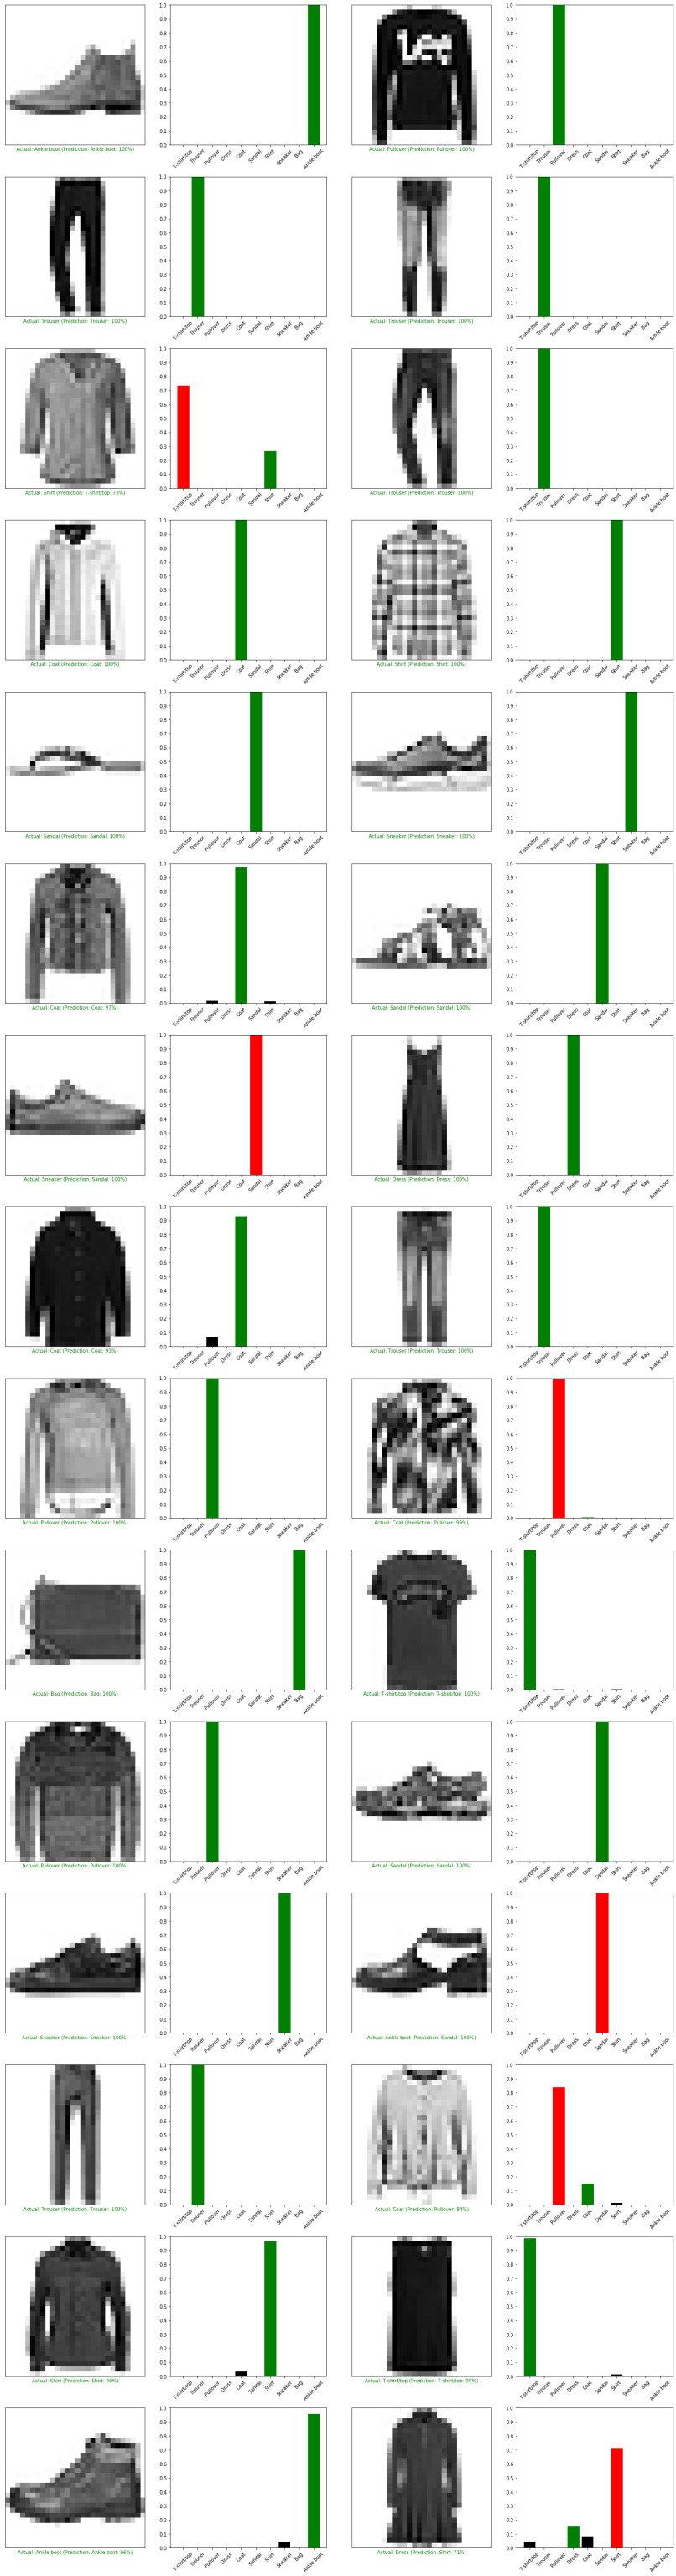
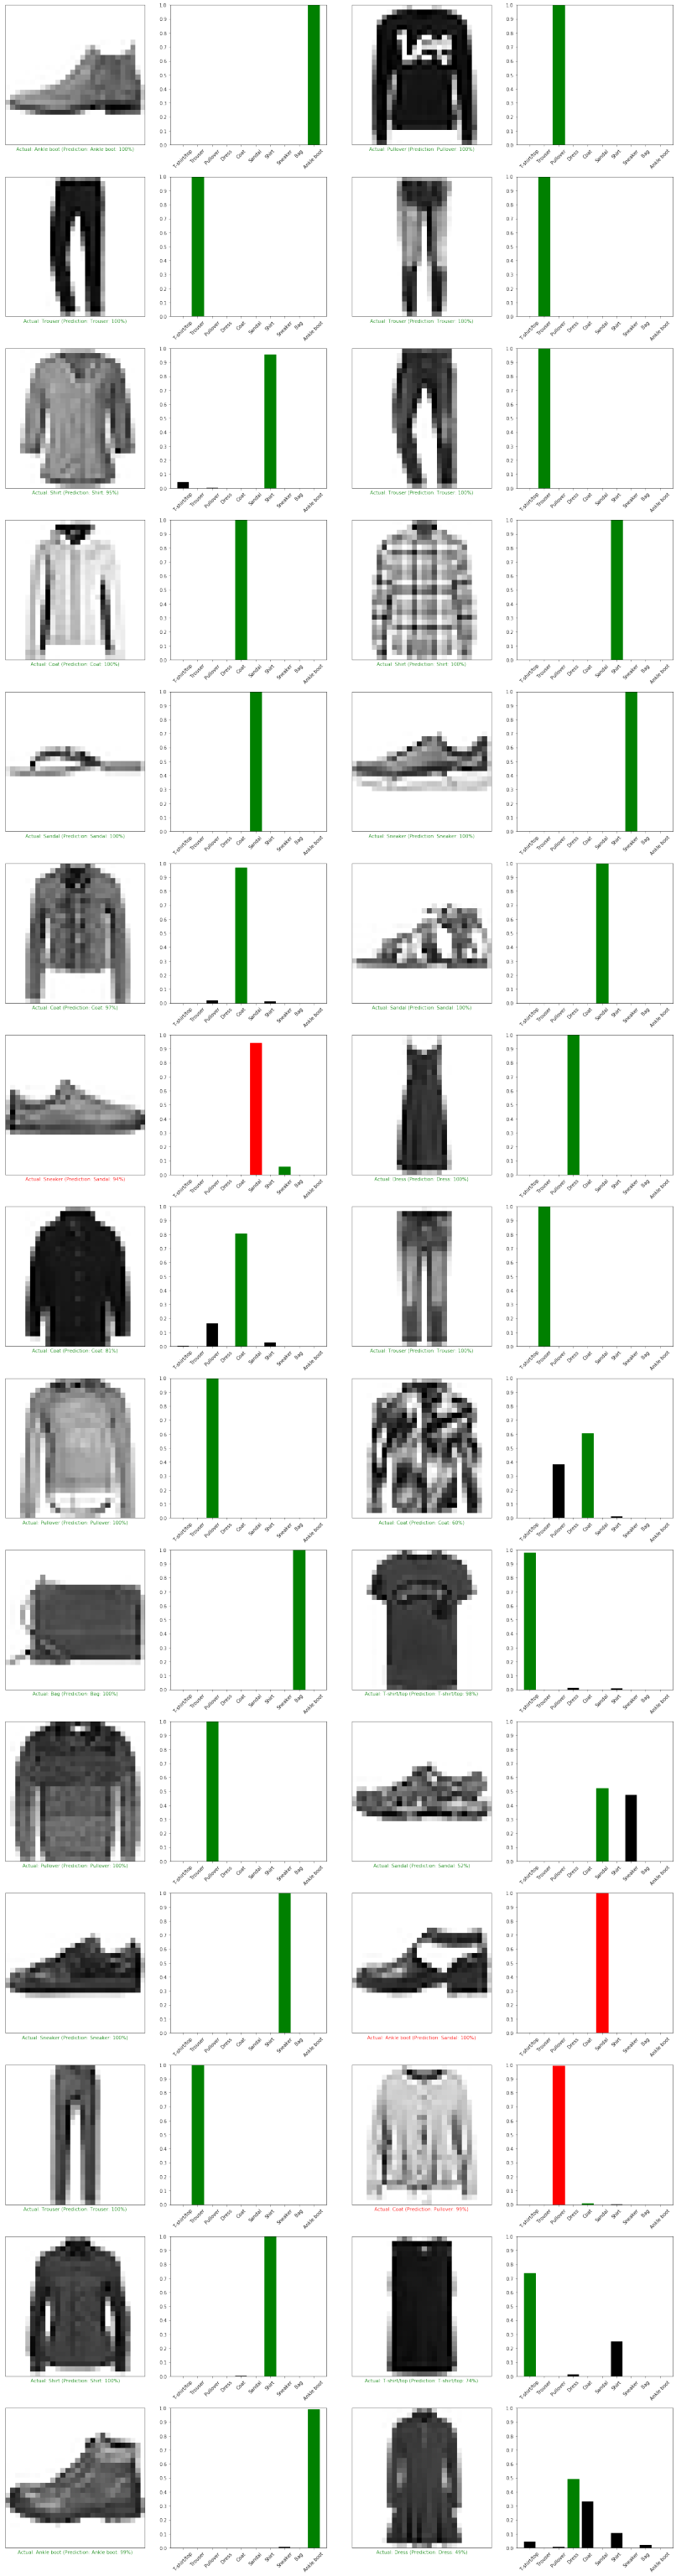
As I was already achieving good results with a CNN I decided to create another CNN which was more complex, this CNN contained four 2D convolutional layers, two 2D max-pooling layers, three dropout layers and one hidden dense layer with 512 neurons, it also contained 5 batch normalization layers. The term batch normalization is a technique that is used to make sure that the weights within a network do not become too unbalanced during the gradient process by normalizing the data. This can help reduce the training time as well as reduce the chances of large weights over influencing the training process. I trained this model on 28 epochs and tested it against the test images and managed to achieve 92 percent which was much better than my previous models. This model also hardly overfitted compared to my previous models as the exact accuracy on the training data was 0.9286 and the exact accuracy on the test data was 0.9227. Finally, I plotted the first 30 test images and was pleased with the results as the model was only classifying 1 image out of the 30 images incorrectly, plus it was only 75% sure with the image that it predicated incorrectly.

0 notes
Text
Image Recognition Using a NN
Before diving into image captioning using TensorFlow I firstly wanted to learn the fundamental basics of computer vision and machine learning. Therefore, I started off with learning image recognition, which is the most basic form of computer vision, this is where a model makes a prediction on what it thinks a single object is from an image. To create my first image recognition model, I based it off the basic image classification tutorial on TensorFlow which classifies images of clothing using a neural network and the Fashion MNIST dataset which contains 70,000 (28 by 28 pixels) grayscale images in 10 categories. This dataset uses 60,000 images to train the model and 10,000 images to test the model. Each image in this dataset contains a label from 0 to 9 which corresponds to a class name array containing 10 string elements, for example, label 0 is mapped to the class name t-shirt/top.
The model is then able to make a prediction on an image as it contains 10 output nodes which return an array of 10 elements, the element which then contains the highest value is the one that the model is most confident the input image belongs to. For example, if the element in the array at index 9 has the highest value then the model thinks the image is an ankle boot as an ankle boot is the 9th element in the class names array. Creating this model gave me a good insight into how image recognition works and how neural networks are used in computer vision. It also gave me a better understanding of neural networks in general as I went and researched what the different features of a neural network were. For example, how an activation function decides whether a neuron should be fired or not, how a loss function is used to calculate the error between the true value and the predicted value, how optimizers are used to update the model using gradient descent and how epochs are used to make the model learn. I also ran into overfitting for the first time as I found that increasing the number of epochs improved the model’s accuracy on the training data however it was then less accurate on the test data. Overfitting is when a model becomes extremely good at classifying the training data, however, it then struggles to generalize new data.
For example, when I increased the number of epochs from 20 to 50 the accuracy on the training images went from 90 percent to 98 percent however for the test images the accuracy went from 88 percent to 86 percent. As well when I plotted the first 25 images the model was now classifying 6 images incorrectly where instead before it was only classifying 3 incorrectly. This let me to research how overfitting could be reduced in order to make a model generalize better instead of just changing the number of epochs. One well-known method that I found was drop out, this is when a random number of output nodes within a layer are set to zero, which prevents them from participating in the final prediction. I then tried to implement drop out into this model, at first, this was making the model less accurate however I then added two hidden layers to the neural network instead of one and increased the number of neurons in each layer to 256 instead of 128. Now the accuracy on the test images was 89 percent.
Test accuracy with dropout

Below are plots of the test images, green means the model predicted correctly and red means the model predicted incorrectly
Neural network with 50 epochs no dropout
Neural network with 20 epochs and dropout
0 notes
Text
User Interface Prototype
I have created a prototype for the user interface of my project. This design is how I envision my app to look once it is complete, I created this design using Adobe XD. A link can be found below to test out the prototype.

https://xd.adobe.com/view/5022f24a-5146-4470-71aa-43181ef7ea5e-2613/
0 notes
Text
Object Detection vs Image Captioning
From testing and research, I have found that object detection is usually more reliable then image captioning. This is because object detection is less complex than image captioning as it is simpler for an algorithm to detect objects in a picture and then simply make a prediction. Whereas with image captioning the algorithm must detect the objects within a picture and make relations between the objects, it must also detect the setting of the image, for example, it is inside or outside. The algorithm then has to piece of this information together and generate a caption for the image, also the sentence needs to written in a way that makes sense to us as humans


image source: https://towardsdatascience.com/image-captioning-with-keras-teaching-computers-to-describe-pictures-c88a46a311b8
0 notes
Text
Computer Vision and AI
I started off by researching the different ways that artificial intelligence and machine learning is being used today specifically in the field of computer vision. I came across a very interesting computer vision AI project currently being used which showcases how useful artificial intelligence can be. The project I can across uses Microsoft A.I to detect snow leopards in the wild which are currently a vulnerable species. Koustubh Sharma is wildlife biologist who has been studying snow leopards for nearly 11 years in Central Asia and now with the help of Microsoft AI his job has become a whole lot easier. In order to find out exactly how many snow leopards are left in the wild, Sharma and his team place cameras in the habitats of the snow leopards, they would then have to go through hours of video footage to see if the cameras caught any sightings of snow leopards which could take days.
However, now using Microsoft AI they are able to gather all of the footage that contains snow leopards in minutes using new a Microsoft AI solution that scans all of the images and separates the images that contain snow leopards from the images that do not by finding the features that make up a snow leopard. The images that are deemed to contain snow leopards by the algorithm are then put into a database for easy viewing.

This saves a considerable amount of time for Sharma and his team which can now be used instead for coming up with solutions to help save the conservation of these animals. In addition, more recording can now be taken at the same time which helps with having a more accurate estimate of how many snow leopards are left in the wild.
The full article can be found below
https://news.microsoft.com/transform/snow-leopard-selfies-ai-save-species/
1 note
·
View note