
Last Seen Blogs

salmasantosposts-blog
Salma Santos C.

gendabee
The Adventures Of...

seecn
Sara

centrorologi
CentrOrologi

bad-sweetygirl14-blog
Nena KumarDevgn
Video
undefined
tumblr
Found some videos while cleaning up my very messy post-semester hard drive! These are videos I made to show the changes to the shoulder I had to make in order to fix the rig.
0 notes
Video
undefined
tumblr
Found some videos while cleaning up my very messy post-semester hard drive! These are videos I made to show the changes to the shoulder I had to make in order to fix the rig.
0 notes
Photo

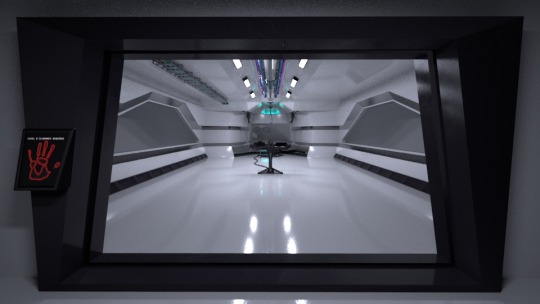
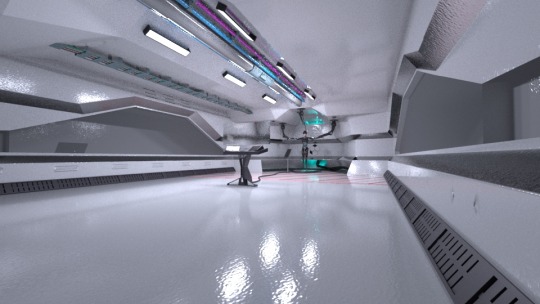
Close up on front door, also not seen really in film.
LAB 04 - TS ; TS is top secret.
I just wanted to really push the idea that the “thing” inside was hostile/dangerous. Making sure that people that enter are calm and non-aggressive to avoid setting off the military device to react.
0 notes
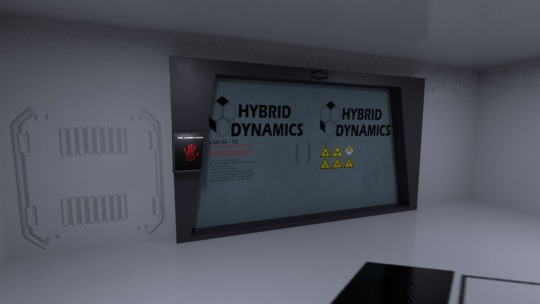
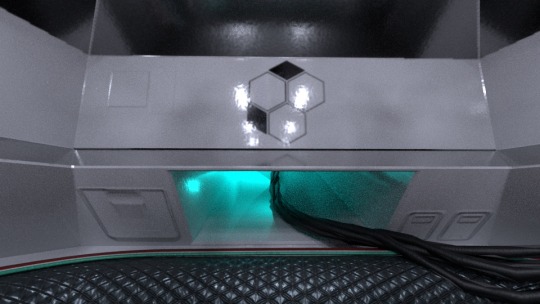
Photo


Some close ups on details not seen much in the film, like the monitor details and the subsurface scattering.
0 notes
Photo


Might be of interest to see my robots colour, normal, metal and roughness maps! The height and emmisve maps are pretty boring :P
0 notes
Text
Reflection
I always remember early on that Andrea told us that if we don’t find ourselves struggling with tasks or with the film, then we aren’t pushing ourselves enough. I made sure to push myself constantly. The sad part about that is that it led to small mistakes and imperfections in the film, the great part about it though is that I was able to learn from every aspect and process I did to complete my film.
For one, I’m glad I was ruthless with my schedule. When my time was up on a task, I moved on. I never left things unfinished, but I needed to move on as I could easy spend more time on every aspect of production.
For example, lots of things could have been fixed or improved on my character, especially as I learned, improved, and tested. My main issue in my entire film is the mesh on her chest and helmet. In an attempt to keep polys low (And being new to quad draw/remesh) I made certain details too low poly. Any/all of the cylindrical details on her armor doesn’t have a clean silhouette, and isn’t perfectly planar. I’m not sure if the latter is a normal/height map issue, but the former is definitely a learning experience.
Height and normal maps are great, but I know now that details that are/will be silhouetted against anything need a higher polycount, and any mesh that will be smoothed NEEDS hold edges, otherwise they become completely warped when smoothed and maps applied. This is why her chest armor lost its sharp definition. This would have been an easy task also if the mesh had slightly better topology - just add an edge loop right? But because the topology wasn’t ideal, an edge loop would not follow the cylinder, for example, but end up adding details where it wasn’t needed, usually causing pinching and other issues, hence why it couldn’t be fixed within my scheduled time.
It was a huge irritation for me sure, but I needed to move on and I had learned from the mistake. The whole point in coming to uni was to do just that - learn.
Another thing that has bothered me lots is Depth of Field. For some reason I couldn’t get arnold’s depth of field to work. I tried using Maya’s viewport blur, but it was really only super blurry, or none at all. I don’t think it was a scale issue, as I spoke to Kieran very early about the importance of scale and if a human should be 1.8m in maya, for example. The answer was yes, for texture and other reasons, so I know, or think, the DOF wasn’t scale. I tried lots of sliders and buttons and couldn’t get it to work clearly. I fear how much it effected the final output, but again, I had to move on and complete rendering and editing. I will no doubt return to this over the next few weeks when I’ve recharged and recuperated to see if I can learn from the issue.
Another issue I had was with the noise in my render - I kept settings to low in order to avoid getting stuck in the farm and ended up being in and out much quicker than expected as the farm was empty. Transmission suffered most for this. Another big bother for me, but again, had the farm not been empty, I may have ended up in a real bind with render times and waiting to the last minute to get my renders back...
I was fairly happy with animation, however I didn’t model her face with animation in mind really. I didn’t think I would use any blend shapes, but luckily I still used it as an opportunity to practice good topology on a face - GOOD JOB I DID!! I ended up using blend shapes on her face, and they worked really well I think. However, it would have been good if I had modelled even basically, the inside of her mouth, to allow for some more dynamic movements... Perhaps it does add to her seemingly being trapped in her body, as her head has been severed from her body - how many of her facial muscles work? (Sure I could, and did take artistic license and allow some emoting but y’know...) But, regardless, the option to open her mouth would have been good ,and definitely of added to her blend shapes, as you can see the deformation across the seam where it would usually part...
I’m also going to use her at some point for other projects or practice. I never got an opportunity to run a walk cycle with her, and I spent ages thinking about how she would walk. I’m really looking forward to playing around with that and getting some real creepy movement out of her!
Over the next couple days I’ll be posting any additional images or thoughts from the last few months that I forgot about or got lost in a file somewhere.
I need to prepare my speech for the graduation show, as I’m representing the course! Eeek! Good opportunity though and looking forward to it.
I’ve also updated my art station https://www.artstation.com/mikeymiddleton
Deadline soon. Luckily, everything is uploaded - one less thing to stress about!
0 notes
Text
Tidying up and getting ready...
I’ve spent the last few days rerendering scenes, trolling through freesound and tweaking the edit...
I spent some time adjusting the sounds individually. I edited some in audacity to make them fit the scene better, added echo in Premiere to give the room some volume and feeling to it, and panned some of the sounds across to one sider or the other to situate the sound in the scene.
I just hope it all makes the film more complete!
0 notes

Photo


MHad a busy day today working through my “to do list”. I had three scenes that didnt even render on the farm for some reason, so spoke to Sean and got them resolved and resent - Hopefully have them back tomorrow.
I also rerendered some frames on my laptop that either had Arnold Watermarks from the renderfarm (I think there was some issues with license when the renders started, it was only 4 frames) and 2 or 3 frames that were “missing” from playback, again, didnt take long to do so just did them here.
I made a few adjustments to a few scenes too. I got some feedback from Brendan later than expected, so my renders had been submitted. I’m waiting to hear back from him on what he thinks of the changes, and will resubmitt those renders too if he beleives its worth it.
I had a strange issue on the final render where the camera clips through the wall; in the playblast it doesn’t seem to clip but does during the render. This isn’t a huge issue as this was one of the scenes brendan suggested a few minor changes to too.
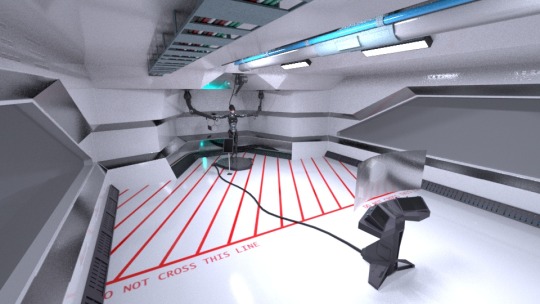
My proudest moment today though was solving an issue that Sang wasn’t sure of the cause. The top image shows that specular seems to be messed up through the screen. He thought perhaps it was a texture issue on the character but I also noticed it was visibld on the chrome accents on wall. I hid the screen in the renderer and sure enough it looked fine. After going through every possible texture option with no improvement, I moved into render settings, I tried initially turning up specular and transmission samples with no luck, and then eventually tried ray depth/samples - success!! It comes at a price though, the scene is lighter and the shadows are much much softer. This takes a bit of drama out the scene and makes it less easy to fix - a simple change in exposure in post wont cover it. I’m trying different settings now, and will speak to Kieran in the morning, but if push comes to shove it will have to do - its a 2 second or so scene so it should be okay.
UPDATE - Lowering diffuse ray samples/depth seems to be lowering brightness and increasing shadows, which is great!
0 notes
Text
Render Farm Time...
I’ve sent my 22 request forms! Terrified I’ve made a mistake in one of the forms, that it’s going to take too long to render, or it’s not going to look right... Time will tell...
While I wait for them to come back, I’m going to start on the screen for After Effects; I need to learn how to do it!!
0 notes
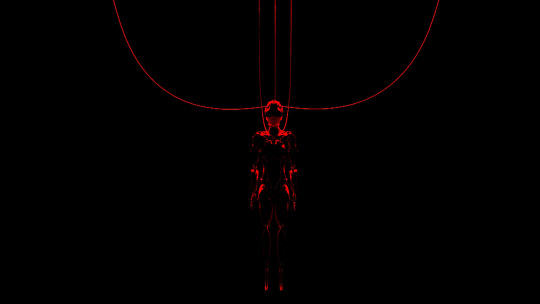
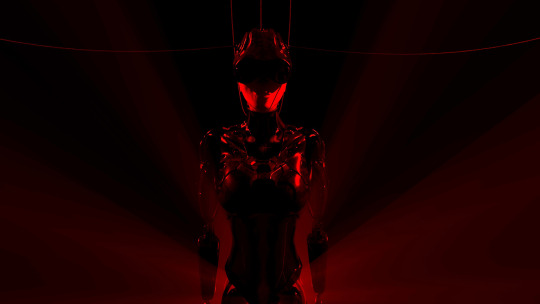
Photo


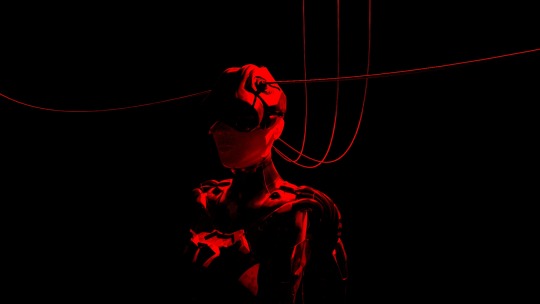
Some light tests I did on a key scene. I had created an emissie map for her in substance but wasn’t planning on using. On this scene (Where she drops the lights to give her an advantage before being attacked) it was clear that she wasnt going to lit well... I thought back to her emissie maps and decided I’d grab them and throw them on just to see how it looked, and it looked great. Her chest has a kind of HUD (The blue graphic of a body shown on the lab screens) that is her information on her robotic body’s status. I thought a bit of blue light from that shining on her face from below would really nicely contrast her against the red light, and help to push the storyline of the room being evil and her being to good guy. I added a blue spot light on her chest pointing up from her chest. I also added an additional red spot above her to give her some nice red light over her shoulder muscles, and an additional blue spot light to her front right - it doesn’t have a source, it was just to help add some contrast and drama to the shot. I had tried using just a white spot, but felt that using some colour and artistic liscense made for a much nicer shot.
0 notes
Photo


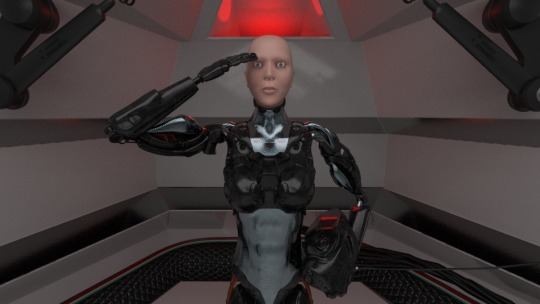
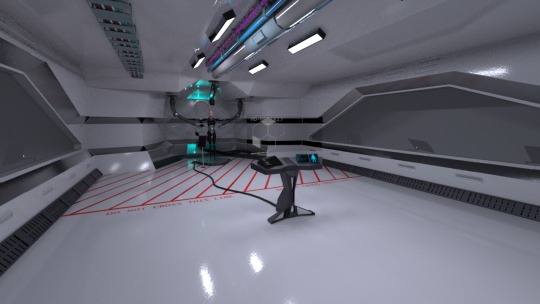
Lighting tests I did, I eventually went with a temperature setting as this made the light look most realistic and clean.
0 notes
Photo


attempts to solve shine on armor with clamping (not the solution I used as I reduces the contrast range)
0 notes


Photo
Sorry for being abscent tumblr, I’ve been super busy with the work! I’ll make a mega update here to get us caught up, and ill upload more photos after.
Since unwrapping the environment I have taken it to substance, got all the maps generated, made some optimisations on render time (Still some noise but render time is at 18minutes at some points so wont push it any more - waiting to hear back from Sang on how good the render time is/optimised the scene is before i send render farm requests) and done my animating!! Phew!
The substance painter stuff was good fun - I learend some lessons with the character, and knew the best way to approach this was to put everything under one material that I wanted on one map. To that end I put the entire room (walls floor etc) as one material (due to its physical size and wanting to put text on the floor) and the objects within the room - computers, piping, platform etc - on another atlas. Both atlas’ were 4k, and the only exceptions to that was a few individual maps - one for the robotic arms holding her, as I made them seperate and couldnt/dont know how to combine maps, and one for the pistol (ill show in next post) as I did that after (I decided a couple days before starting animation to test myself to model, wrap and texture a pistol in one day - I did it!! :D
I messed around with colour palette a bit with the room. I wanted a dark ominous room, but felt that showing the room with grey or dark surfaces lost the clean room/labratory feel. I think its vitally important in a sci-fi environment to try to keep real world links as close as possibly as they act like markers for the viewer to follow. I.e. by maintaing an aesthetic in this room or a labratory or hospital with the clean shiney surfaces, and the screen terminals using words like testing etc, the viewer will hopefully understand that its a lab/test facility of some description for the robot - That’s the plan anyway. By making the room darker, it might all into question the use or purpose of building. For example. is she there to be interogated? Has she been captured? As opposed to thinking oh this is a new technology...
I’ve not done any animation before, so was both excited and concerned to start, although it was a nice change of pace and helped keep me interested with a change of the usual workflow.
Luckily, as my story focuses on her being restrained for a large majority of the film, I didn’t have any massively challenging animation to do. However this didn’t mean I would coast the work and get it done as soon as possible. I wanted to make sure her acting and performance read as clearly as possible, as I need her movements to be one of the key indicators of her “state” i.e. human, or robot. I also quickly created blendshapes for her - I planned on her being unable to emote, but I felt this was a bit of a cop out. I didn’t want her to open her mouth, sure, as I felt that was a one way trip to uncanny that I coulnd’t use within the story, and would make her impossible to empathise with (if I had time, sure it would be a fun experiment to see what worked better, but time isnt on my side). This did mean that her emotions were slightly limited , BUT, because i wanted her to see trapped in her own body, and like her faculties were limited (due to the fact her head has been removed and put on a robot!!) I think it worked well. I created blendshapes for fear, sadness, anger, a blink, and a frown (to augment the other emotions). I’m so glad I did these, as the became key in a few of the shots, and really make them pop, and make her “come to life”, so I’m pleased I took the time to do them.
The animation was fun, a few issues came up however, but for the most part it was pretty straight forward. I took some videos of myself doing some of the movements as reference for the animations. I tried to do it in a week or less, which I managed, to make sure that I stay on target time wise, and as I opted to use After Effects to show the screens, I wanted extra time to learn - I want the screens to flash and change, and thought it would also be a good oppotunity to learn how to use After Effects as I’ve not used it at all.
I’ve spent a bit of time too working on camera movement and set up. I’ve weant for a 25mm focal length for most shots to show as much of the set as possible, situating the camera more. I try to frame each shot as well as possible to make it look good, draw the viewers eye to key information, and on a few shots, frame screens so that they can get plot information as to what is going on. It’s been difficult to make sure the camera looks as natural as possible, and not like a maya camera, which is tough. Camera work itself is an entire artform in itself...
So, I want to discuss a few of the issues I’ve had and how I got around them or solved them.
So, as I mentioned I had some issues with the animatiom. These came from the rig, and the blendshape.
First of all the blendshapes for her face - as I think I mentioned before, I did blenshapes for her bicepts so that when she moves her arm, her biceps will tense and relax to show that movement. It’s very subtle and probably never be noticed, but it looks cool when you look for it, and it was a great learning experience. I had to move its order in the channel editor to make sure it moved at the right time within the rig, and it worked totally fine, and easier than I thought! I did the same with the shoulder muscles, but more as corrective blendshapes as the rig/deformations isnt perfect. However, the face blendshapes wouldn’t play ball... I tried adjusting their order, I tried every combination, I tried deleting their history and their transforms, nothing worked - everytime I applied them, her head would shoot off into the distance. I spoke with both Sang and Michael and Patrick Sloan, eventually the 2 Sloans worked out that by deleting the meshes post, and applying them all as one blendshape (originally I did them one by one) it worked. I tried doing them as one BS without deleting them and for some reason it didnt work. I took it as it was and even asked Sang if he knew why (he didnt). As long as it worked though, I didnt care...
The next issue with the rig was something that totally slipped by somehow; When I rotate her global control her chest and abdomen wouldnt deform right AT ALL. I had no idea how it happened and started freaking out. The 2 Sloans couldn’t work it out either. If I grabbed her chest and her global, she would rotate better, but her stomach would twist up strangely. Eventualy Sang diagnosed that the issue was the IK Spine not twisting right, and that I must have done something wrong during the rigging stage. This was super frustrating as I took my time with the rig and followed Sang’s video perfectly. It must have been one little step, a constrain or a parent, that i missed, omited, or applied incorrectly, and more than a month later, it came to the surface. I was especially confused/frustrated as I tested the rig post completion and binding to check, but obviously hadnt used the global control to twist her. Sang found a work around, but it did mean that one of her spine controls was lost. I then realised towards the end of the animating that a few of her poses caused strange deformations, like verts jutting our, or generally not following the rest of her body too well. I would go into weight paints and smooth out the issue as best I could even though I couldnt see anything glaringly obvious, like an arm joint effecting her lower stomach, but now that I’m processing this, I wonder if perhaps losing a handle reassigne weights and didnt do it right??
Another issue I had was her armor and torso/muscles being SUPER Shiny. I couldn’t work this out especially as she looked totally fine within substance. Initially I assumed it was an arnold render setting and that I hadn’t turned samples high enough, but after optimising the samples using Sang’s tutorla (which made the render time too high unfortunately) I realised the issue remained. One day I eventually decided it wasn’t right and that it wasn’t just me - it was too much. I worked my way through Arnold’s material settings, turning this up, down, off, every which way, to see if it effected the shine. I eventually found the culprit was Diffuse Roughness and nothing more, and that by simple adjusting the exposure/alpha in the settings, it reduced this shine completely. The way I set up my materials meant that it effected her whole texture (even though muscle/skin and armor are in different graphs) so I lost a tiny bit of shine to her skin, but I think it still looks fine - if anything before hand her lips looked too shiney, as if she had on lip gloss.
I also had some issues creating the cabling for her helmet. I needed the cabes to flex and bend with her as they moved. In my head the best way would be and IK set up. Initially I tried this, and I use a cube to measure the start and end points, and used an arc to create a perfect bend over the 90 degrees. This was a good idea, and the cable could go from a 90 degree bend to perfectly straight, but any additional bend didnt work and just turned the cable. I then started thinking about IK Splines, and watched a few tutorials online but couldnt get it to work. It made sense though, a spline would allow the perfect movement! Evnetually me and Sang spoke a few times and he was able to find a solution. An spline set up that didnt work like an IK and meant I had to do lots of manual adjustments, but for the most part it looks great. So for the small cables on the sides of her helmet, i kept the simple but effective “fire and forget” IK cables, and for the rear of her head I used the spline, as this area would move and twist much more. It took a while to create and solve, but meant that it looked good and only took a small amount of additional work to animate.
I will upload some more images, such as test shots, the pistol (which barely gets any screen time, but only took a day to work on so not a massive loss.
Only a few weeks to go! Waiting for Sang to get back to me on scene set up and optimisation, once that gets the green light I’ll start sending render farm requests!
1 note
·
View note


