
♡ Fortune ♡♡ Professional Illustrator ♡♡ Los Angeles ♡♡ Mary Magdalene ~ Angelic Pretty ♡♡ my posts ♡ ♡ my wardrobe posts ♡ ♡ blog ♡♡ MM wardrobe ♡ ♡ instagram ♡
Don't wanna be here? Send us removal request.
Statistics
We looked inside some of the posts by mis-fortuneee and here's what we found interesting.
Average Info
Notes Per Post
7K
Likes Per Post
4K
Reblog Per Post
2K
Reply Per Post
20
Time Between Posts
16 hours
Number of Posts By Type
Text
16
Photo
1
Last Seen Tumblr Blogs


Fun Fact
Tumblr’s website traffic is steadily declining.
Text
Not Rose Basket: An Approx. 5 Year Old Remake Project
In which I attempt to make a Rose Basket JSK.


Read below the cut for my process and crafting notes.
Did you know that all Mary Magdalene "prints" use commercial fabric excepting Perfume Bottle (their first and only original print)? What this potentially means is that scraps of fabric featuring familiar MM motifs sometimes can be found floating around. It seems like at some point, someone found the original Rose Basket fabric and had it made into a JSK (likely by the handmade Taobao store that is known for making MM replications if the buyer provides fabric) in Mary Magdalene likeness.

The resulting item was a good attempt, especially given that the maker only had tiny stock photos to work out the general shape and print placement, but definitely there was something to be desired...
When I saw this JSK for sale, I felt that I had a decent remake project on my hands. I had already been looking for MM (or MM-like) materials for a while, so I figured I had the capability to bring up the piece to its full potential. I don't usually take on larger/i.e. actual garment projects, but this piece was a very strong case for giving it a try.
However, such projects are not without their pains, aren't they? Even with some semblance of a garment existing in the form of this dress, one may as well have been starting from scratch.
Unfortunately I didn't take many photos of the "before" dress so the pictures I do have don't really give it a fighting chance (it's so wrinkly and overexposed), but the shape was pretty much all wrong. However, it had good bones due to good fabric being used, and I knew I could make it better.
Laid flat and from afar, the JSK actually looks okay but there are numerous areas where it falls short. I'll talk about them shortly.

I was initially pretty excited to work on this project, so I pretty much seam ripped it apart right away after receiving it. Little did I know it would sit in parts in a bag for years...
Part 1: Trying to remember what I was doing 5 years ago
In terms of materials, I searched within Japan/Japanese sources using Mary Magdalene's original material terminology as reference. Unfortunately it had seemed that the original "shirurido" lining material had been discontinued, but it had a successor material that was almost identical when I bought a small amount, so that ended up not being a worry. The original lining is a little bit offwhite/ivory, so I purchased white lining and tea-dyed it. This colour will likely lighten as I wash it.

Many think that this light lining material that MM often uses ("for spring and summer" garments) is cotton, but it is actually 100% polyester! However, it does have a great hand feel and seems to have wicking properties as well, so there's no reason to discredit this poly.

Oddly, the wine rose basket specifically uses this kind of more chunky/slightly less structured braid. The other 3 colorways use a firmer type with the same wavy style. I managed to find a shop that carried both types and just bought as much as I felt was appropriate.
I was actually told that the firmer braid had been discontinued (which maybe explained why MM chose a different one for wine--there wasn't any stock of the other braid in red?) at the time (this was ~2017), but currently as far as I know the loose braid has actually been completely discontinued now and another company has picked up selling the firmer braid (maybe the machine that makes it was purchased by another company).

Dot tulle was thankfully not difficult to find. The colour matches perfectly, so I knew I had the right one 🙂
Now, let's break down the original dress.
Note that I did have the original Rose Basket (in a different colour) to use as a reference, which helped immensely.

The silhouette is obviously not quite right, although attempts were made to match seams similar to the original. The measurements are also different (likely made to match the buyer's requested dimensions) with the bodice being a little bigger. The skirt is also shorter, but I think that is just a mistake of the original seamstress.
The tulle is not very nice/cheap looking and the lace is also totally wrong. Those definitely had to go, so ripping off the lace and taking off the lining was first priority.
The lining material was a light cotton. It was okay, but cotton lining doesn't have the slipperiness of the original lining fabric so I preferred replacing it.
The lining and skirt lining would be completely remade from scratch, but obviously since I only had a dress' amount of original rose basket fabric, I would have to use what I had.
I initially focused on the skirt because it was the easiest portion to tackle as a pleated rectangle.

The original dress had the tulle sewn/serged onto the main fabric. This is...you could say, "incorrect", and changes the way the tulle sticks out of the skirt (as you can see in the comparison pictures), so I opted to just cut it off as closely to the serged edge as possible. It seemed sensible to leave the edge alone (rather than rip out the serging) since at the time I didn't have a serger of my own and the edge being already hemmed is convenient.
The original dress uses some kind of serged edge+blind hem stitch, while the replica more lazily folded over the bottom edge and used a line of stitching to secure both the braid/lace and the hem.
When comparing the length of the skirt to the original rose basket, the replica actually has more fabric folded into the seam due to the method used. Thankfully, the length of fabric used for the skirt was actually pretty much perfect when using the old hem fold and I guess the shorter appearance may have been due to other factors (cut of the bodice and length of tulle lace used maybe?).

Because it was easy to leave things as-is, I used this same hem fold and sewed the new braid onto the hem with two lines of regular straight stitch for security (two lines of stitching are consistently used on MM garments to secure braid or lace, although some older items may only have one line).
(I actually made a mistake here which I'll get back to later)


I attempt to use a method similar to MM to create the skirt lining layer. Dot tulle is cut into strips, gathered carefully (I don't have a ruffle foot so I used 2 lines of straight stitch+gather by hand since it tends to gather more evenly and look nicer than using only one, and I wanted to use some care here) and then attached to the skirt lining.

Without a serger, I used my machine's hemming stitch (it's a bit ugly, but it worked okay) and then topstitched the ruffle flat.
I also tried to take advantage of the lining selvedges so I wouldn't have to hem. Any extra fabric with raw edges I had to sew on to match the hem circumference of the original lining also was roughly machine hemmed.

The dot tulle doesn't need to be hemmed, but MM has neatly clipped the bottom edges of any tulle seams so the seam looks cleaner, therefore I did the same. (Sorry the picture seems to have turned out a bit blurry)
I can't really remember well, but I think it was at this point that I initially thought my job was done until I realized that the replica dress' pleats did not line up properly with the original. The widths were all wrong, possibly because the original seamstress had to make some modifications to the skirt pleat proportions to match the adjusted bodice measurements?
The skirt circumference and the way the fabric is cut for the skirt is somewhat different from the original dress, so I had to do some careful adjusting to get the pleats to have the same width and overall appearance as the original dress. I think some of the pleats are not as deep as they should be but you can't really tell with the final result. Such is the trouble when you have to work with what you have and there is no extra fabric available!
It was at this point that I took a break from the project because the bodice was next and that was, of course, a very daunting task. I think I had marked out some seam lines for adjustment on the front piece, and I had also decided that the back piece could remain sewn to the side back portions since they weren't too far off from the original appearance (the original back panel is actually only one piece of fabric with darts--the seamstress of the replica had used 3 separate panels for the back instead, so there are inevitable differences).
I also spent some time making new bows for the rose basket as I was not satisfied with the ones included with the dress. I don't have any pictures, but I dyed cotton sateen dark wine and that was a huge pain since red is a very tough colour to dye. I also made some mistakes with my bow making method (they were initially interfaced and used too much fabric in the middle which made them look too thick), so they were also left as unfinished pieces for a while.
Anyway, many years pass...
Part 2: The revisit
I would like to think I am maybe older and wiser 5 years on, with a more sewing expertise, but I'm not really convinced about that. Anyway, maybe I was better equipped for trying to adapt the bodice because I have a mannequin now.
I had previously had a bit of trouble fussing with the curves of the bodice flat with my fabric pieces, so I threw my mint rose basket on the mannequin and tried to match the seams carefully. Although...this mannequin might have been a tiny bit busty for rose basket and deformed the shape a bit.

Apologies for the cutout PNGs from here on out, the background was way too chaotic for me to let you see it.
It is at this point that I am wanting to put the project down again and really not enjoying working on this because trying to gain a rough pattern, and carefully match seams is not very fun and rather exhausting, requiring a lot of back and forth checking things and making sure I don't mess anything up.

After marking seams and having some confidence in the shape, I sew the front back to the sides again.
Thankfully, it seems like the pieces have enough fabric to create an original-looking bodice, but I suppose that was my expectation given that the original bodice measurements were a little larger than the actual MM dress. It's interesting to see where the original pattern cuts differ compared to how they should look and be sewn.
My first attempt at sewing the front together had a little too much of the print stripes showing at the sides, so I brought them in a little and tried again. When scrutinizing where the print is placed relative to the seams of the original JSK it once again becomes clear where the pattern cuts were a little off in the replica, but it isn't too bad and I think this result is almost indistinguishable.
There is a decent few centimetres of excess fabric at the sides (which was completely expected as the extra bodice room of the inital dress had to go somewhere), but I avoided cutting it down because it's precious extra fabric...

The only real modification the back needed was some small adjustment of the corset loops. I think I had also previously increased the seam at the very bottom of the back side panels because the original dress has this kind of "widening" (circled parts) that gives it a slight dropped waist.
I check both front and back portions, and when I am satisfied with the result I sew one of the side seams together.

Pretty much a completed bodice, the other side seam is left alone for now since zipper insertion will come last.
I can sew on the braid now. It is at this point while I am looking at the braid and realizing that is has a "right side" that I seem to have sewn the braid onto the skirt wrong (those many years ago...)
A 50% chance of getting it right and it was wrong!
While I'm sure a regular person would not care, I felt that it was worth repairing the mistake so the dress could be as close to the original as possible.

Fixed trim on the right.
I spent a few grueling hours ripping out the braid and reattaching it in the same method as before.

Braid also attached to the bodice.
I am wishing I had a complete dress by now, but unfortunately not...getting the bodice lining sorted is next...
MM's Rose Basket has a facing using printed fabric, however since I have no extra fabric to use for it and the dress I was working with didn't bother with adding that kind of detail (the original lining was just plain cotton with no facing panels at all) I decided to use this untextured rose basket fabric.

I originally considered just using the same lining fabric for the facing panel but seeing the dress laid flat with a matching printed facing is a detail that somehow enhances my enjoyment of looking at it a lot.
This fabric is from a reprint of the rose basket fabric from a couple years ago. It is also discontinued now but is very lackluster compared to the older fabric in my opinion. It is a rather thin quilting cotton and doesn't seem as vibrant as the original fabric, and has slightly different contrast colours. While you could still make a garment with it, I feel like it doesn't match up to the fabric used on the old rose basket because of the new fabric's sheerness.
However, given fabric supply limitations (i.e. I don't have anything) I think it's a decent nod to maintaining having self-fabric for the facing and will not be seen when worn.
Lining pieces are similar to the bodice pieces I traced out earlier so I used them as a reference and checked the shape with the lining panels on the original dress (on my mannequin).
The back lining seems to have a centre back seam as opposed to the outer fabric layer that had no seam/darts, and is made from 4 panels total.

Lining complete.
Next I attach the bodice lining to the main bodice piece, along with the straps. I mark where the straps should go based on my reference rose basket, sandwich them between the bodice pieces, pin and sew.

I left the straps as-is from the original replica dress. These are made from two strips of fabric sewn on each side, vs MM having used one strip and folding it in half. Just a different way of achieving the same thing, I guess. Of course I would have preferred the method to be "same as the original" but once again, no extra fabric... (I think I may have asked my SS to ask the seller if they had any extra and to include it if so, and the seller said they didn't have any...)
I also sew an elastic channel (sort of like topstitching) all the way along the top of the bodice about 1cm wide for later.
At this point I think that I seem to have pleated my skirt lining wrong. however, I may have just misinterpreted the other side of the lining pleats as the side that was "wrong", so I ended up having to repleat multiple times in my own confusion.
[it hurt itself in its confusion!]
Anyways, after that fiasco I baste the pleats down and attach the skirt lining to the bodice lining so I can check the length.

It's coming together!
I sew the outer skirt to the outer bodice fabric next, a step that makes me very nervous because if the seam shaping is wrong I feel that it could mess up the silhouette of the dress quite severely. To try to diminish this, I baste the bodice in sections to the skirt by hand, frequently checking beside the original dress.

I ended ripping out my basted skirt pleats and re-pleating the entire back because I didn't feel like the pleats were aligning well.
After sewing the outer skirt to the bodice, I once again check that the lining length is okay (it was a bit too long at the back), finish inner seams etc.

I added the elastic to the channel I added earlier now. Unfortunately I think I should have encased the elastic while stitching in the channel because it was a huge pain to get distributed properly and I had to unpick some sections to get the elastic to spread out and then carefully try to invisibly re-stitch. The elastic is gathered more around the armpits/sides than the front and back.
Last task is attaching the zipper. The dress has a completely encased invisible zipper with no zipper tape edge showing from the inside. It seemed like the lining was sewn on separately after the main fabric was sewn to the zipper, but I ended up folding over and seaming the inside by hand because it seemed too complicated for me to sew the lining to the zipper cleanly with my machine at my current ability level.

Zipper attached, definitely a lackluster job... I don't have a proper zipper foot and the cheap plastic invisible zipper foot I have is definitely not helping with keeping the zipper allowance even. I hope to fix the skirt seam alignment issue here and sew the zipper seam (especially near the top) closer to the fabric, but I'm not entirely sure if I'll ever be motivated to do that since the dress is now "wearable".
I actually also carelessly clipped the excess zipper tape at the top thinking that was what I should be doing even though it seems like MM has cleanly folded it in on the original dress 😢 (can't attach a photo as I'm pushing the post image limit as it is)
Since it was kind of getting down to the wire to the day I wanted to wear this dress, that was when I roughly finished/handsewed the lining to the zipper tape on the inside so the dress can be worn without any terrible consequences. What I should do next is fold in all the upper seams nicely, actually machine sew the lining to the zipper tape so the seam is clean, sew in a hook and eye to the top of the zipper, and add threads to secure the lining to the inside of the skirt + loops for the ribbon belt, but as of now that has not been done.

Dress finished (?) (how does it look beside the real rose basket now...?)
Unfortunately, I feel like I'm not entirely satisfied with how this turned out because although I had tried hard (especially at the beginning) to have clean work, as the project went along I think a lot of places ended up sloppy (like stitching lines on the inside), and the final piece still didn't end up exactly like the original (the bodice seems to be a little shorter somehow but I had no extra fabric especially along the side panels to make it longer, so I think it's a point that I can eventually accept).
Anyway...to finish off I finally add the lacing ribbons and prepare the detachable ribbons.
For the bows + ribbon belt, I have a length of cotton satin ribbon and finished off the bow brooches I started previously. For whatever reason, mint rose basket has burberry material bows, but I believe all the other colourways use sateen bows so I used cotton sateen for these. The original wine dress did come with a long, wide poly satin ribbon and two detachable small ribbons, but I have no idea where I put those relative to the dress and I didn't really like the way they looked anyway.

I took my old handmade bows apart to fix their dimensions (they were slightly too long) and also fixed how the middle fabric was folded, and then sewed them to some nice sharp brooch backs.
While ironing, I noticed that apparently I didn't rinse the fabric well after dying and adding water made the bows bleed. Not great. (I later soaked them in dye fixative and the bleeding issue seems to be better now)
These pictures use the bows from my Valeria JSK (which seem to be approximately the same wine tone), but it's always nice to have a separate set for each dress. I may remake yet another set of bows with a different cotton satin (slightly thinner, not self-dyed) eventually.

Finished, or at least as finished as things are going to get for now.
As I will be wearing this JSK in future outfits, I'm a bit torn as to how I will tag and label it in posts. The design for sure is Mary Magdalene's, and this dress is a big tribute to it, but it's also definitely handmade and not legitimate MM. I'm actually not even confident about labeling it handmade by myself because I didn't technically hand make all 100% of it (at this point, only the initial cutting out of pieces was not my own, but somehow this lack of initial patterning and cutting step bothers me and makes me feel like I didn't put in all the work a handmade piece usually would be). I will probably have a hard time not adding some additional comments each time it comes to adding a label to it in future photos.
Anyways, now I have Rose Basket at home.
Thank you if you read all the way to the end like this!
69 notes
·
View notes
Text


On June 1st, it was 6°C, which explains the million layers.
Outfit rundown
Trench coat: Old Axes Femme; Thick knit cardigan: old Axes Femme; Long sleeved dress: second-hand Innocent World; Thermal top: Heattech; Wool tights: Mondor; Boots: Sperry Topsider; Bag: second-hand Jean Paul Gaultier; Headbow: Baroque; Doll head brooch: Fuwari; Mushrooms brooch: Pepfox; Bat bow: Moth and Fae
578 notes
·
View notes

Text


Yesterday I went to the Huntington Gardens to have their afternoon tea with several other beautiful friends. It was my first time having their tea and my first time seeing the rose garden in bloom! It was such a lovely experience~
parasol: Victorian Maiden hat: Taobao necklace: Vivienne Westwood wristcuffs: Reverie Romantique OP, bag: Mary Magdalene socks: BtssB shoes: American Duchess


#eglcommunity#lolitafashion#jfashion#japanesefashion#ロリィタファッション#lolita_fashion#eglfashion#classiclolita#marymagdalenejp#mystuff
43 notes
·
View notes

Text


I'm in Mary Magdalene's studio! (No, not really.)
MM's stock photos remain a constant source of inspiration and also mild nostalgia for me, although by the time I started getting into lolita, the brand was already on the decline. I especially liked the combination of OP over JSK shown in their Rose Basket JSK blog post, and I am lucky enough to own almost all of the same items, so recreated the aforementioned photo as well as and the full body (ish) stock photo (15 years later!)
Getting the posing and look right was difficult as it was just me and my camera! Every time I took a few photos, I had to get up and cross check the pose beside the original on my phone before sitting down and rearranging my skirt for a whole new attempt. So the pose has quite a lot of differences! The lighting is also much more shadowy since I use natural light from my window (on one side), whilst the original likely has some kind of studio floodlight going on. Regardless, hopefully I managed to evoke the original well enough.
Of course, as a constant nitpicker I can see so many (albeit minor) differences between the photos that I couldn't overcome...I am slightly taller, as well as less slim than the original model 😂 the JSK is actually handmade (blog post on that soon) and I believe it is a cm or two shorter than the original due to a lack of bodice fabric. I really cannot figure out for the life of me how the model managed to have so much fabric pooling at the bottom in her sitting pose, though--can I really chalk it up to body proportions?
The shoe colour is also obviously different (someone please sell me the framboise Sylphid shoes) aand if you look really closely, the background pattern is upside-down! (50% chance of hanging it the same way as MM and I got it wrong 😳)
(All clothes Mary Magdalene except JSK [handmade in MM style] and tights [offbrand])
95 notes
·
View notes
Text


Yuina wears a floral jsk by Blanche Neige in mint green.
Example image via Mirrormannequin on LM
127 notes
·
View notes

Text
The Kickstarter for Le Vitrail, Néant Glass’ EGL Fashion and arts journal, is officially live (and already reached it's goal in under 30 minutes)! This project was designed with heavy inspiration from old school Japanese fashion magazines, and will feature original content in the form of interviews, articles, illustrations, photography, coord snaps (submit yours here!), and so much more!

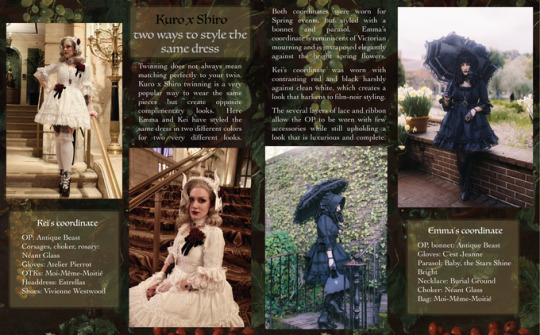
This Kickstarter will help fund the publication and includes several amazing backer rewards in addition to the physical book. Many tiers are already sold out, but more will be added when stretch goals are reached!
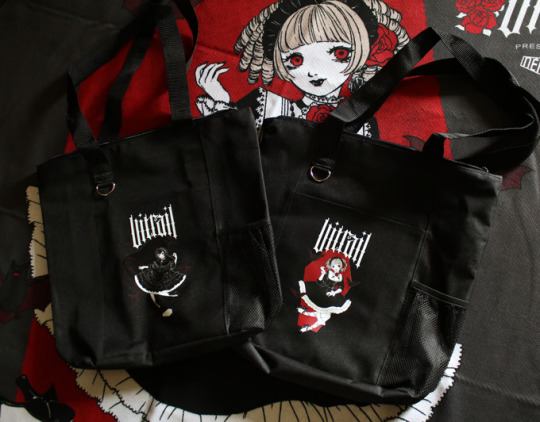
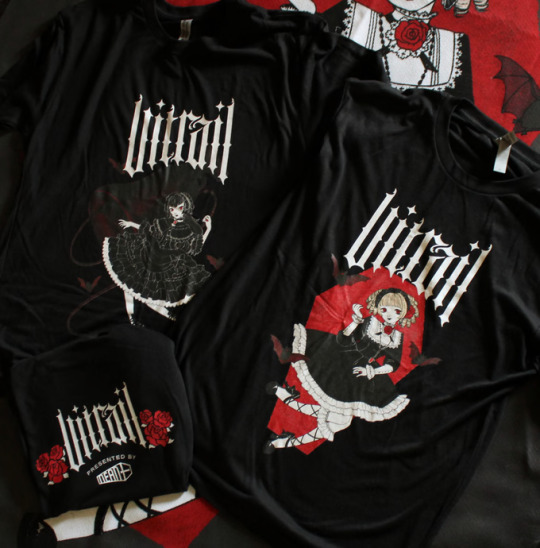
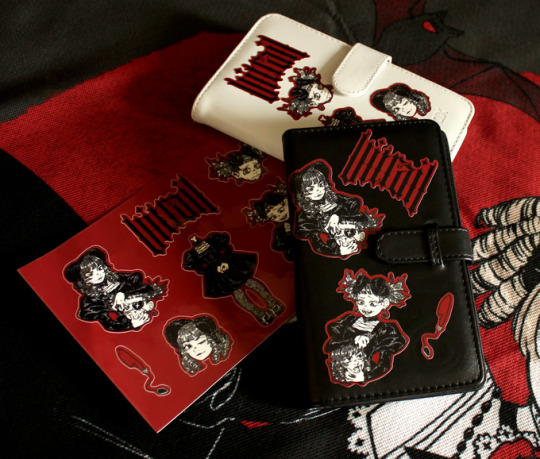
Click the link to back this project and learn more about this publication!

136 notes
·
View notes

Photo


Welcoming 2016 with a chocolatey coordinate! (Featuring my favourite AP accessory of all time)
2K notes
·
View notes
Text


Posted in Feb on my ig, a little late here! Some Melty Ribbon Chocolate coords with the jacket + skirt set and JSK.
Melty ribbon is one of my favourite AP series of all time (me, and so many others, I imagine–there's a reason why it is so popular)! I've worn it often, such that it can get a little difficult to coord it with different items than the ones I've often used before.
For the skirt coord, I wanted to try bringing in a bit of pink, along with a casual feeling via the ankle socks. However, there's a lot of...just...leg?? I'm not sure if I'm used to it 😂
All clothes Angelic Pretty except pink blouse (Mary Magdalene) & bag (Q-pot)
168 notes
·
View notes
Text

#eglcommunity#lolitafashion#jfashion#japanesefashion#kawaiifashion#ロリィタファッション#lolita_fashion#eglfashion#classiclolita#marymagdalenejp#mary magdalene#mystuff#blouseless lolita
53 notes
·
View notes

Text


I just received my first ever Mary Magdalene dress, Ekaterina in pink!! I’m so smitten with it ;_;
OP: Mary Magdalene
OTKs: Innocent World
Headdress: Shimamura x Misako
Shoes: Honey Cinnamon
258 notes
·
View notes
Text

One more snap of a casual-ish coord from the end of May.
42 notes
·
View notes