
Don't wanna be here? Send us removal request.
Statistics
We looked inside some of the posts by mjackson24-271 and here's what we found interesting.
Average Info
Notes Per Post
0
Likes Per Post
0
Reblog Per Post
0
Reply Per Post
0
Time Between Posts
3 days
Number of Posts By Type
Text
17
Last Seen Tumblr Blogs


Fun Fact
12.7% of mobile users access Tumblr.
Text
Final Lab: Website Builders
Which builder did you like better?
The builder I like most is Wix.
Which builder did you choose for the assignment and why?
I chose Wix because it allows for more flexibility in terms of design choices. Additionally, you have pay to use Squarespace whereas, wix is free.
The most challenging aspect of recreating your site (and why)?
The most challenging aspect of recreating my website is reducing the span of the navigation bar. Originally, my rhody.dev website had a navigation bar that did not span across the screen; however, my wix does. I tried to reduced the span of the navigation bar, but I could not to no avail. I was surprised too because I was able to reduce the span of the footer to the center.
The most challenging thing about using website builder (and why)?
The challenging thing about using a website builder is that it limits your creativity, since you are limited to using the tools that Wix provides. In addition, I have limited control in editing the CSS and JavaScript code, therefore I would be forced to use animations that Wix provides in almost every instance.
Something you think was significantly simplified due to using a website builder (and why)?
The placement of elements was significantly simplified since I did not have to specify any margins for the header, navigation bar, or footer.
http://mjackson24.rhody.dev/index.html
https://mjackson220329.wixsite.com/final-lab
0 notes
Text
Weekly Reflection 9: Lab/Project Proposal
Students will identify features of a bootstrap being using the chosen webpage of a website. The type of website they should analyze can be of the following: social media, news/journalism, or personal.
Now, you should identify what features of bootstrap and gyrfalcons are being used without using inspect element or the equivalent used for your browser of choice.
Next, you will use the inspect element to compared the identify the features you identified and the ones you saw in the inspect element.You should understand that are bootstrap features used that has not been covered by the course material. Therefore, you should ignore those.
In a Tumblr post, you should answer the following questions:
1. What bootstrap features are being used for your choice of web page(without inspect element).
2. When using inspect element, what features of bootstrap are used.
3. Comparing your answers first and second questions, were there any deviations(i.e. is there anything you missed or had incorrect.)
Now try to recreate the web page as accurately as possible.
When you are done with your site, you should answer the following questions in a Tumblr post:
1. What challenges did you face when you recreated your chosen website?
2. If you had more time, what you would have done differently?
3. Were there any differences between your chosen website and recreated version?
4. Have you another person rate your recreated webpage on a 1-5 scale based on similarity. You should record the rating and explain whether or not you agree with this person’s rating.
5. In retrospect, would you prefer to recreate your webpage using bootstrap or pure HTML/CSS. Be sure you explain your choice.
Brief statement
This lab/project proposal is similar to the lab, but there are some minor differences. One difference is that students have to analyze the webpage first and report on what bootstrap features are being used prior to recreating the webpage. This is to help students how the developers used bootstrap so they able to recreate the webpage accurately.Some of the major concepts covered in this lab/project proposal are reasons developer use bootstrap, benefits of using bootstrap, and the bootstrap grid layout.
0 notes
Text
Lab 16: Bootstrap
I chose Newsweek because I love keeping with current events rather than playing around with instagram.
The most challenging about recreating the site was finding the exact font to use the site.
The most challenge about the grid was aligning each column to my likening and making sure the size was suitable.
What made bootstrap made the web page overall more responsive than html. In addition, makes it easier to place images and text.
https://mjackson24.rhody.dev/newsweek.html
0 notes
Text
Weekly Reflection 8
November 1, 2019,
This week I learn about using GitHub, and domains and hosting.
Using GitHub was quite a learning curve for me. I had never use frequently GitHub for version control before I took Software Engineering. Even then, one of my group members(who took the course I mentioned) and myself for lab agreed that the instructor for that did not go into much depth with GitHub other than basic command such as merge, pull, and push. My previous experience with GitHub was for two other computer science courses where we had to git clone starter code for a programming assignment or lab.
I wish that I had watch videos and read the material prior to starting the assignment. We all started the assignment writing code for each part over weekend. However, when we reconvene on Monday afternoon, we uploaded our files to GitHub and soon realized that we a problem. We were not fully utilizing GitHub. We needed to push, pull, merge each other files to GitHub. Learning these command to some time. Eventually, I mastery those commands using GitHub desktop. Watching the videos gave me a detailed explanation on what do and it would have save me and my group so much time.
I understand that based on my track, I was suppose to use the command line for sharing files but ran to a major issue. My files in my file explorer was an absolute mess. Many of them were not in a a folder. If had done so, then I would use the command line for sharing files over GitHub. I would prefer the command line over the GitHub desktop because it requires fewer clicks.
Using GitHub for version control and file sharing can help improve the development process. Code reviews can ensure that code style remains consistent and elegant. At the same time, they can help reveal any hard to find syntactic or logical errors that is preventing the code from running for displaying the expected output. Another benefit of utilizing version control, such as GitHub, is that a user can return to a previous version of their code if new changes breaks their program.
0 notes
Text
Lab 15: Web Hosting
Three Domain Name Ideas:
mikathon.info
mjackson24.com
mikstation.com
I chose mikathon since I thought it was good portmanteau between myself and marathon. Additionally, my website also covers running which makes mikathon at suitable domain name.
The TLD I chose was .info. I thought it was appropriate for my site because my site was essentially providing information about running.
This is the link to my website using my chosen domain name: mikathon.info
0 notes
Text
Lab 14: Collaborative Programming
Popcorn Sales Link
Initially, we decided that we should divide the task based on who codes which part of the page and merge it all together. However, as we all completed our tasks, we realized that this was not the intent of the assignment so we had to push, pull, and merge what we had into the repository instead of uploading separate files.
Jason worked on the top section of the Popcorn Sales website which includes the title, and the forms for name, street address, and location. He wanted to do this because he wanted to do the easiest task. Moreover, he did the javascript the forms.
Meanwhile, I worked on the middle portion of the Popcorn Sales website which includes the table for price, product, and quantity. I chose this task because, I wanted what was leftover.
Curtis was responsible for the bottom third of the page. He managed to do the javascript for both his part and my part. I tried attempting to write javascript for my part but I have encountered some issues.
0 notes
Text
Weekly Reflection 7
This week I learned.how to make a form to have valid inputs and implementing JavaScript on my website.
At the beginning of the course, I was curious on how JavaScript was implemented on with HTML/CSS. I soon learned that implementation JavaScript was similar to HTML and there were two ways of doing this. The first way is creating an internal JavaScript using the script(<script>) element, and the second is to create an external JavaScript file.
The creating a DOM diagram helped me understand how implement getElementBy* for my website. I learned that if I implement javascript using getElementByTagName for a parent node, it will its children node with the same tag name. If I wanted to avoid this could use only getElementById since each element has a unique.The getElementById, getElementByTagName, and getElementByClass were initially tricky for me until re-watched the videos and practiced implementing them on my own.
I also used form validation to ensure that no user was able to submit invalid input. When I created my form, users were able submit anything, even if the information was invalid. However, form validation me to make sure that users did not leave anything blank or use letters for numbers. If a user did enter invalid information an alert would from browser would say that please enter a valid name or phone number.
Despite the success, I had some challenges. I wanted to create a form validation for a email address, but it was very tough to do. I tried looking it up online to find a solution. Fortunately, Kenney directed me to a website where this was done. I read the solution, however it a little convoluted for me to understand, and as a result removed the email address line from the form. Moreover, if I had more time, I would try to implement form validation where multiple box had invalid entries to be highlighted red , and not the first invalid entry the browser finds. Another challenge I faced was highlighting a row for one of my tables. Again, I review the course material, but that did not help much. I watch a YouTube video that I found particularly helpful.
Overall, I found this week enjoyable and challenging at the same time.
0 notes
Text
Lab 12: JavaScript in websites, Part 1
DOM diagram

8 Ideas I could change about my site:
1. Add a conformation box prior to submitting my form
2. Make the text disappear when I fill out the form
3. Warn the user if the form filled out is incomplete
4. Change my homepage picture to another image when my mouse hovers over it.
5. A series of rotating images for my homepage.
6. Change the color of text to red when the mouse hovers a row in the pace chart.
7. When a mouse hovers over a spot of the chart, change the text to white and the background to red.
8. Change the navigation links to include click here when the mouse hovers over one.
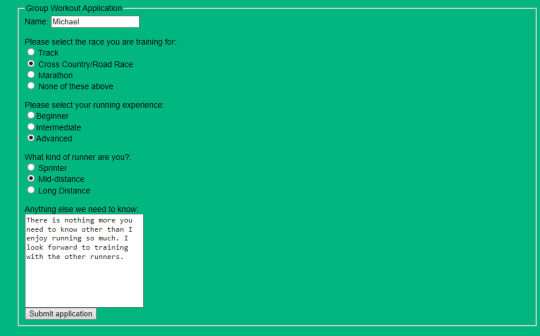
I chose to implement ideas 1, 2, 7, and 8. The first idea is to make users give some thought before submitting their form. If the users sure of their choice, then I would like to see the form disappear with a message thanking them for submitting the form. I decide to implement the last two ideas because some users want to know quickly the pace they should run for a given distance.
Links to my updated site:
https://mjackson24.rhody.dev/pace-chart.html (ideas 7 and 8)
https://mjackson24.rhody.dev/group-workouts.html (ideas 1 and 2)
0 notes
Text
Weekly Reflection 6: Journal
October 10, 2019,
This week’s module was slightly less work, since I had prior knowledge on most of the material. Unlike some of my classmates, I completely understood what variables, loops, functions, and conditionals are. The major problem for me was leaving the subtle differences in terms of syntax and how it is use for web programming. Despite this issue, I found the programming syntax to be similar to C/C++. There is one I aspect do not understand of javascript: why do the maker(s) of the language have to change type for declaring variables from var to let? I know that the class will not use it for future assignments, but it boggles my mind that they would do something that drastic.
Until the problem solving recipe was introduced in class, I was confused. However, I had some idea what it was: a blueprint to writing code to problems. Once it was explained in class, it was straightforward for me. The one part of the problem solving recipe that I do not utilize often is developing thorough test cases. I realized for previous computer science course that I relied heavily on the auto grader to see if my code passes the test. I have also made that same mistake on Wednesday for class activity. My partner and I developed the code for the number grid function that worked for the first test case provided in class, but it failed the second test case. I experienced the same fustration for this activity that I had for assignments I had for other computer science classes.
Likewise, my partner and I had agreed that we could have finished creating a number grid much quicker if we had written a plan on paper rather than jumping straight to the code. In my experience, I realized that writing the code first leads to frustration because you have no idea were start and you are writing random code to make it work. This approach had me put too thought on a code problem that might have been simple to solve. I understand that jumped at writing the code for the summation first; the only difference between the number grid and summation is that I have done the latter in pervious computer science courses, whereas the former is something I have never done yet. Writing a plan on paper would have given us a clearer idea what we needed to do, this is especially true for challenging problems.
0 notes
Text
Lab 11: Intro to JavaScript
Memory Diagram for Code 1:

Memory Diagram for Code 2:

Memory Diagram for Code 3:

Memory Diagram for Code 4:


Swapping Code:

Swapping Output:
Summation function code:
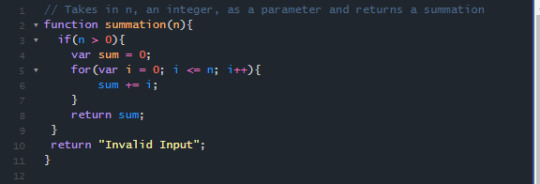
Summation function test cases:
Valid Input Test Case (Includes strings and integers):

Output:
When a user enters a string or a blank.

When a user enters a positive integer greater than zero.

When a user enters a negative integer or a zero.
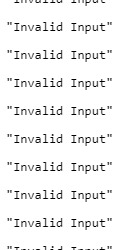
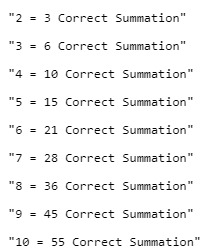
Correct Summation Test Case:
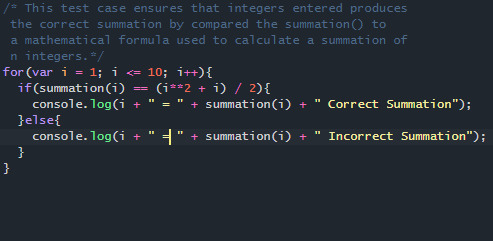
Correct Summation Test Case Output:
0 notes
Text
Weekly Reflection 5: Real World Analysis
This week I will analyzing every Computer Science major’s favorite website Stack Overflow. I will analyze how well Stack Overflow does in applying the topics we learned for the week.
When I view the website’s homepage on a smartphone vertically, I noticed is that the width does not fit on the screen.As result I would have to scroll left or right to read the entire text. The same problem occurs, to greater degree, when I view it landscape. The header and the disclaimer prompt at the bottom of the page block nearly the body of the homepage leaving a little room to read text. Another I discovered was that so much of the text was misaligned in respect to each section of the body. One instance was that the all the content from each box in the body section (”Public Q&A”, “Private Q&A”, “Browse jobs”) was outside. Additionally, the text for each box overlapped with one another and covered the button for browser questions.
What Stack Overflow almost had right was the navigation menu. It was functional and displayed properly when I viewed it in portrait mode, but it did not displayed properly when I viewed it landscape mode. I had to scroll down to find the rest of the navigation links.
After I had finished viewing the navigation menu, I pressed each link and I was surprised. Stack Overflow did a much better job in making sure that each page was formatted properly. There was not issues with fitting each page to a mobile screen.
I would recommend that Stack Overflow would use media query and view port improve its homepage for mobile devices. The homepage is the most important part of your website and it is hard to attractive users if your homepage is close to impossible to navigate. I suspect that the others on its site is formatted better because many users it to ask and answer questions.
0 notes
Text
Lab 10: Responsive Web Design
Before:

After:
Did your partner notice things about your site you hadn’t thought of?
She noticed that my drop-menu was not functional. My navigation bar shifted slightly to the left.
Did you notice things about your partner’s site they hadn’t thought of?
I noticed that the bullets were far apart from the items of the list. My partner told that she has not figured out why it happens.
How much did your experience navigating your partner’s site improve by the end of the lab?
My experience navigating my partner’s site improved slightly. The navigation bar and organization of the content were fine. I was able to see the content without any problems.
How much did your partner’s experience navigating your site improve by the end of the lab?
My partner’s experience navigating on the site has improved slightly. Initially, she had to zoom in to see the pictures. I had improved upon that.
0 notes
Text
Lab 9: More Web Programming
https://mjackson24.rhody.dev/group-workouts.html
0 notes
Text
Weekly Reflection 4: Journal Entry
October 4, 2019
This week, I learned about the box model and the imaging processing.
Until I learned the topic, each page of my website was an one giant mess. It all the elements meshed together with no purpose. The box model helped me understand that I can organize my elements based on purpose. The top box was used my banner and buttons. The middle box was used for my content and the bottom box was used for external links. Moreover, the box model gave me a greater understand on dimensions of a particular HTML element. I used the inspector element to play around with the margin-left, padding and other key terms associated with the box model. It helped me adjust my website to my liking.
Although image processing was less programming than the previous modules, it was a tug and war. I had make each web page load in less than a quarter second. It was very difficult, since high quality images load slower than low quality images. Use of optimizing software and knowledge of benefits and drawback of each extension file made the process less difficult. On a side note, I did not realize the correct pronunciation for GIF was jif not gift. As a result, my instructor reinforced the fact that Northeasters, especially Rhode Islanders have a unique way of pronunciation words.
Overall, I recognized that so much work goes into making a website that is appealing and loads quickly.
0 notes
Text
Lab 8: Image Processing
Unfortunately, I had to remove all of my images, since I unable to modify most of my images and all of them were not from the public domain.
I use Microsoft Powerpoint to create my transparent image. I selected picture format and use the pencil icon to select which parts of the picture of I wanted to remove.
I used http://www.imageoptimizer.net/ to optimize my images to reduce the load times.
https://mjackson24.rhody.dev/
0 notes
Text
Labs 6 and 7
I used the color scheme designer (http://colorschemedesigner.com/csd-3.5/) website. The color palettes I used for my site are #00b64df and #62da97.
Here’s a link to my website: https://mjackson24.rhody.dev/index.html.
If I were to use an internal styles sheet, I would include the style tags every time I wanted to change an element. Therefore, it simpler to use external style sheets.
Tumblr has a few limitations. One limitation is that use of an external style sheet is not possible for Tumblr which would require the user to edit the advance options. As a result, the entire website would change. Another limitation is that the user is not given much flexibility in terms of the URL.
0 notes
Text
Weekly Reflection 3: Tutorial in HTML
In this tutorial, we will learn to how make a simple Wikipedia article on a web page. Even though a web page and a website are similar, they are not the same. A web page in layman's terms is part of a website and a website is a collection of web pages.
Before writing your code on your chosen text editor, you need to develop a wireframe. A wireframe helps you organize the structure of your web page, which includes the placement of your images, paragraphs, and navigation table. If you do not make a wireframe, your website will look disjointed and you may feel that your website looks different than what you had in mind.
Once you develop a wireframe, open your desired text editor and name your file as index.html(all html files end in .html). All html files must begin with <!DOCTYPE html>.This informs the web browser which version of html the website is using.
Before you writing you need to know the some jargon. An element defines the content and structure of a web page. The most common elements are head(<head>), headings(<heading>), title(<title>), body(<body>), paragraphs(<p>), and headings(<h1> to <h6>). Angle brackets surrounding an element is known as a tag. They come in open and close pairs. A closed tag has forward slash(</h1>) while a open tag does not have the forward. They signify where content begins and end.
In addition to the <!DOCTYPE> declaration, a web page needs to have the following elements for it to exist: html, head, and body, elements in that order. Here’s an example of how your code should look like below.
<!DOCTYPE html> <html> <head> <title> Example Title</title> <!-- not needed for a functional web page --> </head> <body> </body> </html>
When you save your code as a html document and open it to your web browser you will see a blank page with exception of a title. It is blank because we did not add any content to page.
The title elements identifies the name of the web page on the tab of the browser as shown above in the example code.
First, you need a heading element( in this case use <h1>) to name your Wikipedia article for your page. After your heading element, you give a brief overview what your article will discuss by the paragraph element. You might leave yourself a few spaces between your overview paragraph and your next step by using the break <br> element. The break element does need a closing tag.
Now, you will use an unordered element to develop to bullet points for each of the topics you discuss in your article.
The syntax looks like this:
<ul> <li> List 1 </li> <li> List 2 </li> <li> List 3 </li> </ul>
The list element inside the unordered element actually makes the bullet list.
Once you have a list of topics for your Wikipedia article, you write each section with a header element other than <h1>, and each header should contain a paragraph using the paragraph element. After you finished writing the article, you would to try have your list of topics linked to where the section is located on the page without scrolling down to that section. What would you do is use the anchor tag inside the list element and i put the following inside the anchor: href=#name_of_object. Then you write the following anchor tag inside each heading element of your topic: <a name = name_of_object> name_of_object </a>. You should be aware that your page needs to be long enough to see a noticeable jump from part of the page to another.
What if you wanted to have links to other websites so your users will find you credible? You must have paragraph tags for each links and the anchor tags go inside the paragraph tags. The only difference between adding links other websites and adding links to parts of a web pages is that the pound sign goes away and the url is present.
Your code should look this:
<p><a href= www.example-site.com> www.example-site.com</p></a>
You should place your links at the bottom of the webpage the same way real Wikipedia articles places its links.
After you have all your information and links for your Wikipedia article web page, you can add pictures to your article. Pictures are optional, but for some topics they help enhance the information presented. If you decide to add a picture, you do the following:(1) start with an image(img) tag, (2) write the URL or directory of your image after your src attribute, and (3) write an alternate text for your image. The last one is important because if your images does load any reason, it will display the alternate text. Additionally, screen reader will able alternate text you provide, enabling the blind or those were poor vision to access your article. You can also adjust width or height your image by adding height or width after the alt text.
Your code should look like this:
<img src= “image.jpg” alt text= a picture of me height = 200 width = 100>
Image tag does not need is closing tag.
Where you place your image is up to you. You can place at the beginning of your web page or at the end. You need to make sure the picture adds on to the information you provide.
You may notice by now your Wikipedia article is complete but it is very bland. A solution to this is to add CSS to web page. CSS allows to change your background of the page, the font of your, and the allows for padding your images( This means the text will appear to the left side of a choosen image if you chose to pad your image to the right.) . For information on CSS click on this link.
Once you feel satisfied with your web page, you can have a web hosting service make your web page live through its server.
Additional Information on HTML :
https://www.w3schools.com/HTML/
0 notes