mobilecomputerskills
Basic for Windows 10
How to use windows 10 competently at home, Basic for Windows 10 will guide basic computer skill for everybody. Those tips very intuitive and easy to understand
4 posts
Don't wanna be here? Send us removal request.
Last Seen Blogs

bvnny-kxn
save me guys with bowl cuts ...

boggirlsummer
bog girl summer

nutracareorganics
Nutracare Organics

icy-sims
pixels fireworks

gblish69
Ur_local_dumbass
Text
How to set Picture Password in Windows 10
In Windows 10, there are more ways to log into your computer. You can to use a password, a pin code, or use devices that are paired to your PC to know when you're away. Howerver today, Windows 10 basic will going to show you how to make a picture password
How to Make a Picture Password
Step 1 and 2: Open Windows Settings (Windows -> Settings or press "Windows + I" hot-key)
Step 3: Go to Accounts
Step 4: Click Sign-in options.
Step 5: Go to the Picture password section and click the Add button.
Step 6: Enter the password, you can watch a tutorial provided with the default image. Next, Click OK to set image password in windows 10
Step 7: Click Choose picture button if you not use the default image
Step 8: Click Use this Picture to use the picture you have selected
You can setup a password by way drawing shapes, tapping the right points, or making the right gestures three times over an image
Confirm your gestures (repeat your three gestures)
Step 9: Click Add to create completely picture password
Source of articles : How to set Picture Password in Windows 10
0 notes
Text
Instructions for Use 3 Best Android Emulators on Windows 10
Android is a mobile operating system developed by Google, it is the most popular operating system on mobile. Android have google play includes many best games and apps. To run apps, games andoid on Windows10, you need a android emulator. I will intro 3 best android emulator, all are free to download and install on your computer
Bluestacks for Windows 10
BlueStacks is Android emulator most popular for Windows PC, there are more than 210 million people around the world use this android emulator on Windows and Mac
How to Install and Use Bluestacks
1. Download bluestacks for Windows 10
2. Run file installer
3. Click Install now to start
4. Click X to turn off welcome screen
5. Starting the Engine
6. Choose language for android emulator
7. Sign in your google account
8. Click Next button
Now you can play any games Android on Windows 10.
Nox Player for Windows 10
Nox Player is Free Android emulator on PC and MAC. You can assign keyboard and mouse to the APK games and Apps with simple key mapping and enjoy easy access to functions like location, , adjust volume, and many more.
How to Install and Use NoxPlayer
1. Download Nox Player for Windows 10
2. Run file installer
2. Click Install button to install Nox Player on your PC
3. Click Start to the application run first time
4. Click X to turn off guide screen
5. Run Play store on Nox
6. Add a Google Account for Nox Player
7. Click ACCEPT to use Google Play
Now you can use NoxPlayer to play your favorite games
Memu Android Emulator for Windows 10
Memu is a lightweight Android Emulator (free) on Windows 7, 8 and Windows 10. It support various hardware configurations, compatible with most of popular games. Furthermore Menu support Android Jellybean, Kitkat and Loillipop spontanously
How to Install and Use Memu
1. Download Memu for Windows 10
2. Run file installer
3. Press Install button to install Memu
4. Click Launch to start App
5. Click X to turn off guide screen
6. Run Play Store on Memu Play and add Google Accout. Way to add Google Account (See guide of NoxPlayer)
7. Accept using Google Play on Memu
Menu Android Emulator is ready to use.
Source of articles : Instructions for Use 3 Best Android Emulators on Windows 10
0 notes
Text
Instructions for Use 3 Best Android Emulators on Windows 10
Android is a mobile operating system developed by Google, it is the most popular operating system on mobile. Android have google play includes many best games and apps. To run apps, games andoid on Windows10, you need a android emulator. I will intro 3 best android emulator, all are free to download and install on your computer
Bluestacks for Windows 10
BlueStacks is Android emulator most…
View On WordPress
0 notes
Text
How to downgrade from Windows 10 to Windows 8.1
Microsoft released Windows 10 on July 29th, and since launch there have been over 50 million installs of the operating system. And there are good reasons. The software giant is betting on Windows 10 to be one of the best operating systems you want to use. After all, it brings familiar features from Windows 7, it improves the shortcomings from Windows 8.x, and it's a free upgrade.
Repeatedly, Microsoft CEO, Satya Nadella said: "We want to go from users needing Windows to choosing Windows to loving Windows." However, while Microsoft wants you to upgrade to Windows 10 and move forward, we're still in the early days of the new operating system. Since launch, many users has been reporting some issues, which range from upgrade problems, apps not opening, compatibility and network issues, and a lot more. So, as you can see Windows 10 seems not to be ready for a lot of people. So, today we're going to look the options you have and instructions to downgrade successfully from Windows 10 to Windows 8.1 if you decide the operating system isn't working for you at this time.
If you want to roll back, there are a number ways you can do this process. Today, we're going to look a three different ways.
Method one: Recovery by using a previous backup

If you have been following our Windows 10 coverage, you probably came across the post: "How to prepare your PC for the Windows 10 upgrade". If you followed the guide, you have created a full backup of your computer before upgrading to Windows 10.
If you did, fantastic! You can simply make a new backup of your new files since the last full backup or just make a copy of all your files to an external hard drive. Also, note any new software installation since the last full backup, as you'll need to reinstall them after rolling back.
You can do this by:
Searching for Control Panel with Cortana.
Navigating to Programs and Features.
Arranging the list of apps in your system by Installed On
Once you have the backup of your files, and you know the apps you need to install, reboot your computer using the "repair disc", which you're prompted to create after creating the initial full backup.
Quick Tip: If you don't have repair disc, you can also boot with the Windows 8.1 installation media to perform the recovery.
After rebooting, follow these steps:
While in the Setup wizard, click Next, and then Repair your computer.
Click Troubleshoot, and then click Advanced options, and select System Image Recovery.
Select the operating system you to recover from, click Next, and then Finish to begin with the recovery process.
Once the process completes, you'll be back to the previous version of your operating system, in this case, Windows 8.1.
Now, if you have made a lot files changes, it'll be recommended you delete all of your files and restore the updated versions using the new backup you created before downgrading back to Windows 8.1. Also, don't forget reinstall any software since the last backup.
Method two: Recovery by clean installation

If you want to downgrade from Windows 10 to Windows 8.1 in a clean way, you'll be better off starting from scratch again. This process involves having the installation media of Windows 8.1 and performing a clean install of the operating system.
This method requires you to backup your files and to re-install all the programs on your computer. This method takes more time, but it's also the cleanest way to downgrade.
If you don't the Windows 8.1 installation media, don't worry, Microsoft now allows you to download the files from the company's servers. Follow this link and instructions.
And then follow these instructions:
Reboot your computer with Windows 8.1 installation files (make sure your PC is set to boot from the drive with installation files).
During the Windows Setup, click Next, accept the licensing, and click Next.
Click the option Custom: Install Windows only (Advanced) option to do a clean installation.
Delete any partition created by you current operating system.
Select the empty drive and click Next to begin the installation process.
Important: If you have a dedicated partition to store files or a secondary hard drive, you don't have to delete these partitions.
After the installation process completes, you'll be back to your previous version of Windows. Now the only thing left to do is to restore your documents and other files from the backup, and you'll need to re-install any software you have previously installed.
Method three: Recovery by uninstalling Windows 10
Then there is the third option. Unlike Windows 8.x, Microsoft has conveniently included a roll back option in the new Settings app that allows users to go seamlessly back to their previous version of the operating system with a single button.
If you happened not to like Windows 10, or you're having issues, Microsoft is adding the "Go back to Windows 8.1" feature to make the process a lot easier. However, the downside is that you only have a month after you upgrade to Windows 10 to go back. If you're still within a month after the upgrade you can follow these steps to go back:
1- Use the Windows + I shortcut to open the Settings app.
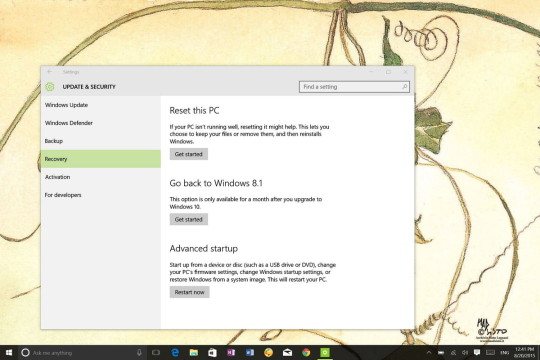
2- Navigate to Update & security and go to Recovery.
3- If everything is set correctly in your system, you'll see the option Go back to Windows 8.1. Here simply click the Get started button.

4- At this point, you can tell Microsoft why you're going back, click Next.

5- You'll get a warning that you'll need to reinstall some apps and programs, and you'll lose any changes made after upgrading to Windows 10. A file backup is not necessary but recommended. And then click Next.

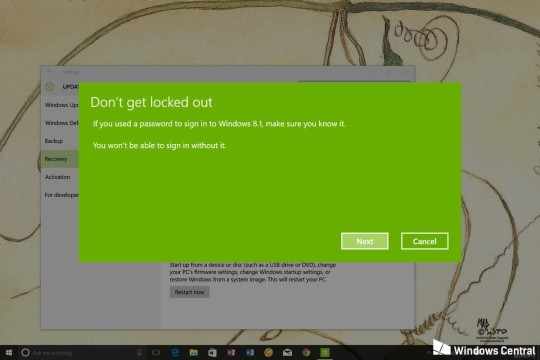
6- Make sure you know your Windows 8.1 password as you'll be locked out of the system without it, and then click Next.
7- Finally, click the Go back to Windows 8.1 and let the process complete.

The process will take some time depending on your system configuration. Once you're back on Windows 8.1, don't forget to check all your apps are installed correctly and check for new updates, as, after a few weeks, it's likely to be out-of-date.
That's all!
Source: https://www.windowscentral.com/how-downgrade-windows-10-windows-81
0 notes