Don't wanna be here? Send us removal request.
Statistics
We looked inside some of the posts by montamileikeunit34-blog and here's what we found interesting.
Average Info
Notes Per Post
1
Likes Per Post
1
Reblog Per Post
0
Reply Per Post
0
Time Between Posts
2 hours
Number of Posts By Type
Photo
12
Text
5
Last Seen Tumblr Blogs


Fun Fact
Mobile US users spent an average of 115.8 minutes on Tumblr app monthly.
Photo

The result
Overall I feel I have definitely improved with my use of Photoshop. I have learned how to use lots of useful tools. I lot of these tools I had never used before so I enjoyed learning about them in-depth. I feel I could have made it more professional looking if I had more time. As this was just a very short project of just 2 weeks I didn’t have time to create a precise and accurate image. I only used a few tools in Photoshop and decided to keep it simple due to time constraints. However I am pleased with my final piece and was particularly happy that I managed to change my image from day to night because I had taken the original photo in the daytime.
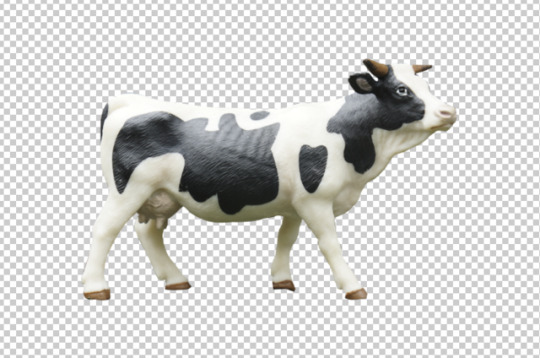
Why I chose dairy – a cow and cheese - for this image?
I want people to be more aware of how often they use dairy in their day to day lives. If people were asked to imagine –
‘What was your breakfast today?’
What would their reply be?
A cup of tea with milk.
A slice of toast with butter.
Cheese or ham sandwiches.
Banana milkshake.
Everywhere people are eating and drinking dairy products. Many appear ignorant as to where these products all come from. People don’t see or even think of the pain the cows go through in the slaughterhouse and how hurtful it is. Calves can be taken straight from their mothers for their milk and some are killed for their meat - veal. A cow’s natural lifespan is about 20 years, but cows used by the dairy industry are typically killed after about five years.
People must be encouraged to try and stop using dairy products and instead replace it with plant-based foods that are dairy-free e.g. coconut, almond, soya etc. It is even possible to buy avocado butter, almond milk, soya sausages, coconut cheese and much, much more. It is also a far healthier alternative as it is low-calorie, low-sugar and lactose-free. So there are many benefits of going diary-free. They’re healthier than cow’s milk, and taste better. It also helps build healthy cells and reduces the risk of heart disease.
I am now a vegan and before I used to get bloating and stomach cramps after having dairy. Now I have stopped eating and drinking diary I feel far better. If you do eliminate dairy, there are plenty of ways to boost your calcium and Vitamin D levels with foods like tofu, almonds, leafy greens and broccoli. These are all good sources of calcium, and many nut milks are now fortified as well. Vitamin D is present in mushrooms and, of course, sunshine.
0 notes
Photo

My aim for creating the final image:
Photoshop process:
I opened the first image – Landscape.
I then opened up all the other saved images.
I opened the Cheese image. I selected the Move Tool.
I clicked on the image and using hold I moved it to the landscape image and placed it.
I clicked on Ctrl + T, for transform, so I could change the size of the image. I then hit Enter.
Ctrl then select a point – change perspective.
I repeated the process for the rest of the images. I placed them all onto the landscape image.
I had one problem with the landscape image. Some parts of the hedge, behind the wall, were too dense so needed editing. I selected the brush tool and I used the black brush to hide the parts I didn’t want. When I made a mistake I switched to the foreground colour and then painted it back in.
I then worked on creating the cars. For the cars I opened up a separate layer.
Firstly I opened the milk carton image. Then the car image which I placed behind the carton. I clicked on CTRL+T for transform to change the size until it looked right and then I clicked Apply.
I used the brush tool. I had to make sure I was on the right layer – Layer Mask Thumbnail. I clicked on this.
Then I used the black brush tool to hide the white car. I changed the brush opacity to 70%. I wanted to keep the wheels of the car though. I was happy with the final result.
I went to Select and clicked All Layers.
I then went to Layers on the top of the menu bar and selected Group Layers. This automatically linked the images together.
I clicked on Group 1 and using hold I moved it to the landscape picture.
I then placed the car on the road and positioned it correctly.
I wanted to stretch the cheeses that were on top of the image. I chose Edit and select -Puppet Warp. When it was done I clicked Enter.
For the background I decided to choose navy and a light yellow colour so that it would look like early evening or night.
To do this I created a New Fill/ Adjustment Layer and clicked on Gradient - Gradient Fill. I chose Radial and clicked OK
I changed the Gradient. I clicked twice on the Layer Thumbnail, which showed the box Gradient Fill. I went to Gradient Editor and selected the right colours - light yellow and navy and clicked OK.
I wanted the landscape to be a little darker because I felt it was too light for night.
I clicked on Layer Thumbnail and landscape to make sure I was working with the right layer. I then chose Image -> Select Adjustments -> Levels. I dragged it and made the landscape a bit darker, clicked OK
I did the same process with the 3 cheeses and the two vehicles and also made them a bit darker to match the landscape.
I felt the cow looked a bit plain and I decided I wanted the cow to glow slightly as if it was being illuminated by a street light. I wanted to makes the cow’s underbelly a bit brighter.
I chose Image - Adjustments - Hue/ Saturation and changed Saturation to +50, clicked OK.
For the shadows under the vehicles I wanted them to be 3D. I clicked on Layer Thumbnail on the landscape.
I chose the Burn Tool and changed the exposure to 50%. Range: Shadows - Burn it under the vehicles.
I also used the Burn Tool to make some of the cheeses slightly darker.
I wanted to add lights from the vehicles to make the street appear brighter.
I chose Dodge Tool and Range: Mid-tones, Exposure to 50%. I drew around the front vehicle to make it look brighter. I wanted the first vehicles headlights to look like they were shining on the car ahead thus making it appear brighter.
I felt the background looked a bit plain and I wanted to make the sky at night. I chose Brush tool. I went to Settings and chose M Brushes and selected brush number 39. I altered the brush size to 400 and Opacity to 10%. Mode: Dissolve.
I then drew on the background; I added more stars to the sky and even the Milky Way.
I saved it as PSD and JPEG.
The result

0 notes
Photo


I wanted to outline the shape of the subjects as Vector.
Photoshop Process:
I loaded Raw into a new folder and changed it to JPEG.
I then opened Photoshop.
I went to File and Open images where I had download them.
I picked the image of the cow.
I used Spot Healing Brush tool because it was pixilated and I wanted to get rid of these and make it look clear.
I then used Pen tool to outline the shape of the cow.
Click right and select Make Selection, click OK.
Click on the Japanese Flag icon.
When I was happy with the image I saved it as PSD. This was in case I wanted to use this image again in the future.
I did the same process for the rest of the images – 5 types of cheese, car, 2 cartons of milk, car wheels and landscape.
Saved it all as PSD as Vector.
Test

0 notes
Text
Diary entry
I went to the Attenborough Nature Centre which is a nature reserve. I wanted to found some landscape that I could use for my image. I didn’t want to use a flat piece of land as I wanted the objects in the image to be on different levels. I found a wall and below this was a railway line. I thought this spot would be ideal as I could place objects behind this wall. I just hoped that it would work and it would look right.
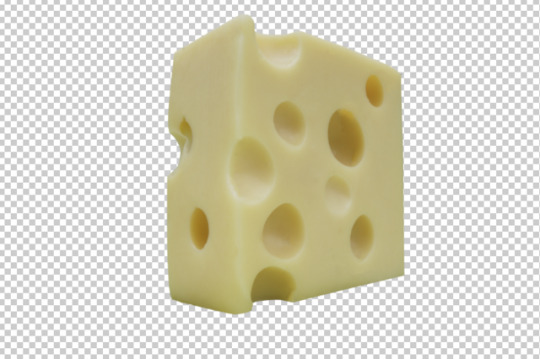
I went shopping to Waitrose and bought different sizes of milk, one full fat, blue topped and one semi-skimmed, green topped. I also bought Emmental cheese. I thought this cheese was the best to use as the holes could represent the windows of buildings.
When I got home I cut up the block of cheese. I wanted to create different shapes and styles of buildings, e.g. a skyscraper, a building with a triangular roof. When the milk cartons were upturned and placed on their side I thought they could easily represent the modes of transport used to transport milk, e.g. a lorry or van. I borrowed one of my son’s toy cows. I wanted people to be able to see the cow amongst the buildings and behind the wall.
When I was at the Nature Reserve I stood in the car park looking for white cars. I then took a photo of different types of white cars. My idea behind this was that I could copy the colour onto the milk cartons so I would get a better colour match.
Contact sheet
Settings:
1/30
F/5.6
ISO 200
Manual

0 notes
Photo

Photoshop
I opened up Google Drive which had a selection of images that people have uploaded and can be used. I chose a moon, two reindeers, a blue door, a red telephone box, 2 buildings, 7 fir trees. For the ground I used old looking paving slabs. I then used the Photoshop process listed below to create this image.
From this exercise I learnt about the Puppet Warp tool which is used to bend an image. I learnt how to create shadows using the Shape tool. I also learnt how to use Filters which is more accurate and makes the shadows look more realistic.
I finally learn how to create beams of light using the Polygon Lasso tool. I used this on the moon to create a beam of light.
Photoshop Process:
Go to Google Drive and use the login: Password
If the photo looks blurry when stretching it, click enter and that will make the photo look clearer.
Puppet warp:
Edit –> puppet warp –> this creates a mesh, put in pins where you want them to be (the pins act like joints) –> then just hold and drag to bend the image.
Shadow: How do we create a shadow? You can use the Burn tool to create a shadow. You can also use a shape tool and colour it a darker colour.
However the way we will do it will be more accurate:
First we need to duplicate the object, hold ALT and drag on the object.
Edit -> Transform -> Flip Horizontal
CTRL + T and move it to where you want the shadow to be.
If you hold CTRL you can skew the shape (you can skew one corner at a time). This helps you make the shadow look like it is sitting on the surface of the floor.
Select object (hold CTRL + click on your object) around the new warped picture
Turn the eye icon off the warped object layer (we only need the selection of the warped object).
Adjustment layer -> curves -> drag the line on the graph down and it creates a shadow.
Filter -> blur -> Gaussian blur -> move the slider and this makes the edges look a bit blurry and more realistic.
Beams of Light
To make beams of light it is the same process:
Add to selection.
Polygon Lasso tool.
Drag down to where you want the beam of light to be.
Adjustment layer -> curves -> drag the line on the graph down and it creates a light beam.
Filter -> blur -> Gaussian blur -> move the slider and this makes the edges look a bit blurry and more realistic.
Save as a PSD. Otherwise save as a JPEG if you have finished.
0 notes
Text
Proposal - Image manipulation
I have some ideas that I want to propose for this project:
My first idea was to do something with the cow model/toy that I bought for my previous poster project ‘We don’t belong on your plate or in your wardrobe,’ which I shot in the small studio. I am not yet fully sure what I want to do as my mind is not yet made up and is a little foggy. I thought of making a cow city, all the buildings are in the shape of cows. I thought of using cows to represent different things as we as humans think that milk is good for us, we need it to grow big and strong and then continue to drink it for the rest of our lives. We are almost like half human and half cow. We drink their milk, make cheese from their milk and people don’t seem to be able to live without it…they are almost addicted to it! We use milk in almost everything we make, there is not a day goes by that we don’t have cow’s milk…it seems impossible for humans to go ‘cold turkey’ without milk. How many cows suffer from our use of cows? People need to wake up! It’s very sad. I think that my image will make people stop and think about the cows. In my shot, cheese and milk cartons replace modes of transport, buildings etc. My tutor explained to me about ‘Mothers against Dairy’ and I like their ideas. I have not yet decided upon the title of my shot, maybe I will use the slogan ‘Milk makes me happy’. Or I might call this: ‘Milk town!’
People living inside cows and cheese instead of buildings. Because people drink so much milk. I have recently become a vegan about 2 months ago. I think people don’t think about milk. People have been taught that it’s okay to drink milk. But really we are taking milk away from a mother, she is artificially impregnated (raped basically). There is a forum called “Mothers against dairy” (https://mothersagainstdairy.org) which highlights this issue.
You could replace cow’s milk with soya milk, coconut milk or rice milk. It is ingrained into our society that we need milk to get all our calcium. I want to get people to change their minds about their use of milk. It happens so often where people automatically buy cow’s milk and never think about trying alternatives like coconut milk.
Other ideas I could use is the compositing of the windows, with a cloudy sky. I could even have hills of soya milk in the background that people have discarded. This could show the solutions in the background, but people aren’t aware of it.
I also need to look at the positives, such as the increase of soya, almond and coconut milk. There is a dairy farm in Ashbourne, which was left to a man when his father died. He couldn’t deal with the crying of the cows as they are sensitive animals, so he gave away the animals to an animal sanctuary and is turning his farm into a vegan farm. Now being vegan is getting into the mainstream, so there are also some positives.
0 notes
Text
Outline the process we used to create “The seaside city” edit. Which tools did we use to create the mask?
The tools I used to create the mask was Opacity tool which I reduced so I could see through it and then it was easier to match the 2 images. I also used the Brush tool - I used the black brush to hide the buildings and reveal the water underneath. I used the Pen tool on the outline of the buildings to make things more precise and accurate. I saved the Selection and then used Make into a selection. I used a soft white brush to reveal the edges of the buildings and to bring detail back in.
Why is a brush sometimes best and why is it sometimes better to use the pen tool? What does grey do on a mask?
With a Brush you can feather an image and apply soft blends. With a Pen tool you can apply sharp edges to an image, e.g. a building. The Grey on a mask has some opacity. The lighter the grey the less it conceals and the darker the grey the more it conceals
0 notes
Photo


The seaside city
Mask Layer
Street and Pier.
Open Photoshop
Stack the layers on top of each other with the pier on top of the street.
Create photo compositing.
Street merges into pier using masks. Important bit is to get the positioning of the 2 images correct. It needs to be very precise so the images merge together correctly. This photo has been taken with a specific composition - leading lines leading to vanishing point - 1 point perspective everything leads to a vanishing point. One vanishing point. Very carefully align the 2 photos so the perspective matches.
Blend them together using the vanishing points to help you.
Reduce opacity of pier down to 40% so you can see through it.
Road and Pier vanishing points need to align with each other. But the perspective in the 2 photos is different. Vertical leading lines don’t match so need lines on edge of pier to be parallel to lines on edge of road. There are 2 tracks on the pier and the street has tram lines.
Make the tram lines merge seamlessly with the yellow lines on the pier.
Artificially Adjust Perspective.
Click Ctrl for Bounding box and then Ctrl + Shift. Pull it out automatically with a straight bottom line.
Need to keep coming back and keep pulling it until it matches as closely as you can.
Need to warp it until you get it right.
There are 2 different widths of lengths so it will take time to match. Picture doesn’t cover it fully.
Stretch out image:
Shift + Alt hold down stretch out from centre point.
Click on bounding box.
Zoom out.
Keep pulling and stretching. Lines will hopefully match more or less. When happy press Enter to confirm changes.
The point the horizon matches is on top of the bus. Lines running roughly parallel.
Put opacity back up to 100%.
Drop city layer on top.
Use whole blend using mask.
Click Japanese Flag icon to add a layer mask.
To conceal parts of the city you need black brush.
Foreground colour black 60% brush size. Paint left side of image – you can use a big brush and do it quite quickly in order to blend them together. So you will get rid of the buildings and reveal the water underneath.
Some parts of the image need more skilful masking – the skyline and buildings brush won’t be good enough as it looks fuzzy. Ghostly image of bus needs to be sharper.
Select Pen tool.
Zoom in quite close and use Pen tool to trace outline of building and skyline.
Turn off mask by pressing Shift and click on mask which will disable it.
Then with the pen go round edges of buildings. But if image of building is more defined it is easier to go round it. Ignore the flag pole – don’t worry about going round this, just get rid of it.
Use the photo of the city to trace round buildings but remember you need to go back to the pier to reference back to horizon line. So straight line down across bus.
Stop path when get to horizon line - where the sea runs along the horizon.
Ctrl+ Z if make mistake.
Path stops at horizon line - Close path.
Right click on middle to turn into selection. Now have box with ants.
Click on mask to re enable it. Make sure on mask and not layer. It will only change selection on the inside. Anything on the outside is safe and won’t change.
Select - Save Selection – call it ‘Buildings’. Click OK.
Ctrl + D to stop selection.
Focus on bus and cars. Ghostly bus and car in image.
Use Masks – disable mask by holding down Shift.
Click on Pen Tool. Carefully pen tool round bus and car. Should have path running round bus and car.
Make it into a selection.
Enable Mask by clicking on it.
Reveal bus using white brush.
Buildings look false. You need to straighten lines with a soft blend.
Go back to selection – Selection - Load Selection.
Click Channels - Click on building. You can see selection (ants) on image.
Use a soft brush.
Press B for brush - use white to reveal.
Bring opacity down to 5 % = a very soft/gentle brush.
Add a very soft feather to buildings.
Paint softly round the edges of buildings. Bring detail back in. Be careful just a subtle adjustment.
Brush then change to 2% and go round wider to feather the two images together.
Alt and click on Mask thumbnail. Look at mask in isolation.
What does grey do?
Grey is the same as opacity - how much we can see through a mask. 50% grey will give 50% opacity 20% grey reduces opacity to 80% 80% grey reduces opacity to 20%
Why use grey? A grey will show some reveal. Masks grey will merge to create a mid-point so it will be partly opaque.
Blend on sky doesn’t look quite right. Want to make light on sky look similar to buildings.
Click Layer 1 – Pier.
Duplicate it – CTRL + J
Create a copy because you are doing destructive editing on it so you need a copy in case you make mistakes.
Click O on the keyboard for the Burn and Dodge tool. Burn makes things darker (this is the hand/fist icon).
Dodge tool is the lollipop icon. Click on the lollipop icon. Select a fat brush – 1200
On the top bar menu - Range to Shadows. Expose to 82%. This will create a more natural flow between tones.
Click on sky a few times.
Then bring expose down to 40% and click on sky again.
Then expose down to 21% and click again.
The aim is reducing the colours of the sky to get blend as smooth as possible.
To make 2 images work together.
Tonal range needs to match. One side of the image has stronger shadows.
Click on Level Adjustment Layer. But you only want levels to effect the buildings.
So you need to use Clip-In Mask. In the Properties box bring in the left slider to between 10-14.
Make small changes to the images until it looks like the same photo.
Apply a Global Photo Filter.
The Properties box comes up.
Select a warming filter.
Go through the list to see which one is right for your image.
The two images of the pier and street are now merged.
Composited together.
Save it.
See my screenshots below outlining the Photoshop process.


0 notes
Photo


Landscape
Photoshop
Tutorial on Masks
Image of a lake with mountains in the background and a cloudy sky. What is a Mask? Layer mask – you put this onto a layer to mask parts of an image out.
Process:
Go onto Moodle – Unit 34 Week 3, Task 1 - Landscape.
Open in Photoshop
Create masks.
Apply layer mask to a layer – click on the Japanese Flag icon. White brush reveals everything but to conceal things I need to use a black brush. If I put this directly onto a layer mask I can conceal part of the images.
Make a mask – using Selection (ants/dotted lines appear).
Click on the Marquee tool then click on Japanese flag. A box will appear over the image. It will get rid of all things outside the box. Conceal all on the outside of it but keep things the same inside.
Mask - Mask Selection.
Adjustment Layer using Masks.
Image of lake, mountains, trees and sky. How do we enhance it or improve it? Image looks a bit flat. Want to add richer tones, stronger colours, more saturated and richer.
Adjustment Layer
Hue/Saturation – Properties box.
Increase saturation - pull slider up – +55%. But this effects whole of image.
Editing whole of image or part of image – Whole of image– global editing. Part of image – Selective editing. So it is now on global editing but I want to do it selectively.
Close down box. Look at adjustment box. Icon next to it is a layer mask. When making layer adjustments it comes with mask. Areas can be concealed and revealed.
Change hue and saturation until happy with tress. Just look at trees. Use your eyes to make the decision.
What hue/saturation works? Don’t focus on anything but the trees. We can see a problem – trees look good – but sky and lake looks purple.
Apply saturation layer selectively using masks.
Go to layers menu. Select mask – CTRL + I invert it. Mask black and won’t see changes. Invert it and have it black. It is better to start with black mask and then this will slowly start to reveal things.
White on mask click B – brush.
Foreground colour pure white – change brush setting - 0 hardness. Opacity 35%. Use square brackets to change size of brushes. Paint trees changing size of brushes where needed.
What happens – Using adjustment layer it brings out saturation on the trees but by using mask it only affects trees.
Using Eye icon click it on/off to see what image looks like.
Do the same process with the water.
Hue/Saturation – global adjustment. Set it to the right colour – maybe a rich blue colour with a touch of purple. Just concentrate on the water.
Move slider back and forth until the colour is right. Find the colour you like.
Ctrl + I, mask brush using the white brush. Paint over the water using the brush.
Curve adjustment layer. Add more detail in sky. Properties box – Curves. On the graph drag line to an S curve.
Go onto mask invert it and paint the colour back into sky.
If you change your mind about water and decide you don’t like the colour. Double click Yin/Yan symbol, Adjust Properties - play around with hue and saturation
Similar to RAW? Why? Use brushes in both. In raw adjustment the brushes change specific areas. Raw is better to use the adjustment brush. But it is also useful for photo compositing.
Water of lake – looks flat and needs more tonal variation.
Water layer create new levels adjustment layer. Needs to sit between curves of sky and hue saturation of water. Use Make an adjustment until you are happy with the amount of shadows and contrast in water. It is on Global Change so changes everything not just water.
Invert mask and use brush to paint it all again. Quicker way. Layer mask but also a Clip In mask. Alt click between layers or click the icon that looks like a box with an arrow pointing down.
Use Adjustment Layer selectively to reveal and conceal changes.
Change hue saturation of individual parts of the photo using brushes and masks.
Isolate bottom layer to see what it looks like on its own.
Alt + I to isolate the layer.
Click on it again to turn it back on. So you can then see where you started and where you are now.
Save as JPEG for Tumbler and PSD
See my screenshots below outlining the Photoshop process.


0 notes
Photo


Park Hill
Clouds
Open them so stacked in same document:
Use Clouds to make a more dramatic image
Layers - Put clouds under Park Hill
Click P = Pen Tool
Zoom in
Use Pen tool to trace round spaces you want to mask/hide
Use anchor points to go round building. Make sure you close anchor points.
Right Click - Make selection - Click OK (You will have dotted lines round selection)
Go back to Pen Tool:
Select 4 corners of selected area
Right click
Make selection
Add to selection
Build up dotted lines
Use Pen tool again for top of building. You can click outside of page:
Right click - Make selection -Add to selection. Pen tool used to mask out all areas you want to hide.
Now Click Layer Mask.
If you Masked out wrong area, so:
Ctrl and I – click to invert it. Match the colour of the sky until it looks better.
Level adjustment layer
Properties - Move sliders. Move them up/down till it looks right.
Layers – Hue.
Photo filter.
Warming filter.
The 2 images then have a similar hue
Save images. PSD and JPEG
Shortcuts:
Disable a Mask - turn it off. Shift and click on Mask thumbnail.
Isolate a Mask - Alt and Click on Mask thumbnail. This isolates it so you only see Mask.
See my screenshots below outlining the Photoshop process.


0 notes
Photo


Circles
Download in Photoshop
On Google type in: Unsplash.com. These are Copyright free photos. You can use any photo you like.
Choose a photo. Click on it and download. This image was taken by Ryan Hefner
Place image on top of circles
Duplicate layer so you have 2 copies - Ctrl +J
Name layer – Circles
Turn off all layers but NOT the circles
Need – Magic Wand tool
Hold down Shift. Select all of black rings
Turn on the 2 photos
Come up to top layer
Hit the Mask icon
You won’t see any difference
Rotate image slightly
Click Enter
Save it
See my screenshots below outlining the Photoshop process.


0 notes
Photo


My Idea
My idea was to create an image in Photoshop with the theme of cows or dairy. I already had a toy cow that belonged to my son and it was easy to buy milk from Waitrose. I bought two sizes: a 1 pint and a 4 pint carton. I had an idea that they could be turned on their sides to look like vehicles. I also bought Emmental cheese because I was interested in the holes and how they might be used to create a window effect. I cut the cheese so I could use different parts to create different angles for the buildings.
See photos below of my ideas and mind map.


0 notes
Photo


The mountain
Unused images on landscape Geometrical Reflections
In class we experimented with geometric reflections. I loved creating these; it really suits my love of landscape photography. I can see myself using this in the future. I feel that by using geometric reflections in landscape photography you can create an arresting image that causes the viewer to stop and take more time to consider and imagine the landscape.
How do you do this?
Copy layer of image.
How did they do the fade?
Steps -
1. Duplicate layer – Ctrl+J
2. Rotate duplicate layer - Ctrl+T - Shift hold down - Flip it over
3. Eliptical Marquee Tool.
Select part of image
4. Adjustment layer.
Click on Gradient - Gradient Fill - Click on Gradient bar - Select – Back to transparent - Reverse (tick) - Align with layer (tick) - Click OK.
5. Put gradient between 2 layers
Clip top layer. Hold down Alt and click between them. I can clip between the layers then move selection round. Move tool (V). Make sure have layer selected. Move circle round.
· Ctrl T – to resize it.
· Control blend works
· Gradient fill tool
· Gradient Editor
· Opacity - move slider up and down
· Click OK
You might want to crop it down
It doesn’t need to be a circle. You can create more complex shapes. Use Pen tool to cut out a shape.
Then go through same process.
1. What is a clipping mask?
A Clipping Mask is a group of layers to which a mask is applied. it allows you to use the contents of a layer to mask layers above it.
2. What is the difference between a clipping mask and a layer mask?
They both allow you to show and hide different parts of a layer. with Layer Mask though you need to add a mask to the layer and then paint or fill areas on the mask with black (to hide area), white (to show area) or grey to partially hide area. Clipping Mask uses the contents and transparency of a layer to decide which parts of the layer above remains visible.
3. How do you make a clipping mask?
Move the clipping path and the objects you want to mask into a layer. In the Layers panel. You need to make sure that the masking object is at the top of the layer, and then click the name of the layer.
See my screenshots below outlining the Photoshop process.


Victoria Siemer
I was inspired by photos by Victoria Siemer. I learnt how to make photographs that were similar to hers.
https://www.behance.net/gallery/25817027/Geometric-Reflections


0 notes
Photo


PARIS 68
This is an iconic image by Bruno Barbey. Students rioting in Paris in 1968. “Never Work” – Protesting against work. They didn’t want to work.
Photoshop process:
There are 2 kinds of Masks -
1. Layer Mask
2. Clipping Mask
Open in Photoshop
Take 'Paris 68' – put it on top of the Riot image
Drag this underneath layer O
Select layer O. Right click on mouse.
Click – Create Clipping Mask from drop down menu
What happened?
1. Layer Mask – Masks part of a layer
2. Clipping Mask – “Clips” a layer to the pixels in the layer below
It only works with a layer with transparity on it
Another way –
1. Click Alt
2. Hover between layers
3. Then click once
It will have an arrow to show it is clipped -
Click Adjustment layer
Solid colour
What happens? Grey scale image
Layer O, Grey/8 (You don’t want this)
Image on top of tool bar
Mode click
RGB Mode
Now again –
Adjustment layer
Solid colour
Now you can select a colour.
Select Photo
Click V (move tool)
Change framing so students are positioned in centre of numbers – 68
Move it round till you are happy
Solid colour layer
Alt and click
Stack clipping masks on top of each other
Bring opacity down
Experiment with Blend Mode
Save image
See my screenshots below outlining the Photoshop process.

1 note
·
View note
Text
Layer Mask
1. What is a layer mask?
This is a really powerful compositing tool and when used the result looks highly professional. It can be used to make a film poster e.g. Harry Potter and is found in Photoshop as the ‘Japanese Flag’.
2. Why use masks? What are their advantages?
You can cut out parts of a photograph and add others to it. You can use squares and circles etc. to make a cut out and see another shot underneath. You can use it to move in all sorts of directions. If you make a mistake, you can always fix a mistake by inverting it. The eraser tool cannot do this as it is destructive, however the mask tool is non-destructive.
3. How do you use brushes to create and adjust masks?
You can hide and reveal using the mask. The brush will also hide or can invert and reveal. Make sure mask is selected (not layer), click B, use black to conceal and white to reveal.
4. How do you unlink a MASK FROM ITS LAYER? Why might you do this?
You unlink the chain which is visible between the layer and mask. The layer now moves but the mask stays where it is. You transform using the bounding box, resize and rescale.
0 notes
Text

Photocompositing
The meaning of Photocompositing:
Putting more than one photo together to create an image. Making 2 or 3 photos into one image.
Useful Tool Masks – The most powerful photo compositing tool. Layers can be put on top of each other BUT if I put layer 1 over layer 2 I can’t see the layer underneath.
Mask:
Cutting a hole in a layer.
Put a mask over the layer so you can see part of the layer underneath.
Add layer Mask.
Icon appears.
Layer thumbnail.
Remember this:
Black conceals means can't see.
White reveals means can see.
Mask selected Ctrl+I
Press B (Brush tool)
Check your foreground/background colour – should be black and white
Masking using a brush tool. Make sure mask selected NOT layer.
Click B for Brush
Use black to conceal/white to reveal
Select foreground colour = black. Then paint onto your mask. It will mask out the area you paint over.
BLACK brush masks it out WHITE brush puts it back
If you make a mistake, switch to foreground colour. Paint it back in
Mask = Hide. Hides part of a layer
Masks are better than erasing. You don’t delete things you just hide them.
Delete layer mask.
Click Marquee tool and click and drag. Hold shift.
Click Mask button and load selection as a Mask. It will mask out everything that is NOT selected.
Select move tool = V. Use V to move it around.
But they move together, how do you separate them?
Separate it: Click on chain. This breaks the chain.
Layer will move but mask stays where it is.
If you select Mask on layer box the opposite will happen. You move mask not layer.
Transform - Bounding box (Ctrl+T).
Resize/rescale mask and photo
Save it.
0 notes
Photo


Removing People
Sometimes you may want to create an image without people present. We were asked to take photographs of an area in the city that is normally busy but then to use Photoshop to alter it to look empty. Settings - ISO 320, F/5.6, 1/200sec. I used a tripod to ensure the camera remained still and took fourteen photos every two seconds. If you don’t have a shutter release cable, you can use a timer. This meant I had lots of images that were busy with people and traffic. I thought we would have to remove each person one by one in Photoshop but Kayne introduced me to ‘Scripts’ which I had never heard of before. This is a fantastic tool that layered or stacked all the images and automatically removed the people in the image. Any irregular pixels that remained could then be tidied up using the clone tool.
Photoshop process:
Automated Process. Needs RAM = Random Access Memory storage.
Create a Folder. Name it ‘Remove the People’. Put all your photos in the folder. Keeping everything together – organised.
Open Photoshop.
Click on File - scroll down to Scripts. Scripts is technical but very useful – makes job faster and more efficient.
Click on Statistics.
Option box appears. Click on Choose Stack Mode. You will see a list with terms including –Mean, Median, etc…
Median = put numbers in numerical order and work out the middle number. Median right in the middle. There is a whole list of words/terms.
Click on Median Stack Mode. This prepares and starts the automation process. All anomaly pixels will be removed from the photos. For example if a tree is in the left hand corner and the leaves moved in the wind and blew out of fashion. Or clouds moved across the sky or people moved within the images – these are all organic matter and can be taken out. The buildings and ground will stay still as they are static.
Select all files from your folder.
Tick – Attempt to automatically Align Storage Images. This lets Photoshop align the images. Press OK.
Photos will start merging together. It will remove people.
Some people in the background will be warped. It looks interesting but it is not the end goal. You want to get rid of all people.
So you need to remove them in a different way.
Use Clone tool, Spot Healing tool or Patch tool. Use these and experiment with each one. Remove “Ghosts”.
Duplicate the layer first – Ctrl + J
Click in the image to rasterize layer. Duplicate it and then work on the duplicated copy.
Clone tool experiment with the percentage on the top bar of the menu.
Stamp tool Click S on keyboard zoom in. Select area using Alt.
Select Opacity and Flow from the top bar of the menu. Opacity down to 50% which gives more of a blend mode. Now can paint in the paving slab.
Select Spot Heal tool - click and drag over images you don’t want.
Be careful getting rid of things near stationary objects. You need to use Clone Stamp tool select it change % then try removing it. In the duplicated layer get rid of as much as you can.
Use liquefy tool for bendy lines that you want to straighten. This makes it look more realistic. Be careful – go through each step carefully.
Keep checking back by turning Visibility on/off.
Save it.
See below for my screenshots outlining the Photoshop process.

0 notes