
Statistics
We looked inside some of the posts by mukicreationlab and here's what we found interesting.
Average Info
Notes Per Post
0
Likes Per Post
0
Reblog Per Post
0
Reply Per Post
0
Time Between Posts
3 days
Number of Posts By Type
Text
17
Last Seen Tumblr Blogs


Fun Fact
Tumblr’s website traffic is steadily declining.
Text
Display
image4 1
Screen Recording 2025-04-10 at 11.54.57.mov

0 notes
Text
Blender technique


Today I learned how to take a picture of an object in Blender. First, I set up a camera in the scene by pressing Shift + A and adding a camera. I positioned the camera to frame the object properly, using the view shortcuts and moving the camera with G to grab and R to rotate. Once the camera was placed correctly, I made sure the lighting was good by adding a light source if needed. After that, I pressed F12 to render the scene. Blender then created an image of what the camera could see. To save the rendered picture, I went to Image > Save As and chose the location and file type. This is how I successfully took a picture of an object in Blender.
This is good for me to show my process and the things I have made in Blender
0 notes


Text
High end store inspiration
Like Cartier I also look into more ideas in this field..
I also had an idea to create a window design for jewelry display by hanging the pieces with transparent string. I’m want to experiment making the jewelry look like it’s floating and give it a clean, artistic look. The inspiration kind of comes from how high-end stores display stuff really simply to make it stand out more. The inspiration comes from how high-end jewelry stores or art galleries display pieces. For example, stores like Tiffany & Co. often use minimalist displays to make their jewelry look like it’s floating, drawing more attention to the details of each piece. It’s all about creating a sleek, elegant presentation that feels special.


Similarly, I was impressed by a Swarovski display I encountered in person, which closely resembled this design. Experiencing it in real life provided a more tangible and realistic perspective, allowing me to fully appreciate the elegance and effectiveness of the presentation. Seeing it firsthand reinforced my appreciation for well-executed visual merchandising and inspired me in my own approach.
0 notes
Text
Wall texture


I mixed cement and wall filler to coat the outside to look like a real wall. I used the dry tab method to add texture by tapping on the coating when it was partly dry, creating patterns. I liked how it turned out because the texture made it look more natural and realistic and it added more depth and character to the surface.
0 notes
Text
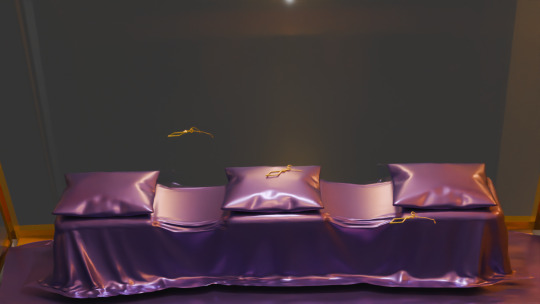
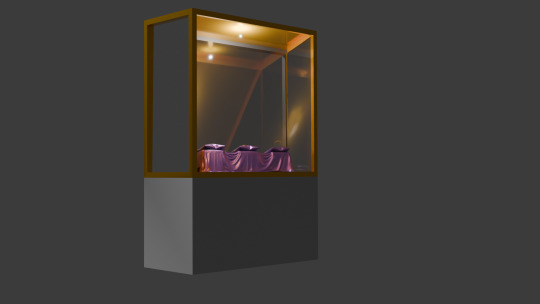
Making window design model


I decided to make this model to show how it would also look in real life. As much detail I can add on blender I think that real life model is alway better to show your audience your ideas and thought process behind design.
I used cardboard to make the base first.
Selecting material
I chose this luxury vibrant purple velvet material for the base. This will make the gold stand out more I learnt this from my previous experimenting on different types of patterns and colours.


0 notes
Text
Experiment jewellery background
I experimented with different backgrounds for my jewelry using higher-quality paper with various designs, compared to last time when I used regular printer paper. I wanted to see if the upgraded materials would make a noticeable difference in the overall presentation.
I signed up for a workshop with Laura Gale to explore which paper works best for showcasing jewelry. I asked for advice on paper quality and learned there are two main types—shiny and matte. I decided to go with matte paper, since it contrasts nicely with the shine of the jewelry. I didn’t want the background to reflect light; I wanted the jewelry to stand out on its own.
I had a chance to print my own designs, I experimented with a random piece of paper from Lauren’s workshop using one of my own jewelry pieces. I found that matte paper worked much better than shiny, as it complemented the jewelry without creating unwanted reflections.
Therefore, I decided to print these prints in Matt paper and experiment how jewellery looks on top of it. I also tested this out using different lights: natural and also studio light. Found that natural light was much better which is perfect because it’s a window display so natural light will be there either way.


Fabric prints

I noticed a pattern on one of Emily’s pieces, which inspired me to create my own fabric prints that could be used for jewelry window displays. This idea really aligned with something I had mentioned before—how, in Italy, they often use fabric as a base layer to beautifully present and display jewelry
This influenced me to book textiles workshop. I spoke to Taryn’s about printing on fabric and asked for advice regarding the stiffness and other details. I found out that while I can use flowy fabrics like silk or polyester—which will lay flat nicely—the colours won’t come out as vibrant as I’d like. For example, achieving a rich royal purple isn’t possible with those materials. Therefore, we decided to book a workshop to get some samples out to see if I should carry on with this idea.
0 notes
Text
Cartier Jewellery Display
Mostly Cartier is known for using glass to display their jewellery.
The way they set up their pieces made them look even more special, like little treasures in a fancy museum
It felt like each piece had its own story to tell, and that made it even more exciting to look at.
This inspired me


This reminded me of how jewellery is displayed in Venice. The way they arrange each piece with such care, using soft lights and elegant setups, makes everything look like a masterpiece. It feels less like a store and more like an art gallery, where every piece has its own story and charm.
This inspires me to think differently about how jewellery is presented.
Therefore, I want to focus on jewellery storytelling and art. I don’t just want to just display pieces—I want to create an experience that brings out their meaning, history, and beauty. which is what my original am was.

The project was designed by Hayon Studio, led by Spanish artist-designer Jaime Hayon. Born in Madrid, Jaime gained recognition through his early installations like ‘Mediterranean Digital Baroque’ and ‘Mon Cirque,’ which helped shape a new wave blending art, design, and decoration. Since founding his studio in 2001, he’s worked with a wide range of global clients across interiors, furniture, and objects, always pushing the boundaries between function and fantasy. With studios in Valencia, Barcelona, and Treviso, his work has been featured in top art and design publications. What I really admire is how he brings a playful, childlike spirit to his designs without losing depth or craftsmanship.
I also noticed that every piece of "ART" has a bit of colour. Also whatever bead used in jewellery is the background. For example the green set has green beads and different shade of green is the background.
0 notes
Text
Their design


I thought the jewellery looked a bit grey and dull in their design apart from the pieces on black object. However they liked their idea more so I decided I will do more experimenting to show them something different.
Jewellery on mirror
Although this wasn’t my main idea I thought it’s good to introduce them to more ideas. I took some pictures of jewellery on mirror to show them as well however I got sake response. But this didn’t stop me I will still experiment more to show them and get some ideas from other jewellery designers.


0 notes
Text
Blender


I found this keyboard short cut which helped me a lot with my project. It’s so much easier to follow these steps then finding tools from my screen
0 notes
Text
Design Ideas
Since the area is mostly South Asian, I wanted the background to reflect their culture. Right now, they’re celebrating Ramadan, and at the end of it, they celebrate Eid, which is very important to them. It’s common for people to exchange gifts during this time, and this inspired me to create a design that ties into these traditions.


Collage
I started off experimenting with the collage I made and photographing gold jewellery on these prints.


I also decided I could include symbols like crescent moons, lanterns, dates, prayer beads, or patterns inspired by Islamic art. Using colors like gold, green, and blue could also give a festive and spiritual feel. Adding touches that represent giving gifts, like decorative boxes or ribbons, would fit the Eid celebration.
I also experimented it by using the same jewellery that was displayed on the window to see how it would look as a base and not back ground since behind the jewellery it will be glass anyways.


Personally, I thought that this background especially the dark red one made the gold jewellery stand out more and it was also shining a lot. The light reflecting and jewellery shining was what I was aiming for.
Although some background (light colours) did not reflect this idea. This made me want to discover this idea more and get these prints printed in good quality paper to do more experiments with it and selected the sort of print based on how much the gold is reflecting.
However, after showing these photos to the shop owner and the rest of the staff, they mentioned that the design didn’t meet their standards. They prefer to stick with their own perfected aesthetic, which follows a black and gold theme.
0 notes
Text
Scheduling time
Due to blender being so complicating for me I am spending alot of time learning it then making anything. I am struggling a lot trying to make anything in blender so I am sure how I will plan a design in blender
0 notes
Text
I decided to try making my own traditional designs for the background. I made rough designs of types of flowers I liked and found inspiration from flowers and leaves from my surroundings.


Althought I liked the design I thought it lacked colour so I am planning on adding colour and also experimenting more with these types of design. I decided I want to also make this digitally.
I also decided to create this digital to see how it looks


0 notes
Text
Adding reflection


So to add reflection on the donut, I went into the Material Properties tab, selected the donut, and under the Shading workspace, I clicked on the Base Color to add an Image Texture. I used this to bring in an HDRi image, which is great for getting realistic reflections.
To do this, I added a Principled BSDF shader to the donut and hooked up the Image Texture node into the Base Color. Then, in the World Properties tab, I added an HDRi image for the environment to get those reflections showing up on the shiny surface of the donut.
For the icing, I made sure it had a glossy look by lowering the Roughness and increasing the Specular in the Principled BSDF. This made the icing reflect the light and the environment more realistically. After that, I switched to Cycles Render to get the best reflections, and the donut ended up looking nice and shiny with reflections from the surrounding environment. This is useful for my project as I will be making window.
0 notes
Text
Blender donut
I've picked up a lot of useful tasks from this tutorial I watched. Here's a breakdown of what I've learned so far:
Navigating the Interface: I got comfortable with Blender’s interface, figuring out how to move around in the 3D viewport, select and manipulate objects, and use the toolbar. It took a little time, but I feel pretty confident now.
Creating Basic Shapes: I learned how to add primitive shapes like cubes, spheres, and cones to my scene. From there, I practiced scaling, rotating, and moving these objects to position them just right.
Mesh Editing: One big thing I picked up was using tools like extrude and loop cuts to add detail to my models. I also started using the Subdivision Surface modifier to smooth things out and make them look cleaner.
Modifiers and Sculpting: I played around with modifiers like Mirror, Subdivision Surface, and Boolean to make the process more efficient. I even dove into sculpting a bit, learning how to use different brushes and dynamic topology for more detailed work.
Texturing and Shading: I practiced UV mapping to unwrap my models and apply textures. Also, I got into the Shader Editor to make materials and shaders. The node system took a little time to get used to, but it’s a really powerful tool for creating cool effects.
Lighting and Rendering: I learned how to set up different lights in the scene to make it look more realistic. I also played with the rendering settings, switching between Eevee and Cycles, and tweaking them for the best results.
Animation Basics: I started animating by setting keyframes for objects. I even explored the Graph Editor to get the timing and movements just right.
Finalizing the Scene: I figured out how to set up the camera to get the perfect shot of my scene. Finally, I learned how to export my models in formats like .FBX, .OBJ, and .STL.

To add icing to my donut model in Blender, I started by selecting the top face of the donut where I wanted the icing to go. I switched to edit mode and used face select to pick the top face of the donut. Then, I pressed E to extrude and started pulling the icing up from the donut's surface. As I extruded, I moved the new geometry slightly upwards and outwards, making sure the icing flowed over the edges. I used S to scale the icing and give it a nice, smooth, flowing look around the donut. After extruding, I smoothed out the icing shape by tweaking the vertices and adding some small adjustments, making it look like the icing was naturally draped over the donut. Finally, I exited edit mode to see the whole result, and it looked just like a donut with a perfect layer of icing on top
I also learnt how to make object smooth. As you can see the icing of tis donut was very pointy and not realistic. Therefore, I learnt from this to do that I have to be on edit mode to click on each dots then play around to see what looks best.


I managed to make the icing and I am proud of how well I did this for first time.
However after making the icing drip I realized the top bit got messed up. probably because the dots were pulled down too much.
0 notes
Text
Blender donut
I learned a lot go new techniques from this tutorial although its hard to get hang of it in short amount of time.
These are some notes I took from tutorials I got from Lee workshop and also hemza told me similar rules.

0 notes
Text
Measuring the shop

To make the full shop inside blender I decided to measure the entire area.
I used measuring laser and noted the place I am measuring so it’s easier for me to remember later.
This will help me get better idea of how the window will look from inside too
0 notes