
Kijah // 17 // she/they// I have a fanfiction addiction// starting to draw// I like to rant
Don't wanna be here? Send us removal request.
Statistics
We looked inside some of the posts by mustbedead and here's what we found interesting.
Average Info
Notes Per Post
490K
Likes Per Post
258K
Reblog Per Post
231K
Reply Per Post
468
Time Between Posts
3 days
Number of Posts By Type
Note
2
Text
13
Photo
2
Last Seen Tumblr Blogs


Fun Fact
There were a total of 171.5 billion posts on Tumblr in 2019.
Note
Hey :) I've wanted to start trying embroidery or visible mending, so I thought I'd start with my sleeping sweatpants and fix the seams that are slowly coming apart with that pretty stitch you showed a while ago (jesus did that take me many times stopping a video and rewinding). It doesn't look as neat as I hoped it would, but it's just sleeping pants, so good for practicing.
BUT: I got new needles because mine all had too small eyes for the thread to fit (I used a string of a ball of wool that's definitely not wool but some other cheap material, and then embroidery thread for the pink part), and I broke five needles in total for one leg.
I don't think it's the sweatpants' fault - they're pretty old, and at some spots, you can even see through the fabric because it's so thin already. I made one small knot at the needle's eye, and it and the needle still kept getting stuck when I tried to pull the thread through.
Do you maybe know a reason why the needles' eyes kept breaking? Should I have used a thinner thread* or smaller needles? I don't want to break any more needles :(
(*But then wouldn't it be too thin? Like, would it still have the same effect of visible mending if the thread is pretty thin?)


[ID: A photo of the inner seam of black sweatpants that has been fixed using a blanket stitch with a purple-and-white and a pink thread. There's two close-up pictures, one for the purple-and-white thread and one for the pink thread. End ID]
Breaking sewing needles
Good job on those sweatpants!
There's plenty of reasons why needles will occasionally break if you're sewing by machine, but to be honest I've never broken any hand-sewing needles before. I've bent plenty, but never broken.
It's important to use the right needle for the right job. A standard sharp needle might not suffice when you're working with something like yarn or embroidery thread: a crewel needle or chenille needle will be a better fit.
If you use thread that's too large for the eye of your needle, you'll have a hard time threading it. Even if you do manage to thread it, it might get stuck when you sew with it as the thread's larger than the eye. This is not only frustrating, but can also damage your fabric.
Also make sure to use good quality needles. Look up reviews if you can, and take a good look at a set of needles before you buy them. Are all of the needles straight? Are they smooth, or do you see any jags?
As for knots: making a knot at the eye of your needle is an easy way to keep your thread on your needle. However, it's not always the best technique to use: if the knot's bigger than the needle's eye, it can be difficult to work with and even damage your fabric. If you find yourself in this situation, there's other techniques you could try to keep your needle threaded as shown by this Stitch Clinic article.

(Image source) [ID: nine black squares on a yellow background showing nine different types of hand-sewing needles labelled with white text, all shown in different sizes: sharps, betweens, tapestry, crewel or embroidery, chenille, milliners, darners, yarn darners, and beading.]
318 notes
·
View notes
Text
How to sew a rolled hem
Looking for a nice way to hem sheer, slippery fabrics like silk or chiffon? A rolled hem makes for a neat finish. It looks neat and is surprisingly easy to do!
Check out this rolled hem tutorial by Retro Claude to see how it's done. The article contains both written instructions and a video tutorial.
You can also do rolled hems with a sewing machine as demonstrated by Seamwork.
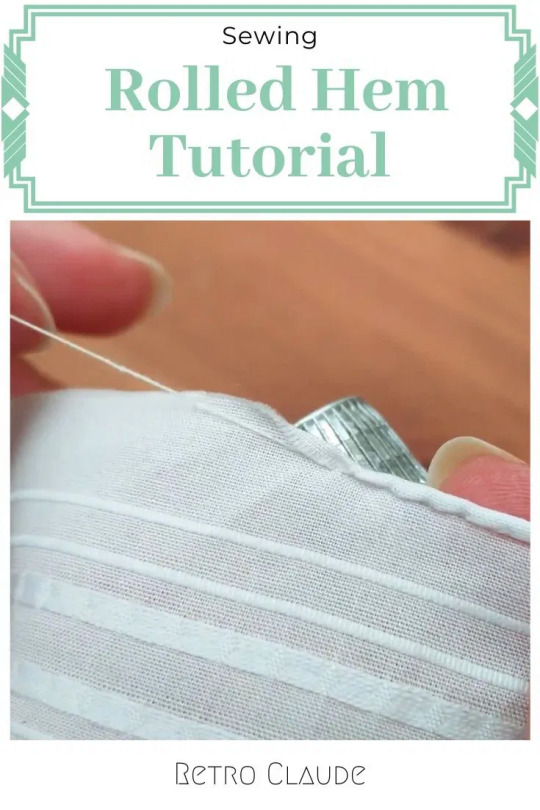
(Image source) [ID: close-up of a white thin fabric. The raw upper edge is in progress of being hemmed with a rolled hem, sewn by hand. Text: "Sewing. Rolled Hem Tutorial. Retro Claude."]
737 notes
·
View notes
Text
Hand-sewing: how to start and how to finish
I've discussed how to thread a needle before, but I've yet to make a post on two other important elements of hand-sewing: how to start and how to finish.
These things may seem obvious to an experienced sewist but can be very frustrating when you're new to the craft, especially as a lot of tutorials assume you already know how to do them.
By machine:
When you're sewing by machine, securing your thread at the start and end of your work is easy: just sew backwards for a few stitches, then forwards. This is called backstitching (not to be confused with the manual backstitch) and will stop your thread from coming loose.
Some sewing machines also have a lockstitch function. A lockstitch is less visible than a backstitch as your thread is locked in one specific spot rather than across several stitches. If your machine doesn't have a lockstitch, you can still make one by shortening your stitch length as much as possible and sewing several stitches in the same spot. Note that this may jam your machine, so proceed with caution.
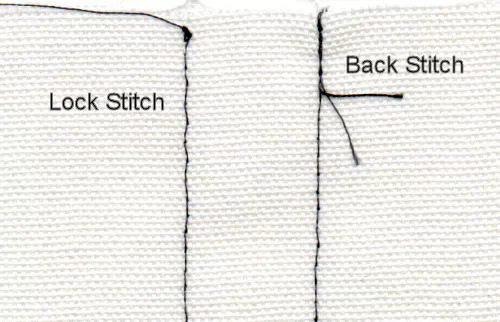
(Image source) [ID: two lines have been sewn in black thread on a piece of white fabric. The line on the left was started with a lock stitch while the line on the right was started with a back stitch.]
By hand:
There are various ways to secure your thread at the start of your project when you're sewing by hand, ranging from different types of knots to locking stitches. Check out this Sew Guide article to learn five different ways to tie a knot and secure your thread when sewing by hand.
The easiest way to do this is to tie a knot at the end of your thread. If you'd rather not have any knots in your work, you could also look into using different stitches to lock your thread, like the loop knot stitch.
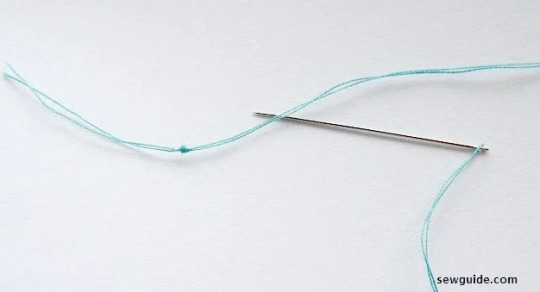
(Image source) [ID: a sewing needle double threaded with blue thread lies on a white background. A knot has been tied near the end of the thread. Text: "Sewguide.com".]
Various techniques exist for securing your thread at the end of your project, too. This Instructables article will show you four ways to tie off your thread to finish sewing, including how to do so with and without a visible knot.

(Image source) [ID: a line of purple running stitches sewn with a double threaded needle on white fabric is secured in place by tying a knot with the two ends of thread.]
Which technique to use depends on your personal preferences and on the project you're working on. Try out a few different techniques and see which ones you like the most!
1K notes
·
View notes
Text
Let's talk stitches!
While a sewing machine is super convenient, having access to one is not required for mending. Most mends can easily be done by hand. If you're really patient, you can even make entire garments by hand, just like they did in ye olden days.
So, let's take a look at a few basic hand sewing stitches to get you started.
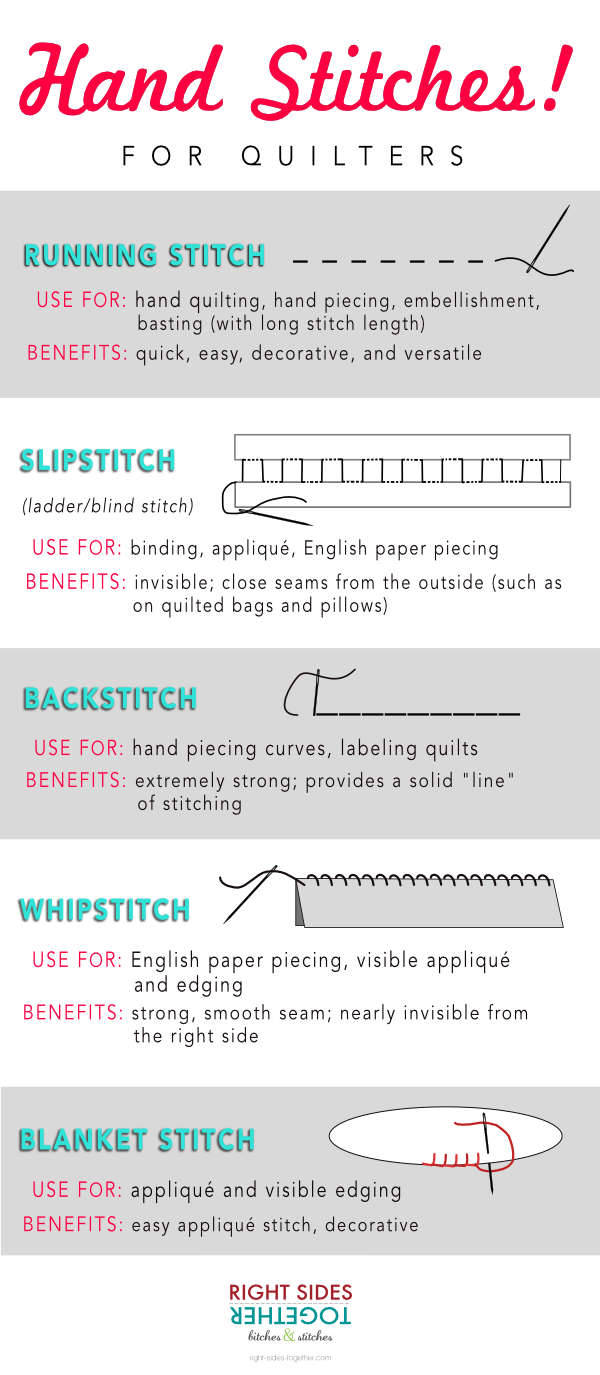
(Image source) [ID: hand stitches for quilters: the running stitch, slipstitch, backstitch, whipstitch, and blanket stitch.]
The running stitch
The running stitch can be used for many purposes. It's popular in embroidery, and can be used to outline shapes or baste (temporarily secure) pieces together. It can also be used to ruffle fabric by hand, and I personally use it a lot to secure patches in place when covering up holes in garments. The running stitch is also the base stitch for sashiko, a popular style of visible mending.
Video tutorial for the running stitch
Text tutorial for the running stitch
The slipstitch
The slipstitch, also known as the ladder stitch, is my go-to stitch for closing tears and fixing torn seams. This stitch is frequently used to sew pieces of knitting together, too. You can also use it to make small size corrections in a garment, for example to add a quick dart or to make a side seam smaller. It's invisible on the outside, which makes it a great stitch to fix up things like plushies, duvet covers, or pillows.
Video tutorial for the slipstitch
Text tutorial for the slipstitch
The backstitch
The backstitch will likely be the stitch you'll be using the most when working on a project. It's a strong, clean stitch that can be used for almost anything: seams, hems, embroidery, attaching two pieces of fabric together, zippers,... This is also the best stitch to imitate machine sewing with. If you're only going to learn one hand sewing stitch, then make it the backstitch!
Video tutorial for the backstitch
Text tutorial for the backstitch
The whipstitch
The whipstitch, also known as the overcast stitch, can be used to stop fabric edges from fraying and is great to finish seams off with. It can also be used to quickly sew two pieces of fabric together, for appliqué, or as a decorative technique. I personally prefer the blanket stitch over the whipstitch because it's a little cleaner, but the whipstitch is faster than the blanket stitch.
Video tutorial for the whipstitch
Text tutorial for the whipstitch
The blanket stitch
The blanket stitch is great for finishing off seams and stopping fabric from fraying. It's also frequently used for appliqué and embroidery, and can be used to make button holes by hand. It looks neater than the whipstitch, but is also slower to get done.
Video tutorial for the blanket stitch
Text tutorial for the blanket stitch
Conclusion
Get yourself a spare piece of fabric and try these stitches out before attempting them on a real project. I promise you'll get the hang of them quickly!
If you're only going to learn one of these, then make it the backstitch as it's the most versatile hand stitch.
6K notes
·
View notes
Note
Hey, I’m relatively new to sewing and mending. Do you have like,,, a baby step guide for beginners? Most things I find online say to use a stitch but won’t like,,, teach it to you.
Also what is a thimble for?? I know it’s a sewing thing but,,, why?
Sewing 101
Baby steps are important! We all have to start somewhere, after all. :)
Getting started:
Here's a few sewing 101 guides to get you started:
How to thread a needle
Hand-sewing: how to start and how to finish
5 basic hand-sewing stitches (start off with the backstitch)
How to use a seam ripper
Once you know to do these things, you've got the basics of sewing by hand down and know how to undo mistakes with a seam ripper.
Practice on spare scraps of fabric at first until you feel confident enough to tackle a project, and start out small. Make your first project something that's easy and doesn't use a lot of fabric. It's okay if you mess up, because that's the best way to learn!
If you'd like to see more tutorials, check out my tutorial masterpost. Want to learn how to use a sewing machine? Check out this beginner's guide by Treasurie.
Thimbles:
As for thimbles, a thimble is a small protective device you wear on your finger while sewing by hand to protect your finger from getting pricked by your needle.
Abby Cox does a good job explaining what it's for and how to use one in her video about thimbles.

(Image source) [ID: five different types of thimbles: metal, rubber, plastic, leather, and an adjustable ring.]
782 notes
·
View notes
Text
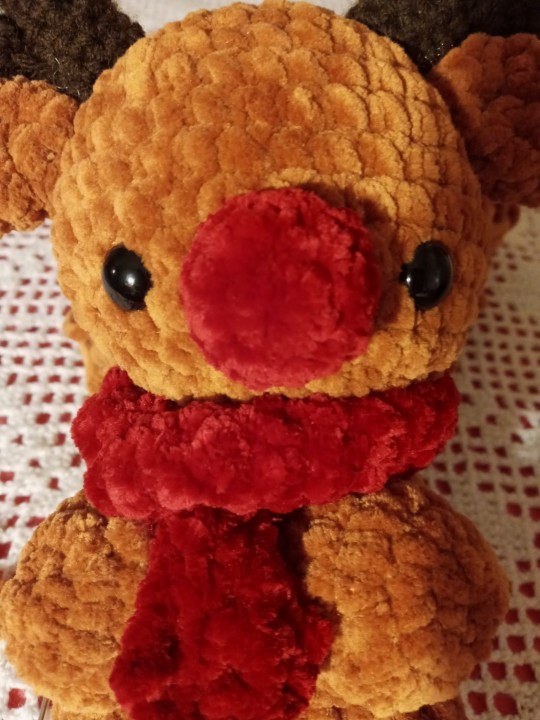
Adorable
Here is Rudolph all done 👍
I LOVE HIM SM 😭♥️

18 notes
·
View notes
Text
Vintage Pattern Terminology Update: Knee Warmer (AKA Crochet Knee Cap)

(I will be releasing this as a free PDF pattern on my Ravelry page in a week or so. But I got the overall rewrite done already, so here you go!)
First published in Priscilla Wool Crochet Book 1908, revised 1912; edited by Lola Burch Hetitch; Within Public Domain in the United States
Supplies:
3.50 mm hook
Stitch markers
Scissors
Tapestry needle
3 ounces of 4-ply wool -- fingering weight (3 ounces equals just over 85 grams)
Note: While the original pattern calls for 100% wool, a wool blend with nylon or other secondary, stretchy fiber would also work. For tester pieces, Cascade 220 Fingering (100% Wool) and Knitpicks Chroma (70% Superwash Wool / 30% Nylon) were used. Items came out very similar.
Stitches:
Chain
Back Loop Only Single Crochet (BLO SC)
Front Loop Only Single Crochet (FLO SC)
Sizing:
Knee Cap laid flat before wearing: 4”
Knee Cap as designed fits up to a 14” knee circumference and a 16” thigh.
For a larger kneecap/thigh, add 2 rows to the first six rows, 2 rows to the middle six rows, and 2 rows to the final six rows per inch you would like to add.
Pattern:
Work 42 chains loosely
Row 1: Skip first chain. SC 41. Chain 1. Turn.
Row 2: BLO SC in all stitches in previous row. 41 BLO SC. Chain 1. Turn.
Row 3-6: Repeat row 2
Row 7: BLO SC in first 20 stitches. In FLO of next stitch, complete 3 FLO SC. Place a stitch marker in the second FLO SC and move it into the corresponding stitch throughout the pattern. 20 BLO sc to end. Chain 1. Turn.
Row 8: BLO SC in first 20 stitches. FLO SC in the next 3 stitches. BLO SC in following 20 stitches. Chain 1. Turn.
Row 9: BLO SC in first 20 stitches. FLO SC in next stitch. Work 3 FLO SC in the following stitch. FLO SC in next stitch. BLO SC in next 20 stitches. Chain 1. Turn.
Row 10: BLO SC in first 20 stitches. FLO SC in the FLO SC stitches of the previous row. BLO SC in next 20 stitches. Chain 1. Turn.
Rows 11-25: Repeat rows 9 and 10 until you have 21 FLO SC stitches (Row 25)
Rows 26-31: work even, working 20 BLO SC, 21 FLO SC, and 20 BLO SC. End each row with a Chain 1. Turn.
Row 32: Work 20 BLO. Skip the first FLO SC stitch. FLO SC in next 20 stitches. 20 BLO SC to end. Chain 1. Turn.
Rows 33-51: Repeat 32nd row 19 times. You will skip a FLO SC each row until you are back to the original 41 stitches at the end of the 51st row.
Rows 52-57: Work even in BLO SC. Chain 1 and turn at the end of each row. Fasten off at the end of row 57.
Seam the two long sides together. Use a tapestry needle to weave in the ends.
36 notes
·
View notes
Text


KARASUNO CROWS!! 💕
This is one of my sillier projects but one I'm so proud of 😂 When I drew this way back when, my lovely friend @unacaritafeliz expressed a wish to hug big Asahi crow, so for Christmas I've done my best to make it a reality :D and then I couldn't resist making some more (shipped off to @lilac-writes @stringofturtles and @pigeonwithapen respectively!!)
Sidenote, oh my god this yarn is EVIL. Black yarn is EVIL and velvet yarn is EVIL. But for Rae and for Asacrow I would go through anything
Pattern: I used this YouTube video for the basic crow!
Yarn: for some reason I was logged out when I ordered and I don't have the tag, but I'm REASONABLY sure it's Schachenmeyer Luxury Velvet in 'Black Sheep'. Asahi's hair and beak is Stylecraft Special Chunky - Graphite and Dark Brown, and the rest of the details are DK scrap I'm not sure about 😂.
The safety eyes are these in a few sizes!
127 notes
·
View notes
Text
Can't wait to try out

Some of my handmade crochet bits (bags, bowls and blankets)
62 notes
·
View notes


Text
Things that will make your computer meaningfully faster:
Replacing a HDD with an SSD
Adding RAM
Graphics cards if you're nasty
Uninstalling resource hogs like Norton or McAfee (if you're using Windows then the built-in Windows Security is perfectly fine; if you're using a mac consider bitdefender as a free antivirus or eset as a less resource intensive paid option)
Customizing what runs on startup for your computer
Things that are likely to make internet browsing specifically meaningfully faster:
Installing firefox and setting it up with ublock origin
adding the Auto Tab Discard extension to firefox to sleep unused tabs so that they aren't constantly reloading
Closing some fucking tabs bud I'm sorry I know it hurts I'm guilty of this too
Things that will make your computer faster if you are actually having a problem:
Running malwarebytes and shutting down any malicious programs it finds.
Correcting disk utilization errors
Things that will make your computer superficially faster and may slightly improve your user experience temporarily:
Clearing cache and cookies on your browser
Restarting the computer
Changing your screen resolution
Uninstalling unused browser extensions
Things that do not actually make your computer faster:
Deleting files
Registry cleaners
Defragging your drive
Passively wishing that your computer was faster instead of actually just adding more fucking RAM.
This post is brought to you by the lady with the 7-year-old laptop that she refuses to leave overnight for us to run scans on or take apart so that we can put RAM in it and who insists on coming by for 30-minute visits hoping we can make her computer faster.
132K notes
·
View notes
Text
Watching twilight on a poorly hung projector. (x)
339K notes
·
View notes

Photo
I've never been more prepared

A new poster for Alice in Borderland (2020 ‒ ) has been released. Season 2 is set to premiere on December 22, 2022. Only on Netflix.
226 notes
·
View notes
Text


In every life, the angel Seven will find Pili again and again
6K notes
·
View notes