
Blog made by Marleen Vijgen for the Master Games Art and Design at Hertfordshire 2017-2018
Don't wanna be here? Send us removal request.
Statistics
We looked inside some of the posts by mvga17 and here's what we found interesting.
Average Info
Notes Per Post
2
Likes Per Post
2
Reblog Per Post
0
Reply Per Post
0
Time Between Posts
2 days
Number of Posts By Type
Photo
5
Text
7
Video
5
Last Seen Tumblr Blogs


Fun Fact
Tumblr is used by 21% of adults online aged 18-29 years.
Photo
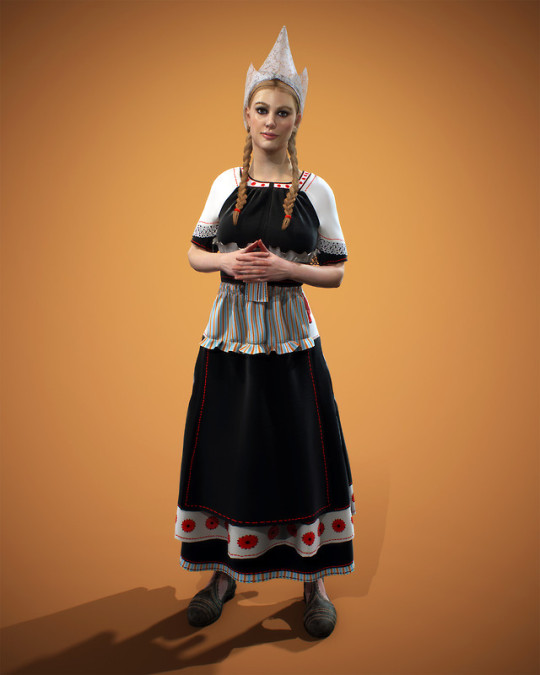
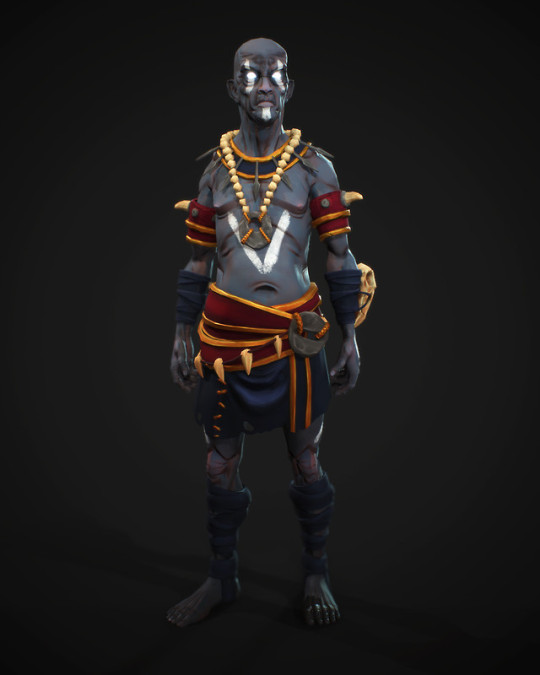

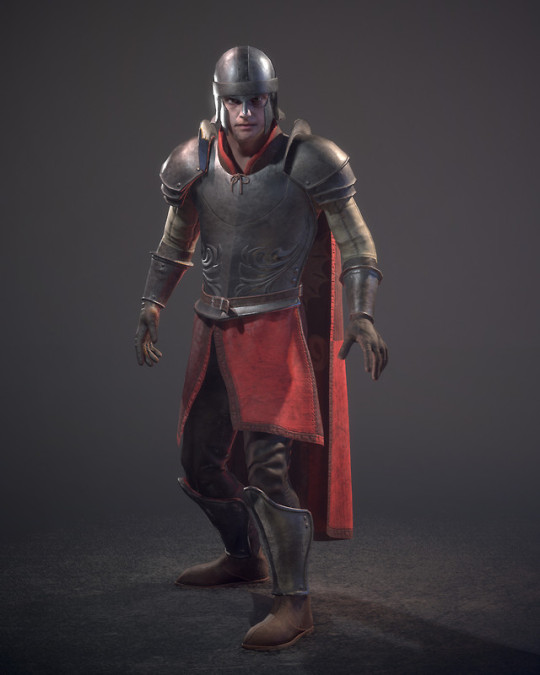
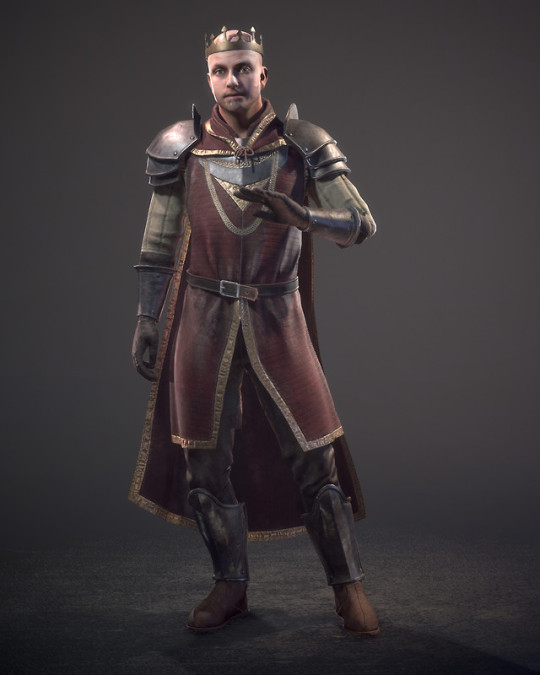
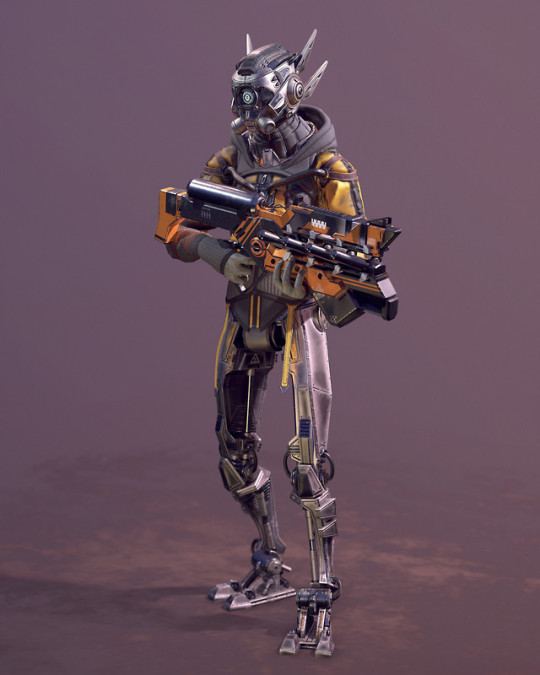
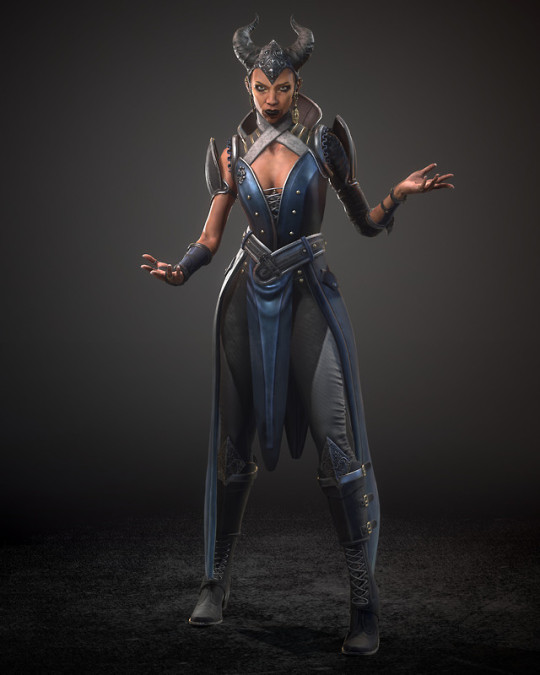
(pictures: all the projects I made during the MA that I could add to my portfolio)
And after this?
And so, to end with one last blogpost for this blog.
This last year was an incredible opportunity for me and I learned more than I ever thought I would. My goals at the beginning of the year were to become a proper junior character artist. At the beginning I knew this would be hard. My portfolio was not industry ready at all and there are very few junior character artist positions in the game industry. But creating characters is my passion, I could not let this chance go by to work for a full year on myself, becoming a better artist.
In the beginning I set a few goals:
· I wanted to be able to create realistic characters
· I wanted to learn Marvelous Designer for realistic clothing
· And I wanted to become better at designing character
I have been able to learn all of that and much more! At the beginning of the year I set a goal that I would be happy if I could get a job in the UK, either as a prop or character artist. I hoped for AAA-companies, but getting a full-time job was most important for me. Interestingly after putting the Cyborg from the Rewind brief online I began seeing that I was ready to enter the industry. While at the beginning I was fearing that I had to do a lo of job-hunting, from the deadline of the Cyborg companies started to contact me. This really surprised me as I never experienced something like that before. In the end I selected the company Frontier to work at. When I was there for a tour I loved the company. It was really catered towards giving juniors the best opportunities to grow to senior artists. It was also very nice that they have different themed projects, from realistic sci-fi, to cartoony games. As my portfolio has gotten quite diverse as well I like that I can possibly switch between games.
I would love to grow to a senior character artist here in the UK, as there are many possibilities with this number of companies. But once I reach that I want to go to America, working on my favorite games like The Elder Scrolls or Dragon Age. But that is still quite far away... My first day will be the 3rd of September 2018 at Frontier, starting as a Graduate Character Artist. And then we will see how I will progress.
Thank you for reading my process on my blog.
Marleen Vijgen
www.marleenvijgen.com
0 notes
Text
Creative decision making reflective post
For my final major project I decided that I wanted to create the character Vivienne from Dragon Age: Inquisition in a setting referenced from the game Dishonored 2. To recreate the character style from Dishonored 2 I researched how they approach their designs during the pre-production. This gave me a set of rules to follow when making the character. I concepted the model in ZBrush using the original concept art, the original Vivienne 3D model, Dishonored 2 characters, Maleficent and (medieval/steampunk) cosplay as references. After each major change in the project (mostly weekly) I asked feedback from various sources finding as many artists as I could.
While I had a lot of fun in the beginning sculpting the model, creating the concept that I had in mind I had a constant nagging feeling in my mind about it. The concept that I was creating was not bad. But it certainly was not good either. For these kind of portfolio project I found it to be important to that they are better than the previous one, and this one wasn’t. At one point I realised that I was adding things to the concept for the sake of looking nice, instead of adding parts because they would fit the character and her story. After the portfolio review at Rebellion I also decided that it is more important to create a great character, than to focus on the environment as well. Cutting time from the environment I recreated parts that were bringing down the character beforehand.
The most incredible thing throughout my project was the process of feedback. Many artists tend to ask for feedback after their art is finished, but then it is too late to make changes. The creative choices that I made were based on one big rule. Who is Vivienne and how does this choice show who she is? For this I used her origin story and I selected the essence that they wanted to achieve with her concept art. I used the original model to look what they meant with some of the shapes and tried to make a logical combination or new decision to my redesign. Whenever I made a big change I would ask people how they felt about it, and what I could improve about it. Not only artists, but also players of the game gave me feedback on how the character looked. This way I had a nice flow going on where I made the creative choices, but the feedback provided upgraded the creative choices.
Yet I encountered one very big problem using this flow. It is possible to end up in a circle of continuous feedback. When I decided that I wanted to take more time revamping the face I took out a couple more days from the environment to do this, but I ended up with taking too many days.
Using the references, other art(ists) that I was following and the feedback that I received I was able to create a much better character. Only after the visit with Rebellion, showing my art in person to another character artist I found out what was bringing down the project. I think for a lot of artists, including myself it is important to go out more, meeting up with other artists and discuss the project. Online feedback is most times short, pointed at the surface problems that are easy to see. A planning should not only include days to think of the design, but also days to review the design with others and then improving the design. This way I could prevent my problem with cutting days from the environment, because in the end I did not create all of the props myself deciding that working on the character was more important.
2 notes
·
View notes
Text
New learning over the project reflective post
The final major project was not only a good project to test my skills that I had developed over the year. It was also a good project to accomplish learning even more skills. I set goals that I wanted to achieve. Adding a storyline, animation and adjusting my workflow habits.
I wanted to do this because I was feeling confident in my general skills as a character modeller. I however also felt that that my characters were lacking a story and personality. Technically the characters are put together well enough, but them showing no personality was a returning problem that I was facing. It was important for me to fix that as it was mentioned by several different people during portfolio reviews.
I am happy that I did achieve all the learning outcomes that I set. I believe that using the first few days of each part in the time planning for finding tutorials really helped me with having a rigid schedule where I immediately can apply what I have learned. Using examples from the forefront, learning from current-gen tutorials and talking to working artists I was able to consciously learn skills in the way they are used in the industry. Learning to adjust to a constant flow of work however, was one with bumps. Instead of researching good workflows over long periods of time I just jumped in to see what would happen. This caused me to have problems with my inspiration flowing out of me too fast. I also learned something (lighting for setting the mood) that was incredibly important, but that I did not know what was important, thus never set as a learning outcome. Luckily by talking to artists I found out about it.
If I look at what went well and what could use some more work I believe that I function and learn well with rigid workflows, if I am able to set them up early in the project. If I however don’t have a vision of how I can learn something, or even worse, if I don’t know that I should learn something important it could create a severe lack or bottleneck in my project and portfolio. Talking to other artists that are working in the industry helped me seeing what more I should learn.
Currently I am accustomed to learning in a fixed way. It is always:
What do I want to learn?
Which tutorials will help me with that?
Apply it
Repeating over and over again for each character that I make. Perhaps I could try a more adaptive process next time. Talking to the other artists was something I did not do much before while doing the process. If I could apply their feedback and suggestions for things that I could improve and missed to learn. Having these views of other people that look at me with a fresh eye. I could even work together with other artists during the project so I can learn of the skills that I didn’t know I didn’t have.
I will always have a list with things that I want to learn, but I also have to acknowledge that if I want to improve even more that there are a lot of things that I don’t know that I have to learn.
0 notes
Text
Learning outcomes post
Before I started this project I set specified goals that I wanted to achieve, as I do before every project that I start. A lot of the skills that I wanted to learn are combined together resulting from feedback that I received from previous projects. This all contributed to adding personality and story to a character.
Rigging, Skinning and Animation
It started with the combination of rigging, skinning and animation. How do I utilise straightforward animations that will improve the personality that the character will show? This was easier than I thought it would be. Using facial animations for the first time made a considerable change. I created very plain animations before, but now I established a solid way to do it quick as well. The knowledge of animation will help me communicate better with animators as well, as I tended to make mistakes in topology before as I did not know how the animations would deform the model. I learned a lot of animation rules from talking to animators.
Story
To create a story I learned that I should focus a lot on the mood that I want the character to portray. The feedback from the character artists taught me that the face is the most important part of the character, it should show the emotion lead by her personality. I achieved this by not only using blendshapes to animate the face, but also by carefully concepting the make-up building up on her written personality. I also talked with environment artists to see their view on adding a story. They showed me that lighting can create a setting for the character to be in, something I did not know before. I never minded environments, so my characters were always kind of neutral. One big learning outcome that I did not foresee at all was that lighting could make such a big difference. It also has a lot of rules, being a job on its own and very hard to master. Bad lighting kills the mood for the story and good lighting makes a huge difference giving a setting for the story. A simple room with windows and lights can already set a mood. Combining both animations of the character and the mood of the room can create a story if you cut up the shots for a cinematic.
Unreal Engine
One of my learning outcomes was to be able to include all of this in Unreal Engine 4. I had used it before, but not much. In order to make sure that everything would work on time I put it all into UE4 as quickly as possible. The character in particular was important for me because I knew that many things could go wrong with the rig and animations. I was indeed right; there were problems importing the rig and animations. Luckily the UE4 forums are extremely helpful with these kind of things and I was able to quickly fix my problem without delaying the project.
Working full-time
The last skill that I wanted to accomplish had to do with founding out how I can work more effectively. I tended to work in random bursts beforehand. Four or five days in the week with unrealistic long hours and then a break for a few days in between every part of character creation. Not only for this project, but also for the future when I start working in a studio as a full-time artists I decided that it was important to learn how to maintain a constant flow of working days and hours. Especially in the beginning this was a hard thing to do. I automatically still worked really long hours, but now for a full week instead. This became very tiring until I hit a wall and my inspiration stopped flowing from exhaustion. I realized that in order to work constantly I should make sure that I take enough brakes, even if I am in a flow. Later on this proved to be working, changing my habits into new ones that would work better in an office-environment.
Setting out the skills that I wanted to learn in specific parts of my timetable I was able to easily switch from time spend learning and researching how to do things, to applying it effectively in my project. I am happy that I achieved the learning outcomes that I set out in the beginning. I even learned new very important things that I had not foreseen before. This final major project definitely set a good start becoming a junior character artist in the industry.
0 notes
Video
vimeo
The final short version. I left in the most important parts, but cut the total time to just under two minutes.This video will be used for promotion of my project as it is short enough to hold interest and neutral enough to listen in all environments.
0 notes
Video
vimeo
I started putting together the shots that I had made before. However something that I had not foreseen was that the files were way too big to handle in Adobe Premiere, lagging and making editing impossible. I did one shot to test and it was unworkable.
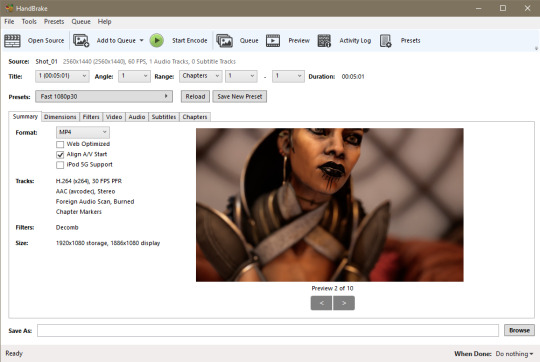
(HandBrake, 2018)
With the program HandBrake I was able to cut down the size of the files to a workable format without losing quality. After that I was able to put everything together in Premiere.
References:
HandBrake. (2018). The HandBrake Team. Available at: https://handbrake.fr/ [accessed 29 Jul. 2018]
0 notes
Video
tumblr
I also made a set of Marmoset turntables with breakdowns of the polyflow and normalmaps. While showreels themselves are not that popular for modellers, it is a good way to show of the animations and the complete model in a 3d turntable. This example from Sam Bang is incredibly well done. His models are clearly presented.
youtube
(Bang, 2016)
For my own video I wanted to show mostly full body turntables in the end, because in the video itself I focused mostly on close up shots. This would be my chance to show the full body animations.
References:
Bang, S. (2016). Samuel Bang - Character Artist Showreel. [video] Available at: https://www.youtube.com/watch?v=kboWv9lK9wM [Accessed 1 Aug. 2018].
0 notes
Video
tumblr
With the environment and all the character animations finished I started on making the video. The planning is to make three video’s:
One around five minutes long, showing the full story in a very extensive way, with at the end a full breakdown of the characters and the animations.
One max. two minutes version. Basically a cut down from the long version, meant for portfolio purposes as a specific showreel for the project with a very short breakdown of the character at the end.
One version also around two minutes that is meant as the promotional video. This one will include my commentary about the project, without the breakdown shots.
The Rewind project was the first time I made a showreel video. However it was badly recorded, the environment was too noisy and the video did not have any logical progression. So once again I looked at the way of presenting the models as Baolong Zhang does.
youtube
(Zhang, 2018)
In order to achieve the same style I analysed his videos. The characters are heavily focused while the background is very blurred. Most of his shots are around 25 seconds panning in or out, up or down.
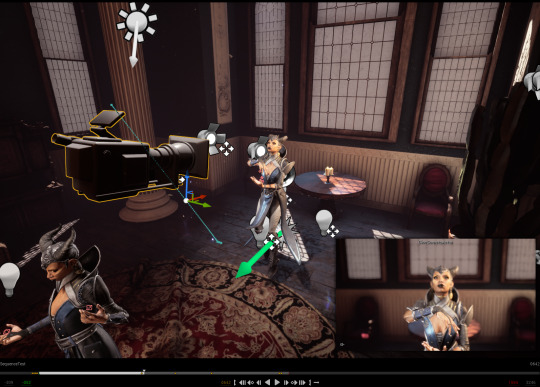
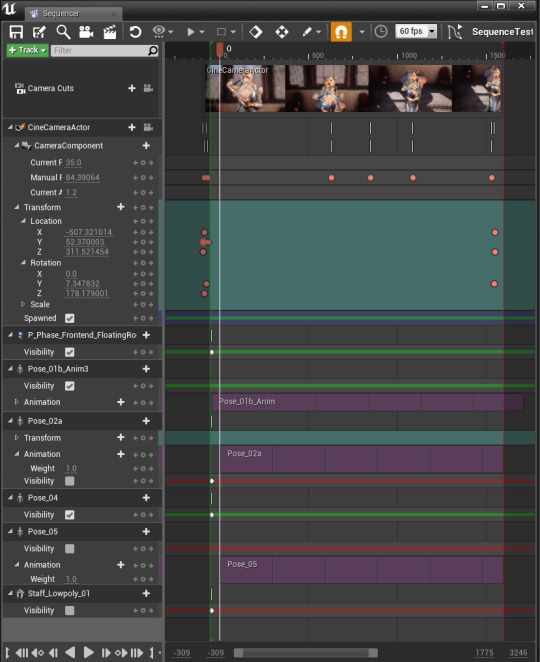
First I made a script that would fill the 5 minutes of story. Giving the better animations more time and the less good animations less time, making sure that I would have fullbody shots, and close-ups from all sides of the model. Using the matinee in UE4 for the first time I created and recorded a sequence for all the 25 second shots. I did them all separately because I wanted to have the highest quality possible before turning that down.
References:
Zhang, B. (2018). Goblin From Harry Potter UE 4 project. [video] Available at: https://www.youtube.com/watch?v=WjOLXd2UDw8 [Accessed 29 Jul. 2018].
0 notes
Text
At the forefront: Narrative in Games
Something that I did not discuss in my forefront posts is about narrative. Narrative has always been something that I knew it was important, but that I never actually applied. While looking around how to apply narrative I stumbled upon an article by Caty McCarthy (2018) who explores writers across various video games.
She writes that for many years (and still) writers had been under appreciated and that designers were often times more important than writers, causing the narrative to be developed far after the game design was finished. Narrative was added later to glue the gameplay elements together, but this separation could cause weird set-ups. Earlier the games narrative was mimicking the linear narrative of movies, but games are expanding their worlds.
McCarthy continues that only recently game development studios began to explore to add narrative through the development of the game itself. She mentions for example League of Legends, where the world is sustained through the story around the universe. The game has seen continuous development over the past 10 years on the same game and this makes it that players get attached to characters, craving a story around them.
Bigger budgets and non-linear games create more immersive games, creating more important roles for the writers. I believe this is a very good development because many use games to escape and better narrative will help with that. For my project it has been the first time that I was able to add a ”little” bit of narrative, setting a mood for the environment and creating a series of 4 different poses. I believe though that I should really try to think about the narrative throughout the project, instead of the nearing of the end. This way I can create immersive smaller environments. For me as a character artists receiving a better written narrative in a company when I start working on a character means that I know better which design choices to make. With Vivienne I saw that referencing choices to the story makes a better character, even though it was just a small bit of story. A full narrative could make a big difference.
References:
McCarthy, C. (2018). Out of the Wild West: Inside the Evolution of Games Writing. [online] USgamer.net. Available at: https://www.usgamer.net/articles/writing-in-games-feature-part-one-wild-west [Accessed 27 Jul. 2018].
McCarthy, C. (2018). Narrative Paramedics: Meet the Writers Called in to Patch Up Games. [online] USgamer.net. Available at: https://www.usgamer.net/articles/writing-in-games-feature-part-two-narrative-paramedics [Accessed 27 Jul. 2018].
0 notes
Photo

Today I looked once again to the lighting. It was important for me to add windows, this would give less of the sense that everything was closed off. I wanted the world to look a bit surreal and magical, without spending any time on the outside. The first try on the windows however failed awfully:
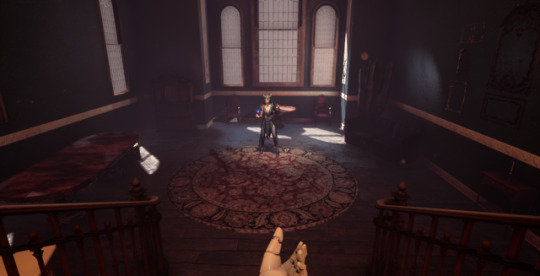
Sure, it looked pretty cool, but if you look good the sunlight is actually coming from different directions instead of just one point. Also, the colour of the sky/windows did not fit the environment at all. I wanted to make sure that the character would not only fit in the setting of the environment but also stand out at the same time giving her the focus. By having a rather dark lit environment and putting spotlights just on the character this could be achieved. Having the purple/red tinted colours I was able to convey a gloomy setting.
During the tutorial I also learned of a couple of things:
Using the sky from CGskies (CGSkies, 2016) you can make a cubemap. If you put that cubemap inside the emission of the window shader you can make a glass that fakes an outside environment. This way you can easily adjust what is shown outside, without making anything.
I also learned of LUT’s. I had seen them before, but I didn’t know what they were actually used for. LUT’s are used in the color grading process and it is a table that affects the final colours of the output. Adding the red LUT really defined the atmosphere in my environment
Lastly I also learned something really basic. In my scene I was using moving lights for everything. My thought process was that since the character is moving, I need movable lights to properly move her. I also liked that I didn’t have to bake anything to see what I was doing. Apparently that was not the right way of working. Movable lights should only be used if the light itself is moving. They are also very expensive to use. The better way of doing it is using stationary lights. These are able to be baked on static environments, but will also light and cast shadows on moving models. They are also a lot cheaper. Static lighting in my case would not be useful since the character is animated, thus moving and static lighting would not be able to handle that.
References:
CGSkies. (2016). Dusk Skies. [online] Available at: https://www.cgskies.com/browse.php?type=dusk [Accessed 25 Jul. 2018].
0 notes
Photo
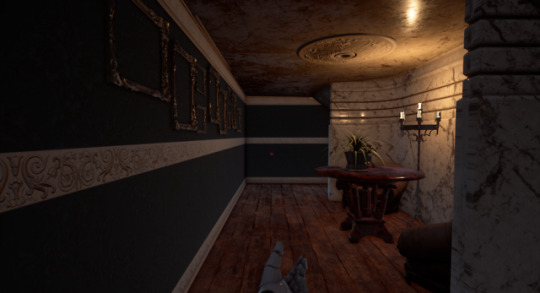
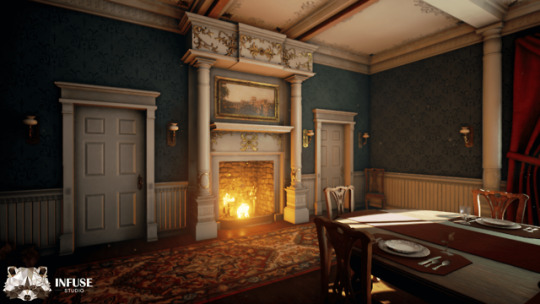
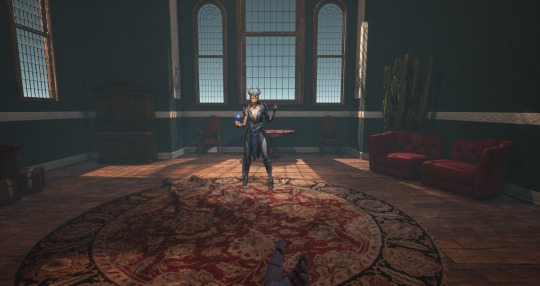
First two pictures: Renders in Unreal Engine. Bottom picture (Infuse Studio, 2016)
Today I started putting everything together. First I just created a tile floor and a plaster wall. However the colours were not fitting at all and it just looked wrong. I did however place all the friezes and other wall details when I decided to look for references. While searching for “Victorian Room” I stumbled on the renders made by Infuse Studios on the Unreal Marketplace and they were actually precisely what I was looking for. Adjusting the colours of the walls and floor made the environment fit together a whole lot better.
I also wanted to start a little bit with the lighting. You can put the lights that you are using in 3 different channels. The different props also can be put in 3 different channels. When a light only lights on channel 1 and a prop only receives light from channel 2, it will not be lit. This way I managed to create lighting for the chandeliers. If they would be lit the same as the rest of the environment they would cast very strong shadows that I wanted to prevent, so I put them on a different channel with their own point light lighting them. The character is also on another channel so I can light them separate from the environment, making sure that she stands out more.
References:
Infuse Studio (2016). Victorian Dining Room. [image] Available at: https://www.unrealengine.com/marketplace/victorian-dinning-room [Accessed 23 Jul. 2018].
0 notes
Photo

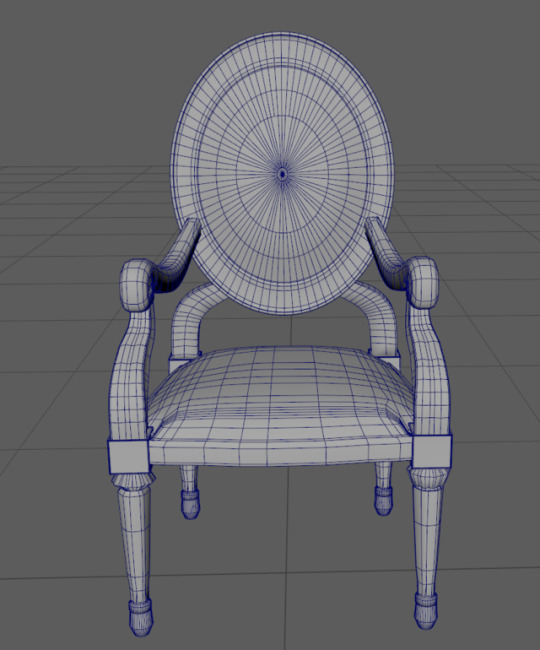
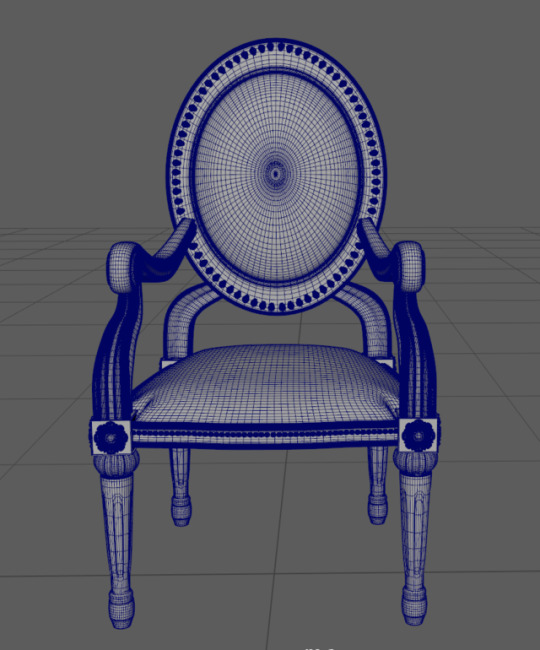
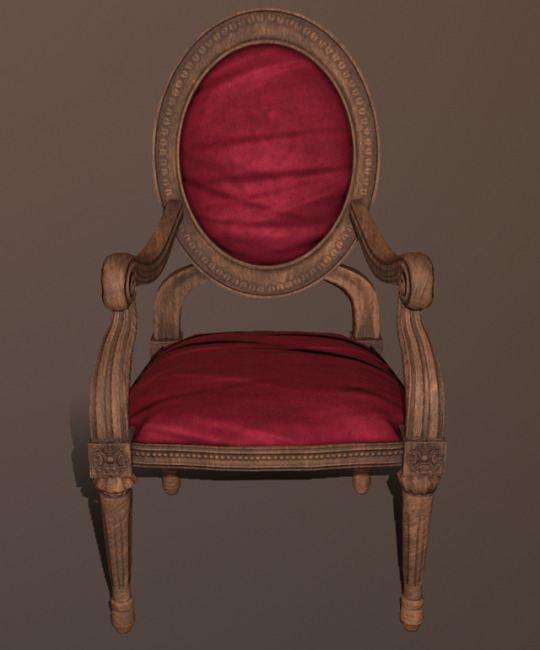
First picture (lowercase Studios, 2016)
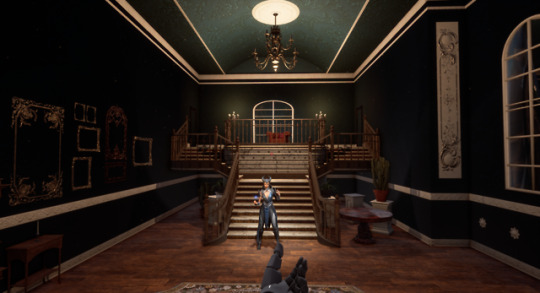
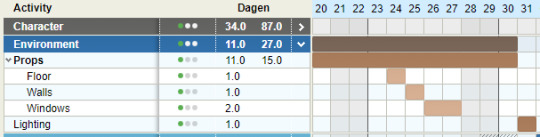
In the beginning I thought to make everything myself, but the focus being a character artist, and spending more time on the character than the environment took up way too much time. For time management reasons I decided that it might be better if I would use free models instead of making all the models myself. While could have had perhaps enough time to create the models myself I reasoned that it was more important for me to show my character in a completed and full environment rather than below-passing and rather empty environment. This saved time could be used for the most important props that I have to make myself: The walls, ceiling and windows. Here we see that from the around 30 days originally I was able to use only 1/3rd of it. Next time I should be more aware of the time that is being used up by applying improvements on the character.
First of all I went to Turbosquid, selecting “free models” and selecting all the models that I had on my prop list to create. In the browser I could already see that some models would be useless, for example this one:
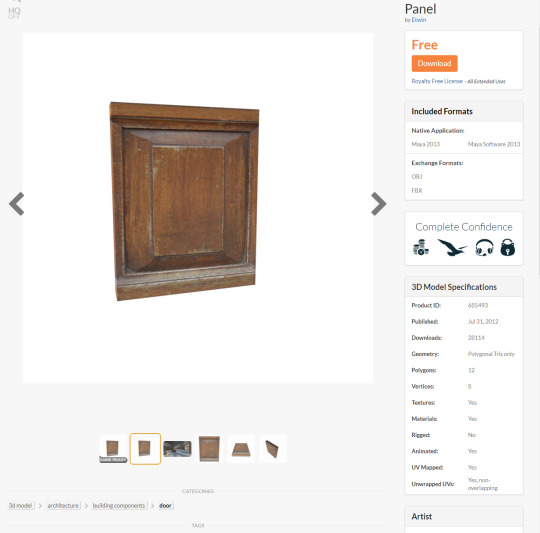
(Etwin, 2012)
The texture relied too heavy on one photo and there was no highpoly model, just an incredibly lowpoly one. Whilst selecting the right models I looked at how highpoly the model was, because that would cost most of the time to create by myself. It is easy to make a lowpoly model from a highpoly model. Next up I also looked at if the model would be easy translatable to an engine. Most of the models are made for arch-viz and definitely not for game engines.
After downloading the first batch of models I already realised that almost every single model would need retouching, whether it was making a lowpoly, adjusting UV’s, or creating new textures to make sure that the model would fit the environment with the rest of the props.
I made sure that all the models would be available to use regarding their licences. Since it is a uni project and non-commercial I will not have any problems regarding the licences.
References:
lowercase Studios (2016). Baroque Dining Room Chair. [online] Turbosquid.com. Available at: https://www.turbosquid.com/FullPreview/Index.cfm/ID/1104962 [Accessed 20 Jul. 2018].
Etwin (2012). wooden panel 3d model. [online] Turbosquid.com. Available at: https://www.turbosquid.com/FullPreview/Index.cfm/ID/685493 [Accessed 20 Jul. 2018].
0 notes
Text
At the forefront: No Man’s Sky Returns
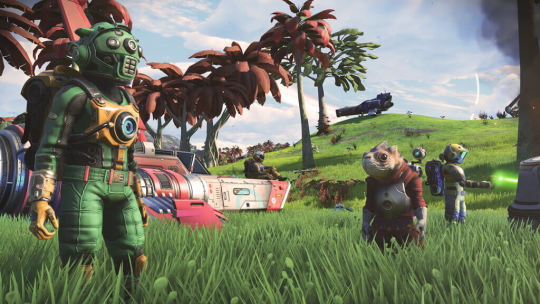
(Hello Games, 2018)
The internet has a loud voice these last couple of years. When the developer Hello Games published No Man’s Sky on August 2016, the online public became outraged. Hello Games had hyped the game a lot in the previous months, but the launch game did not finish some of the promises they made. Sean Murray explains what went wrong in an interview with The Guardian (2018)
��The internet is really good at knowing when somebody has made a mistake,” says Murray. “It’s not necessarily the best at determining the most appropriate response, but it’s really good at knowing when somebody has messed something up. We definitely messed up a whole bunch of communication. I’ve never liked talking to the press. I didn’t enjoy it when I had to do it, and when I did it, I was naive and overly excited about my game. There are a lot of things around launch that I regret, or that I would do differently.”
Players were angry that the gameplay elements were not included and gave low rates en masse. The developers received bomb and death threads after launch.
However, Hello Games was creating a game for their players. And the developers wanted to continue to develop the game for those that continued playing the game. In a Red Bull Article M. Fraser states that: “As with many other games recently (Destiny, The Division, Rainbow Six: Siege), the developers refused to give up and roll over. Sean Murray and the team weathered the criticism, as harsh as it sometimes became, to keep on plugging.” (Fraser, 2017). Instead of making games for just the money, developers will continue on failed games improving the experience after launch. I believe it is an interesting question to wonder if there is a monetary reason for continuing failed games, or if they do it because they want to improve the game up to standard. It might also be a good question to ask if these games recently failed because they did not test enough, or perhaps had too little time.
The reason that the improvements of No Man’s Sky are at the forefront is because despite severe backlash on the initial launch, they managed to improve it so much that people see it now as a proper re-launch, accepting the game as it should have been accepted. The way they managed their game is an example of how future failed games can be handled successfully. Games like No Man’s Sky might happen more in the future, but persevering the backlash teaches me that when something is finished there is always room for improvement. Even if the outcome was not at all what you intended to do.
References:
Hello Games (2018). Explore. [image] Available at: https://www.nomanssky.com/ [Accessed 20 Jul. 2018].
Fraser, M. (2017). Why there’s never been a better time to revisit No Man’s Sky.. [online] Red Bull. Available at: https://www.redbull.com/us-en/revisit-no-mans-sky [Accessed 20 Jul. 2018].
MacDonald, K. (2018). No Man’s Sky developer Sean Murray: ‘It was as bad as things can get’. [online] the Guardian. Available at: https://www.theguardian.com/games/2018/jul/20/no-mans-sky-next-hello-games-sean-murray-harassment-interview [Accessed 20 Jul. 2018].
0 notes
Text
Multiple Roots
To make sure that everything would work in Unreal I decided to import the character with animations as soon as possible. From previous experience I knew that a lot could go wrong with trying to import characters into an engine.
And indeed something was wrong with the model! When I tried to import it I got an error stating that there were “multiple roots found in bone hierarchy” making it impossible to import the model. However, I was pretty sure that I just had “one” root bone.
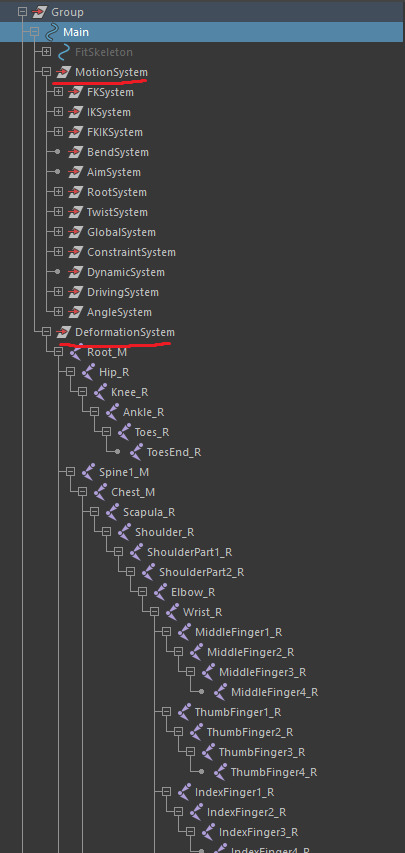
The Advanced Rig plugin that I was using to create the rig had put everything into different groups. To export the rig properly I had to use the bones in the DeformationSystem. After further inspection I found out that some bones were actually in the MotionSystem group! Since both have different root folders the importer in Unreal thought there were two root bones. The bones that were found in the MotionSystem folder were actually the bones that I added by hand later; the bones for the capes. For some reason they ended up in the wrong system as I didn’t know how to check that at the time.
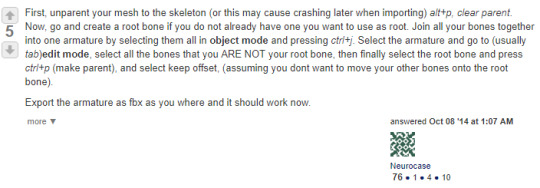
(Answers.unrealengine.com, 2014)
Luckily I found a quick solution to reparent the bones without any problems. After I fixed this the model imported perfectly in Unreal and it was ready to use!
References:
Answers.unrealengine.com. (2014). Multiple roots are found in the bone hierarchy we only support single root bone blender - UE4 AnswerHub. [online] Available at: https://answers.unrealengine.com/questions/109814/multiple-roots-are-found-in-the-bone-hierarchy-we.html [Accessed 18 Jul. 2018].
0 notes
Video
tumblr
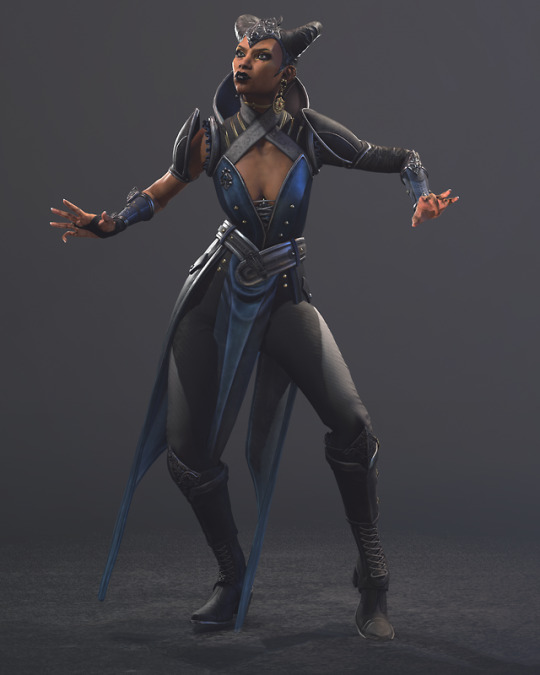
Today I managed to finish the animation in one go. I had this pose in my mind for a long time, so it was easy to recreate. I went for a simple idle animation where it looks like she is casting something. This way I am able to display her in a rather neutral pose, while you can still feel her personality. It’s nice seeing everything coming together giving her life.
0 notes
Photo
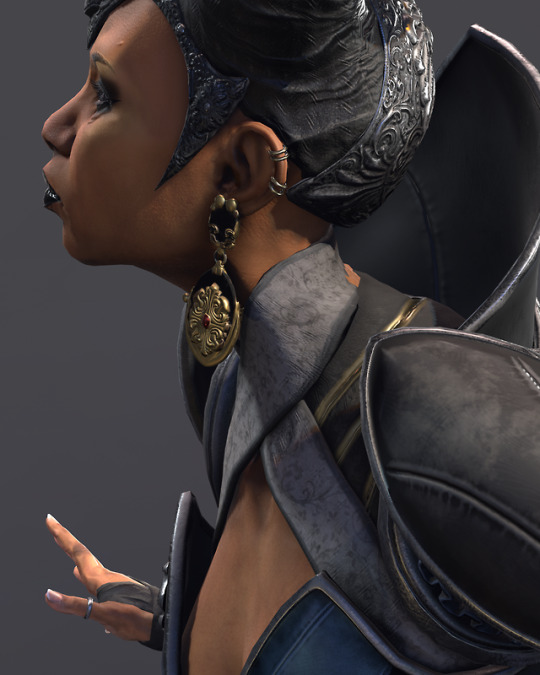
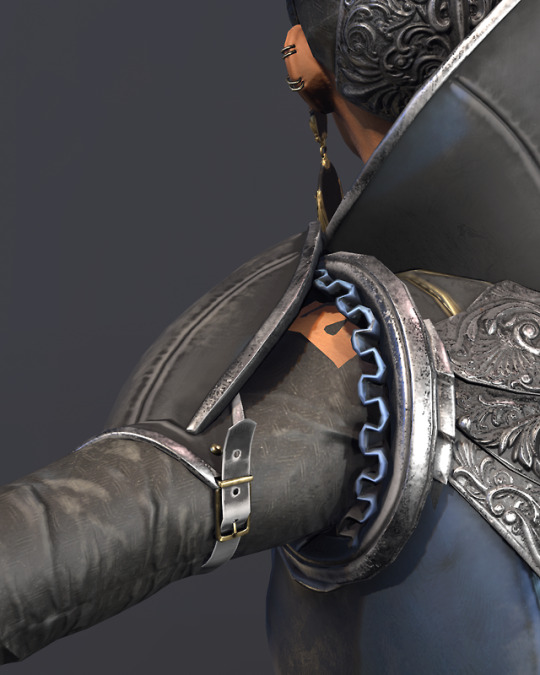
I decided to use the Advanced Rigging plug-in for the rig that I wanted to make. The tutorial is very clear and easy to understand. When I started placing adjusting the rig to the character I actually recognised the rig. I had seen it being used before by other riggers, so it is good to know that this rig is actually being used in the industry. While the rigging went fairly easy I knew that most of my time would be spend painting the skin weights. In order to make sure that in all extreme poses the skinning would be fine I’d move every part of her body. Especially difficult parts were the scarf around her neck, which was influenced by a whole lot of different movements on a short amount of space.
I also realised that if I want to present this model in Marmoset that I actually need to rig and skin the cape as well, because cloth simulation doesn’t exist in Marmoset. Even more I also found out which parts I made too low-poly. I thought the poly distribution was good enough, but the vest was actually too lowpoly and thus more challenging to make look good in animations.
0 notes
Text
At the forefront: Blendshapes for anatomy practice
As repeated before, current and future games are becoming more and more realistic. However there is still a big difference between film and games. One of these elements is visible when we see characters. There is a contrast between the way of animating characters between film and games. In an article (Seymour, 2018) about Ninja Theories Hellblade the writer explains how to overcome these differences in a new way. According to him did games use joint (facial) rigs, while film teams used blendshapes. The reason for this is that joints are usually more efficient. VR and AR still require very high frame rates, so companies like Ninja Theory are trying to find ways to combine blendshapes with joint systems.
youtube
(Snappers Mocaps, 2017)
He continues that blendshapes are spatially linear and for example movement around the lips with blendshapes can look wrong due to those linear transitions. The mouth moves more like an arc which is handled better by joints. Combining both joints and blendshapes can create rolling muscles visibly.
There is also something else that started popping up recently, since blendshapes are entering the games industry. At the start we see that blendshapes are mostly applied on the face, because it really helps with adding expressions. However, rolling muscle movement studies are becoming increasingly popular as well, as they might be applied next to game characters. This will improve the realism a lot, because the tiny details can make the difference.
(Zamai, 2017)
For my own project I also made a simple combination between blendshapes and joints. Although the face is just animated by blendshapes I want to try the combination of joints and blendshapes next time for the face in order to create a bigger range of expressions. However, being able to control the tiny movements on the face with blendshapes already made a huge difference to my character!
References:
Seymour, M. (2016). Put your (digital) game face on. [online] fxguide. Available at: https://www.fxguide.com/featured/put-your-digital-game-face-on/ [Accessed 13 Jul. 2018].
Zamai, C. (2017). Shoulders Anatomy. [image] Available at: https://www.artstation.com/artwork/oYJDB [Accessed 13 Jul. 2018].
Snappers Mocaps (2017). Snappers Advanced Facial Rig for Maya and Unreal Engine. [video] Available at: https://www.youtube.com/watch?v=Vo_FALeUc8c [Accessed 13 Jul. 2018].
0 notes