
Don't wanna be here? Send us removal request.
Statistics
We looked inside some of the posts by mystickyarchive and here's what we found interesting.
Average Info
Notes Per Post
5K
Likes Per Post
3K
Reblog Per Post
1K
Reply Per Post
40
Time Between Posts
18 days
Number of Posts By Type
Text
6
Note
7
Video
1
Photo
2
Link
1
Last Seen Tumblr Blogs


Fun Fact
70% of Tumblr users say the Dashboard is their favorite place to spend time online.
Text
how to search for old likes
hi guys
so tumblr put pagination back on the likes page but the customised url isn’t formed by numbered pages (/page/30) anymore but unix timestamp (?before=1593548055)
this number that seems completely random can actually be made with a converter
what you have to do is to go to: unixtimestamp.com/ (or any other online converter you find and like)
insert the date you want and click convert, the result will be a number that you have to copy and then past at the end of this url: tumblr.com/likes?before=
in this way you will be able to search for old likes
i hope this will help :)
2K notes
·
View notes
Note
Omg please teach me! I have always hated the mosaic in San myshuno it just ruined the aesthetics for me
i’m awful at explaining things, but i’ll try:
First, open Sims 4 Studio and create an empty package. Under ‘Tools’, select Game File Cruiser, sort by the type “DST Image”, then filter by the instance number E82E25B9EAFFF456. The mosaic texture should come up. Click ‘add to current package’. Then you can export the image, edit it however you want (I just copied the concrete over the mosaic in photoshop), and import the edited image. When you put the package in your game, your edited image should override the mosaic!
...or you can just get my little override here if you want :)
109 notes
·
View notes
Note
hi !! i was wondering if u knew a way to remove the cas background on a cas edit and not have a few cas white edges (my cas bg is white) on the sim or on the edges of the sim. i’ve tried the i think lasso tool? idk what it’s called and it leaves the cas edges still there ;c tysm
Sure do! I still use the select tool to cut out the background (mine in CAS is white, too!) but that’s not the end of it, the edges will still be jagged. So! Time to put some work in- in paint.net (although you could do it in photoshop as well) I create a new layer and fill it with my preferred background color for the image, then I switch back to the sim layer. Now you need to grab your eraser tool and set it to a fairly low opacity (I go with a size 4 brush at like 30% opacity and zoom the heck in) and erase the fine edges around the sim. It’s time consuming, but it makes the image so clean. It’ll take practice to get good at it but you’ll get faster eventually and the final result is super satisfying!!!
20 notes
·
View notes
Note
Your game always looks so lovely. What lighting mod are you using at the moment? (I saw your FAQ about brntwaffles but I was wondering which one exactly, if you don't mind)
Sure, I’m using the St. Claire one right now.
16 notes
·
View notes
Text
Soooo, TS3 people...
Is it possible to add new CC files to an existing file of merged CC? I’ve been Googling and I come up with all kinds of tutes on how to merge CC (which I’ve already done; I just want to add stuff to my existing files) and one on how to remove files from a merged file, but nothing about if it’s possible/safe to add files to a merged file and, if so, how to do the thing.
Anybody know?
28 notes
·
View notes
Note
Anon is dumb because even your unedited pictures look fabulous. I know you have to have a good computer to have the graphics that high, but do you have any other hints about getting it to look so nice?
I actually don’t think I have a better computer than most people. I play on a 2015 MacBook Pro (a laptop), and not in Bootcamp or anything like that. The memory is upgraded, but that’s it.
I crank up just the graphics settings that actually matter for close-range pictures and turn all the rest of them all the way down. So my house pictures are crispy as fuck but you can see that the background is always shit. And my Sims are featureless pudding cups. The settings I have turned all the way up are: lighting, texture details, tree details, edge smoothing, advanced rendering. And the ones I have all the way down: visual effects, draw distance, high detail lots, Sim detail. Edge smoothing can be changed without restarting the game, so you can turn that one on as needed.
And lighting mods make a huge difference—often so much so that houses I built with one lighting mod look significantly different in color when using another lighting mod. I change mine depending on the world, but I always import Gelina’s lighting tweaks into the mod. It makes the shadows a lot darker.
25 notes
·
View notes
Text
NVidia Card Users: How to fix those lines on your Sim’s face
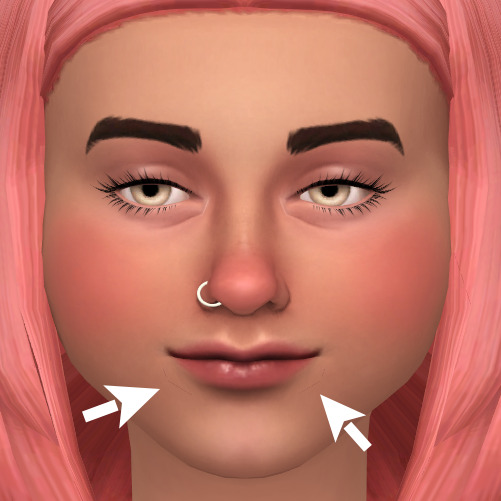
If you have an NVidia graphics card then you most likely have these little tiny lines around the mouth of all of your Sims’ faces. It’s most noticeable zoomed in in CAS but it can be present in-game too. If I understand correctly this is an issue for nearly all NVidia cards since the launch of TS4. I switched from an AMD card within the last year or so and was previously unawares, so I don’t know how common-knowledge this is?
I found this info on EA help forums some time ago, but the how-to images there were so tiny and blurry my old lady eyes couldn’t read them (and it was only images, no text yall!!,) and the googling I had to do to find even that was a guessing game so thought I would share the info here in case you have the same issue and didn’t already know how to fix it.
It’s a simple fix, just requires you changing one graphics setting, but it’s not one that is available in TS4 game settings like it is for some other games. You’ll need to download an external program called NVidia Inspector to change the setting on your drivers yourself. Here is how. (Click below the cut)
Keep reading
1K notes
·
View notes
Video
youtube
The Sims 2: 50 FUN LITTLE DETAILS not in Sims 3 & Sims 4
502 notes
·
View notes
Text
More Nvidia Inspector goodness!
Just saw this over on @uglytownie simblr from some anon asks. If you used/saw my tutorial for using Nvidia Inspector to remove lines on your sims’ faces, check this out too, so exciting! I didn’t take any before or after shots in my game, cuz this ain’t about me, but it’s looking mighty fine. Here are links to the original images submitted to uglytownie:
results: https://imgur.com/a/zxpDimJ
settings to change: https://imgur.com/w9ZEm3g
230 notes
·
View notes
Photo


Problems with Duplicating Worlds
Tried duplicating Magnolia Promenade following this tutorial but after duplicating the worlds, there is a problem with the street view.
Above is the duplicated world (1st picture). I did quickly replace all lots with lots from the gallery, so it is supposed to look completely different from the original world.
However, when I travel to the original world (2nd picture), all lots except for the current lot looks like their copied versions.
That being said, it doesn’t actually change the the original lots with the copied ones. When I go to another lot in the original neighborhood (3rd picture), that lots looks the way it is supposed to look, but again, all of its neighbors looked like the copied ones, even the one that I just went to.
I think we might have to change lot_description_id or something else, but I couldn’t find how to.
(lots credits to simsontherope, simlicy, avelineyt)
13 notes
·
View notes
Note
Weird problem: I have your no occluder mod; it works great with base game and your appliances. Okay, when I add recolors I did of the BG appliances, it shows the huge shadow over my recolor AND the BG appliances even though the BG works fine as long as the recolors aren't in my mods folder. Even weirder: Illogicalsims cabinet only shows the shadow over my appliance recolor and not the BG ones. I have pics of the issue but can't send them to you on ask. Game and your mods are both fully updated.
Recolours probably clone the light resource so they are referencing the original resource, not my edited one. To fix, you open the package and go to the warehouse tab. Find the light resource and click on it. Go to the occluder line then click edit items. A popup will open with a list of items and some buttons. Find the ‘clear’ button, click it, save out of popup and then save the package. Repeat for all recolours.
I am pretty sure IllogicalSims has their own No-Occluder override so it makes sense that just your recolours are causing issues. Following the above steps should remedy the issue.
62 notes
·
View notes
Link
215 notes
·
View notes
Note
Hi, this might be a silly question but can you take more than one Sim to university at the same time? I feel like I've only seen people take one at at a time. Thanks!
You can, but not at the same time. For example if you want twin sisters to go to the same uni and live in the same dorm, you have to enroll and move one in, then switch back to the family household and enroll and move the second one in. Any roommates that are already assigned to the dorm will be moved out automatically to make room for the manually moved in ones. It’s a bit annoying but once you’ve moved in all the sims you want you can then control them all in the dorm household.
The only thing to keep in mind is that you can only control 8 sims (without mods) but dorms can house up to 10 sims (if you have 10 beds in it), so if you add a full household of 8 sims to a dorm, you will still get 2 randoms if you have 10 beds in the dorm. But you can easily just remove 2 of the beds and you shouldn’t get any randos! 😊
84 notes
·
View notes
Note
Do you know of any tutorials that explain the correct way to make specular and normal maps for walls? The only tutorials I can find on the subject are for CAS or objects. I am also be confused on when to resize textures. Thank you for any help!
The way you compile a normalmap is the same regardless of it being an object or a CAS peice. You generate it using your program of choice, copy red layer to alpha, then green layer to blue and red then export and a dxt5 DDS.
Speculars are a little different for walls as they aren’t as complex. I would honestly clone a wall you like the specular of then eyedrop the RGB colour and use it as a base. When I create a spec for an object or wall I have a 50% grey base texture, set it to overlay and place over the colour then export as a dds. Walls you don’t generally need to worry about an alpha, but check the base wall for what they have done.
As for sizing, you need to obey DDS ratio rules. That states it needs to be a multiple of 4 (so 4, 8, 16, 32, 64, 128, 256, 512, 1024, 2048 etc) in a ratio of 1:1, 1:2, or 1:4. Walls are almost never in those ratios except for the medium wall height so they need to be scaled down so the game can process the textures properly. So in Photoshop, a short, standard wall is 256x768px (1:3), medium is 256x1024px (1:4), and tall is 256x1280px (1:5). Maxis scales these to 256x512px (1:2), 256x512px (1:2), and 256x1024px (1:4) respectively. I don’t scale down my medium wall height since it is already at the ideal resolution and ratio for dds. This applies to all standard walls, so the more you do it the easier it will be to remember. Remember, you can export as a png but S4S but since it changes the format on import to work ingame you still need to obey the ratio rules. If you export as a dds you generally get a warning of it being the wrong size but you wont as a png or jpeg. SO be aware of the sizing when exporting.
Making ‘mural’ walls Maxis usually deals with 768x768, 1024x1024, and 1280x1280px textures for the different heights then scales then to 512x512, 512x512, and 1024x1024. There is a tutorial on S4S on how to make custom mural walls if you need a specific size.
Hopefully that helpsclear some of your questions up :)
58 notes
·
View notes
Text
Fixed My Sage issue
A nice person pointed me to the sage attractor in S4S debug so I made a default replacement to gain access to them then took them out once I save the lot. They generally just stand in one place when someone is not interacting with them, but it’s way better then before.
60 notes
·
View notes

Text
Townie Mod
Has anyone seen a mod that prevents normal townies from showing up in Glimmerbrook and the Magical world?
47 notes
·
View notes