
Statistics
We looked inside some of the posts by n0ran1-code and here's what we found interesting.
Average Info
Notes Per Post
0
Likes Per Post
0
Reblog Per Post
0
Reply Per Post
0
Time Between Posts
6 days
Number of Posts By Type
Text
13
Photo
1
Last Seen Tumblr Blogs


Fun Fact
Tumblr was acquired by Yahoo for $1.1B in 2013.
Text
Consume WCF service in android app
Hi! This time I want to share on how to consume WCF service in Android app.
The step is very easy.
First, you need to download ksoap2-android-assembly-2.6.0-jar-with-dependencies jar file from here and put into your libs folder
Add this line to gradle dependencies compile files('libs/ksoap2-android-assembly-2.6.0-jar-with-dependencies.jar')
Put this code which a method to call operation from WCF service.
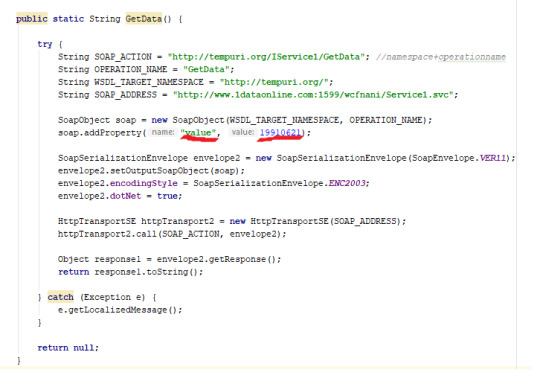
Screenshot : value is a variable name & 19910621 is a number I entered.


Screenshot : Please take note on the important things: - namespace, operation name, variable name, soap action
All this you can find from service description. It was given in the wcf web, as for me http://www.1dataonline.com:1599/wcfnani/Service1.svc?singleWsdl
0 notes
Text
Create & consume WCF Service - asp net web
Hi! Today I am going to share how to create WCF service and consume it in asp net web.
Firstly, need to create WCF service.
Create new project > WCF Service Application in Visual Studio
Publish it. Please refer to this link for how to publish : https://n0ran1-code.tumblr.com/post/182208541546/publish-aspnet-web-in-visual-studio
If got 404 error when try to access services , try this :- WCF service should be enabled using Programs and Features -> Turn Windows features on or off in the Control Panel. Go to .NET Framework Advanced Services -> WCF Services and enable HTTP Activation

Screenshot : Successfully published web services
Step to consume that service :
Open your asp net web
Put import YourProjectName.ServiceReference1 in your web form aspx.cs
get data by:
Service1Client sc = new Service1Client(); sc.GetData();
0 notes
Text
SQL Queries (if_else,string,for_loop alike )
DECLARE @SomeString varchar(MAX) = ''; /*String*/ DECLARE @MyDay varchar(max) = ''; DECLARE @Day varchar(8000) = '1';
WHILE @Day <32 /*For loop*/ BEGIN
SET @MyDay += 'count(case when DAY(date_time) = ' + @Day + ' AND MONTH(date_time) = replaceTHIS AND YEAR(date_time) = 2019 then 0 end) as Day' + @Day + ' '
IF @Day !=31 /*If Else*/ SET @MyDay += ', '
SET @Day = @Day + 1;
END;
SET @MyDay = 'SELECT ' + @MyDay + ' from Attendance';
DECLARE @Month varchar(8000) = '1';
WHILE @Month < 13 /*For loop*/ BEGIN
SET @SomeString += @MyDay
IF @Month !=12 /*If Else*/ SET @SomeString += ' UNION ALL ';
set @SomeString = REPLACE(@SomeString,'replaceTHIS',' ' + @Month + ''); /*Replace String*/ SET @Month = @Month +1;
END; exec(@SomeString)
0 notes
Text
SAP Crystal Report
Step 1 : Create crystal report (.rpt file)
Download https://www.crystalreports.com/crvs/confirm/ (CRforVS_13_0_24.exe)
Install
Add New Item > Reporting > Crystal Report
Drag text field from toolbox to section 2, write any words.
Click Crystal Reports > Database > Database Expert
Create New Connection > select OLE DB (ADO) >> click on +
Select Microsoft OLE DB Provider for SQL Server > Next
Insert Connection Information > Next > Finish
Now you can see the db is loaded under OLE DB
Add the table you want to add to Selected Tables > OK
On the left side has Field Explorer, click it
Drag the fields you want to Section 3

(9)

(10)
Step 2 : Create web form (or window form)
Open web form
Drag CrystalReportViewer from toolbox to web form
Choose crystal report file that you saved in Step 1 as Crystal Report Source.
DONE!
Output :

Source :
https://youtu.be/bRf8MTfUjhY & https://www.aspdotnet-suresh.com/2012/01/crystal-reports-sample-in-aspnet.html
0 notes
Text
SELECT command (SQL) - Gridview definition in c# instead aspnet
The reason to define gridview in c# instead use <asp:SqlDataSource ID="SqlDataSource1"... because I want to take Label2.text as a parameter in sql command.
in aspx
<asp:GridView ID=“GridView2” runat=“server” AutoGenerateColumns=“False”> <EmptyDataTemplate>No attendance</EmptyDataTemplate> <Columns> <asp:BoundField DataField=“Student name & id” HeaderText=“Student name & id” SortExpression=“Student name & id” ReadOnly=“True” /> <asp:BoundField DataField=“Class” HeaderText=“Class” SortExpression=“Class” ReadOnly=“True” /> <asp:BoundField DataField=“Scan” HeaderText=“Scan” SortExpression=“Scan” /> <asp:BoundField DataField=“Date & Time” HeaderText=“Date & Time” SortExpression=“Date & Time” /> <asp:BoundField DataField=“latitude” HeaderText=“latitude” SortExpression=“latitude” /> <asp:BoundField DataField=“longitude” HeaderText=“longitude” SortExpression=“longitude” /> </Columns> EmptyDataTemplate>No attendance</EmptyDataTemplate> </asp:GridView>
in aspx.cs (inside Page_Load)
con.ConnectionString = ConfigurationManager.ConnectionStrings[“MDMV1ConnectionString”].ConnectionString; con.Open(); SqlCommand cmd = new SqlCommand(“Select TabletDetail.StudentCombine AS ‘Student name & id’,” + “ concat(UserTeacher.TeacherClassType, ’ ’ , UserTeacher.TeacherClassName) AS 'Class’, Attendance.type_in_out AS 'Scan’,” + “Attendance.date_time AS 'Date & Time’, Attendance.latitude, Attendance.longitude from Attendance” + “ INNER JOIN TabletDetail ON TabletDetail.id = Attendance.tablet_id INNER JOIN” + “ UserTeacher ON UserTeacher.username = TabletDetail.TeacherUname where TabletDetail.TeacherUname = @uname”, con); cmd.Parameters.AddWithValue(“@uname”, username); SqlDataAdapter sda = new SqlDataAdapter(cmd); DataTable dt = new DataTable(); sda.Fill(dt); GridView2.DataSource = dt; GridView2.DataBind();
Screenshot

0 notes
Text
Integrate Android app with Google sign in
Step 1 : Add code below to project level gradle
dependencies { ... classpath 'com.google.gms:google-services:4.2.0' ... } } allprojects { repositories { ... google() }
Step 2 : Add code below to app level gradle
dependencies{ ... implementation 'com.google.android.gms:play-services-auth:16.0.1' ... } // Add to the bottom of the file apply plugin: 'com.google.gms.google-services'
Step 3 : Add credentials.json file to app folder
Go here
Configure a Google API Console project > CONFIGURE A PROJECT
Create a new project
Configure your OAuth client > Choose Android
Insert your package name & SHA-1 signing certificate How to get your SHA-1 debug key : 1.Click on Gradle (From Right Side Panel, you will see Gradle Bar) 2.Click on Tasks 3.Click on Android 4.Double Click on signingReport (You will get SHA-1 and MD5)
Download the file and add into app folder
Step 4 : Create MainActivity.java
First, copy from here (It includes all important methods)
Then, call these method to sign in with Google account :
configureGoogleSignIn(); doSignInSignOut();
Done!
Tip : Update dependencies to latest version to ensure gradle sync perfectly.
Screenshot :

0 notes
Photo

Publish asp.net web in Visual Studio
Refer https://docs.microsoft.com/en-us/aspnet/web-forms/overview/deployment/visual-studio-web-deployment/deploying-to-iis
0 notes
Text
Delete value from SQL database via GridView
GridView :

We will delete a row using Link Button ‘x’ (red color under Actions column)
Refer https://gist.github.com/n0ran1/d4e47e834f02dc7173ad27404ae5936d
Highlight :
<asp:TemplateField ItemStyle-HorizontalAlign="Center" HeaderText="Actions"> <ItemTemplate> ... </ItemTemplate>
protected void DeleteMsg(object sender, EventArgs e) {...}
Use case :
User click x button to delete
SQL delete the message based on id selected by user
Page refreshed
0 notes
Text
Insert data to SQL - C#
Use case :
A form will be filled up by user.
User click submit button.
Data will be inserted into SQL database.
User redirected to new page telling that user success submit form to server.
Refer https://gist.github.com/n0ran1/88fe22c6d963a311b24878ac32a62711 for code
Explanation :
Register.aspx - front-end code (HTML, JavaScript, bootstrap)
Register.aspx.cs - back-end code (C#)

0 notes
Text
SQL Command in Java (Insert, update, delete)
STEP 1: Create database table in MSSQL
Execute this query
CREATE TABLE [dbo].[RegisteredUser]( [id] [int] IDENTITY(1,1) NOT NULL, [email] [varchar](50) NOT NULL, [dateTime] [varchar](50) NOT NULL ) ON [PRIMARY] GO
STEP 2 :
0 notes
Text
AsyncTask class should be static or leaks might occur : Solution
Ho ho ho! (Horlicks ads)
Got this problem meh?
Solve it with static inner AsyncTask class
Example :
https://gist.github.com/n0ran1/fe3ebba03cb20a06469a7d645b91a158
Explanation :
use weak references will reduce memory leaks. It will gone after sometime. I use activity and app reference. if activity is finished, then I use app reference as backup.
Consume it :
new DownloadFileTask((Application) getApplicationContext(), MyFirebaseMessagingService.this).execute(a, b, c);
Important :
makesure your java class name is same to the context declared. See example below, it must in Register.java class
private WeakReference<Register> activityReference; // only retain a weak reference to the activity insertEmail(Register context) { activityReference = new WeakReference<>(context); }
Thanks <3 https://stackoverflow.com/questions/44309241/warning-this-asynctask-class-should-be-static-or-leaks-might-occur#
0 notes
Text
Connect to MSSQL with java/android
Hi guys!
I’ll share how to connect to MSSQL with java eh
STEP 1 : Get the ConnectionClass.java
https://gist.github.com/n0ran1/6cf55170502036a127058996eeb95601
Lemme explain bit
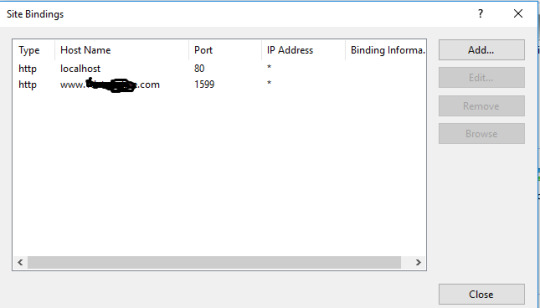
private static String myweburl = "www.example.com"; // your domain / put public ip address public static final String ip = myweburl + ":3031"; // 3031 is port number for mssql server instance that you set in sql server configuration static final String classs = "net.sourceforge.jtds.jdbc.Driver"; static final String db = "MDMV1"; //database name static final String un = "sa"; //username to login database String password = "12345"; //password to login database
ASUS_X450L:3031 //ASUS_X450L is your pc name / you can put the pc local ip address
1599 is port number you set in IIS. (Ignore if you won’t check your domain connection) Open IIS, Default Web Site > Bindings
STEP 2 : Add jtds jar
https://github.com/n0ran1/SQLConnection/blob/master/jtds-1.2.7.jar
Put into libs folder
STEP 3 : Allow port in Port Forwarding
Setup :
Open cmd.exe, type ipconfig and press enter.
Find ipV4 address, it is your local ip.
Type your local ip in browser and go.
It will open the router page. Login and set the port forwarding , allow 3031(port number you set in step 1)
Important :
Make sure your pc connect to wifi which your router has broadcasted
If your local ip changed, please update it in port forwarding.

STEP 4 : Consume it
ConnectionClass connectionClass = new ConnectionClass(this); Connection con = connectionClass.CONN();
STEP 5 : DONE. Do the sql command
Select, Update, Delete, Insert
0 notes
Text
Create multiple SQL Instances
STEP 1 : Create multiple SQL Instances
1. Open SQL Server Installation Center
2. Click Installation tab
3. Click New SQL Server stand-alone installation or add features to an existing installation
4. Choose installation media path : for me C:\SQLServer2017Media\Express
5. SQL Server setup will install
6. Choose Perform a new installation of SQL Server 2017 , Next
7. Accept the license , Next, next
8. Named Instance & Instance ID : SQLPLAYSTORE, Next, next
9. Authentication Mode : Mixed Mode > Enter password & confirm password : 12345, Next
10. if got error try https://stackoverflow.com/questions/50525317/vs-shell-installation-has-failed-with-exit-code-1638
STEP 2 : Enable TCP/IP
1. Open SQL Server Configuration Manager
2. Expand SQL Server network configuration
3. Choose Protocols for SQLPLAYSTORE
4. Status change to Enabled for TCP/IP
5. Right click TCP/IP > Properties > IP Addressess > IPAll > TCPort> Enter unreserved port eg :3031
STEP 3 : Allow port
1. Open Windows Defender Firewall with Advanced Security
2. Allow Inbound & Outbound Rules for port 3031 (as chosen in Step 2, 5 above)
STEP 4 : Copy db without data (only scheme) to generate MDMV1.sql
1. Right click your database in your server, and select Tasks > Generate Scripts.
2. At Introduction step, click Next.
3. Select Script entire databases and all database objects then hit Next.
4. Choose your file name and destination then click next
5. Review and then click next
6. Done!
STEP 5 : Copy scheme of database without data from old server to new server
1. Open MSSQL Management Studio (Run as administrator)
2. Connect server SQLPLAYSTORE with us : sa & pw : 12345 (as created in Step 1, 9)
3. New Query > copy MDMV1.sql text and paste into New Query
4. In MDMV1.sql, find
i) C:\Program Files\Microsoft SQL Server\MSSQL14.SQLDB\MSSQL\DATA\MDMV1.mdf'.and change to C:\Program Files\Microsoft SQL Server\MSSQL14.SQLPLAYSTORE\MSSQL\DATA\MDMV1.mdf'.
ii) \Program Files\Microsoft SQL Server\MSSQL14.SQLDB\MSSQL\DATA\MDMV1_log.ldf to\Program Files\Microsoft SQL Server\MSSQL14.SQLPLAYSTORE\MSSQL\DATA\MDMV1_log.ldf
5. Execute MDMV1.sql
6. Done!
0 notes
Text
Send mail for email verification or forgot password (Java)
Hello hello ! (After been through a lot of obstacle to reach thisss) Let’s cut the crap.
Purpose : Send a mail to / from any host (gmail,yahoo,bizmail etc)
Platform :Java (you can also use in Android Studio)
STEP 1 : JUST NEED 2 java class guysss. Copy it and paste into android project
1) MailSender.java https://gist.github.com/n0ran1/a00585a9a76ff480052fba474c159a71
2) MainActivity.java https://gist.github.com/n0ran1/c0a478d65027448d7a04f3da3e5618e0
STEP 2 : Ha then add libs : https://github.com/n0ran1/MailJava
dependencies { compile 'com.android.support:support-v4:18.+' compile files('libs/activation.jar') compile files('libs/additionnal.jar') compile files('libs/mail.jar') // implementation files('libs/javax.mail.jar') }
STEP 3 : Permission :
<uses-permission android:name="android.permission.INTERNET"/>
STEP 4: MainLayout.xml : https://gist.github.com/n0ran1/9042b7fa17586a486737192e4f4058aa
STEP 5 : Setting : Let say your sender email is [email protected]


Put the SMTP like shown above (get it from Microsoft Outlook) into MailSender.java:
emailProperties.put("mail.smtp.host", "smtp.bizmail.yahoo.com"); emailProperties.put("mail.smtp.port", "465"); emailProperties.put("mail.smtp.socketFactory.port", "465");
STEP 6: In MainActivity.java, the sender email is [email protected], the password you need to get from ISP. Mine was from bizmail yahoo.
Login bizmail > Account Info > Manage App password > Choose Outlook Desktop> Generate
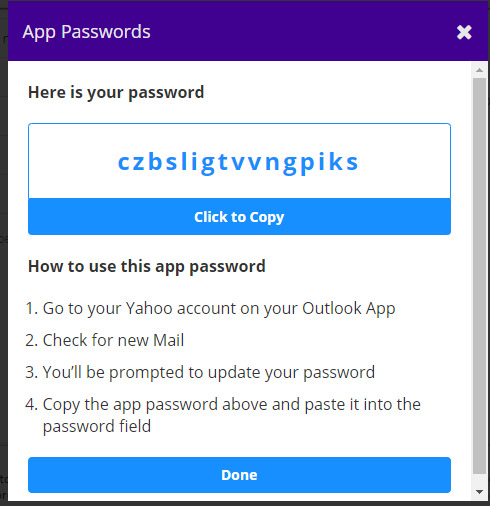
username = "[email protected]"; pass = "qrqpkiogkdasdrxz";//HERE PUT czbsligtvvngpiks like above
That’s ALL. HAHA. Happy coding
0 notes