
Capturing my research and design process for developing a 3D virtual Red Imported Fire Ant
Don't wanna be here? Send us removal request.
Statistics
We looked inside some of the posts by neritat and here's what we found interesting.
Average Info
Notes Per Post
3
Likes Per Post
3
Reblog Per Post
0
Reply Per Post
0
Time Between Posts
6 days
Number of Posts By Type
Text
8
Last Seen Tumblr Blogs


Fun Fact
The average Tumblr user visits about 67 pages every month.
Text
Finalise Project Phase
The plan for this final phase was to continue refining the model and prepare it for presentation. Some final areas of learning around the modelling process include looking at how to add hairs, apply lighting and rendering. Rendering refers to how the model is presented and how viewers engage with the finished product. Rendering well can make a significant difference to how the model appears and make it appear more aesthetically pleasing and appealing to potential customers. Part of this period was also learning what I could successfully achieve within the project timeframe and what tools I could use to good effect using my existing knowledge.
There were a myriad of ways to add and shape hair. Below images shows some screenshots of my simple experiments with creating hairs starting by adding "particles" to a sphere to playing with the properties of the hair as well as colour.


I struggled however to get sparse thick curved hairs. The majority of the learning material focussed on human hair and styling which differed from what I wanted to achieve for the RIFA. Some of the learning material also assumed a level of knowledge around modelling that I didn't yet have and required working with nodes which I'm not yet familiar with.
I had a review session with my client RK on 6/10/23 to discuss options for wrapping up the RIFA model. Some of the areas we discussed included:
using PNG images over JPEG for textures as they have transparency (i.e. for ruler set-up)
options for creating hair and applying lighting. RK advised that the particle tool I trialed above for hair is likely to be phased out of Blender and trialing texture images on a plane or modelling a simple single hair to multiply, would be a more successful approach. Using nodes for hair has advantages like being able to adjust the direction of multiple hairs simultaneously however learning how to use nodes would require additional time beyond the scope of this project.
rendering - we agreed that learning how to render the model as part of presenting the model was also beyond the scope of this project timeframe. Therefore we looked at some simple lighting adjustments to trial and I could look to manipulate the model while obtaining a screen recording.
uploading the model to Sketchfab - Sketchfab is a popular platform used by the science community for their virtual assets. It also has additional features for presenting models including the ability to add annotations and further adjust how you view the model. While not critical to completing this phase here, it's important to know as it's the final step to making the model accessible for viewing by the public and potential clients.
The below images show two different lighting settings achieved by only adjusting the Viewport "theme" and lighting direction.


In the below screenshots I started to build the "clypeal teeth" which are a key identifying feature of the RIFA. Initially I tried sculpting the teeth in but this was messy and distorted my mesh. So I created a stretched ball shape but revised this to starting with a cylindrical mesh base and building up the shape to get the angle and orientation. I then placed these teeth on my UV texture map to get the teeth to match the colour of the nose at the base and darken toward the tips. I chose to apply the teeth as separate pieces so that I could readjust their position until I was happy with the nose and mouth section of the RIFA model. These could also be attached to the head at a later date for a more seamless finish.


Finally, I spent some time reviewing hard modelling techniques to better understand ways to create organic shapes and work with curves. Josh Gambrell's Youtube videos have been particularly helpful and well-paced sessions on creating different shapes with a focus on creating quality meshes. My knowledge of how to create quality mesh with good "edge flow" so as to avoid issues with the mesh pinching or deforming is still fairly rudimentary- this means I frequently spend additional time cleaning up my object's mesh and sometimes don't pick up on issues until later on when it creates more work to undo. Good quality mesh is also important if looking to animate a model in future. Animating the model is beyond the scope of this project however would be worthwhile exploring in the future as the behaviour of some species could be a potential identifier if looking at other scientific models in future.
Final steps, pending time, include adjusting the colour/lighting, further refining the mouth/nose section only, adding a few hairs, and preparing the model to upload it to Sketchfab.
0 notes
Text
Finalise Project Phase
This week was spent experimenting with colour to better understand how the UV mapping worked and to play with colouring to look at achieving the glossy copper red colour of the RIFA’s head. I also explored options for presenting the model including looking at adding in a scale bar. A total of 40 hrs of modelling has been completed so far not including the total time spent learning how to use the Blender software.
UV mapping – colour and texture
The plan was to look at getting the full colour range on a single reference image. I set up a colour plate in Photoshop and used colour matching from images of the RIFA to get an approximate colour. The challenge in working with images is the colour differentiation between photos and the specimen in reality with variation in colour according to the lighting conditions. The RIFA is described as having a reddish-brown to copper colour and the head has a slightly glossy surface and some colour variation across the head, antennae and mandibles. It could also appear slightly lighter with hairs and at this stage my model is hairless, so colouring may need to be adjusted once lighter coloured hairs are added. The reference images vary in colour from a yellower appearance to a darker red brown. I started off with a lighter colour to see how this might look on the model before working toward a darker colour. I also looked at how to colour objects in Blender to get a honey or beer-like or amber coloured appearance and experimented with the lighting in Blender which also impacts how the colouring appears.
See images below for a couple of colour variations showing the colour plate or reference image I created in Photoshop and how this mapped to the object on the right. The first colouring was too light and tan and the second image the model appeared too orange. I also had insufficient colour variation on the antennae and around the front of the face.

The image below shows the adjusted colour plate with the UV maps for each body part placed on the colour map. This took a number of hours of tweaking the colour plate and colouring and also adjusting the UV maps so that the way the colours are laid over the model appears seamless.

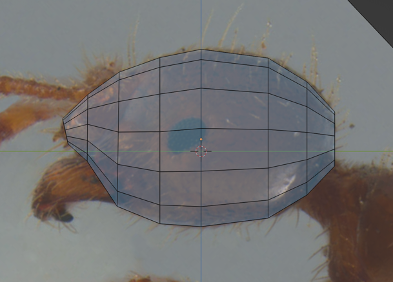
The eye texture seen in the above image at the top left of the colour plate was achieved by using a high resolution image of an eye from a similar ant species and blending this with the colours using filters. The original image of the eye is shown below. Using reference images is a quick way to achieve results and in this case the image used was a copyright free image by Charles Kreb (2015) taken from Pixabay as I wasn't able to access a suitable specimen to create my own image. The texture could also have been created in Photoshop however for time saving purposes I was able to achieve a good outcome just by using an image. I noted there was a little bit of stretching of the texture as the eyes curves around the side however this was alleviated when I adjusted the eye shape by flattening the profile.

After applying the adjusted colouring, I worked on refining some sections of the model including the eyes and antennae. See below a screenshot of the amended model showing the colouring and textures applied.

If time permits, I plan to work further on the fine detail around the mouth and mouthparts of the RIFA.
Showcasing RIFA model
There are a number of platforms used to present virtual assets for viewing purposes and/or for download and purchase. These include Sketchfab, Turbosquid, and CGTrader amongst others.
Sketchfab is a popular platform for 3D and AR and appears to be the platform of choice for viewing 3D assets and for many models used by the science community. Platforms like CGtrader and Turbosquid are better suited to selling 3D assets. Sketchfab is the preferred platform to use for showcasing the RIFA model as it is used by the science community. However transitioning to a platform better suited to selling 3D assets may be a viable option in future.
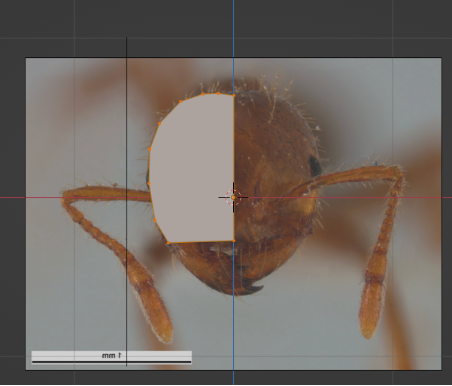
In setting up the model for optimal viewing, I decided to insert a measure or scale. A scale or measurement tool is critical for giving the viewer a sense of the size of the ant and the size is a key identifier for this species. A ruler provides more clarity for the viewer whereas using objects like a 5 cent coin is less accessible for viewers unfamiliar with the size of the object.
I created a ruler to sit alongside the model which when finished will include the body of the ant also. See screenshot of the scale in the below image.

Final project phase
The week ahead will be used to continue refining critical aspects of the model like the mouth parts while preparing a project summary report.
2 notes
·
View notes
Text
Develop & Adjust Project Phase
This week I split my time between refining the model and learning about applying texture and colour using a UV map. I was also mindful of my work set-up and looked to practice optimal positioning to avoid exacerbating my wrist and hand issues.
Refining model
I experimented with sculpting techniques to reshape the model but found this problematic in that I had less control over the shaping process so ended up abandoning this and returning to “hard surface” modelling techniques.
Applying colour & texturing
I met with my client RK this week to review the model as well as go through her process for texturing mainly using images and texture painting in photoshop. We looked at the properties I’d need for texturing for the head, antennae and eyes and getting gradation and depth to the colouring. The UV map works a bit like a pattern for clothing in that it is the 2D pattern laid out flat that then wraps around the model.
The image below shows using a reference image on the left and placing the UV map for the head over the image to colour the head. Although the image is glossy, it has a matt appearance on the model.

The second image below shows using a painted over image on the left to capture a range of colours which the UV map can be arranged on to achieve the colour results needed. The greater the amount of detail needed then the larger the map for that part needs to be. Mapping the entire ant head and all its elements onto a single image can also help keep the file size small. In this image below the head on the model appears glossy which was achieved by adjusting the material properties after the texture/colour map had been applied.

We also looked at how to layout the UV map, where to place “seams” or cuts in the design. Seams can show up so need to be either hidden or made seamless so it doesn’t interrupt the surface pattern. We also worked through some clean up of aspects of the model which included some speedy ways to select, orient and adjust the model’s mesh.
We looked at some of RK's plant models for examples of how she had put the colour mapping into practice using images, photoshop editing and adapting the UV maps. RK reiterated that playing with the model and software are key to embedding learning and understanding how to get the best out of the tools and project.
Finally, it was agreed that although the model needs further refining to reach a suitable level for scientific use, that it was important to focus on this next stage of colouring and texturing a model to round out my skill set in modelling. Further refinement of the model can be done at a later stage and will go beyond this project - RK advised that a number of iterations are usually needed to achieve a highly refined model that incorporates feedback following reviews from experts in the field. We discussed some options to try out with the colouring and the intention for this next week will be to experiment with the colouring.
0 notes
Text
Create Project Phase continued
This week has included ongoing development of the prototype in Blender and time spent learning Blender key shortcuts for modelling as well as starting to look at how to develop a UV wrap for adding texture and colouring.
A particularly useful site is the Blender manual which has been developed by volunteers and has the key functions and commands for modelling which I had not been aware of. This was not available when I started learning how to use Blender and for previous versions of Blender:
A key challenge this week was of a physical nature in that I have developed a repetitive strain issue arising from the additional computing load on my dominant hand while using the computer mouse (my day job is also computer based). Doing modelling sessions in shorter blocks and the switch to doing some online learning modules has aided in managing this issue and the increased use of keyboard shortcuts instead of mouse “clicks” is likely to help also.
Prototype development
This week I was able to achieve a key objective which was to block out the key shapes for the head and aim to get the size and proportion relatively accurate before adding more topology to refine the features. I compared the model with the reference images as well as the scanned RIFA model from EconomoLab (below right image) and another generic fire ant model created by Triduza 2013 on the Turbosquid platform (below left image). Triduza’s model does not accurately portray some key identifying features of the RIFAS however provides a comparison for the level of detail.

The head of my model as per below image still seems quite rounded despite it being matched to the profile of the RIFA in reference images but the head shape may require some additional changes once the mandibles and facial features refined as these could be skewing the appearance.

The mandibles (jaws) were created using a Bezier curve converted into a mesh- I’m undecided if I may need to revert to a rectangular block mesh to create the teeth on the mandible as this aspect may be easier working with a block shape than a rounded tube.

Plan for this next week:
This next week will largely be in the Develop and adjust phase of my project. I plan to continue to refine the model by adding in more detail and to explore UV wrapping to look at learning how to use textures and colour the model. This is a critical and new modelling skill for me to develop in Blender that I can use for future modelling projects - I will need to determine at what point I can apply a texture map to this model that still allows for additional changes in future where required.
I've also adapted my modelling set-up to create a more ergonomic work space to help manage the impact of the repetitive movements involved in modelling on my right hand and arm. This next week will be a good test of this adaptation! See image below showing ergonomic mouse and a low cost forearm support (folded hand towel) on the right hand side.

0 notes
Text
Create Project Phase continued
This week has included mainly ongoing development of the prototype in Blender, upskilling in Blender modelling, and a brief review with my client RK around the modelling process.
I also learnt this week that NSW has declared a Biosecurity (Fire ant) Emergency Order as the outbreak of this invasive ant in QLD has spread southwards. The Department of Primary Industries is looking at increasing efforts to contain and eradicate the RIFA which has now been detected within 5.5kms of the NSW border – see media release here. A 3D model could prove even more valuable given the current situation.
Prototype development
The modelling this week focussed on some additional shaping of the head in order to accommodate the antennae and starting on the antennae. Some travel away for other work related commitments impacted how much modelling I could complete but more regular sessions has supported the continuity of my learning.
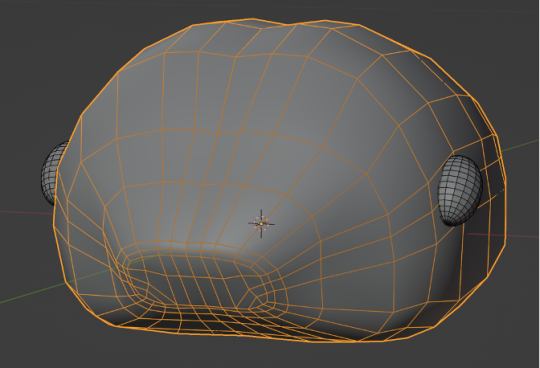
Each modelling session I tend to review the existing 3D scanned model and reference images located previously in place of having an actual specimen to study. Going back to these sources before starting has 2 purposes, the first being to re-familiarise myself with the RIFA’s shape and features so that when I start modelling I’m not taking it in a direction that doesn’t reflect the RIFA and secondly, this observational process tends to reveal new insights each time. For example, noting that the eyes are not just toward the side of the head and angled but also slightly forward facing. These small observations help me continue to refine the model working from rough approximates to a more refined shape. Working in the “nose” for the base of the antennae also provided new perspectives on the shape of the head and meant I went back and adjusted the head shape again further.

See above image showing further refining of the RIFA's head shape to prepare it for adding on the antennae. Below images show progress made on building the scape section of the antennae.


On reflection, this virtual modelling process has not been dissimilar from the process I might use to sculpt a physical model- working back and forth between different parts of the model as it takes shape and continually checking it against the source material and or specimen for scale, proportion and accuracy.
Client session
Key outcomes of a brief catch-up with my client RK this week included:
Gaining some tips around working with a couple of features in Blender to improve the ease of manipulating objects and parts of the model
Reviewing the plan for the model outcome based on progress to date
Discussed plan for reviewing online videos on hard surface modelling to enhance modelling skills and learning more shortcut keys
Started discussion around what features could be created using texture mapping that wraps over the mesh like clothing rather than physically sculpting the mesh e.g. the detail in the eyes. Smaller details generally require more topology in the mesh so where possible using texture overlays can help keep the mesh more simple and keep the file size down.
It has taken around 18 hrs to reach this stage of the prototype not including time spent on reviewing demo videos to breakdown steps for different parts of the modelling process.
I discussed the time taken even for relatively small parts of the modelling with my client RK. We agreed that it would be helpful for me to spend some time learning how to elicit different pie charts and learning more shortcut keys for the modelling tools to improve the time efficiency of modelling. Reviewing hard surface modelling demo videos showcasing alternate ways of doing could also refine my work process.
What’s next?
This next week (week 8 of project plan) I aim to continue building the prototype and splitting the time between modelling and upskilling through reviewing demo videos and learning material. This is likely to further slow down progress on the prototype, however it was agreed this would be worthwhile for getting a better outcome for the prototype and the development of my foundational modelling skills. Aspects of my project plan could be revised to focus on learning the skills needed to complete a full ant model - this might mean compromising on the level of detail for the initial prototype.
0 notes
Text
Create Project Phase continued
This week has included ongoing development of the prototype in Blender, collating responses to the survey I developed to obtain additional information about the RIFA and meeting up with my client to feedback on my progress and discuss the modelling process.
Prototype development
I selected the modelling approach I had used for Model 2 to carry forward. This was a more controlled approach to modelling and better suited to trying to keep the mesh relatively simple and the file size small.
Progress on the prototype model was slower than anticipated this week for a couple of reasons. The first being some of the photographic reference images I had initially chosen to guide my modelling were at slightly more angled views than a clear top down and side views of the RIFA’s head - this became more apparent as I started to look at where the other elements would join to the head and required some re-shaping to be done. I was able to resolve this issue by cross referencing the photographic images with a Micro CT scanned model of a RIFA from the Economo Lab from the Okinawa Institute of Science & Technology in Japan - see link below:
The above model is available to view but not available to purchase or download. My earlier investigations found that the technology to create a scan such as this of a specimen is not readily available in Australia. By rotating this scanned model I was able to screenshot a better set of reference images for the top, bottom and side of the head. I continued to use my original reference images for scale but referred to the scanned model images for the shape. Here’s a screen shot of my PC display below showing the use of the additional reference images to the right:

The second reason progress this week was somewhat slower was that during the development of the head shape and in my efforts to keep a low poly count (i.e. low number of faces on the mesh that makes up the model) I had unwittingly made a few rookie errors in the way I built the model. A clean and well-built mesh for the model is critical to avoiding issues with the model down the track – it’s like not lining up the bricks to build a wall or the posts for a fence. It takes time to fix but fixing the alignment is critical to getting the end result. Issues with the mesh aren’t always obvious and it can take a bit of troubleshooting to work out where things have gone awry and how to fix them. See here below just a couple of the issues I discovered which needed to be resolved. The first was that I had somehow turned my model inside out at some point during the build (see image below - the outside of the model should appear blue and the inside red). Thankfully this was easy to fix.
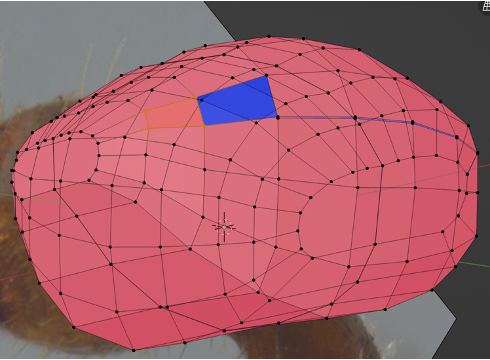
The second was that I had inadvertently created some tiny overlaps in the side of the model which only became obvious when I adjusted the view of the model to a smoother shape and these showed up as a crease (see image below).
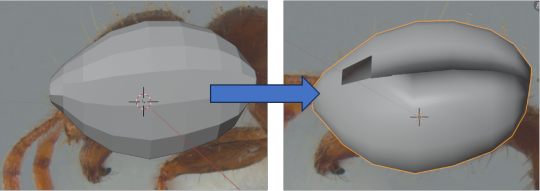
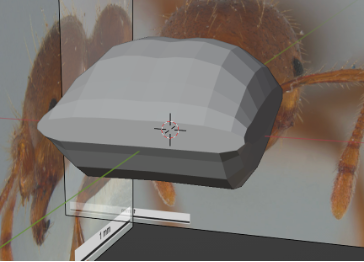
By the end of the week I had reshaped the head more accurately (see below image), developed a clean model mesh and learnt a great deal about managing mesh topology but… had not yet added the mandibles or antennae!
Survey results
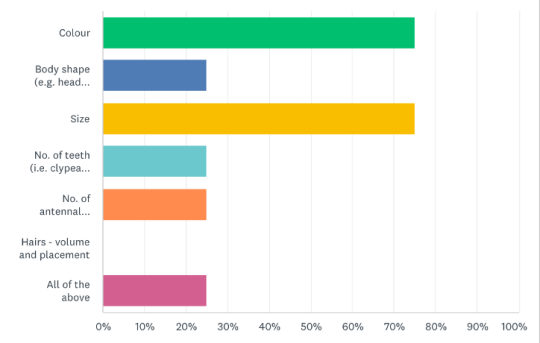
I received feedback via my emailed survey from an academic researcher, a project officer working on the RIFA and a diagnostic entomologist with specialist knowledge of the RIFA. Feedback included the key and most useful identifying features of the RIFA and confirmation that the worker ant (major or minor) was appropriate to target for this model. The survey results also appeared to confirm our assumptions about where the model could be of use i.e. to support education of staff and to better engage the public.
The chart below shows the respondents selection of the critical features to ID a RIFA and differentiate it from other similar species. The results also indicate how at the moment that the key identifiers used with the public are mainly only matching the colour and size of the RIFA (using photographs) - a specialist team triages potential sightings and then visits to obtain specimens to confirm an ID. The availability of an accurate reference model of this invasive species has the potential to expedite aspects of the process of confirming positive sightings and save time and money spent on this.
Table - Key features for identifying a RIFA:
Client feedback session
Key outcomes of meeting with my client RK this week over Zoom were confirming the modelling approach I had selected to move forward with, confirming the plan for the next stage and analysing the results of the survey. It was agreed that we had sufficient information at this stage to move forward with and all survey respondents had advised they would be happy to be contacted for further information or review of the model in future. We touched on a communication plan for the next part of the modelling phase and points at which I may need to check in for advice.
This next week will be focussed on adding the additional elements to the head of the RIFA and further refining the shape.
0 notes
Text
Create project phase
This last week or so I started modelling the head of the RIFA using the software Blender. I chose to work on the head for this prototype as it's shape and features will challenge my modelling skills, extend my learning and it includes a number of key identifying features for this species so could be useful if seeking feedback on the accuracy of the model and level of detail needed for it to be fit for purpose. Skills learnt modelling the head can then be applied to building the rest of the body at a later date. I started building the head and experimented with a few different ways of modelling using different shapes and tracked the time spent modelling. Progress on the modelling has been slower than I’d like due to my lack of knowledge of Blender and need for repetition to consolidate my skills. This past week time spent modelling has also been intermittent while I’ve been on the road travelling. Establishing a more regular modelling practice will help me retain knowledge between sessions. I also started a tip sheet to help me recall new commands and learnings faster.
Experimentation with modelling approaches
My first two experiments used a "hard modelling" process where you start with a certain shape and build onto it or you create the shape from scratch. I used scaled reference images of the RIFA as a visual guide to help get the shape and proportions accurate. I based my approaches on what I had observed in other digital models and a discussion with my client RK about how she would approach the modelling.
Model 1 - Initially I started by shaping a 10 sided cylinder mesh to the head shape, creating loop cuts around the cylinder and scaling the loops to the reference images which were scaled to match the size indicated in the image. One of my key aims in the modelling process is to keep the polycount (no. of polygons) low so the file size is kept as small as possible. From discussions with my client RK, the file size is a key factor in how easily the model can be accessed on mobile devices in the field. Too large a file and this will impact ease of use. By controlling the amount of faces created in the model I can work to keep them to a minimum. This approach was based on viewing the build of Massimo Righi’s Fire Ant where they have used two cylindrical shapes for the head to establish the crease down the forehead (see image below).

I experienced a few difficulties getting the shapes to overlap adequately and working out how to duplicate and invert one side to keep the head symmetrical- this was mainly due to my limited knowledge of some modelling tools and an issue with the view because I am modelling the RIFA at it’s actual scale which is smaller than typical modelling in Blender and does the odd weird thing with the view which threw me for a bit until I worked out what was happening. See images below of Model 1 in process:

Model 2 – I wanted to see if I could control the modelling process and get a better head shape from the outset which would potentially save time later so also experimented with creating a flat plane of half of the head (front view). Using this approach I could build half and then mirror the other side, thus creating a symmetrical head shape and any changes applied to one half would automatically be made to the other half. This had an advantage over model 1 with the potential to reduce the polycount a little further. This method was based on examples I had seen of hard shape modelling on youtube previously. I had an issue with mirroring the design at one point however and had to set this model aside while I worked out how to resolve this issue while continuing to work on model 1. See images below:
Another modelling approach I looked into more briefly but decided to discard was using a soft sculpting process. This tends to create a higher polycount and I felt the sculpting process in particular was not well suited to modelling of the RIFA where I want more control over the shape of each element (i.e. antennae) and polycount.
Additional research on RIFA
I have further questions about the RIFA and would like to test some assumptions about what value the model could provide to the market. I developed a list of these questions and put the questions into a short survey using Surveymonkey to make it easier to send the questions out to potential stakeholders and to collate the responses. I got my client RK to test and review the survey to help ensure it would be suitable and the link to the final version is here: https://www.surveymonkey.com/r/YXR8NZ7
I also reached out to a contact at the CSIRO insect collection who confirmed they have RIFA specimens, although these are not currently accessible by the public, and they may be able to assist if I need to clarify some features of the species.
What next? I plan to use one modelling approach going forward using the learning from the past week to draft the elements of the head i.e. head, eyes, antennae and mandibles before I start refining these elements. During this time I hope to receive some responses to my survey and gain further clarity around some of the features of the RIFA for when I begin to add more detail to the model.
0 notes
Text
Define project phase
My starting point for this project was to review the Exotic Environmental Pest List (EEPL) which is a national list outlining the priority species that pose greatest risk to Australia’s biosecurity. Of the 5 insects listed as posing the greatest biosecurity risk at this time, the Red Imported Fire Ant Solenopsis invicta is the one I have chosen to explore building a virtual prototype of. The rationale for this was the topical nature of this insect given the present outbreak in Queensland and the availability of sound information and high-resolution images to work with for modelling. There’s also a detailed species description (Buren 1972) to aid with dimensions and which I'll need to break down to make sense of some of the scientific terminology.
Information about current outbreak in Qld - https://www.outbreak.gov.au/current-outbreaks/red-imported-fire-ant
My research into the market for digital models of insects revealed that there are already a number of virtual models of this species available. These models are priced between $84 - $499 AUD on sites like Turbosquid. These Fire ant models are of variable quality and lack specificity and scientific accuracy. Many of the higher quality models are also animated to a degree.
An example of a high quality model by Massimo Righi is below:
This model has the more generic label of Fire Ant and is much more detailed but lacks some of the features specific to this type of species that may make it more difficult to differentiate it from similar species. It was modelled using Maya and appears to have been built using shapes.
Another lesser quality model labelled “Red Fire Ant” by JamesAbell:
The creator appears to have used sculpting as the primary method for building this model and it may be more of a creative interpretation of this type of ant but lacks a lot detail, accuracy and some elements are not in proportion.
It's evident from my research that there's plenty of competition for the development of virtual assets with many solo designers or small that have far more advanced digital modelling skills than myself that could lend their expertise to creating insect models. There is however currently a gap in the market as my client RK identified and I'm hoping that this project will enhance my skills in this area. It will however take me longer than the length of this project to be able to develop a high-quality full scale model and undertake modelling in a timely manner for it to be cost effective in the longer term. To track my time working on the model, I explored time tracking options and have settled for now for using a basic manual timesheet. To add value and a point of difference, my focus for this virtual prototype will need to be on developing a scientifically accurate model and leveraging my natural history illustration skills for this.
The next phase of this project will focus on developing a prototype using select images from my reference material. A preliminary discussion was had with my client RK about ways to start the prototype build using Blender with insights into her work process and the different phases of the build using a plant model to give me a better understanding of what's involved. This helped me scale down my project plan to something more achievable for the project period i.e. modelling part of the RIFA (i.e. head or body part) rather than a full scale RIFA.
1 note
·
View note