
Statistics
We looked inside some of the posts by netcat5 and here's what we found interesting.
Average Info
Notes Per Post
811
Likes Per Post
544
Reblog Per Post
250
Reply Per Post
17
Time Between Posts
4 days
Number of Posts By Type
Photo
2
Text
12
Link
1
Last Seen Tumblr Blogs


Fun Fact
Tumblr’s website traffic is steadily declining.
Photo

Vue 3 - A Look At Vue-Next (Alpha) - And What You Can Do ☞ http://bit.ly/2HdJQPy
#Vue
3 notes
·
View notes
Text
phpMyAdmin Unlimited Session
Open /etc/phpmyadmin/config.inc.php
Add the following:
$newTimeout = 1190804011908; $cfg['LoginCookieValidity'] = $newTimeout; ini_set('session.gc_maxlifetime', $newTimeout);
0 notes
Text
How to Secure Apache Web Server

Securing your web server is very important, it means allowing others to see only the intended information & protecting your data and restricting access.
These are common things that enhance your Apache web servers’ security.
1) Hiding Apache version and OS information:
Apache displays its version and the name of the operating system in errors as shown in below screenshot.
A hacker can use this information to launch an attack using the publicly available vulnerabilities in the particular version of the server or OS.
In order to prevent Apache webserverfromdisplaying this information, we have to modify
“server signature” option available in the apache configuration file. By default, it is “on”, we need to set it “off”.
vim /etc/httpd/conf/httpd.conf
ServerSignature Off
ServerTokens Prod
We have also set “ServerTokens Prod” that tells the web server to return only apache and suppress the OS major and minor version
After modifying the configuration file, you have to restart/reload your apache web server to make it effective.
service httpd restart
2) Disable Directory Listing
If your document root directory does not have an index file, by default your apache web server will show all the content of the document root directory.
This feature could be turn off for a specific directory through “options directive” available in the Apache configuration file.
<Directory /var/www/html>
Options -Indexes
</Directory>
3) Disabling unnecessary modules
It is good practice to disable all unnecessary modules that are not in use. You can see list of enabled module available in your apache configuration file -
[root@amsterdam ~]#httpd –M
perl_module (shared)
php5_module (shared)
proxy_ajp_module (shared)
python_module (shared)
ssl_module (shared)
Many of the listed modules can be disabled likemod_imap, mod_include, mod_info, mod_userdir, mod_autoindex, as they are hardly used by any production web servers.
vi /etc/httpd/conf/httpd.conf
#LoadModule auth_digest_module modules/mod_auth_digest.so
Once you commented the module, save the file.
Restart apache services with following command.
/etc/init.d/httpd restart
4) Restricting Access to files outside the web root directory
If you like to make sure that files that is outside the web root directory are not accessible, you have to make sure that the directory is restricted with “Allow” and “Deny option” in your web server configuration file.
<Directory/>
Options None
AllowOverride None
Order deny,allow
Deny from all
</Directory>
Once you restrict acess outside the web root directoy, you will not be able to access any file located on any other folder on your web server, you will get 404 return code.
5) Using mod_evasive to rebutting the DoS attack
If you like to protect your web server from Dos (i.e. Denial of Service) you must enable the module mod_evasive. It is a third party module that detects Dos attack and prevents the attack from doing as much damage as it would do if left to run its course. It could be downloaded here.
6) Using mod_security to enhance apache security
This module works as a firewall for Apache and allows you to monitor traffic in real time. It also prevents the web server from brute force attacks. The mod_security module could be installed with the default package manager of your distribution.
7) Limiting request size
Apache does not have any restriction on the total size of the http request that could lead to a DoS attack. You can limit the request size of an Apache directive “LimitRequestBody” with the directory tag. The value could be set anything from 0 to 2 GB (i.e. 2147483647 bytes) as per your requirement.
<Directory "/var/www/html/uploads">
LimitRequestBody 512000
</Directory>

0 notes
Photo
sexy!

Don’t mind me, just working on the webpp project! I’m so excited about the path that this project on. It compiles now. Wow! (it didn’t for months if you’re not following the process).
I really like Test Driven Development (TDD). There’s just no other way to do it with projects at this scale. It’s just no possible without tests. . . #coding #code #programming #codiglife #dev #development #developer #devlife #techie #technology #tech #webdev #web #webdevelopment #coderslife #test https://www.instagram.com/p/B8zRZY6gQP7/?igshid=1naoaccmymvas
9 notes
·
View notes


Text
Allow access to SSH on a server with VPN
just add these 3 lines to the bottom of your /etc/network/interfaces so that it looks like the following (sudo nano /etc/network/interfaces) auto eth0 iface eth0 inet static address 192.168.0.12 netmask 255.255.255.0 gateway 192.168.0.1 dns-nameservers 192.168.0.10 up ip rule add from 192.168.0.0/24 table 128 || true up ip route add table 128 to 192.168.0.0/24 dev eth0 || true up ip route add table 128 default via 192.168.0.1 || true where 192.168.0.0/24 is your local network and 192.168.0.1 is the gateway. Change the local network and gateway to match your networks configuration. Save your changes and reboot. After reboot you can now allow access through your home router/firewall to whatever local ip and port you wish and all internet traffic from the machine will still go out the VPN tunnel.
0 notes
Text
Docker: could not find an available, non-overlapping IPv4 address pool among the defaults to assign to the network
UPD:
in docker, create a new network by issuing:
docker network create --driver=bridge --subnet=192.168.2.0/24 --gateway=192.168.2.10 new_subnet
src OLD SOLUTION Create /etc/openvpn/fix-routes.sh script with following contents:
#!/bin/sh echo "Adding default route to $route_vpn_gateway with /0 mask..." ip route add default via $route_vpn_gateway echo "Removing /1 routes..." ip route del 0.0.0.0/1 via $route_vpn_gateway ip route del 128.0.0.0/1 via $route_vpn_gateway
Add executable bit to the file: chmod o+x /etc/openvpn/fix-routes.sh. Change owner of this file to root: chown root:root /etc/openvpn/fix-routes.sh.
Add to your config following two lines:
script-security 2 route-up /etc/openvpn/fix-routes.sh
Explanation: ->
Openvpn adds routes that for following networks: 0.0.0.0/1 and 128.0.0.0/1 (these routes cover entire IP range), and docker can't find range of IP addresses to create it's own private network.
You need to add a default route (to route everything through openvpn) and disable these two specific routes. fix-routes script does that.
This script is called after openvpn adds its own routes. To execute scripts you'll need to set script-security to 2 which allows execution of bash scripts from openvpn context.
0 notes
Text
Advances in Spam Detection on Tumblr

As with all open platforms for user-generated content, Tumblr has been hit with a fair bit of spam. People who create spambots or abuse our platform in the interest of non-genuine social gestures are really good at finding new ways to develop and implement their spam. It’s what they do. Over the years, we have been experimenting with various tools and techniques to combat issues like spambots and non-genuine social gestures. To understand more about our work, let’s dig into the details.
Challenge: precise identification of spam
Spammers often try to disguise themselves by attempting to use a platform in the same way a real person would. As spammers learn how to develop newer, better ways of mimicking the behavior(s) of real people, the boundary between spammers and real people becomes more and more blurred, which unfortunately means non-spammers may get flagged as spam. This is what is known as a false positive.
Tumblr’s goal has always been to find the delicate balance needed in making sure we are addressing spam as aggressively as possible without dramatically increasing the number of false positives.
Challenge: evolving spam behavior
Spam evolves. Spammers learn how to dodge new spam detection as soon as a platform starts using it. Therefore, relying on fixed logic is not sufficient. We instead approach the issue with a broad set of dynamic predictors, because the best way to combat spam is to utilize an adaptable detection methodology.
Our work
At the heart of all good spam detection efforts are machine learning algorithms. These algorithms are fed data from how real people use Tumblr and use this data to enhance our classification accuracy. Thanks to this historical data, when new spam or malicious patterns start occurring, we can react faster and identify spam with higher accuracy. Our newly launched model demonstrates 98% accuracy in determining if a user is a spammer.
The diagram below describes our spam classification pipeline:

Because every machine learning algorithm starts with data, we begin with a data management system that manages and controls data streams flowing around Tumblr. Every microsecond, the data management system records this data into log files. The system then periodically transfers these logs into our database, or Hadoop File System (HDFS). We then write numerous scalding jobs that focus on identifying what parts of this mountain of data are helpful when learning who’s a spammer. To start this process, we come up with specific hypotheses on some data sources and then collect the data to test these hypotheses in the next step.
How do we test if a data source is useful? After the scalding jobs finish, we analyze and visualize the data source to determine if the collected information can be turned into a signal. If the raw data itself is not enough, we might need to combine several signals to produce better results. The whole thing may sound a little hard to grasp for some. Maybe a pseudo example could help?
What if we found that many spammers really enjoy, say, insects and they were creating posts with a massive number of insect images? Based on this observation, we would hypothesize that the more pictures of insects someone’s blog has, the more likely it is spam. If we validated this hypothesis, we would then build a feature called InsectImageNums to track how many times a blog has posted an insect. But wait! What if we realized that the majority of our users post zero insect images? This becomes problematic because most of the data in InsectImageNums are zeroes, and those that are not zero have a very diverse range. Besides, some insects specialists or nature lovers do post images of insects, and we don’t want to classify these people as spam incorrectly. We would need to dig deeper and find a more detailed differentiator. Perhaps we see that it is rare for even the most bug-loving person to post more than five pictures of insects. We’d use that finding and create a new predictor called InsectsImageNumsGreaterThanFive. After this transformed feature is verified as accurate and useful, it is included in our predictor set.
When we have a verified and helpful set of working features, we then pass them to the machine learning models in Spark through Hive. Sometimes the aggregated size of the data is way too big for a single machine to process, so we use Spark and Spark ML interface to train our larger data-sets.
What kinds of machine learning algorithms are we using?
Supervised machine learning requires training labels, but these labels are only partially defined. With imperfect labels, we use iterative semi-supervised machine learning techniques to label instances closest to the classification decision boundary by checking our predictions with human agents. When human agents stop seeing false positives, we assume the model is crafted strong enough to be placed into HDFS. Through this semi-supervised approach, we achieve a 98% accuracy rate. We then upload the trained machine learning model to our database and periodically update it.
We save the spam probability score of new groups of users daily on Redis, an in-memory data structure store. This user spam probability score becomes a useful data validation point for our internal team that leads our spam moderation effort. In a way, the machine learning spam detection pipeline’s job is not to automatically suspend suspicious blogs, but to find blogs that have suspicious behaviors—like spreading viruses or malicious content across the internet. We want our community to enjoy a friendly environment on Tumblr, and we want to avoid as many false positives as possible. That’s why our overall pipeline involves both machine and human efforts.
What’s next
Spam detection work is never done. What works above may not work six months from now. Our goal is to evolve one step ahead of the spammers. Keep your eyes peeled here on @engineering to stay up-to-date!
— Vincent Guo (@dat-coder)
204 notes
·
View notes
Text
Tumblr Bug Bounty Revamp

Exciting news! It’s been almost six years since we launched our Bug Bounty program and it has been amazingly successful. We’ve realized how instrumental you—the security community—is to keeping Tumblr a safe place for millions of people.
Over the years we’ve gone from a self-hosted submission form to a program under Verizon Media. Today, we’re announcing with great gratitude that our Bug Bounty program is available directly on HackerOne.
Again, a huge, huge thank you to everyone who has participated in our program so far and we look forward to working with all future reporters as well. We highly appreciate your honest submissions and hope that you will continue to send us any future discoveries you find =]
Submit a bug
144 notes
·
View notes
Text
How Reblogs Work
The reblog is a beautiful thing unique to Tumblr – often imitated, but never successfully reproduced elsewhere. The reblog puts someone else’s post on your own Tumblr blog, acting as a kind of signal boost, and also giving you the ability to add your own comment to it, which your followers and anyone looking at the post’s notes will see. Reblogs can also be reblogged themselves, creating awesome evolving reblog trails that are the source of so many memes we love. But what is a reblog trail versus a reblog tree, and how does it all work under the hood?
A “reblog tree” starts at the original post (we call it the “root post” internally at Tumblr) and extends outwards to each of its reblogs, and then each reblog of those reblogs, forming a tree-like structure with branches of “reblog trails”. As an example, you can imagine @staff making a post, and then someone reblogging it, and then others reblogging those reblogs. I can even come through and reblog one of the reblogs:

A “reblog trail” is one of those branches, starting at the original post and extending one at a time down to another post. In the reblog trail, there may actually be some reblogs that added their own content and some that didn’t – reblogs that added content are visible in the trail, while the intermediate ones that didn’t may not be visible.
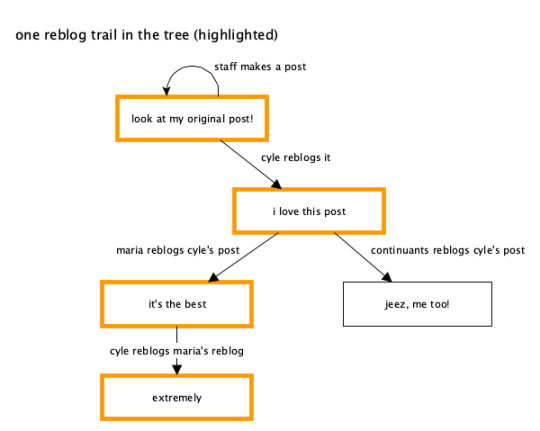
You’ll notice that the reblog trail you’re viewing somewhere (like on your dashboard) doesn’t show all of this reblog tree – only part of it. If you open up the notes on any wildly popular post, you’ll probably see lots of reblogs in there that you aren’t seeing in your current view of the post’s reblog trail. The above diagram shows the whole reblog tree (which you don’t see) and the current reblog trail you’re actually viewing (in orange). If you want to visualize a post’s entire reblog tree, the reblog graphs Tumblr Labs experiment shows off these reblog trees and trails as kind of big floppy organisms. They’re a useful visualization of how content percolates around Tumblr via reblogs. You can turn on the experiment and see it on web only right now, but here’s an example:
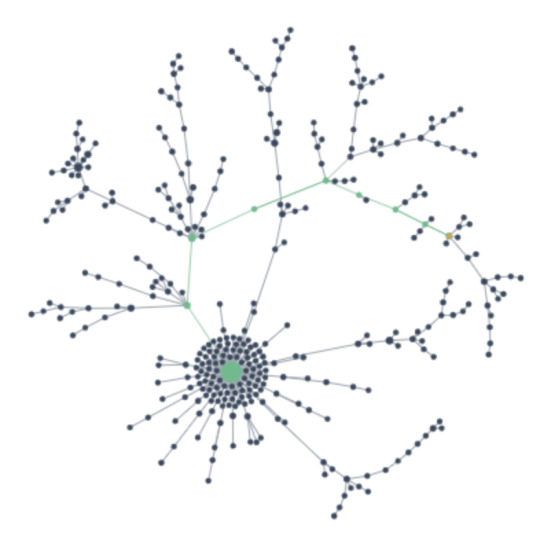
The tiny orange dot is the post we’re viewing, and the green line is a reblog trail showing how the post got reblogged along many blogs. And there are tons of other branches/trails from the original post, making dozens of different reblog trails. This is a much larger, more realistic example than my simplified diagrams above. You can imagine that my diagram above is just the start of one of these huge reblog trees, after more and more people have reblogged parts of the existing tree.
Storing Reblog Trail Information
The way we actually store the information about a reblog and its trail has changed significantly over the last year. For all posts made before this year, all of a post’s content was stored as a combination of HTML and properties specific on our Post data model. A specific reblog also stored all of the contents of its entire reblog trail (but not the whole reblog tree). If you have ever built a theme on Tumblr or otherwise dug around the code on a reblog, you’ll be familiar with this classic blockquote structure:
<p><a class="tumblr_blog" href="http://maria.tumblr.com/post/5678">maria</a>:</p> <blockquote> <p><a class="tumblr_blog" href="http://cyle.tumblr.com/post/1234">cyle</a>:</p> <blockquote> <!-- original post content --> <p>look at my awesome original content</p> </blockquote> <!-- the reblog of the original post's content --> <p>well, it's just okay original content</p> </blockquote> <!-- this is the new content, added in our reblog of the reblog --> <p>jeez. thanks a lot.</p>
This HTML represents a (fake) old text post. The original post is the blockquote most deeply nested in the HTML: “look at my awesome original content” and it was created by cyle. There’s a reference to the original post’s URL in the anchor tag above its blockquote tag. Moving out one level to the next blockquote is a reblog of that original post, made by maria, which itself adds some of its own commentary to the reblog trail. Moving out furthest, to the bottom of the HTML, is the latest reblog content being added in the post we’re viewing. With this structure, we have everything we need to show the post and its reblog trail without having to load those posts in between the original and this reblog.
If this looks and sounds confusing, that’s because it is quite complex. We’re right there with you, but the reasons behind using this structure were sound at the time. In a normal, traditional relational database, you’d expect something like the reblog trail to be represented as a series of references: a reblog post references its parent post, root post, and any intermediate posts, and we’d load those posts’ contents at runtime with a JOIN query or something very normalized and relational like that, making sure we don’t copy any data around, only reference it.
However, the major drawback of that traditional approach, especially at Tumblr’s scale, is that loading a reblog could go from just one query to several queries, depending on how many posts are in the reblog trail. Some of the reblog trails on Tumblr are thousands of posts long. Having to load a thousand other posts to load one reblog would be devastating. Instead, by actually copying the reblog trail content every time a reblog is made, we keep the number of queries needed constant: just one per post! A dashboard of 20 reblogs loads those 20 posts, not a variable amount based on how many reblogs are in each post’s trail. This is still an oversimplification of what Tumblr is really doing under the hood, but this core strategy is real.
Broken Reblog Trails
There is another obvious problem with the above blockquote/HTML strategy, one that you may have not realized you were seeing but you’ve probably experienced it before. If the only reference we have in the reblog trail above is a trail post’s permalink URL, what happens if that blog changes its name? Tumblr does not go through all posts and update that name in every copy of every reblog that blog has ever been involved in. Instead, it gracefully fails, and you may see a default avatar there as a placeholder. We literally don’t have any other choice, since no other useful information is stored with the old post content.
At worst, someone else takes the name of a blog used in the trail. Imagine if, in the above example, oli changed his blog name to british-oli and someone else snagged the name oli afterwards. Thankfully in that case, the post URL still does not work, as the post ID is tied to the old oli blog. The end result is that it looks like there’s a “broken” item in the reblog trail, usually manifesting as the blog looking deactivated or otherwise not accessible. This isn’t great.
As a part of the rollout of the Neue Post Format (NPF), we changed how we store the reblog trail on each post. For fully NPF reblog trails, we actually do store an immutable reference to each blog and post in the trail, instead of just the unreliable post URL. This allows us to have a much lower failure rate when someone changes their blog name or otherwise becomes unavailable. We keep the same beneficial strategy of usually having all the information we need so we don’t need to load any of those posts along the trail, but the option to load the individual post or blog is there if we absolutely need it, especially in cases like if one of those blogs is somebody you’re blocking.
If you’ve played around with reblog trails in NPF, you’ll see the result of this change. The reblog trail is no longer a messy nested blockquote chain, but instead a friendly and easy to parse JSON array, always starting with the original post and working down the trail. This includes a special case when an item in the trail is broken in a way we can’t recover from, which happens sometimes with very old posts.
The same reblog trail and new content as seen above, but in the Neue Post Format:
{ "trail": [ { "post": { "id": "1234", }, "blog": { "name": "cyle" }, "content": [ { "type": "text", "text": "look at my awesome original content" } ], "layout": [] }, { "post": { "id": "3456", }, "blog": { "name": "maria" }, "content": [ { "type": "text", "text": "well, it's just okay original content" } ], "layout": [] } ], "content": [ { "type": "text", "text": "jeez. thanks a lot." } ] }
Got questions?
If you’ve ever wondered how something works on Tumblr behind the scenes, feel free to send us an ask!
- @cyle
448 notes
·
View notes
Text
NNN - beautiful console file manager
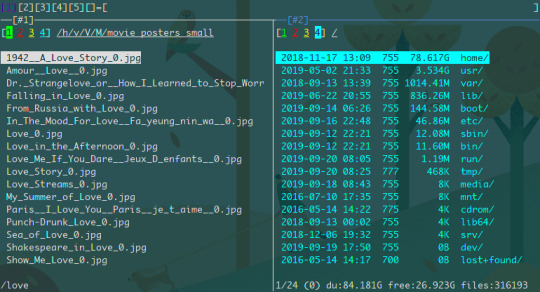
Features
Resource sensitive
Portable
Quality
Modes
Navigation
Search
Sort
Mimes
Information
Convenience
Typically needs less than 3.5MB resident memory
Works with 8-bit colors
Disk-IO sensitive (few disk reads and writes)
No FPU usage (all integer maths, even for file size)
Minimizes screen refresh with fast line redraws
Tiny binary (typically less than 100KB)
Language-agnostic plugins
Minimal library deps, easily compilable, tiny binary
No config file, minimal config with sensible defaults
Widely available on many packagers
Unicode support
Privacy-aware (no unconfirmed user data collection)
POSIX-compliant, follows Linux kernel coding style
Highly optimized, static analysis integrated code
Light (default), detail
Disk usage analyzer (block/apparent)
File picker, (neo)vim plugin
Navigate-as-you-type with dir auto-select
Contexts (aka tabs/workspaces) with custom colors
Sessions, bookmarks with hotkeys; pin and visit a dir
Remote mounts (needs sshfs, rclone)
Familiar shortcuts (arrows, ~, -, @), quick reference
CD on quit (easy shell integration)
Auto-proceed on opening files
Instant filtering with search-as-you-type
Regex (POSIX/PCRE) and string (default) filters
Subtree search plugin to open or edit files
Ordered pure numeric names by default (visit /proc)
Case-insensitive version (aka natural) sort
By file name, modification/access time, size, extension
Reverse sort
Open with desktop opener or specify a custom app
Create, list, extract, mount (FUSE based) archives
Option to open all text files in EDITOR
Detailed file information
Media information plugin
Run plugins and custom commands with hotkeys
FreeDesktop compliant trash (needs trash-cli)
Cross-dir file/all/range selection
Batch renamer (feature-limited) for selection or dir
Display a list of files from stdin
Copy (as), move (as), delete, archive, link selection
Dir updates, notification on cp, mv, rm completion
Copy file paths to system clipboard on select
Create (with parents), rename, duplicate (anywhere) files and dirs
Launch GUI apps, run commands, spawn a shell, toggle executable
Hovered file set as $nnn at prompt and spawned shell
Lock terminal after configurable idle timeout
0 notes
Text
Docker cheat sheet
List docker images
docker image ls
List docker process
docker ps
Remove a docker image
(use docker image)
docker rmi -f <image-id>
Build a docker image
docker build -t <repo-url>:5000/<image-name> .
Push a docker image to a docker repo
docker push <image-name-with-repo>:latest
Pull a docker image
docker pull <image-name-with-repo>:latest
Run a docker image with port mapping
docker run -d -p 8081:7777 <image-name>
Show docker image logs
(use docker ps)
docker logs -f <container-id>
Attach to a terminal inside docker image
docker exec -it <container-id> /bin/sh
Remove all images matching a given name
docker rmi $(docker images |grep 'imagename')
1 note
·
View note
Link
1 note
·
View note