
Statistics
We looked inside some of the posts by niku-code and here's what we found interesting.
Average Info
Notes Per Post
0
Likes Per Post
0
Reblog Per Post
0
Reply Per Post
0
Time Between Posts
18 days
Number of Posts By Type
Text
4
Last Seen Tumblr Blogs


Fun Fact
The Tumblr app for Google Glass was released on May 16, 2013.
Text
Do you Validate...?
Using Rails gives us plenty of handy tools to clean up our code and make our apps more user friendly. One such method is Validations.
Validations are an incredibly important part of modern-day websites and programs. Validations are a special method that prevents users from entering incorrect data to our database. This not only makes our website look and function correctly, but protects the database from bad data - which may cause more issues down the road...
Firstly, what is invalid data?

There are plenty of different validations that we can add to our code to help better protect our databases. It could be anything from data in the incorrect format - such as a phone number input field allowing for text characters to be entered - or entering the wrong length of a given data type...
For example, if your program is asking for user to signup to access the site. In your signup you could include a phone number field for added security measures as well as to verify the user, etc... If one of your users enter "123-456-789" and it's accepted to your database, this could cause huge problems down the line (security, verifying user, and contact). You also wouldn't be able to call this number as it isn't a real phone number!

Invalid data like this is part of the reason why validations exist. If you're not paying attention, it looks acceptable, but we aren't perfect and sometimes things slip through the cracks. So instead of having to check everyone's inputs ourselves - lets work smarter and have validations do the work for us!

Adding Validations:
In this case, you could add a validation like so
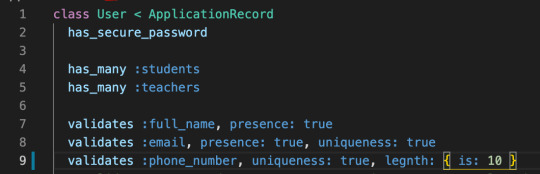
Above you can see that we have a few validations in our User model. Take a look at our "phone_number" validation. It's telling us that each user must have a phone number which is unique and has a length of ten characters (in this case integers...). If we try to create a user and enter a phone number as "123-456-789", we will trigger an error and that user will not be created!

But we could successfully create our user if we changed our phone number to the correct length, keep it unique (meaning no one else is using that number), and follow our other validations correctly (we have a full name, and an email which is also unique). Meaning that data would successfully enter our database!
We could test if our user is valid in our rails console:

Validation Failures
We can see failed validations in a few different ways. As shown above, we can see the response to our second User.create in our rails console - False. When we are creating that user on our frontend (let's say it's a sign up page), we would be able to see our failed validation in our inspector. After trying to sign up a user with invalid data we should see the response in the networks tab.
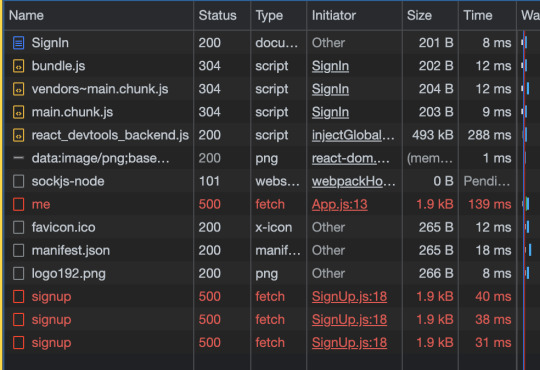
As a user, most websites should explicitly tell you the error on the front end when it occurs. As developers, we need to dive deeper to find the error when we do not have that front end functionality. After trying to signup a user with some incorrect data, we are getting a signup error. When we look closer at the issue, it is telling us that have a length validator error that is causing us to not post this user to our database. We can fix by simply creating a user with the valid data!
This is just a small example of how powerful and important validation is to our code. I hope you find this useful while learning rails and working with validations in your own code!
0 notes
Text
Sinatra & Routing: Smashing!
What is Sinatra?
Sinatra is a simple and easy-to-use framework in Ruby that helps users create web based applications. A huge benefit of using Sinatra is that it can run a temporary server to host our project!
This blog will primarily be a basic guide, illustrating how to set up Sinatra, and using CRUD w Active Record and Sinatra. Once you have everything set up, routing through Sinatra is pain-free and super convenient! Let's get started!
Firstly, we need to gain access to Sinatra. Let's add this code to our Gemfile and run bundle install (or just bundle).

This will install all of the information we need to use Sinatra inside of a new file called Gemfile.lock. Inside you will see a bunch of code referencing rack - this doesn't really matter to us at the moment - just know that Sinatra is using rack under the hood to make our lives easier!
Next, If you don't already have a application_controller file, please make one. In this file we will be setting up our routes and what we will be doing in each route.

We will make a class and call it ApplicationController and inherit Sinatra from the ruby gem using < Sinatra::Base. This will give us access to all of the base methods from Sinatra for us to use later. Also, we have to set our default content type to json.
In Sinatra we declare our routes using methods. For this example we will start with a get request method. Start with your get method (get), then write the specific route address you would like to visit, followed by do. Usually landing pages are designated with the '/' route.

Here we are visiting https://localhost:9292/pokemon and our browser should show 10 of our pokemon from our database in name order. You need to enter Rake Server for the server to host your route.

Cool! We've displayed our pokemon... but what if we encounter a new pokemon and want to add it to our record (a pokedex). To add new data to our database we need to make a post request.
Our code should look similar to our previous get request. It should start with post, include our route, and do because it's a method.

First we are using the same route and referencing the specific ID of the Pokemon we want to create here after a new slash. This indicates a new page from our previous get request.
Inside of this method we created a variable that creates a new Pokemon from the Pokemon class. Inside of the parenthesis, we are references params which are our values we are passing down from our tables. When referencing a specific value from your params you need to put it inside of brackets like so [:name]. As with all our routing methods we will return the new Pokemon to JSON p.to_json so that we can return a response and communicate with the backend.
We have added a new Pokemon to our database!

OOOPS! Looks like we made a mistake ...
Clearly Nigel doesn't belong in our Pokedex, so we need to find a way to delete his information from our database. As you may have already suspected, to accomplish this task we are going to use a delete request.
Try this one out for yourself!
...
Hopefully you had no trouble with this method!
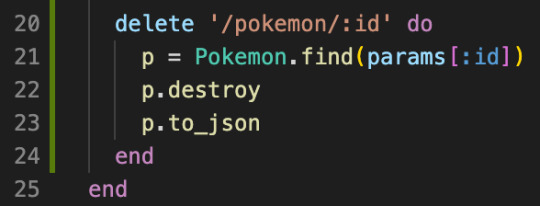
After navigating to our postman we should enter the URL with Nigel's specific id. Breaking down our code:
We are finding Nigel's id through our params and assigning it = P. Once his id has been found we are going to use .destroy on p which deletes that "Pokemon" entirely from our database. And as always, we return a JSON response to show us the specific data that has been destroyed.

Great! Nigel is no longer a Pokemon in our database!
He must have been in disguise during one of his adventures and mistaken as a Pokemon...

You should now be able to use CRUD methods using Sinatra in combination with Active Record. Try adding a new Pokemon to our database and using a Patch request to change its information.
Thank you for reading!

0 notes
Text
My Experience with React ft. Controlled Components
Phase 2 at FlatIron School has been
It's been fun to get my hands dirty with React and more advanced coding methods. But I'm not going to lie, it hasn't been easy... It's been a loooooooooooooong 2 weeks.

In the beginning, the idea of creating more dynamic websites and using components to make modular designs was really exciting to me. It helped my brain connect the dots with how I interact with apps and programs as a user, and what I'm creating as a developer. But once we ventured into Props & States my brain just wasn't computing...
The concept of props made total sense to me. Props allow you to pass information down from parent components to their children, and possibly the children's children, and so on... Becoming comfortable with implementing that into code took most of our first week.

On the other hand, state had me lost...
State is a huge part of coding in React. State holds the information of components and allows dynamic functionality to your code. Where as props are passed through components, state is something that is managed inside your individual component - the current state of that component. We no longer have to hardcode all of information we want to work with and state allows us to access user input more easily.

Working up to the code challenge was a struggle. I felt as if I understood the how to work with components, props, and state. But coding something as comprehensive as a code challenge was taking me too long. After the mock code challenge I spent the next day or so studying our review session with Chris. Going over this several times helped me lock down what we needed to know for the upcoming code challenge.
During the challenge I ran into a road block when it came using controlled components in one of our components. After class that day I met up with some Software Engineer friends. They helped me work through the concept of using controlled components.
A controlled component is essentially giving your component the ability to determine its own values through user input rather than declared variables in the DOM. Although making a controlled component seems more complex, it allows us to pass values into other elements of our code.
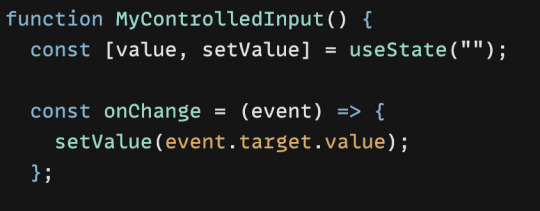
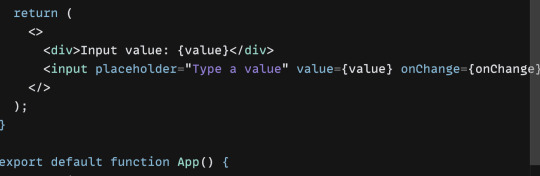
Below you can see an example of a controlled component.
Feel free to try it for yourself!
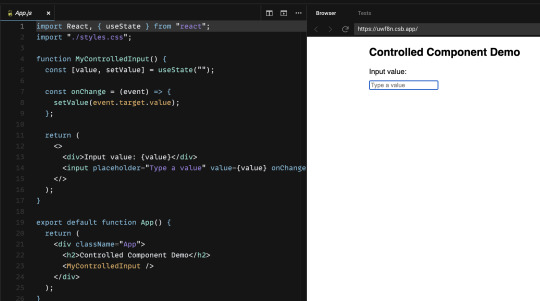
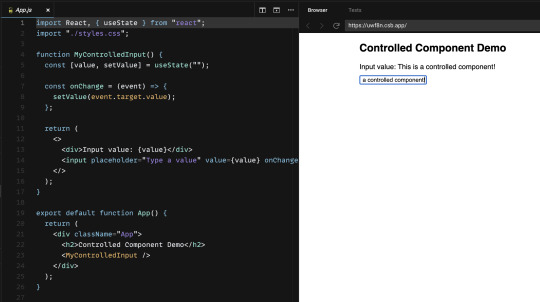
Above, we created a state for the input value. Leaving it an empty string as default. The setter function setValue has been given the value of (event.target.value) inside of a function onChange. This function responds to the onChange event inside of the input tag. Meaning that whatever a user types into the input field will be displayed next to "input value:".
Fairly simple! This means we would no longer have to reference declared variables that are assigned to user input fields in our code. We can simply pass along that state to an onChange in our form input. For example:
function Whatever() {
const [function, setFunction] = useState("")
...
return (
<form>
<input onChange ={(event) => setFunction(event.target.value)} />
</form>
)
}
Learning React this phase, while being a huge challenge, has helped me build confidence in myself a Software Engineer. In our previous phase I felt more disconnected from the projects I was working on and the code I was implementing. I'm excited to see how I can incorporate React and controlled components into our upcoming group project this phase!
Good luck everyone!

0 notes
Text
.FIND, PYTHTUTOR RESOURCE & KPOP
Like most of my classmates reading this, I've also had trouble learning all this information we are being taught. After our first week of Bootcamp, I was feeling overwhelmed and headachy. So, I approached some of my close friends, who are software engineers and Bootcamp graduates, and asked them for some advice or tips. Specifically we were focusing on JavaScript Methods and how useful they are in Functions.I wasn't retaining any of the content.
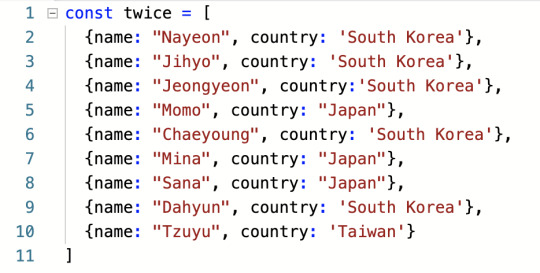
One friend sat me down and helped me through our .find & .filter labs. He used concepts that are familiar to me and applied them into the coding lesson. The first thing he did was create an Array called TWICE, the name of a K-Pop group that we both share a love for. TWICE is a nine-person group with members coming from many different countries in Asia, not just Korea.

(TWICE during their "Feel Special" Era)
My friend proceeded to list all of the names and countries of origin for each member of the group as an Array.
We then created a function using the .find method to find which member of the group would be from whatever country we declare when calling our function. We passed TWICE as our first variable as we are searching through that array for this function. Our second variable is string because we want to see whatever string we declare when invoking the function as our answer. We declared "memberFromCountry" because eventually we will be using this variable in a ternary operator to find which country they are from.
Firstly, "memberFromCountry" is equal to our "twice" object.find. .Find is a JavaScript Method that allows us to search through an array and find the FIRST element in our array that matches the value passed into it, being "string", our second variable.
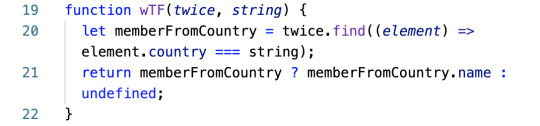
next we ran the syntax for .find - twice.find((element) => element.country === string); effectively, for each element of our array (twice), the element's country should be approximately equal to the string that we enter when we call our wTF function.
ex. wTF(twice, "South Korea") South Korea being our string.

Next, we set up a ternary operator for our "memberFromCountry" expression followed by a "?". The second is expression will execute if the condition is truthy, followed by a ":". The third expression will execute if the condition is falsey - meaning if we input a string of a country that a member isn't from, our function will return "undefined". We later up this function to return "No members from this country" if we returned undefined. :)

Refer back to our Array and what do you think the result was? Lastly, we invoked our function as seen above. The result was "Momo", as Momo is the first member on the list from Japan. We entered "Japan" as our string when invoking wTF().

Still after learning 1 on 1 with a friend and using familiar material to help engage myself, I still didn't have a full grasp of HOW the function was executing.

My friend moved our code over to Pythontutor.com - a visual execution program. Running our code through PythonTutor breaks down our code to step-by-step. For someone like myself being new to code makes this resource highly valuable!
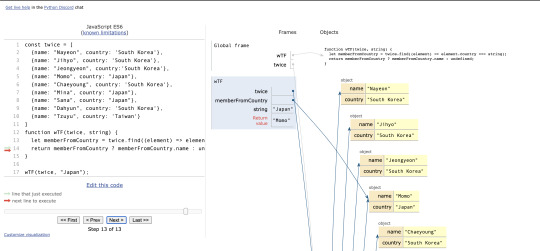
Above you can see our code executed visually line-by-line! Feel free to copy and paste your own code to see how PythonTutor works. This site has been a huge help to me as a BootCamp student. It fleshes out my code, breaking down new concepts and materials into simple and easy to read visual diagram.
For example, I could see how the same Function using the .Filter method executes differently than .Find. The .Filter function ran through every member object inside our Twice array. Then returns every member from our string. In this case, it returns Momo, Mina, Sana - all the members from Japan!

You can see below that PythonTutor filters through our array. It looks for each country key thats value returns "Japan". When it finds an object that does match, it returns the name key value and stores that into a new array.

You can imagine how confusing functions, methods, and arrays could be for someone with no background in learning code. Using content that is familiar with me and seeing that information + code displayed visually through PythonTutor has been a huge asset to learning code!
0 notes