Statistics
We looked inside some of the posts by nim-raff and here's what we found interesting.
Average Info
Notes Per Post
0
Likes Per Post
0
Reblog Per Post
0
Reply Per Post
0
Time Between Posts
8 days
Number of Posts By Type
Link
2
Text
15
Last Seen Tumblr Blogs


Fun Fact
Tumblr was acquired by Yahoo for $1.1B in 2013.
Text
Post-Production // Evaluation
I think my biggest weakness of the project was not doing enough practice to get back into the rhythm as a photographer because I hadn’t done any photography for a few months but I still thought I’d be able to get back into it okay. This led to my practice shoot not turning out well and my first actual location shoot being overexposed and unusable. And because of that I wasn’t able to meet the briefs requirements for four photographs from each location shoot, I was only able to complete three.
One of my other weaknesses would be not being well versed in Adobe Bridge, I am used to using lightroom and thought I could get into Bridge just as easily. This ended up taking up a bit of my time trying to learn how to use Bridge and I eventually just went back to Lightroom for my final edits. I will improve my Bridge skills by looking at tutorials and using any spare time I have in Bridge.
Another weakness I believe I had throughout this brief was picking locations, whilst I did have four different locations only three appear in my final submission and two of the locations look very similar to each other so overall it looks like I only shot at two different locations rather than four.
I’m not quite sure what my strengths were for this brief but I did manage to overcome the obstacle of having more than one of my models cancel on me and was able to find replacement models and locations in a short period of time.
Overall this was not one of my best pieces of work, I am only really happy with two of my images. I had a very difficult time getting into this brief and didn’t finish it with the best quality of work. Although I did research and looked into possible inspiration images, I couldn’t find the creativity to produce any good quality of photographs.
However, since finishing the brief I have found myself back into the photographers mindset and will put all my effort into the next brief to make sure it is a 100% better and that I was happy with the majority of work I produce.
If I was to reshoot this brief, I would make sure I do more than the bare minimum of shoots, that way if anything goes wrong, I have backup shoots in which I can use images from that. I would also bring along a stand for a reflector that way I utilise the lighting situation effectively.
0 notes
Text
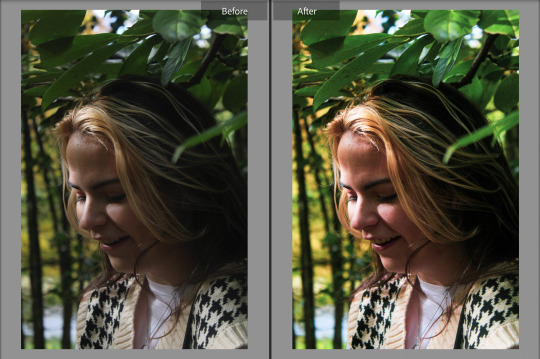
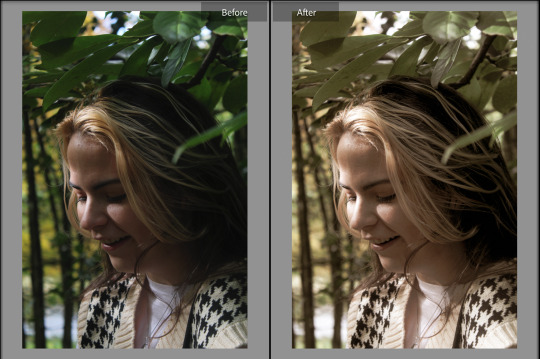
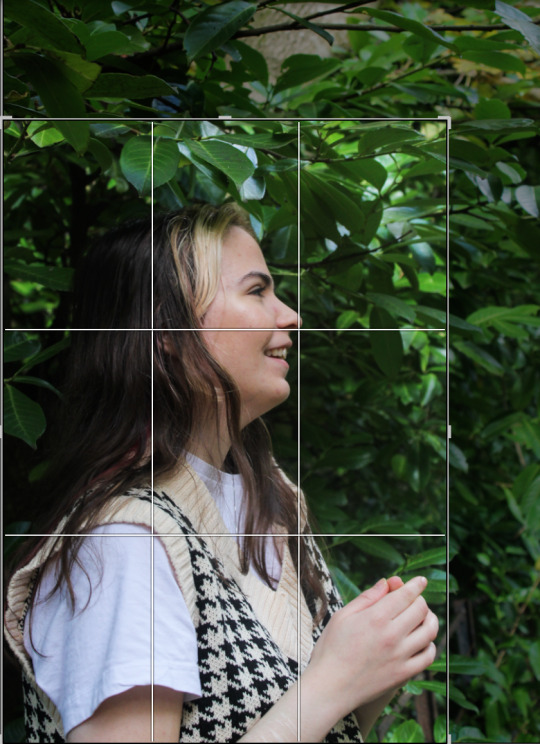
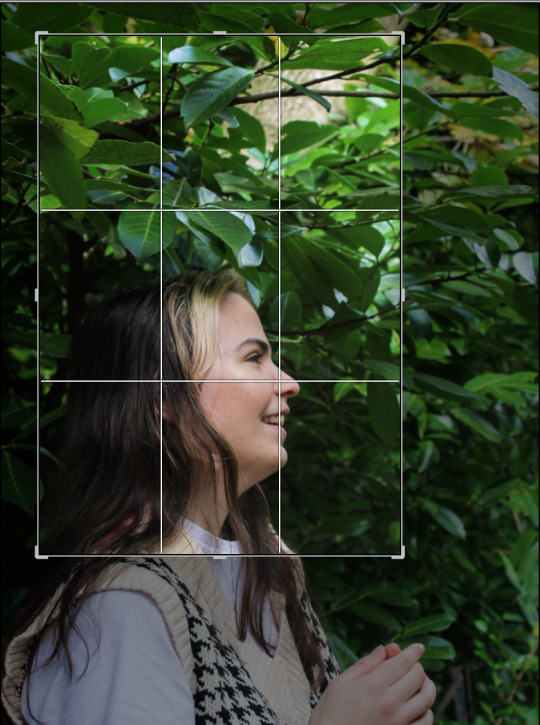
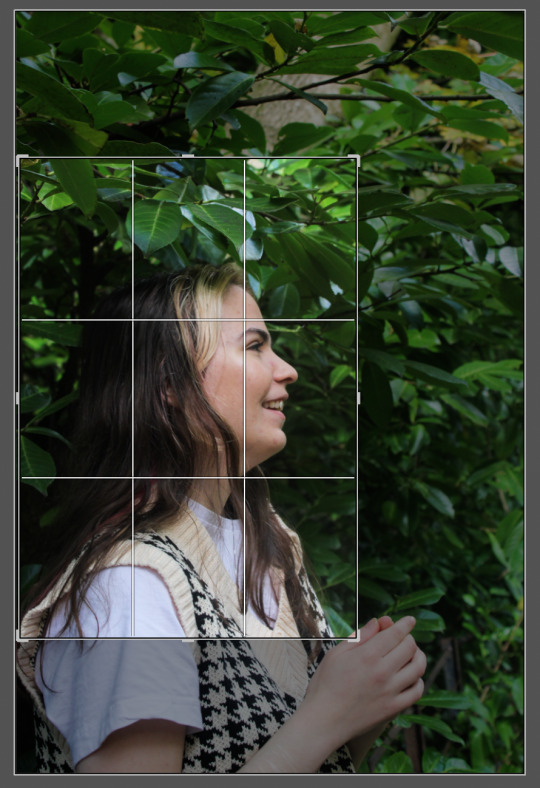
Post-Production // 4 Edits of One Image
Colour Corrections
Natural

Turquoise and Red
Aged Photo
B&W Soft

Crops

0 notes
Text
Post-Production // Creating a workflow
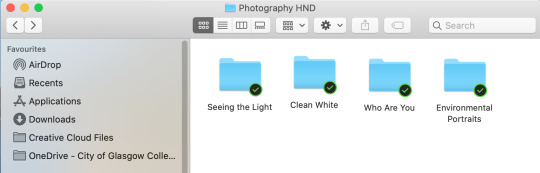
Onedrive
At the start of the school year we all made a Onedrive in which we would store everything we’ve done during the year, such as our photographs, research images or briefs we’ve written out. I had made one for the previous year when I did NQ and so I sorted all of the work into one folder with multiple sub-folders and then created a new folder for HND. Within the HND folder, I’ve got places for each of the briefs I will be doing throughout the year so I don’t mix anything up and get confused. And, going into each folder will have a separate one for the shoots.

To make things easier for when I’m in photoshop, I have multiple folders for each step of the editing process, including a folder for all of the originals that way no matter how much editing I have done or accidental deletes I will always have copies.

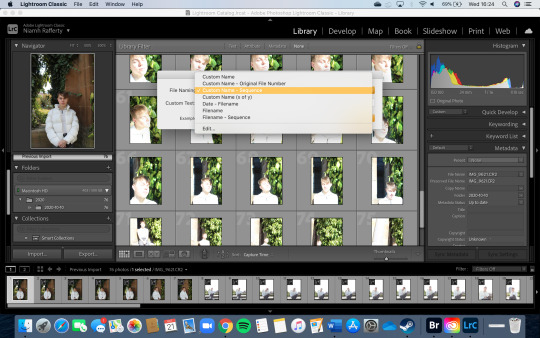
Creating contact sheets
After importing my first shoot into lightroom, I went onto batch rename all of my images so that I can make a note of any important ones and easily get back to it, it also helps if i accidentally mix up the shoots I can see which image is which. To do this I selected all the images and chose the file rename option “Custom Name - Sequence” that way I could pick the name NiamhRaffertyAperature and have the sequence count each image after that as NiamhRaffertyAperature01 and so forth.

After making sure all my images were named, I then created a contact sheet to save within my contact sheet file. After doing this again with a further selection of up to 10 images to narrow down for my final choices, I move onto optimising.


Optimising
For optimising, I chose a minimum of ten images that I liked the look of and did basic adjustments to them so I could decided which ones I preferred the look of to further narrow down to my final four for the briefs requirements, I then pick a final two out that which I will choose between for the best shot from each shoot.

After selecting the final two, I export them into a folder under final choices. As I am making an online portfolio I export them for web but I make sure to have copies saved under print and pdf as well. I will also rename them appropriately.

I will continue to do this for each of my shoots making sure everything is easy to find and saved.
0 notes
Text
Pre-Production // Planning {Location & Equipment Research}
Locations
For my four locations I wasn’t able to plan around myself. I had work my 4 possible locations around who was being my model. My locations would’ve varied between Glasgow and East Kilbride. The majority of them would be outside as the restrictions for visiting other peoples houses is ever changing, the majority of the locations are going to be close to where my model is so that we both don’t have to make efforts to travel far.
One of my locations was definitely going to be in Kelvingrove Park as it’s close to where my model lives and there is plenty of available light, depending on the weather and how many people are in the park will affect whereabouts I take the picture.
I’ll have another shoot in Glasgow at Rottenrow Gardens as I’ve taken photographs there before and I quite liked the scenery and the available light it got as an open space.
A shoot will be taking place in my house as I will be using my brother as the model and we decided to do this shoot when the weather was too bad to go out and shoot my other models outside.
Another was going to be at an abandoned swing park but upon going to check it out, found it was demolished and so I’m currently working on finding somewhere else for my last shoot.
Equipment
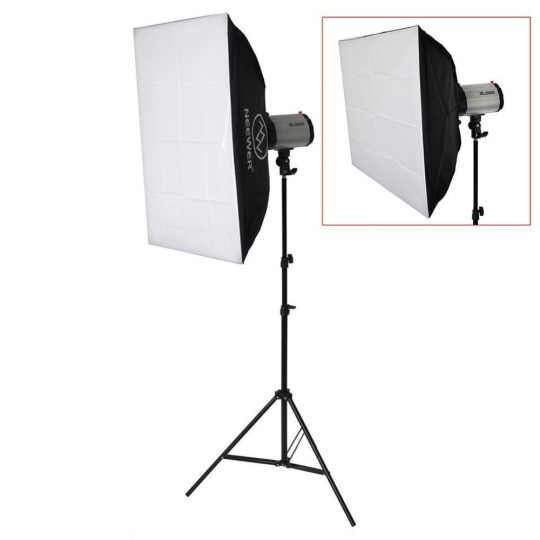
Reflectors - In photography a reflector is used to control, shape and direct the light. You can get either a board or lamp reflector depending on what you want your outcome to be.
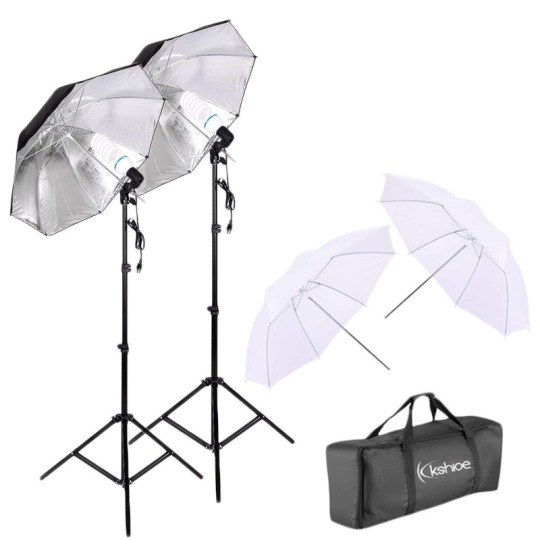
Lamp reflector - A lamp reflector is one that affixes to the light source and with the lamp reflectors you can get a Standard Reflector, Umbrella, Magnum, Beauty Dish, and Telephoto Reflector. Each one does something specific but all are made to provide the subject with more light by reflecting off the inner concave surface. The one most people think of is the umbrella which looks like this.
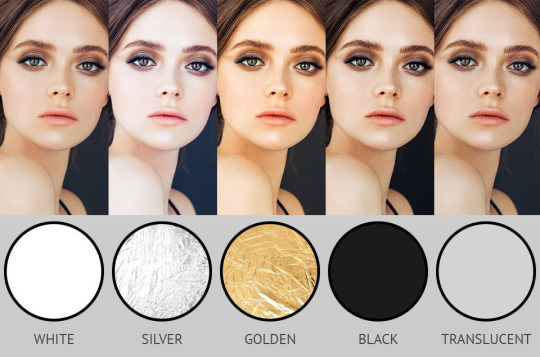
Board Reflector - A board reflector provides the same purpose as the lamp except they are handheld and rather than being soft and evenly scattered like the lamp, boards give a more direct and sharp reflection. They can be solid or made of a flimsier material to give you more flexibility. Boards come in three types; white, gold and silver.
A white board is used give more natural lighting and is probably the most versatile of the colour choices. It’s good for providing fill light and if you’re doing portraits it helps smoothen out the skin. This board works well for both studio and outside work.
A gold board helps to make a photograph look warmer by changing the colour temperature of the light source. The gold helps brighten skin tones and is best for shoots when it’s golden hour (late afternoon). This is an ideal choice for enhancing beauty in a shoot
Similar to gold, a silver board can add a cooler tone to the image if you need to desaturate the image a bit more. Silver also provides a heavier contrast to the light it’s bouncing onto the subject, the effect it has is probably the closest to a mirror with the reflector being less harsh than a mirror. You can use this reflector if you need to add just a bit more than just extra light to your image, it will be soft and diffused but a very flattering result.
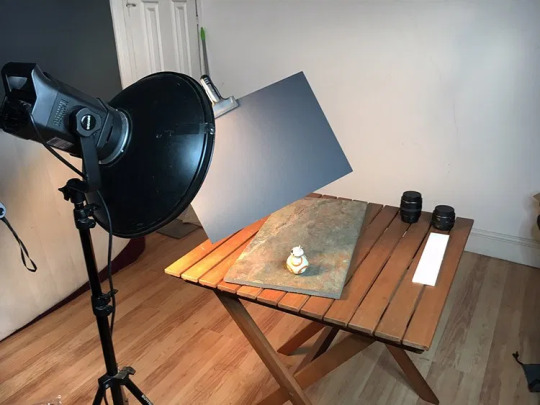
Flags - Flags are used in photography to either block light in certain areas, to create a negative fill or protect the camera lens from flare. Flags can also be used to change the shape of your light source such as turning a softbox into a striplight should you not have access to one.
The best way to explain a flag, is that it acts the same way a blind does by blocking light where or when it isn’t wanted whether because it’s too bright or you’re attempting to stop glare on reflective surfaces.
You can use most things as long as they are dark in colour for a flag, the most common are black paper, foam board and some 5-in-1 reflectors come with either a black or black covering side that can be used.
Diffusers - The same with reflectors and flags, diffusers are also used to control light but rather than shape or enhance the light they reduce the contrast or intensity of the light.
Usually the lights in studio has some form of modifier, whether that’s a beauty dish, barn doors or honeycomb but even then sometimes the flash output is too strong but lowering the outage can make the image too dark. This is where a diffuser comes in, the diffusers allow you to have the brightness you want but they just make it less intense. The diffusers in studio are mostly known as soft-boxes and come in many sizes.
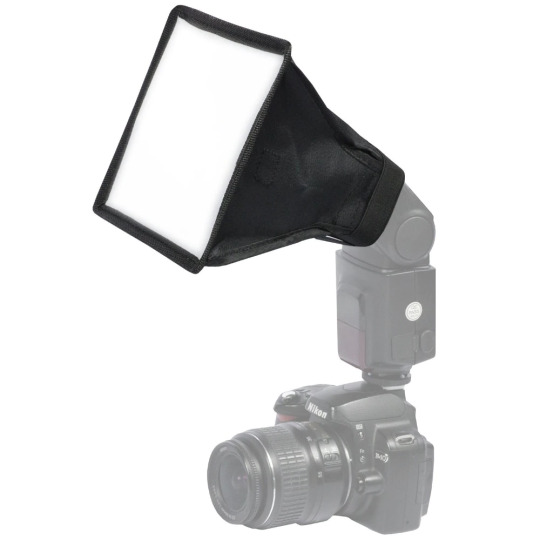
But sometimes when you’re doing shoots outside, circumstances won’t allow you to bring out a softbox or separate flash kit and so you can get camera flash diffusers which either pop over the flash itself or look like a smaller softbox.
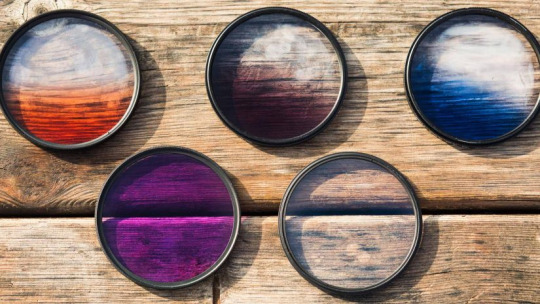
Filters - These are used affect the way your lens views light, some change the state of colours whilst others reduce reflection and glare. There are many types of filters you can get, one’s that change the colour temperature, UV, Polarised and Macro.
Polarised filters much like polarised sunglasses help with minimising reflections and glare you may get from shooting metal objects or water. With this filter you can affect the hue of colours you may see as it changes the contrast, looking into water will be clearer, leaves will stand out more clearly and appear greener.
Skylight filters are incredibly helpful should you find find yourself in a situation where you will need to protect the lens like muddy or rainy conditions. Whilst they were originally made for reducing the blue tint of coloured film, modern camera don’t have this issue. Like UV filters, the skylight helps against ultraviolet light which helps to reduce haze. The skylight also helps to blur movement without allowing the image to become overexposed.
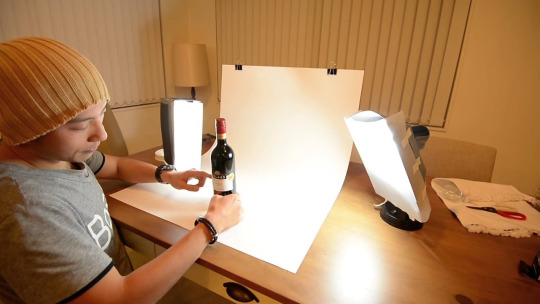
Improv - You will find on occasion that you won’t access to some of these modifiers but it’s easy enough to make some of your own. For reflectors it’s easy enough, you can use almost anything such as a white bedsheet, a piece of paper any type of clothing or something reflective itself like a mirror, phone, sunglasses or anything that will catch light. Filters are easily made with transparent material whether that be coloured or slightly tinted. Diffusers just need an opaque enough material over the light source, even a stretched out balloon would work.
0 notes
Text
Pre-Production // New Photographer Research {Inspiration}
The one new photographer I’ve decided to look into was Henri Cartier-Bresson. I had done some research on Cartier-Bresson previously in High School for Art but didn’t know that he was also a photographer.
Henri Cartier-Bresson was born in 1908, Chanteloup-en-Brie, France and he was the oldest of five children. As well as having an early interest in photography, he would sketch as a child. Cartier-Bresson would start taking photographs on holiday with a Brownie, a Kodak camera mainly marketed towards children and soldier, before later going onto use a 3x4 inch view camera. His father would financially support him so he could pursue photography more easily.
In 1927, after finishing school he would attend a private art school and the Lhote Academy, where he would meet the painter and sculptor Andre Lhote who mainly focused on Cubism, Cartier-Bresson would later go onto say that Lhote was “his teacher of photography without a camera”. Cartier-Bresson found interest in modern Art and Renaissance during his time at the Academy. Whilst he found some frustration in Lhote’s techniques, it helped him to identify problems of the artistic form and composition as a photographer.
After a year in the Lhote Academy, Cartier-Bresson spent two years at the University of Cambridge studying art, literature and English before being conscripted into the French Army where he was stationed at Le Bourget near Paris. It was during this time when he met Harry Crosby who shared an interest in photography and gifted Cartier-Bresson with his first camera.
In 1947, after having spent time in the tropics, filmmaking, doing photojournalism, getting married and having his work in many exhibits. Cartier-Bresson founded Magnum Photos along with William Vandivert, George Rodger, David Seymour and Robert Capa, having met the later two a few years prior. Magnum photos was the idea of Robert Capa in which the original five members would be given designated places around the world (minus Capa who would pursue his own interests) in which to photograph. Cartier-Bresson was given East and South Asia.
In his time is East and South Asia, Cartier-Breslin received recognition for his coverage of Gandhi’s funeral in 1948. In 1949 he also covered the last stages of the Chinese Civil War. In Shanghai, Cartier-Bresson worked for the photojournalist company of Sam Tata. With documentation of the independence of the Dutch East Indies from the Dutch and many more over the period of 2 years he received international fame.
Henri Cartier-Bresson’s later life consisted of publishing his famous book, “The Decisive Moment”, his first exhibit in France at the Lourve Museum in 1955. His career took him to many places around the world such as Mexico, Canada, Japan, Portugal, China and the Soviet Union. Cartier-Bresson become the first Western Photographer to photograph “freely” in the post-war Soviet Union.
In 1962, he went to Sardinia for around 20 days on behalf of Vogue. Four years later, Cartier-Bresson withdrew as a principal of Magnum to focus on portraiture and landscapes. In the early 1970s, he had officially withdrawn from photography stating that perhaps he has said all the could through photography, and began drawing and painting again. His first art exhibit was in 1975 at the Carlton Gallery in New York. Henri Cartier-Bresson died aged 95 in 2004.
These are four photographs I found when researching Henri Cartier-Bresson which I think are amazing.


0 notes
Text
Pre-Production // Portrait Research {Inspiration}
Photography itself is used in a variety of ways from photojournalism, creative expression, communication, a career choice. And within some of these media is portrait photography. Here are some of the styles of portrait photography that I’ve looked at.
Traditional;
Traditional photography is typically someone looking at the camera in a posed manner, with the frame only showing the head and shoulders. You will usually find this style of photography taken in a studio with a solid coloured backdrop to draw emphasis to the subject. A sub-genre of this would be formal photography which is the same set up but in business or formal attire. Another could be headshots which can be formal or casual wear and headshots are made with the intent of going in a portfolio when applying for industry related jobs.
Self-Portraits;
A self portrait is when the person behind the camera is the subject, and it can be taken when looking into a reflective surface or on a timer. Whilst some self-portraits can show or depict things that are meaningful to the photographer a self portrait can be just the photographer.
Environmental;
Carrying on from self-portraits, an environmental photograph is the same but with a subject that isn't a photographer. The scene can be anything that is meaningful to them such as a place that holds an emotional connection wether that be a where they got proposed to, something where they found out incredible news or just a place they enjoy visiting.
Candid/Street Photography
Candid and street photography kind of go hand in hand. Candid photography is about catching something real and in the moment, and it doesn’t necessarily mean spying on someone waiting for the perfect moment. Street photography is a very specific branch of candid photography which features chance or random encounters within public places. That being said, street photography does not need to feature people.
Conceptual/Surreal
Conceptual and Surreal photography can seem like the same branch of photography but there is a difference between them. Conceptual photography is a photography which shows an idea, or a concept. Surreal is where the photograph may show things that are familiar but in an unconventional way. The difference between conceptual photography and surreal photography is that in conceptual the conceptual art itself is the idea, whereas surreal is meant to challenge the idea of reality. Both branches will often use photoshop in post-production to add to or enhance the original photograph.
Historical
When portrait photography began to be widely used it was used to preserve history, the dead and record criminals. When the Civil war began in 1861, portraits were used to to remember the faces of loved ones should they have been killed in battle and during the victorian age when diseases would take people rapidly, portraits were a way of keeping the dead with them wether the photographs were taken before or after death. Portraits became popular when helping to assist Detectives catch criminals.
0 notes
Text
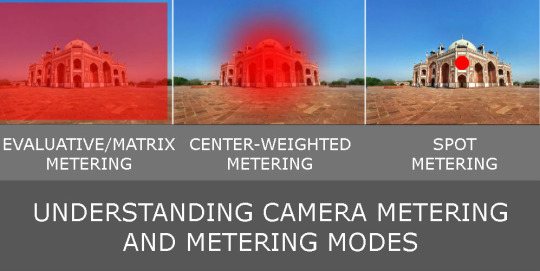
Metering Research // Part 2
(Q1) What does an in-camera light meter measure?
An in-camera light meter measures the reflective light and determines what the best exposure is for your image.
(Q2) What are the three metering modes that DSLR’s have?
The three modes are Evaluative, Centre weighted and Spot metering.
(Q3) What camera mode should you set your camera to and why?
You should set your camera to manual mode as you will want to be in control over all of your settings rather than leave it to Aperture priority, Shutter priority or Program to make decisions for you.
(Q4) On your camera’s light meter, what do the numbers represent?
Each of the numbers represent a stop of light and the stops of light are usually based on 1/3rd increments.
(Q5) If there is too much light in a scene, what side of the scale will your camera meter be on? And what if there’s not enough light, which side?
If your camera is pointed at a bright scene the meter will go to the plus side of the scale (+2) and if you are looking at a scene where there is not a lot of light the meter will go to the minus side of the scale (-2).
(Q6) What does evaluative metering work well for?
Evaluative metering works well for scenes that are evenly lit. Evaluative metering works by dividing the frame into multiple zones and analyses them for light and dark tones. It also prioritises where your focus point is and will make that more important over the other zones.
(Q7) What’s the difference between centre weighted metering, compared to evaluative metering?
The difference between centre weighted metering and evaluative metering is that centre weighted measures the light and the bits surrounding the centre of the frame and ignore everything outwith of that. It also unlike evaluative does not take into consideration where your focus point is.
(Q8) What does spot metering do/how does it work?
Spot metering gives you the most precise and accurate reading as it it only evaluates the light around the small point that you choose and ignores everything else. This is helpful for when your subject is being silhouetted by a backlit scene.
0 notes
Text
Metering Research // Part 1
(Q1) What does a handheld light meter measure? How is this different from a camera light meter?
A handheld light meter measures the intensity of light and then calculates for exposure. The difference between handheld and the one in a camera is that handheld measures the light falling on your subject rather than the light reflecting off the subject or the overall exposure.
(Q2) Checking if your exposure is over, under or correctly exposed allows you to do what for you image?
It allows you to ensure that you are not losing anything int the shadows or highlights of your image.
(Q3) Why did Jeff Rojas set his shutter speed to 1/200th of a second and his ISO to 100?
To calculate for the exposure of the strobe lights and eliminate any ambient lighting in the room and to also freeze any movement in the frame such as clothing or the subject.
(Q4) By entering these settings into the light meter, what will the light meter calculate?
The light meter will focus on giving the right aperture of F Stop.
(Q5) Why should you hold your light meter against your subject?
It will allow it to measure the light falling onto the subject.
(Q6) If you want a moodier image, why should you move the light meter to record the brightest light?
It ignores measurement for the darker/shadow side and only focuses on the brightest creating a contrast.
0 notes
Text
Flash-Lighting // Studio
In our class bubbles for our first studio challenge, we had to make a portrait image using a studio flash light, for my first image I had to shoot a correctly exposed image at f5.6
This is a photograph of Callum which I took on manual mode at f5.6, 1/125 and at an ISO of 100.


I then took another photograph of Callum at f16, 1/125 and at an ISO of 200.


0 notes
Text
The Exposure Triangle
The exposure triangle is key when it comes to creating a photograph. It can be split into three main parts: The Aperture, Shutter Speed and ISO. Each side or part of the triangle has a different way of manipulating the light and quality of light that comes into the camera.
> Aperture;
The aperture is the size of the lens opening and it controls how much light is entering the camera but also the depth of field, meaning how much of the image is in focus. A smaller aperture creates a deep depth of field and a larger aperture creates a more shallow depth of field. The aperture can be measured in Stops (f stops). A stop is usually seen as an F followed by a number, and this is used to help you find out how much light is entering the camera meaning that going from f45 -> f32 is a full stop and you have allowed more light to enter the lens.

> Shutter Speed;
Shutter Speed is to control the duration in which light that hits the cameras sensor and can affect how much movement is visible in the photograph. The faster the shutter speed the more the image is likely to be underexposed and if you’re wanting to capture a still photograph with no movement you’ll want to compensate this by adjusting the aperture. If you change one part of the triangle you have to then adjust another part equally. The shutter speed is measure in fractions of seconds rather than stops.

> ISO
ISO works in sensitivity and can be seen as an “only adjust if necessary” as whilst it can help brighten an image if it’s still too underexposed, the higher the ISO number the more grain/noise is going to appear in the photograph and it will also dampen the quality of your photograph.
0 notes
Text
Pre-Production // Task 2
https://www.youtube.com/watch?v=7I998hpvzoc
This is a link to a video I found explaining the Sekonic Flashmate L-308 X light meter that we use in studio, it’s around 12 minutes long but it helps to explain the metering system very well.
The App that I found to help with light metering on your phone was ‘Light & Exposure Meter’ by Measure Photography Light. It also allows you to change shutter speed or aperture and will automatically adjust the other for you.


0 notes
Text
Pre-Production // Task 1
These are two examples of a shallow depth of field and an extended depth of field. You can see that the photograph with the buildings has everything in focus from the foreground to the background meaning that this is the extended depth of field image whereas the one beside it only has the foreground in focus meaning that that one has a shallow depth of field.


These are two examples of a fast shutter speed and a slow shutter speed. You can easily identify shutter speed by the movement a photograph, this one with the red lines is lights from a car moving, this shows that it’s a slow shutter speed but the lemon with the water drops shows that it was taken with a fast shutter speed as it has frozen all of the movement.


(photo cred: https://caitlynudy.wordpress.com/2017/09/20/aperture-and-shutter-speed/)
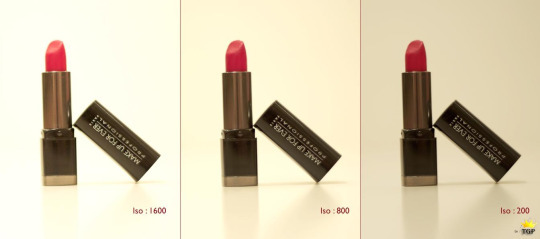
The last two photographs show examples of high ISO and low ISO. As you can see with the photograph on the left, whilst it’s more exposed there is evidence of “grain” in the photograph making it less clear. Whereas the photograph on the right is darker, everything is much more detailed to look at.

(photo cred: https://www.flickr.com/photos/lesleyo/2662832799)
0 notes
Text
Photographic Inspiration
In one of our zoom classes we talked about sources and where or who we get our inspirations from. The majority of the sources came from instagram, but I’ve found inspirations from also Pinterest and Tik-Tok. There was a huge mix in terms of what the photographers specialised in such as B&W photography, Concerts, Special Effects, Set Building and more.
Here are some of the photographers that were listed;
> Brandon Woelfel - https://www.instagram.com/brandonwoelfel/
> Marilena Vlachopoulou - https://www.instagram.com/darkroom.memoir/
> Romy Gregory - https://www.instagram.com/romyoco/
> Albert Watson - https://www.instagram.com/albertwatsonphotography/
> Victoria Misu - https://www.instagram.com/victoriamisu/
> Josh Hight - https://www.instagram.com/josh._.hight/
0 notes
Text
Zoom Background Challenge
For our zoom background challenge we had to take a photograph that we could use as a background during our zoom meeting that told everyone else a little bit about ourselves.
I had initially wanted to go to my local country park to get a picture of a waterfall glen/lagoon surrounded trees as it was a place I went to a lot as a child but I came into contact with someone who may have had covid and so I had to quarantine for a bit and never got to the location.
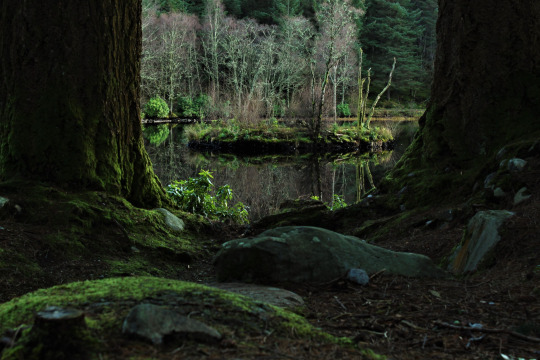
This is a photograph I took last year at Glencoe, I feel this photograph is very similar to the mood I was hoping to capture with my original idea. Unfortunately, I only remembered that I had this photograph after the zoom challenge and was unable to show it.
0 notes
Text

Meet Mike Noble. He had previously started HND but dropped out to see more of the world. He decided to go visit a friend in Australia before trying out Photography again. He is 21 years old and has a pet cat and fish. He thought about doing Engineering but found he wasn’t great at maths and so pursued a different career choice.
0 notes